With the lifting of the level cap in Promathia areas, this quest is now relatively trivial in difficulty. The walkthrough below was written for a level cap of 40.
(Optional) Speak with Migliorozz in Upper Jeuno next door at the Temple of the Goddess (H-9) to begin the sidequest A Reputation in Ruins. The fame requirement is unknown and the recommended level for it 60+.
The content and cutscenes of this sidequest change after this mission is completed. There is no way to replay the alternate cutscenes, so complete the quest during the next steps if you wish to see them.
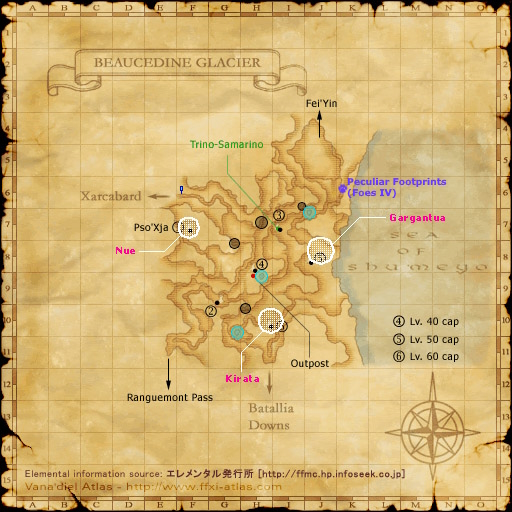
Update:Pso'Xja is no longer level capped. The easiest place to farm is the entrance at (H-8), Other's are at (I-7), (F-7), and (G-9).
Defeat all monsters until everyone or if solo (you) has any of the colored chips (). It doesn't matter which color, as long as everyone has atleast one.
It is easiest to fight Diremite which drop Gray Chip in the first room from the (H-8) entrance.
The Survival Guide warp to Beaucedine is the closest point to (H-8).
#1: Enter at the (I-7) tower in Beaucedine, spawns on second floor down. #2: Enter at the (F-7) tower in Beaucedine, spawns on second floor down. Drop at (I-8).
Enter at the (G-9) tower in Beaucedine, spawns on second floor down. Drop in the lower right corner of (H-9). Go to the long hallway on the right side of this map.
This area will be full of small rooms and many zone lines.
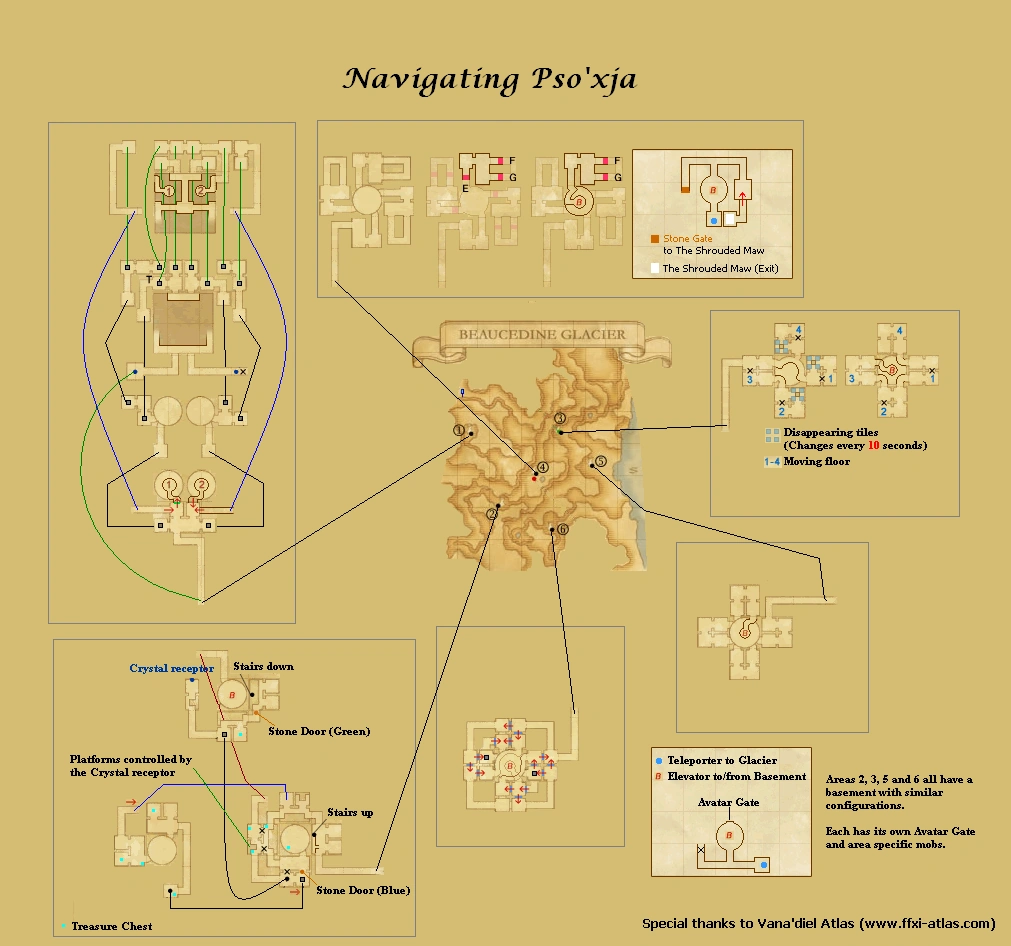
After entering, proceed on the singular path ahead to the central room at (H-8) to run through colored walls.
Each time you zone through a wall your buffs will wear off; so don't bother with them. Just make sure to use Sneak and Invisible if necessary.
Note: You will zone, but still be in a similar looking section of Pso'Xja. Keep walking forward.
There can be bombs in here sometimes so be careful of magic use.
Pass through the walls at (H-7) and (I-7) in the following order:
Red
Black/Purple
Red
Black/Purple
After the last wall, take the elevator that appears at (H-8) to the bottom, and follow the northwestern path to the Stone Gate which leads to The Shrouded Maw.
If you don't remember which way is north (since the map can't be opened here), here are directions: from the elevator, ignore the shiny teleporter pad and instead go into the T-intersection hallway opposite it. Take a left to reach the Stone Gate (taking a right just leads to a dead-end square room).
A cut-scene will play upon entering the Shrouded Maw.
A Home Point is located immediately after the Stone Gate, make sure to use it to register it.
Rest and go over strategies in this area. When you are ready, check the Memento Circle and enter the battlefield "Darkness Named".
Your buffs will wear when you enter the battlefield.
Nightmare: Inflicts anyone on the floor with Sleep and 21HP/tick Bio. Damage will not wake you up from Nightmare, only Cure and Benediction(Benediction will also remove the Bio effect)).
Camisado: Single-target physical damage and knockback. Stand with your back to the wall so that this doesn't knock you into the pit below.
Noctoshield: Gives Diabolos the effect of Phalanx (Dispel or Magic Finale).
Ultimate Terror: AOE Absorb-All. Drains multiple attributes. Absorbed by Utsusemi.
The battle starts with your party on a platform above the battle field. Buff up and jump off when you are ready. You will land in the center of a grid of 25 floor tiles, facing Diabolos.
Some of the tiles will fall (X) during the fight, leading to your death at the jaws of some Diremites below.
Mages should run back 2 squares from where the party lands, and melee jobs should pull Diabolos all the way to the right wall, and forward one square from the starting position.
These tiles never fall (O) so you should be safe there as long as you don't walk off the edge if you aren't paying attention.
The primary focus of this fight should be stunning the move Nightmare. A Dark Knight casting Stun, Blue Mage using Head Butt(may not be 100% accurate so more than one stunner is advisable), or weaponskills like Flat Blade or Shoulder Tackle. Nightmare inflicts a 21 HP/tick Bio while asleep to anyone within range.
Cure/Benediction (Removes Bio) are the only ways to wake people up when Nightmare lands, and the Bio should be erased as soon as possible. Tanks should also stand with their back to the wall so Camisado doesn't knock you off the edge.