The Voracious Resurgence | |
| Prime Weapons • Ultimate Weapons • Ultimate Augments • Abjurations iL119 • JSE Necks • Divergence Augments • Escutcheons | |
| Reforged Armor Artifact: +1 • iL109 • iL119/+2/+3 Relic: +1/+2 • iL109 • iL119/+2/+3 Empyrean: +1/+2 • iL109 • iL119/+2/+3 |
Guides • Crafting • Trusts • Apex Monsters |
Rune Fencer End-Game Tank Guide
|
|
What Is This Guide?
This guide will serve as a purpose as helping newer players and even veteran players learn how to tank and manage all end-game scenarios they may be faced with. A little bit about myself, this guide is written by Shiraj from Asura. I have learned and adapted the way Rune Fencer is played from excellent Rune Fencers such as Ruaumoko, Gashnir and Saevel and want to help as many people learn how Rune Fencer is played and just what it can do to its full potential. This guide is not about the job itself as there are two guides already available. A link to the two guides will be below:
Endeavoring to awaken, by Prothescar, is a guide to people who are new to the job and is really informative if that is what you are looking for. Quiescence, by Ruaumoko is another guide to Rune Fencer which serves as an End-game guide to how the job plays into end game today. That guide is detailed and touches upon some of the topics this guide is about. I highly recommend reading the two previous guides before getting into this guide.
The Rune Fencer Tank guide is mainly for help on NMs and how to deal with them with what Runes to use to be able to survive any given attack which may come at you. This guide will range from Reisenjima Tier 4s, Omen Bosses and pushing to content as hard as Master Trials. This is a follow up from Ruaumoko's guide, but expands further on the HNM tactics. I have however elaborated on the HNMs in Escha - Ru'Aun and Reisenjima as Ruaumoko gave details on a strategy.
For Escha Ru'Aun and Reisenjima there is very little to add since most of it was already covered, so I will just add the TP moves which are dangerous and can end fights if you are not careful. If an NM is not in this list it is because Ruaumoko has already covered everything about it in his guide and there is no point repeating.
Sub-Job Selection for tanking End-game:
![]() Dark Knight
The Dark Knight sub job, a job that has recently became Rune Fencer's best sub job for just about anything, whether that is DD or tanking. This sub job is a solid choice for tanking end game content, however you must be aware of its limitations. The Dark Knight sub job really shines when you are only tanking a single mob, this is because with capped magic haste and Inspiration you will be able to sky rocket your enmity through the use of Flash, Foil and Stun. Going sub Dark Knight also has access to AoE enmity control by using Poisonga, but it cannot do it to the same latter as a Blue Mage sub.
Dark Knight
The Dark Knight sub job, a job that has recently became Rune Fencer's best sub job for just about anything, whether that is DD or tanking. This sub job is a solid choice for tanking end game content, however you must be aware of its limitations. The Dark Knight sub job really shines when you are only tanking a single mob, this is because with capped magic haste and Inspiration you will be able to sky rocket your enmity through the use of Flash, Foil and Stun. Going sub Dark Knight also has access to AoE enmity control by using Poisonga, but it cannot do it to the same latter as a Blue Mage sub.
![]() Warrior
The Warrior sub job is a common sub job that I see many people using, however, just don't. Subbing Warrior for anything on a Rune Fencer except for Teles is just robbing you of everything a proper sub job can do. Warrior sub cannot reach the same level of enmity control as /Drk or /Blu due to the Job ability on cooldown - it also lacks any form of AoE enmity control, this can prove vital in areas such as Dynamis Divergence Wave 3.. I would say the only time to go /War is when you do not have access to /Drk or /Blu.
Warrior
The Warrior sub job is a common sub job that I see many people using, however, just don't. Subbing Warrior for anything on a Rune Fencer except for Teles is just robbing you of everything a proper sub job can do. Warrior sub cannot reach the same level of enmity control as /Drk or /Blu due to the Job ability on cooldown - it also lacks any form of AoE enmity control, this can prove vital in areas such as Dynamis Divergence Wave 3.. I would say the only time to go /War is when you do not have access to /Drk or /Blu.
![]() Ninja
The Ninja sub job is an odd choice, that's for sure, it actually works really well when used on the correct mobs as you become virtually untouchable.
However, the downfall with /Nin is that it cannot hold enmity as well as other sub jobs, or have any form of AoE enmity control. But where /Nin really shines is when you are trying to evade attacks that can down right end fights if they connect. This sub job is a niche aspect of Rune Fencer tanking which isn't used often, but I will go in more detail further on.
Ninja
The Ninja sub job is an odd choice, that's for sure, it actually works really well when used on the correct mobs as you become virtually untouchable.
However, the downfall with /Nin is that it cannot hold enmity as well as other sub jobs, or have any form of AoE enmity control. But where /Nin really shines is when you are trying to evade attacks that can down right end fights if they connect. This sub job is a niche aspect of Rune Fencer tanking which isn't used often, but I will go in more detail further on.
![]() Blue mage
The Blue Mage sub job is without a doubt the best sub job you can possibly have in terms of tanking and going full defense. This job offers everything a tank needs - a bunch of enmity tools, AoE enmity which is practically unrivaled, Cocoon and to top it off, Killer Trait effects to make you an even noticeable tank. With every job there is downfalls, with the blue mage sub job its downfall is that is cannot allow you to swap between a tank or a DD in a pinch, this is not always used, but when the options becomes available it is really good to contribute to damage.
For sub Blu tanking there are spells which you can combine to get traits, these range from killer effects, Auto regen and defense bonuses.
Blue mage
The Blue Mage sub job is without a doubt the best sub job you can possibly have in terms of tanking and going full defense. This job offers everything a tank needs - a bunch of enmity tools, AoE enmity which is practically unrivaled, Cocoon and to top it off, Killer Trait effects to make you an even noticeable tank. With every job there is downfalls, with the blue mage sub job its downfall is that is cannot allow you to swap between a tank or a DD in a pinch, this is not always used, but when the options becomes available it is really good to contribute to damage.
For sub Blu tanking there are spells which you can combine to get traits, these range from killer effects, Auto regen and defense bonuses.
- Auto Regen trait comes from having Healing Breeze and Sheep Song.
- Resist Sleep comes from having Wild Carrot and Pollen.
- Lizard Killer is by having Foot Kick and Claw Cyclone set.
- Beast Killer by having Wild Oats and Sprout Smack.
- Power Attack and Mandibular Bite make the Plantoid Killer trait.
- Bludgeon and Smite of Rage makes the Undead Killer trait.
For Enmity generation there are a number of spells which work:
Setting spells for what you are doing is important. For example, if you are fighting an NM such as Kouryu you must set Healing Breeze and Sheep Song to counteract his Sleepga II and then use Healing Breeze to wake party members who get slept. The spells which should always be set no matter what are the following: Cocoon, Sheep Song, Jettatura, Blank Gaze, Geist Wall, Wild Carrot. The reason for this is that cocoon is DEF bonus +50%, Wild Carrot can provide self cures if needed. You can rotate enmity spells non-stop with them spells allowing constant hate generation.

 - Ignis - Evasion Down / Paralyze / Frost / Bind
 - Gelus - Defense Down / Gravity / Silence / Choke
 - Tellus - Magic Defense Down / Stun / Shock
 - Sulpor - Attack Down / Poison / Drown
 - Flabra - Accuracy Down / Petrification / Rasp / Slow
 - Unda - Magic Attack Down / Amnesia // Plague / Addle / Burn
 - Lux - Magic Evasion Down / Dispel / Sleep / Blind
 - Tenebrae - Magic Accuracy Down / Finale / Lullaby / Charm
This Elemental Wheel must be kept in mind no matter what. I've used Ruaumoko's image to emphasize the fact that Rune Fencer is played on the 5Ps, learn what each NM does, what do you have to do to counter it, which move is more important and what am I supposed to prioritize.
Job Abilities
Offensive Job abilities / Effusions
Gambit
Gambit Is one of Rune Fencer's main offensive job abilities and It's a pretty good one. Gambit reduces the mob's magic defense 10% per Rune Enchantment harbored up to a maxium of 3 runes and a -30% Magic Defense Down. When paired with AF Gloves +3 and 20/20 Job Points invested in Gambit's duration the maximum duration Gambit can last is 96 seconds. Gear that enhance Gambit:

Rayke
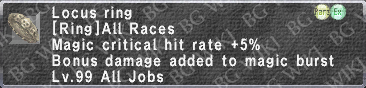
Rayke Is the best friend of Gambit and that it is a very cool and overpowered job ability. This job ability for some reason trips a lot of people up, and It's understandable. Many people think Rayke directly lowers a monster's Magic evasion, however, this is not entirely true. Rayke lowers a monster's Magic Resistance and what this means is that a monster such as Schah will only take 20% of damage from dark sources, but using Rayke with 3 Tenebrae runes will make Schah take an extra 30% of damage from dark sources putting that 20% resistance to 50% instead for a much lower duration than Gambit. A max duration Rayke only lasts 49 seconds compared to Gambit's 96 seconds. So when using magic damage, it is best to use Gambit first then Rayke so the durations compliment each other. Gear that enhances Rayke:

Swipe and Lunge
Swipe and Lunge are a Rune Fencer's last set of offensive abilities and they aren't necessarily bad job abilities, but they are mostly tools used to have fun with. They are used to deal damage to an opponent. Having a right gear set and a Geo-Malaise bubble makes it very possible to hit 99,999 on some monster's, especially in Vagary. However, it is not worth trying to use these abilities on anything where Magic damage is not the main source of damage as the damage dealt just won't be worth the time/risk of using them. The way Swipe and Lunge work is that they expend your rune enchantments to deal damage corresponding to the runes used, for example 3 Ignis runes paired with Lunge would deal Fire damage. With Lunge, if a mob happens to die mid-way through a Lunge, it won't consume all rune enchantments and only consume 1 or 2. Swipe only expends 1 rune, while Lunge expends up to 3.
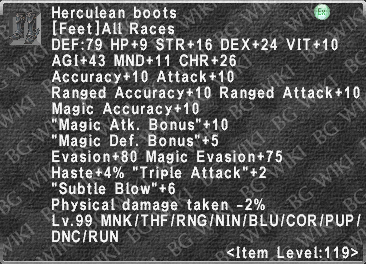
My personal set for these abilities are built around Magic Bursting and all of my Herculean gear share the same/similar augments. 2 Herculean augments of mine have +10 and 12% Magic burst bonus and the feet have +15%. A replacement for that could be a well augmented Herculean Body with similar augments.
Defensive Job abilities / WardsVallationVallation Is one of the first job abilities you acquire as a rune fencer and it's a pretty good one. Vallation reduces the damage dealt by magic depending on the runes harbored. 1 Rune gives you a -15% magic defense taken for 1 element. With 3 runes that goes to -45% magic defense for 1 element if using 3 of the same rune. Further info below once Valiance is spoken about. This ability alone lasts 2:00 with a recast of 3:00. This can be further extended with JSE gear below. Valiance Is similar to Vallation in that it reduces magic damage taken, however, Valiance is Area of Effect, whereas Vallation is self-target only. Valiance has a longer duration and a longer recast than Vallation. End-Game Tanking tips and tricksConserving MP and having unlimited MPFirstly, Rune Fencer should never have any issues with MP if you follow these tips, however, mobs such as Kin and other mobs who use and spam Aspir do not count as they absorb your MP. So first thing to think of is this: What are Rune Fencer's ways of getting Refresh? Well the answer to this is the following:
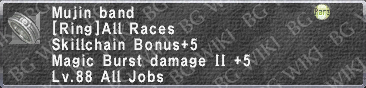
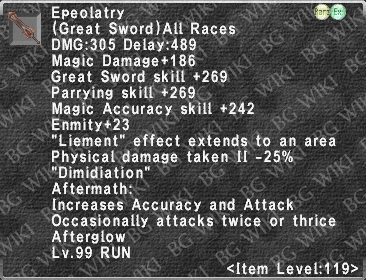
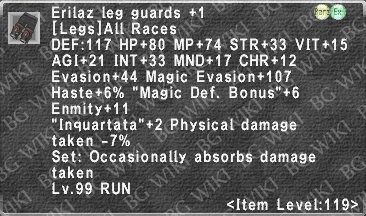
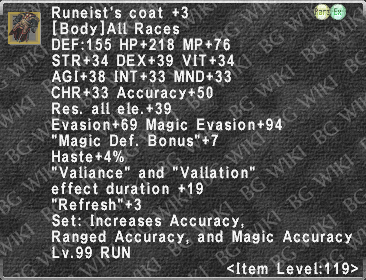
Using these two items together is amazing. So casting Refresh on yourself normally would only give you 3 MP/tick, which isn't much at all. However, casting Refresh while using the Erilaz Galea +1 adds 2 extra potency to it and gives it 5 MP/tick. With the 5 MP/tick refresh on you, you should get into a habit of tanking with the Runeist's Coat +3, the +2 works well too. So this so far gives us 8 MP/tick which is a bit better than what we originally had, right. But there is another trick to gaining a lot of MP. Rune Enchantment can also be used for many different uses, amazing uses which are under utilised throughout the job. Tenebrae runes x3 can be used to restore MP when used with Vivacious Pulse. Each Tenebrae rune will restore roughly 80-100 MP per rune, so 3 runes restores anywhere between 240-300 MP every 60 seconds. The variations within Vivacious Pulse depends on your gear and your buffs. Since I have explained the ways of how to get MP, let's talk about how to conserve MP so you have unlimited. First of make a rotation which works - instead of spamming spells back-to-back like a maniac and wondering why your MP drains out, rotate Job Abilities with spells and while that is happening the 8 MP/tick refresh, or 5 if you aren't using Runeist's Coat +3 does its work and regens on the side. With this happening your MP will slowly deplete like it should, as the refresh per tick won't be enough, but then you have Vivacious Pulse to use with Tenebrae runes which basically restores all MP used within that 60 second window. Holding Enmity on Rune FencerThis tip is fairly simple, but very effective once used right. For this to be effective, you must do the same thing you do for conserving unlimited MP - that is figuring out a rotation. Certain circumstances may change that rotation, but it should never disrupt it if you act quickly. Once a fight starts it is your job to hold enmity fast, this may be from heavy DDs which will pummel the mob fast and if you aren't quick will tear enmity off you. At the start of fights you should always open with your strongest spell which is Flash which provides a nice Volatile enmity boost of 1280 base. If you have Epeolatry that makes it easier, if not, don't sweat it. Flash >>> AoE Liement or Valiance if no Epeolatry on your party members is crazy good enmity boost. Valiance by itself gives you a 900 Volatile enmity boost as a base, but if you hit all 5 party members it gives you a 4500 boost. Opening each fight with Flash and then Valiance or Liement with Epeolatry almost guarantees you secure enmity on your target for a short while. With this being said, don't use Vallation or Valiance before battle, use it during the fight for insane enmity boost! This is my personal rotation, but honestly, anything works. Bear in mind circumstances change, this rotation does not work for everything. The first one is with /DRK, the second is with /BLU. Flash -> Valiance -> Foil -> Stun -> Pflug -> Flash and repeat. Where the Job Abilities have been used you will use 1 different one, but keep the spells coming. Always remember to check how many party members are around you for sudden spikes of enmity from AoE Job Abilities. Second Rotation using /BLU: Flash -> Valiance -> Foil -> Jettatura -> Pflug -> Flash -> Geist Wall -> Foil and repeat. The reason rotations are important for Rune Fencer is to keep up with the demands of it. whether that is restoring MP, rapid enmity and all out survival. All of these work in conjunction with each other so rotations are really helpful. Here is a little cheat sheet so you can see the base enmity values of the spells and abilities yourself: VE = Volatile Enmity | CE = Cumulative Enmity Spells Flash - 1280 VE | 180 CE Foil - 880 VE | 320 CE Stun - 1280 VE | 180 CE Blank Gaze - 320 VE | 320 CE Jettatura - 1020 VE | 180 CE Geist Wall - 320 VE | 320 CE Soporific - 320 VE | 320 CE Sheep Song - 320 VE | 320 CE Stinking Gas - 320 VE | 320 CE
Vallation - 900 VE | 450 CE Valiance - 900 VE | 450 CE Swordplay - 320 VE | 160 CE Pflug - 900 VE | 450 CE Gambit 1280 VE | 640 CE Rayke 1260 VE | 640 CE Liement - 900 VE | 450 CE Battuta - 900 VE | 450 CE One for All - 320 VE | 160 CE Elemental Sforzo - 7200 VE | 1800 CE
Supertanking on Rune FencerThis is a trick barely anyone does, for some reason Rune Fencer and the concept of Supertanking is frowned upon - I never understood why. If Rune Fencer is played right, it can Supertank better than a Paladin and provide less stress for a White Mage than a PLD too. There are a few tips to increase your supertanking capabilities. I do demonstrate them in the video below, but in case you missed them, here they are:
Epeolatry is not the only weapon which lets you supertank, it can also be done using the Aettir. You might notice in the video the damage I take is increased, but it's still easily manageable with a healer. Supertank example video: https://youtu.be/cU_rPfa2X7U Escha-Zi'tahTier 1 NMs Level 119:
Tier 2 NMs Level 125:
Tier 3 NMs Level 135:
Tier 3/4 Helms Level 135:
Escha-Ru'aunTier 1 NMs Level 119:
Tier 2 NMs Level 125:
Tier 3 NMs Level 135:
Duke Vepar - https://youtu.be/YQjJu0DXVOE
Pakecet - https://youtu.be/19gLT4UUn7k
Vir'ava - https://www.youtube.com/watch?v=o8wBV0-oYF8&t=534s Ark Angels Level 140:
AAHM - https://youtu.be/Ph-a0HuU124 AAMR - https://youtu.be/sZlVwls4DAc
Heavenly Beasts / Gods Level 140:
Byakko - https://youtu.be/4kNgcNZNwcQ Genbu - https://youtu.be/jJSEkNdSX6g
Seiryu - https://youtu.be/P_7JJjUTsoc Suzaku - https://youtu.be/P79rIW2k4Gc Helms Level 150:
Warder of Courage is one of the first high tier NM that Rune Fencer really shines. There are multiple moves to watch out for and planning ahead can prevent them from being any real threat to you and your party. Call Wyvern is the first move this NM can do following up with Familiar, when this happens you can prepare a One for All to try negate as much damage coming from the Breath Attacks from each Wyvern. Another move to look out for is Soul Voice - When this is used it can be deadly as Warder of Courage now gains access to Charm. Save your charm buffer for when the Wynavs spawn, but prep a Pflug Tenebrae x3 if there are no adds as you can resist Charm from Warder of Courage himself, but not the wyverns. The final dangerous move is Medusa Javelin, this is an attack Warder of Courage does which inflicts petrify on you, this may not seem that important, but if you get petrified it leaves you vulnerable. Preparing for this can be a real help.
Kirin/Kouryu is not as bad of a fight for a Rune Fencer as Warder of courage, but if you are not paying attention you will die faster than you can imagine. The only real threatening moves Kouryu does is Absolute Terror and Horrid Roar. To counter Absolute Terror use a 'Steadfast Tonic'. This will stop you being terrorized for 60 seconds. The most dangerous move is 'Horrid Roar'. There is very little you can do to stop this, however you can prepare for it. Knowing that this NM can full dispel you should keep you on your toes to be ready to re-buff fast before you die from 1 shot. ReisenjimaTier 1 NMs Level 129:
Golden Kist - https://youtu.be/I2D61vBlTdQ
Oryx - https://youtu.be/MmrhejpLFBM
Sabotender Royal - https://youtu.be/z0AK7Yche-U
Tier 2 NMs Level 135:
Bashmu - https://youtu.be/RZB_3qkcmw4
Old Shuck - https://youtu.be/L_nBUGu3FDY
Tier 3 NMs Level 145:
Yakshi: https://www.youtube.com/watch?v=1NOaelcNz-E Helms Level 150:
Albumen is one of the most annoying NMs to tank end-game, it isn't very hard, but can be really frustrating. The reason Albumen is so annoying is because of the TP moves that it has access to. Petalback Spin is the main move to look out for as it can play heavily on how this fight works for your party. Petalback Spin inflicts Poison, Paralyze, Blind, Silence, Plague and Amnesia. It also resets all Enmity. Tepal Twist is another important move to pay attention to as it reduces your hp by 50% and then by 75% when the fight is near an end, have a Panacea ready to remove it quickly, don't rely on a White Mage to do that. Albumen also gains access to Doom through Fatal Scream when it gets below 50%, this is a 10 count doom which is easily removed through White Mage or Holy Waters. There is no real need to use Lux runes to counter Doom as it is easily removed.
This NM is fairly straight forward, there is only one move however which can make this fight hard - that is Dust Void. Dust Void is a conal breath attack that will strip you of all your gear and lockstyle. This means the NM can go from attacking you from 20 damage all the way to 700+ in a short space of time. Having a macro ready to equip all of your gear for Tank/DT is the only way to effectively work around this move.
This NM is fairly easy to tank, but additional options for you to tank it are available. For Zerde the most threatening move is Just Desserts, this move will end the fight 9/10 times if it is not stopped - it needs to be stunned. The second and last threatening move Zerde does is Slimy Proposal. This is a Dia effect and also a Charm move. Zerde does not gain access to this move until below 50%, but watch out for it and have a Charm buffer ready. Optional Tanking Strategy for Zerde This tank strategy is available for every Rune Fencer out there, but this is extremely difficult to pull off and requires huge knowledge of your team's capabilities and how the NM's mechanics work. A Rune Fencer Stunning Zerde instead of having another person doing it. A Rune Fencer stunning Zerde can be incredibly hard due to being overwhelmed, but it can be done, and if it is then it pays off really well. To do this either go /Drk or /Blm to gain access to Stun. If you are stunning him as he just pops you will need /Blm for Elemental Seal. /Drk works for stuns after the initial stun providing you have the gear to get high Magic Accuracy along side Geo debuffs. This strategy is all about timing and precision, everything must be used perfectly and job abilities applied to keep the fight going.
Vinipata is a very dangerous NM, but there is very little you can do about any of his attacks. However there is one attack you need to pay attention to and do everything you can to prevent it - Yama's Judgement is a 5 Count Doom which will end the fight most of the times providing there is only 1 tank. Go full Resist set when you know it is going to come and prepare to spam Holy Waters and help your White Mage out if it lands.
Teles is similar to Vinipata in a way, in that sense there is very little you can do to stop the TP moves connecting, only know when they can come and do what you can do defend against them. I may also add that Teles is the only NM in the end-game scene that you should go sub war for the sole purpose of Provoke. Most of Teles' attacks are Wind Based, but they are not a huge problem. The problem is when Teles uses Soul Voice, she then gains access to two types of Charm - Entice and Maiden's Virelai. Since Charm is light based and the most dangerous, have 3 Tenebrae runes to counter Charm and /War will counter the Silence Aura that Soul Voice gives. The Final Unity Concord Fight
This fight is seriously hard, but a tank isn't used on the main NM itself, it is instead used as a 'Supertank'. The reason a Tank isn't really used on this fight is because of the 'Enmity Mechanics' for the Unity Concord fights. In that sense, to hold hate on the NM you need to be doing substantial DPS to it. Tumult has many really annoying gimmicks which make it so hard, some of which just need to be pushed through and pray you survive with the buffs you have. Astral Flow - The move which ends almost every Tumult Curator fight. This move is so deadly because instead of using only 1 avatar Tumult uses every Avatar after different people while doing shocking AoE damage - with -50% MDT/DT 1 Avatar's Astral Flow will still hit you for around 700 damage, and it hits you about 7 times. To survive this you must know exactly when it is coming and time One For All accordingly. Astral Flow happens 4 times during the fight - 74%, 49%, 24% and 4%, knowing this can spare you and your party members. Tumult also gains access to a 300HP/tic Bio aura when it uses Bligestorm, this is a 30" radius so be prepared to use Elixers to heal if your White Mage is already busy. Wave 1 - 4 Chariots which are light based and used light based attacks, Tenebrae is recommended to negate the damage and to resist Charm. Wave 2 - 3 ToAU Beastmen Kings, no particular runes are needed for this wave, except pay attention to Mijin Gakur as it has no element, only One For All will negate the damage. Wave 3 - Shedu, Thu'Ban and Sarama. Use Unda Runes for this wave as Sarama is fire based and should be killed last and you will suffer his Chainspell Fire spam, Unda will help you. Wave 4 - Tumult Curator himself. You will use Lux runes for this part to counter Dread Spikes, and a lot of medicines such as Panacea, Remedies and Holy Waters. Here is this UNM on video to demonstrate what I mean: https://youtu.be/sObCASUyO6g As a tank job you cannot rely on a White Mage to remove your status ailments, that is why you must bring your own medicines to all content, not just Tumult Curator. Omen
Kei is one of the Omen bosses which has a gimmick to it. The gimmick to this Omen boss however is a nasty move called 'Dancing Fullers', this move is used at certain intervals, this allows you to plan for it and prepare how you are going to handle it. It will use this move at 75%, 50%, 25% and 10%. To handle this gimmick there are two options: out run the move or stand there in a full HP set and take the brunt of it. To out run the move you need to run 10" away from Kei, but no more than 14", if you run more than 14" it will do a Draw-In and wipe your party. The second way to handle it is by removing all Geo Luopans, Smn pets and what not. This is because Dancing fullers is 2,500 damage per person who is in range of 10", so if only the tank is inside with no pets or Geo bubbles it will only do 2,500 damage. The Sulpor runes are used to allow you to Gambit and Rayke when they are available for your mages to magic burst off of a skillchain.
Fu is another Omen boss, however the gimmick to Fu is that it absorbs your buffs, It will use this move at 100%, 75%, 50%, 25% and 10%. Fu's gimmick is that it punishes you for having too many buffs. The ideal amount of buffs you want on you is about 5 or 6, this does not enrage him, but also allows the party to deal heavy damage as well. However, when Fu absorbs buffs his damage increases as well. Buffs such as Reraise, Food effects and Rune enchantments do not count towards the number of buffs he absorbs.
Ou is the final Omen Boss which has access to all previous Omen Bosses at a given interval. Ou uses Fu's gimmick at 95%, Kyou's gimmick at 75%, kei's at 60%, Gin's at 45%, Kin's at 30% and Ou's own gimmick, Gardez at 15%. When Ou is at 11% he will start his final stage, Prophylaxis. For the Rune Enchantment situation, the runes you use depends on the game day, as that will determine what spells Ou will cast. For example, If it is ice day, he will cast blizzard spells, so you will use Ignis to counter that and so on.
Dynamis Divergence Wave 2 Bosses
Halphas is a tough fight to tank, there are so many factors which come into play which affect how the fight plays out and what can potentially end fights faster than you can react. To start off, I will explain why Tenebrae runes are needed for this fight and what they can really do. So Halphas has access to a deadly move called Veil Of Chaos, a Light based attack which has an Additional effect of Amnesia, however, the deadly thing about this move is that it has a radius of 30" and does a lot of damage. You using Tenebrae runes can protect fellow party members with Valiance. Another dangerous move is Full-On Tackle, the reason this move is dangerous is due to its hate reset. The hate reset is the key to ending fights as it is most likely going to be drawn and stuck on a more fragile party member who will probably die in 1 shot. The third and most dangerous TP move to watch out for is Orcish Counterstance combined with Flailing Blow is a killer to anyone, even the tank. As Halphas' HP gradually goes below 50% he has an enhanced version of Might Strikes, pair that with counter, you're gonna get flattened if you are facing him. It is generally best to back tank this NM for this reason as you cannot parry either due to an Avoidance Down aura.
This NM is a rather annoying one, in that it can basically give you the aids, similar to Albumen and Kyou. Below 50% he can use the more enhanced version of Hundred Fists and that it inflicts status ailments when attacks land on you, to counter this have Battuta ready as soon as you see Thousand Fists. Another dangerous move to look out for is Ore Hurl, a physical based attack which inflicts Defense Down and Magic Defense Down - be ready to use a Panacea when this happens. The last and one of the most dangerous moves to look for is Torment of Gu'Dha. This move is a really strong Stone based attack which inflicts Defense Down, Petrify and Slow - the range is around 20" as well, so the mages need to position accordingly.
This NM's most dangerous move is Doom, a single target 10 count doom attack, easily avoided with Lux runes and Pflug. The Lux runes also counter Bio from another move called Feather Fusillade which inflicts bio and poison which are fairly potent. Another dangerous move is called Vorticose Sands, a wind based attack which is conal that removes 1 piece of gear along with inflicting Silence. This NM also has access to Thousand Fists as well, which inflicts aids on to you - have Battuta ready.
This Wave 2 NM is fairly easy to tank in all honesty, it only has one real threat which is Thousand Fists. Aside from that move it isn't really difficult or has fight ending moves. Unda runes will counter the majority of his attacks as they are fire based, but the barspells will counter Paralysis Shower. Dynamis Divergence Wave 3Note that ALL Wave 3 Mega Bosses have access to Odin's Shin-Zantetsuken. That is a 20" move which will insta KO anyone in range who does not have Reraise on and if they have it on, it will wipe it. Multiple sources of Reraise is highly recommended. All Dynamis Divergence Wave 3 bosses will summon 4 sets of adds at 4 given intervals. The adds will come at every 20% - 80%, 60%, 40%, and 20% as the final one. Coordinate with your other tank member and see who will aggro the adds and who will focus the boss. When a White Mage add or Corsair add spawns it is recommended to move them away from mega boss as they will heal the mega boss for 25% HP, or 5 Million HP.
The Wave 3 Dynamis bosses are all similar, but knowing what makes them different can be vital to you surviving and doing your job as a tank. In Dynamis San d'Oria the noticable difference is that this NM hits like a truck, full-time DT sets are required, combined with Temper II makes him deadly. Another gimmick which makes this Zone Boss so difficult is the frequency he dispels. His dispels are all AoE, and he will Chainspell spam everyone with AoE Debuffs and Dispels
The Disjoined Galka is a fairly easy mob to tank when it comes to gimmicks, it's most dangerous attack is an AoE version of Cloudsplitter. When his HP becomes lower his TP moves will start to become AoE and can be deadly if they connect with a mage job. One issue you will have as a tank is how frequently you get slept from his Weapon Skills.
There is very little which a Rune Fencer can do except mindlessly hold hate for this fight, there isn't any spells which are used, or moves to defend against as nearly all his attacks are physical. Keep 3 Tenebrae runes up however as this NM uses daggers and has access to Energy Drain, steals mp single target. When this NM gets lower hp it will start to use an AoE version of Rudra's Storm, this can be deadly if you get caught in casting equipment.
The Disjoined Mithra is quite an annoying NM to fight, this is because of how frequently it will paralyze you, the NM seems to have a more potent version of Blade: Retsu, if you get paralyzed from it you will seriously notice it. Aside from the dumb paralysis the only threat with this NM is the AoE version of Blade: Metsu near the end, this is deadly and can 1 shot players unaware of it. The Last section of content is not for everyone, this content requires a top tier tank who rarely makes mistakes, any mistake made will result in a wipe. They are seriously complex as there is a lot to do, I will explain each role a Tank has to do and why it is so vital that you do. Master TrialsBlack and White
Firstly let's talk about merits for this fight, you will want 5/5 Rune enchantment effect, 5/5 Pflug Effect for Group 1. Group 2 will simply be 5/5 Battuta, and 5/5 Inspiration. Bring at least 24 Panacea, 24 Holy Water and 24 Remedies. Do Not Rely on your Healer to remove anything, do it yourself. A Warning for this Master Trial: While supertanking the 11 mobs, DO NOT use any AoE spells or you will wipe instantly, focus on 1 target at a time and turn /Autotarget OFF. For sub job selection there are only really 2 which work for this: Blue mage and Ninja. As you cannot rely on Utsusemi Shadows to save you all the time, they come in handy for Odin himself, that's all.
For this fight it will be a living hell, no hyperbole either, you will be killing Helmwige first and as you do you will have 10 other mobs beating on you, spamming all sorts of weapon skills, skillchaining. What makes Helmwige the worst out of every other enemy is the spells he casts. Helmwige has the tendancy to Magic Burst off of a skillchain that the other adds make, as a Rune Fencer you only have 3 tools to guarantee your survival against these magic bursts. With Full MDT/DT expect a magic burst to hit you for over 3k damage. Even without a magic burst Helmwige will use Chainspell and spam you with nukes for around 800 damage per. After Helmwige is dead you will kill Grimgerde next. You will also full time the 2 recommended runes up until Alexander. The reason Grimgerde is killed next is because it had access to Horde Lullaby. In this Master Trial Horde Lullaby is a form of hate reset, if you get Hate reset and using Rangers, you have to be very fast to pull Grimgerde back so he does not wreak havoc on the back line.
This fight should mean that all of the adds are dead and it is only Alexander and Odin left. For this particular NM you are advised to stay in a tank set, however, you can actually go to a 'Hybrid' DT set and start laying some weapon skills to Alex to make the fight go faster, because this is a long fight, about 10-20 minutes on Alexander alone. If you help DPS, use Dimidiation as it will be your strongest weapon skill since you are unbuffed. Beware of 2 attacks Alexander does, Void of Repentence inflicts a 10-15 second Terror effect on you, and Mega Holy can close light skillchain and deal heavy damage.
The final NM left in this Master Trial, and frankly the most annoying. The reason this NM is so annoying is because of his TP moves. Your party members Must be further than 20" so they do not die, and everyone must have multiple sources of Reraise items for it. While fighting this NM there is a chance that Odin will 3 step on you just from auto attacking. Auto Attack -> Light -> Radiance will be the following, use Tenebrae runes to counter it. However, during this fight expect to die, there is and will be nothing you can do unless you have /Nin for Utsusemi Shadows.
Unafraid of The Dark
For this Master Trial you will be going /Nin, end of. Other sub jobs do work, yes, but there is no point risking a death for more damage which may ultimately slow damage down because you died. This is where /Nin plays like a saint for this fight - the Shadow Lord has the similar effect of Wrathare of En-Death, a 1 shot kill no matter what on auto attacks, it is not 100% proc, but it can still happen. Bring all sorts of Medicines available and most importantly, bring over 5 stacks of Holy Water as a bare minimum. Play religiously with Utsusemi on the Quadav and the Shadow Lord.
This NM is the first NM which is killed during this Master Trial. You as a DD and a Tank have 2 rolls to play for this NM, protect your party members and dish out some high Resolution numbers, you should be able to hit consistent 30K weapon skills on this NM as it has fairly low defense. As soon as you see Ruinous Omen, pop One For All to reduce the damage of the next incoming attacks, as this NM has a pattern: Astral Flow -> Diabolos then either Sweep or Dark Invocation.
This Orc is the 2nd NM to kill out of the 4 in this Master Trial. It is a fairly annoying fight as he has the tendency to either go nuts with Invincible spam, or he can be nice and use it once or twice, or not at all. Moves to watch out for: Meikyo Shisui and Veil Of Chaos. Beware though, below 30% HP this NM will start using Veil of Chaos multiple times, and more likely to use it 3 times back to back when under the effect of Meikyo Shisui. For the DD side of things here, don't be surprised to see 15k weapon skills as a maximum, this NM has some serious defense.
For this Master Trial this NM is seriously annoying and can be the most deadly if not played right. You have to pull this NM away from the Shadow Lord so Benediction does not wake the Shadow Lord and make your job even harder. What makes this NM so hard is Mighty Strikes combined with his TP moves. As soon as you see Mighty Strikes get used, snap into a DT set with Utsusemi and try survive what he has to throw at you. From experience this NM can kill anyone, 75% PDT and I got 1 shotted by Head Butt for 3K damage from Mighty Strikes, you must never let Utsusemi drop for a few seconds or you can die very easily. I would highly recommend full timing a Hybrid TP set from this point on as you cannot afford a death.
The fourth and final NM for this Master Trial. For this fight you should fight him on top of the stairs so his back is face the door you entered, that way his conal moves will not hit your back line and possibly kill them. The dangerous and important moves to look out for are the following: Doom Arc, a 10 count AoE doom + physical damage, Spawn Shadow, creates a clone of the Shadow Lord and gives him high regen and regain until it is dead, and Umbral Orb, a 30" Darkness based AoE which ignores all forms of shadows and deals heavy damage, Lux runes will counter this. For your roll as a Tank and DD, you will focus solely on the main Shadow Lord, let your other DD and Corsair handle the Clones, this way you have the attention of this hardest mob and most threatening. Sealed Fate
This Master Trial is notorious and takes some serious skill and know how to pull off. You are up against Ultima and Omega, and have to take them both down simultaneously or you will wipe. For the Merits allocated for this Master trial, I would recommend going same 5/5 Gambit Recast, 5/5 Vallation effect for Group 1. Group 2 is a mixture - 4/5 Rayke, 5/5 Inspiration and 1/5 Battuta. Go Sub Dancer for this Master Trial to help you and your party out. This is probably the hardest fight in the game to tank as a Rune Fencer due to there being no White Mage or actual healer. You must self sustain for a whole 60 minutes. As this Master Trial is a lot different than the others, I will explain the tank's role 1 at a time, even though you must do them both at the same time while fighting.
For Ultima you will maintain Level 5 Box Step throughout the entire fight. Engage Ultima and funnel both NMs together. While maintaining Box steps, you must also be on top of your own buffs - Phalanx, Aquaveil, Stoneskin and Refresh must be kept on full time and cannot be forgotten or you will pay with some heavy hitting attacks. The gimmick with Ultima is his attack speed, although he does not hit particularly hard, he attacks fast, and gets even faster when it is closer to death. Ultima also has a very potent Enlight effect which gets stronger as the fight goes on. For Omega it gets overwhelming and may take you a while to get it right. You have to constantly apply Gambit and Rayke whenever it is up, and as soon as it is up. While doing all of this you must also watch which NM you weapon skill, as you cannot afford to waste any time. You will be skillchaining with the Corsair to allow the Black Mage to magic burst. The skillchain will be Ground Strike -> Leaden Salute for Darkness. It is recommended to have about 1380 Accuracy in your Ground Strike set to allow you to hit consistently. The skillchains have to be almost non-stop while also maintaining hate on both NMs along with the Corsair possibly hitting 40k Leaden Salutes and capped Darkness skillchains. Making sure all of this is done right is what makes this fight so hard, you can't allow one mistake to happen as you never know when something will turn and get harder. For this Master Trial there shouldn't be any TP moves that go off, so they are not to worry about, if they go off then you should worry about them. Here is the entire strategy that I done for my clear: Heroines' Combat II
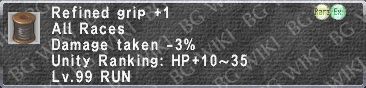
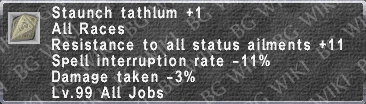
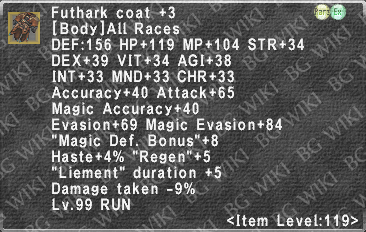
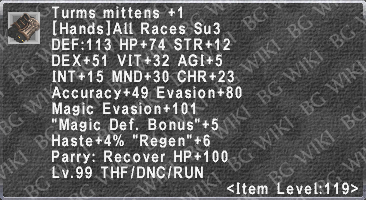
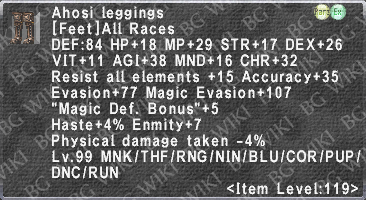
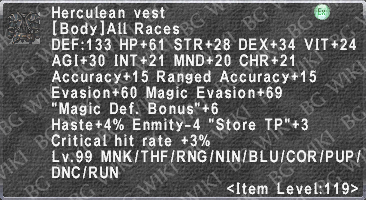
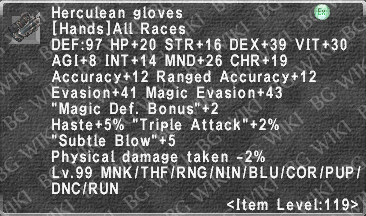
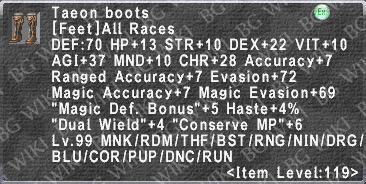
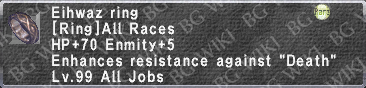
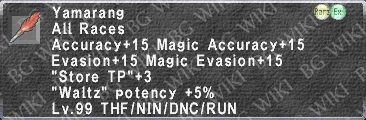
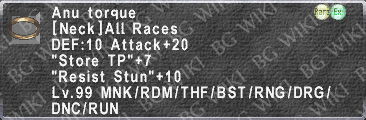
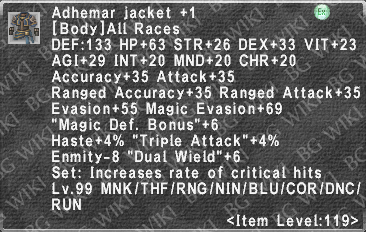
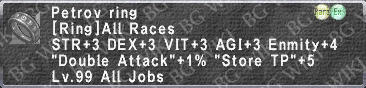
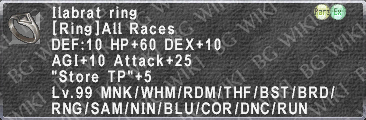
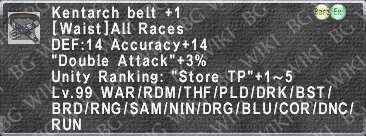
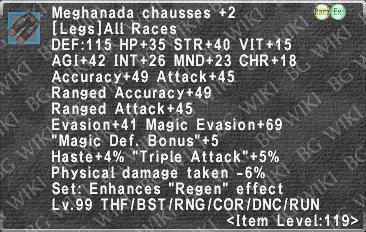
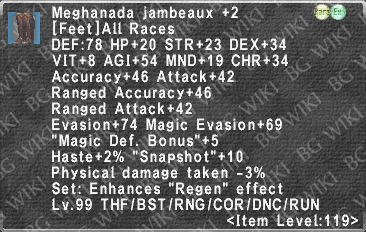
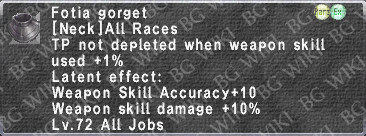
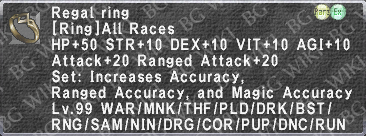
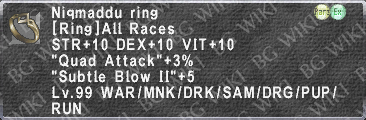
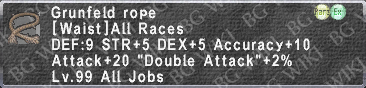
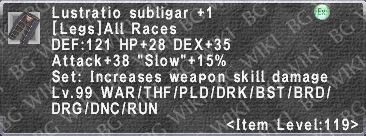
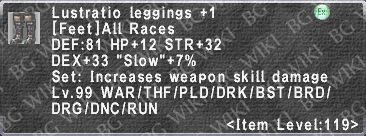
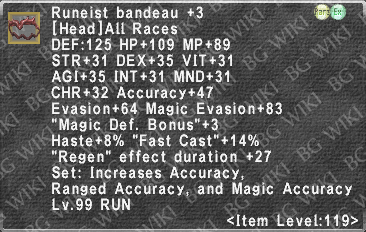
This is the final Master Trial and the newest one out. I cannot tell all of the mechanics, but I do know most of them and will explain them as much as I can. For the Tank's role the main issue is Iroha herself, not so much the other adds that spawn. The reason for this is because she is similar to Helmwige from Black and White and that she will magic burst off of a skillchain for ridiculous amounts of damage. What makes it worse is that Iroha will self skillchain to do so. Iroha is fairly easy to predict in all honesty, she will Weapon skill a few times to make a 2 step light skillchain, and then she will weapon skill again for a 3 step light. Knowing which skillchain is which will allow you to counter it and use enmity tools such as Liement to your advantage and absorb her magic burst. As the Rune Fencer in this fight you must play the job how it was supposed to be played. Protect your party members no matter what with Valiance, One For All and Liement. Same as Sealed Fate, the entire battle strategy that I used when clearing this Master Trial: Tanking GearsetsI will include some of my sets that are identical to what I currently use in-game. Below will list alternatives which could be used if some pieces are out of reach.
|