| The Temple of Uggalepih
|
| Series
|
Rise of the Zilart
|
| Starting NPC
|
None
|
| Title
|
Bearer of the Wisewoman's Hope
|
| Repeatable
|
No
|
| Description
|
The Temple of Uggalepih is an ancient place where it is said that evil deities were once worshipped. Gilgamesh has ordered you to travel there and search out a strange, old hermit.
|
|
Note: Having a significant amount of Rancor can be very harmful as the mission requires you to combat several Tonberries, including Notorious Monsters that can use the ability Everyone's Rancor for a great amount of damage. The rancor can be lowered with the quest Everyone's Grudge located in Norg. Consider completing this before proceeding.
- One can avoid gaining rancor by calling for help as well.
Shortcut
- If you already have the Den of Rancor Home Point unlocked, you can use it to warp directly to the Den of Rancor, step into the Sacrificial Chamber, and enter the Battlefield for the boss fight.
Walkthrough

The overall goal of this mission is to reach the Sacrificial Chamber BCNM zone. Before that, your goal is to reach the Den of Rancor.
Reaching the Den of Rancor
Method #1
Use the Den of Rancor Home Point #1 warp.
- If you have the Home Point already, you can simply warp there and zone into the Sacrificial Chamber area.
Method #2
The Unity warp to Den of Rancor (under content level 128) allows you to skip the Temple of Uggalepih step of Method #3 without the need for a  Paintbrush of souls. Paintbrush of souls.
- Note: You will still need an
 Unlit Lantern, unless somebody opens the Rancor door for you. Anyone with the Home Point warp can easily do this, saving you a lot of time. Unlit Lantern, unless somebody opens the Rancor door for you. Anyone with the Home Point warp can easily do this, saving you a lot of time.
Method #3
This is the old fashioned way, by obtaining the Paintbrush of souls.
- See the Mini-Quest page for instructions on obtaining the item, the come back to this page and continue below:
You will also need one Unlit Lantern to access the Sacrificial Chamber area. Obtain one via the below methods, and continue on the Temple of Uggalepih steps.
- Unlit Lanterns are dropped by Tonberry Jinxers in Yhoator Jungle, Tonberry Maledictors and Tonberry Pursuers in Temple of Uggalepih, and slightly higher level Tonberry Imprecators in Den of Rancor.
- A good area to farm Maledictors would be the map with Sozu Rogberry's ??? and where Uggalepih Offering can be found.
Temple of Uggalepih steps
- Enter the Temple from the main entrance in Yhoator Jungle (J-11/12).
- The Voidwatch warp brings you to this entrance.
- Make your way to the northwestern exit at (F-5). Pick up the Survival Guide on the way.
- Enter the temple again from (H-11), and work your way down to the Temple Guardian at (I-10).
- Kill the guardian if he is up, otherwise the door will be open already.
- Go ahead to (I-7). The door is on the far side of the room. Whoever has the Paintbrush of souls needs to stand at the empty frame in the middle of the wall. Everyone else wait by the door.
- To use the Paintbrush, check the frame and confirm you wish to continue. You should get a message saying "a new painting begins to appear on the canvas". Wait 30 seconds without moving or entering any commands, and check it again. You should get another message about the Den of Rancor, and the door will open.
- The person who is checking the frame cannot be aggro'd or acted on during these 30 seconds, otherwise you'll have to start over.
Den of Rancor steps
- Enter the Den of Rancor. Everyone will need Sneak and Invisible (Status).
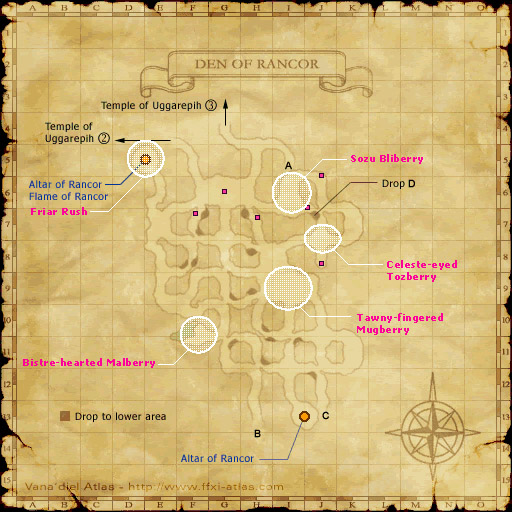
- Head to (E-5) on map 1. Once clear of the bomb mobs there, drop Invisible and trade your Unlit Lantern to the Altar of Rancor. You will receive a Rancor Flame item instead.
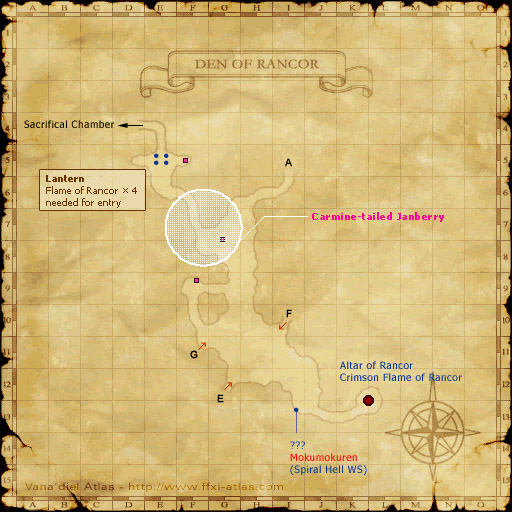
- Run to (F-7) and drop down the hole in the northeast corner to map 2. Make your way to (E-5) on this new map.
- To access the Sacrificial Chamber the four lanterns outside its gate need to be lit with Rancor Flame by trading the Unlit Lantern to an Altar of Rancor. While it can be done with one Unlit Lantern going back and forth from the Alter of Rancor and the lanterns, it would be suggested to farm multiple. 4 is ideal, but you can only hold one Lantern and one Flame at any time so that will require 4 players.
- Consider clearing the room, as it is hard to trade while being attacked.
After arriving at the Home Point in Den of Rancor
- Be sure to obtain the Home Point, and then walk further to zone into the Sacrificial Chamber.
- Examine the door to progress to the boss fight, see below for details.
- The name of the fight is the same as the mission, "The Temple of Uggalepih"
|
Boss Fight
- Inside, gather up and prepare. You will now enter an uncapped BCNM against 3 Tonberry NMs. Buff inside, as they'll wear upon entering the BC.
- Once you've cleared the BC, you'll get a cutscene. Afterwards, you'll exit on the other side of the Sacrificial Chamber, that will lead you back out to the Temple.
- After winning the BCNM, you may now continue Rhapsodies of Vanadiel Mission 2-24 The Cursed Temple.
| Area |
Boss |
Abilities |
Notes
|
| Sacrificial Chamber |
Grav'iton (THF), Molyb'iton (BLM), and Tungs'iton (SMN) |
|
- Recommended to battle order of Grav'iton THF → Molyb'iton BLM → Tungs'iton SMN
- Grav'iton cannot be slept, and therefore should be defeated first. Silence and Sleep the other two.
- Grav'iton can use Everyone's Rancor, which does 10 times the damage of Everyone's Grudge. A tank can very easily be KOed by this if they have significant rancor.
- The Summoner will have a pet, but that does not indicate what avatar it will use for Astral Flow. Defeat it quickly to try and avoid Astral Flow. It probably won't KO you if it does use it, but it will cause you some issues. Make sure everyone has full HP before attacking it.
|


