The Voracious Resurgence | |
| Prime Weapons • Ultimate Weapons • Ultimate Augments • Abjurations iL119 • JSE Necks • Divergence Augments • Escutcheons | |
| Reforged Armor Artifact: +1 • iL109 • iL119/+2/+3 Relic: +1/+2 • iL109 • iL119/+2/+3 Empyrean: +1/+2 • iL109 • iL119/+2/+3 |
Guides • Crafting • Trusts • Apex Monsters |
Category:Ambuscade: Difference between revisions
m (→Intense Ambuscade (Vol. One): put the old info here, will touch up eventually, after Toast is done checking it.) |
|||
| Line 163: | Line 163: | ||
{{Ambuscade Monthly Battle |
{{Ambuscade Monthly Battle |
||
|Volume=1 |
|Volume=1 |
||
|Month= |
|Month=October |
||
|Year=2019 |
|Year=2019 |
||
|Family= |
|Family=Moogle |
||
|Boss=Bozzetto |
|Boss=Bozzetto Voyager Moogle |
||
|Boss Job= |
|Boss Job=??? |
||
|VD Mobs=Bozzetto Steward x2 <sup>(???)</sup> |
|||
|VD Mobs=8 Random [[Fomor]]s:<br />Aegis<sup>(PLD)</sup>, Amanomurakumo<sup>(SAM)</sup>, Annihilator<sup>(RNG)</sup>, Apocalypse<sup>(DRK)</sup>, Bravura<sup>(WAR)</sup>, Claustrum<sup>(BLM)</sup>, Excalibur<sup>(PLD)</sup>, Gjallarhorn<sup>(BRD)</sup>, Gungnir<sup>(DRG)</sup>, Guttler<sup>(BST)</sup>, Kikoku<sup>(NIN)</sup>, Mandau<sup>(THF)</sup>, Mjollnir<sup>(WHM)</sup>, Ragnarok<sup>(DRK)</sup>, Spharai<sup>(MNK)</sup>, Yoichinoyumi<sup>(RNG)</sup> |
|||
|VD Notes= |
|||
|VD Notes=The Fomors are resistant to [[Elemental Seal]] sleep at this difficulty. A [[BRD]] using abilities such as [[Troubadour]] is recommended/required. |
|||
|D Mobs= |
|D Mobs=Bozzetto Steward x2 <sup>(???)</sup> |
||
|D Notes= |
|||
|D Notes=The Fomors are susceptible to [[Elemental Seal]] sleep from a [[GEO]] from this difficulty and easier. |
|||
|N Mobs= |
|N Mobs=Bozzetto Steward x2 <sup>(???)</sup> |
||
|N Notes= |
|N Notes= |
||
|E Mobs= |
|E Mobs=Bozzetto Steward x2 <sup>(???)</sup> |
||
|E Notes= |
|E Notes= |
||
|VE Mobs= |
|VE Mobs=Bozzetto Steward x2 <sup>(???)</sup> |
||
|VE Notes= |
|VE Notes= |
||
|Boss Notes= |
|Boss Notes= |
||
'''Uses the following TP Moves''': |
|||
*Posseses very low HP. |
|||
:*'''Invite Over''': Summons Bozzetto Steward, which has a short-ranged aura consisting of extremely potent Dia and elemental(?) DoTs |
|||
*Immune to sleep. |
|||
:*'''Washtub''': AoE damage and stun |
|||
*Susceptible to stun, addle |
|||
:*'''Mogsplosion''': AoE damage with knockback |
|||
*Cast Aspir, Curaga, Death, Drain. |
|||
:*'''Contaminated Concoction''': Disease |
|||
*Uses [[Chainspell]] at 75%. |
|||
:*'''Somnic Shell''': short-timed AoE sleep |
|||
*Spams [[Death]] during chainspell if players have not defeated all fomors. |
|||
:*'''Crystaline Flare''': AoE light-based damage with flash and stun effects |
|||
**If all formors are defeated then the Deathsinger will not chainspell death. |
|||
:*'''Bill Toss''': conal gaze terror |
|||
*Pulling the Deathsinger away from the group is recommended as curaga will ruin the fight if it wakes the Fomors. Landing addle will make stunning curaga easier if desired. |
|||
:*Can use any of the SP moves available to the starter jobs (e.g. Chainspell, Perfect Dodge, Mighty Strikes, Benediction, Manafont); <div id="copywrite">This code and information has been copied verbatim from the [http://wiki.bluegartr.com BlueGartr Wiki].</div> usage seems to be dependent on HP; number of uses available varies according to difficulty; will have a visible white aura |
|||
|Notes= |
|Notes= |
||
'''Bozzetto Steward''': |
|||
*All Fomors are susceptible to sleep and stun. |
|||
:*has extremely potent Dia and elemental(?) DoT |
|||
:*On Difficult difficulty and lower a [[GEO]] may use [[Elemental Seal]] [[Sleepga]]. |
|||
:*Does not move |
|||
::*The fomors will resist this at Very Difficult, and require a [[BRD]] to sleep instead. |
|||
:*Will despawn over time (approx 1 minute) |
|||
:*Once awoken the Fomors gain drastic sleep resistance. |
|||
::*This is removed upon a complete wipe. |
|||
*All Fomors may parry/shield block, recommended to fight from behind. |
|||
''' |
'''Moogle''': |
||
:*Does not move on Normal and lower difficulty; will roam on Difficult and Very Difficult |
|||
*Uses [[Invincible]] |
|||
:*Provides an aura that will counter-act the Voyager Moogle's aura but also gives amnesia; aura only activated when boss uses SP |
|||
'''Amanomurakumo'''<sup>(SAM)</sup>: |
|||
*Uses [[Meikyo Shisui]] |
|||
'''Annihilator'''<sup>(RNG)</sup>: |
|||
*Uses [[Eagle Eye Shot]] |
|||
'''Apocalypse'''<sup>(DRK)</sup>: |
|||
*Uses [[Blood Weapon]] |
|||
'''Bravura'''<sup>(WAR)</sup>: |
|||
*Uses [[Mighty Strikes]] |
|||
'''Claustrum'''<sup>(BLM)</sup>: |
|||
*Uses [[Manafont]] |
|||
'''Excalibur'''<sup>(PLD)</sup>: |
|||
*Uses [[Invincible]] |
|||
*Possesses a powerful [[Enlight]] additional effect on melee hits for 25% of Excalibur's current HP. |
|||
**This may do thousands of damage depending on the difficulty chosen and easily KO players. |
|||
**This may be mitigated via abilities such as [[Sentinel's Scherzo]], [[Earthen Armor]], [[Sentinel]], [[Battuta]], [[Slow]], [[Paralyze]], etc. |
|||
'''Gjallarhorn'''<sup>(BRD)</sup>:<br /> |
|||
*Uses [[Soul Voice]] |
|||
'''Gungnir'''<sup>(DRG)</sup>:<br /> |
|||
*Uses [[Call Wyvern]] |
|||
*Will gain a [[Shock Spikes]] aftermath. |
|||
'''Guttler'''<sup>(BST)</sup>:<br /> |
|||
*Uses [[Familiar]] |
|||
**This will charm the player who has hate. |
|||
'''Kikoku<sup>'''(NIN)</sup>:<br /> |
|||
*Uses [[Mijin Gakure]] |
|||
'''Mandau'''<sup>(THF)</sup>:<br /> |
|||
*Uses [[Perfect Dodge]] |
|||
'''Mjollnir'''<sup>(WHM)</sup>:<br /> |
|||
*Uses [[Benediction]] |
|||
'''Ragnarok'''<sup>(DRK)</sup>:<br /> |
|||
*Uses [[Blood Weapon]] |
|||
'''Spharai'''<sup>(MNK)</sup>:<br /> |
|||
*Uses [[Hundred Fists]] |
|||
'''Yoichinoyumi'''<sup>(RNG)</sup>: |
|||
*Uses [[Eagle Eye Shot]] |
|||
|Very Difficult Strat= |
|Very Difficult Strat= |
||
Setup: '''SMN x3, GEO, THF/PLD, RDM''' |
|||
Groups on easier difficulties can get by on a player /BLM using sleepga, but BRD is the recommended sleeper for Very Difficult as Horde Lullaby II + [[Troubadour]] should grant 5+ minutes of sleep. |
|||
*After the mobs wake up from the first sleep they will no longer be susceptible. |
|||
Strategy: |
|||
'''PLD or RUN, DD, DD, GEO, BRD, WHM''' |
|||
*RDM gives Protect & Shell to the THF. |
|||
*PLD or RUN gains hate on all the adds, the BRD JA horde sleepgas, and then the tank pulls the eye away. |
|||
*GEO uses Bolster and Entrusts Indi-Languor on THF, Indi-Frailty on themselves and will use Geo-Torpor once the boss moogle is in position. |
|||
*Two DDs then go to town taking the adds down. Save NMs like Excalibur or Mjollnir for last, and the eye last of all. |
|||
*SMN's have Ramuh's out and ready. |
|||
*If your group struggles at this then consider doing Difficult instead of Very. |
|||
*THF will run in, Perfect Dodge, Flash & Sentinel. Moogles will move, if they remain close to the boss moogle in the center, then the THF will need to bring the boss moogle away from the helpers. |
|||
*RDM will Stymie Silence & Dia 3 then cast cures as needed. |
|||
*SMN will Astral Flow/Astral Conduit right out the gate at 100% HP once the RDM has debuffed. This is the only real way you can kill him if he uses Benediction as his first 1-hour, and even then it's not guaranteed. |
|||
*At 85% HP, THF will Larceny once the 1-hour animation goes off on the boss moogle unless it's Benediction. If it's Benediction, THF will need to Larceny if he uses Perfect Dodge, but you will most likely wipe unless your SMN's are stacked and can kill it before the aura becomes active and tick's twice. If the second 1-hour is Benediction, it's a wipe. |
|||
Alternate Strategy (not luck-based): |
|||
* '''PLD, BRD/WHM, COR X2, RNG (or COR), WHM''' |
|||
* Rolls: Hunter's and Monk's (for Subtle Blow), Samurai's and Chaos |
|||
* Barsilencera and Auspice (along with Subtle Blow will help reduce the chances of Invite Over) |
|||
* If the boss uses Invite Over, PLD should move a few steps away to avoid the spawn's aura. |
|||
* Boss uses SP at 85%, 65%, 45%, 25%, and 10% HP. Reduce boss HP down to 88%, 68%, etc. and stop all damage. Then look for a nearby moogle. Wait until that moogle starts moving and then drop the boss HP down to the trigger level. The idea is to make it to the safety moogles right as they are about to stop. (If the boss has an SP aura up and the moogle starts moving, there is a good chance death). No damage during this waiting phase so as to avoid AoE damage and Invite Over. Spam Curaga IV and Curaga V (WHM needs Eber's Pantaloons +1) to ensure that no one dies if the boss happens to use an AoE spell or ability that everyone can still survive. Using any type of bind effect on the moogle can be helpful. |
|||
* Save Rampart and Sacrosanctity for Chainspell; spam Finale to prevent the boss from self-curing. |
|||
* If anyone dies, stop damage just before the next SP trigger level and wait out the weakness before forcing the SP move on the boss. Do NOT get up near a steward or when an aura is out -- wait until nearby stewards despawn and/or SP auras to drop. |
|||
* This method is a sure way to win (unlike the SMN burn method) and does not require the use of SPs. Moreover, it is very easy on support jobs since only the PLD is ever in range of more dangerous moves such as Crys. Flare (high damage to non-tanks even with Shell V), Washtub and Atra. Lib. (stun/terrorize) followed by SP aura. |
|||
|Difficult Strat= |
|Difficult Strat= |
||
'''Tips:''' |
|||
*For D+ the regen moogles will roam around and not stay stationary. |
|||
*Boss will 2-hour at 85%, 65%, 45%, 25%, and 10% hp. |
|||
:*It helps to DPS during the periods the boss has not used 2-hour and you do not have amnesia. |
|||
*When boss uses 2-hour everyone should run to either regen moogle and stay close during the whole time amnesia is on. |
|||
:*It helps to slow down damage before a trigger point and pull boss close to a regen moogle, just depends how alert everyone in your party is. |
|||
*Keep using dispel to remove pro/shell on boss, this keeps boss from curing himself. |
|||
*The stewards will randomly spawn around the boss while you are DPSing. |
|||
:*Just move a bit away from them when that happens. |
|||
*Silence during 2-hour phase helps. D and VD can easily be melee burned. |
|||
|Normal Strat= |
|Normal Strat= |
||
Solo-able on '''BLU/WAR''' using healer trusts that do not spread out (e.g. Koru-Moru, King of Hearts, Ferrous Coffin, etc). |
|||
:*Cherukiki and Apururu are usable as well, but they will require some additional management (by way of disengaging and re-engaging). Cherukiki can cast Silence |
|||
:*Required BLU spells include Silent Storm, Subduction, Blank Gaze (or Geist Wall), Magic Fruit, Occultation |
|||
:*Pull with Silent Storm and dispel with Blank Gaze (Geist Wall); keep Silence on to avoid Cure VI during Chainspell (can heal around 68k) |
|||
:*The gimmick is simple: when the boss uses Invite Over, move your party away from the Steward to avoid the potent DoT aura. When it uses its SP move (any one among those from the starter jobs), the boss itself will have the same aura (visible on the boss itself). At this point, move toward one of the two Moogles who themselves have a beneficial aura that will counteract the aura from the boss. Additionally, the Moogles will have an amnesia aura during this time. Avoid engaging the boss if possible so that it does not gain TP and use Invite Over during its SP (because you will be forced to run to the other Moogle and may possibly die, or your NPCs might die). Use Occultation and Magic Fruit to stay alive. If you need healing from your NPCs, engage to get healed, and then disengage until the boss' aura is down (otherwise they will waste MP trying to Erase and use healing spells to remove aura effects). Try to fight away from the Moogles so you will always have a safe spot during the boss' aura. On Normal, there should only be 4 (?) uses of SP. |
|||
:*Re-apply silence when necessary even at the cost of possibly losing one of the Moogles (but do not kill both of them). Best to fight along the outer walls and move in a circle when Stewards are spawned. |
|||
:*When/if you are out of MP (including NPCs), use Subduction and run to the opposite side of the arena to rest (or to simply stand still) to allow the NPCs to recover MP/HP. |
|||
:*Other NPCs that might work well: Selh'teus and Arciela as they both provide AoE healing; Selh'teus also replenishes MP |
|||
|Easy Strat= |
|Easy Strat= |
||
|Very Easy Strat= |
|Very Easy Strat= |
||
Solo-able on almost any job. '''Do not kill the Moogles that appear at the start.''' Summon NPCs and fight on top of the Moogle on the right (as viewed when zoning in). |
|||
|Key Item Locations= |
|Key Item Locations= |
||
Revision as of 13:47, 11 October 2019
|
Getting Started
Complete the Stepping into an Ambuscade Records of Eminence objective and speak with Gorpa-Masorpa in Mhaura at (G-9) for an explanation about Ambuscade.
- Players must have completed the First Step Forward Records of Eminence objective in order to undertake Stepping into an Ambuscade.
- Stepping into an Ambuscade can be set from the Tutorial section of the Records of Eminence menu under Basics:
- Quests → Objective List → Tutorial → Basics → Stepping into an Ambuscade
Be in possession of either the Ambuscade Primer Volume One or Volume Two Key Items.
- All party members must be in possession of one of these two Key Items.
Eligibility Requirements
In order to participate, players must satisfy the following:
- Complete either the Ambuscade Primer Volume One or Volume Two objectives in order to obtain the Key Item for the corresponding volume of the primer for the type of battle players wish to complete.
- Players may have only one of each of the Ambuscade Primer Key Items.
- Objective targets vary by month after a version update, opponents are rotated out, and generally not repeated.
- Players may have only one of each of the Ambuscade Primer Key Items.
- The Ambuscade Primer Volume One and Two objectives can be undertaken from the Ambuscade category of the Records of Eminence menu.
Entry and Progression

- Examine the Ambuscade Tome in Mhaura (G-9) and select the type and difficulty level you would like to attempt.
- Only the party leader may register the group.
- The party will be registered so long as the system detects that there are no issues with the layer area or registering party members.
- Players will be unable to register if:
- Any player is not in possession of an Amuscade Primer Volume One or Two Key Item.
- The number of registrants exceeds the maximum of fifty reservations.
- A party member already has a reservation.
- To cancel a reservation:
- A player may cancel their reservation via the ambuscade tome.
- Three minutes has passed from the time the player is notified that their instance is ready.
- The registrant boards a boat.
- The registrant leaves Mhaura in any way.
- To cancel a reservation:
- Players will be unable to register if:
- Adding new party members after registration will not cancel the registration, but the party may only enter with the number of players it registered with.
- A message will display for the party leader when entry is ready.
- As of the July 2016 update[3], automatic entering was added.
- The default setting is "off" and may be changed by having the party lead examine the Ambuscade Tome and selecting the Toggle auto-transport function.
- In line with this, having the auto-transport function off has a notification sound played when it is the party's turn.
- This may be disabled via the sound settings in the Config menu.
- As of the July 2016 update[3], automatic entering was added.
- Examine the ambuscade tome within three minutes to enter.
- The time limit for an Ambuscade is 30 minutes (Earth time).
- Between 1~6 players may participate.
- Trusts may be called after entering Maquette Abdhaljs-Legion.
- The number of alter egos that may be called forth will depend on the number of players initially registered.
- Player HP and MP will be restored to full and any status ailments they are suffering from will be removed upon entry.
- Trusts may be called after entering Maquette Abdhaljs-Legion.
- Key Items will only be lost upon victory.
- Meaning that should a player or group lose, they may reattempt the battlefield without having to reacquire new Key Items.
Upon victory, a special currencies known as Hallmarks and Badges of Gallantry, which may be exchanged for rewards, Experience/Limit Points, and Capacity points will be given to all players.
- Notorious Monsters inside Ambuscade do not drop any treasure directly.
Battle Information
A Word On Enmity
- Enmity functions abnormally in just one way during Ambuscade, and this has entirely to do with enmity gain upon self/party actions.
- Any action (buff, cure, job ability) at any time (before/after pull) taken upon yourself or a party member will gain enmity on all mobs for the person initiating the action.
- Any action before the monsters have been aggroed will receive the minimum level of enmity (1 CE/VE).
- This explains why the mobs often go straight for your WHM upon the pull. Protectra, Shellra, and two Bar-spells equal 24 (6*4) party action enmity events if 6 players are in range.
- Any action before the monsters have been aggroed will receive the minimum level of enmity (1 CE/VE).
- To counter this have your tank use self/party-target enmity actions before the pull, and enmity abilities (Sentinel, Rampart, Pflug, Foil, etc) immediately after the pull.
- The tank should not use their enmity abilities before aggroing the enemies in Ambuscade as they will gain almost no enmity with them before the pull.
- Any action (buff, cure, job ability) at any time (before/after pull) taken upon yourself or a party member will gain enmity on all mobs for the person initiating the action.
Battle Type & Levels
There are two types of Ambuscades you may attempt. Entry into either is determined by which Key Item you possess.
|
| ||||||||||||||||||||||||||||||||||||||||||||||||||||||||||||||
An ![]() Abdhaljs Seal will triple the amount of hallmarks and gallantry you receive from a successful Ambuscade.
Abdhaljs Seal will triple the amount of hallmarks and gallantry you receive from a successful Ambuscade.
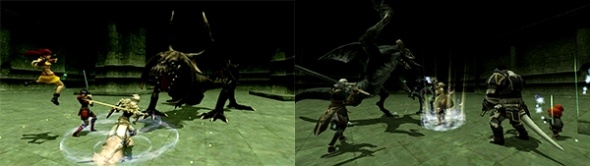
Intense Ambuscade (Vol. One)
| Volume 1, April 2024, Moogle | ||||||||||||||||||
|---|---|---|---|---|---|---|---|---|---|---|---|---|---|---|---|---|---|---|
Notes:
Bozzetto Steward:
Moogle:
Setups and Strategies: Very Difficult:
Strategy:
Alternate Strategy (not luck-based):
Difficult:
Normal:
Very Easy:
|
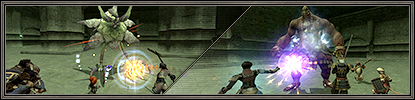
Ambuscade (Vol. Two)
| Volume 2, April 2024, Mantid | ||||||||||||||||||
|---|---|---|---|---|---|---|---|---|---|---|---|---|---|---|---|---|---|---|
Notes:
Setups and Strategies:
|
Previous Battles
Old battlefield information is stored on the Ambuscade Archive page.
Rewards
See Ambuscade Rewards for specific item and equipment rewards.
Hallmarks
Hallmarks are the primary currency of Ambuscade. They can be used to purchase items from Gorpa-Masorpa.
There are two types of rewards available. Those received in exchange for Hallmarks and those received for total amount of hallmarks accumulated.
- Hallmarks are not expended upon receiving items from the list of rewards for total amount of hallmarks accumulated.
- The types of items available vary with the content of that month’s Ambuscade.
- Your total number of hallmarks will reset back to 0 after each month's version update.
- Hallmarks and Badges of Gallantry are reset upon the next month's version update being implemented (usually set to happen from around the 3rd to the 10th of a month).[4]
Gallantry
Badges of Gallantry are the secondary currency of Ambuscade. They can be used to purchase items from Gorpa-Masorpa, and are only given to those who participate in Ambuscade with other players.
- Like Hallmarks, your Badges of Gallantry will reset back to 0 after each month's version update.
- Hallmarks and Badges of Gallantry are reset upon the next month's version update being implemented (usually set to happen from around the 3rd to the 10th of a month).[5]
Monthly Adventurer Campaigns
There is one type of campaign that may run any given month.
Ambuscade Point Bonus Campaign
- When this Monthly Adventurer Campaign is active, hallmarks and badges of gallantry will yield double the normal amount once per day when participating in each Ambuscade difficulty level.
- This bonus will reset at Japanese Midnight Earth time and stacks with the effects of Abdhaljs Seals to yield a total of four times the normal amount.
- Unclear on whether a mistranslation. Currently observed value with Campaign active and Seal used is 5 times the normal amount.
- This bonus will reset at Japanese Midnight Earth time and stacks with the effects of Abdhaljs Seals to yield a total of four times the normal amount.
Ambuscade Gallantry Campaign
- When this Monthly Adventurer Campaign is active, the number of Badges of Gallantry earned from Normal and Intense Ambuscades will be doubled once per Earth day.
- This bonus will reset at Japanese Midnight Earth time and stacks with the effects of Abdhaljs Seals.
JSE Cape Augmentation
Job-specific Back equipment obtained with a ![]() Ambuscade Voucher: Back can be augmented by trading them along with certain items to Gorpa-Masorpa.
Ambuscade Voucher: Back can be augmented by trading them along with certain items to Gorpa-Masorpa.
- See the
 JSE capes page for augment information for the Job Specific Capes.
To augment a cape:
- Trade the item to Gorpa-Masorpa along with either an Abdhaljs Thread, Abdhaljs Dust, Abdhaljs Sap, Abdhaljs Dye or an Abdhaljs Resin.
- Select the desired attribute, and confirm your choice. After the initial trade, you can max out that path on your next trade if you also trade enough materials.
- Augments may be changed by repeating the above steps.
- Changing the augment path will not return any items used up to that point.
- However, when using an
 Abdhaljs Needle to change the augment, the current potency is maintained.
- However, when using an
- Further trading an augmented item with items corresponding to the attribute initially selected will increase the strength of the augmentation.
- For maximum strength augments the following are all required per cape:
 Abdhaljs Thread x20,
  Abdhaljs Dust x20,
  Abdhaljs Sap x10,
  Abdhaljs Dye x10,
  Abdhaljs Resin x5
Armor Upgrade
To upgrade Salvage Armor Variant Ambuscade Armor trade either the NQ or +1 variant and the requisite ![]() Abdhaljs Metals to Gorpa-Masorpa:
Abdhaljs Metals to Gorpa-Masorpa:
| Base Armor | Armor Piece +1 | Armor Piece +2 | ||
|---|---|---|---|---|
To upgrade Limbus and Nyzul Armor Variant Ambuscade Armor trade either the NQ or +1 variant and the requisite ![]() Abdhaljs Fibers to Gorpa-Masorpa:
Abdhaljs Fibers to Gorpa-Masorpa:
| Base Armor | Armor Piece +1 | Armor Piece +2 | ||
|---|---|---|---|---|
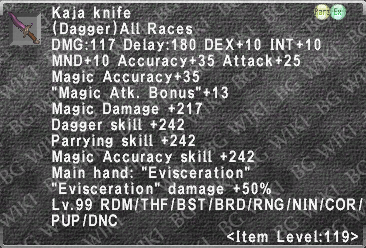
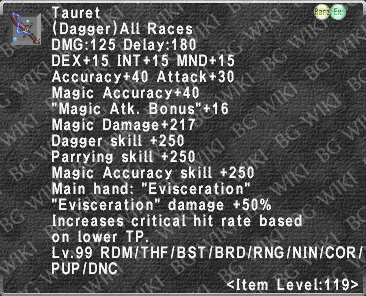
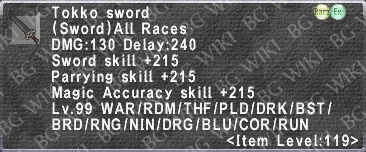
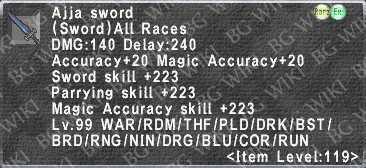
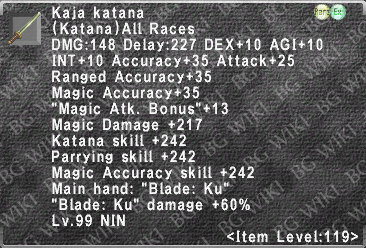
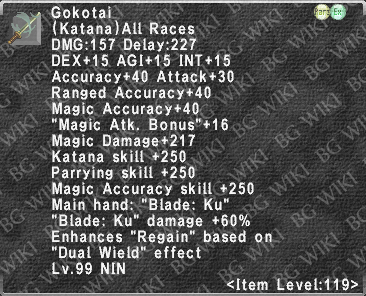
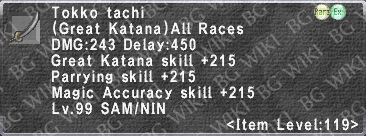
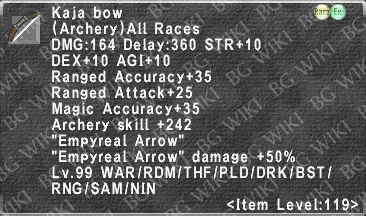
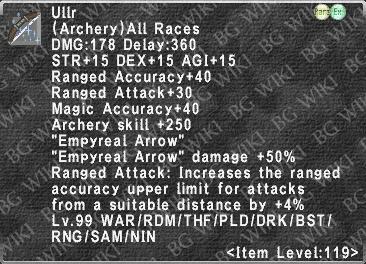
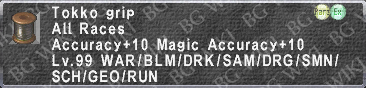
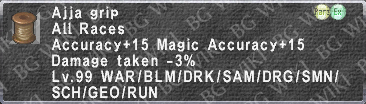
Ambuscade Weapons
Speaking with Gorpa-Masorpa and listening to the message from Abdhaljs will allow you to exchange an ![]() Ambuscade Voucher: Weapon for a weapon of your choice or the grip.
Ambuscade Voucher: Weapon for a weapon of your choice or the grip.
Each stage is then upgraded as follows:
![]() Abdhaljs Nugget x5 (3,750 Total Hallmarks / 12,500 Total Gallantry)
Abdhaljs Nugget x5 (3,750 Total Hallmarks / 12,500 Total Gallantry)
![]() Abdhaljs Gem x5 (5,000 Total Hallmarks / 17,500 Total Gallantry)
Abdhaljs Gem x5 (5,000 Total Hallmarks / 17,500 Total Gallantry)
![]() Abdhaljs Anima x5 (7,500 Total Hallmarks / 22,500 Total Gallantry)
Abdhaljs Anima x5 (7,500 Total Hallmarks / 22,500 Total Gallantry)
![]() Abdhaljs Matter x5 (10,000 Total Hallmarks / 27,500 Total Gallantry) and one of any nonAmbuscade Pulse Weapon‡
Abdhaljs Matter x5 (10,000 Total Hallmarks / 27,500 Total Gallantry) and one of any nonAmbuscade Pulse Weapon‡
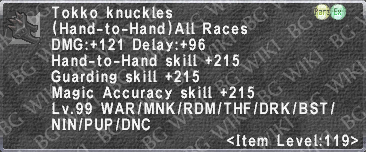
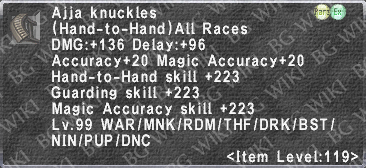
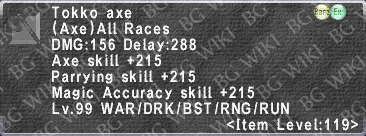
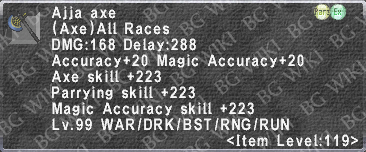
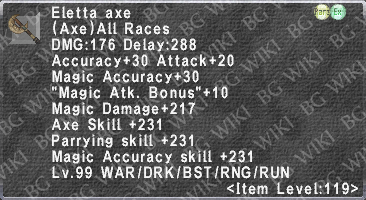
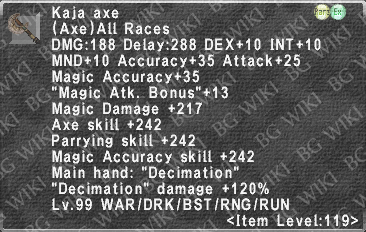
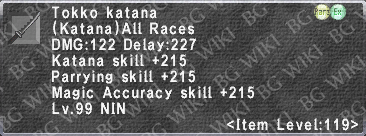
- For a single base Tokko to Final Form weapon, total required points: 26,250 Hallmarks or 80,000 Gallantry
- An additional 5,000 Hallmarks or 10,000 Gallantry is needed in addition to above totals if the Tokko weapon was not obtained from the free
 Ambuscade Voucher: Weapon from the Total Hallmarks Rewards list.
- An additional 5,000 Hallmarks or 10,000 Gallantry is needed in addition to above totals if the Tokko weapon was not obtained from the free

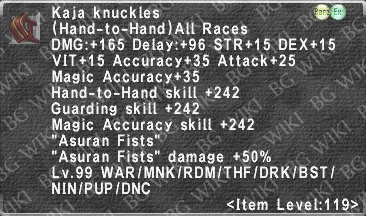
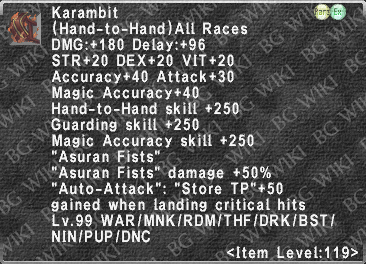
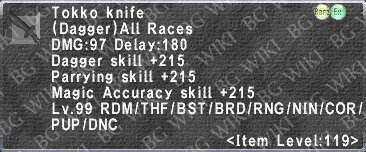
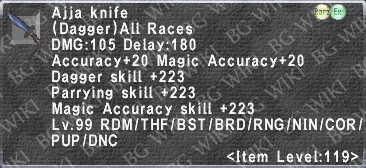

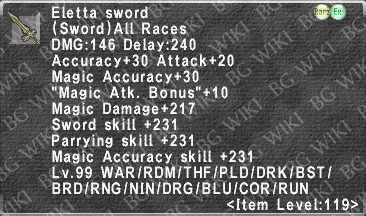

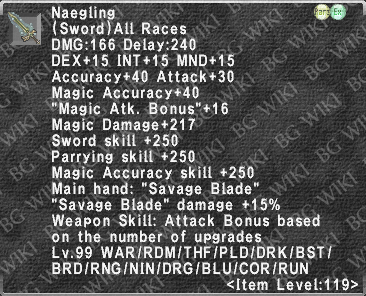
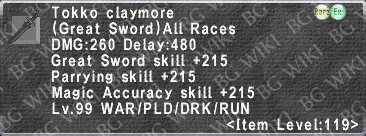


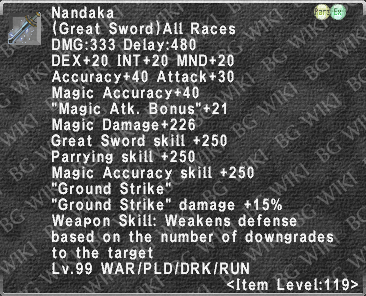
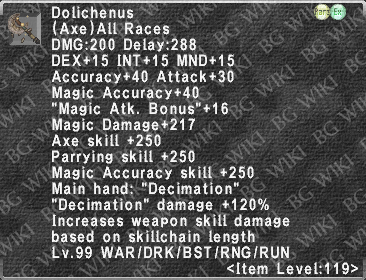

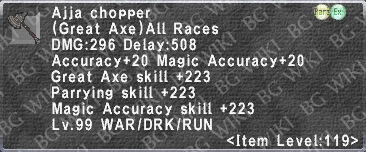
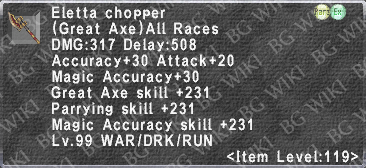

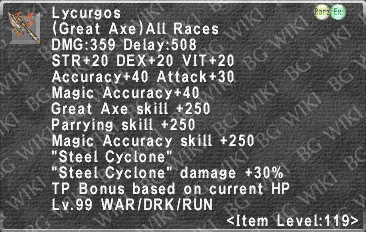
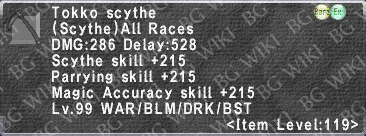


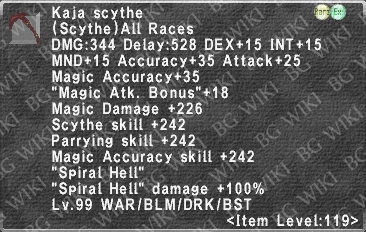
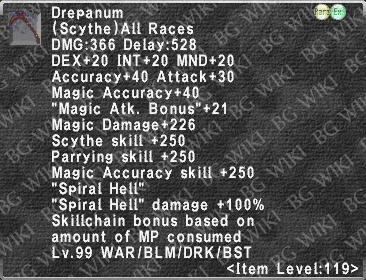
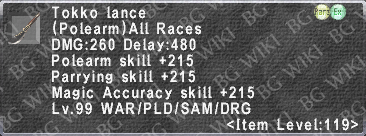


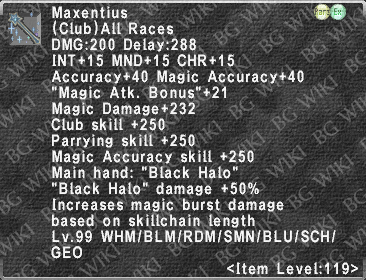
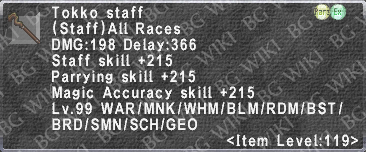
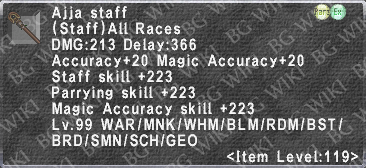
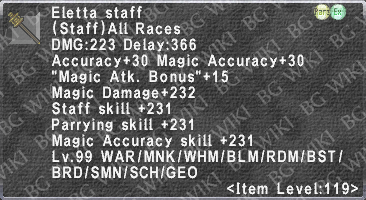

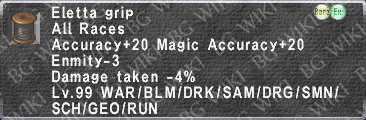
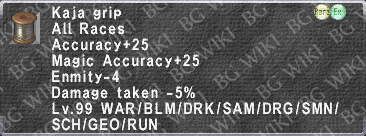
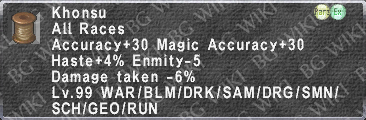
- ‡ Eligible Pulse Weapons: Sagasinger
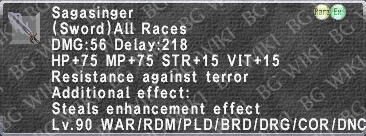 / Murasamemaru
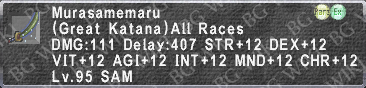 / Tenkomaru
 / Himthige
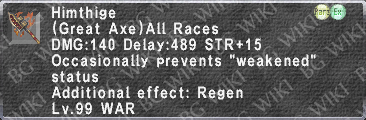 / Aytanri
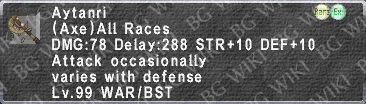 / Adflictio
 / Girru
 / Gusterion
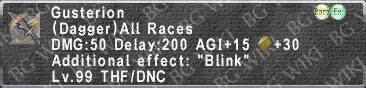 / Dukkha
 / Ephemeron
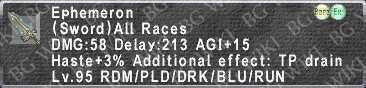 / Coruscanti
 / Asteria
 / Borealis
 / Ikarigiri
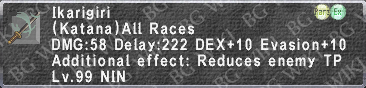 / Delphinius
 / Chastisers
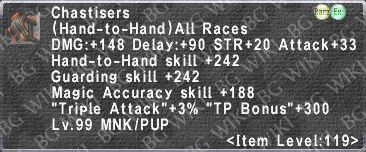 / Router
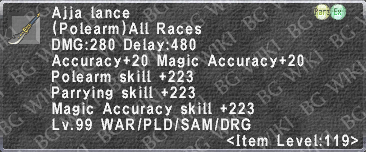
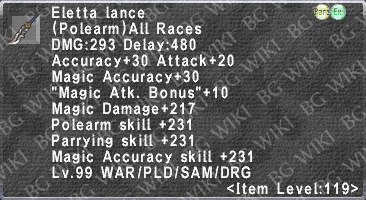
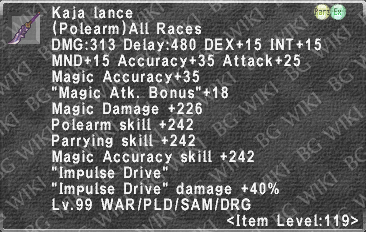
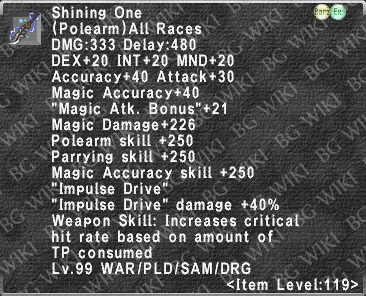
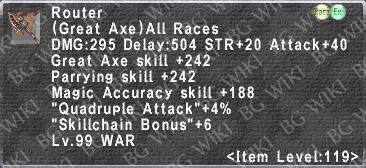 / Annealed Lance
Pages in category "Ambuscade"
The following 27 pages are in this category, out of 27 total.
B
- Bozzetto Berserker
- Bozzetto Brawler
- Bozzetto Conjurer
- Bozzetto Crusader
- Bozzetto Devout
- Bozzetto Duelist
- Bozzetto Elementalist
- Bozzetto Erudite
- Bozzetto High Vicar
- Bozzetto Lancer
- Bozzetto Lyricist
- Bozzetto Moraingist
- Bozzetto Protector
- Bozzetto Pugilist
- Bozzetto Reaver
- Bozzetto Shinobi
- Bozzetto Stormbringer
- Bozzetto Swordsman
- Bozzetto Tamer
- Bozzetto Warlock
