Before Earning Capacity Points
Capacity Point Bonuses
You can increase the amount of Capacity Points you earn by gaining Capacity Point Bonuses through a variety of methods, such as completing story Missions, participating in Reives, Rings that provide a temporary Capacity Bonuses, or during monthly Adventurer Campaigns. Players wishing to earn Job Points should consider these options to increase their Capacity Point Bonuses before setting out to earn CP, as these will make accumulation much quicker.
Apex Strategies
Several strategies are common while dealing with Apexes. This will depend on not only which jobs are available to the group, but the jobs players wish to CP on.
Points may only be gained for the current job being used and are not shareable like Merit Points are.
Magic Burst
Most commonly occurring in Dho Gates as Crabs provide Aspir fodder, and are of a decent difficulty more often for average shout members. Almost no monsters after these Crabs have an MP pool to utilize.
Typically these setups involve a pair of DDs to create skillchains to burst, a GEO, and a combination of support and nukers.
- However, a COR or SMN (ideally Shiva for Avatar's Favor) works as well. Ideally you should defeat the mob in a single MB volley. Mages may use a high tier nuke then burst again with a weaker nuke.
- Keep in mind how SDT tiers change from skillchains and multiple skillchains.
See also: Magic Accuracy Food.
Skillchaining
More common, and often more viable against a large array of targets are skillchain style apex parties. Where multiple skillchains from powerful weapon skills are coordinated between DDs.
Players will want to aim for a level 2 skillchain, into a level 3, and then a level 4.
- See the Skillchain page for information on skillchaining.
- A tool like FFXI Calc may be very useful to you for finding skillchains without as much work.
- Each weapon type page on the wiki or the Weapon Skills page itself has the skillchain elements listed.
- While using level 2 properties together to create the first level 2 skillchain is convenient. Often times you will be stuck looking at the secondary/level 1 properties of a weaponskill
For example, a party of DRG, THF, PLD, BRD or COR, GEO, WHM against Apex Bats in Dho Gates.
- BRD or COR buffs and pulls then sleeps while the PLD tanks. You don't even really need a tank *. Defense Food works well too in this role with proper buffs/debuffs.
- COR is ideal for Allies' Roll, but it shouldn't matter too much really.
- You could also run this with another job like RDM magic bursting each step or even meleeing, skillchaining, and magic bursting at the end if need be. Don't forget about Inundation.
- While you can't put a price on the sweetness of capping attack via Geo-Frailty, decent/good DDs with Allies' Roll against Dho or even Woh gates targets (gear, targets, and buffs depending) shouldn't require this to down a mob given Dia II/III and other buffs from jobs like BRD or SMN.
Parties may even form magically based strategies where Geo-Malaise is used for something like Leaden Salute as powerful a  Dark SC closer to multiple physical weapon skills. There could even be a player there to magic burst after the fact if desired or necessary, given the buffs in this example.
Capacity Point Party Notes
Jobs that aren't typically known for their damage dealing (such as PLD) can be better off setting NIN or DNC as a support job with two weapons in order to help open or close Skillchains, depending on the overall strategy set up. Melee jobs should focus primarily on TP accumulation, with options such as Double Attack, Store TP, Haste, and Accuracy.
Mage-type jobs should focus on increasing their Magic Burst Damage, providing the party with beneficial effects, debuffing the mob's defense and resistances, and decreasing down-time.
Certain players will sometimes have unreasonable requirements to get into their CP PTs. Such as requiring an Ultimate Weapon. DO NOT feel discouraged by the ignorance of such players. Party optimization often isn't required for any but the toughest of Apex monsters; and even then, every job is capable of functioning within a CP PT, provided that they are prepared and fill a needed role in the group's strategy (e.g. overbuffed melee group kills, magic bursting, multistep SCing, etc).
If you are a newer player to Capacity Points; consider soloing Moh and Sih Gates to get the feel for it.
Then form small parties with friends or random people and fill empty slots with trusts.
If you want to join a CP PT but are unfamiliar with the party set up, be up front with the party leader and explain what concerns you might have. If you invite someone who is not familiar with CP PTs and may not have the correct set up, explain to them what they should know.
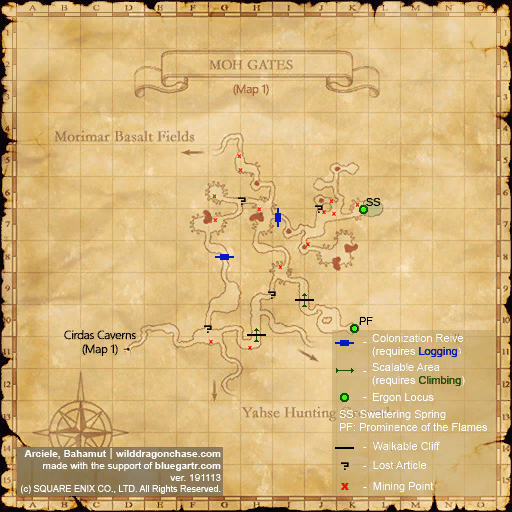
Moh Gates
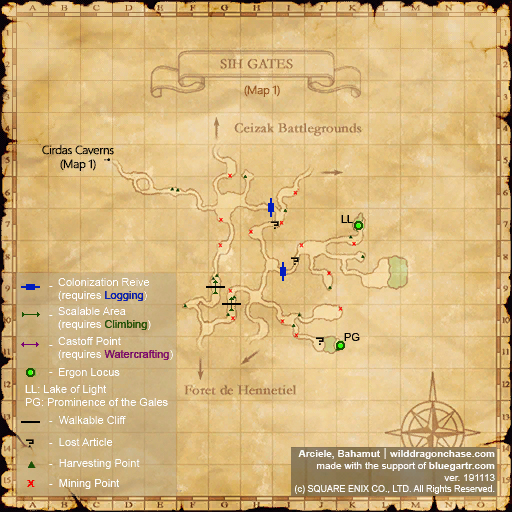
Sih Gates
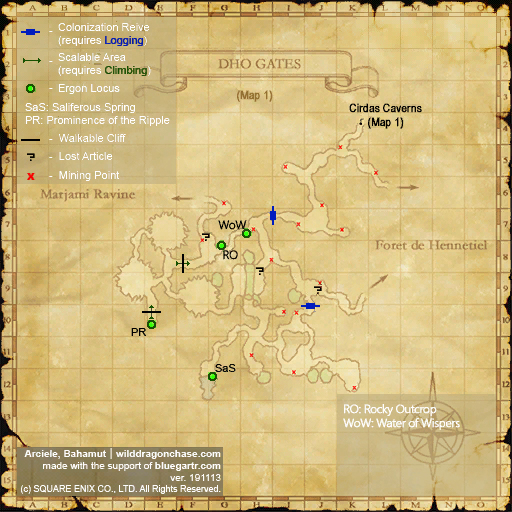
Dho Gates
Woh Gates
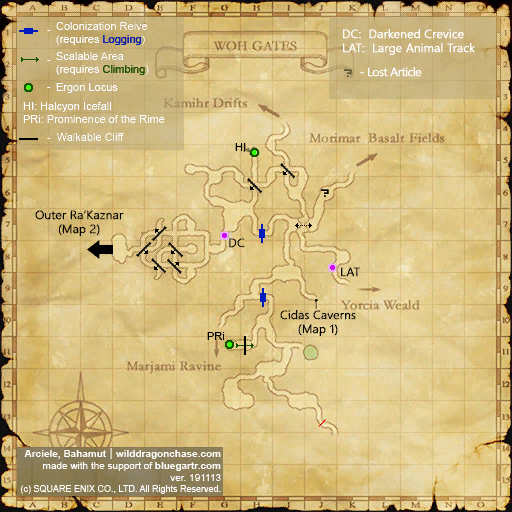
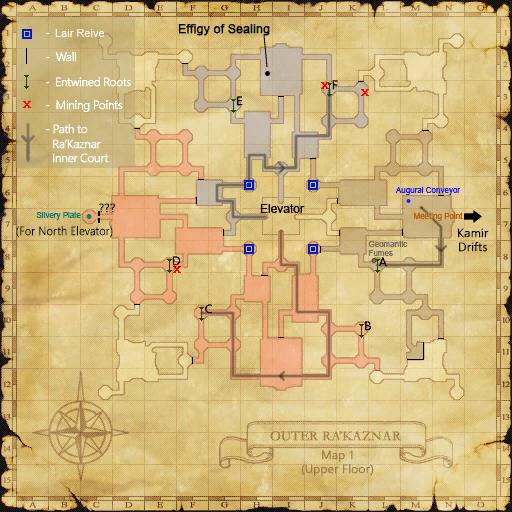
Outer Ra'Kaznar
- Twitheryms at E12 (2nd floor).
- Bats (single) at D5 (2nd floor).
- Ironclads: 2 at each of the camps above.
- Neither the Bats nor Twitherym aggro or link at all.
- Ironclads aggro from 10' sound/7.5' sight, but the room is huge and they're typically tucked in a corner, so you'll have more than enough space to avoid them.
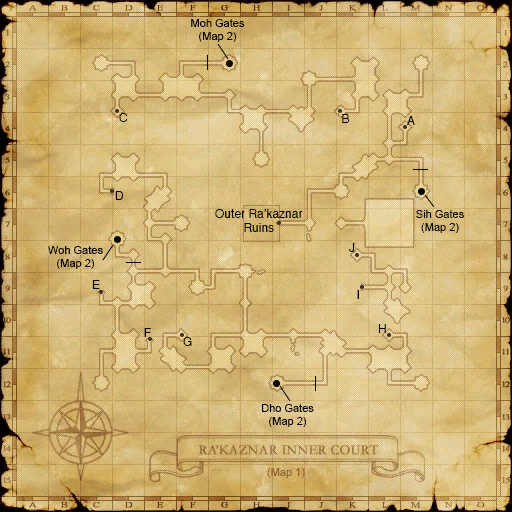
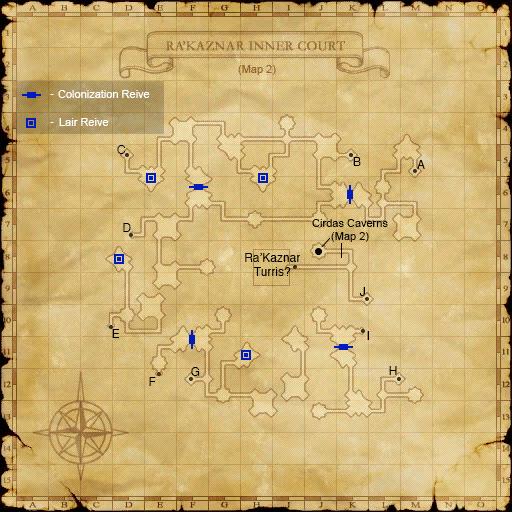
Ra'Kaznar Inner Court
| Monsters
|
| Monsters
|
Job
|
Spawns
|
Aggro
|
Detects
|
95% Hit Rate
|
| Apex Bats
|
WAR
|
6
|

|

|
1,384
|
| Apex Bhoot
|
BLM
|
18
|
|

|
1,384
|
| Apex Cyhiraeth
|
BLM
|
13
|
|
|
1,359
|
| Apex Draugar
|
BLM
DRK
THF
|
18
|
|
|
1,359
1,384
1,524
|
| Apex Poxhound
|
WAR
|
10
|
|
|
1,384
|
| Apex Umbril
|
WAR
|
22
|
|
 
|
1,384
|
| Apex Vodoriga
|
WAR
|
12
|
|
|
1,384 (Ground)
1,454 (Flying)
|
| Disheveled Naraka
|
WAR
|
2
|
|
|
1,384
|
| Enigmatic Vampyr
|
WAR
|
1
|
|
|
1,384
|
| Inimical Corse
|
BLM
|
2
|
|
|
1,384
|
| Powercrazed Dvergr
|
BLM
|
2
|
|

|
1,359
|
|
|
- All the Apexes are located at the northern parts of both map 1 and 2.
- Apex Poxhound can be found at (J-3) of Map 1.
- Apex Draugar can be found at (K-2) of Map 1.
References
Pages in category "Apex Monster"
The following 51 pages are in this category, out of 51 total.
 Transfixion to a
  Scission (Sonic Thrust or Dancing Edge for example) creates
  Distortion.