The Voracious Resurgence | |
| Prime Weapons • Ultimate Weapons • Ultimate Augments • Abjurations iL119 • JSE Necks • Divergence Augments • Escutcheons | |
| Reforged Armor Artifact: +1 • iL109 • iL119/+2/+3 Relic: +1/+2 • iL109 • iL119/+2/+3 Empyrean: +1/+2 • iL109 • iL119/+2/+3 |
Guides • Crafting • Trusts • Apex Monsters |
Category:Dynamis - Divergence
|
|
Dynamis Divergence, introduced in the November 10th 2017 update [1], Content Level 139 versions of original Dynamis areas. |
Entry Requirements
- Be level 95 or higher.
- Have completed the mission A Rhapsody for the Ages.
- Be in possession of the permanent Key Item Dynamis - Tavnazia sliver.
- Obtained by defeating at least one of the Dynamis - Tavnazia bosses:
 Diabolos Heart, Diamond, Spade, or Club
- Obtained by defeating at least one of the Dynamis - Tavnazia bosses:
- Purchase the permanent Key Item Empty hourglass from the goblin Aurix in Ru'Lude Gardens (G-8) (near the AH) by trading a single
 100 Byne Bill,
  M. Silverpiece, or
  L. Jadeshell to the ???.
- A player may enter once every 60 hours (Earth Time).
- Aurix is able to tell when the Player may reenter again when selecting to "Ask about time limits with Dynamis (D)" when talking to him.
- You may also check the exact time you are able to reenter by clicking the entrance to Dynamis-San d'Oria [D] at Southern San d'Oria K-10.
- To enter a zone, interact with the corresponding Enigmatic Footprints.
- Parties must be between 3 and 18 players.
- Every party member must have the Empty hourglass key item.
- Trusts may be called.
- Parties must be between 3 and 18 players.
Time Limit
- The initial time limit is 60 minutes (Earth time) and may be extended up to 120 minutes.
- The time limit is extended by fulfilling certain requirements. Currently, the only known time extension is by defeating the zone's mini-boss Overseer's Tombstone, which grants 30 minutes. There is another 30 minute time extension, but there is no known information on how to obtain it. There is a possibility that the 2nd 30 min time extension has not yet been implemented due to a recent post by the SQUARE ENIX development team but take it with a grain of salt.
- Players may leave at any time before time expires by using the
 Black Hourglass temporary item received upon zoning in.
Currencies
 Rusted I. Cards drop from "Squadron" Orcs.
- Aurix trades 100 Rusted I. Card for 1
 Beastmen's Medal
- 3
 Beastmen's medals for 1
  Footshard.
- 2
 Shards are required for upgrading each piece of Reforged Relic Armor +2.
- This will cost 600
 Rusted I. Cards for 6
  Beastmen's Medals
- This will cost 600
- 3
 Shards are required for upgrading each piece of Reforged Relic Armor +3.
- This will cost 900
 Rusted I. Cards for 9
  Beastmen's Medals
- This will cost 900
- 2
- 3
- Aurix trades 100 Rusted I. Card for 1
 Black. I. Cards drop from "Regiment" Orcs.
- "Regiment" Orcs spawn after Overseer's Tombstone has been killed.
- Aurix trades 100 Black. I. Card for 1
 Kindred's Medal
- 3 Kindred's Medal for 1
 Voidfoot.
- 3
 Voidfeet are required for upgrading each piece of Reforged Relic Armor +3.
- This will cost 900
 Black. I. Cards for 9
  Kindred's Medals
- This will cost 900
- 3
- 3 Kindred's Medal for 1
- Between 1 and 4 cards may drop per Orc killed. Treasure hunter affects drop rate.
- Cards can be stolen from Orcs using the Thief job ability, Steal.
Dynamis - San d'Oria [D]

- Entrance: K-10 Southern San d'Oria Home Point #2
- Content Level = 139
- Grants the title: "Dynamis-San d'Oria [D] Trespasser" after Overseer's Tombstone is defeated .
Zone Info
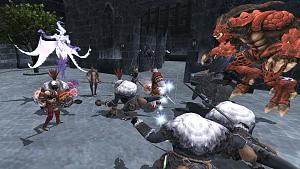
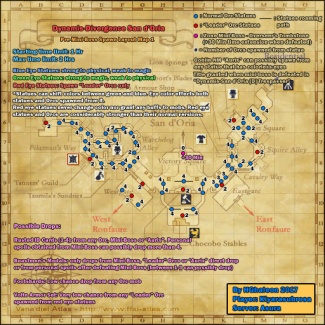
- Zone initially loads out with only statues called "Corporal Tombstone"s. These statues spawn Orcs when aggroed.
- All Orcs are dual job and have access to 1 hr abilities from both jobs. BST mobs may use charm even if a pet is summoned.
- "Squadron" BST Orcs spawn rabbit pets and "Regiment" Orcs spawn coeurl pets.
- Confirmed combinations so far are BST/RNG, SMN/WHM, PLD/DRG, and RDM/RUN. Mobs use all 22 jobs for combinations.
- Statues and Orcs are true sight and link with each other via sight. You may go behind these mobs to avoid aggro.
- As with normal Dynamis, mobs that aggro a player and are within range of other players at time of aggro will immediately attack the next player on the list of hate despite even if that person did not take action against the mob. There is no delay when mobs turn to the next target. Best to keep your distance from mobs so only 1 player is killed in case of aggro or a bad pull to minimize deaths.
- Generally, each statue is able to spawn between 2 and 6 Orcs. It is possible to coordinate pulls to avoid linking.
- Statues have different color eyes which determine the following:
- Blue Eyes: Grants statue and Orcs spawned a high resistance to physical damage but low resistance to magical damage.
- Green Eyes: Grants statue and Orcs spawned a high resistance to magical damage but low resistance to physical damage.
- Red Eyes: Spawns higher level Orcs called "Leaders" which spawn before mini-boss is killed. After mini-boss is killed, red eye statues will spawn "Commander" Orcs. These Orcs are significantly stronger than their normal counterparts with higher defense, attack and HP.
- Zone mini-boss near the entrance to Northern San d'Oria is named Overseer's Tombstone.
- It is best to fight the mini-boss at his spawn area and have the back line party members off to the side to avoid a mass wipe due to statues popping on the ramp after the mini-boss is defeated.
- Black. I. Card start dropping instead of Rusted I. Card after the mini-boss is killed.
- Grants 30 minutes of additional time once defeated.
- May drop up to 3 Beastmen's Medals along with several Rusted I. Cards.
- Personal drops will be gained based on if any party members are gaining the win for the first time.
- This may include Rusted I. Cards and Beastmen's Medals. Spoils vary in number.
- After the Overseer's Tombstone is defeated, all previously spawned statues and Orcs that still remain in the zone will be removed and replaced with new statues which spawn upgraded Orc mobs called "Regiments".
- Halphas, a tri-job (PLD/WAR/DRK) Orc NM will spawn at the Mog House after the Overseer's Tombstone has been defeated. This NM is the true boss of the zone. Upon defeat, he will grant the title: "Dynamis-San d'Oria [D] Infiltrator".
- In the event that you pull a statue that has no color eyes, the Goblin NM Aurix has a chance to spawn.
- He can use Bomb Toss and Frypan and will run away after a period of time so you will need to kill quickly.
- In the event he is not killed and runs away, he has a chance to spawn from another random colorless eye statue.
- There are 2 possible Aurixs in the zone. 1 pre mini-boss kill and 1 post mini-boss defeat.
- Aurix can not spawn again from a statue if he has been defeated for each of the previously mentioned instances.
Drops
- Footshards can uncommonly be obtained directly as spoils from any Orc mob before the mini-boss is killed.
- Void Footwear can uncommonly be obtained directly as spoils from any Orc mob after the mini-boss is killed.
- Any Red eye based statues that spawn the upgraded "Leader" or "Commander" Orcs can potentially drop new pieces of the Volte armor introduced in the November 2017 update. Drop rate seems to be incredibly low.
- Orc Boss Halphas is confirmed to also drop the Volte armor pieces along with Kindred's Medals. Volte armor pieces have a much better chance to drop from Halpas than from "Leader"/"Commander" Orcs.
- Goblin NM Aurix is confirmed to drop Rusted I. Cards, Black. I. Cards, Beastmen's Medals, and Kindred's Medals. Drops are dependent whether the zone's mini-boss is killed or not.
Strategies/Setups
A balanced party of jobs is recommended. One PLD or RUN main tank is sufficient, but a group should bring two just in case. DDs may wish to sub NIN due to mobs and statues attacks hitting quite hard. A main tank for pulling and holding mobs and a 2nd tank for kill order is highly recommended. Puller should potentially be a RUN or PLD to minimize casualties.
One WHM per DD party along with a BRD, COR, GEO and SCH for support and buffing DDs to speed up kills. BLM, RDM, SMN, COR, SCH, BRD, or BLUs are required for crowd control via sleeping and nuking of statues as they are very melee resistant.
Mob killing order is important. SMN mobs should always be killed first to avoid an Astral Flow wipe from awakened pets. NIN mobs are dangerous with Mijin Gakure as it can kill the entire alliance and should be dealt with last. Puller should try to prioritize color eyes on statue to be green or colorless so the orcs spawned are weak to melee or have no bonus on them so that the DDs may dispose of much them easier. Average party size for this event is recommended for 12-18 but can be done with less depending on gear and jobs used.
Alternatively, CORs and RNGs work well on statues for Leaden Salute and Trueflight if you prioritize blue eye statues. It's very easy to one shot them this way.
Subcategories
This category has the following 10 subcategories, out of 10 total.
Pages in category "Dynamis - Divergence"
The following 41 pages are in this category, out of 41 total.
