The Voracious Resurgence | |
| Prime Weapons • Ultimate Weapons • Ultimate Augments • Abjurations iL119 • JSE Necks • Divergence Augments • Escutcheons | |
| Reforged Armor Artifact: +1 • iL109 • iL119/+2/+3 Relic: +1/+2 • iL109 • iL119/+2/+3 Empyrean: +1/+2 • iL109 • iL119/+2/+3 |
Guides • Crafting • Trusts • Apex Monsters |
Category:Odyssey
|
Progression
- There is a time limit of 30 minutes.
- Battle the various foes and various Notorious Monsters among the multiple floors of the instance as you make your way to the exit.
- Interacting with the Veridical Conflux found at the exit completes the Odyssey.
- Running out of time will eject all party members.
- Using the
 Moglophone temporary item will allow you to leave the instance.
- Moglophones will be automatically granted to all players upon entering Sheol.
Moogle Mastery
- After 100+ Nostos enemies defeated, when obtaining a new
 Moglophone, the moogle will unlock the first tier of "Moogle Mastery".
 - Ones Mog Mastery effect is increased:
- Minorly when defeating Nostos Enemies and when opening Chests.
- Largely when opening Coffers.
- Greatly when defeating Notorious Monsters or when opening Aurum Strongboxes.
- The increase increase to Mog Mastery is an ambiguous point system where each of the above actions works towards increasing Moogle Mastery's "meter".
- Such that defeating Notorious Monsters and opening Aurum Strongboxes will increase Moogle Mastery very quickly compared to opening chests and chests alone.
- When a players Mog Mastery increases within Sheol, a message will be displayed stating that "your Moogle Mastery is now XX".
- Only the player opening the Chest/Coffer/Aurum Strongbox will receive the message should their Moogle Mastery upgrade.
- Other players' Moogle Mastery will increase as well, but they won't receive the message in Sheol.
- Up to Tier XV (15) Mog Mastery has been observed.
Mog Mastery Effects
- Mog Mastery will decrease the number of UCNM pop items required to spawn a Notorious Monster in that particular wing of Sheol.
- Each level decreases the required pop items by 1.
- This benefit is specific to the Mastery Tier of the Sheol wing in question.
- If you have Mog Mastery I in Sheol B and Mog Mastery XV in Sheol A. You will receive no required pop item reduction in Sheol B.
- Mog Mastery will increase the strength of Trusts.
- It is currently unknown how this specifically boosts Trusts, as it doesn't increase their HP/MP as per +Level. It is thought to increase their Base Stats and/or their Derived Stats by increasing amounts by tier.
Foes
The various normal enemies that patrol areas within Sheol are all aggressive.
They come in two varieties, all behave accordingly to their real world brethren and take reduced AoE damage similar to mobs in Domain Invasion and Dynamis Divergence.
The HP of foes depends on their level, which increases with each level climbed.
- Sheol A
- ~30,000 to ~65,000 HP
- Sheol B
"Nostos" type
Common enemies that while aggressive, obey the normal aggro rules for their species, plus sight if a species is normally nonaggressive.
- They cluster in groups of 10 mobs.
- The type of which is randomly chosen at the creation of the instance.
- None seem to possess True Sight or True Hearing
- They do not link.
- They are Charmable.
- For every 5 defeated, the player will be granted 1 izzat.
 "Agon" Beastmen type
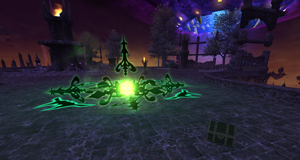
Semi-invisible enemies that cannot be interacted with until their appropriate Agon Halo is destroyed.
- Even though they cannot be targeted, Nostos can and will aggro players before their fetter is destroyed.
- Agon link with each other, but not with their associated Agon Halo.
- Agon possess True Sight and True Sound unlike the "Nostos" type mobs.
- Agon mobs can not be enfeebled via AoE spells in any way before the Agon Halo has been destroyed.
- Using an AoE ability or spell, however, will generate hate on all Again foes as if they were affected by it normally.
- They only appear on floors: 1, 3, 5, and 7 in Sheol A.
- They are found alongside any group of "Nostos" type mobs and do not link with them.
- Floor 7 Agon Beastmen may contain Beastmen Leader type variants in their groups.
- These have access to their appropriate SP Abilities.
- When all are defeated the player will be granted 10 izzat and an Ethereal Junction will spawn in the location of Agon Halo.
- This is used to pop a random Notorious Monster corresponding to the Sheol wing at a cost of 10 izzat.
Notorious Monsters
- Trading UCNM materials to an Ethereal Junction that wants items will spawn a matching NM to the UCNM whose materials were traded.
- Ethereal Junctions spawned from Agon Halos and their accompanying Beastmen demand an izzat payment of 10, and will spawn one of the Notorious Monsters of that Sheol wing at random.
- All Notorious Monsters have access to various SP Abilities.
- In Sheol A, the Notorious Monster will gain an aura after it is used.
- In Sheol B, the Notorious Monster will spawn 2 copies after it is used.
- The copies have less hit points, but provide a buff to the main Notorious monster while they are alive.
- The buff scales with the number of adds alive.
- All Notorious Monsters drop the Lustreless item of that Sheol wing with the possibility to also drop a
 a Lustreless Box of the corresponding Sheol wing when defeated.
 - Once a specific Notorious Monster has been spawned, it may not be spawned again in that same Odyssey run.
Mimics
- A Thief with
 Thief's Tools,
  Living Key, or
  Skeleton Key has a chance to fail and spawn a Mimic NM.
- Skeleton Keys return the lowest failure rate, followed by Living Key, and Thief's Tools.
- Mimics posses high attack and defense, and take reduced damage from magic and skillchains.
- Mimics will use draw in and have rapid hate decay. This causes them to shift targets regularly and draw them in.
- Mimics have an aggro range of 20', and will reaggro the Thief which spawned it, even after a full party wipe and reraise.
- The Thief must never return to within 20' of an idle Mimic or it will reaggro.
- Mimics will not reaggro other party members after a wipe, regardless of their range.
- A Thief may place a party member or Trusts on a Mimic and run away to be defeated by other foes out of range. They may then safely reraise afterwards.
- Mimics in Sheol A will exclusively use Death Trap which is an AoE Stun and Poison.
- Mimics in Sheol B will exclusively use Hell Trap, an enhanced version of Death Trap which also reduces players TP by 50%.
- The stun effect from these moves may be resisted by increasing ones Magic Evasion and with thunder resistance enhancements such as Carols, Runes, and Barthunder.
Sheol A

Sheol A
- Primary Reward:
 Lustreless Scale.
|
Main objective
- Reaching the Otherworldly Portal at the topmost (7th) level will complete the Odyssey.
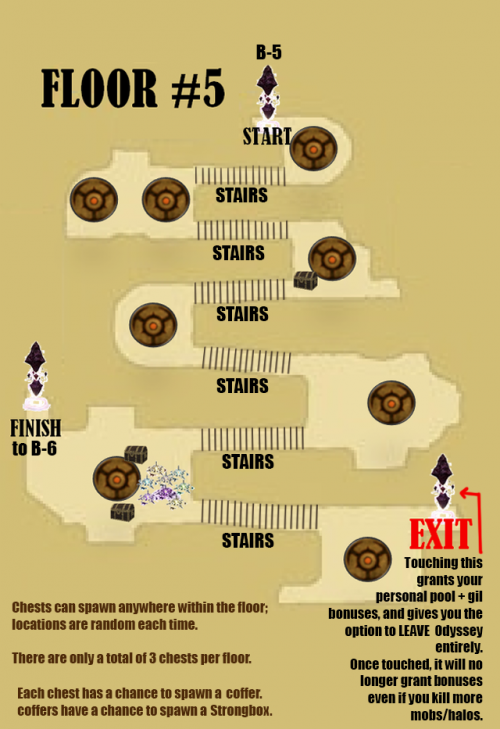
- At the "end" of a floor, there is a Veridical Conflux; examining it warps you to the next higher floor and increases the foes' level by +2.
Additional Objectives
- Complete the of Eminence Objective, Content → Odysssey → Sheol A.
- This is a one time objective and will unlock Sheol B.
- Various Notorious Monsters may be spawned by trading UCNM Materials to various Ethereal Junctions within the instance.
Translocator Locations
- Various Translocators may be discovered along the way. Once registered by examining one, you may warp between them at any point.
- This is not lost or reset when an Odyssey is completed, and may be used to shorten future Odysseys.
- You are unable to use the Translocators if anyone in your party currently has aggro.
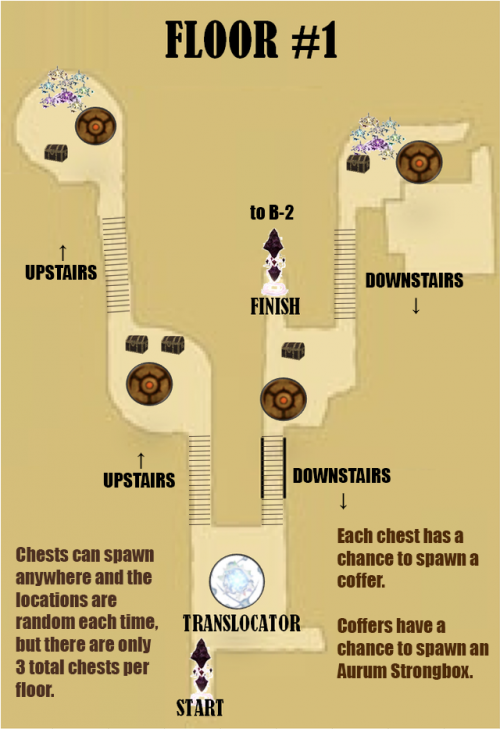
 #1: Near the start on the first floor.
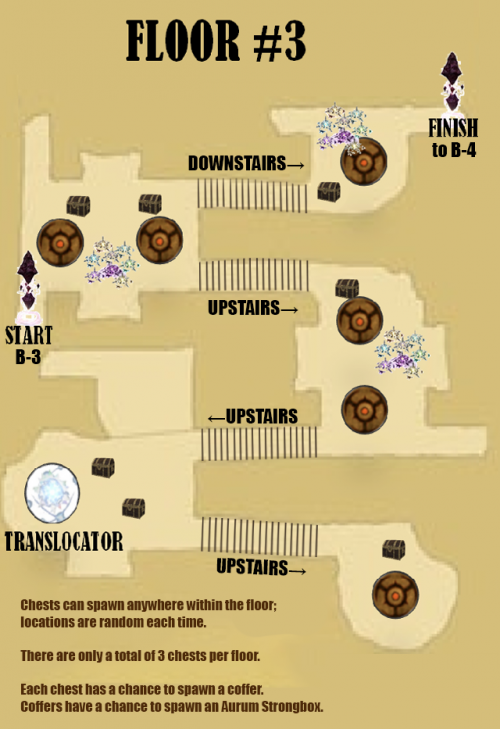
- #2: On the third floor, close to the western side of the large main area.
- #3: On the fifth floor, past the giant doors south of the starting point, and all the way down the stairs.
Sheol A Maps |
|---|
|
|


Sheol B
- Primary Reward:
 Lustreless Hide.
- Note: Players must have completed the Records of Eminence objective; Content → Odyssey → Sheol A in order to enter Sheol B
|
Main objective
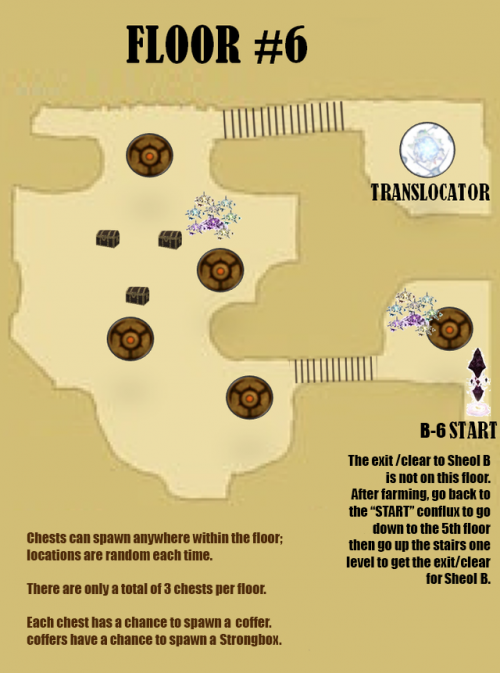
- Reaching the Otherworldly Portal on level 5 will complete the Odyssey.
- There is a floor 6, but there is no exit on this floor. Pay attention to the Conflux you use.
- At the "end" of a floor, there is a Veridical Conflux; examining it warps you to the next higher floor and increases the foes' level by +2.
Additional Objectives
- Complete the of Eminence Objective, Content → Odysssey → Sheol B
- This is a one time objective and will unlock Sheol C.
Various Notorious Monsters may be spawned by trading UCNM Materials to various Ethereal Junctions within the instance.
|
Translocator Locations
- Various Translocators may be discovered along the way. Once registered by examining one, you may warp between them at any point.
- This is not lost or reset when an Odyssey is completed, and may be used to shorten future Odysseys.
- You are unable to use the Translocators if anyone in your party currently has aggro.
- #1: Near the start on the first floor
- #2: On the third floor, south of where you start, hug the right wall.
- #3: On the sixth floor, north of where you start, hug the right wall.
Sheol B Maps |
|---|
|
|


Rewards
- All enemies have a chance to drop Lustreless items.
- Higher level enemies have a higher drop rate.
- Treasure Hunter increases the drop rate of Lustreless items.
- To being augmenting UCNM equipment you must complete the item's corresponding Sheol wing's RoE Quest by examining the exit Veridical Conflux.
- You will need 1,190 Lustreless items (12 stacks and 2 single) to fully upgrade to
 .
.
- Trade 1 of the corresponding Lustreless item, the equipment, and pay the fee of 30,000 Accolades. Unlike the +1 upgrade, there is no game day wait.
- Sheol A related items are Lustreless Scale based.
- Sheol B related items are Lustreless Hide based.
- See the Unity Rewards page for which equipment requires which Lustreless item to upgrade it.
- Sheol A related items are
- You will need 1,190 Lustreless items (12 stacks and 2 single) to fully upgrade to
Individually Issued Rewards
- Successfully reaching the end of an Odyssey, when examining the Otherworldly Portal, rewards the player with an amount of
 Gil and possible
  Lustreless Boxes or
  Large Lustreless Boxes of the Sheol wing.
 - Examining the Otherworldly Portal is when individual rewards are issued, not actually leaving the instance via it; each character must examine it themselves in order to receive their reward.
- Players may not examine the Portal if they are currently receiving aggro.
Sheol A
- Every Nostos Enemy defeated, regardless of floor, adds +5,000 gil to each player's individual reward.
- Every Notorious Monster defeated, regardless of floor, adds +
 gil to each player's individual reward.
 - Defeating 1 Agon Halo and all its accompanying Agon Beastemen adds 1 Lustreless Scale Box to each player's individual reward.
- Defeating 1 Mimic spawned from a chest adds 1 Large Lustreless Scale Box to each player's individual reward.
Sheol B
- Every Nostos Enemy defeated, regardless of floor, adds +6,000 gil to each player's individual reward.
- Every Notorious Monster defeated, regardless of floor, adds + gil to each player's individual reward.
- Defeating 1 Agon Halo and all its accompanying Agon Beastemen adds 1
 Lustreless Hide Box to each player's individual reward.
 - Defeating 1 Mimic spawned from a chest adds 1
 Large Lustreless Hide Box to each player's individual reward.
Izzat
Players will earn izzat, a special currency unique to Odyssey, as they vanquish monsters within.
- Izzat is shared among all party members.
- All Izzat will be lost once your current Odyssey has ended and you leave Sheol.
- Players will receive 1 izzat for every 5 monsters defeated and 10 izzat for clearing a Agon Halo and it's beastmen.
- Izzat is also used to spawn various Notorious Monsters from Ethereal Junctions that are spawned from defeating Agon Halos and their accompanying Beastmen for a cost of 10 izzat.
Chests
- Izzat is used to open the various chests and coffers found scattered throughout the instance and that spawn from defeated enemies.
- Chests can contain multiple Lustreless items and possibly Lustreless Boxes or Large Lustreless Boxes.
- Coffers have a greater chance of rewarding Lustreless Boxes.
- Gold-lined aurum chests contain more scales than ordinary grey chests.
- Only Aurum chests may drop Large boxes.
- The contents of chests are added to the party's treasure pool, not to individual rewards nor directly to the person opening the chest.
- Normal chests (
 ) are opened by spending 10 izzat.
- The izzat cost for opening chests is reduced by 1 for every 10 chests opened in that Sheol wing opened.
- This reduction caps at -5 izzat.
- e.g. with 28 chests opened, the cost to open a normal chest will be 8 izzat, while with 77 chests opened, the cost to open a normal chest will be 5 izzat.
- A Thief with Thief's Tools, Living Key, or Skeleton Key may attempt to open a chest without spending the required izzat; however, this has a chance to fail and consume the tool, or spawn a Mimic NM.
- After opening a normal chest, there is a chance for a coffer (
 ) to spawn that can be opened for 15 izzat.
- The izzat cost for opening coffers is reduced by 1 for every 10 coffers in that Sheol path opened.
- This reduction caps at -7 izzat.
- After opening a coffer, there is a chance for an Aurum Strongbox (
 ) to spawn that can be opened for 20 izzat.
- The izzat cost for opening strongboxes is reduced by 1 for every 10 strongbox in that Sheol path opened.
- This reduction caps at -10 izzat.
- The izzat cost for opening
- The izzat cost for opening
- The izzat cost for opening
- Chests can contain multiple
- Opening a chest with Izzat greatly increases the chance of a higher tier one spawning compared to using keys.
References
- Naming Designation of nonNM Type Enemies (Akihiko_Matsui, Oficial Forums)
- Level Growth of Nostos mobs (ごまだら, 日本語 Twitter)
- Lv131 (Sheol A Floor 7) Nostos Flytrap HP (ごまだら, 日本語 Twitter)
- Nostos Mobs are Charmable (shamgi, FFXIAH)
- Agon Beastmen kill Rewards (Bahamut.Lexouritis, FFXIAH)
- Killing Mimics rewards Boxes at the end of a successful Odyssey (Carbuncle.Papesse, FFXIAH)
- Moogle Mastery Requires NM wins (Ragnarok.Inx, FFXIAH)
- Moogle Master goes up to V (Asura.Geriond, FFXIAH)
- Moogle Mastery VI with only 500 Nostos (Siren.Codegen, FFXIAH)
- UCNM Material Cost to pop NMs (alamihgo, FFXIAH)
