The Voracious Resurgence | |
| Prime Weapons • Ultimate Weapons • Ultimate Augments • Abjurations iL119 • JSE Necks • Divergence Augments • Escutcheons | |
| Reforged Armor Artifact: +1 • iL109 • iL119/+2/+3 Relic: +1/+2 • iL109 • iL119/+2/+3 Empyrean: +1/+2 • iL109 • iL119/+2/+3 |
Guides • Crafting • Trusts • Apex Monsters |
Dynamis - San d'Oria (D)
From FFXI Wiki
| ||||||||||||||||||||||||||||||||||||||||||||||||||||||||||||||||||||
Dynamis - San d'Oria [D]
|
| ||||||||||||||||||||||||||||||||||||||||||||||||||||||||||||||||||
| |||||||||||||||||||||||||||||||||||||||||||||||||||||||||||||||||||
Maps
 
|
 
|
 
|
|
|
Zone Information
| Divergence Statues | ||||||||||
|---|---|---|---|---|---|---|---|---|---|---|
| Zone | Icon & Eyes | Statue and Monsters | ||||||||
San d'Oria |
+25% -75% | |||||||||
| +25% -75% | ||||||||||
| Spawns higher level Orc NMs. These NMs will have access to Orcish Counterstance. Orcish Counterstance: | ||||||||||
All Zones |
Colorless | NOTE: Lacks any nameplate icon.
| ||||||||
- Zone initially loads out with only statues called "Corporal Tombstone"s and the mid-boss, Overseer's Tombstone. "Corporal Tombstone"s spawn Orcs when aggroed.
- All Orcs are dual job and have access to 1 hr abilities from both jobs. BST mobs may use charm even if a pet is summoned.
- Halphas along with "Leader" and "Commander" Orcs have access to their unique family move Orcish Counterstance which is a Counter stance with a high activation rate.
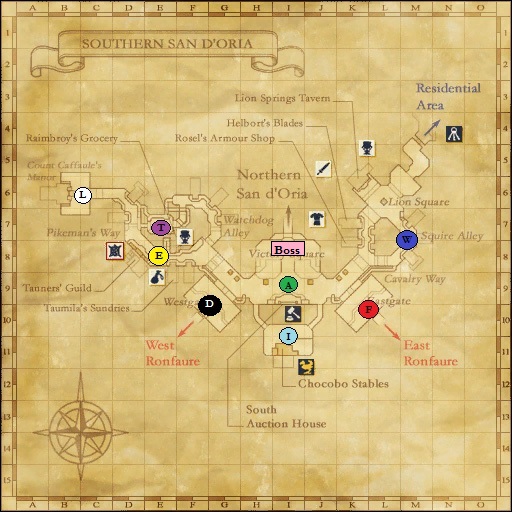
- This zone's mid-boss is near the entrance to Northern San d'Oria (top of I-8 on the map), Overseer's Tombstone.
- Grants 30 minutes of additional time once defeated along with the title: "Dynamis-San d'Oria [D] Trespasser".
- It is best to fight at its spawn area and have the back line party members off to the side as statues pop on the ramp after the mid-boss is defeated.
 Black. I. Card start dropping instead of
  Rusted I. Card after the mid-boss is defeated.
- May drop Beastmen's Medals along with several Rusted I. Cards as personal drops.
- Personal drops will be gained only if party member(s) are gaining the win for the first time. It is possible to not receive any drops.
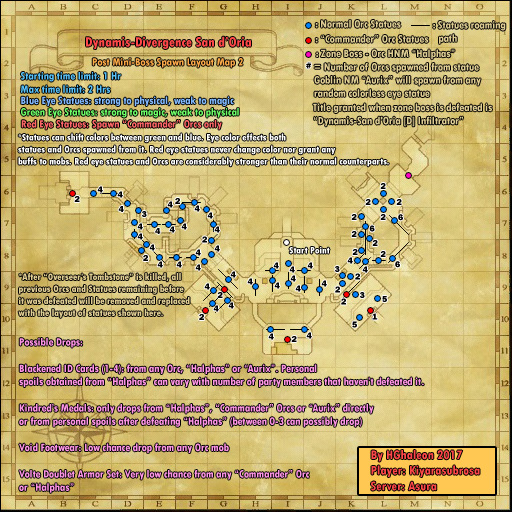
- After the Overseer's Tombstone is defeated, all previously spawned statues and Orcs that still remain in the zone will be removed and replaced with new statues which spawn upgraded Orc mobs called "Regiments".
- Halphas, a quad-job (PLD/RUN/WAR/DRK) Orc NM will spawn at the Mog House (top of M-5) as well. Upon defeat, he will grant the title: "Dynamis-San d'Oria [D] Infiltrator" and an additional 30 minute time extension.
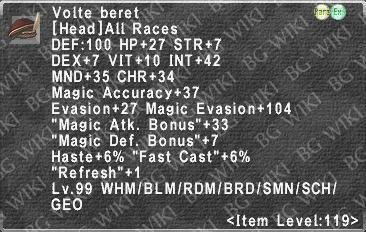
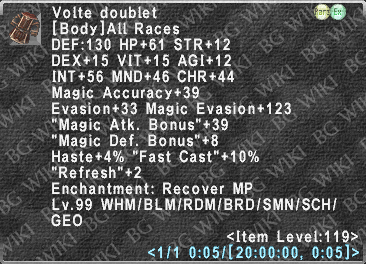
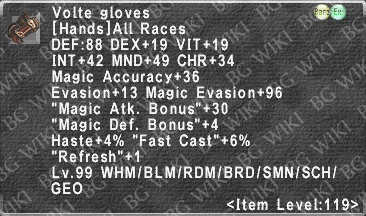
- May drop up to 3 Kindred's Medals along with several Black. I. Cards and Volte Armor.
- Personal drops will be gained based on if any party members are gaining the win for the first time.
- This may include Black. I. Cards and Kindred's Medals. Spoils vary in number. It is possible to not receive any drops.
- Halphas, a quad-job (PLD/RUN/WAR/DRK) Orc NM will spawn at the Mog House (top of M-5) as well. Upon defeat, he will grant the title: "Dynamis-San d'Oria [D] Infiltrator" and an additional 30 minute time extension.
- After the Halphas is defeated, all previously spawned statues and Orcs that still remain in the zone will be removed and replaced with "Volte" Hydra Corps mobs and Elemental "Circle" fetters.
- "Volte" Hydra Corps mobs only have 1 job and can use their respective 1 hour ability.
- "Volte" Ninja's 1 hr ability Mijin Gakure is only single target instead of AOE.
- Disjoined Elvaan, a Hydra Corps Elvaan Fomor NM will spawn near the zone to Northern San d'Oria at I-8 as well. If he along with the other 3 Disjoined NM mobs from the other Dynamis-Divergence zones are defeated, the player will be granted the special title: "Judge, Jury and Executioner".
- May drop up to 3 Demon's Medals along with several Old Identification Cards.
- Personal drops will be gained based on if any party members are gaining the win for the first time.
- This may include Old Identification Cards and Demon's Medals. Spoils vary in number. It is possible to not receive any drops.
- "Volte" Hydra Corps mobs only have 1 job and can use their respective 1 hour ability.
Drops
- Footshards may be rarely obtained directly as spoils from any "Squadron" or "Leader" Orc before the mid-boss is killed.
- Drops correspond to an Orc's jobs.
- "E.g. Squadron Fleetfoot (THF/DNC) drops THF-Footshard and DNC-Footshard"
- Drops correspond to an Orc's jobs.
- Void Footwear may be rarely obtained directly as spoils from any "Regiment" or "Commander" Orc after the mid-boss is killed.
- Drops correspond to an Orc's jobs
- "E.g. Regiment Pugilist (MNK/PUP) drops MNK-Void Footwear & PUP-Void Footwear"
- Drops correspond to an Orc's jobs
- Any "Leader" or "Commander" Orcs that spawn from Red eye based statues:
- These may potentially drop either Beastmen's Medals or Kindred's Medals which are dependent whether the zone's mid-boss is killed or not.
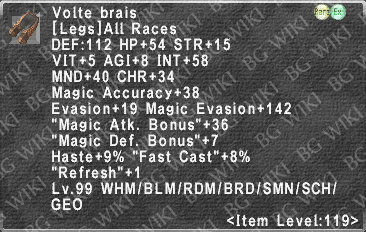
- They may also potentially drop new pieces of the Volte Doublet armor set introduced in the November 2017 update. Drop rate seems to be incredibly low.
- Note that individual spoils gained from either the mid-boss, Overseer's Tombstone or Halphas varies with the number of party members that have not killed either respective mob.
- Keep in mind that this only affects the number of potential drop slots and doesn't guarantee any drops. It's possible for nothing to drop.
- All mobs of wave 3 in including Aurix, "Volte" Hydra Corps Fomors, and Disjoined Elvaan can drop Old Identification Cards and Demon's Medals. The Elemental "Circle" Fetters drop nothing.
NM Locations
Notorious Monsters
| Notorious Monsters | ||||
|---|---|---|---|---|
| Lv. | Name | Genus | Drops | Map |
| Aurix Special: Aggro statues with closed (Grey) eyes. |
Goblin |
Pre Mid-Boss: Post Mid-Boss: Post Wave 2 Boss: |
||
| 139 | Halphas PLD, RUN, WAR, DRK· Zone Boss: Defeat Overseer's Tombstone |
Orc |
Direct Drop Pool: Personal Drop Pool: |
|
| 132 | Overseer's Tombstone Mid-Boss |
Replica |
Direct Drop Pool: Personal Drop Pool: |
|
| 149 | Disjoined Elvaan Disjoined Boss: Defeat Halphas |
Fomor |
Direct Drop Pool: Personal Drop Pool: |
|
| Disjoined Elvaan ??? Special: Spawns from any elemental "circle" fetters in wave 3 |
Fomor |
Direct Drop Pool: Personal Drop Pool: |
||
Adversaries
Strategies/Setups
Setup:
- A balanced alliance of jobs is recommended. One PLD or RUN main tank is sufficient, but a group should bring two just in case.
- Sub NIN for DDs is highly suggested due to mobs hitting quite hard and back to back AoEs from statues and mid-boss may kill them.
- A main tank for pulling and holding mobs and a 2nd tank for kill order is highly recommended. Puller should potentially be a RUN or PLD to minimize casualties.
- One WHM per DD party along with a BRD, COR, GEO and SCH for support and buffing DDs to speed up kills.
- BLM, RDM, SMN, COR, SCH, BRD, or BLUs are required for crowd control via sleeping and nuking of blue eye and red eye statues as they are very melee resistant. Green eye statues are resistant to nukes so it is best to melee them.
- Before the mid-boss you only need a Sleeper (BRD, BLM, SMN, BLU), DDs (any kind), and a Tank. Normally the Orcs die after one Skillchain.
- After the mid-boss it is a better choice to go on blue eyes and when you have a well equipped COR, and you may one-shot the Orcs with a dark Skillchain. If not, a magic burst may do that too.
Strategy:
- Pulling mobs without links is highly suggested to increase survivability.
- Mob killing order is important. Statues should be killed first followed by SMN mobs to avoid an Astral Flow wipe from awakened pets.
- NIN mobs are dangerous with Mijin Gakure as it may kill the entire alliance and should be dealt with last.
- Puller should try to prioritize color eyes on statue to be green so the Orcs spawned are weak to melee so that the DDs may dispose of much them easier. MNK mobs should be tanked by a PLD or RUN due to Hundred Fists or should be stun locked.
- Halphas, "Leader", and "Commander" Orcs should be handled with care as they use Orcish Counterstance.
- Melees are advised to attack from the sides or rear to avoid potential death.
- Average party size for this event is recommended for 12-18, but may be done with less depending on gear and jobs used.
- Done with a party of 8 including 1 tank, 3 DDs, 1 WHM, 1 BLM, 1 BRD and 1 GEO if well geared and coordinated. Mid-boss can prove timely so it is best to go in with at least 15 minutes to spare. Coordinating a 3 step double light or darkness skillchain along with magic bursts from mages is very effective and will shorten the fight by a significant amount.
- Alternatively, CORs and RNGs work well on statues for Leaden Salute and Trueflight if you prioritize blue eye statues. It's very easy to one shot them this way.
