The Voracious Resurgence | |
| Prime Weapons • Ultimate Weapons • Ultimate Augments • Abjurations iL119 • JSE Necks • Divergence Augments • Escutcheons | |
| Reforged Armor Artifact: +1 • iL109 • iL119/+2/+3 Relic: +1/+2 • iL109 • iL119/+2/+3 Empyrean: +1/+2 • iL109 • iL119/+2/+3 |
Guides • Crafting • Trusts • Apex Monsters |
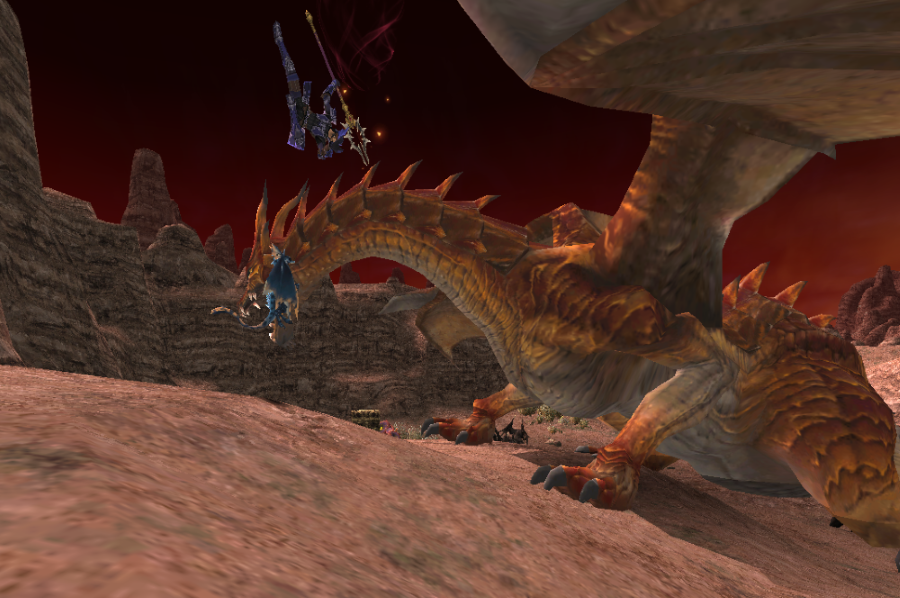
Here Be DRGs
|
|
 | ||||
Forum Thread
![]() See the thread on BG for discussion. Feel free to pop in and ask questions or give feedback.
See the thread on BG for discussion. Feel free to pop in and ask questions or give feedback. ![]()
Podcast: Martel joins Fox and I to talk about DRG. Perhaps if you are considering picking up the job then you might want to listen to it: here, or on any podcast platform.
- This was right before the Gleti's Armor Set or Nyame Armor Set came out. So while a lot of DRGs magic evasion woes were alleviated they are still pretty far below other jobs.
- This was also long before Sortie came out.
Preference
First off, brush up on the ![]() Wyvern (Dragoon Pet) page if you never have. There is information in there that I brush over because it is already in there.
Wyvern (Dragoon Pet) page if you never have. There is information in there that I brush over because it is already in there.
For the past several years this job has lacked a guide, and it has been harder for curious players to learn about it. Basic questions about subjobs, weaponskills, or the position of DRG in endgame goes unmentioned.
To be fair I was just going to put some basic sets on a page and call it a day, but that just didn't feel right, and a couple weeks later here we are.
Why DRG?
So in a world where DRK, WAR, and even DD Runefencers exist. Why would you want to be a Dragoon? Personally, my reason is simply because I can.
Dragoon excels in low-to-mid level support situations. It sports a higher Weaponskill frequency over other jobs along with defensive abilities that heavier DDs lack.
Pros:
- Tied with DNC and RUN for the second highest natural accuracy thanks to Accuracy Bonus traits.
- Piercing damage is the most frequent physical weakness in the game.
- Caps Attack Speed more easily than any other two-handed weapon user thanks to Wyvern bonuses along with Hasso from subbing SAM.
- Wyvern benefits come with no direct drawbacks, can not be dispelled, and may be maintained fulltime. Wyverns are also rather resilient on their own thanks to their native -40% Damage Taken (DT) which helps to soak up AoE damage and abilities. Wyvern bonuses as well as other defensive options provide a Dragoon better survivability over other damage dealers.
- Obviously proficient at combating dragons. Ancient Circle and Dragon Breaker are solid tools.
- Leg Sweep has a ridiculous stun duration and Sonic Thrust is easily the most powerful physical AoE Weapon Skill available to players.
- Possesses two separate abilities to reduce enmity. Super Jump is the only ability in the game that provides complete immunity from any and all attacks.
- Restoring Breath is available regardless of the player's support job and provides a free 2,000+ HP restoration to any party member when properly geared.
- Your wyvern will always be your friend if no one else is.
- Has access to three of the four level 2 Skillchain properties natively with the fourth provided via the Relic Polearm. This makes a DRG excellent at skillchaining for extra damage.
- A DRG in possession of the Aeonic Polearm will have access to what is possibly the strongest 4-step skillchain in the game as well as the ability to easily close Umbra or Radiance level 4 skillchains.
- Spirit Surge combined with Fly High can provide a nice emergency boost of damage via the capped Job Ability Haste, STR and Accuracy bonus, -20% defense down, and TP reduction effects added to Jump and High Jump. These also can't miss during the duration of Spirit Surge.
- Angon provides an unresistable -25% defense down effect. When combined with other defense down debuffs this may allow you to cap your Attack to Defense ratios (PDIF) without having to resort to abilities such as Bolster or Soul Voice.
Cons:
- Similar to Samurai, Dragoon's weaponskills are weaker than that of other DDs, but sport great Skillchain compatibility. You will be pushing quantity over quality.
- For example Great Sword is absolutely horrible for self skillchaining with itself on a job like Warrior or Rune Fencer, but Resolution goes completely bananas with damage when it is buffed up in endgame.
- The loss of your wyvern eliminates a great deal of your DD power.
- The wyvern is on a long 20 minute cool down.
- Keeping the wyvern alive via Spirit Link or Dawn Mulsums (if required) will cost you in DPS.
- In high level support situations it has less power potential than that of other heavy DDs. Which is the reason DRG isn't bandwagoned.
- Then again people Bandwagon BLU and try to take it to the same high level situations over heavy DDs so why not?
- The Dragoon specific armor is very purple, if that isn't your thing. Puppetmasters Summoners, and Beastmasters also have more pets to be friends with than you do.
Roles
As a DRG your primary role is to DD with the formation of optimal Skillchains.
As a secondary role you are capable of subbing mage to trigger Healing Breath from your wyvern, but in an era full of Trusts this is generally unnecessary.
Abilities and Traits
| Job Traits | |
|---|---|
| Lvl. | Name |
| 10 | Attack Bonus I |
| 20 | Strafe I |
| 25 | Dragon Killer I |
| 30 | Accuracy Bonus I |
| 30 | Damage Limit+ I |
| 40 | Strafe II |
| 40 | Smite I |
| 45 | Conserve TP I |
| 45 | WS Damage Boost I |
| 55 | WS Damage Boost II |
| 58 | Conserve TP II |
| 60 | Accuracy Bonus II |
| 60 | Strafe III |
| 60 | Damage Limit+ II |
| 65 | WS Damage Boost III |
| 71 | Conserve TP III |
| 75 |
Empathy |
| 75 | WS Damage Boost IV |
| 76 | Accuracy Bonus III |
| 80 | Strafe IV |
| 80 | Smite II |
| 84 | Conserve TP IV |
| 85 | Critical Defense Bonus I |
| 85 | WS Damage Boost V |
| 86 | Dragon Killer II |
| 90 | Damage Limit+ III |
| 91 | Attack Bonus II |
| 95 | Critical Defense Bonus II |
| 95 | WS Damage Boost VI |
| 97 | Conserve TP V |
| Job Ability | ||
|---|---|---|
| Lvl. | Name | Equipment of Note |
| 1 | Spirit Surge | 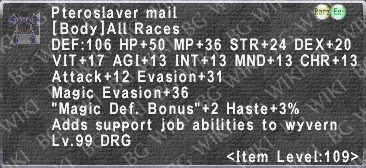 |
| 1 | Call Wyvern | |
| 5 | Ancient Circle |  |
| 10 | Jump | See Jump Sets Blow |
| 25 | Spirit Link | 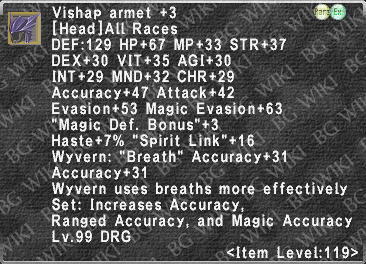   |
| 35 | High Jump | See Jump Sets Blow |
| 50 | Super Jump | |
| 65 | Spirit Bond | |
| 75 |
Deep Breathing | 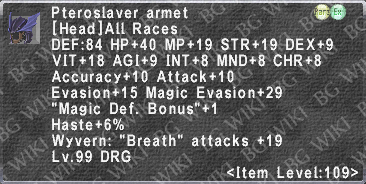 |
| 75 |
Angon |   |
| 77 | Spirit Jump | See Jump Sets Blow |
| 85 | Soul Jump | See Jump Sets Blow |
| 87 | Dragon Breaker | |
| 96 | Fly High | |
| Pet Command | |
|---|---|
| Lvl. | Name |
| 1 | Dismiss |
| 90 | Smiting Breath |
| 90 | Restoring Breath |
| 95 | Steady Wing |
Apache, Jump On It!
Understanding your jumps is a fundamental part of playing DRG.
Due to Job Ability Delay, Jumps should be used to reach 1,000+ TP. Otherwise you suffer a two second delay to your auto-attacks.
Which jumps to use:
- All of the above! As of the January 2019 update, all timers are now separate for jump. Ru~ules out [the window], fo~r-ever!
- Jump and High Jump:
- While
 Spirit Surge is active, additionally:
- Jump lowers the target's defense (-20% for 1 minute, does not stack with, but overwrites Angon).
- High Jump lowers the target's TP proportionately to the amount of damage dealt (TP is reduced by damage × 2).
- While
- Spirit Jump and Soul Jump
- These are the bees knees while your wyvern is alive as they will offer double and triple TP return.
- Super Jump usage is obvious; when you don't want hate. It also reduces the enmity of the player behind you during Spirit Surge.
- Super Jump can also be used to avoid or stop TP moves, if timed properly.
- During Spirit Surge, it will also reduce the enmity of the nearest target behind you by 50%.
- Not sure of the distance limit on this, but be sensible.
Spirit Surge and Fly High:
- Spirit Surge would be a lot more useful if the wyvern timer wasn't a lifetime away. With the old Adoulin era change of the wyvern's presence granting buffs to you it has really lost it's shine.
- You lose the superior wyvern buffs upon the use of Spirit Surge as well as the superior TP gain from Spirit/Soul jump despite the fact your Jumps won't miss with Surge active.
- So in order to realistically gain the most use from this ability it is best reserved for when your wyvern timer is not ready and you are in imminent danger of losing your wyvern. This will eventually happen, and this way you may at least maintain some buffs.
- It isn't useless by any means, but it certainly isn't Mighty Strikes or Yaegasumi.
- So in order to realistically gain the most use from this ability it is best reserved for when your wyvern timer is not ready and you are in imminent danger of losing your wyvern. This will eventually happen, and this way you may at least maintain some buffs.
- Fly High is at least more useful, although still leaving something to be desired. A minute duration would have been more appropriate given the cool down of jumps with it active is still 10 seconds for a 30 second duration.
- So, stand out situations for this would be to eat up your jump timers as it resets them and:
- You just want a bit more DPS.
- You are not capping haste and/or attempting to skillchain.
- You just used Spirit Surge and might as well.
- High Jump under this situation is nice for lowering the TP of the enemy, and certainly one of the best perks against certain opponents.
Buffs to Jump:
- Jump is affected by Double Attack, Triple Attack, Multi-Hit Weapons (like the Aftermath from Ryunohige), Additional Effects, and En-spells.
- In the case of multi attack procs you will also gain extra TP.
- Relic and Empyrean weapons reportedly do not proc extra damage on jumps, womp-womp.
Jumps and Jump Bonus Gear
Jump bonus gear and the text accompanying it has been inconsistently implemented over the years and does not always work universally.
- "Jump: TP Bonus" equipment only affects the first hit of Jump and High Jump.
- "Jump: Double Attack" equipment works with all jumps.
- "Jump: Accuracy" equipment is assumed to work with all jumps.
Equipment particulars include the following:
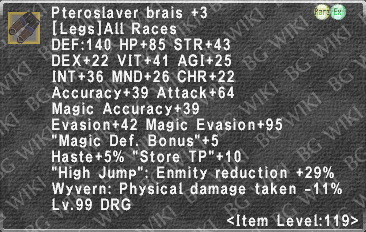
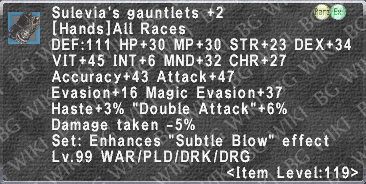
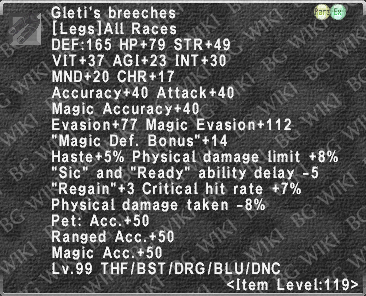
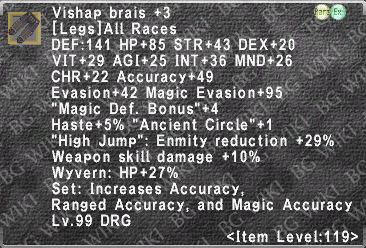
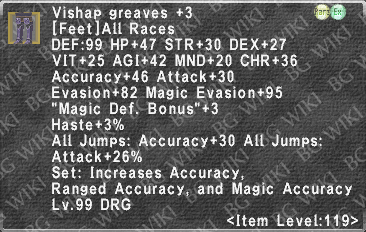
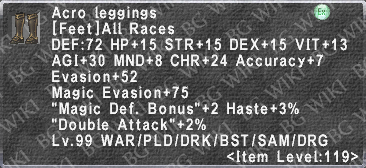
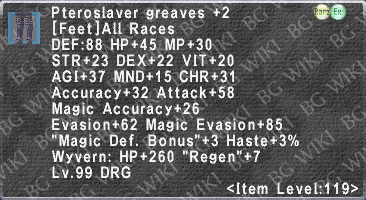
 Vishap Greaves, +1, +2, +3 only affect Jump.
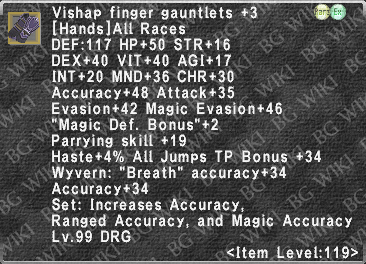
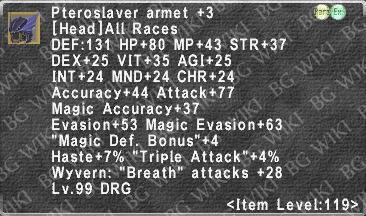
 Pteroslaver Brais, +1 , +2, +3 only affect High Jump.
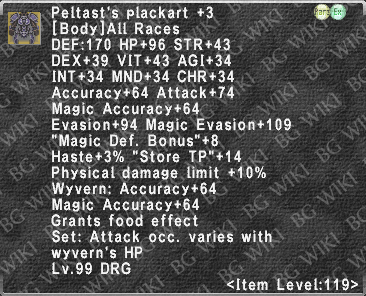
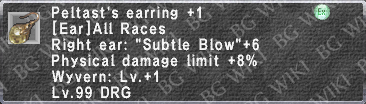
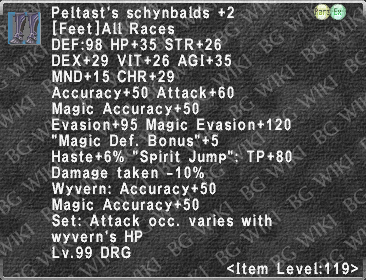
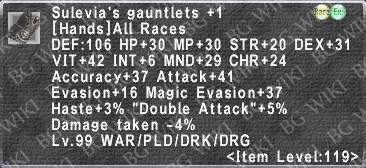
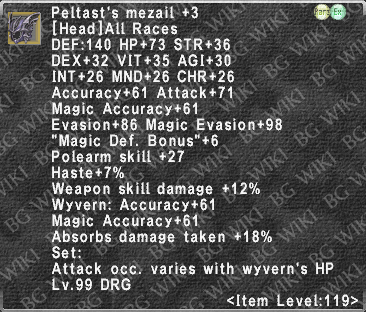
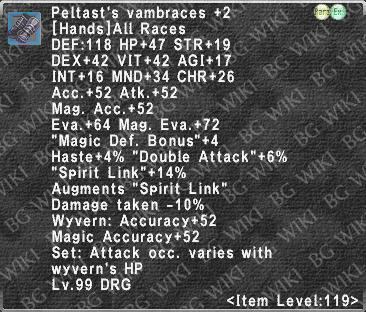
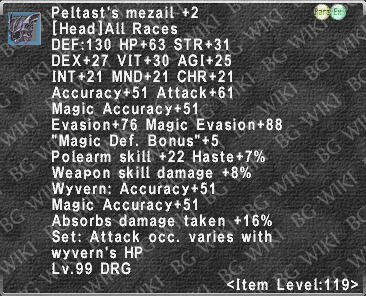
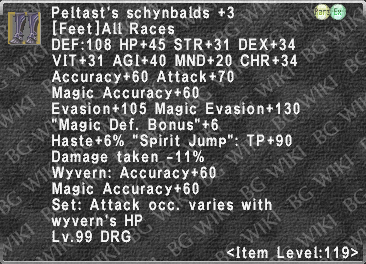
 Peltast's Schynbalds +1 only affect Spirit Jump.
 Peltast's Cuissots +1 only affect Spirit Jump and Soul Jump
Merits
| Group 1 | |||
|---|---|---|---|
| Name | Description | Level | Notes |
| Ancient Circle Recast | Shorten recast time by 10 seconds. | 0/5 | |
| Jump Recast | Shoten recast time by 2 seconds. | 0~5/5 | Applies to both Jump and Spirit Jump. |
| High Jump Recast | Shorten recast time by 4 seconds. | 0~5/5 | Applies to both High Jump and Soul Jump |
| Super Jump Recast | Shorten recast time by 6 seconds. | 0/5 | |
| Spirit Link Recast | Shorten recast time by 3 seconds. | 0~5/5 | While Jump 5/5s are an offensive boost, Jump itself becomes a small gain while capping haste. The real value in jumps is while slowed, continuing or boosting SCs, maintaining AM, or shedding enmity via High Jump, and not as an endgame DPS weapon. By contrast the 15 seconds off Spirit Link, especially over the course of a longer fight with AoEs may very well save your wyvern which is worth more than Jumps. |
| Group 2 | |||
| Name | Description | Level | Notes |
| Deep Breathing | Enhances effect of next wyvern breath. Recast: 5min Enhance effect by an additional 10% |
0/5 | There is really only one choice to make here, and this is not part of it. |
| Angon | Expends an angon to lower an enemy's defense. Recast: 3min Increase defense down duration by 15 seconds. |
5/5 | |
| Empathy | Copies beneficial status effects to wyvern when using Spirit Link. Increase number of copied effects by 1 and experience points obtained by 200. |
5/5 | An absolute must. Allows your wyvern's maxed parameters with a single Spirit Link. |
| Strafe Effect | Increases accuracy of wyvern breath. Increase accuracy by 10. |
0/5 | |
Support Jobs
|
Weaponskills
Polearms:
Unlike certain jobs where you only spam one WS, Dragoon has several to gear up and use many. Mostly due to skillchaining which is covered next.
- Stardiver - Our strongest WS outside of a few situations. If you can't form a SC due to being surrounded by DDs then you just spam this. The damage on your Stardivers will go up significantly with proper gear and buffs compared to being solo.
- Drakesbane - When properly geared and using a Ryunohige, this will actually do more damage than Stardiver. Otherwise for ordinary weapons it will not. Drakesbane stands out for damage in Abyssea (not that it matters anymore) and the fusion skillchain property attached to it. Otherwise Drakesbane suffers from ~19% attack penalty and a lower modifier than Stardiver.
- Camlann's Torment - Another WS that sports solid WS properties. Any very old DRGs will understand when I say that this is just an upgraded version Wheeling Thrust. As such it sports the same uses. Outside of SCing this WS is to be used when you are underbuffed. Which is not to be confused with simply lacking buffs which still leads to Stardiver more than Camlann's. This means against evasive targest where hits of Stardiver are missing and/or very defensive enemies. Otherwise Stardiver overshadows this significantly.
- Sonic Thrust - Similar to Camlann's without the defense penetration, but on a very narrow conal AoE. This is actually the strongest physical AoE WS in the game. It is also used to create a darkness multistep with Stardiver. Meaning you need to gear it to go romp around on things solo.
- Impulse Drive - You don't need to quest it. Shining One (see weapons below) will provide it to you.
Staves:
- Retribution - This is our best staff weapon skill over Full Swing. Retribution gains a nice 50% attack bonus with better skill chain properties. Just use the same gear set for this that you do for Sonic Thrust.
- Shattersoul - Really "meh" on DRG, but used to skillchain with Retribution. The modifier is purely INT so honestly I would just forget about maxing it with yet more gear and use the same set you do for Stardiver with SC damage gear on top of it.
Skillchains
No DRG is complete without some Skillchain Knowledge.
SCing is important due to all the extra damage it provides, much more than your weapon skill itself will do. Multistepping, or creating multiple skillchains off of previous skillchains increases the damage of a skillchain more and more each step. The window to create another step becomes shorter and shorter after each. Initially the window for a skillchain starts at 10 seconds between WSs to count. Each step reduces that time down by about 2 seconds until reaching 3 seconds.
Overall thanks to Spirit, Soul Jump, and Spirit Link it is easy to multistep by yourself.
All primary WS properties are used first to create a SC, and if no SC is created then secondary properties are used.
- So if s WS has a secondary property you wish to use. It won't work unless the primary property is not utilized to make a SC first.
Level 1 → 2:
 Liquefaction →
  Impaction =
  Fusion
 Induration →
  Reverberation =
  Fragmentation
 Detonation →
  Compression =
  Gravitation
 Transfixion →
  Scission =
  Distortion
Level 2 → 3:
- Gravitation → Fragmentation = Fragmentation
- Distortion → Fusion = Fusion
- Fusion → Gravitation = Gravitation
- Fragmentation → Distortion = Distortion
- Fusion ↔ Fragmentation =
 Light
Light - Gravitation ↔ Distortion =
 Dark
Dark
Level 3:
- Light ↔ Light = Light
- Dark ↔ Dark = Dark
Empyrean and Relic WSs are the only WSs with a level 3 (light or dark) property. These may be used to create light and dark with themselves.
- Under Aeonic Aftermath all merit WSs gain a light or dark property too allowing for level 3s while it is active.
You may make a double light or dark SC, but this must be done with a level 2 → 3 resulting in light or dark and then a relic or empyrean level 3 WS following it to create the second light or dark.
- Level 3 skillchains can not make double light or darkness off of themselves.
Suggested Skillchains
 denotes the need of Trishula to continue the SC.
 denotes the need of Gungnir to continue the SC, and is more of a courtesy inclusion.
Dark
- Stardiver → Camlann's Torment = Fragmentation → Geirskogul = Distortion → Stardiver = Dark
- Stardiver → Sonic Thrust = Distortion → Stardiver = Dark →
 Stardiver = Umbra
- Penta Thrust → Stardiver = Transfixion → Sonic Thrust = Distortion → Stardiver = Dark → Stardiver = Umbra
- This just adds the option of extending your SC one addition step for more damage as Stardiver already has a secondary property of Transfixion.
Light
- Camlann's Torment → Drakesbane or Wheeling Thrust = Light → Camlann's Torment or Geirskogul = Light
- Stardiver → Camlann's Torment = Fragmentation → Drakesbane = Light → Camlann's Torment = Light ( creates Radiance instead of double light)
- Stardiver → Sonic Thrust = Distortion → Drakesbane = Fusion → Stardiver = Gravitation → Camlann's Torment = Fragmentation → Drakesbane = Light → Camlann's Torment = Light
- Geirskogul → Drakesbane = Fusion → Stardiver = Gravitation → Camlann's Torment = Fragmentation → Drakesbane = Light → Camlann's Torment = Light
Staff
- Retribution → Shattersoul = Induration → Retribution = Fragmentation
- That is about it, Staff gets crap weapon skill properties.
- Shattersoul → Full Swing = Impaction → Full Swing = Liquefaction → Full Swing = Fusion → Shattersoul = Gravitation
Equipment
Weapons
If it isn't listed here then don't bother with it!
|
There is a set for Shining One Impulse in the gaggle of sets below.
Staves come into play generally for AoE magic damage or Undead. Corses, Skeletons, Narakas, Yggdreants, etc all have a -50% damage taken to piercing. The undead variety also have a +25% weakness to blunt damage.
Otherwise, despite how gross it can feel to use this weapon as a DRG. As without the TP Bonus of a Blurred Shield +1, losing delay cap, lacking nearly any SC options, watching as your TP gain and Jumps sputter compared to a polearm. However, the job is rather well suited to utilizing it as an important utility option.
|


Ultimate Weapons
Augment Rank 0
|
Rather than amend the entirety of this to suit REAMD Rank 15 augment weapons. I figured it make sense to leave the info for both. Afterall, the target audience of the guide likely needs this info as much as what proceeds it. |
| Gungnir is third in the hierarchy of non-augmented Ultimate Weapon polearms and dead last in the R15. From a devils advocate position this can be said of it: The defense down proc may be helpful to party damage as may be the accuracy boost from Afterglow. After all, we aren't always playing in these perfect or rightful situations people argue over online.
| |
| Aside from even the fact that Farsha receives STR for it's split property weapon skill and Rhongomiant does not, this is still a great weapon, and comes in at #2 in the ranks. Unfortunately while it wins on spreadsheet paper it doesn't beat a Trishula in reality or via the simulator unless some uncommon or unrealistic situations occur:
No, the 50 VIT doesn't "count for something" as people who really want to like this may grasp at, and no the Afterglow really doesn't help anyone unless they use a critical hit weapon skill with no AM of their own overwriting it. This weapon has a wider variance in it's final DPS than Trishula due to the AM3 so a tie is ultimately a loss in those two ways.
| |
| Stardiver is overall our best weapon skill, and this weapon is the best for spamming it. That is right this weapon is the wyvern's meow (they meow, right..?) and really brings the DPS and skillchaining house down upon the mobs. Not only does the weapon provide the ability to create Umbra and Radiance, a feat which Dragoon may do solo thanks to Jumps, Wyvern Haste, and Spirit Link. However, (with AM active) it allows for spamming darkness over and over via Stardiver spam. With skillchains taken into account this weapon should defeat any other. Succeeding in this is a different matter entirely when you have several DDs all weapon skilling at once though, but even then SCs do happen regardless.
| |
| Once our mightiest weapon to rule them all, but now arguably it is the worst R0. It is still better than ordinary weapons, but time has not been kind to Ryunohige. Job Gifts have increased our native double attack by 15%, and over time better multiattack gear has also put a large dampening on the Aftermath effect for which this weapon is known. Not that it was a nail in the coffin either, but Fighter's Roll (as well as COR) is more common now than it used to be before Geomancer existed. In the end the lower base damage on the weapon after all of this is it's own undoing.
| |
Augment Rank 15
|
Running with the big boys and the gil buyers. |
| Back to the bottom of the pile, old friend. The R15 update was not kind to Gungnir. Between Gungnir and Mjollnir are we really to believe the all father, god of death and wisdom, can't make a better ultimate weapon? Gone is the accuracy bonus advantage as Aram snuck into Gungnir's house and ate it's lunch. Even Trishula has a large accuracy bonus now, and both weapons (especially Trishula) are significantly ahead of Gungnir. Lets also take a moment to laugh at how puny a 5% DA bonus from AM is. Not only does Aram gain a large constant attack boost free from AM, but it has a 50% chance of follow up attack. So if you suddenly had 100% DA then you would still have another chance for yet another attack on top of that. But On paper the defense down bonus is a better idea than in reality. The reality being that it has little practical use. Go ahead, disagree with me in the DRG thread, but really when is Gungnir's defense down ever seriously important outside of making up for poor planning? The only real factor left is Geirskogul, and the need to go out of your way to make the most of this weapon. Even if that was putting out better numbers than Camlann's Torment, at least that skillchains with itself. This is not to say there is no niche left to scratch here, but you really need to go out of your way. The final nail in the coffin for Gungnir is not how useful it may or may not be for DRG. It is the fact that for all the gil you are spending, you could have skipped all the trials and hassle to buy an Aram. | |
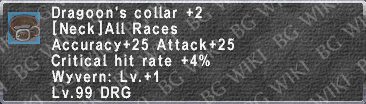
| Remember when I bemoaned the lack of STR on Rhongomiant? Well, SE said "hold my beer" and tossed 20 on. What a swell bunch of guys. Isn't that right, Gungnir? Oh, wai-
If you are indeed using this weapon at R15 then don't be shy about spamming lights with Camlann's over missing out on skillchains with Stardiver. Situationally, of course as are all things, but Camlann's is certainly no slouch with your wyvern alive and this weapon at R15. At any rate, Trishula and perhaps even Ryunohige both got the better end of the deal overall. So what was once said still applies. This weapon is no better than #2 now in bad situations and perhaps even #1 with the absolute worst of buffs. Even worse is it falls to #3 now in the best of situations. Unless you need to find a new hobby, is that really what you would put time into? So, why, right? Well, Physical Damage Limit is why. Once you cap pDIF, our new trait as well as the Dragoon's Collar +2 sees the weaponskill damage from Rhongo fall far behind that of Stardiver with Trishula or Drakesbane with Ryunohige. The best Rhongo offers up now is use for when you aren't capping attack, cap accuracy, but still just loses to Trishula anyway without SCs. So let's call this our struggle weapon! As in I struggle to see ever wanting it. It is still always better than Gungnir or Aram, but once again why even bother? | |
| Float like a butterfly, and Stardiver like a bee. Trishula is the all around undisputed heavyweight champion of the world. You should always imagine it speaking to any detractors in a manner similar to that of Richard Sherman, Mohammed Ali, or Rick James.
Don't you ever try Trishula with those sorry polearms. It is so bad it makes medicine sick. It is one of the baddest motherparses of all time. | |
| Well, well, well, look what the cat dragged in. From last to first, second, third, or even fourth. What a whacky ride for this weapon. As you may know, all of these rankings include the right equipment and appropriate swaps. None of this means anything if you used each weapon with the same set. Each weapon was is simulated in various likely situations and with various buffs to test how things turn out. Thanks to the Collar +2, PDL trait, newer crit equipment, and the huge boost from R15 Ryunohige gained. It may narrowly come out ahead of all options spamming Drakesbane with capped attack, the right gear, and Samurai Roll without Fighter's Roll. In which case we invoke the "SKILLCHAIN DAMAGE!!!11" as well as plain old "human error" clauses and all is right in the world again. It is with the loss of capped attack, and thus the large gains from Physical Damage Limit+ as well as the attack penalty of Drakesbane (still the right choice for this over Stardiver) that we see a sharp decline back to #3/4. With even Aram (B) potentially overtaking it while Rhongo firmly steps into the #2 spot. That synopsis is all with Chaos/Sam roll on which is a standard for these situations and with how massively popular COR is now. So it is because all the aforementioned as well as the reminder that modern day multiattack gets in the way of the AM on this weapon where as it helps all the others. | |
| Path B, there, your question has been answered and you may close the guide now.
As mentioned, this polearm is a solid performer over Gungnir and sometimes Ryunohige, but comes behind the rest. It cuts out all the hassle of trials and everything that comes along with that. Even better, you could argue it is somewhat free to upgrade. Oh, and yes, This should beat your Shining One, but it is up to you at that point if you want to invest into this or just make an Aeonic or Mythic. You certainly could SC with an Aram better than a Rhongo or Shining One would for sure, thanks to the follow up attacks, and that is worth something if you make the most of it. |

Armor
| Haste Caps: | ||
|---|---|---|
|
|
|
| JA Hastes: | ||
|
|
|
|
Overall delay cap -80% | ||
Common scenarios:
- 1) Capped magical haste, Hasso (10% JA), and your wyvern (10% JA) at max paramaters you only need 17% in gear haste to cap delay.
- With capped JA Haste (DNC or Spirit Surge) you only need 12% in haste gear to cap delay.
- 2) Only 30% (Haste II) magical haste and capped JA delay allows you to cap delay with 25% gear haste.
- Otherwise you probably aren't capping delay. See: Attack Speed.
The following sets assume capped haste.
Gearing DRG for Max DPS is not black and white as situationally several things may change the "best" sets. Certain weapons favor more STP than multi attack and vice versa. Frequently one piece of equipment may be the best and after changing another slot it no longer is. Corsair buffs alter the landscape significantly too
TP Sets
All tiered sets are run through the spreadsheet as /SAM, capped accuracy and haste, -52% defense down on the mob, and with no attack buffs at all unless stated.
- All rolls are on their lucky value. None of this 11 or bust shit.
- The Stardiver tier was run as the WS set to the corresponding TP tier set.
- Sometimes a slightly weaker choice was made due to assumed situational needs or the players position in the game at that point.
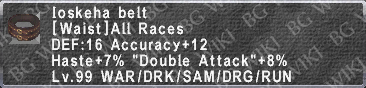
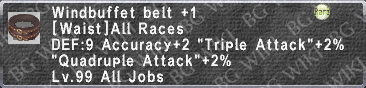
- Often I chock this up to being better on paper than in reality. I could make some example here with Windbuffet +1 vs Ioskeha +1, but you are already likely scrolling through this guide to the equipsets so who cares?
| TP sets abide with the following criteria: | ||
|---|---|---|
|
| |
- Overall I wouldn't recommend obsessing over STP for x-hit builds. Best in slot pieces of gear are often still the best even if they break your build.
- Stardiver benefits from TP overflow and DRG has a 26% chance of Conserve TP procing on a WS which distorts the value of STP as well.
Somewhere around as close as 80% of your overall damage is in your weaponskills, and sometimes boosting your WS damage over maintaining a build is more beneficial. This is whatspreadsheetingguestimating is for.
For high end min/maxing everything is in flux based on your situation, buffs, weapon, and the opponent. There is no definitive best answer here, but you can get best guesses by spreadsheeting and simulating the gauntlet.
- Stardiver benefits from TP overflow and DRG has a 26% chance of Conserve TP procing on a WS which distorts the value of STP as well.
|


Ultimate Weapon TP Sets
Unlike the max tier, these are run with great, but not perfect augments.
- Mid-buffs: Run against Warder of Courage's assumed stats with capped delay, -54% Defense, Capped Accuracy, Honor March, Valor Minuet V, and entrusted Fury. No Rolls
- Spreadsheeted with the max tier Stardiver sets; Ryunohige uses the max Drakesbane sets.
- Max-buffs: -83% Defense, Soul Voice, +7 Samurai (II), and Fighter's (V) rolls on top of the Mid-buffs.
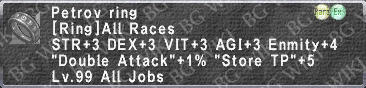
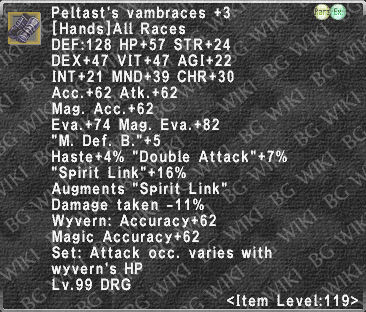
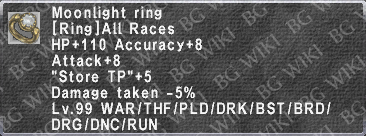
- Some choices were made for practical reasons. Ptero Brais over Valorous or Moonlight Ring over Petrov for survivability.


|
TP Accuracy Sets
- Based on the Trishula Ultimate Weapon Mid-buff set.
- Your base set nowadays has so much accuracy that you only manage relatively small gains for large DPS and DT drops.
- Carry acc food, but get better buffs at this point.
|

Jump Sets
General Note: As long as you use the main Jump+ pieces listed in these sets then simply using the rest of your TP gear is fine, and the correct move.
- You are picking up peanuts here outside of Jump specific pieces. Changing suboptimal pieces for optimal ones results in about 0.5-4 DPS a piece.
- STP is generally more important for jump than multiattack is. Your DPS matters more than your Jump damage.
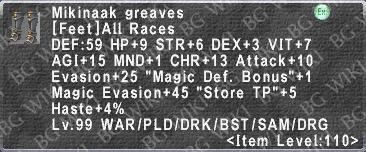
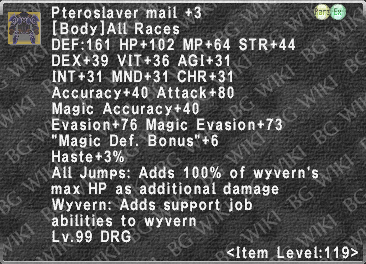
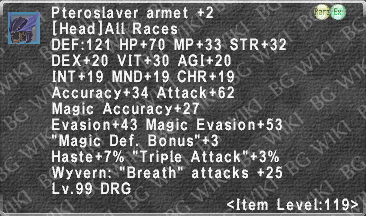
![]() Ptero Mail +3:
Ptero Mail +3:
- Is an optimal choice for Jump/High Jump.
- Due to the double/triple TP gain on Spirit/Soul jump it is a good competitive option.
- Probably your best bet for Spirit Jump.
- I would never use it for Soul Jump. The TP bonus is too great to not maximize.
|
WS Sets
Stardiver Sets
Note: The ![]() Gavialis Helm
Gavialis Helm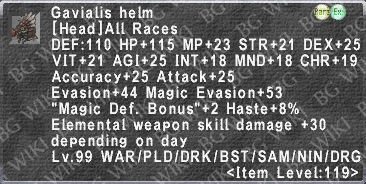 is an amazing piece for newer or DRGs still working on their sets. It is easy to obtain, and lasts for awhile for Stardiver.
During the applicable days it is like wearing a more powerful Elemental / Fotia Belt with stats on your head.
These days are earthsday, lightsday, and darksday.
During Trishula aftermath this helm does not extend to watersday and iceday.
However, Gavialis is eventually replaced:
- If you are not capping attack then Ptero. Armet +3 (not +2) or Peltast's Mezail +3 will be the better choice for Stardiver.
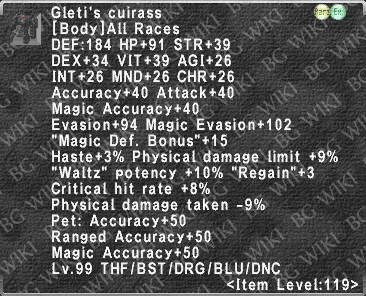
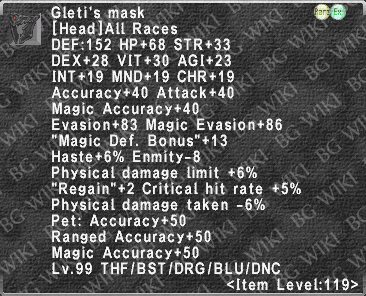
- If you are capping attack then Gleti's Mask will be the better choice for Stardiver.
- It is nice that the item lasted for countless years until this point though.
|


WSD Based Sets
- For Savage Blade or Judgment, sub WAR and use the same set as Sonic Thrust.
|


|
|
Drakesbane Sets
|


Other WS Sets
|


Misc. Sets
Breath/Wyvern Sets
|


DT Sets
- Wyvern has an innate 40% DT.
- 87.5% is the cap.
|


Gearswap Luas
- Here is my current DRG .lua
- Here is Braden's basic DRG .lua.
- Here is Braden's intermediate DRG .lua.
- Here is ErC8D's basic DRG .lua.
Spreadsheet
The DRG Spreadsheet is managed and updated by Braden of Sylph server.
Use it to compare gear in various situations.
Note: This is an old version pre Jump changes, REAMD weapon augments, PDL, and various fixes.
Simulator
New to the field of figuring it out, is Austar's DRG Simulator. It is my favorite tool for testing out DRG DPS. While the spreadsheet makes it easier to compare theoretical sets, this is used to test if the spreadsheet was actually accurate enough.
Located: Here
Authors
- Spicyryan of Asura - Original Creator and caretaker
Contributors
- Braden of Sylph - Information and Spreadsheet. Long since MIA. Thanks for everything though, Braden.
- Martel of Ragnarok - Information and Spreadsheet.
- Austar of Ramuh - Information via their DRG simulator or general discussion.
Last Edit
(DD/MM/YYYY)
Not when it was last "updated", but last edited:
- Last Edited by Spicyryan: 25/03/2024
