The Voracious Resurgence | |
| Prime Weapons • Ultimate Weapons • Ultimate Augments • Abjurations iL119 • JSE Necks • Divergence Augments • Escutcheons | |
| Reforged Armor Artifact: +1 • iL109 • iL119/+2/+3 Relic: +1/+2 • iL109 • iL119/+2/+3 Empyrean: +1/+2 • iL109 • iL119/+2/+3 |
Guides • Crafting • Trusts • Apex Monsters |
Promathia Mission 1-3
|
| Rewards |
|---|
|
The goal of this mission is to reach the Spire found at the end of each of the 3 Promyvion zones and defeat all 3 of the bosses in the "Ancient Flames Beckon" battlefields. Defeating each boss gives a key item. Once you have all 3 key items the mission is completed, and the next mission starts.
With the lifting of the level cap in Promathia areas, this quest is now relatively trivial in difficulty. The walkthrough below was written for a level cap of 30. However, be aware that there are new, high-level Apex enemies ranging from level 139 to 142 in these areas, but they may be avoided since they are not placed on main paths.
Trusts may be called through the entire climb and Spire fight, making it possible to solo this at 40 or even earlier.
- Do make sure to avoid any Apex Mobs as those will aggro with
 True Sound detection and require multiple endgame players to fight.
Note: Your mission log won't change to "The Mothercrystals" until clearing one of the Promyvion areas. Since the walkthrough for all 3 Promyvions are similar, they are all included in this section.
Walkthrough
After you are geared up and have your group ready to go, head to any of the 3 crags.
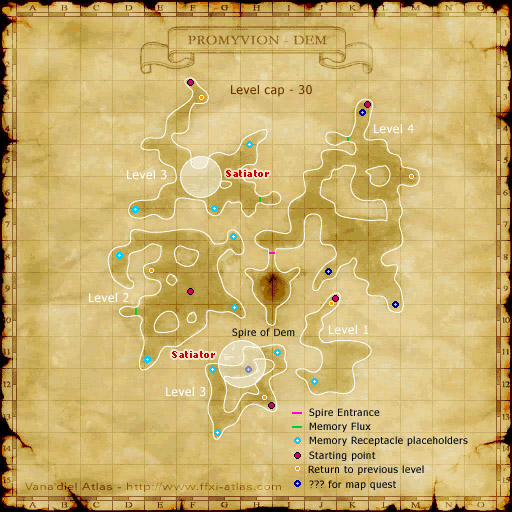
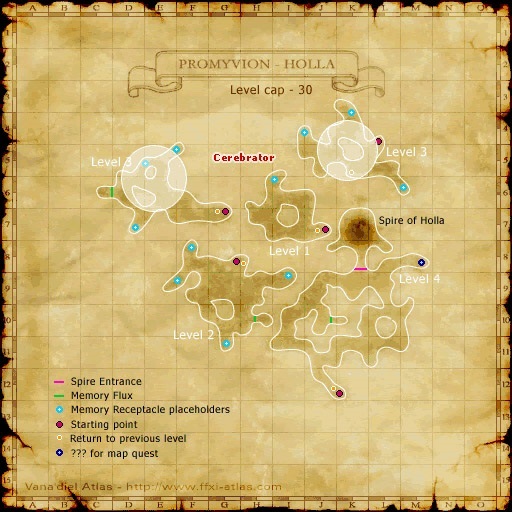
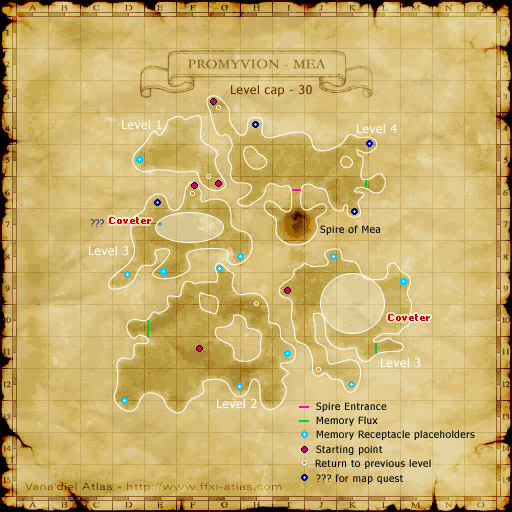
There are 4 levels inside Promyvion, each with increasing difficulty. In order to reach the next floor, you must locate and defeat a Memory Receptacle. Some floors have more than one receptacle but only one of them hides the portal to the next floor. Widescan is useful for finding them. Sneak and Invisible are useless here as all the monsters are True Sight and/or True Sound.
|


Boss fights
- After defeating each boss once, you will be awarded with (
 Light of Dem, Light of Holla and Light of Mea) and be transported out to the area in which you entered. The exception is after defeating the third Promyvion, you will appear at (K-9) in Lufaise Meadows and begin Chapter 2.
 - If you plan on using animas, create an order to use them on the boss. They each last for 30 seconds and the effect do not stack.
| Zone | Boss | Abilities | Notes |
|---|---|---|---|
| Spire of Dem | Progenerator |
|
|
| Spire of Holla | Wreaker |
|
|
| Spire of Mea | Delver |
|
Side-quests
- RoE (Region) objectives for Chains of Promathia zones become available after entering a CoP zone for the first time.
- Accessible from the Quests menu if Records of Eminence (Quest) was completed.
- Empty Memories becomes available after entering Promyvion for the first time.
- In order to obtain the
 Hamayumi,
  Stone Gorget , or
  Dia Wand , you will need to obtain a Cerebrator Rem., Satiator Remnant, or Coveter Remnant from the NMs in the Crag Promyvions. They will be used to trigger other NMs on a later mission.
- In order to obtain the
- Investigation of the Emptiness is available after completion of this mission.
- Also requires an Adventuring Fellow with a certain familiarity level.
- Unlisted Qualities is the start of the Fellowship quests.
- Promyvion Maps
- Trade a memosphere to a ??? on top level near spire (multiple locations).
- Holla: Teal Memosphere
- Dem: Beryl Memosphere
- Mea: Indigo Memosphere
- Trade a memosphere to a ??? on top level near spire (multiple locations).
- Level 30 Cap ENMs become available after completion of this mission.
- See Venessa for key items.
- Note: Trust Magic cannot be used in ENMs.


Plot Details
- The Empty
- Empty are the remnants of creatures absorbed by the emptiness. Some of these creatures are region specific.
- Craver: Exclusive to Mea, with the gait of a Dhalmel and the long legs and tail of a Coeurl.
- Thinker: Exclusive to Holla, a region resembling La Theine Plateau / Ordelle's Caves with Crabs, Morbols, and Walking Trees.
- Gorger: Exclusive to Dem, a region that may draw from places similar to Konschtat Highlands and Gusgen Mines.
- The Empty have an elemental core, based on their last memories. The Empty hunger for memories, and even feed from other Empty.
- The color of their core matches the memory item they drop, and the element of their Promyvion Brume and Memory of ____.
- [Wanderer and Weeper (Official Site)]
- Empty are the remnants of creatures absorbed by the emptiness. Some of these creatures are region specific.
