The printable version is no longer supported and may have rendering errors. Please update your browser bookmarks and please use the default browser print function instead.
| Desires of Emptiness
|
| Series
|
Chains of Promathia
|
| Starting NPC
|
Promyvion - Vahzl
|
| Title
|
Frozen Dead Body
|
| Repeatable
|
No
|
| Description
|
The Emptiness has trapped you and your companions. You must find them before you are able to continue your journey into the depths of Promyvion.
|
|
With the lifting of the level cap in Promathia areas, this quest is now relatively trivial in difficulty. However, you still need to avoid Apex Idle Drifters, Apex Woeful Lamenters, and Apex Livid Ragers, as these are extremely strong true hearing mobs roughly level 140.
- You may want to set up Reraise just in case you catch aggro.
The walkthrough below was written for a level cap of 50.
Walkthrough
| Useful Items to bring:
|
 Reraise, as usual Reraise, as usual HP and MP regen Drinks HP and MP regen Drinks Any Animas you may have. Any Animas you may have.
 Potions, Ethers, and possibly Icarus Wing Potions, Ethers, and possibly Icarus Wing
|
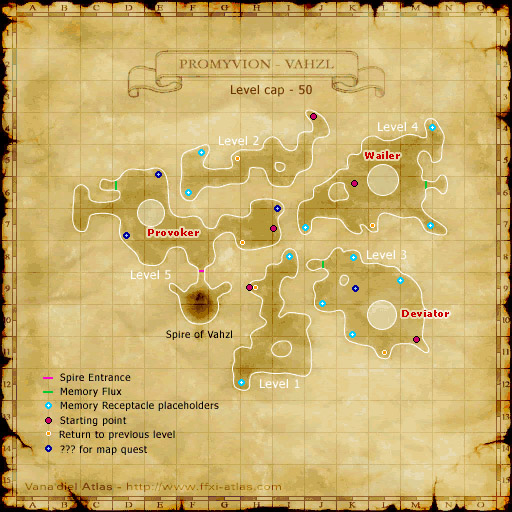
- As with the first three Promyvions, moving to the next level requires locating and killing a Memory Receptacle. Progress through level 1 and 2 normally.
- Note: In addition to the Memory Receptacle, there are Memory Fluxes on levels 3, 4, and 5 that spawn NM's that you must defeat in order to advance.
- Be careful not to click the Memory Flux again after spawning the NM as you will be trapped in a cutscene for a moment and they will still attack you.
- Checkpoints: After a cutscene, a "Teleport to the Propagator(3rd)/Solicitor(4th)/Ponderer(5th)" option will be available at the Stone Door in Pso'Xja which teleports you back to that memory flux.
- Make sure you get the cutscene at the Memory Flux on the 3rd, 4th, and 5th floors:
- Third Floor:
- Make your way to the Memory Flux at (J-8), to the northwest.
- When your party is ready, check the flux to spawn a Propagator.
- Defeat it and check the flux again for a cutscene.
- Locate the Memory Receptacle and move to the 4th level.
- Fourth Floor:
- Travel straight east to the Memory Flux at (M-6). Check it to spawn a Solicitor.
- Defeat it, check the flux for a cutscene and locate the Memory Receptacle to move on.
- Fifth Floor:
- The Memory Flux is at (D-6), northwest of the starting point.
- Click The flux to spawn a Ponderer.
- After defeating it, check the flux for a cutscene.
- Zone into the uncapped area Spire of Vahzl at (F-8).
- Note: If you do not defeat all the three Memory Flux NMs and get the cutscenes at the Memory Fluxes, you will not be able to cross to the Web of Recollections within the Spire of Vahzl.
- Use this time to rest and go over strategies. When your party is ready, click on the Web of Recollections and enter the battlefield "Desires of Emptiness". Buffs will wear when entering so wait until you are inside.
- If the cutscene stops progressing for an addon user, you may need to set FrameRateDivisor to 2 in order for it to resume.
- After defeating the bosses, you'll be returned to Beaucedine Glacier.
- (Optional) Go to (I-7) and speak to Torino-Samarino, Potete, and Leigon-Moigon.
- Return to the Metalworks and speak with Cid.
|
Boss Fight
| Area Name |
Boss Name |
Abilities |
Notes
|
| Spire of Vahzl
|
Procreator, Cumulator, and Agonizer
|
- Procreator:
- Fission: Spawns an Offspring.
- Vanity Drive: Directional AoE damage.
- Spirit Absorption: Drains about 200 HP from the target. Blinkable with 1-2 shadows.
- Promyvion Barrier: Defense boost.
- Stygian Flatus: AoE Paralyze.
- Quadratic Continuum: Single target damage.
- Cumulator:
- Brain Spike: Single-target damage
- Carousel: AoE damage
- Promyvion Brume: AoE damage, Poison, and resets hate
- Empty Crush: Single-target damage
- Impalement: Single-target damage
- Agonizer:
- Shadow Spread: Sleepga/Cursega/Blindga; Poison Potions highly recommended to counter this.
- Negative Whirl: Medium-high AoE damage plus Slow, strips shadows.
- Winds of Promyvion: Erases a single debuff from itself
- Stygian Vapor: Short range AoE Plague.
- Trinary Tap: Absorbs up to 3 buffs from a single target
- Trinary Absorption: Absorbs a large amount of HP (~200-300) from a single target
|
- Despite the name change, these bosses are essentially the same as the bosses in the 3 previous Promyvions so the same basic rules still apply.
- When you are fighting one of the 3 and get it to about 20% health, the next one in line will come at you. This is a good place to use any anima you may have. Use the anima on the approaching boss to keep it busy while you finish off the first one.
- You can also use Shadowbind on the next mob to hold it in place while you finish the first off.
- Of the 3, Agonizer usually presents the biggest challenge. Fighting it first while you are still at full strength is a good idea, just remember to not buff the tank or use food until it is dead.
|
Side-quests

 Map of Promyvion - Vahzl
