The Voracious Resurgence | |
| Prime Weapons • Ultimate Weapons • Ultimate Augments • Abjurations iL119 • JSE Necks • Divergence Augments • Escutcheons | |
| Reforged Armor Artifact: +1 • iL109 • iL119/+2/+3 Relic: +1/+2 • iL109 • iL119/+2/+3 Empyrean: +1/+2 • iL109 • iL119/+2/+3 |
Guides • Crafting • Trusts • Apex Monsters |
Quickstart 1-119 Guide
| |||||
|
|
 Another crappy guide by Spicyryan of Asura, formerly Pandemonium. | ||||
Perhaps you already read the Returning to Vana'diel guide and perhaps even the official Aventuring Primer, but still don't know what in the wild world of sports you are doing. So how about a guide that gets right to the heart of advice players are looking for?
This guide will skip a lot of the fluff (less jokes, o~h no~).
So no, it won't tell you what to do with your ![]() Adventurer Coupon, throw it on the ground (seriously).
Adventurer Coupon, throw it on the ground (seriously).
A lot of this will also be linking to solid resources that exist. For example, "Here is the Gold World Pass page", rather than explain everything about it to you. This guide will rehash things that subjectively need to be, and point you in the direction to answers otherwise.
Forum Discussion
Here is the thread for any questions or comments you may have, come and post.
Before You Start
FAQ
|
|
|
|
|
|
|
|
|
|
|
|
|
|
|
|
|
Gold World Pass
Gold World Passes are invites from existing players in the game. You put in a code provided by an existing player and then an NPC gives you some free and useful stuff. It is detailed on that page, but don't get hung up on this if you don't have one lined up beforehand.
- You can request a Gold World Pass sponsor Here.
Race and Nations
Pick any race you want for your character. It really doesn't matter at all and is mostly aesthetic. Back in 2014 SE reduced the HP disparity between the races. Compared to modern equipment, race stats differences are beyond negligible.
As far as nations that also doesn't matter much. You get a barely useful level 1 ring for choosing the nation affiliated with your race. The goal should eventually be to do the Missions in all three nations though.
Change your national affiliation at just about any time via an Allegiance Changer NPC.
|
Nation |
Description |
Ring |
| Bastok |
Industrial and technological mining city inside a rocky, mountainous, and desert-like region near the sea.
Home to the Hume and Galkan population as well as Cid and his big teeth. |

|
| San d'Oria |
Walled city and castle overseen by a monarchy. The surrounding area is a lush green forest.
Home to the proud (snobby) Elvaan population. Facilities are arguably the most conveniently placed of the three towns. |

|
| Windurst |
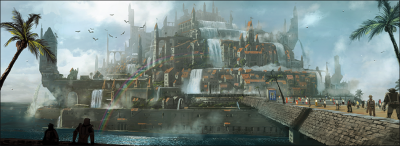
An expansive city at harmony with the surrounding waters and greenery. Heavens Tower, a massive and magical tree is the focal point of this nature based nation. Windurst is the birthplace of magic and resides in a region of grasslands in a savanna. Home to the Tarutaru and Mithran populations as well as the famous magician and rhyme artist, Shantotto. |

|
Levels 1-5
| Goals: | ||||
|
|
|
|
|
After the opening cutscene you will find yourself in one of a few random spots somewhere in your chosen city. Roam around and acquaint yourself with the controls and your surroundings.
When you are ready open your map or type /map.
Pro Tip: Selecting markers while inside your map and toggling left or right will allow you to see markers such as party members (blue), set your own markers (red), or marked items via NPCs (green). You may also select widescan and see NPCs in the area around you if you are looking for one.
| Settings |
|---|
Before anything else though change some settings really quick in your Menu → Config:
|
| Hot Keys and Text Commands |
|---|
You may want or need these.
Menu Based:
|
 |
Linkshell Concierge:
Make your way to any of the following exits: Bastok Markets (E-11), Southern San d'Oria (G-10), Windurst Woods (J-10) to get started.
Use either your map or the position next to your clock (bottom left) to find where you are on the map. If you don't see this type /clock which toggles the visibility of it.
|
On the way to one of the exits you will run into a Linkshell Concierge. These hold linkshells and you can take one out per game day. Each NPC has a different stock to hold and it is cleared out after any maintenance. Start trying them out so you can meet people, get in a group, ask questions, etc.
That or /yell something like: NO WIFE! NO KID! NO HOME! HEEEEEELLLLPP MEEEEEE PLEASE! 1,999k CAN I HAVE IT?!" or you know, "new and need a linkshell, {Help me out!} {Please assist}."
Don't get discouraged by shouts, some people just play this game in order to treat it like an AoL chat room. If you are on the sensitive side you can always /blist add Playername.
Once you reach an exit grab Signet from one of the NPCs with a title at the end of the name near the exit (I.M., T.K., or W.W.). Then we will go over your new routines.
Signet being one of those routines. Regions in this game have a buff like Signet. They are not all the same, but all you need to know is it allows you to collect crystals from monsters in nation controlled regions.
Since inventory is tight, sell these crystals at an Auction House (AH) or in an Ephemeral Moogle. Moogles all share the same inventory.
- Speaking of inventory, read over Inventory 101.
- Or RoE as it is known, will be your bread and butter. It will provide you with free exp, occasionally an item (depending on objective), a currency named Sparks, etc.
Sparks are the most important as they provide you with easy access to equipment and money via selling said equipment to the NPC. All ordinary equipment that you can buy with sparks resells for the same ratio as the cost is equal to the NPC resale price. So just buy and sell the highest costing item (Acheron Shield) in the future when you build up sparks.
- See Sparks for a list of items from RoE NPCs.
- Open up your quest menu and select Objective list → Tutorial → Basics. Begin completing these objectives. The goal is to do the entire Basic section. More will open up as you complete them.
- You may skip the "Stepping into an Ambuscade" objective for now.
- So your goal is to reach level 5 at this point while doing those Basics RoE objectives. Head outside (did you remember Signet?) and we can tackle the final part of this section.
Floating Books!
- These floating books outside near the entrance have an immediate value. The bobbing black Survival Guides work similar to Homepoints in that you can warp between them and yes they also show up on your /map.
- Fields of Valor (FoV) books are simply small repeatable zone based objectives that allow you to gain some extra EXP. They are in the Basics objectives so you will come across them and need to complete an objective.
Otherwise the last note of these are that they provide points (Tabs/gil) once per game day for an objective. You may notably spend these tabs on "Repatriation" which warps you to your home nation.
- Grounds of Valor (GoV) is nearly the same as FoV just in different, and dungeon areas or higher level zones. Subsequent completions of these objectives provide you with minor enhancements (noted by a book with stars icon) while you are in the zone. They also use Tabs like FoV and can warp you to your home point as well as repatriate you.
Once you reach level 5 via RoE and maybe a small defenseless monster or two, get ready to head back inside for the next part. After you reach level 3 and zone back inside your nation you will also get a cutscene for Rhapsodies of Vanadiel Missions. Just ignore this for a moment.
Login Campaigns
- The final thing to note are Repeat Login Campaigns. These have been regular for years now. Basically every time you log in, you get points. You get to use these points during the month to exchange for items via Greeter Moogles.
These items generally help new players much more than existing players so take advantage and check that page each month the campaign changes to see what is offered.
Maps and Spells
- Back in the day many maps and spells were quested only. All maps may now be purchased from NPCs as well as spells such as Sleepga II or Utsusemi: Ichi. You no longer need to overpay on the auction house or waste time questing them.
- Search for the "map of xyz zone" on the wiki or utilize the Map Vendors page.
- All scroll information for spells on the wiki is on a separate page accessible via clicking the "Scroll Page Link" icon.
Note: Story time level suggestions in the following level ranges are in general, best educated guesses for a solo player. The level you can do them really depends on your main job, strategy, knowledge, skill, equipment, etc. A job like PUP, DRG, or BLU will fare much better at completing something solo over a job like WHM or GEO. If you are having too hard a time for something then rethink your approach, get some help, improve your equipment, or level a little bit then try it again.
Overall, these levels are here for people who don't want to just faceroll the game and get a lot more out of it.
Also, a lot of these missions are directly tied into the advice provided within this guide too. If you are looking to just rush up to level 99 then know this is not a "speed run" guide.
No, the irony of a "Quick Start" guide not being about the quickest way to get something done isn't lost on me. Rushing is meaningless in my eyes though.
Levels 5-10
Story Time:
| ||
Nation missions aren't the most exciting story, but they are where you get your start. | ||
Goals:
|
Acquiring Trust Magic:
- Upon reaching level 5, a player may begin to unlock Trust magic by completing one of these three initiation quests:
- Trusts are an essential part of the game. They are summonable NPCs of characters in game that will fight along side you in place of party members.
The Basics RoE objectives will provide you with some solid starter trusts to use, but there are better ones and plenty to unlock. Utilize the Trust page for more details.
- Trusts are considered spells and thus may not be used if you are silenced, and their recast is greatly impacted via Haste and Fast Cast+.
- Certain trusts are also only available during special periods in the game, and this is noted on the Trust page. Some of these trusts are very good such as Cipher: Amchuchu or Cipher: King. Certain events to watch for are:
- Repeat Login Campaigns (Random Trusts, monthly)
- Spring & Autumn Alter Ego Extravaganzas (Same Trusts, two times a year)
- New Year's & Summer Alter Ego Extravaganzas (Same Trusts, two times a year)
- There are other events outside of this such as random appreciation campaigns that provide a Red Mog Pell, but this is not a consistent thing. There is also the anniversary every March which grants a few Trusts.
Pro Tip #1:The level of your Trusts does not increase when you level up. You must release and resummon them. Pro Tip #2:Trusts are always summoned at maximum HP and MP. This being said, it is quicker to release and resummon your healer Trusts to continue gaining Experience Points instead of waiting for them to naturally recover MP if they are out. This is only true if the recast timers previously mentioned are ready, of course.
Macros:
- Something people take for granted, but you may not understand are Macros. There are just customizable buttons. See the Macro page for more on macros, but some basic example are:
- /ja "Job Ability Name" <t> (for your target) or <me> to use it on yourself.
- /ma "Spell/Trust/Ninjutsu Name" <subcommand>
- /pet "Pet Command" <t>
- You may add a wait between lines at any time by adding <wait 1> to 60.
- So if you are making a macro for trusts you would put:
- /ma "Mihli Aliapoh" <me> <wait 8>
- /ma "Valaineral" <me>, and so on.
- So if you are making a macro for trusts you would put:
- You should not have this as a macro, but the command "/refa all", when used, will release all of your trusts at one time. This is useful for resummoning them after leveling up, or quickly joining a party while in the field.
Pro Tip:Type /itemsearch "Exact item name here" to see if an item is in your posession. For example: /itemsearch "Earth Crystal". Quotes are needed when the item is more than one word, but not needed if it is only one word.
Unity:
- Unity is an extension of Records of Eminence and utilizes Accolades. Accolades are used to spawn Notorious Monsters (NMs) for rewards of Sparks and items.
Most importantly, and the reason I mention this is because unity allows you to quickly warp to areas you haven't even been before as a new player. Which saves you an immense amount of time.
By selecting to warp to a zone next to Jeuno like Batallia Downs you can walk right into Jeuno for the first time without all the running on foot and death, if you so choose.
- Simply speak to one of the Unity NPCs and ask to be brought to one of the areas for a price of 100 accolades.
If you lack Accolades, then a single Copper Voucher rewarded from Records of Eminence (Other → Daily Objectives → Vanquish 30 enemies, for example) may be exchanged at one of the RoE NPCs. Select currencies, and 1 Copper Voucher is able to be redeemed for 1,000 Accolades.
After joining your unity you may also gain an instant 195 accolades by typing anything into the unity channel (/u hello) after flagging the Unity → Unity (Shared) → U. Communique objective. If it is greyed out that is because it is full of people at the moment.
- In order to join a Unity you must be at least level 5, and have completed 10 different RoE objectives. Simply speak to one of the Unity NPCs (next to the RoE NPCs) and select which one you want to join.
I would recommend starting off with Apururu or Yoran Oran as they are the best White Mage trusts in the game. - If you are short on the 10 required objectives then you can speak to some of the guild master NPCs under Tutorial → Synthesis
Skipping Missions:
- Certain nation missions are skippable by trading a few crystals to the NPC. These are the second of three missions generally, and are noted in the green story box for the section if skipping is possible.
- While you may not want to do this certain missions like San d'oria missions 3-2 requires you to go fishing for a Crystal Bass. That isn't something I suggest you get stuck on.
- On the flip side, you do NOT want to skip Windurst mission 3-2 as it provides you access to a Portal charm which opens a pesky gate that you need to pass for those missions or unlocking Fenrir.
Leveling:
- Refer to the Fantastic EXP guide leveling spots.
Levels 10-20
Story Time: You may complete most of Rank 2 for your nation.
| ||
|
||
| ||
Goals:
|
Sub Jobs:
- Ordinarily Support Jobs AKA subjobs AKA subs, were unlocked at level 18 by players via a quest players generally needed help with. Nowadays though you can unlock it sooner (and alone) via completing Rhapsodies of Vanadiel Mission 1-4, Set Free.
- Sub jobs are exactly what you might expect, a secondary job that grants you the traits, spells, and abilities of that class. The only catch is that subjobs:
- Are half the level of your main job.
- Level separately. You must change jobs at your moogle and level other jobs separately.
Pro Tip: Instant Reraise from the Gate Guards that provide Signet will, if used before death, allow you to raise back up after being knocked out, regardless of your current job.
Levels 20-30
| Story Time: Finish nation Rank 2. | ||
|
||
| ||
Goals:
Optional:
|
Remember Signet?:
- After fighting enemies in conquest zones with the aforementioned Signet on you will gain Conquest Points.
- After gathering 5,000 conquest points buy a
 Warp Ring from the Signet Gate Guard. This is one of the most useful items in the game (returns you to your Home Point) and the first thing you should buy with these points before an Emperor Band (EXP Boost).
- Conversely, Homing and Return Rings are entirely useless.
Pro Tip: Type /rmap to quickly open the Conquest Map and view your Conquest Points

Chocobo License and Mounts:
- Utilize the Unity warp level 125 → Batallia Downs to be placed right outside of Upper Jeuno where you will unlock your Chocobo license via the quest Chocobo's Wounds. This will allow you to rent a Chocobo from the Stables.
- After obtaining your license you may then unlock Mounts via the quest Full Speed Ahead!. Mounts are much more convenient than chocobos as you can use them in the same area and call them in the field. You can not be attacked while riding a Chocobo or a Mount either, but they can not be called in dungeons.
In Living Rhapsody Color:
- After completing RoV 1-6 you will be granted the "Rhapsody in White" key item. There are 9 RoV KIs and each provides you with a boost.
- For example this white on will provide you with double the rate of skillups, 30% more EXP gaining, a lower home point warp cost, and the ability to call a fourth Trust. Forever, that is it, just get the key item.
Curio Moogles
- Curio Moogles sell very useful items for your benefit. Their inventory is increased the more you obtain RoV KIs.
Pro Tip: Remember that you may only hold on top 99,999 sparks, any more are simply lost. Spend them on new armor and weapons from a Sparks NPC or Acheron Shields (71-98) to NPC if you have excess.
Gobbie Bag:
- Gobbie bag quests will expand your inventory by 5 per quest which you likely are dying for right now. The main issue with these will be the cost of items, but if you have been taking advantage of seeking out various RoE objectives then you should be able to NPC some Acheron Shields (NPC → 71-98) for ~27k per shield and get one.
- Remember the Inventory 101 Guide?
Pro Tip: Mog Sacks do not automatically increase with a Gobbie bag like Mog Cases do. You must speak to an Artisan Moogle to increase your sack size. Don't have a sack yet? Why not? It only costs ~10,000 gil from the same moogle.
Levels 30-40
| Story Time: Complete Rank 3 Missions | ||
|
||
| ||
Goals:
Optional:
|
Abyssea
- Abyssea is a series of 9 zones with a small storyline. It premiered shortly after the level cap was raised from level 75. A few important things are still linked to this zone such as a set of armor for your jobs you will need to pick up. You don't need to worry about Abyssea until a much higher level though as you won't be doing anything in there for now.
- You do however need to complete The Truth Beckons quest starting at level 30 in order to begin obtaining Traverser stones. You see, one does not simply walk into Abyssea. You must spend traverser stones in order to be in the zone. Each stone grants you 30 minutes in the zone. After you complete the quest you will begin accumulating a stone every 20 real hours.
- There are various ways to increase your stone gain rate or even stay in the zone longer, but we will cover Abyssea more later, just unlock access to the stones for now.
Unlocking Jobs
- Any Job you don't have may be unlocked at 30. Each quest for a job is listed on their page.
Pro Tip: Store your  Beastmen's Seals with Shami in Port Jeuno to save inventory space. Shami will hold all of these varieties. They are used for special fights or certain Limit Breaks later.
Nation Missions:
- Once again if you are from Windurst do not skip 3-2 Written in the Stars. It provides you with access to the Portal charm which is important to have.
RSE Armor
- Also in the same building as the Gobbie bags is your RSE quest, The Goblin Tailor. For those of you who have never heard of RSE (Race Specific Equipment), it is an all but forgotten throwback.
- Fortunately, RoV KIs (and Survival Guide warps!) has made this quest worthwhile again. Your RSE will provide quality armor (levels 29-33) for awhile and is wearable by all jobs. Each piece is designed to compliment your racial shortcomings so only certain pieces may be good for a particular job. Given leveling speed though it honestly doesn't matter so this stuff is great to throw on for awhile.
- All you must do is pick up a key from the Curio Moogle and unlock a chest for a key item, return to the goblin, and repeat immediately. This is of course really easy and cheap to do as the keys costs 2,500 gil after you have your "Rhapsody in White"
 .
. - The kicker is that you must wait for a time period to open the window before you may obtain these pieces. Each race has a game week (~8 hours IRL) where they are eligible to obtain the key item through the quest. The quest cycles each race in a row. Three zones are also cycled so the zone for your race won't repeat next window.
- This eligibility period means you may have to wait a real day or two before you may actually quest this armor.
- On The Goblin Tailor quest page there are links to some ancient and somehow still functional websites which will tell you when your pattern will occur. There are probably also mobile apps or something out there that may have it, who knows.
Money:
- Yes, sparks are going to probably be the best way of making it at this point. This is best done during the "Gain EXP" RoE objectives. Simply because they are the easiest to complete again and again.
- See the calendar on the RoE page to find out when that happens three times a week.
- However, you have a few other options that will very depending on your server. Crystals (x12) tend to sell for a bit of money on the Auction House (AH) if you are accumulating them from monsters and feel desperate. You should be saving these in your Case, Sack, or Satchel in the field and storing them when you get back to town in an Ephemeral Moogle as was mentioned.
- There are a few things you can easily craft at low levels. Namely things like Copper Ingots or Sheep Leather. Gobbie bag and armor forging materials are sometimes actually rather valuable and accessible for newer players. People are impatient and willing to drop over 100k on a Moblinweave and other easily made materials for years now.
- Certain base materials like Gausebit Grass are easy to farm and sell fast at ~10k a pop on Asura. Tiger Hides would be a good choice too depending on the crafting market, as things tend to change in time.
- Of course anyone reading this will have already swamped the market on good items that I list and the price may have crashed so there isn't much use in me listing out ways to make money besides "sell extra sparks". So just remember to NPC all your old crap to try and pay the bills in the meantime.
- Utilize FFXIAH.
Levels 40-50
| Story Time: Start Rank 4 Nation Missions | ||
|
||
| ||
Goals:
|
Artifact Weapons:
- Artifact Weapons and armor (AF or AF1) are weapons crafted specifically for your job. These weapons are pretty mediocre, but they are a prerequisite for unlocking your Artifact Armor. Depending on what you are using they may be an upgrade. You may begin questing them at level 40+.
Levels 50-60
| Story Time: Obtain rank 5 | ||
|
||
Optional:
| ||
Goals:
|
Limit Breaks:
- Time for your first Limit Breaks. Starting at 50 and beyond, there is one every 5 levels all the way to 99.
- In Defiant Challenge - Quest for breaking the limit of level 50.
- Atop the Highest Mountains - Quest for breaking the limit of level 55.
- Whence Blows the Wind - Quest for breaking the limit of level 60.
- You must be past Nation mission 4-1 for this limit break.
- You may start and complete each limit break for the next limit, one level after completing the previous break. E.g. Atop the Highest Mountains may be completed at level 51.
Artifact Armor
- Back to the Artifact Armor (AF). At least this stuff serves a long lasting purpose. You will upgrade it several times all the way to level 99. Now you can look the part too.
- Once you have obtained the "Rhapsody in Umber" KI you may save tons of time by simply buying the coffer key for your AF from the Curio Moogle.
- So what I would recommend is doing your first limit break and level up. Then after that you can do your first AF quest for your level 52 piece. Then you can complete RoV up to 1-11 for the "Rhapsody in Umber" key item and buy the coffer keys for your level 54, 56, and 58 pieces from the Curio Moogle.
- You may obtain these 3 coffer pieces before you may actually wear them once the quest has been started.
- Note:GEO and RUN obtain their Artifact, Relic, and Empyrean armor differently via quests and commissions.
Pro Tip: You can check where your homepoint is in your menu under Status → Profile.
Some Useful Key Items:
- You will need all of these at some point in the game. Some of them for your AF armor even:
- Pouch of weighted stones - Allows a player to pass through the banishing gates of Garlaige Citadel solo.
- Select the ??? in Garlaige Citadel on map 1 at (G-8) to obtain this.
- Magicked astrolabe - Allows a player to pass through the gates in Eldieme Necropolis solo.
- Pay Churano-Shurano in Windurst Waters (North) (F-8) 10,000 gil to obtain this.
- Loadstone - Allows non-galka players to pass through the weighted doors in Quicksand Caves solo. Thus eliminating the only reason to ever be a Galka.
- Complete the quest Open Sesame to obtain this.
- Portal charm - Aforementioned, allows players past the Three Mage gate in the Inner Horutoto Ruins solo. From Windurst Mission 3-2.
- Alternatively there is a survival guide in Toraimarai Canal right behind it you may obtain if someone lets you in once.
- Alternatively there is a Rhinostery certificate for entering Toraimarai Canal solo after a series of quests starting with Food for Thought.
Leveling:
- Around your mid 50s when you unlock Escha - Zi'Tah I would reccomend leveling in there from ~52-60 on Dhalmels and Coeurls (as per the EXP guide). Just so you can earn a preliminary amount of Silt, a currency accumulated similar to Conquest Pointss. You will need Silt for level 99+ so you can buy the key items required to fight eschan monsters for better armor. Otherwise, I enjoy leveling in Aht Urhgan areas personally.
Welcome to Whitegate:
- If you haven't already unlocked access to Whitegate (once known simply as "WG") then now is the time. Complete the quest The Road to Aht Urhgan and either unity warp over to Wajaom Woodlands or ride the correct boat from Mhaura (the galka flips the sign where you pay to board to the snake).
- Completing the quest is required before you may use the unity warp to the woodlands, so there is no shortcut around this.
- After completing Aht Urhgan (ToAU) Missions 1 and 2 you will gain access to the Mog Locker and Sanction.
- Alternatively, if you are playing as a Warrior, Monk, White Mage, Black Mage, Red Mage, Thief, Paladin, Dark Knight, Beastmaster, Bard, Ranger, Summoner, Ninja, Dragoon, or Samurai you may put off completing The Road to Aht Urhgan until you are completing your level 70 → 75 limit break, Shattering Stars. The quest will require a job testimony which you retain after the fight and may trade under the advanced option to complete the quest with no additional time or effort.
Optional Missions:
- Since RoV is the most important to any new player the guide is built focusing on progressing through it for the Key Item bonuses. As such all missions that are now required are listed as "optional".
- Progressing through these optional missions without finishing the story line will block progressing through RoV at certain times.
Levels 60-70
| Story Time: Obtain rank 6 | ||
|
||
Optional:
| ||
Goals:
|
Limit Breaks:
- Riding on the Clouds - Quest for breaking the limit of level 65.
- Shattering Stars - Quest for breaking the limit of level 70.
- The level 70 limit break varies based upon your job, see the Limit Break page.
- Job testimonies are good for three tries now instead of just one like they used to be.
Pro Tip: Macro in equipment sets before weapon skilling, casting spells, using abilities, etc to improve performance. Menu → Macros → Edit Equip Set. is where you find these equipment sets.
Example:
- /equipset 2
- /ja "Vorpal Blade" <t> <wait 1>
- /equipset 1
- In this example equipset 1 is your TP set, and 2 is your WS set.
Levels 70-80
| Story Time: | ||
Optional:
| ||
|
|
|
| ||
Goals:
Optional:
|
Moving on from 75 upwards will open up a lot of content for you. Historically level 75 was when players began endgame before the level cap was increased back in mid 2010 so there is a lot of group content focused around that level range. The only thing that is really relevant to you will be the story lines which should be manageable solo as early as at 80+ with trusts.
No one would blame you for wanting to take in some of the level 75 experience (okay, do at least one real Campaign Battle!) as it was a big part of this game at one time. Feel free to keep leveling though if you want to come back and tackle it more efficiently later though.
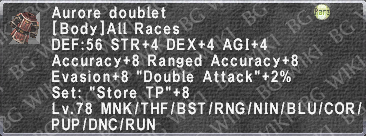
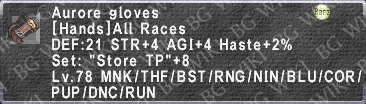
Armor
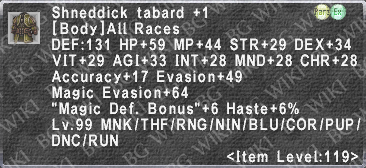
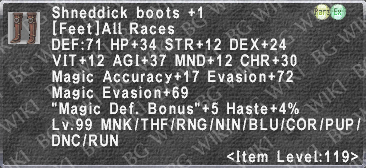
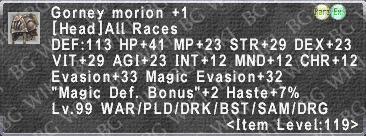
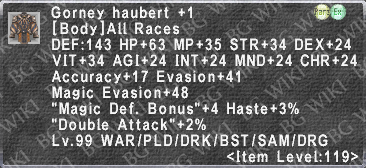
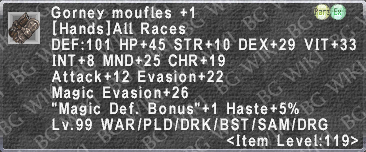
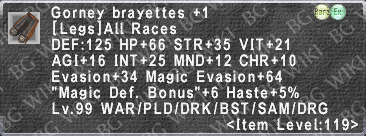
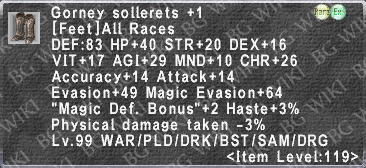
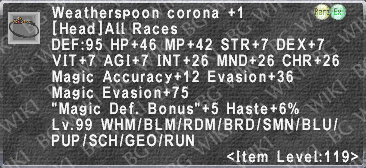
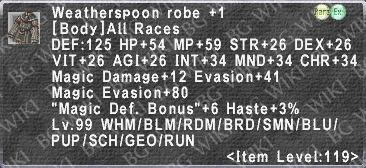
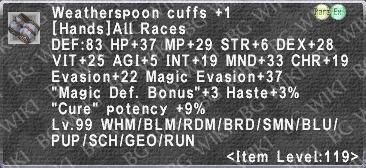
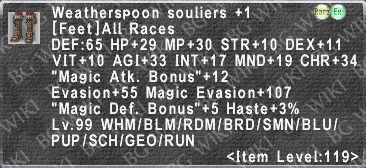
| |||||||||||||||||||||||||||||||||||||||||||||||||||||||||||||||||||||||
If you are a bit confused about the +1 versions for those UNMs. The level 75 normal quality (NQ) items may be traded to the Unity NPC that warps you to the zones along with 3 trophy items (dropped from it) named after that NM and 1,000 accolades. After a game day they will return the +1 version for you. Higher level Unity pieces upgrade the same, but cost more.
The level 75 At level 78 there are the following sets of gear from Abyssea which are probably an upgrade to anything you have. They are purchasable by anyone with Cruor and also found on the Auction House: | |||||||||||||||||||||||||||||||||||||||||||||||||||||||||||||||||||||||
|
|
| |||||||||||||||||||||||||||||||||||||||||||||||||||||||||||||||||||||
| |||||||||||||||||||||||||||||||||||||||||||||||||||||||||||||||||||||||


Limit Breaks:
- New Worlds Await - Quest for breaking the limit of level 75.
- Expanding Horizons - Quest for breaking the limit of level 80.
![]()
- Starting at level 75 you can begin obtaining merits. These will enhance your abilities beyond your current limits as well as gain your new bonuses and abilities.
- Speak to the Nomad Moogle next to Maat in Ru'Lude Gardens to unlock merits.
- You may only obtain EXP or Merit points at once. You may change the mode from EXP to Merit points in the Status → Merit Points menu.
- If you are maxed out on EXP then you will automatically begin obtaining merits.
- I wouldn't go too nuts with obtaining merit points at your level. You will need to obtain a couple of them later for Limit Breaks, but otherwise it makes more sense to put most pf this off for now until obtaining more EXP boosts from RoV KIs which also increase your merit point gains. Eventually gaining merit points becomes a joke because of this. It will be obtaining Job Points which takes you forever, but that is a later topic.
Rise of the Zilart:
- Go through these missions and skip the Divine Might quest for now. That was designed for an alliance of 75 players, and you may complete the story and come back to do Divine Might later for the earring reward.
Wings of the Goddess:
- Also known as "the past". Wings of the Goddess is an expansion that released the Shadowreign ([S]) areas. These are areas that exist in an era during the Crystal War between the four nations and the forces of the Shadow Lord, linked to present day by Cavernous Maws. It was released at level 75, but the story was not finished until about level 90. This means it scales up in difficulty, somewhat like CoP, but in a smaller scale.
- There are some fun things you can do here like Campaign if you feel like it and the story is the longest in the game. Partly due to the quests for your chosen nation that are required for progress in Wings of the Goddess Missions. You also must choose the nation you wish to alliance to, it is independent of your present day nation, but that is covered on the Wings of the Goddess Missions page.
- Overall, the most important thing for you to know now is that you must reach mission 8 In the Name of the Father, in order to progress through RoV.
Voidwatch:
- Voidwatch (VW) is a battle system with a mini story line that came out on the heels of Abyssea. You won't be completing this content anytime soon, but much like with Abyssea it uses a stone system per NM encounter. So at 75+ you may speak with a Voidwatch Officer near the Records of Eminence NPCs to obtain a colored abyssite and begin collecting Voidstones for later.
- You will need to do VW later in order to unlock some Weapon Skills. There are also special events occasionally during adventurer campaigns from Square Enix where all of the spectral alignments will become maxed during the campaign. VW becomes a lucrative money maker during these times for people, so it is wise to begin collecting your stones now. You can even use two Voiddusts to jump start the process.
Add-On Scenarios:
- A Crystalline Prophecy, A Moogle Kupo d'Etat, and A Shantotto Ascension are three mini stories that were released at 75. The armor rewards quickly become irrelevant by level 99 though except for a macro piece for a couple of jobs like Beastmaster or /lockstyle. So if you did want to take this on, it is fun, but only if it is a challenge still. The final fights can probably be soloed around 85-90 with trusts or duoed with trusts around 80+.
- This means you have to actually go in with a strategy. You will need sleepga for the Henchman Moogles, and so on. Overall, I felt I had to list these here due to the fact they quickly become irrelevant later.
Pro Tip: Use /lockstyle to lock on the appearance of your current equipment set. You may also /lockstyleset <number> a set from your Menu → Macros → Edit Equip Set.
- You may do this even if the items are away in your mog house.
Levels 80-90
| Story Time: |
Optional:
|
Goals:
|
Limit Breaks:
- Beyond the Stars - Quest for breaking the limit of level 85.
- Dormant Powers Dislodged - Quest for breaking the limit of level 90.
Arriving in Adoulin:
- Welcome to the untamed wilderness of Adoulin and yet another expansion and story line. If you read ahead to this then you could have unlocked Adoulin at any time, whether it was for the Crafting skill up rate bonus from Ionis or some other factor. However, around level 90+ Mandragora's are a popular way to level to 99. Ionis also grants a skill gain rate increase so your skills can catch up if you were rushing up in levels.
- Until 90, the main purpose in Adoulin for you will be completing Seekers of Adoulin Mission 1-5 and then speaking to a Task Delegator in one of the coalitions to begin collecting Imprimaturs. These accumulate every 6 real hours and are spent on Coalition Assignments. Which provide you with EXP, Bayld (the currency of Adoulin), and are a requirement early on for progressing through the Seekers missions which in turn is required up to the Behind the Sluices mission for RoV.
- This imprimatur gate for Adoulin missions is eased slightly by gaining fame in the city as well from completing Adoulin Quests later. Some of which provide some good rewards. All in all you can complete something basic like the Couriers' Coalition supply assignments at any level once you unlock a bivouac to warp to and deliver the supplies then warp back for the EXP, hint-hint.
- If you are at a personal point where you are stuck waiting for Imprimaturs then take advantage of the downtime to explore and unlock bivouacs. As well as gain some useful rewards from Adoulin Quests. There is also a reward for completing all of the quests, but more on that later.
Pro Tip: Type /focustarget <playersname> to see the status effects active on a party member. Use the same name again to turn it off.
- Only one target may be selected at a time, and this overrides the ability to see status effects of any other target (you may change the target at will), but it works well for those already in combat.
- This may not be used on Trusts.
Levels 90-99
| Story Time: |
|
Optional:
|
Goals:
Optional:
|
Limit Breaks:
- Beyond Infinity - Quest for breaking the limit of level 95.
- Pick up an
 Olde Rarab Tail or two in the sidequest for this fight. It makes the fight trivial if you are having trouble.
- The items for this are reguarly available through Repeat Login Campaigns under 10 points.
- Congragulations on completing your limit breaks.
- Pick up an

Armor:
- By most accounts you are still rightfully using your level 78 Abyssea armor since most armor in the 76-90 range are all from NMs in Abyssea.
- You have neither the stones (oho~!) nor the proper assistance for going after that stuff just yet. This is also partly due to the Weakness Targeting system AKA "Proc"ing that was invented with Abyssea.
- More on procing in the next section.
- So this leaves you with two choices:
- Get your last 9 levels and replacing everything instantly.
- The most efficient route.
- Upgrade your 78 abyssea armor to the +1 level 90 version.
- Not a bad choice if you can avoid the main issue with this.
- The main issue with upgrading to the level 90 pieces, assuming you have the few (easy) items already is the game day wait. When trading unity items to upgrade you lose that piece of armor to the NPC until the next game day.
- So there are three ways around this:
- Have a spare piece available. You can't hold more than one
 rare item at a time, but you can send it to yourself in the delivery box and get another or get one another after trading it.
 - Trade the item to upgrade right before the day changes. As soon as it changes you can take your item back.
- Trade the item before going AFK and come back to get it.
- Otherwise, don't bother upgrading the level 78 armor.
![]()
- Starting at level 99 you may unlock access to Job Points. Think of them as hardcore Merit Points. They are essentially earned the same way except slower, with a higher requirement per point. Once again these offer significant bonuses to your job and eventually will grant you three stars over your head signifying that you have Mastered that job.
Pro Tip: Type /jobmasterdisp off/on to hide/show the stars over your head from master status.
- /displayhead off also removes the visibility of your headgear while you wear it.
Levels 99-119
Step 1
Primary Goals:
|
Secondary Goals:
Optional: |
Story Time:
Optional:
|
Intermediate RoE:
- This is your first stop after reaching 99. Follow the RoE Intermediate Guide and you should be square. This will leave you with a new weapon and full Sparks ilvl 117 armor.
RoV and VW
- Next, complete RoV chapter 2. Afterwards you will obtain a "Rhapsody in Mauve" which allows you to purchase Phase Displacers for a mere 1,000 gil per pop from Ardrick at the Outpost in Jugner Forest. Displacers are traded to a Voidwatch NM conflux before spawning it to significantly weaken it.
- So, take some displacers with you and go easily complete the quest Guardian of the Void with your trusts. This will reward you with some Cruor for Abyssea as well as enable you to unlock Empyrean Weapon Skills for your jobs.
- You may go about completing the mini story for Voidwatch, but you should probably just save your stones for a max lights campaign to join shouts to farm these NMs and make money.
Relic and Empyrean Armor:
- Obtain Relic Armor and Empyrean Armor so that you may later reforge these lower level pieces into their ilvl 119 versions.
- Dynamis is a simple event in which you enter with an hour, gain another hour by defeating five statues for time extensions and then proc enemies based on some simple factors for currency to build Relic Weapons. You do not need to proc mobs for the armor, and with the Treasure Hunter trait it drops pretty easily. Also, you should not be building a Relic Weapon until later.
- Note:GEO and RUN obtain their Artifact, Relic, and Empyrean armor differently via quests and commissions.
- Abyssea is a bit less simple as the procing takes is a little more complex and you have a limit to how long you may be in the zone based on a timer. While you can just go to town right away in Dynamis, you should make a detour before you start farming Empyrean Armor.
- You may reduce the recast time on your Traverser stones via three key items; each taking off four hours per key item:
- Ivory abyssite of celerity - Defeat tonberries in Abyssea - Konschtat and it will pop in your chat log.
Crimson abyssite of celerity- Quest - Whither the Whisker. You need fame 3 (via quests in Abyssea - Vunkerl only) in the zone to unlock this quest which defeats the point in the short run.- Ivory abyssite of celerity - Purchased for 4,500 cruor from a Cruor Prospector in either Abyssea Altpea, Grauberg, or Uleguerand.
- You should already have this cruor handy from doing Guardian of the Void.
- Now, when it comes to obtaining the papers for your job's Empyrean Armor you should really bring at least a BLM to
 proc. BLM has the most spells that trigger yellow out of any of the jobs. Around Thundersday, Lightsday, and Darksday, a WHM may also be useful for their procs. You may also deaggro the NM via a conflux warp and reclaim it to change the weakness.
 - You may obtain no more than 1~2 seal without staggering the yellow weakness. With a yellow proc this changes to 2~5 (TH also helps). Each NM drops four different seals and you need 8 for your piece. Even while proced the monster might just drop four seals for a different job. So make the most of your time and stones, and other people need it to so /yell to team up.
- During special campaigns, sometimes including Login Campaigns, Kupon I-Seals are available. Which may be traded to a Dealer Moogle for any +1 Empyrean Armor piece and simplifies the whole task.
Pro Tip:During random adventurer campaigns from SquareEnix, sometimes Abyssea is included. During these campaigns a box full of bonuses will be stationed next to Joachim in Port Jeuno. Select it to gain a one time bonus of abyssea items including a Lunar abyssite and 100,000 cruor.
Weapon Skills!:
- This will vary depending on your job. Not all Weapon Skills you can unlock are good or even useful. This will take researching your job to find out something like Savage Blade and Resolution are great while a WS like Exenterator is not.
Step 2
Primary Goals:
|
Secondary Goals:
Optional:
|
Story Time:
|
Intermediate RoE:
- Continue on with and finish these with the RoE Guide. Wildskeeper Reives (WKR) will probably be your largest obstacle. Go check if the NM is up (select the area you enter and view progress) then go back to town and do a few /yells. People generally show up, otherwise during WKR campaigns from SE people will spam the fights for HP Bayld either for money or making an Ergon Weapon.

Wildskeeper Reives:
- Wildskeeper Reives are accessed after Seekers of Adoulin Mission 1-6 Life on the Frontier. You will need to do Coalition Assignments and Reives to build up bayld in order to start doing these.
- Old Adoulin bayld gear or WKR armor/weapons may be traded to Runje Desaali for free bayld.
- Make sure you flag the Content → WKR RoE objectives.
- WKRs also drop good starting armor which is augmentable via Prah Janimhar in Western Adoulin at the Inventor's Coalition. Don't be fooled by the fact the item level is 115 (give Runje the ilvl 106 junk) and lower than the ilvl 117 and 119 gear you may obtain right now. The stats are what counts, and something like the ilvl 115 Otomi Helm or Ejekamal Boots after augments from Prah are easily better than the sparks 117 or bayld 119 pieces. Mix and match the best pieces along the way up, comparing stats should be easy on these pieces.
- Also, as long as you have accuracy, the WKR 115 weapons with an augment of occasionally attacks twice (OAT) are some of the best stopgap weapons you can use atm for melees. This is especially true for offhand weapons for 1H jobs, for instance the Atoyac dagger with OAT for a Thief or Dancer.
- When you are in need of accuracy these weapons quickly drop off in performance, and good 119 gear replaces them later regardless.
JSE Capes
- JSE Capes are best obtained from WKRs, but may also be obtained from Reives in Marjami Ravine, Yorcia Weald, Kamihr Drifts, and Ra'Kaznar at a lower frequency. They also drop from Incursion coffers except those already will have augments on them.
- Capes may be augmented via trading Detrovio a Refractive Crystal (from the AH or Unity NM coffers) along with your cape.
- Lastly, Makel-Pakel in the Celennia Memorial Library will exchange three unagumented capes for one of your choice. You may also have him remove the augments from a cape.
Bayld Sets
- After a few Reives you will easily have enough bayld to start picking up some quick ilvl 119 weapons from Craggy Bluff and armor from Vesca in Eastern Adoulin at the Peacekeeper's Coalition. These will work fine for now, but are about some of the lowest quality 119 items there are.
|
|
| |||||||||||||||||||||||||||||||||||||||||||||||||||||||||||||||||||||
| |||||||||||||||||||||||||||||||||||||||||||||||||||||||||||||||||||||||


Alluvion Skirmish
- You will come across Skirmish and Alluvion Skirmish as a result of your progression and the RoE Guide. As a result this will serve as the immediate boost to your gear after the last step. Use some of the stones available to you from the event or maybe even do a couple of rounds. Remember /yelling for things is your friend and how you actually make them to get things done.
- Stones are overpriced due to a lack of supply so do not go nuts trying to get augments for what is probably better than anything you currently have on. You will replace this gear soon enough with Escha Rewards.
- See Alluvion Skirmish Weapons and Alluvion Skirmish Armor for augment details.
SKCNMs
- Or Macrocosmic Orb battlefields are what you should be teaming up to farm after you finish your Intermediate RoE objectives. These will grant you Rem's Tales 1-5 (ilvl 109) for Reforged Artifact Armor, and are easier than other battlefields which grant chapters 6-10 (ilvl 119).
- Tackle these on Normal with a couple of people and your trusts. This provides a good effort to reward ratio for newer players.
- If you are solo instead then you will have to spend more seals for less reward. Others using an orbs in the group will grant you a personal pool of free chapters based on the difficulty selected so find someone else to duo with at least.
- Completing one of these on "Dificult" will unlock access to JSE Weapons.
Unity
- Meanwhile, there is Unity, which you should start breaking into. Ironhorn Baldurno drops a Bleating Mantle for DDs still working on their ambuscade cape. So depending on your equipment there is a lot of stuff here you can pick up.
- See Unity Rewards.
- Alternatively there are a few uses for the trophy rewards from these coffers. They are not simply just for upgrading that UNMs rewards, but are also used in popping common NMs in Escha or reforging AF +3. This means if you have spare accolades, you and your trusts can go about making some decent gil AHing the trophy items. Not to mention the sparks from defeating UNNs.
Delve
- Delve will provide you temporarily with some armor and weapons for your jobs. However, given the other options mentioned before this you will likely pass most of it on the way up. Given that it takes three people to enter Delve you will have a slight barrier to entry. Trusts can be called in here though after entering. You may even take in mules and disband to call 5 trusts.
- Important materials for popping some Escha NMs, to crafting, and more over upgrading some of your Reforged Armor come from Delve.
- Completing any Delve also unlocks access to JSE Weapons if you want to go this route.
Pro Tip: A.M.A.N. Reclaimer NPCs will accept most ilvl gear you don't want and trade you back points for Copper Vouchers.
Incursion
- Last and somewhat least here is Incursion. Also known as "WHERE ARE WE RUNNING TO?!" and it "F*CKING TOOK MY WEAPONS OFF AGAIN!!".
- Incursion has some useful pieces from it still, even at 99. You also may farm augmented and improved JSE Capes from it, and the Grand Coffers are used for popping Reisenjima Tier 2 NMs for good weapons.
- Most important though is that you obtain Mecistopins Mantles from the coffers in this event. These are randomly augmented back pieces with one purpose, and that is to increase your Capacity Points by up to 50% depending on which augment you get. This is the back piece which you will wear during "CP PTs" aka "Capacity Point Parties" where people earn Job Points together.
Walk of Echoes (Surged Walks)
- Yeah, almost forgot old WoEs. An event that used to be popular at 75+, was decently fun, then died, and then was made an endgame level 99 event via "Surged" WoE Battlefields. Which made it popular again, and then ilvl came out, ann~nnd it is dead.
- A couple of the Walk of Echoes Battlefield Rewards accessories are still the best for certain jobs such as the Windbuffet Belt +1 or Flume Belt +1. However, no one does WoEs until an event that keeps the battlefields in constant Surge is active. Which then drives down the price of currency for Walk of Echoes Weapons, used to unlock Empyrean Weapon Skills to dirt cheap levels. So basically you get to skip the whole event! Surely you will check it out some time. Just imagine how it was fun it must have been for a zone of strangers to go mostly pet jobs and die a lot for nearly 45 minutes. Only to get a mahogany log (what is this, Voidwatch?!).
Step 3
Primary Goals:
|
Secondary Goals:
|
| Story Time:
Optional:
|
The Arciela Directive
- The Mog Garden part was not thrilling, but it wasn't hard and just took time. Spam Revival Tree Roots and your Garden Furrows will level faster than the other areas.
- There are several Adoulin Quests that you will want to do for the rewards anyway, and I enjoyed the stories personally. If for nothing else you get the Ygnas Trust which is the healer I use since I chose Syvlie (GEO) as my Unity Trust and not Yoran or Apururu.
High-Tier Battlefields:
- High-Tier Mission Battlefields are all the fights you know and love, but repurposed. These fights grant some useful armor and the Rem's Tales #6-10 for Reforged Armor. With TH on "Normal" difficulty, the drop rate for armor from the fights is mediocre, and poor without it. On "Difficult" and beyond a piece of gear will always drop, even without TH. So once again, team up with your trusts here. You don't need a full party for "Difficult", but a trio should work fine with trusts.
Sinister Reign:
- Sinister Reign is something you can enjoy on a weekend while you get high or something. It is another random augment system that provides some good pieces of gear as well as some trusts, most notably Cipher: August as he is one of the best tank Trusts.
- If anyone is asking in /yells for this and asking for an Ultimate Weapon DD, A.K.K REAM DD then please send them something mildly insulting and say that it came from me. This event is old news, and came out when the best weapons and armor were from Alluvion Skirmish, and Mighty Guard didn't even exist yet. Players have far better gear now, and those REAM DDs don't need this content. So don't be discouraged by "that guy".
Vagary:
- Vagary is an event players seem to have a harder time with. It also favors mage setups over DDs most of the time. This event unlocks players ability to make 119 Empyrean Armor which is the only set of the three that requires the 119 being unlocked before reforging. Otherwise a couple of useful items come from Vagary, but overall the boss materials for reforging or crafting are the most important.
- Remember to set your Vagary RoE objectives when you do it for a free one time material.
Ambuscade:
- Ambuscade is likely where you will start really upgrading your equipment. By the end of Step 2 you are just some DD in Alluvion Skirmish Armor and misc items. So now it is time to work towards NQ (normal quality), +1, and +2 Ambuscade Armor.
- Make or join Volume 1 E (easy) shouts and you can reach NQ gear pretty quickly with +1 soon to follow. After that N should be getting within in reach for even more points. Once again if people are asking for "Master" or REAM jobs for Volume 1 on EASY, then please give them the old Sinister Reign greetings on my behalf. Don't worry about being new or crappy for Easy, it isn't "Normal" or beyond so you should expect other people on Easy to be just like you.
- Points are lost after each version update (not from random maintenance) and the fight changes monthly. So sometimes GEO, RDM, BRD, etc may be in huge demand, and other months it may be made useless by that month's fight mechanics.Don't be upset if your job is super popular one month, and unwanted the next. Eventually, you will have multiple jobs and that won't be an issue.
- Ambuscade takes a little bit of research each month for people as the fights are never really basic and tend to have some rather significant mechanics/gimmicks (maybe endeath, or a massive regen, etc) that need to be understood. Some players quickly set their minds to it and publish that info. Typically the information for Volume 1 is updated well on the wiki too as well as some strategies. So it is understandable if you feel a bit intimidated about shouting for a fresh month of Ambuscade, but after doing a couple you shouldn't have an issue taking what you learned and making a group.
- Finally, while you can upgrade NQ armor to +1, this is a big waste. You may only upgrade two pieces of equipment to +2 a month, and it costs half of the materials to make a +1 as it does a +2. Which means you essentially can make 0-1 +2s an entire month if you upgrade an NQ piece to +1. Conversely +1 pieces are regularly available from grinding out some extra Gallantry. This isn't a bad thing as Ambuscade is flush with items to spend extra Hallmarks on and sell on the AH. Ambuscade is a real money maker if you spam it well.
Escha:
- Escha was listed as a secondary Objective for the same reason Omen was. The primary objective content is clearly in a different (easier) league than the other events.
- Many players with help from senior players can skip right to Escha or even team up with farily newer players and take on Tier 1 Escha NMs. Thus skipping past a good deal of things, but others need more progression so that is how this was designed.
- Since you already have some acquaintance with Escha from RoV and possibly leveling here there is less mystery to this event. As for the NMs, you just look at the Escha page and trade the pop item listed to the NPC at the start. Grab a Tribulens (good for one NM) or Radialens, go beat up the NM, and repeat. As a new player you will need to team up with other players to get your foot in the door and pick up better gear here.
- Beware of dead weight as increasing the number of people in the party past 3 increases the HP of the foe.
- Generally you don't want to start taking a second and incomplete party to NMs you may be struggling with if they don't offer a real benefit. Such an example of benefit would be sticking the tank and WHM in the outside party to get more DDs into the main party for buffs.
Omen:
- Omen is a bit of a dream come true for solo-minded players. While you can't solo your way to the bosses or something of the sort, there is another option. Players may either join an alliance or just solo it themselves, and enter into a "card farm". Which is basically Omen with the NMs taken out and just ordinary monsters with objectives left. Completing more objectives results in obtaining more cards. These cards are used for creating Reforged Artifact Armor +2 and +3. Meaning players can solo their 119 +2 AF if they really want to.
- So the great news is that farming cards is the biggest bulk of making a +3, and AF 119 +2 requires no boss materials. However, +3s require a boss drop in order to forge. The good news is that the item is a 100% drop and people already want these NMs for armor and crafting materials. So changes are good that no one else in your group really wants a scale. Even then, you can farm up all the cards on your own in your spare time, +2 your AF armor, and be ready for +3ing all by yourself if you choose to.
- Otherwise Omen boss runs and their rewards are for Eschan tier geared players. The bosses drop some of the best armor/accessories as well as materials for crafting.
- Remember to set your Omen Boss RoE objectives when you do it for a free one time scale.
Pro Tip: Research your job, the game, and improve your equipment. Don't be afraid to ask real questions. We have a collection all notable job guides from around the web on our Job Guides page.
Dynamis - Divergence:
- Or simply known as Divergence, is the old and long gone level 75 era Dynamis (revamped at level 99 into what it is today) reborn for the highest content levels. This is where you will go to reforge your 119 relic armor to +2 and +3. Thankfully, there is no procing to worry about.
- The event has a two hour time limit, similar to the old Dynamis system. Upon entering the area, you are given a one hour time limit. There are two methods to extend your time, +30 minutes in wave one and +30 minutes in wave two. Both time extensions are obtained in the same way for both waves; Every statue you defeat grants a one minute extension to your time, for a maximum of 30 additional minutes. If you did not defeat 30 statues in wave one or wave two, both wave bosses grant the additional time you did not receive (up to 30 minutes) upon defeat.
- The event somewhat scales be design where you can enter with an initial one hour time limit and simply pull statues (which spawns enemies) and beat them up for
 Rusted I. Cards and "shard" item drops. Shards are used for +2 items with the slot based on the zone. Now that shards may be simply purchased off the auction house (misc 3.) it largely defeats the purpose of the cards which are exchanged at a 300:1 ratio.
- At any point you may fight the zone mid-boss statue previously mentioned which is much harder than ordinary monsters, but honestly not that crazy for any decent group to take down. The statue just chills at some point in the zone waiting for you, and upon defeat all other remaining statues and monsters will despawn and then respawn.
- The monsters from these new statues are noticeably more difficult than before and will also now drop
 Black. I. Cards instead of Rusted I. Cards. Furthermore a new zone boss will spawn near the mog house of the zone. This zone boss is of a significant difficulty to even the most well geared players. If you need a comparison, Omen bosses are a walk in the park compared to Divergence bosses. Defeating these Wave 2 bosses is necessary in order to progress to Wave 3.
- Wave 3's main purpose is to unlock access to the Ultimate Weapon Augments system. In short, "Item Level 119 III" variants of the Ultimate Weapons can now be augmented with some additional stats to push their level further. See that page for details on this system.
- The other purpose of Wave 3 is for
 Old I. Cards. These are traded for Demon's Medals, which in-turn are traded for materials to synthesize Job Master (Su 5) weapons. These weapons require the Escutcheons to craft. Most of them are rather lackluster for the price, but some prove to be rather useful. See Su5 Equipment page for details.
- Some things to keep in mind:
- You must unlock access to reforging each slot of gear for each job:
- Reforged Relic Armor +2 may be unlocked simply by entering the zone on the job you wish to reforge with.
- Reforged Relic Armor +3 may be unlocked by defeating the mid-boss statue on the job you wish to reforge with.
- Each of the four Divergence zones unlocks a specific slot of armor: feet, hands, head, and legs. Bodies unlock after you unlock all four other slots on a job.
- There is nothing to keep track of this other than the fact Aurix won't reforge for you until you unlock the armor slot on that job.
- Aurix will allow you to exchange your rusted and black cards (100:1) for
 Beastmen's Medal and
  Kindred's Medals respectively and then for the shards and voids (3:1) you need to upgrade items.
- Shard and Void items have a terrible drop rate, and only drop from the monster of the same job/sub job.
- You may receive medals in a personal pool. Each player in the alliance obtaining the mid-boss win for the first time will open up a drop slot which may potentially drop multiple medals directly to players. This feature is only a players initial win, not a win for a subsequent job they are unlocking armor for.
- Wave one boss granting beastman and the wave two boss kindred.
- For more information read through the Divergence page. Each zone divergence zone page is also done nicely with maps, details, etc.
Step 4
Primary Goals:
Secondary Goals:
|
Optional:
|
| Story Time:
Optional:
|
REAM Weapons:
- Ultimate Weapons should be the last thing you make for your character. Yet it is the thing many people get distracted with due to their perceived status and inflated importance. The large majority of your equipment slots obviously aren't your weapon. It is this majority that you should focus on as that is where your damage is coming from. Yet for some reason sometimes you will see players running around fighting in poor choices for equipment, but sporting one of these weapons. Don't be like one of those people.
- Just because you see shouts or linkshells asking for these weapons doesn't mean you need to obsess about it. Everything in due time, and move at your own pace. You aren't ever at the mercy of what people want. You are only at the mercy of the extent of your own knowledge and your resolve to get out there and do what it takes to get what you want.
- That being said Relics are the cheapest and easiest to make. Mythics and Empyreans are much more expensive and Mythic Weapons are more time involved than Empyrean weapons. Aeonics are something that may be difficult for you or really easy for you depending on the typical factors of the game. Each weapon category varies in value for each job. Some are situational, some are the best, some are niche, and some just aren't worth making. Don't be fooled, rarely some are so mediocre (I am looking at you, Ryunohige...) for the job that they are barely any better than the best ordinary weapons.
- You will have to do research or crunch real numbers to find out which weapons are the best for your jobs.
Master Trials:
- Master Trials have the making of everything serious players want and need in this game. An event that requires you master the jobs (obtain and spend all Job Points) you wish to take. Provides a real challenge over what other content does for up to an hour straight. With an entry item that costs time to get (250 merit points given to an NPC per attempt) and when it is all said and done you gain nothing except a unique lockstlye piece that does absolutely nothing besides look cool.
- Honestly, it is really fun, and I hope SE continues to add them into the game.
Augmenting Reisenjima Gear:
- Oseem, I hate you. I hate you. I don't even know you, and I hate your guts. I hope all the bad things in life happen to you and nobody else but you.
Gearswap:
- I heard you like packets dawg so we injected yo precast along with yo midcast packet so you can use quick cast with yo fast cast while yo midcast still gets on, yah dig?
- Yes, Gearswap (GS) is one of those wonderful things where the first thing everyone says is "YOU NEED IT BECAUSE IT LETS YOU USE QUICKCAST GEAR!". Sure, that is true, but GS lets you do so much more if you have a good Gearswap .lua file.
- For example, you may automate things, such as canceling a weaponskill if you are at a certain range in order to not lose TP as often. It also allows you to create key combinations to use items or abilities, and automatically swaps equipment based on your rules. For instance, anytime I become terrorized, petrified, asleep, or stunned my equipment automatically becomes a full -Damage Taken set, and when the ailment wears off I return to the set I was in.
- These equate to things you eventually never want to live without, and boost your performance by increasing your efficiency as a player. There is simply no way to do what Gearswap does with the ingame equipsets.
- The catch is that first this requires using Windower, a third party tool. The second is that there is a learning curve, and you will have to figure things out. Luckily there are premade files people share, and all you really need to do is just put in your gear and go for the most part.
Note: You should also probably check out the Windower Guides page for various resources that will help you.
GS Instructions:
- Download a text editor such as Notepad ++ in order to edit .lua files.
- Download Windower 4
- Configure your resolution and basic options via the pencil icon.
- Click "Addons" and scroll down to Gearswap and turn it on. This will download it and autoload it.
- Look around in here for other addons you may want to spice up your life.
- Locate your GS folder. Likely under C:\Program Files (x86)\Windower4\addons\GearSwap
- Right click the "data" folder and either pin it to the quick access, to start (in Windows 10), or add it to another library. This will allow you to quickly access it in the future.
- Your .luas go inside the data folder of your GS folder.
- Your GS .lua will load based on your job/character.
- Naming something WAR.lua will autoload it to any character on that computer who changes jobs to a WAR.
- Naming something Buttchug_DNC.lua will only load it for any character on that computer named Buttchug when they are a DNC.
- Find a .lua on the web, ask some friends, or check/ask in the BG Gearswap Shop Thread
- I share my BLU, RUN, and DRG .luas in my Pastebin if you need want one for either of those three jobs.
- Edit this .lua in your preferred text editor and save it.
- You must reload GS if you are currently in game and want the changes enacted.
Useful Gearswap Commands:
- //gs reload - reloads GS
- //lua unload (or load) GearSwap
- //gs showswaps - toggles on and off a text based check in your chat log to show if your GS is actually working. Cast a spell or perform an action and it should show you that your gear is changing, and lists out what changes. :*If something is on during precast, and not listed in midcast/aftercast then the same piece is being used.
- //gs validate - compares your inventory against items called in the gearswap file and reports what isn't in your inventory.
- Useful for finding spelling errors or missing gear.
- //gs export - exports your current set into a lua file within the data folder in an export folder.
- Useful for adding augmented gear to gearswap, or just for adding sets via copy paste.
Common Gearswap Problems:
- IT ISN'T WORKING
- Did you File → Save As a .lua? Did you reload GS? Did you spell things wrong?
- It loaded fine, but after putting in my gear I am getting an error.
- You likely forgot to close quotation marks around the "armor" or forgot each "armor", must have a comma after it before the next piece.
- Some other error.
- Load the GS before you even put in your gear to make sure it works. If not, and if you can't fix it then ask for help or find a new one.
Ashitacast
- Windower alternative that is separate from the Gearswap and the Windower team. It functions via .xml instead of .lua, and some people use it over Gearswap for whatever reasons they may have (generally they are more knowledgeable). I do not use it, and there is less community support for it, but if you want to use it there here is the tip off.
In Conclusion
Enjoy Final Fantasy XI.
If you appreciated this guide then please join the wiki. Help contribute information to it as you go through your journey so that others may benefit too.
- Even if you don't know anything about editing, the biggest help is from people who simply use the wiki while doing missions, quests, etc and add a line of information they think should be there.
- You can always reach out to us for help with this via the discord below or talk pages of the staff.
- The BG Discord!
- BG's FFXI Forums - Wiki accounts are linked to the forum.
- BG Forums Returning Player Thread.
- Joining the Forums is also nice for keeping the community alive. Besides, I am banned from all the other ones :P
- Getting Started page for the wiki.
