The Voracious Resurgence | |
| Prime Weapons • Ultimate Weapons • Ultimate Augments • Abjurations iL119 • JSE Necks • Divergence Augments • Escutcheons | |
| Reforged Armor Artifact: +1 • iL109 • iL119/+2/+3 Relic: +1/+2 • iL109 • iL119/+2/+3 Empyrean: +1/+2 • iL109 • iL119/+2/+3 |
Guides • Crafting • Trusts • Apex Monsters |
San d'Oria Mission 4-1: Difference between revisions
No edit summary |
mNo edit summary |
||
| (28 intermediate revisions by 12 users not shown) | |||
| Line 9: | Line 9: | ||
|Next=San d'Oria Mission 5-1{{!}}The Ruins of Fei'Yin |
|Next=San d'Oria Mission 5-1{{!}}The Ruins of Fei'Yin |
||
|Title=Have Wings Will Fly |
|Title=Have Wings Will Fly |
||
|Reward=*Rank 5 |
|Reward=*[[Image:Sandy_icon.png|22px|link=San d'Oria]] Rank 5 |
||
*10,000 |
*10,000 [[Gil]] |
||
*[[Airship Pass]] |
*{{KI}} [[Airship Pass]] |
||
*If already in |
**If already in possession of an {{KI}} [[Airship Pass]] you receive 20,000 [[Gil]] |
||
|Image=Magicite_Mission.jpg |
|Image=Magicite_Mission.jpg |
||
}} |
}} |
||
{{Color|red|Note:}} You may want to pair this Mission with your level 60 Limit Break [[Whence Blows the Wind]], as you have to visit exactly the same places.<br> |
|||
| ⚫ | |||
==Walkthrough== |
==Walkthrough== |
||
[[Image:Magicite.jpg|350px|right]] |
[[Image:Magicite.jpg|350px|right]] |
||
First head to a [[Conquest Overseer]] either in your home city or [[Jeuno]]. Trade them enough Crystals, until your Rank bar is almost or completely full. |
|||
* |
*To flag the Mission, click the '''Door: San d'Orian Emb.''' in [[Ru'Lude Gardens]] (G-10) for the {{KI}} [[Archducal audience permit]]. |
||
* |
**The 3rd door on the left in the '''San d'Orian Embassy''' is the correct one. |
||
*Click on the door to the '''Audience Chamber''' in [[Ru'Lude Gardens]] (H-5) for a cutscene and the {{KI}} [[Letter to Aldo]]. |
|||
| ⚫ | |||
* |
*Speak to [[Aldo]] in [[Lower Jeuno]], in the back of the '''Neptune's Spire''' Tenshodo H.Q. for a cutscene and the {{KI}} [[Silver bell]]. |
||
**If you have done this mission in a other Nation then you already have the bell, but you still need to talk to him for a cutscene. |
|||
| ⚫ | |||
*Obtain the 3 Magicite Key Items. '''See below for details'''. |
|||
| ⚫ | |||
| ⚫ | |||
| ⚫ | |||
'''Note:''' With [[Tractor]] and a friend who has all of the Key Items, the only Key Items that is necessary are {{KI}} [[Silver bell]] and {{KI}} [[Yagudo torch]].<br> |
|||
This mission is identical for all three [[Nations]]. If you have completed this mission in another nation, you will '''not''' have to complete the prerequisite quests again, as the Key Items are saved, you will only need to obtain the Magicites. |
|||
====Tenshodo==== |
====Tenshodo==== |
||
*Gain access to the Tenshodo by completing the quest [[Tenshodo Membership]] if you have enough fame. |
*Gain access to the [[Tenshodo]] by completing the quest [[Tenshodo Membership]] if you have enough [[fame]]. |
||
**Buy a [[Tenshodo Invite]] from the [[Auction House]] and trade it to [[Ghebi Damomohe]] inside [[Neptune's Spire]] in [[Lower Jeuno]]. |
**Buy a [[Tenshodo Invite]] from the [[Auction House]] and trade it to [[Ghebi Damomohe]] inside [[Neptune's Spire]] in [[Lower Jeuno]]. |
||
*Examine the door at the end of the hallway in '''Neptune's Spire''' to enter the Tenshodo H.Q. |
*Examine the door at the end of the hallway in '''Neptune's Spire''' to enter the Tenshodo H.Q. |
||
*Once inside speak with [[Aldo]] at (J-8) for the |
*Once inside speak with [[Aldo]] at (J-8) for the {{KI}} [[Silver bell]]. |
||
====Key Items==== |
====Key Items==== |
||
*[[Yagudo torch]] |
*{{KI}} [[Yagudo torch]]: |
||
**Speak to [[Paya-Sabya]] |
**Speak to [[Paya-Sabya]] in [[Upper Jeuno]] (I-8) and then [[Muckvix]] at (H-9) inside '''Muckvix's Junk Shop''' in [[Lower Jeuno]] for the torch. |
||
*[[Coruscant rosary]] and [[Black matinee necklace]] |
*{{KI}} [[Coruscant rosary]] and {{KI}} [[Black matinee necklace]]: |
||
**Speak to [[Sattal-Mansal]] |
**Speak to [[Sattal-Mansal]] in [[Lower Jeuno]] (J-8) behind the '''Tenshodo Guild Doors''' to start the quests [[Mysteries of Beadeaux I]] and [[Mysteries of Beadeaux II]], then trade him the [[Quadav Charm]] and [[Qdv. Augury Shell|Quadav Augury Shell]]. |
||
*[[Crest of Davoi]] |
*{{KI}} [[Crest of Davoi]]: |
||
**Speak with [[Baudin]] |
**Speak with [[Baudin]] in [[Upper Jeuno]] (G-8), trade him a [[Coeurl Meat]]. You can buy one from the [[Auction House]] or farm one from a [[Coeurl]] in [[Sauromugue Champaign]] or [[Meriphataud Mountains]]. |
||
====Maps==== |
====Maps==== |
||
Before you head out, if you haven't already bought your maps, now is the time to do it. They can be purchased for 3,000 Gil from the following NPCs: |
|||
*[[Elesca]] — [[Northern San d'Oria]] (I-8) |
|||
*[[Violitte]] — [[Southern San d'Oria]] (G-10) |
|||
*[[Karine]] — [[Bastok Markets]] (H-9) |
|||
*[[Rex]] — [[Port Bastok]] (J-7) |
|||
*[[Mhoji Roccoruh]] — [[Port Windurst]] (G-9) |
|||
*[[Pehki Machumaht]] — [[Windurst Woods]] (H-11) |
|||
*[[Promurouve]] — [[Lower Jeuno]] (H-7) |
|||
*[[Rusese]] — [[Upper Jeuno]] (H-6) |
|||
====Beadeaux (Prerequisite) ==== |
====Beadeaux (Prerequisite) ==== |
||
'''Note:''' This prerequisite can be done either ''before or after'' the [[Davoi]] and [[Castle Oztroja]] sections of this mission. It's up to you whether you want to get the requisite [[Key Item|Key Items]] now, or in concert with the [[Beadeaux]] section. |
|||
*Mages will need [[Echo Drops]] for this area. |
*Mages will need [[Echo Drops]] for this area. |
||
**[[Beadeaux]] has a gimmick whereby you must inflict [[Silence]] upon yourself when passing through certain sections to stop yourself being Cursed, [[Curse]] will decrease your HP/MP and cause you to walk slower. |
|||
*Everything in this area aggros sound, therefore only [[Sneak]] is necessary. |
*Everything in this area aggros sound, therefore only [[Sneak]] is necessary. |
||
*Set your [[Home Point]] in [[Jeuno]] and bring some form of [[Warp]]. |
*Set your [[Home Point]] in [[Jeuno]] and bring some form of [[Warp]]. (You may purchase [[Scroll of Instant Warp]] from the [[Conquest NPC]] under Common all-rank items for 10 points.) |
||
*You will have to kill two level 40-45 [[NM]] in this zone. Having [[Trust|trusts]] summoned before applying [[Sneak]] and heading out is recommended. |
*You will have to kill two level 40-45 [[NM]] in this zone. Having [[Trust|trusts]] summoned before applying [[Sneak]] and heading out is recommended. |
||
*Enter [[Beadeaux]] from [[Pashhow Marshlands]] at (L-11). |
*Enter [[Beadeaux]] from [[Pashhow Marshlands]] at (L-11). |
||
**If you have a high level helper it is easier at this point to send them ahead to kill the [[NM|NM's]] and then just lot the drops. If this is the case you can head back to [[Jeuno]] as soon as you have both items. |
**If you have a high level helper it is easier at this point to send them ahead to kill the [[NM|NM's]] and then just lot the drops. If this is the case you can head back to [[Jeuno]] as soon as you have both items. |
||
**You may also consider leveling to 60 (which is most likely your current cap). |
|||
*Follow the left wall to a tunnel at (H-7). |
*Follow the left wall to a tunnel at (H-7). |
||
*Inside follow the right wall until you get to a '''Mute''' device. Click this device and it will [[silence]] you. This will allow you to pass the up coming '''Afflictor''' without being [[Curse|Cursed]]. |
*Inside follow the right wall until you get to a '''Mute''' device inside a circular room. The ''Mute'' has an effervescent glow and appears like a huge mushroom. Click this device and it will [[silence]] you. This will allow you to pass the up coming '''Afflictor''' without being [[Curse|Cursed]]. |
||
*Head south after you have been silenced and then follow the tunnel west until you reach the exit at (F-8). |
*Head south after you have been silenced and then follow the tunnel west until you reach the exit at (F-8). |
||
*Outside reapply silence at the '''Mute''' in front of you and then head southwest to a ramp at (E-10). |
*Outside reapply silence at the '''Mute''' in front of you (There is another ''Afflictor'' in this area) and then head southwest to a ramp at (E-10). |
||
*Once you are on the upper area turn right and go across the bridge. Follow this path across a second and a third bridge then remove your silence. Follow the right wall here until you reach (H-9/10). |
*Once you are on the upper area turn right and go across the bridge. Follow this path across a second and a third bridge then remove your silence. Follow the right wall here until you reach (H-9/10). |
||
*Here you will find [[De'Vyu Headhunter]]. He is a [[Warrior]] [[NM]]. He will drop the [[Quadav Charm]]. |
*Here you will find [[De'Vyu Headhunter]]. He is a [[Warrior]] [[NM]]. He will drop the [[Quadav Charm]]. |
||
| Line 66: | Line 82: | ||
*Trade both items to [[Sattal-Mansal]]. |
*Trade both items to [[Sattal-Mansal]]. |
||
**These '''''must''''' be traded separately through the use of two trades. |
**These '''''must''''' be traded separately through the use of two trades. |
||
**If you trade him both items at once you will not get both of the [[KI|KIs]] you need to open the door in the [[Qulun Dome]]. The second item will still be in your inventory. |
**'''If you trade him both items at once you will not get both of the [[KI|KIs]] you need to open the door in the [[Qulun Dome]]. The second item will still be in your inventory.''' |
||
== |
==Magicites== |
||
===Davoi Magicite=== |
|||
''This part of the mission can be soloed but a group or high level help will make death less likely.'' |
|||
<br><br> |
|||
You will need to reach the [[Monastic Cavern]] in [[Davoi]]. Davoi is located in [[Jugner Forest]] (G-12). |
|||
*Make your way to [[Davoi]]. |
*Make your way to [[Davoi]]. |
||
*Once you've entered, head to (G-7). |
|||
*Head to (G-7). There will be two Orcs here - either kill them or sneak past them. Drop invisible and click on the '''Wall of Dark Arts'''. If you aggro the Orcs you can quickly run through the Wall to the zone a few feet ahead. |
|||
**There will be two Orcs here - either kill them or sneak past them. |
|||
| ⚫ | |||
*Drop invisible and click on the '''Wall of Dark Arts''', you'll be able to enter the [[Monastic Cavern]]. |
|||
| ⚫ | |||
* |
**If you aggro the Orcs you can quickly run through the Wall to the zone a few feet ahead. |
||
| ⚫ | |||
*You will need both [[Silent Oil|Silent Oils]] and [[Prism Powder|Prism Powders]]. |
|||
| ⚫ | |||
==== Maps ==== |
|||
| ⚫ | |||
<gallery> |
|||
| ⚫ | |||
File:Davoi-map.jpg | Davoi Map |
|||
| ⚫ | |||
File:Monastic Cavern.jpg | Monastic Cavern Map |
|||
**Select one of the levers |
|||
</gallery> |
|||
| ⚫ | |||
| ⚫ | |||
| ⚫ | |||
| ⚫ | |||
''This part of the Mission can be soloed but a group or high level help is highly recommended.'' |
|||
| ⚫ | |||
*You will need both {{ItemIcon|Silent Oil|22}} {{tooltip|text=[[Silent Oil]]|tooltip=[[File:Silent Oil description.png]]}}s and {{ItemIcon|Prism Powder|22}} {{tooltip|text=[[Prism Powder]]|tooltip=[[File:Prism Powder description.png]]}}s. |
|||
| ⚫ | |||
| ⚫ | |||
| ⚫ | |||
| ⚫ | |||
| ⚫ | |||
| ⚫ | |||
| ⚫ | |||
| ⚫ | |||
*Here follow the right wall until you reach a door at (H-9). |
*Here follow the right wall until you reach a door at (H-9). |
||
**The mobs in this area are much higher level then the ones previously encountered. |
**The mobs in this area are much higher level then the ones previously encountered. |
||
*At the door, light the |
*At the door, light the '''Torch''' and you will be taken through. |
||
*Head |
*Head south and take a right to another '''Brass Door'''. Click on the door to open it. |
||
*The zone is just beyond this door so run like hell if you have aggro. |
**The zone is just beyond this door so run like hell if you have aggro. |
||
*Inside you will be in an area with no mobs. Click on the '''Magicite''' |
*Inside you will be in the '''Altar Room''', an area with no mobs. Click on the '''Magicite''' to receive the {{KI}} [[Magicite: Orastone]]. |
||
'''Note:''' If the cutscene did not trigger, and you received a message that the "''magicite glows ominously,''" then try the following: |
|||
* |
*Go back to '''Upper Jeuno''', trigger the cutscene with [[Paya-Sabya]], go to '''Lower Jeuno''', and trigger the cutscene with [[Muckvix]] to receive {{KI}} [[Yagudo torch]]. |
||
* |
*Go back to '''Altar Room''' for an initial cutscene with [[Fickie]], and then a subsequent cutscene when touching the magicite. |
||
* |
*Seems that the {{KI}} [[Yagudo torch]] portion is required, even if someone else can get you through. |
||
=== |
====Maps==== |
||
<gallery> |
|||
| ⚫ | |||
File:Castle Oztroja-map1.jpg | Castle Oztroja Map 1 |
|||
*There are no monsters in here. Check the '''Magicite''' for your last [[Key Item]]. |
|||
File:Castle Oztroja-map2.jpg | Castle Oztroja Map 2 |
|||
| ⚫ | |||
File:Castle Oztroja-map6.jpg | Castle Oztroja Map 6 |
|||
File:Castle Oztroja-map7.jpg | Castle Oztroja Map 7 |
|||
</gallery> |
|||
===Beadeaux Magicite=== |
|||
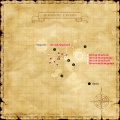
You will need to reach the [[Qulun Dome]] in [[Beadeaux]]. Beadeaux is located in [[Pashhow Marshlands]] (L-11). |
|||
*Everything in this area aggros sound, therefore only [[Sneak]] is necessary. |
|||
*From the entrance of Beadeaux, hug the left wall until you reach a tunnel entrance at (H-7). |
|||
| ⚫ | |||
*There are no monsters in here. Investigate the '''Door''' to open it. Inside you'll the find the '''Magicite''', click it to obtain the {{KI}} [[Magicite: Aurastone]]. |
|||
====Maps==== |
|||
<gallery> |
|||
File:Beadeaux-map1.jpg | Beadeaux Map 1 |
|||
File:Beadeaux-map2.jpg | Beadeaux Map 2 |
|||
</gallery> |
|||
==Conclusion== |
|||
===Final Cut Scene=== |
|||
| ⚫ | |||
| ⚫ | |||
*Click on the door to the '''Audience Chamber''' at (H-5) for a cutscene. |
|||
| ⚫ | |||
* |
*Speak to [[Nelcabrit]] in the '''San d'Orian Embassy''' to receive promotion to Rank 5. |
||
[[Category:San d'Oria Missions]] |
[[Category:San d'Oria Missions]] |
||
Latest revision as of 14:01, 3 September 2023
|
| Rewards |
|---|
|
Note: You may want to pair this Mission with your level 60 Limit Break Whence Blows the Wind, as you have to visit exactly the same places.
- This Mission is identical for all three Nations. If you have completed this mission in another nation, you will not have to complete the prerequisite quests again, as the Key Items are saved, you will only need to re-obtain the Magicites.
Walkthrough

First head to a Conquest Overseer either in your home city or Jeuno. Trade them enough Crystals, until your Rank bar is almost or completely full.
- To flag the Mission, click the Door: San d'Orian Emb. in Ru'Lude Gardens (G-10) for the
 Archducal audience permit.
- The 3rd door on the left in the San d'Orian Embassy is the correct one.
- Click on the door to the Audience Chamber in Ru'Lude Gardens (H-5) for a cutscene and the Letter to Aldo.
- Speak to Aldo in Lower Jeuno, in the back of the Neptune's Spire Tenshodo H.Q. for a cutscene and the Silver bell.
- If you have done this mission in a other Nation then you already have the bell, but you still need to talk to him for a cutscene.
- Obtain the 3 Magicite Key Items. See below for details.
- Click the Audience Chamber in Ru'Lude Gardens (H-5) after obtaining all 3 Magicites for a cutscene and your reward (either an Airship Pass, or, if you already have one, 20,000 Gil).
- Return to Nelcabrit in the San d'Orian Embassy to complete the mission, receive 10,000 Gil and Message to Jeuno (San d'Oria).
Prerequisite Quests
Note: With Tractor and a friend who has all of the Key Items, the only Key Items that is necessary are ![]() Silver bell and
Silver bell and ![]() Yagudo torch.
Yagudo torch.
This mission is identical for all three Nations. If you have completed this mission in another nation, you will not have to complete the prerequisite quests again, as the Key Items are saved, you will only need to obtain the Magicites.
Tenshodo
- Gain access to the Tenshodo by completing the quest Tenshodo Membership if you have enough fame.
- Buy a Tenshodo Invite from the Auction House and trade it to Ghebi Damomohe inside Neptune's Spire in Lower Jeuno.
- Examine the door at the end of the hallway in Neptune's Spire to enter the Tenshodo H.Q.
- Once inside speak with Aldo at (J-8) for the Silver bell.
Key Items
- Yagudo torch:
- Speak to Paya-Sabya in Upper Jeuno (I-8) and then Muckvix at (H-9) inside Muckvix's Junk Shop in Lower Jeuno for the torch.
- Coruscant rosary and Black matinee necklace:
- Speak to Sattal-Mansal in Lower Jeuno (J-8) behind the Tenshodo Guild Doors to start the quests Mysteries of Beadeaux I and Mysteries of Beadeaux II, then trade him the Quadav Charm and Quadav Augury Shell.
- Crest of Davoi:
- Speak with Baudin in Upper Jeuno (G-8), trade him a Coeurl Meat. You can buy one from the Auction House or farm one from a Coeurl in Sauromugue Champaign or Meriphataud Mountains.
Maps
Before you head out, if you haven't already bought your maps, now is the time to do it. They can be purchased for 3,000 Gil from the following NPCs:
- Elesca — Northern San d'Oria (I-8)
- Violitte — Southern San d'Oria (G-10)
- Karine — Bastok Markets (H-9)
- Rex — Port Bastok (J-7)
- Mhoji Roccoruh — Port Windurst (G-9)
- Pehki Machumaht — Windurst Woods (H-11)
- Promurouve — Lower Jeuno (H-7)
- Rusese — Upper Jeuno (H-6)
Beadeaux (Prerequisite)
Note: This prerequisite can be done either before or after the Davoi and Castle Oztroja sections of this mission. It's up to you whether you want to get the requisite Key Items now, or in concert with the Beadeaux section.
- Mages will need Echo Drops for this area.
- Everything in this area aggros sound, therefore only Sneak is necessary.
- Set your Home Point in Jeuno and bring some form of Warp. (You may purchase Scroll of Instant Warp from the Conquest NPC under Common all-rank items for 10 points.)
- You will have to kill two level 40-45 NM in this zone. Having trusts summoned before applying Sneak and heading out is recommended.
- Enter Beadeaux from Pashhow Marshlands at (L-11).
- Follow the left wall to a tunnel at (H-7).
- Inside follow the right wall until you get to a Mute device inside a circular room. The Mute has an effervescent glow and appears like a huge mushroom. Click this device and it will silence you. This will allow you to pass the up coming Afflictor without being Cursed.
- Head south after you have been silenced and then follow the tunnel west until you reach the exit at (F-8).
- Outside reapply silence at the Mute in front of you (There is another Afflictor in this area) and then head southwest to a ramp at (E-10).
- Once you are on the upper area turn right and go across the bridge. Follow this path across a second and a third bridge then remove your silence. Follow the right wall here until you reach (H-9/10).
- Here you will find De'Vyu Headhunter. He is a Warrior NM. He will drop the Quadav Charm.
- Now turn around and head northeast back toward where you came from.
- Follow the right wall now until you reach (F-6).
- Here you will find Go'Bhu Gascon, another Warrior NM. He will drop the other required item, Quadav Augury Shell.
- Head back to Jeuno.
- Trade both items to Sattal-Mansal.
- These must be traded separately through the use of two trades.
- If you trade him both items at once you will not get both of the KIs you need to open the door in the Qulun Dome. The second item will still be in your inventory.
Magicites
Davoi Magicite
This part of the mission can be soloed but a group or high level help will make death less likely.
You will need to reach the Monastic Cavern in Davoi. Davoi is located in Jugner Forest (G-12).
- Make your way to Davoi.
- Once you've entered, head to (G-7).
- There will be two Orcs here - either kill them or sneak past them.
- Drop invisible and click on the Wall of Dark Arts, you'll be able to enter the Monastic Cavern.
- If you aggro the Orcs you can quickly run through the Wall to the zone a few feet ahead.
- Inside there will not be any enemies. Walk down the path into a large room and inspect the Magicite to obtain the Magicite: Optistone.
Maps

Davoi Map
Monastic Cavern Map


Castle Oztroja Magicite
This part of the Mission can be soloed but a group or high level help is highly recommended.
- You will need both
 Silent Oils and
  Prism Powders.
 - There are areas of this zone where anyone under Level 60 will still receive aggro.


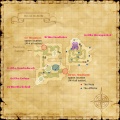
You will need to reach the Altar Room in Castle Oztroja. The Castle is located in Meriphataud Mountains (L-8).
- Enter the Castle and head to the Brass Door at (I-8). You will see a lever at either side of the door. One lever will open the door and the other will open a trap in the floor and cause you to fall into a pit. There is a very easy way to open this door:
- Stand between the two levers in front of the door, click one of the levers and immediately run back.
- If it is the trapped lever there is some lag between when the lever is clicked and when the trap door opens. If the door opens run through, if the trap opens wait for it to close and then use the other lever.
- The game is very picky about where you stand to hit the lever. You may have to move around a bit until you don't see the "Target is out of Range" message.
- Proceed upstairs, you'll be on Map 2. Head to (G-7) where you will exit into a courtyard in Map 6.
- On this map, head north (without falling off) to a hallway entrance at (I-7) which will lead you to Map 7.
- Here follow the right wall until you reach a door at (H-9).
- The mobs in this area are much higher level then the ones previously encountered.
- At the door, light the Torch and you will be taken through.
- Head south and take a right to another Brass Door. Click on the door to open it.
- The zone is just beyond this door so run like hell if you have aggro.
- Inside you will be in the Altar Room, an area with no mobs. Click on the Magicite to receive the Magicite: Orastone.
Note: If the cutscene did not trigger, and you received a message that the "magicite glows ominously," then try the following:
- Go back to Upper Jeuno, trigger the cutscene with Paya-Sabya, go to Lower Jeuno, and trigger the cutscene with Muckvix to receive Yagudo torch.
- Go back to Altar Room for an initial cutscene with Fickie, and then a subsequent cutscene when touching the magicite.
- Seems that the Yagudo torch portion is required, even if someone else can get you through.
Maps

Castle Oztroja Map 1

Castle Oztroja Map 2
Castle Oztroja Map 6

Castle Oztroja Map 7


Beadeaux Magicite
You will need to reach the Qulun Dome in Beadeaux. Beadeaux is located in Pashhow Marshlands (L-11).
- Everything in this area aggros sound, therefore only Sneak is necessary.
- From the entrance of Beadeaux, hug the left wall until you reach a tunnel entrance at (H-7).
- Make your way down the tunnel and once you reach the intersection, go left. You'll zone into Qulun Dome.
- There are no monsters in here. Investigate the Door to open it. Inside you'll the find the Magicite, click it to obtain the Magicite: Aurastone.
Maps
Beadeaux Map 1

Beadeaux Map 2


Conclusion
Make your way back to Ru'Lude Gardens.
- Click on the door to the Audience Chamber at (H-5) for a cutscene.
- Speak to Nelcabrit in the San d'Orian Embassy to receive promotion to Rank 5.
