Greetings fellow Dragoons,
I’m Darcain, a career Dragoon with my wyvern Tatang. This is a journal of my findings and notes from over the years. I’ve collected and condensed them down to the more unique aspects of my discoveries. The information below may not be for everyone. I’m putting it here as a way to memorialize it, as well as share with those who may be interested. The content below takes no consideration for cost, or if it’s “worth it”, inventory, or even other jobs when it comes to selecting certain reward items. Enjoy.
Update: The statements and values listed below reflect Master level: 30, and max leveled up parameter boosts from wyvern, unless stated otherwise.
Tatang's Journal
Chapter One
Spirit Link / Empathy
Buffs can be copied that have little to no effect.
Buffs do not simply copy in order from left to right of screen.
- Prior to testing all buffs were independently confirmed to be able to copy.
- Buffs left to right: Blink, Haste, Protect V, Shell V, Barfire, Stoneskin, Aquaveil, Regen IV.
- Buffs copied: Protect V, Shell V, Barfire, Haste, and Regen IV. (5 buffs)
- Skipped over Blink, Stoneskin, and Aquaveil but did Regen IV which was last buff to right.
- Tested on a separate occasion with more buffs and similar results: This time priority was given to Stoneskin, Auspice, and bar spells over Haste and Protect V (still took Shell V).
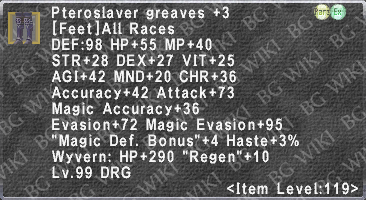
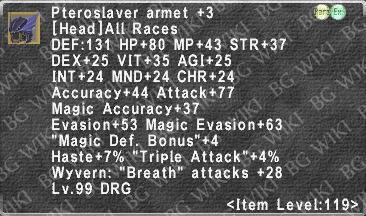
Pteroslaver Greaves +3 Empathy augment add up to a 50% increase to transferred buff duration not 25%.
- Tested multiple times, each time buffs lasted +50% longer not 25% with 5/5 Empathy merits.
- Must increase buff duration by 10% per merit level for a maximum of +50% duration.
- Not that you would; but if you copy buffs with Pteroslaver Greaves +3 Empathy augment then Spirit Link again without the feet, the buff durations are set back to normal.
Spirit Link formula: “(Player HP Lost + MND + α)x2 = wyvern HP Restored” is not accurate. It’s significantly off.
- Proposed new “formula”: (Wyvern Level Modifier) + (MNDx2) + (Player HP Sacrificedx5) = wyvern HP Restored for a mastered DRG with -20% HP Sacrificed job point category. For non-mastered DRG, Player HP Sacrificed is 4x.
- I say “formula” because there seems to be a formula to express the “Wyvern Lv. Modifier” revealed by rounding errors, but I’m not able to derive it. However, I’ve been able to calculate it for the following wyvern levels:
Wyvern Level Modifier
| Wyvern Level |
Modifier
|
| 99 |
138
|
| 117 |
332
|
| 118 |
336
|
| 119 |
345
|
| 120 |
354
|
| 121 |
365
|
- These numbers assume your equipment is all ilvl 119, as it was found during testing that your overall ilvl has an effect on this part of the formula as well -- not only wyvern ilvl from main hand weapon.
- Since there is a formula these numbers can be +/- 1 from the above values due to rounding.
- Adding wyvern HP has no effect on HP recovery.
- Leveling up your wyvern’s parameters from Empathy/Spirit Link has no effect on HP recovery.
- I believe “Player HP Sacrificed” is also rounded from the percent lost, and is not necessarily the number of HP lost. So multiplying the amount of HP lost 5x can also introduce rounding errors.
- Master Job points -20% HP sacrificed could play a part in rounding errors too.
- Percent lost is not 25-35%. For non-mastered DRG it’s about 12-17% sacrificed. For Mastered DRG it’s about 10-15%, with the average sacrifice being somewhere in the middle.
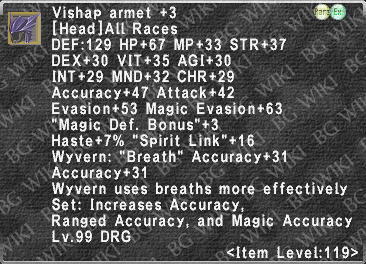
- “Spirit Link +” equipment such as Vishap Armet +3, Pelagos Lance, and Pratik Earring do nothing more than add the amount listed towards wyvern HP Restored -- +16 HP, +30 HP, and +50 HP respectively.
- Lowering HP sacrificed was not observed with Vishap Armet +3. The sample was small, but it’s likely to only add HP towards recovery.
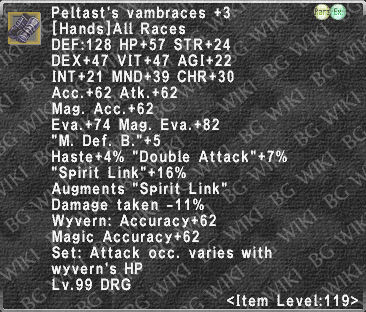
- Peltast’s Vambraces +1: This is a 12% boost that is calculated after the standard formula plus any "Spirit Link +" equipment. This increases rounding errors.
- In the end, expect +/-3 from actual values. But more often than not it’s spot on.
HP Sacrifice:
- Will still sacrifice maximum HP to heal even 1 HP.
- Exception is a non-parameter level boosted wyvern. Wyvern can be near death but no HP will be sacrificed and the recovery amount displays “0 HP recovered”. However, the wyvern will be brought to max HP.
Some buffs that cannot copy:
Enhanced Protect and Shell from Sheltered Ring copy to Tatang enhanced.
Conditions Spirit Link cannot remove:
Removes Sleep without recovering HP.
Transfers half TP effect:
- Rounding – E.g., wyvern has 113 TP, after Spirit Link wyvern has 57 TP (rounded up) Dragoon has 56 TP (rounded down). Overall 113 TP remains same difference.
Chapter Two
Other Findings / Info
- Tatang translates to “Father” in Filipino.
- It’s a boy! Tatang is a boy. In-game text says “Tatang parries the <t>’s attack with his weapon.” (Game text will say her weapon for female characters and avatars etc.)
- Giving your wyvern a female name has no effect on this; even if you literally name your wyvern “Lady”.
- Master Levels: Wyverns gain +1.5 Acc, Att, Eva, Def, and +7 HP per level before any increases from Spirit Link or innate wyvern increases.
- It is unknown if there are increases to other stats such as Meva, Mdef, Macc, etc.
- Wyverns have 2,655 HP without equipment.
- Vorseals affect wyvern too.
- Weakness: Having Raise weakness condition on Dragoon has no effect on wyvern.
- Tatang’s Elemental and Healing Breath still work at max potency. Which means HP is unaffected. Confirmed HP by using Pteroslaver Mail +3 to test jump additional damage which is 100% of the wyvern’s HP.
- Also "/checkparam <pet>" shows no effect on Att, Acc, Def, or Eva while Dragoon is weak.
- Wyvern is not considered hand-to-hand, dual-wield or a two-handed weapon.
- Zanshin does not work with hand-to-hand or dual wield but wyvern gets Zanshin multi attack procs by transferring Samurai sub job traits.
- Wyvern does not receive full benefit of two-hand job abilities such as Hasso.
- Enemy wyverns can have MP (drained by Aspir), but Tatang does not yield MP from Aspir.
- However, it is possible for Tatang to have MP under the effect of Vorseals (Tested by Aspir).
- Tested Beastmaster Reward job ability by subbing BST and using Pet Food Theta. However, it does not allow me to use the ability with Tatang out.
- Cannot have another pet with wyvern. I even tried to summon a water elemental via Poseidon’s Ring which did not work.
- Deep Breathing: Has no status effect symbol on Dragoon because it applies to wyvern. Despite not being a pet command and all animations are on the Dragoon. Wyvern gets wears message after 3min: “Tatang’s Magic Atk. Boost effect wears off.”
- Wyvern Subtle Blow trait is +40% or more according to JP Wiki. Here
Chapter Three
Job Abilities & Equipment
Dark Matter Augment Suggestions:
- Not really going for Weapon Skill Damage anymore with Nyame as an option. Choose a piece that could potentially be best in slot for multiple sets for the best chance at something useful. E.g., legs with 3QA even with no Acc could be BIS for some TP sets, or you could roll 10 STP for jump set(s) etc.
- On the other hand, 3QA alone on head would not replace Flamma Zucchetto +2 for TP or jump sets.
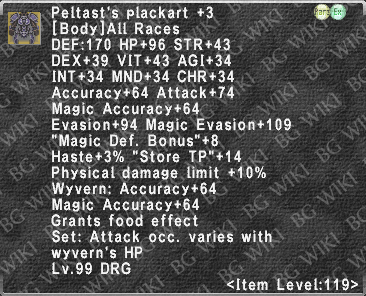
- Take consideration of possible upgrades to Peltast’s Armor Set in the future.
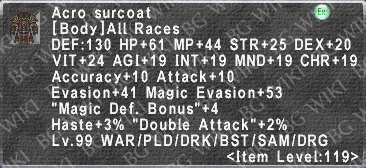
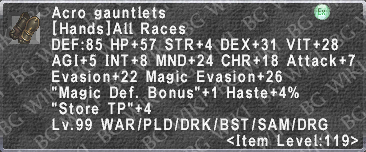
Wyvern Items:
Vim Torque +1 R15:
- Tip: Have on macro to wake yourself from Sleep while engaged.
- The 20 Regain Tick can sometimes proc when swapping in for jumps, but so can the drain HP tick.
- The reason is because ticks are set to a global timer, not from the time the item was equipped. So watch your HP. See Byrthnoth’s post on global ticks: Here
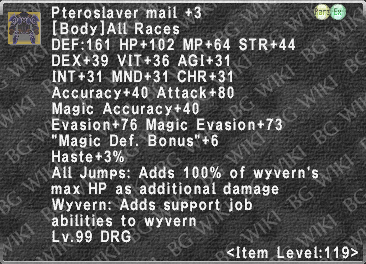
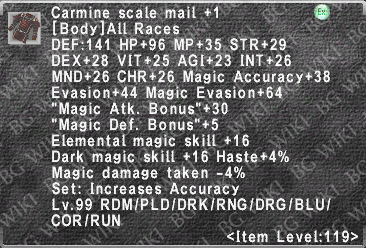
Pteroslaver Mail +3:
- Additional effect is magical breath damage that Macc does not matter. As such, it can hit through Invincible etc. Only BDT/DT can reduce its potency.
- HP / Damage = 2,655.
- Breath + equipment and breath + augments have no effect on this. Ardor Pendant was even tested (which doesn’t even work for regular Elemental Breath attacks), there was no effect.
- Only maximum wyvern HP can boost this damage.
- But macroed-in wyvern +HP equipment does not work.
Wyvern +HP Equipment:
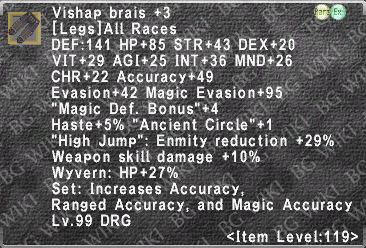
- Wyvern HP is boosted by 30% when you max wyvern level up parameters. Wearing Vishap Brais +3 boosts wyvern HP by an additional 27%.
- These boosts apply after any other equipment, giving a total of up to +57% more HP over the face value of wyvern / pet +HP equipment.
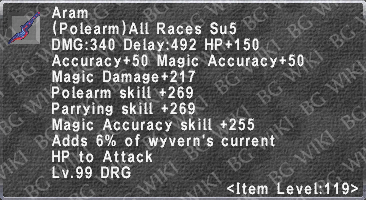
- Current max wyvern HP = 4,846 with R15 Path C Aram. Without Aram max wyvern HP = 4,453.
Wyvern Regen Options:
Idle Set Suggestions:
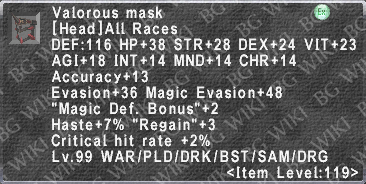
- Valorous Mask: For the Regain
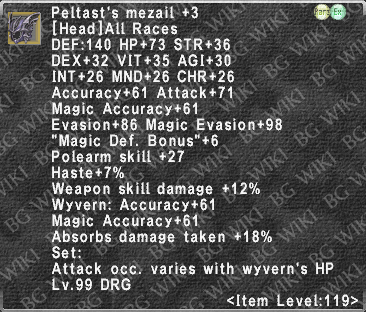
- Pteroslaver Mail +3: Copies sub job traits to wyvern upon zoning. Usually sub Samurai for example. That’s +15 STP, +25 Zanshin, +20% Resist Blind, and +8% Demon Killer for wyvern.
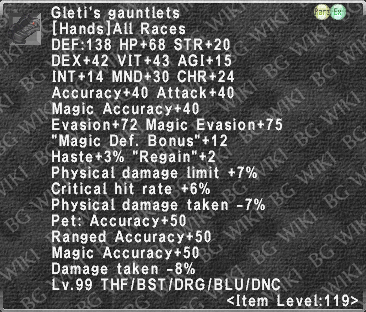
- Gleti’s Gauntlets: For PDT -7%, 2 Regain, and wyvern: DT -8%.
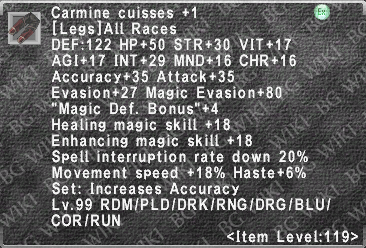
- Carmine Cuisses +1: For +18% movement speed.
- Path A R15 for added idle stats.
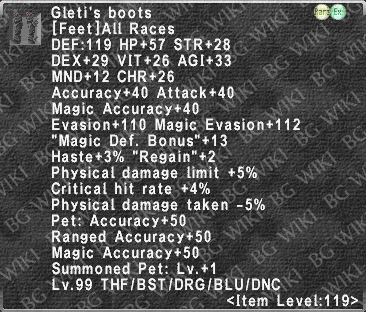
- Gleti’s Boots: For PDT -5%, +2 Regain.
- R25 for +13 Evasion.
- Despite the wording of “Summoned Pet: Lv.+1” on armor that’s for two pet jobs it only works for Beastmaster Charmed pets. Not sure if bug or poor wording. It was reported to official forums and moved to “Accepted Bugs”. Here
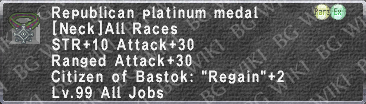
- Republican Platinum Medal: For +2 Regain
- Isa Belt: For Pet: 10 Evasion, 1 Regen, and DT -3%.
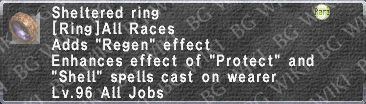
- Use Sheltered Ring in idle set. Not only will it give you Regen and boost your own Protect and Shell but your boosted Protect and Shell values copy over to wyvern with Spirit Link / Empathy for added durability during fights.
- Karieyh Ring: For +5 Regain.
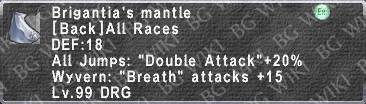
- Brigantia’s Mantle: VIT+30, Eva/Meva+20, PDT -10%, 10 pet Regen. Or similar.
- Consider filling extra slots with DT etc.
- This idle has 16 pet Regen. Could be +21 if you want to sacrifice PDT -10% for 5 more pet Regen.
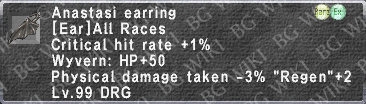
- Could also add +2 pet Regen from Anastasi Earring. However, depending on your play style you may not want wyvern +HP in idle set; for the reason that you cannot Dismiss wyvern and call back right away if dismissed below 100% HP.
Wyvern: Damage Taken / Tank Stuff:
- Tip: Super Jump to put hate on wyvern. Use in “wipe” situations. Wyvern can live through just about anything in this set while you stay as far away as possible. This will give the party a chance to raise and recover without the fight resetting.
- Wyvern / Pet DT equipment is calculated as x/256.
- E.g., Isa Belt’s DT -3% is really DT -2.7%. (.03*256 = 7.68. Drop the .68 7/256 = 2.7)
- Other equipment follows this same pattern.
- Wyvern innate DT -40% is actually -39.9%. Which is not exactly 102/256 so not sure what is going on there. This was tested on 1k needles hitting for 601 HP.
- This set includes -89.12% DT (126/256 equipment + 39.9% innate wyvern) (Cap is 87.5%) even without DT augment on Updraft Mantle.
- Absorbs Damage +24%, HP + ~1,781, Regen +11, VIT +7, INT +20, Eva +10, and wyvern level +3 stats, less the HP.
- Consider filling extra slots with DT etc.
- This set gives up ~174 HP (111 +57%) in return for regen +16.
Spirit Link:
- Don’t forget MND plays a role in how much HP the wyvern recovers, 2 times the amount of MND you have to be exact.
- Consider adding equipment with high MND to fill unused slots. Options shown below.
- As mentioned earlier, Vishap Armet +3, Pelagos Lance, and Pratik Earring have vague descriptions, but they increase Spirit Link HP recovery by the amounts listed: +16 HP, +30 HP, and +50 HP respectively.
- Lowering HP sacrificed was not observed with Vishap Armet +3. The sample was small, but it likely only adds +HP towards recovery.
- Regal Gloves: Damage taken converts to TP does not proc on HP lost from Spirit Link or Spirit Bond.
Spirit Surge:
- Tip: Use if you’re about to die and Super Jump and Restoring Breath are both down, and doing so could give you enough time to finish off your target.
- Macroed-in wyvern +HP equipment does work. Tested numerous times on separate occasions. During last testing I specifically waited until after a Tick so there wasn’t a chance it was ticking up HP at the time of activation. It is possible, as with any set, that intense lag can cause this to fail. But out in the open it works just fine.
- Consider filling extra slots with DT etc.
Call Wyvern:
- Tip: Have your wyvern called early (20 min when possible) before the content you’re about to do in case of early K.O. or Charm, etc. You will be able to call back right away.
- Consider filling extra slots with DT etc.
Dismiss:
- Tip: Dismiss wyvern at 100% HP and Call Wyvern is reset. Useful if you know you’re going to wipe and Call Wyvern is not ready yet.
- Be mindful of adding wyvern / Pet +HP in idle set as it could negate the reset as mentioned above.
Dragon Breaker:
Ancient Circle:
- Consider filling extra slots with DT etc.
Angon:
Spirit Bond:
Steady Wing:
- Macroed-in wyvern +HP equipment does not work. But you can still create a set to equip ahead of time if you like.
- Damage Negated = 1.3 x Max wyvern HP – Current wyvern HP.
- Minimum Stoneskin effect = 796.5 HP at 100% HP (2,655*1.3) – 2,655 = 796.5.
- Theoretical max possible Steady Wing Stoneskin = 6,298.8 HP. If wyvern only has 1 HP and max HP set with Aram. (4,846*1.3) – 1 = 6,298.8.
- Consider filling extra slots with wyvern DT etc.
Smiting Breath / Elemental Breath:
- Tip: Wyvern Elemental Breath can be used to determine magic weakness on an enemy.
- Max Elemental Breath = 1,165.
- “Breath attacks +” on equipment caps at 25.
- Nyame with “Pet: DMG +5%” augment path works on Elemental Breath damage and comes with 70 pet Macc.
- See Bixbite’s test for results: Here
- While it comes with extra pet Macc, its peak damage potential is actually lower than Alluvion Armor +8 Breath augment, and there are better augment path options for DRG.
- “Wyvern: Lv.+1” Affects Att and Acc, and appears to affect Matt after some testing. None of that matters for Elemental Breaths. However, it seems likely it would affect Macc too. Consider filling unused ring slot with Dreki Ring until proven otherwise or something better becomes available.
- Your wyvern will spend a lot of time in this set. Consider adding pet DT augments too.
Restoring Breath / Healing Breath:
- Macroed-in wyvern +HP equipment does work.
- Max Healing breath set is currently 2,841 HP without Aram weapon swap.
- Enhances Cure + received equipment has no effect on Healing Breath potency.
- Consider filling extra slots with DT etc.
Pet Kill:
Chapter Four
What’s Next / Questions
Peltast’s Armor +3 hypothetical suggestions for potential upgrades:
Other:
The following are personal unanswered questions as well as some of the wiki links with the require more info “?”:
- Personally my number one question is: Does wyvern: Lv.+1 affect Elemental Breath magic accuracy? I asked this question during the developer Q&A but was ignored.
- Initial Testing suggests it increases Matt along with Att and Acc, so it is likely.
- To even prove if there’s an effect would be a step in the right direction. Exact values can come later.
- Empyrean Armor: Set bonus 1 or 2%? (Figure out before Peltast’s Armor +3)
- Master Levels: Increase wyvern Macc, Matt, Meva, Mdef? Dev post Here suggests there is an effect on Meva at least.
- Spirit Link: Determine precise formula / mechanics. MND cap?
- Empathy: Determine 5 buff transfer priority?
- Spirit Surge: Gain any effect of the wyvern’s new 10 WSD contribution?
- Any DA carry over from job points?
- Dawn Mulsum: Wyvern +HP set work on activation to provide additional healing percent?
- Vishap Armet +3: Does it actually enhance wyvern Elemental Breath weakness targeting? Wyvern seems to already do this accurately.
- Peltast’s Vambraces +1: “Removes 2-3 more debuffs from the wyvern” Marked with Information Needed “?” on the Spirit Link page.
- JP wiki says it’s equal to Panacea and Erase effect, implying it can remove more in a single use. Here
I realize some of the points I’ve made are contrary to some of the information that’s currently available. If anything is questionable, please feel free to validate and let me know. I would like to update the wiki with what I can, but could use some help. Some results may need to be replicated before updating. Any discussions on this page can take place at FFXIAH Here. If you feel the need to edit anything here, please contact me before doing so.
To be continued…