The Voracious Resurgence | |
| Prime Weapons • Ultimate Weapons • Ultimate Augments • Abjurations iL119 • JSE Necks • Divergence Augments • Escutcheons | |
| Reforged Armor Artifact: +1 • iL109 • iL119/+2/+3 Relic: +1/+2 • iL109 • iL119/+2/+3 Empyrean: +1/+2 • iL109 • iL119/+2/+3 |
Guides • Crafting • Trusts • Apex Monsters |
Bhaflau Remnants II
|
|
- The entrance area for Bhaflau Remnants II can be reached by using the southeast teleporter on the Nyzul Isle map of the Alzadaal Undersea Ruins.
- Bhaflau Remnants II has far fewer monsters than the other Level 99 Salvage areas, and on floors 1 and 2, each monster has considerably more HP than monsters in the other zones. However, the primary unlock method in Bhaflau is via Runic Lamp rather than via defeating monsters. Each non-NM defeated on floors 1 and 2 yields 10 Runic Lamp uses on the next floor (i.e. clearing all 7 non-NM monsters on floor 1 will allow 70 Runic Lamp uses on floor 2). Defeating one of each type of monster will allow you to use the next floor's lamp to unlock that monster's associated restrictions, so it is possible to have a full party very close to fully unlocked at the Runic Lamp on floor 3.
Notorious Monsters & Drops
| Notorious Monsters | |||
|---|---|---|---|
| Notorious Monster | Location(s) | Plans Dropped | |
| Throat Tearer Tregotroq | F1 (east) | Ritualistic Plans x1 | |
| Silent Smotherer Silak | F1 (west) | Tutelary Plans x1 | |
| Smouldering Dahak | F1 (center) | Ritualistic Plans x1 Tutelary Plans x0-1 | |
| Troll Occultist | F2 (center) | Ritualistic Plans x1-2 Tutelary Plans x0-1 | |
| Troll Spellbinder | F2 (northeast) | Tutelary Plans x1-2 Ritualistic Plans x0-1 | |
| Troll Pugilist | F2 (southeast) | Tutelary Plans x1-2 Ritualistic Plans x0-1 | |
| Troll Guardian | F2 (northwest) | Ritualistic Plans x1-2 Tutelary Plans x0-1 | |
| Troll Huntsman | F2 (southwest) | Primacy Plans x1-3 | |
| Archaic Gear (NM) | F4 (east) | Ritualistic Plans x1-2 Tutelary Plans x0-1 | |
| Archaic Gears (NM) | F4 (west) | Tutelary Plans x1-2 Ritualistic Plans x0-1 | |
| Acrolith (NM) | F4 (east) | Ritualistic Plans x1-2 Tutelary Plans x0-1 | |
| Acrolith (NM) | F4 (west) | Tutelary Plans x1-2 Ritualistic Plans x0-1 | |
Optimized Plans Farming
Note: On either path, the second Troll on F2 can be substituted for going west -> southwest to Troll Huntsman. This will reduce the available Ritualistic and Tutelary Plans but add 1-3 Primacy Plans to the total.
Ritualistic Plans
The following route will acquire 6-10 Ritualistic Plans and 0-5 Tutelary Plans. This is the best (and only) path for farming Ritualistic Plans in any area.
- F1: East: Throat Tearer Tregotroq, then Smouldering Dahak
- F2: Troll Occultist, then west -> northwest to Troll Guardian.
- F3: Teleport East
- F4: East: Archaic Gear, then Acrolith
Tutelary Plans
The following route will acquire 4-11 Tutelary Plans and 2-6 Ritualistic Plans. This is the best path for farming Tutelary Plans in any area.
- F1: West: Silent Smotherer Silak, then Smouldering Dahak
- F2: Troll Occultist, then east -> northeast or southeast to Troll Spellbinder or Troll Pugilist.
- F3: Teleport West
- F4: West: Archaic Gears, then Acrolith
First Floor
|
| |||||||||||||||||||||||||||||
|
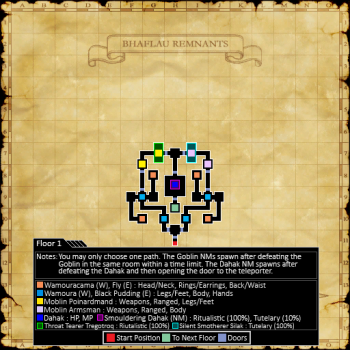
Central Start Room
West path Notorious Monsters
East Path
East path Notorious Monsters
Central Area
Central Notorious Monsters
|
Second Floor
| ||||||||||||||||||
Central Area
- The central loop will contain one each of Troll Stoneworker (SE), Troll Smelter (SW), Troll Cameist (NE), and Troll Gemologist (NW).
- Notorious monsters in the corner rooms will only be spawned if the corresponding monster in the central area was killed prior to opening the door to leave the central area.
- Once the door to the east or west past is opened, the opposite door will lock, and Troll Occultist (NM) will spawn in the northern room of the central loop (H-8).
East Path
- The east path contains one Troll Lapidarist in the center area and two more Troll Lapidarists to the north and south. Opening the door to the northeast will lock the door southeast, and vice versa.
Northeast Room
- The northeast room contains Troll Spellbinder (NM) if Troll Cameist was killed prior to exiting the center area. This NM is a RDM and will use Chainspell.
Southeast Room
- The southeast room contains Troll Pugilist (NM) if Troll Stoneworker was killed prior to exiting the center area. This NM is a MNK and will use Hundred Fists.
West Path
- The west path contains one Troll Engraver in the center area and two more Troll Engravers to the north and south. Opening the door to the northwest will lock the door southwest, and vice versa.
Northwest Room
- The northwest room contains Troll Guardian (NM) if Troll Gemologist was killed prior to exiting the center area. This NM is a PLD and will use Invincible.
Southwest Room
- The southwest room contains Troll Huntsman (NM) if Troll Smelter was killed prior to exiting the center area. This NM is a RNG and will use Eagle Eye Shot.
Third Floor
| ||||||||||
|
While the path you start in is restricted depending on where you teleported from 2F, the general layout of monsters is identical regardless of which direction you come from:
|
Fourth Floor
| ||||||||||
|
The available path will be determined by which teleport was used on 3F. Western Path
Eastern Path
Central Area
|
Fifth Floor
If Cerberus was spawned on the fourth floor (whether or not it was defeated), the final boss, Orthrus Seether, will spawn upon entering the last room. If Cerberus was not previously spawned, it will spawn here instead of Orthrus Seether.
- Both Cerberus fights are similar, and as noted above, weapons or abilities which deal non-physical damage can be extremely helpful.
- Orthrus Seether can use Acheron Flame at low HP (<25%) and Gates of Hades at <50%.
- Defeating Orthrus Seether yields the title Bolide Baron.


