The Voracious Resurgence | |
| Prime Weapons • Ultimate Weapons • Ultimate Augments • Abjurations iL119 • JSE Necks • Divergence Augments • Escutcheons | |
| Reforged Armor Artifact: +1 • iL109 • iL119/+2/+3/+4 Relic: +1/+2 • iL109 • iL119/+2/+3/+4 Empyrean: +1/+2 • iL109 • iL119/+2/+3 |
Guides • Crafting • Trusts • Apex Monsters |
Better Dynamis-ing
Overview
Better Dynamis-ing Compiled by Mikumaru
|
|
- "5 Levels breaks this game" - Hakudoshi
- "If you Think it will link, give it a plink" - Vespajava
- "Is that Aurix?" - Everyone in Dynamis D, always.

- "I got a resist, bringing some friends" - CORs on Lightsday
- "Watch out, the 'insert Volte NM name here' is handing out naps from his Nap Sack" - Mikumaru
A Note from the Author:
This Guide is meant to help the uninitiated enter the Shrouded Realm of Dynamis Divergence and clarify some of the more ambiguous information from the main article while not crapping it up with alot of minutiae. You already know how to enter and sort of what to expect. This is to help you and your group better manage your trips since failure results in a 60 hour wait to try again.
Common Parlance: Jargon used through the guide
- Plink - One shotting a statue to prevent the spawning of monsters or get a time extension.
- Binky - a monster used as a TP battery, usually from a Blue Eye statue. Baby need milky.
- Trash - Non-Leader Mob. As all monsters check as Impossible to Gauge, using the term 'NM' can be confusing.
- Leader - The Baddest of the Bad.
- Halo - Elemental Circles/Angons.
- Mid Boss - The Wave 1 Statue Boss that closes out Wave 1 and begins Wave 2 upon defeat
- Zone Boss - That guy in that spot with the cool hat who wants to kill you and all your friends. Defeat this guy and Wave 3 starts.
- Griefer - The Disjoined NM spawned by the Halo when engaged. This term is used to disassociate this NM and the actual Wave 3 NM.
- Disjoined/Mega/Bag - The Wave 3 Boss.
Raw Numbers
Hard, fast data of known variables to overcome
- The numbers provided are not exact. This is information gleaned after many runs and eyeballing results.
| Wave 1 | Wave 2 |
|---|---|
| 20,000 | 25,000 |
- Accuracy Requirements: These numbers are whats known to hit a capped hit rate on most monsters. Evasive jobs like THF, NIN, and RNG may require more.
| Wave 1 | Wave 2 | Wave 3 |
|---|---|---|
| 1250-1300 | 1375-1400 | 1625+ |
- As monster evasion goes up, so does HP and Defensive stats.
- Monster HP: These are approximate as Family/Race and Job Class contribute to this stat.
| Wave 1 Trash | Wave 1 Leader | Wave 2 Trash | Wave 2 Leader | Wave 3 Trash | Wave 3 Leader |
|---|---|---|---|---|---|
| 50,000+ | 650,000+ | 80,000+ | 750,000+ | 100,000+ | 350,000+ |
- Wave 1 Aurix
- Wave 2 Aurix 350,000-ish
- Disjoined - 25,000,000 (Square has stated they have 20M , but we have found this to not be quite the case. the number is closer to 25M looking at parse numbers and comparing it to HP remaining)
Statues and the mobs they spawn
- W1 and 2 Trash Statues will spawn between 2 and 7 monsters. Some Statues have what jobs will spawn fixed, but many are random. An example of Fixed Trash Spawn is the Statue at the MH in San D. It will spawn 3 NIN Orcs. 100% of the time. 'Traps' located through the zones typically spawn no Monsters and more Statues, which in turn only spawn 2 monsters each in most cases but not all. An Example is the Jeuno Wave 1 Traps in the Ducal Chamber. These 2 statues will each spawn 5 more that spawn 2 monsters each.
- Once spawned they are dont stay linked but they have a wide vision cone, if sight, and a large radius if sound, making clean pulls very hard after recovery.
- Statues are all True sight and have a 180 degree cone of sight that extends 10 yalms from center. 12 is safe, just in case. They link by Sight with other statues and the monsters spawned from them, including Aurix.
Emnity can be a bit weird. One thing is for sure however, if you get aggro the only way to lose it is to kill or be killed. It doesnt matter if its from a statue or a specific monster. Trash, leader, or Boss. It will hunt you down and attack you. We have seen instances of Aggro through walls even after a wipe.
- A special note for all the cheaters: Plan on using TAKO or Clipper? Be careful. There is anti-cheat AI baked into all Monsters. If you are somewhere you shouldnt be, normal Aggro AI is thrown out the window. Think you can avoid DMG by hiding in a Wall or the floor? The Monsters will instantly Warp to you and beat you down. You can warp around the zone as much as you want, but you will never lose aggro. Use caution as it can upset the emnity table and cause unwanted things to happen, like links, spawns and other chaos.
Tactics and strategies to Clear Wave 1, Farm W1 & 2
Wave 1, +3 Unlocks, and Generic Tactics that span all Waves
- The info below is for those who wish to go about it old school as a new means of unlocking has been added. Simply defeating 100 foes will grant access to the +3 item of the designated location.
If you simply want to unlock Relic+3 gear all you need do is defeat the Mid-Boss. Some jobs are easier to make work but at the end of the day, you can make any combo of jobs work. The main strat to do the thing uses a tank to engage the statues blocking progress while the PT clears the trash they spawn. Its that simple. PUP bots are robust and a great tool for groups who may be punching above their weight. With the Rao Set, a PUP should have little trouble holding the statue and it's spawned friends if built properly. They can hold the pile while you peel them off one at a time. Hopefully, you can clear them before the Bot kills the statue. This is a very safe and effective method for weaker groups that need to unlock equipment but can run into trouble quickly if pulls are done haphazardly. The quick and dirty shopping list of what is needed for a smooth ride is as follows:
- Tank
- Healer
- Crowd Control
- Plinky Plinkerton
- 3 cans of Whup-ass - Whup-ass, Whup-ass Lite, Whup-ass Zero Sugar
- With San D being the exception, you will need to clear at least a few statues to make it to the Mid-Boss. I'll list specific strats for the quickest possible routes below. San D'Oria's Mid-Boss can be reached only requiring 1 statue to be cleared. There is a reason for this. Put a pin in that for later.
- Highly recommend your group, no matter the size have 1 of each of these jobs present : COR BRD RDM.
| COR |
|---|
| the easier job to gear to be Plinktastic Vs. BLM which requires Su4 Job Points and a decent Death Set. Plus it can buff a PT. Buffs are good, See ACC requirements. |
| BRD |
|---|
| is, was, and always will be the Apex Supporter. Capped Haste? Check. AoE Sleep? Check. Can be a healer or a DPS? Double check. Remember those ACC requirements? Madrigal got chu. The one Caveat is Carbuncle. Which is a perfect Segway to..... |
| RDM |
|---|
| immensely helpful in Dyna D from Wave 1 to Wave 3. RDM/BLM is the default go to for obvious reasons, but in case you still dont get it: Sleepga. Crowd Control can save a run from a nasty link. Distract and Frazzle are your friend (ACC ACC ACC). Paralyze 2 and Slow 2 Make Melee jobs pretty dumb. Silence makes BLUs BLMs and RDMs squishy, toothless, Meat sacks. If your RDM is Meleeing over enfeebling, find a new RDM. |
- Monsters spawned from Green Eye statues in Jeuno CAN NOT BE SLEPT! Remember what Vespa says about plinking. Jeuno can turn into an unsleepable pile really quick.
- Can you win with out BRD COR and RDM present? Yea, but why struggle.
- 'But Miku, what about GEO? Its sooooooooo important. Blah blah blah.' GEO makes things even easier, yes. However with the Debuff redux Dyna D monsters get, those enfeebling bubbles dont make as much of a difference as you think. Yes, even Idris. Sorry. The other jobs offer more utility Vs GEO. Dont read this as 'Dont bring GEO'. By any measure GEO is amazing. But if your choices are limited or your group is small, it might not be the best choice. At the end of the day, not my pig, not my farm. You do you. GEO works more effectively using 'defensive' bubbles vs enfeebles. If you only have 1 in the alliance then enfeebles will help the whole alliance but giving the 35%+ ATK boost to one 1 PT can still bump alliance DPS up similarly to the -75% Potency Idris Frailty.
- When fighting the Mid-Boss, your biggest enemy is TP feed. Limit how much it is getting hit by using a 2 Handed DPS (DRK or WAR are ideal) SCing with a RA COR. Torcleaver >> Leaden Salute or Steel Cyclone >> Leaden Salute. Have your mages Burst with Ice.
- 'But Miku, My THF has full Malignance blah blah blah'. DW jobs with Multi-strike feed an insane amount of TP, causing the statue to Stomp and Lead Breath all day long, drawing the fight out, annoying your WHM and frustrating your Tank.
There is no Best Tank. RUN has a better time with the added effects but can falter if you have a strong COR poppin off Leaden Salutes for 50k+. PLD can falter if the Boss is particularly stompy that day, stunning hate generation. And a Bot will struggle keeping hate off a strong DPS. An alternative, rarely used is a Bot tank with a SCH opening Lv2 SC and an Avatar Closing a 3 Step Lv3. 2 SMNs SCing works too. At the end of the day, theres 100 ways to strip a mithra. Knowing the basic rules will allow you to tailor a strat to work for you and your group. From Nose to Tail, Dynamis will punish you for getting Zergy in most cases. With Few exceptions, Fewer melee Coordinating SCs pays off better than throwing as many Naeglings as possible at it. This is a 2 hour Marathon, not a sprint like Omen or Vagary.
Unlock Maps
-
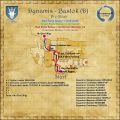 Bastok Route
 -
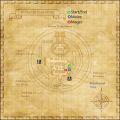
 San D Oria Route
 -
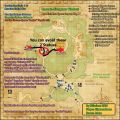 Windurst Route


Farming Wave 1 & 2
Now that you're a little more comfortable the real fun can start. Plinky shouldnt be helping you clear Trash and if you're Fighting NMs they shouldnt be contributing to the DPS there either. Plinkerton-kun Should be getting TP from the Pile or NM and plinking Statues to max out Time Extentions all while killing the pulled Statues first. 2 Plinks is ideal: One to clear statues with the alliance, moving the line of scrimmage ever forward and the other to Roam The Shrouded Realm like the Lone Wolf Plinkerton ensuring safe passage and maximum Time allotment.
- Plinkerton-kun's main focus is killing statues. Melee are highly discouraged from engaging statues. Are you running melee heavy? Having a BLM GEO or SCH, or even all 3 can be very helpful if things go sideways and you find yourself in a pile of mobs and statues. Contrary to popular belief, Magic Damage is still useful in the current meta. It just requires some actual coordination, but that requires people to not mash macros and spam WS.......
- BST and NIN mobs should be treated as similar. Gang up on them, get them to about 50% then everyone WS. A strong DD getting charmed will plant your alliance like a flower bed and an errant Mijin Gakure will give your group a hard DT check. Sacrosanctity will absorb 1 Kaboom. Earthen Armor will greatly reduce the damage to a point that practically ensures the party will survive. Scherzo also reduces the damage to a manageable level.
- Having the THF or a THF as main assist will help loot. If you prefer a more Battle Royale feel, THF/BRD is pretty on point.
- Depending on your DPS and just how Plinkity-ploppity you've been will determine when you should take on the Mid-Boss. Both Waves 1 and 2 have 30 minutes in time extensions. If you cap TEs in W1 and you're looking to split Waves 50/50 heading to the Mid-Boss around 35-40 minutes will do just that. Stronger groups can engage around 30 minutes remaining and not lose much.
Wave 2, Volte Armor Farming, and how to handle the Guys in Funny Hats
Wave 2 has a significant jump in difficulty from Wave 1. If you're plowing through Trash and Statues like old pros, you could be in for a rude awaking when the Mid-Boss dies, and the Zone levels up. Trash jumps 7 Levels, and the NMs go up 8. Statue Placement is also alot less pull friendly. Square lulls you into a false sense of security in Wave 1 and really drops the Hammer on you for Wave 2. Statues not only have about 15-20% more HP, but are more resistant to DMG. Those 30k Wave 1 Leaden Salutes drop 10%+, leaving you with a Statue at 1% HP and 7 angry mobs chasin you down.
- Wave 2 NMs are Significantly more difficult than their Wave 1 Counter Parts. The 8 Level increase will put a spot light the size of a Behemoth on your weak points. Added effects from TP moves proc more often with a stronger potency along with Familial Traits and bonuses being turned up to 11. Yagudo's Doom lands alot more frequently and is much harder to remove. Do Not Fight Quadav From behind. Do Not, under any circumstances, fight an Orc from the front and if it turns to you either disengage or turn your back. Orcish Counterstance from a Wave 2 NM is no joke and it will One Shot a Non Tank. Be prepared to Fight Goblins 2 or 3 times, Goblin Dice in Wave 2 seems to favor a full reset on the Monster. Those brave enough to take them on and stalwart enough to win may be rewarded with a piece of Volte Amour. These pieces are very nice and in some cases offer bonuses rarely seen or only seen for your job on them. The Bastok Harness set is a great TP set for a Melee Bard.
- The Zone Bosses for their respective city are, in many ways, more difficult than their Wave 3 Counter part. They seems to have a higher Accuracy check and can get real ragey. Each one is able to use Multiple SPs above 50% and gain access to enhanced versions along with the NQs for good measure at 50% and below. Remember what i said about Dynamis not being Zerg? This is the part to throw that out the window. With Halphas being the exception, Taking 5 or so minutes to get up good rolls, and doing a 5 song Bard Swap is just what the doctor ordered for the Zone Boss. All 4 use the Same Exact Strategy with one Caveat on Halphas. You will utilize a height disparity to keep your backline out of harm's way, you want your front line in Full DT. Oh your TP gain falls off in DT? Get better DT gear then. Let the buffs do their job. If you're tryin to take on the Zone Boss in Ambuscade +2 gear, you might want reevaluate your life choices before engaging the guy with the funny hat.
Your BRD's play list should be
- BRD #1 : March x 2 Minuet x 3. If 3 Song , March x 2 , Minuet x 2
- BRD #2 : Carol x 2 Madrigal x 2 Scherzo. If 3 Song, Carol T2, Madrigal x2, Scherzo
- Windurst- Wind Carol
- San D- Thunder Carol
- Bastok- Earth Carol
- Jeuno- Light Carol
- If your Tank Party is lucky enough to have a BRD as well dont include them in the swapswap. Too many moving parts can cause trouble. The songs depend on the party build but good defaults are:
- March x 2 Sirvente Scherzo
- If 3 song: Marcato Victory March,Foe Sirvente, Scherzo
- WHMs should Barthundra to take the edge off of Stun in all 4 zones. You can also replace zone specific carol with Thunder to help aid.
- You may have noticed the Tank PT BRD recommendation doesnt list Clarion Call use. The idea is for the less experienced groups to have an "Oh Shit, we wiped. What do we do" emergency button. The Tank PT doesnt need 5 Soul Voiced Songs. Yea they help or are cool, but especially when learning how to handle Halphas, having a BRD with SV/CC can prove helpful if things take a turn for the worse.
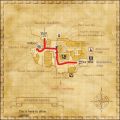
Jeuno
We like to clear a path from the Palace to the stair case leading down towards the MH in Wave 1. When Wave 2 starts, this requires minimal clearing of the stairs and Bridge (See pics). There are minimal statues in Wave 1 in this path as well. It is a huge time saver. There is a Danger element here however. The danger is the back line needs to get back to that staircase before the Wave 3 Halos pops, which means you're running while Obstrix is still alive. This leaves your Melee healerless for a few seconds. if you have a PLD as one of your tanks the danger is lessened but not mitigated. Depending on how fast you're pushing it down will determine when you need to run. Ideally you want the Backline to get to safety just after Obstrix dies.
-
 Killbox

Bastok
Bastok has a tall order to fill in terms of prep work. There is no way to shorten the process like in Jeuno. Once the Mid-Boss dies get 2 Binkys. You will need to clear from the Mid-Boss to the MH ( see pic for pathing) AND you will also need to clear the area outside of the Mid Boss staging area. This is where the 2 Binkys comes into play. You can shave some time by splitting up. Bastok has my favorite Killbox. Its easy to use and causes no issues before, during or after the kill. No Panic run for the back line to get to safety, no blind spots. Just kicking the shit outta the turtle.
-
 Pathing
 -
 Killbox


Windurst
Windy has less clearing than the other 3 zones but it has alot of running. Theres only a handful of statues to clear but you gotta drag Fii Pexu from the MH to Heaven's Tower. Que NWA's 100 miles and running. There are 2 ways to use this Killbox. The popular strat is to have the melee on the bridge and the backline in the alcove where the HP crystal is. We however flip it so the melee Fights in the alcove. We've run into issues with ppl getting knocked off the bridge (with and with out TAKO being used) and the Dark Circle spawns in that spot so rather than risk the back line, the front line takes the risk. Its easy to handle after a little practice.
The Halphas Caveat
- Halphas is the most difficult and dangerous boss in all of Dynamis D.Hands Down. Remember that thing about how quick it was to get to Wave 2 in San D'Oria? This is why. The 10-20+ minutes you save getting to Wave 2 is used to clear your kill box and the path to it, then fighting the boss. For lower tier groups this fight can draw out to 10 or more minutes.There's some pretty good videos out there that I'll link to save some space. Nitro Songs with Soul Voice in pocket just in case. There's alot that can go wrong with this fight. He becomes a real jerk below 50% and if you have some strong DDs that dont understand the concept of Restraint, he can turn and Orcish Counterstance them a dirt nap lickitey split.
- There is technically 2 killboxes you can use but really only 1. There's some ppl who have used the AH for the height disparity but doing this requires use of Anchor, but as Square quietly combats cheating with code changes that negates 3rd party tools, it can cause issues and isnt worth the hassle in the end.
Once the Mid-Boss dies, quickly get a binky and get to work. You will need to clear the statues in front of Eastgate (Clinton Pass) then go down Cavalry Way (Cosby Cove) and Squire Alley (Epstein Alley) ending at Lion Square (Trump Plaza). Dont forget to clear the Eastgate Rampart. This is the worst Killbox by far but there is no other choice. The tanks will position between the vendor stalls and they have to stay between the front 2 posts otherwise they will be out of casting range. (See Pics) It is paramount that Halphas also be in this area, using the stalls as a wall to help control Knock Back. You want Tanks on one side and melee on the other.
RP Farming:Dialing 999 for Maxwell Murder
RP farms are about maximum body count. You will want to arrange your parties so they are able to work as efficiently as possible. Capped or near capped haste is ideal, some attack, maybe a little accuracy. If only one job existed that could do that..... If you're thinking about farming RP, congrats on leaving the kiddy pool. In this 'Mode' you're basically operating like an Abyssean EXP PT. Wait, most people reading this wont understand that reference. You're operating like a Meat Grinder. Statues and Monsters go in the front and RP comes out the back. The amount of RP you get will be based solely on your performance. Groups that can beat the drum faster will cap their items faster than those who move at a more leisurely pace. Keeping a steady flow of statues will keep the melee busy. Stick to the rules and you will do well. having your THFs /BRD may be beneficial for loot. Taking advantage of traps is also a neat little feature. We've observed in a few runs where we have cleared the entirety of both waves, minus the Zone Boss, yields about 6000-7200 RP. Maximum RP from Wave 3 is capped around 2700 (64 Trash between the 8 halos and 4 waves from the Mega, 16 leaders), meaning that Waves 1 and 2 are the better option on many levels. if you're hitting R10 on a fresh neck, you're doing pretty good since the most you can hit is about R16. Also fun to note: 0-15 is the same as 16-20 and 21-25 is the same as 0-20, points wise respectively. 2000 RP in a run is nothing to sneer at.
Trap Maps
Bard Shards?
Jeuno
- Jeuno Has Multiple traps in both Waves 1 and 2. They are in the same areas(Ducal Chamber and The Quadrangle/Embassies) but locations and spawns differ between waves
Wave 1
- In each of the alcoves of the ground floor in Ducal Chamber area is a statue that will spawn 6 more along the floor in front of it.
- In the Quadrangle are traps too, more info to follow
Wave 2
- On the Mezzanine outside the Ducal Chamber (where the mid Boss spawns) in the 3 pockets are statues looking down stairs. They are looking at the trap spawn points and will spawn 4-6 Statues on the ground floor in close proximity to and on the stairs.
- At the mouth of the hall leading to the Ducal Palace is a single trap that calls 4 or 5 statues of known spawns. Its position and proximity to normal statues has made it difficult to determine how many monsters are called.
- In the Quadrangle in the corners facing the fountain are statues that spawn not only the usual traps but more traps as well! All-in-all there (ironically?) are 3 waves of traps here.
Windurst
Windurst's Traps only appear on Wave 2.
Wave 2
- On top of the 5 'Manors' going clockwise: Koru-moru's, Yoran-Oran's, House of the Hero, Zonpa-zipa's, and Shantotto's.
These spawn 6 statues in front of said Manors. It is important to note the Spawned Statues from the trap spawn 6 Monsters each in most cases.
Bastok and San D'Oria dont seem to have traps. Needs verification.
