The Voracious Resurgence | |
| Prime Weapons • Ultimate Weapons • Ultimate Augments • Abjurations iL119 • JSE Necks • Divergence Augments • Escutcheons | |
| Reforged Armor Artifact: +1 • iL109 • iL119/+2/+3/+4 Relic: +1/+2 • iL109 • iL119/+2/+3/+4 Empyrean: +1/+2 • iL109 • iL119/+2/+3 |
Guides • Crafting • Trusts • Apex Monsters |
Talk:Urmahlullu
- ML25 DRG/SAM - Solo
A mixture of Empy+2/Ambu+2/Relic+2 w/ Shining One, ensuring max DT-. Used Joachim, Ulmia, Koru, Monberaux, and Sylvie. Meditate or kill mobs near by for at least 1k TP. Get trust buffs up, stack together, and then pop NM. Spam Camlann's Torment for Light. After the first SC, I rotate around/thru NM to do my best to place Trusts behind boss to lessen/avoid his AoE damage. Some pulls its like they didn't take hardly any damage at all, but then sometimes they don't want to act right and still get AoE'd. Takes a few minutes, sometimes Soul Jump comes back before it dies, sometimes not. Caseus (talk), 22 July 2025.
- Have been successful using the above method on multiple DD jobs.
BLU/RUN, used ARKEV, Pieuje, Nashmeira II, Iroha II, Koru-Moru, during Alter Ego Expo. Spammed Savage Blade, maintained Lux and Nature's Meditation, and used Diffusion + Mighty Guard when he was below half health. Took 11 minutes though... lol --Ocero (talk) 05:18, 30 April 2025 (UTC)
BLU/RUN, ML23. Solo
Honestly had very little issue with this.
- Cornelia/Yoran-Oran/Joachim/Qultada/Koru-Moru used as trusts.
- Built up TP to 3k prior to fight to let trusts buff me + have AM3 ready for Tizona.
- Popped with some buffs, Magic Barrier, Barrier Tusk, Cocoon, Occultation etc.
- Spammed Savage Blade > Expacion for Distortion.
- Was down in 2.5 minutes with no danger.
https://www.youtube.com/watch?v=nwIGOdEYhBk
--Nil (talk) 14:47, 15 December 2025 (UTC)
THF/DNC Solo
Consistently soloable with some difficulty by THF/DNC for Pulse farming, 400JP.
Setup
- Ate Grape Daifuku.
- Trusts used: Cherukiki/Kupipi, Qultada, Ulmia, Joachim, Koru-Moru
- Don't go into this fight without Ulmia. Scherzo is very important.
- Tank trusts are not very good here.
- They make it impossible to move your support trusts (RDMs/BRDs specifically) out of AoE range.
- They can't really handle Wild Horn unless they have the 50% HP/MP boost from Trust Campaign.
- Koru-Moru is likely a better pick than King Of Hearts, since he will Refresh Joachim and healer trusts.
- Joachim will use Ballad/Paeon if he is below max HP/MP, which is bad because you really want at least one Madrigal.
- If you use a UC healer trust (Apururu / Yoran-Oran), use them instead of Cherukiki/Kupipi.
- I normally bring Sylvie (UC) instead of Qultada, but I found her to be useless here for a couple of reasons:
- You can't take advantage of Indi-Fury because Sylvie casts it on herself, and she will get annihilated if she stands near you at all.
- It's difficult to take advantage of Indi-Frailty because Sylvie Entrusts it to you, and Entrusted bubbles get erased immediately upon spawning the NM. You need to build a bit of TP on enemies before spawning the NM, so she will inevitably waste Entrust.
- The 3 subjob options here are /NIN, /RUN, and /DNC. I found /DNC to be the best.
- /NIN shadows protect from Wild Horn somewhat, but they're easily cleared by most of Urmahlullu's other TP moves and spells.
- Additionally, Wild Horn is a multi-hit, so it will inevitably still damage you unless you just put up shadows.
- If you have a maxed Fast Cast set and sufficient DW from gear without Haste Samba, this sub might be better than /DNC.
- /RUN provides magic resistance, but doesn't help at all against Wild Horn other than Inquartata.
- With a proper hybrid TP set, you already have enough magic evasion to resist most of the incoming status effects.
- /NIN shadows protect from Wild Horn somewhat, but they're easily cleared by most of Urmahlullu's other TP moves and spells.
You need a competent hybrid TP set to survive here. Capped PDT and MDT (after Shell V) are a necessity, along with as much as Magic Evasion as you can stack. Accuracy is also very important, since Urmahlullu is quite evasive.
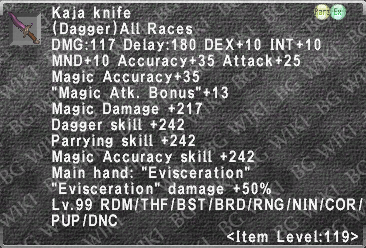
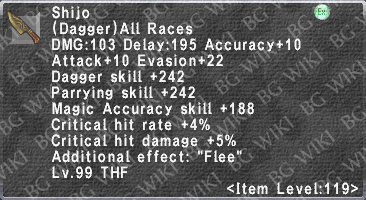
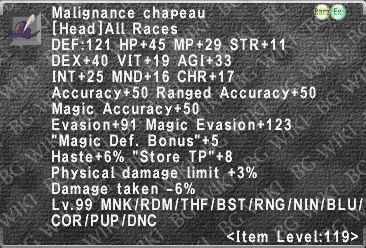
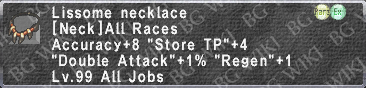
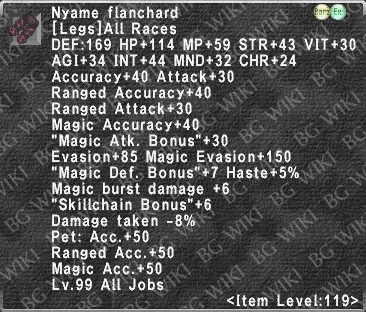
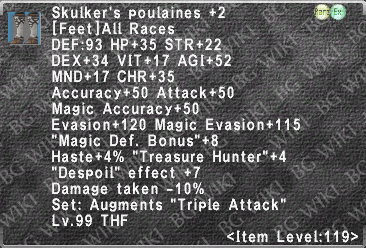
| TP Set | |||||||||||||||||||||||
|---|---|---|---|---|---|---|---|---|---|---|---|---|---|---|---|---|---|---|---|---|---|---|---|
Notes:
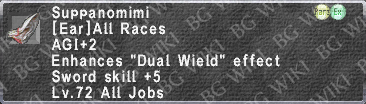
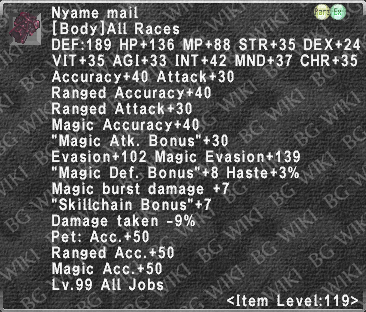
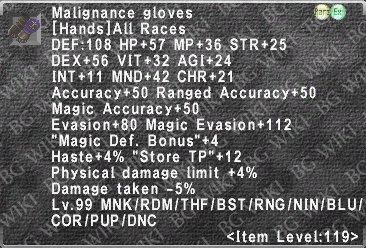
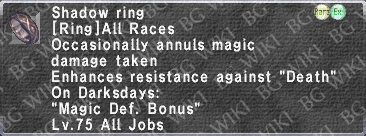
Nyame pieces are R0. Replace with Malignance if you have them and use Defending Ring to cap PDT if needed. If you have +3 Poulaines, replace Lucky Egg with Staunch Tathlum to cap PDT. Replace weapons as needed. |


Notes
Urmahlullu has a fairly predictable attack pattern.
- 3 back-to-back TP moves
- Physical attacks
- 1 spell, 1 TP move
- Physical attacks
- goto 1.
Urmahlullu's starting location in the pattern on spawn seems to be random.
- Recommended to pop at portal #6 or #5.
- The biggest risk at the start of the fight is your Trusts getting hit by Wild Horn immediately.
- Get TP before the fight so your Trusts can pre-buff and you can WS on pop to get hate.
- Try to ensure all of your trusts are behind Urmahlullu on pop.
- After popping and getting hate, slowly drag Urmahlullu towards a wall/obstacle and put your back to it.
- Urmahlullu will Draw In if you are more than 15 yalms away.
- Amnesic Blast has high knockback, and will result in a Draw In if you take the full effect.
- Draw In is very dangerous, since it may cause Urmahlullu to face your trusts and kill them with Wild Horn.
- Haste Samba, build up/maintain Box Step, and slowly whittle it down with weapon skills.
- Use Aura Steal to steal Howl (Warcry) for an extra attack boost.
- Avoid WSing when Urmahlullu is using TP moves or casting.
- This is not only because you may get caught out of your DT set, but also because you need to have TP in reserve to use Waltzes. You cannot rely solely on your healer trust in this fight.
- When Urmahlullu is using TP moves, hold TP. Make sure you are full HP after every TP move and spell.
- Thunder VI/Thundaga V consistently dealt about 800 damage (resists were fairly rare).
- Amnesic Blast / Ecliptic Meteor deal a similar amount of damage unresisted, but resists were far more common.
- You can fit Waltz III + Waltz II in between a spell and the follow-up TP move.
- As stated previously, the biggest risk in this fight is Wild Horn.
- Wild Horn can deal up to 2200 damage in capped PDT even with Scherzo.
- Wild Horn is a multi-hit "critical rate varies with TP" move.
- Scherzo can only mitigate damage from a single hit, so it does not guarantee your survival, but it still helps a lot.
- Ulmia will not Scherzo you until you take a lot of damage from this move once.
- Wild Horn can deal up to 2200 damage in capped PDT even with Scherzo.
After some practice, I had about a 90% success rate with this gear and strategy. Deaths/failures were generally caused by one of two things:
- Urmahlullu wiped my trusts with Wild Horn immediately after popping, before I could get hate.
- This became a non-issue after I started building TP before popping.
- Urmahlullu one shot me from near full HP with Wild Horn.
- This usually came from a one-two punch of unresisted Thunder VI/Thundaga V (800 damage) followed up by Wild Horn.
- Even after catching on and saving Waltz III + Waltz II for this combo, I still died occasionally due to Wild Horn simply one-shotting me from full HP. Non-Taru races might have more leeway due to slightly higher max HP.
- This usually came from a one-two punch of unresisted Thunder VI/Thundaga V (800 damage) followed up by Wild Horn.
Good luck on your pulses!
--Septentaru (talk) 22:35, 18 May 2025 (UTC)
