The Voracious Resurgence | |
| Prime Weapons • Ultimate Weapons • Ultimate Augments • Abjurations iL119 • JSE Necks • Divergence Augments • Escutcheons | |
| Reforged Armor Artifact: +1 • iL109 • iL119/+2/+3/+4 Relic: +1/+2 • iL109 • iL119/+2/+3/+4 Empyrean: +1/+2 • iL109 • iL119/+2/+3 |
Guides • Crafting • Trusts • Apex Monsters |
User:Brahmsz/Sandbox2
Need a project to work on.
General Information
- One of the original six Advanced Jobs.
- Earliest introduction of a Pet-based job, alongside Summoner.
- Beastmaster fights along side a monster companion, via "Charmed" monsters in the field or summonable monsters from consumable "Jug" items.
Roles
- Tradionally, pet jobs are primarily damage dealers. Beastmaster itself has evolved over time with various updates, both increasing and decreasing the viability of their pets.
- In modern day XI terms, Beastmaster has settled as a support damage dealer, providing alternative and unique benefits to battle scenarios.
- Charmed monsters and Jug pets are generally considered sturdier than player characters, which sealed Beastmaster's reputation (for literally years) as a "Solo" job.
Food & Medicine
 Grape Daifuku
- Player: HP+20, STR+2, VIT+3, Acc./R.Acc.+10% (Max. 80), Att./R.Att.+10% (Max. 50), MAB+3.
- Pet:
 Rolan. Daifuku
- Player: HP+20, DEX+2, VIT+3, Acc./R.Acc.+10% (Max. 80), M.Acc+50.
- Pet:
 Marine Stewpot
- Player: HP+90, Acc./R.Acc./M.Acc.+90.
- Pet:
JSE Table
Artifact Armor
| Wakido Armor Set | ||
|---|---|---|
| Item | Upgrade? | Notes |
Wakido Kabuto +4 
|
Maybe | Offers an extra two ticks of Meditate. Current highest Regain rate attainable in slot. Use case for Artifact "Max. Accuracy Build." Also, serves as a swap-in piece for extending the duration of Warding Circle. Your Mileage May Vary. |
Wakido Domaru +4 
|
Yes | Remnants of Samurai's tank origins. While not the highest amount of Damage Taken-% or Store TP+ in slot, is a good consideration for alternative Hybrid DT-% TP gear builds. |
Wakido Kote +4 
|
Yes | A fundamental part of Samurai TP builds, due in part to the additional Job Ability-based Haste granted while under the affect of Hasso. High priority. |
Wakido Haidate +4 
|
Yes | Second highest Weaponskill Damage piece in slot--second only to max augment Nyame Flanchard. Until +3 stage, a pair of Hiza. Hizayoroi +2 will outperform them. High priority. |
Wakido Sune. +4 
|
No | While these offer a Hasso boost, similar to the hands, they are outperformed by more attainable options--such as Flam. Gambieras +2, and Ryuo Sune-Ate (and their +1 variant). |
Relic Armor
| Sakonji Armor Set | ||
|---|---|---|
| Item | Upgrade? | Notes |
Sakonji Kabuto +4  Enhances "Ikishoten" |
Maybe. | Main (and probably only) use is as a ranged attack piece. Serious ranged Samurais are few and far in between for a myriad reasons, so it'd only be recommended to those seeking to pursue that venue. |
Sakonji Domaru +4  Enhances "Overwhelm" |
Yes! | Hands down, one of the strongest weaponskill damage pieces. High priority piece. |
Sakonji Kote +4  Enhances "Blade Bash" |
Yes. | Meditate duration macro swap. Good PDT alternative, if necessary. |
Sakonji Haidate +4  Enhances "Shikikoyo" |
Maybe. | Seigan Counter piece. Will see niche situational use, but for those looking for defensive options, this is a good piece to hold onto. |
Sakonji Sune. +4  Enhances "Meikyo Shisui" |
No. | Unfortunately, these feet are subpar. The augment only works while the feet are equipped. |
| Divergence Weapon | ||
|---|---|---|
| Item | Upgrade? | Notes |
Fusenaikyo  Multiple Augment Paths. |
Yes. | Shown previously in the weapon section, this Divergence-based Great Katana is quite useful when augmented and used appropriately. Has two relevant augment paths which turn it into either a mini-Empyrean, or a mini-Mythic. The third path is questionable but may have some use. The HQ1 variant Sakonji-no-Tachi, is also a decent alternative. |
| Divergence Neck Accessory | ||
|---|---|---|
| Item | Upgrade? | Notes |
Sam. Nodowa +2 
|
Yes! | Divergence-based neck slot. Don't settle for less than the HQ1 variant, Sam. Nodowa +1. |
Empyrean Armor
| Kasuga Armor Set | ||
|---|---|---|
| Item | Upgrade? | Notes |
Kasuga Kabuto +3 
|
Yes. | Hybrid DT-% TP piece. |
Kasuga Domaru +3 
|
Yes. | Hybrid DT-% TP piece. Can be paired with the Sajonki Haidate for a Seigan/Third Eye counter build. |
Kasuga Kote +3 
|
Yes. | Very strong alternative for physical weaponskill damage outside of Nyame Gauntlets. |
Kasuga Haidate +3 
|
Yes. | Hybrid DT-% TP piece. Third piece in SAM's JSE to contribute to Hasso Job Ability-based Haste. |
Kas. Sune-Ate +3 
|
Yes. | Niche weaponskill swap piece for "Attack Capped" scenarios. Extra Conserve TP is also nice to have. |
| Empyrean Armor Accessories | ||
|---|---|---|
| Item | Upgrade? | Notes |
Kasuga Earring +2  Acc/M.Acc+16~20 WSD+3%~5% STR/DEX+7~15 |
N/A | One of the strongest Weapon Skill earrings currently available. Period. HQ1 is a bare minimum for swapping into any builds. |
Convert MP
So, originally I thought this wasn't something I thought needed to address, but after reading elsewhere I'm addressing it here. Brahmsz (talk)
- HP management when swapping gear is one of the most important (and often times unspoken) responsibilities of tanking. Some may find this surprising, but I'm a Vanilla XI player. I wrote the guide from that perspective. With that said, taking the time (and some space) here to address the mechanics and styles of play that accompany HP swaps for optimal and efficient HP Management.
- A Bit of History:
- Long, long ago, Vanilla XI players used to swap gear via macros (up to six pieces at a time per macro) for an action, such as a weaponskill, ability, or spell. (It was awful lol.) Whatever order equipment was written in, was the order it would swap (more on this later). Later on, early adapters of Windower & Ashita used text files to swap full sets of gear in much the same way (line by line), but without the extra button pushes.
- Currently:
- Today, we have Equipsets for Vanilla XI; Gearswap for Windower; and Ashitacast(?) for Ashita users.
- Equipsets read & load all 16 equipment slots in this order: From left to right, top to bottom. Mainhand weapon slot is first (1), Foot slot is last (16).
- Gearswap (and assumedly Ashitacast) are written as a gear list, with main visible armor pieces first and accessories following after. The caveat being, they both offer the capability of assigning a priority order to each individual piece of gear in a set.
- It's my personal belief that setting gear priority is based off the same principle as early equipment macro & text file equipment swaps.
- Today, we have Equipsets for Vanilla XI; Gearswap for Windower; and Ashitacast(?) for Ashita users.
- Things To Keep In Mind:
- Equipsets are subject to a global one (1) second delay between swaps. Third party swaps are not.
- Comparatively, the differences in individual gear slots' HP values can cause radical HP swings. Typically resulting in significant drops in HP if you're not mindful of swaps.
- TL;DR:
- While I've done my best to keep equipment sets as close in HP values as possible, the best advice I can give is this:
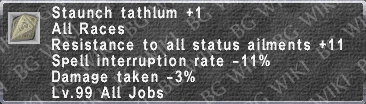
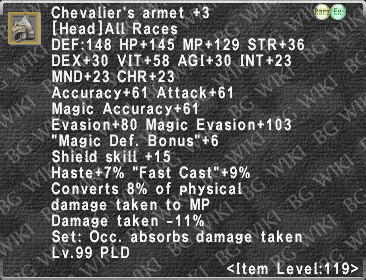
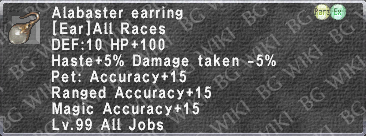
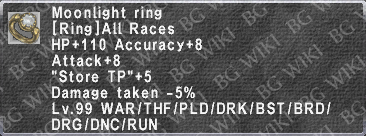
- Prioritize your highest HP swaps first: Reverence Surcoat +2/3/4; Moonbeam/light Rings; Odnowa Earring+1, Tuisto and Alabaster Earrings, Souveran +1 (when unavoidable/absolutely necessary).
- Please note: Personally, I adapted by writing in up to three (3) items (per action, per macro) preceding an Equipset change. While this may sound dramatic, if you're sets have progressed anything like mine have, you likely have certain pieces that are essentially "anchor points" that everything swaps around anyway.
- While I've done my best to keep equipment sets as close in HP values as possible, the best advice I can give is this:
utility sets
|


Notes on Skillchains
No Samurai is complete without some SC (Skillchain) knowledge. Period.
Skillchaining is important due to the extra damage they provide--much more than your weaponskills by themselves. "Multi-stepping" (creating/building multiple skillchains off of previous skillchains) exponentially increases their damage each step further. The window to create a following skillchain step becomes shorter each time. Initially, the window for a skillchain starts at 10 seconds between weaponskills. Each step reduces that window by about two (2) seconds, until you reach a maximum window of three (3) seconds.
Overall, thanks to massive amounts of Store TP (and various ways to gain it), it's easy to multi-step by yourself.
All Weaponskill properties have a priority order.
- Level One properties can be linked together to create Level Two skillchains, and Level Two properties can be linked together to create Level Three skillchains.
- Level Three properties can only ever be matched (Light ←/→ Light and Darkness ←/→ Darkness) to make a Level Three skillchain.
- Empyrean and Relic weaponskills are the only WS's with a Level Three (Light or Darkness) property.
- With an Aeonic Weapon equipped, their merit equivalent weaponskills gain a Light or Darkness property. They are also the only weapons able to create Level Four skillchains (Radiance and/or Umbra), stronger more advanced versions of Level Three skillchains.
So, if a WS has a secondary property you wish to use, it won't work unless the primary property is ignored to make a skillchain first. (see below)
Skillchain Properties and How They Connect
Level 1 → 2:
 Liquefaction →
  Impaction =
  Fusion
 Induration →
  Reverberation =
  Fragmentation
 Detonation →
  Compression =
  Gravitation
 Transfixion →
  Scission =
  Distortion
Level 2 → 3:
- Gravitation → Fragmentation = Fragmentation
- Distortion → Fusion = Fusion
- Fusion → Gravitation = Gravitation
- Fragmentation → Distortion = Distortion
- Fusion ↔ Fragmentation =
 Light
Light - Gravitation ↔ Distortion =
 Dark
Dark
Level 3:
- Light ↔ Light = Light
- Dark ↔ Dark = Dark
- You can make a double Light or Darkness skillchain, but they must be built up from a Level 2 → 3 skillchain. This results in a Level Three, followed up the matching Level Three property to create the second Light or Darkness.
- Level Three skillchains can not make double Light or Darkness off of themselves.
- You can make a double Light or Darkness skillchain, but they must be built up from a Level 2 → 3 skillchain. This results in a Level Three, followed up the matching Level Three property to create the second Light or Darkness.
Suggested Skillchains
Note: ![]() denotates the need of Dojikiri Yasutsuna to continue the SC.
denotates the need of Dojikiri Yasutsuna to continue the SC.
- Light Skillchains
 Tachi: Shoha → Tachi: Shoha = Light
- Tachi: Shoha → Tachi: Kasha (Light) → Tachi: Fudo = Light
- If using , ends in Radiance.
- If using
- Tachi: Fudo → Tachi: Kasha (Fusion) → Tachi: Shoha (Light) → Tachi: Fudo = Light
- If using , ends in Radiance.
- If using
- Tachi: Shoha → Tachi: Fudo (Distortion) → Tachi: Kasha (Fusion) → Tachi: Shoha (Light) → Tachi: Fudo = Light
- If using , ends in Radiance.
- If using
- Tachi: Ageha → Tachi: Yukikaze (Detonation) → Tachi: Kasha (Gravitation) → Tachi: Shoha (Fragmentation) → Tachi: Kasha (Light) → Tachi: Fudo = Light
- If using , ends in Radiance.
- If using
- Darkness Skillchains
- Tachi: Rana ←/→ Tachi: Fudo = Darkness
- Tachi: Shoha → Tachi: Fudo (Distortion) → Tachi: Rana = Darkness
- Tachi: Kasha → Tachi: Rana (Gravitation) → Tachi: Fudo = Darkness
- Tachi: Rana → Tachi: Shoha (Fragmentation) → Tachi: Fudo (Distortion) → Tachi: Rana = Darkness
- Tachi: Ageha → Tachi: Yukikaze (Detonation) → Tachi: Kasha (Gravitation) → Tachi: Fudo = Darkness
