The Voracious Resurgence | |
| Prime Weapons • Ultimate Weapons • Ultimate Augments • Abjurations iL119 • JSE Necks • Divergence Augments • Escutcheons | |
| Reforged Armor Artifact: +1 • iL109 • iL119/+2/+3/+4 Relic: +1/+2 • iL109 • iL119/+2/+3/+4 Empyrean: +1/+2 • iL109 • iL119/+2/+3 |
Guides • Crafting • Trusts • Apex Monsters |
Crafting Torque Farming Guide by Funkworkz
|
|
Crafting Torque Farming Guide by Funkworkz
Introduction to Crafting Torques
There are torques for all crafts in Final Fantasy XI that give a direct boost to their respective craft level. Besides the Cooking Hocho, these are the only items in the game which boost crafting skill that are not purchased via the Guild Union system. Also similar to the Katana, they are not equippable by level 1 characters. A character must be level 70 in order to equip crafting torques, and 81 to equip the fishing torque. At the time of their introduction, they were not very sought after because of such a minor boost of two levels. Since then, we were given Crafting Stalls which now give us a boost of five levels with Mega Moglification, instead of the one level we had before with the 150,000 guild point Furnishings. With your correct crafting torque, the 70,000 Guild Point item, Apron, Advanced Synthesis Image Support, and Mega Moglification it is now possible to Tier 1 while skilling up on items that cap at one level above your current base skill.
I still see a lot of people asking the best way to farm these highly sought after torques. I have put off obtaining torques myself until recently, so I wanted to share my experiences in hopes of helping the community get their torques. Please submit any suggestions to me if you find a more efficient way of farming than I have described here.
Need-to-know
The torques are only available from gold colored locked Treasure Caskets. Each torque is also located in a single, different location. I have gotten torques from extremely easy combinations, so the rumor about torques only coming from hard boxes is false. Also, it is possible to obtain two torques in a single box! Chances are very low, but still possible.It can be difficult to have a monster drop a locked treasure casket, but luckily there are a few things I highly suggest for you to do to save yourself hours of time. Each torque has basically the same strategy to obtain, but they vary slightly based on dungeon. Read over the following and apply them to each area you head for. Happy Hunting!
Super Kupowers
My first suggestion is to make sure you are under the effect of the Super Kupower 'Myriad Mystery Boxes'. This power makes treasure caskets appear about 20% of the time when you kill a monster, and the chance that the box is gold locked chest is about 40%. This power is useful for every torque with the exception of the Alchemist's Torque and Weaver's Torque, since they are acquired in sky and the kupowers do not affect Tu'Lia.
Prowess
If you participate in Fields of Valor and successfully complete a Training Regime, you have a chance of gaining a Prowess. These enhancements affect anything from increased HP and MP, all the way to enhancing weapon skill damage. What we are looking for is Increased Treasure Casket Discovery. Each boost gives you an extra 5% chance of discovering a casket upon the defeat of a monster. You can receive up to five levels of this bonus. With this prowess being capped, while under the effect of the Super Kupower, you can potentially get a gold casket to appear after almost half of your kills!
Thief's Tools
It is possible to gain an extra hint by using Thief's Tools on gold treasure caskets. The hints you get are only the "Greater than, Less than" variety and are usually a very wide range in digits. Because of this, you need to use them first before searching for more hints. Using enough of these tools can guarantee success in opening every box. The catch is you need to either be on the Thief job, have a thief alternate character logged in at the same time, or have a thief friend be with you to lend a hand. Sometimes the tools do not work, so be sure you have plenty with you. Never use these as a "last ditch" effort. You will normally have around 8 choices left with one more attempt, so getting a very wide range of numbers will most likely never be useful when you are about to lose the box.
Casket Helper
You might not be very good at the math required to open a casket. If that is the case, there are a few scripts that people have made to help solve the puzzles. To find one, simply google the term 'treasure casket solver' and a plethora of results will come up. Find one that you prefer and use it on every casket you get to appear. I am not going to go into details on how to open caskets, that is another guides job. There are also casket solver plugins via Windower 4. If you are on PC I recommend installing one.
Farming Time!
*Map images and spawn data from FFXIDB*
Alchemist's Torque
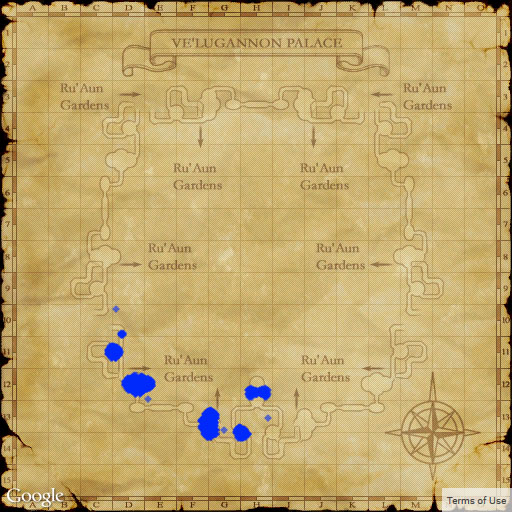
Zone: Ve'Lugannon Palace
Suggested Fields of Valor page: Page 2 (Seven of the Arcana family)
Alternate: 6 Elementals page
Suggested farming positions: D-10, D-11, D-12 / I-10, I-11, I-12
Breakdown: You can kill the six or so spawns in this room, walk north and kill the two weapons in the little room, then a little further north and kill the two on the stairs. This area is is a very good spot, but there is one drawback. There is a door in the hallway at the top part of D-12/I-12. This door can only be opened if you are on the south side of that door. Usually nobody will mess with the switch, but is is possible for someone to come along and lock you out of the D-12 room. If this happens, you can continue down the steps at I/D-10 into the Curtana spawn area and kill the weapons in the little rooms while occasionally snatching a free Curtana. This is not a loop, but its close enough for you not to be bothered by the short walk back. There is also a detector that pops in the hallway by the locking door, and two downstairs but they shouldn't be much of a nuisance.
Alternate Breakdown: Target Earth or Wind elementals, as you can target 8-12 of them in a loop.
Tanner's Torque
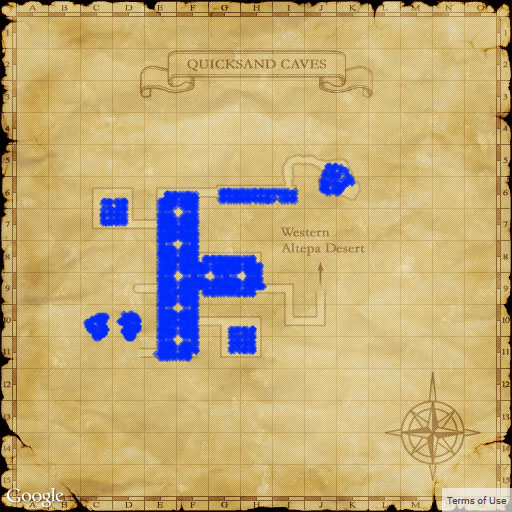
Zone: Quicksand Caves
Suggested Fields of Valor page: Page 4 (Seven of the Antlion family)
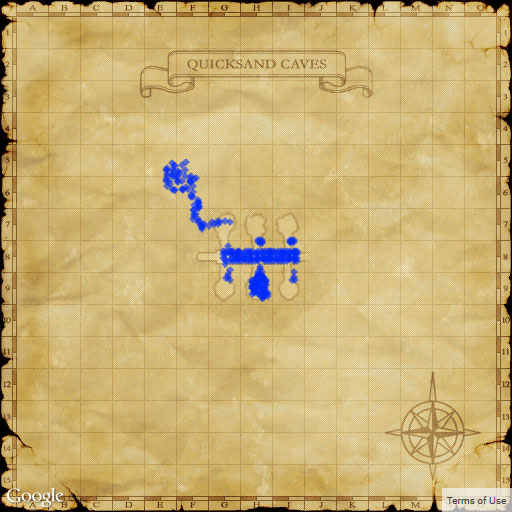
Suggested farming positions: E-6/F-6 south through E-11.F-11, east to H-8/H-9
Breakdown: This area can be warped to via Voidwatch. There are a lot of Anticans here, so you will have plenty of mobs. The only drawback is that people like to come here to farm Ifritite during Firesday/weather, and to do their Earth Weather quests for Trial of the Magians. Even with others you will still have a lot of mobs to kill. This is also a prime opportunity to team up to snatch up their gold chests if the player is not interested in them.
Alternative Approach: If you have multiple crafting accounts and are looking to level them to 70 to equip a torque, this is a prime area to book burn page 4. A safe place to stand for low level characters is right inside the door at F-10 on this map. You can pull from two directions, The first spot to start is at F-8 on the map below, and at I-6 on the map above. Pull all trains to the outside of the door where the low levels are standing so they are in range. I recommend being on Beastmaster, use Lucky Lulush for Whirl Claws, and use any PDT down gear you have. You will get multiple brown chests this way, and will need to be quick in order to open all of them before they disappear. Keep in mind that the characters you are looking to level need to be around level 15 to gain at least 1 exp per kill to qualify for a page 4 completion after 7 kills. I Confirmed that a level 12 character will gain experience with one other player in the party at level 99.
Smithy's Torque
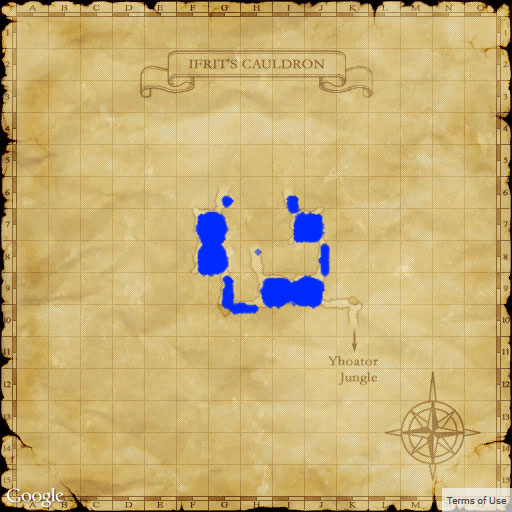
Zone: Ifrit's Cauldron
Suggested Fields of Valor page: Page 2 (Four Old Opo-Opo, one Bomb)
Suggested farming positions: Entirety of map 4, Southern two tunnels of map 2
Breakdown: This is a very nice looped path. By the time you complete the circle, monsters will have respawned for you to continue. You may encounter people leveling their NPCs here or even soloing their jobs. There are plenty of mobs, and people usually tend to stay in the open areas to the south near the Fields of Valor book. The only danger here is bombs with their Self-Destruct. They should rarely, if ever, get it off before you kill them.
Boneworker's Torque
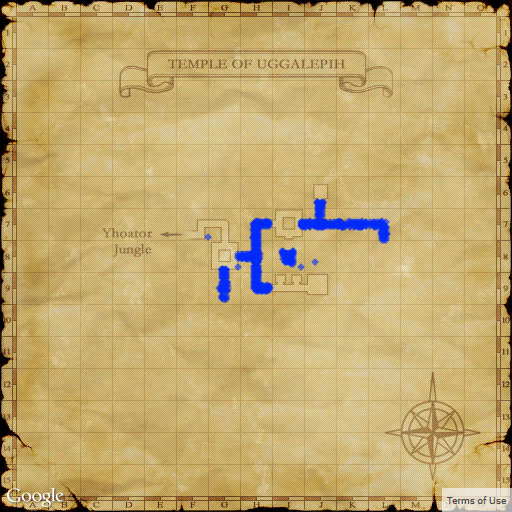
Zone: Temple of Uggalepih
Suggested Fields of Valor page: Page 4 (Three Temple Bees, Three Tonberries)
Suggested farming positions: Entire map 3
Breakdown: Warp to Temple of Uggalepih via Voidwatch, take a left after zoning in and you'll end up at this map after exiting to the jungle and enter back in. Tonberries tend to lost hate easily, so training them is hard. Bees and Tonberries do aggro you here so it is a little more dangerous than other zones. Make sure you are aware of your current tonberry hate, as Everyone's Grudge will instantly kill you and all progress on your Prowesses will be lost if you need to home point. You can walk counterclockwise and kill everything in your path. Pursurers pop in this area, and you might get lucky with a Flickering Lantern pop item for Sozu Rogberry and nab a Thief's Knife. An extra few thousand gil can't hurt.
Fisher's Torque
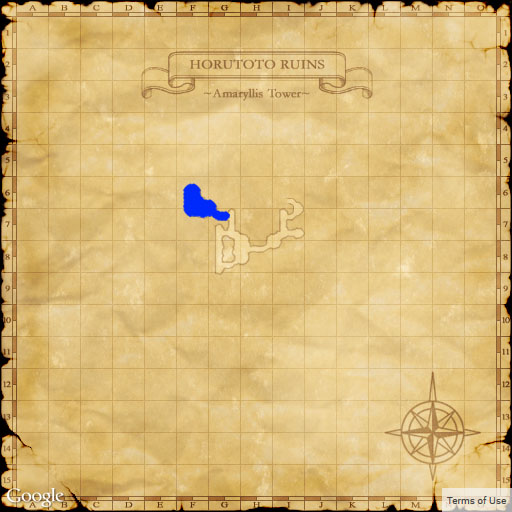
Zone: Outer Horutoto Ruins
Suggested Fields of Valor page: Page 8 (five Thorn bats, one Fuligo (slime))
Suggested farming positions: I-7, H-8, G-7, G-8
Breakdown: You can Voidwatch warp to the entrance of Outer Horutoto Ruins. Zone in, and there will be a cracked wall at I-6 to access this map. It is not a loop path but there are plenty of monsters in a small area to keep you busy. The only competition you will have would be others after the same item you are. There are enough mobs to support two people farming a torque.
Carver's Torque
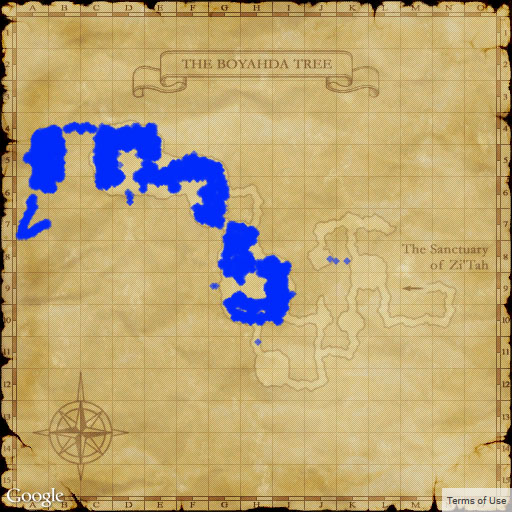
Zone: The Boyahda Tree
Suggested Fields of Valor page: Page 3 (Three Moss Eaters, Four Mourioches)
Suggested farming positions: H-9 room (Aquarius spawn area) or the D-5 (Unut spawn area) room, first map
Breakdown: Train bunnies, crabs, mandragoras, and crawlers in the first two rooms. Be aware that you can easily lose aggro on bunnies and crawlers due to the water. BST Whirl Claws one shots mostly everything, otherwise they only take one or two more hits.
Goldsmith's Torque
Zone: Den of Rancor
Suggested Fields of Valor page: Page 2 (Two Mousse, Four Dire Bats)
Suggested farming positions: Entire first map tunnels
Breakdown: Train/aggro bats and slimes in the first map tunnels. If you aggro a Tonberry, it should never get off Everyone's Grudge before you kill them so you should not have to worry about it. Whirl Claws with Lucky Broth usually one shots all of the bats. I highly recommend using that if you are on Beastmaster.
Weaver's Torque
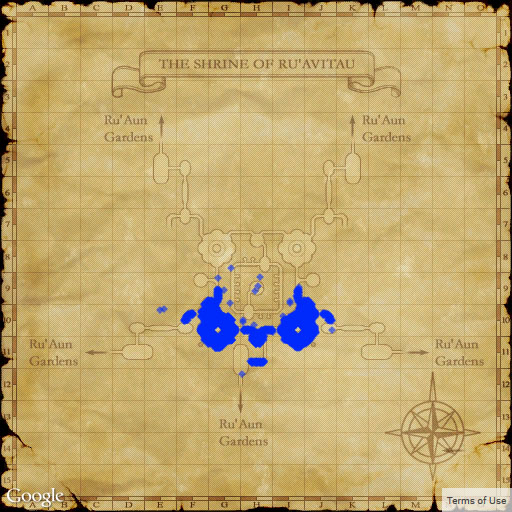
Zone: The Shrine of Ru'Avitau
Suggested Fields of Valor page: Page 1 (Ten Arcana Monsters)
Alternate #1: Page 6 (Seven Golem Monsters)
Alternate #2: Elementals (To farm Crystals while your at it)
Suggested farming positions: Main entrance near Despot
Alternate: Middle of the first map via the Home Point warp
Breakdown: This area also is not affected by Super Kupowers, and has a lot less monsters than other areas. The southeast and southwest rooms of the main entrance have enough weapons to support two people. They are not red mage mobs so they do not buff themselves up. You need to be careful not to get locked out of the rooms by venturing into the southeast or southwest tunnels. It is possible that when your killing the weapons that roam just outside the door someone could hit the switch and lock you out. You will need to wait until the door is opened so you do not lose your prowess progress.
Alternate #1 Breakdown: Warp in via the Home Point warp to The Celestial Nexus then walk up the stairs. Use page 7 and run around the square path in the middle of the map on the first page and kill golems. A Grounds Tome can be found at (H-8) if you do this method.
Alternate #2 Breakdown: You need crystals to synth, so it makes sense to target whatever element your main craft needs while farming up your Kupowers.
Culinarian's Torque
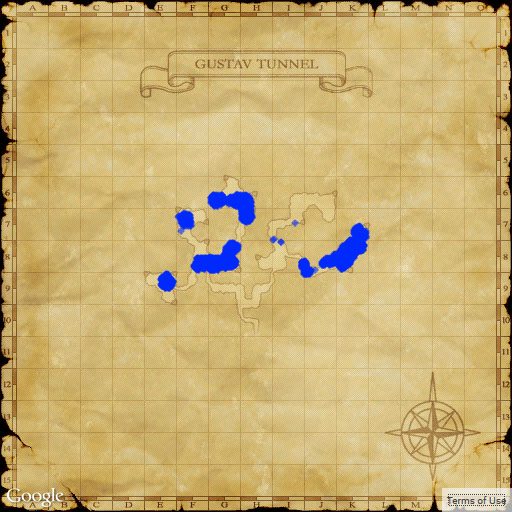
Zone: Gustav Tunnel
Suggested Fields of Valor page: Page 4 (3 Doom Warlocks, 3 Demonic Pugils)
Suggested farming positions: Second floor (Basement) E-9, F-7, Taxim spawn area in the middle of the map, G-6 area, and E-8 area
Breakdown: You will most likely have to travel clockwise around this zone and kill as you go. Pick two branches of the lower map and alternate between the two if you have respawns by the time you are going to the third branch. You could always train a couple branches, but do not overwhelm yourself because skeletons aggro low HP and there are alot of them.

