The Voracious Resurgence | |
| Prime Weapons • Ultimate Weapons • Ultimate Augments • Abjurations iL119 • JSE Necks • Divergence Augments • Escutcheons | |
| Reforged Armor Artifact: +1 • iL109 • iL119/+2/+3/+4 Relic: +1/+2 • iL109 • iL119/+2/+3/+4 Empyrean: +1/+2 • iL109 • iL119/+2/+3 |
Guides • Crafting • Trusts • Apex Monsters |
User:Arkevorkhat/Piracy for Bilgerats: A Corsair's Guide
|
|
So you want to play Corsair?
This guide aims to get you sailing the seven seas as smoothly as possible.
Note: This guide will not be covering the upper tiers of play. For additional information on endgame gearsets, please see All Jobs Gear Sets/Corsair
Step 0
Unlock the Corsair job and Level it to 99
Setup
First things first. If you're not using Gearswap on Windower (recommended for non-programmers as support is more widely available), Luashitacast on Ashita V4 (recommended for programmers), or Ashitacast on Ashita V3 (recommended for nobody), stop reading here and fix that.
Yes, it is feasible to play corsair using only in-game gearsets. However, it places you at a distinct disadvantage, because you're going to be stuck in whatever set you've changed into for a full second at minimum. Many of corsair's best gearsets are heavily limited in defensive stats, and being stuck in them when an AOE comes out spells certain doom.
It is also recommended to pick up the following addons:
|
|
Merits
Corsair merits are deeply situational, and you'll likely find yourself updating them regularly. As you move through your progression, different pieces of content will demand different merits, especially in group 2.
| Merit | Recommended | Description |
|---|---|---|
| Phantom Roll Recast | 5/5 | Nobody wants to wait for the COR's phantom roll recast. Merit this to 5/5 and do A Shantotto Ascension. |
| Quick Draw Recast | 0 or 5/5 | Whether you get good use out of this depends greatly on what content you're doing. If you're playing in mage parties regularly, or swapping mobs rapidly, this will give you great returns. If not, it's less important. |
| Quick Draw Accuracy | 0 | 10 mAcc can be gained with an accessory swap, no point meriting it. |
| Random Deal Recast | 0 or 5/5 | If you primarily use COR in long-form content like Dynamis-D or Odyssey Sheol C, this will give you good returns. If not, use Quick Draw Recast instead. |
| Bust Duration | 0 | This merit category is training wheels for learning how to roll. You want to have 0 merits in this as soon as possible. |
| Merit | Recommended | Description |
|---|---|---|
| Snake Eye | 1~3/5 | The value from a single merit in this category is huge. However, it is difficult to justify additional spending as the benefit is generally quite small. |
| Fold | 1/5 | Spend the merits to unlock this, but nothing more. Your phantom roll recast should be short enough that the reset chance is insignificant. |
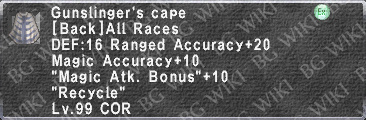
| Winning Streak | 3~5/5 | Meriting 5/5 here allows for the use of an augmented Gunslinger's Cape in your roll set, gaining -5 seconds in phantom roll recast. use 3/5 if you need the extra Loaded Deck merits. |
| Loaded Deck | all remaining points | Loaded Deck is an awkward merit category. The amount of benefit you'll get from it depends greatly on how often you're pressing Random Deal. |
Group 2 Merits
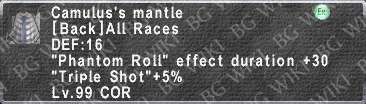
There are arguments to be made for many different merit configurations, and it's difficult to say for certain which one is "correct". Arislan@Shiva recommends 1, 1, 3, 5, for maximizing Random Deal efficiency at the cost of phantom roll efficiency. I personally use 3, 1, 5, 1, for maximizing Phantom Roll economy. As you play Corsair more, you'll get a feel for what configuration gives you the best benefit. If you're looking for a hard and fast 'rule', my opinion is that you should use 1, 1, 3, 5 if you primarily play in hard content and/or long content. If you primarily play Corsair inside Ambuscade and other short form content, use 3, 1, 5, 1. If you use 1, 1, 3, 5, update your roll sets to include both Compensator and Camulus's Mantle, or you won't be able to ride crooked cards.
Things you will need to grind
There's no getting around it. There are certain pieces of gear that will be necessary for your progression as a Corsair. Unfortunately for us, some of those pieces involve extensive grinding. The earlier you can start working on these grinds, the faster you will be ready for endgame. Don't be afraid to ask Linkshell members or even people you meet in the world if you can tag along.
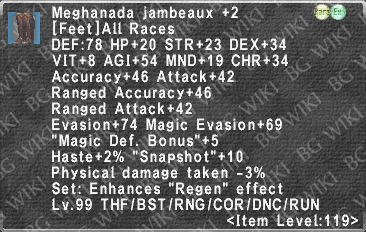
- Maiden of the Dusk II: This fight drops the Malignance Attire Set, which forms the core of our hybrid TP and DT sets. With the November 2025 Version Update, finding people willing to help you get drops from this fight has gotten significantly more difficult. You should expect to need to level another job to obtain this equipment.
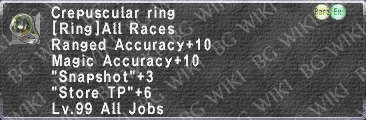
- The Wyrm God II: This fight drops the Crepuscular Ring, which is used for our Ranged TP set, and the Crepuscular Earring, which allows for incredible flexibility in our snapshot sets. Between the Crepuscular Cloak and Crepuscular Knife, you'll find many people who are grinding kills on this fight and already have the accessories.
- Ambuscade: As a Corsair you're going to need between 4 and 8 fully augmented JSE Capes from Ambuscade plus multiple pieces from both of the Ambuscade Armor Sets that we have access to. Once you've gotten your gear, Ambuscade also serves as an important income stream for getting our other expensive gear pieces. Finally, Ambuscade is inherently group content and finding parties as a basic roll-only Corsair is easier than you'd think.
Support Jobs
99 times out of 100, you will be using one of these four subjobs.
|
|
|
|
| Niche Support Jobs | ||||
|
Job-Specific Equipment
| Laksamana's Attire Set | ||
|---|---|---|
| Item | Upgrade? | Notes |
Laksa. Tricorne +4 
|
No | This piece does not shine in any set. |
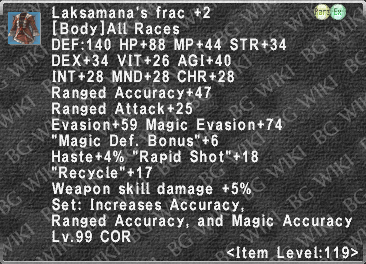
Laksa. Frac +4 
|
Yes | This piece shines in your preshot sets under flurry, also being useful in some (but not all) weaponskill sets. |
Lak. Gants +4 
|
No | Only useful in the rare fights where you A) want to reduce TP feed, and B) aren't just sending a Monk or Samurai to handle it. |
Laksa. Trews +4 
|
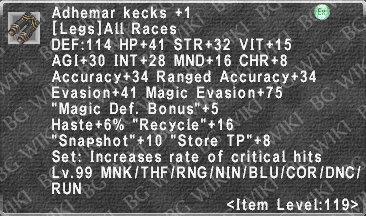
No | In a world where Adhemar Kecks +1 doesn't exist, these are incredible. However, their 5 additional snapshot is easily compensated for in sets. Potentially useful in a low-enmity set, but ultimately very niche. |
Laksa. Bottes +4 
|
No | These are a middling brick of stats at best. |
| Lanun Attire Set | ||
|---|---|---|
| Item | Upgrade? | Notes |
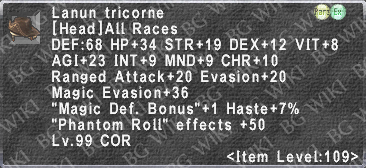
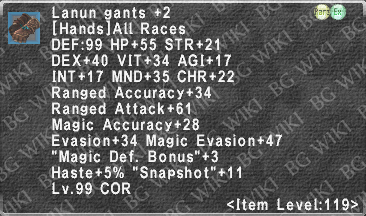
Lanun Tricorne +4  Winning Streak (+6s phantom roll duration per merit level) |
Maybe | This piece does a perfectly serviceable job even at item level 109. Further upgrades exclusively improve defensive stats. |
Lanun Frac +4  Enhances Loaded Deck (Reduces failure chance from 50% at 5 merits to 0% at 5 merits. Additional 10% failure reduction per merit.) |
First | This is your best option for Leaden Salute in the chest slot. |
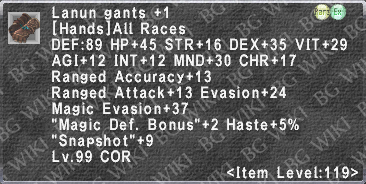
Lanun Gants +4  Enhances Fold (adds 20% chance per merit level for fold to clear a second roll or bust.) |
Third | This piece is incredible for your triple shot set. However, given the high cost of this item and relatively niche usage, saving it for later in your progression is advised. |
Lanun Trews +4  Enhances Snake Eye (Adds 4% chance to negate recast time on use.) |
No | If Adhemar Kecks +1 didn't exist this piece would still be middling. With Adhemar being available, these have nothing meaningful going for them. Take them to iLvl 109, no further. |
Lanun Bottes +4  Enhances Wild Card (Rerolls 1s and 2s once) |
Second | With the limbus update these are now unquestionably best in slot for ranged weaponskills when accuracy is not a concern. |
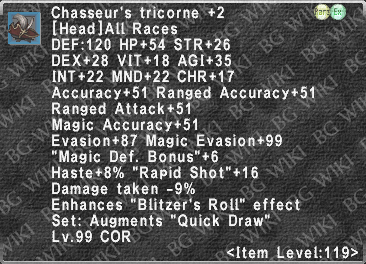
| Chasseur's Attire Set | ||
|---|---|---|
| Item | Upgrade? | Notes |
Chass. Tricorne +3 
|
Third | Preshot, DT. |
Chasseur's Frac +3 
|
Fourth | DT and Triple Shot. |
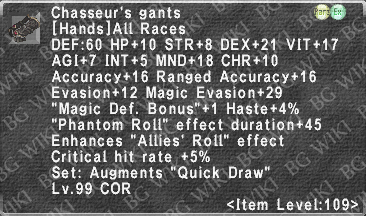
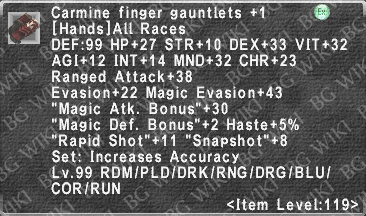
Chasseur's Gants +3 
|
First | This is your best WSD option in the hand slot bar none. It also improves your roll set. |
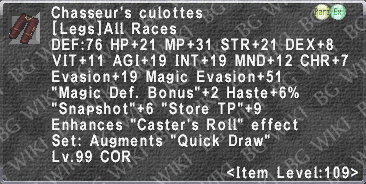
Chas. Culottes +3 
|
Second | This piece goes in your ranged TP set, being better for TP gain than both Malignance and Ikenga's. Also part of your Idle DT set. |
Chass. Bottes +3 
|
Maybe | This piece is in a rough spot. It's not better for magical weaponskills than the Relic Feet, and the bonus to quick draw, while significant, requires good timing to get good value from. Nobody will argue that 31% boosted elemental damage is bad. However, the boost to damage only applying to the next hit means you have to be very careful to ensure that the damage boost you're applying isn't consumed by the damage cap. |
Weapons
Corsair gets meaningful access to 3 types of weapons: Marksmanship (Almost exclusively guns), Daggers, and Swords. Each has their use, and neglecting any of them will put you at a distinct disadvantage.
Access to item level 119 weapons is so plentiful now that non-119 options will not be discussed.
Guns
Non-EMA
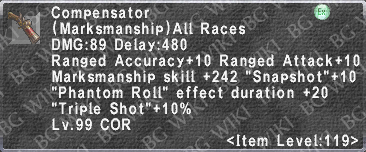
![]() Compensator: This gun is incredibly important for all Corsairs. The bonus to phantom roll duration is huge, and the additional snapshot, triple shot rate, and (with path C augments) accuracy and attack make this a great early-game weapon that you will hold onto forever. Obtainable from Domain Invasion
Compensator: This gun is incredibly important for all Corsairs. The bonus to phantom roll duration is huge, and the additional snapshot, triple shot rate, and (with path C augments) accuracy and attack make this a great early-game weapon that you will hold onto forever. Obtainable from Domain Invasion
![]() Doomsday: With augments this weapon is among the best in the game for Leaden Salute and Wildfire. Random augmentation will have you cursing, however. Obtainable from Alluvion Skirmish, augmented by Divainy-Gamainy
Doomsday: With augments this weapon is among the best in the game for Leaden Salute and Wildfire. Random augmentation will have you cursing, however. Obtainable from Alluvion Skirmish, augmented by Divainy-Gamainy
![]() Holliday: More random augments. With perfect or near-perfect DMG, AGI, and MAB augments, this weapon is second-best for Leaden Salute and Wildfire outside of EMA. Obtainable from Reisenjima Geas Fete or Domain Invasion. Augmentable by Oseem
Holliday: More random augments. With perfect or near-perfect DMG, AGI, and MAB augments, this weapon is second-best for Leaden Salute and Wildfire outside of EMA. Obtainable from Reisenjima Geas Fete or Domain Invasion. Augmentable by Oseem
![]() Molybdosis: No random augments this time. This weapon is second best weapon overall for Leaden Salute, and competitive for Wildfire. Drops from Warder of Courage in Escha - Ru'aun
Molybdosis: No random augments this time. This weapon is second best weapon overall for Leaden Salute, and competitive for Wildfire. Drops from Warder of Courage in Escha - Ru'aun
EMA (Ultimate Weapons)
![]() Armageddon: Corsair's Empyrean weapon. Requires significant time investment but is obtainable solo. Arma is a white-damage machine, pumping out unparalleled shot numbers. Once augmented, this weapon is best in slot for Wildfire.
Armageddon: Corsair's Empyrean weapon. Requires significant time investment but is obtainable solo. Arma is a white-damage machine, pumping out unparalleled shot numbers. Once augmented, this weapon is best in slot for Wildfire.
![]() Death Penalty: Corsair's Mythic Weapon. Requires significant time and monetary investment. Technically obtainable solo, but many assaults are only feasible with multiple people. Best in slot for Leaden Salute, and a solid option for Wildfire as well. Dispenses our best available magic bullet.
Death Penalty: Corsair's Mythic Weapon. Requires significant time and monetary investment. Technically obtainable solo, but many assaults are only feasible with multiple people. Best in slot for Leaden Salute, and a solid option for Wildfire as well. Dispenses our best available magic bullet.
![]() Fomalhaut: Corsair's Aeonic weapon. Not obtainable solo. Our best option for Last Stand and Hot Shot. Dispenses our best physical bullet as well. If you're only going to make one ultimate weapon, this is the one to choose.
Fomalhaut: Corsair's Aeonic weapon. Not obtainable solo. Our best option for Last Stand and Hot Shot. Dispenses our best physical bullet as well. If you're only going to make one ultimate weapon, this is the one to choose.
Daggers
![]() Kustawi +1: Very solid main-hand for ranged attacks, provides much-needed accuracy, -enmity, and rapid shot. Drops from Unity 128 NM Glazemane
Kustawi +1: Very solid main-hand for ranged attacks, provides much-needed accuracy, -enmity, and rapid shot. Drops from Unity 128 NM Glazemane
![]() Blurred Knife +1: This weapon is generally relegated to off-hand duty when meleeing. Worthwhile to obtain if you can't get a Ngai clear.
Blurred Knife +1: This weapon is generally relegated to off-hand duty when meleeing. Worthwhile to obtain if you can't get a Ngai clear.
![]() Kaja Knife: Ambuscade weapon, one of our best options for daggers when meleeing. Obtained from Ambuscade
Kaja Knife: Ambuscade weapon, one of our best options for daggers when meleeing. Obtained from Ambuscade
![]() Tauret: Ambuscade weapon, and the final form of the Kaja Knife. If you're main-handing a dagger, it should be this one. Best in slot for Evisceration.
Tauret: Ambuscade weapon, and the final form of the Kaja Knife. If you're main-handing a dagger, it should be this one. Best in slot for Evisceration.
![]() Gleti's Knife: When dual-wielding, this will almost always be in your off-hand. Obtained from Odyssey Gaol boss Ngai
Gleti's Knife: When dual-wielding, this will almost always be in your off-hand. Obtained from Odyssey Gaol boss Ngai
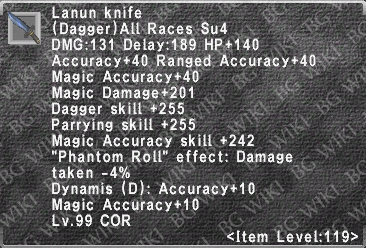
![]() Lanun Knife: Budget endgame mainhand. You'll want at least one of these with Path C augments for your roll set.
Lanun Knife: Budget endgame mainhand. You'll want at least one of these with Path C augments for your roll set.
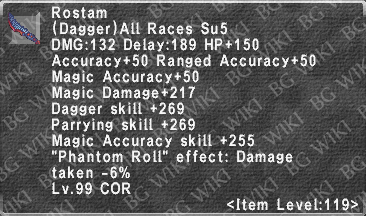
![]() Rostam: For those with very deep pockets. If you only get one of these, augment it with Path C, and get a Lanun Knife path A for your shooting set.
Rostam: For those with very deep pockets. If you only get one of these, augment it with Path C, and get a Lanun Knife path A for your shooting set.
Swords
Corsair's sword skill is fairly middling, so daggers will be your mainstay. However, there are a few options here that are a cut above.
![]() Kaja Sword: Ambuscade weapon. This is the first sword that is really worth using on Corsair, but once you obtain it, it's incredible. Your gateway to Savage Blade spam.
Kaja Sword: Ambuscade weapon. This is the first sword that is really worth using on Corsair, but once you obtain it, it's incredible. Your gateway to Savage Blade spam.
![]() Naegling: Ambuscade weapon. We can hold the green sword, therefore we use the green sword. Turn your brain off and press the Savage Blade button until your fingers ache.
Naegling: Ambuscade weapon. We can hold the green sword, therefore we use the green sword. Turn your brain off and press the Savage Blade button until your fingers ache.
Shields
We only get one shield, but it's a good one, very worth getting.
![]() Nusku Shield: When you're /WAR or /DRG, this will be your off-hand. Store TP +3 might not seem like much, but in our TP sets, it's often the difference between a 3-hit build and a 4-hit build. Obtainable from Omen midboss Glassy Craver
Nusku Shield: When you're /WAR or /DRG, this will be your off-hand. Store TP +3 might not seem like much, but in our TP sets, it's often the difference between a 3-hit build and a 4-hit build. Obtainable from Omen midboss Glassy Craver
Gearing Path
The order in which you build your sets is important. I highly recommend following this gearing path:
- Roll Set
- Ranged Sets
- Ranged TP Set
- Ranged WS sets
- Last Stand
- Leaden Salute
- Wildfire
- Hot Shot
- DT set
- Melee Sets
- Melee TP set
- Melee WS Sets
- Savage Blade
- Evisceration
- Burning Blade
Roll Sets
This is the bare minimum roll set for playing with other people. Compensator can be obtained through Domain Invasion, and Barataria Ring can be obtained from the Auction House or Kupon AW-WK. |
This set will allow you to contribute to harder content. The increased roll duration means you can roll once at the beginning of an ambuscade, and not have to re-apply rolls during the fight.
|
With this set you are nearly indistinguishable from a top-tier corsair. Additionally, this tier of gearing is possible to attain entirely solo with trusts. |
Beyond this point, there are no further upgrades to make beyond minor improvements to magic evasion and defense. This set will (with recommended merits) reach 10 minutes of roll duration, which is sufficient to ride Crooked Cards. You can continue to use Compensator if you want some wiggle room in your rolls, but it is not necessary, and the loss in TP may not be worth it. |


Ranged Sets
A Corsair is at their most vulnerable when standing near the enemy. An errant AOE spell or TP move that wouldn't affect most other jobs in the game will leave you in the red, begging for healing. Until much later in your progression, you will be using exclusively ranged attacks. (Get comfy with your /ra <t> macro.)
Ranged TP sets
When attacking from a distance, you can't get away with just one gearset. Much like a caster, you will have a Snapshot set for reducing your ranged attack delay, and a damage set for maximizing your white damage and accuracy.
Snapshot
I won't sugarcoat it, getting adequate snapshot on Corsair sucks in the early game. You're going to be spending a lot of time spitting in Divainy-Gamainy's face.
Your goal with your snapshot set is maximizing Rapid Shot activation rate while ensuring that you have enough snapshot to reach the delay cap.
- Corsair Job Gifts: 10% at 1200 JP, 5% at 100JP
- Flurry I: 15% (Assumed)
- Flurry II: 30% (Dev Confirmed)
These sets should be equipped in your ![]() Precast or
Precast or ![]() Preshot handler.
Preshot handler.
Intro Tier: At this tier of gearing, the following assumptions are made: You have at most iLvl 119 JSE gear, and access to no more than Ambuscade and Escha - Zi'Tah Geas Fete.
This set will reach the snapshot cap under flurry I at 0 JP. |
Under Flurry II, this set will hit the snapshot cap at 0JP. |


Basic Tier: This tier expects that you've been saving your income from Sparks and Accolades for several weeks, and have found a linkshell that runs low-tier group content together. (This includes Vagary and Dynamis - Divergence wave 1.) Alluvion Skirmish augments are assumed to be perfect. (Every snapshot augment is +5)
You will want the Lanun Gants at +3 or better for your triple shot set, so investing in them now is worthwhile.
This set will reach maximum delay reduction at 0 JP with no flurry. |
|

|
1200 JP doesn't gain enough snapshot to change this set. |
At 1200 JP, you can freely use any gun you want instead of Compensator. |

Intermediate Tier: This tier expects you to have run moderate amounts of higher level group content like Sortie, Odyssey Gaol, and to have saved up significant amounts of gil. I will also no longer be providing sets for anything less than 1200 JP.
NQ Oshosi vest is also acceptable, placing this set at 59% snapshot. Depending on the prices on your server, this may be a very worthwhile downgrade. |
|
|


Additionally, make note of the use of Lanun Gants +3 in all of these sets. Corsair's relic hands add a 50/50 chance for you to fire 4 bullets instead of 3 when Triple Shot procs. They also give a solid block of Snapshot, which adds much-needed flexibility to these sets.
Sets are only provided here for no flurry and any flurry. While swaps can be included to gain some additional Triple Shot chance under flurry 2, those swaps are prohibitively expensive. Instead of buying Oshosi Leggings +1 for 3% Triple Shot rate, you can buy half or more of the items you would need to complete Fomalhaut.
If you chose to downgrade from Oshosi Vest +1 to Oshosi Vest, it still functions in these sets.
NQ Oshosi trousers are perfectly sufficient. The upgrade to HQ is orders of magnitude more expensive and only provides +1% proc rate. Save your money and spend it elsewhere. |
|


