The Voracious Resurgence | |
| Prime Weapons • Ultimate Weapons • Ultimate Augments • Abjurations iL119 • JSE Necks • Divergence Augments • Escutcheons | |
| Reforged Armor Artifact: +1 • iL109 • iL119/+2/+3 Relic: +1/+2 • iL109 • iL119/+2/+3 Empyrean: +1/+2 • iL109 • iL119/+2/+3 |
Guides • Crafting • Trusts • Apex Monsters |
Arrapago Remnants II: Difference between revisions
m (→Third Floor) |
m (→Fourth Floor: north side, west room has acrolith) |
||
| (23 intermediate revisions by 11 users not shown) | |||
| Line 51: | Line 51: | ||
| {{cdrop}}: [[Genta Gote]], [[Genta Sune-Ate]], [[Idi's Mask]], [[Idi's Gloves]], [[Namru's Tiara]], [[Neit's Pigaches]]<br>{{rdrop}}: [[Ate's Cuirass]], [[Genta-No-Hakama]], [[Neit's Coat]], [[Neit's Slops]]<br>{{rdrop}}: [[Linen Coin Purse]] |
| {{cdrop}}: [[Genta Gote]], [[Genta Sune-Ate]], [[Idi's Mask]], [[Idi's Gloves]], [[Namru's Tiara]], [[Neit's Pigaches]]<br>{{rdrop}}: [[Ate's Cuirass]], [[Genta-No-Hakama]], [[Neit's Coat]], [[Neit's Slops]]<br>{{rdrop}}: [[Linen Coin Purse]] |
||
|- |
|- |
||
| [[ |
| [[Khrysokhimaira Elder]] |
||
| {{cdrop}}: [[Ate's Cuirass]], [[Genta-No-Hakama]], [[Genta Gote]], [[Idi's Gloves]], [[Neit's Coat]], [[Neit's Slops]]<br>{{udrop}}: [[Genta Sune-Ate]], [[Idi's Mask]], [[Namru's Tiara]], [[Neit's Pigaches]]<br>{{gdrop}}: [[Linen Coin Purse]] |
| {{cdrop}}: [[Ate's Cuirass]], [[Genta-No-Hakama]], [[Genta Gote]], [[Idi's Gloves]], [[Neit's Coat]], [[Neit's Slops]]<br>{{udrop}}: [[Genta Sune-Ate]], [[Idi's Mask]], [[Namru's Tiara]], [[Neit's Pigaches]]<br>{{gdrop}}: [[Linen Coin Purse]] |
||
|} |
|} |
||
== Optimized Plans Farming == |
|||
===Umbrage Plans=== |
|||
The following route will acquire 5-13 [[Umbrage Plans]] and 1-4 [[Bloodshed Plans]]. This is the best path for farming [[Umbrage Plans]] in any area. |
|||
*F1: [[Chigoe Stinger]], teleport anywhere |
|||
*F2: [[Archaic Gear]] |
|||
*F3: East: Defeat [[Acrolith]], then west/south, defeat [[Chigoe Stinger]], teleport south |
|||
*F4: South: Defeat [[Acrolith]] and [[Qutrub Devourer]] |
|||
===Bloodshed Plans=== |
|||
The following route will acquire 3-9 [[Bloodshed Plans]] and 3-6 [[Umbrage Plans]]. A better optimized path for farming [[Bloodshed Plans]] can be taken in [[Zhayolm Remnants II#Optimized Plans Farming|Zhayolm Remnants II]]. |
|||
*F1: [[Chigoe Stinger]], teleport anywhere |
|||
*F2: [[Archaic Gear]] |
|||
*F3: East: Defeat [[Acrolith]], then east/north, defeat [[Archaic Gear]], teleport north |
|||
*F4: North: Defeat [[Acrolith]] and [[Lamia Spoliator]] |
|||
== First Floor == |
== First Floor == |
||
| Line 68: | Line 83: | ||
|- |
|- |
||
| [[Leech]] |
| [[Leech]] |
||
| Ranged, Rings/Earrings |
| Sub Job, Ranged, Rings/Earrings |
||
|- |
|- |
||
| [[Merrow Kabukidancer]] |
| [[Merrow Kabukidancer]] |
||
| Line 172: | Line 187: | ||
|valign="top" | |
|valign="top" | |
||
'''Northwest Room''' |
'''Northwest Room''' |
||
* [[Merrow Chantress]] |
|||
| ⚫ | |||
* [[Leech]] 10x |
|||
'''Southwest Room''' |
'''Southwest Room''' |
||
| Line 210: | Line 228: | ||
| [[Qutrub]] |
| [[Qutrub]] |
||
| Job Abilities, INT, MP |
| Job Abilities, INT, MP |
||
| ⚫ | |||
| ⚫ | |||
| ⚫ | |||
|- |
|- |
||
| [[ |
| [[Lamia Dancer]] |
||
| ⚫ | |||
| ⚫ | |||
| [[Lamia Dartist]] |
|||
| Job Abilities, HP, Legs/Feet |
| Job Abilities, HP, Legs/Feet |
||
|- |
|- |
||
| [[ |
| [[Lamia Fatedealer]] |
||
| |
| CHR, VIT |
||
|- |
|||
| [[Lamia Graverobber]] |
|||
| MND, Magic |
|||
|} |
|} |
||
|width="5px"| |
|width="5px"| |
||
| Line 227: | Line 248: | ||
! width=40%; | Enemies |
! width=40%; | Enemies |
||
! width=60%; | Cell |
! width=60%; | Cell |
||
| ⚫ | |||
| ⚫ | |||
| ⚫ | |||
|- |
|- |
||
| ⚫ | |||
| ⚫ | |||
| ⚫ | |||
| [[Merrow Chantress]] |
|||
| Magic, MP, Hands |
|||
|- |
|||
| [[Merrow Icedancer]] |
| [[Merrow Icedancer]] |
||
| Magic |
| Magic, Sub Job |
||
|- |
|- |
||
| [[ |
| [[Merrow Kabukidancer]] |
||
| Job Abilities, HP, Legs/Feet |
| Job Abilities, HP, Legs/Feet |
||
|- |
|- |
||
| [[Merrow |
| [[Merrow Shadowdancer]] |
||
| Magic, MP, Hands |
| Magic, MP, Hands |
||
|} |
|} |
||
| Line 244: | Line 268: | ||
|valign="top" width="350px" | |
|valign="top" width="350px" | |
||
[[Image: |
[[Image:ArII-3.png|right|350px|Arrapago Remnants 3F]] |
||
|width="5px"| |
|width="5px"| |
||
|valign="top" | |
|valign="top" | |
||
'''East/North Path''' |
'''East/North Path''' |
||
* Three rooms of [[Qutrub]] x4 |
* Three rooms of [[Qutrub]] x4 |
||
* Large room contains |
* Large room contains 12 [[:Category:Lamiae|Lamiae]] and one [[Archaic Gear]]. |
||
** [[Lamia Dancer]] x3, [[Lamia Dartist]] x3, [[Lamia Fatedealer]] x3, [[Lamia Graverobber]] x3 |
|||
'''West/South Path''' |
'''West/South Path''' |
||
* Three rooms of [[Flytrap]] x4 |
* Three rooms of [[Flytrap]] x4 |
||
* Large room contains |
* Large room contains 12 [[:Category:Lamiae|Lamiae]] and one [[Archaic Gear]]. |
||
** [[Merrow Chantress]] x3, [[Merrow Icedancer]] x3, [[Merrow Kabukidancer]] x, [[Merrow Shadowdancer]] x2 |
|||
|} |
|} |
||
| Line 276: | Line 302: | ||
|- |
|- |
||
| [[Merrow Icedancer]] |
| [[Merrow Icedancer]] |
||
| Magic |
| Magic, Sub Job |
||
|- |
|- |
||
| [[Merrow Kabukidancer]] |
| [[Merrow Kabukidancer]] |
||
| Line 319: | Line 345: | ||
'''North Side''' |
'''North Side''' |
||
* Northern Room contains [[Flytrap]] x10 |
* Northern Room contains [[Flytrap]] x10 |
||
* |
* Western Room contains [[Acrolith]] x2 |
||
* Room beyond the Acrolith contains 8 additional [[:Category:Lamiae|Lamiae]] |
* Room beyond the Acrolith contains 8 additional [[:Category:Lamiae|Lamiae]] |
||
** [[Lamia Fatedealer]] x2, [[Lamia Dancer]] x2, [[Lamia Dartist]] x2, [[Lamia Graverobber]] x2 |
** [[Lamia Fatedealer]] x2, [[Lamia Dancer]] x2, [[Lamia Dartist]] x2, [[Lamia Graverobber]] x2 |
||
| Line 325: | Line 351: | ||
'''South Side''' |
'''South Side''' |
||
* Southern Room contains [[Qutrub]] x8 (4 DRK, 4 BLM) |
* Southern Room contains [[Qutrub]] x8 (4 DRK, 4 BLM) |
||
* |
* Eastern Room contains [[Acrolith]] x2 |
||
* Room beyond the Acrolith contains additional [[:Category:Lamiae|Lamiae]] |
* Room beyond the Acrolith contains 8 additional [[:Category:Lamiae|Lamiae]] |
||
** [[Merrow Chantress]] x2, [[Merrow Icedancer]] x2, [[Merrow Kabukidancer]] x2, [[Merrow Shadowdancer]] x2 |
** [[Merrow Chantress]] x2, [[Merrow Icedancer]] x2, [[Merrow Kabukidancer]] x2, [[Merrow Shadowdancer]] x2 |
||
| Line 350: | Line 376: | ||
|- |
|- |
||
| [[Archaic Gear]] |
| [[Archaic Gear]] |
||
| Weapons, Ranged, Body |
| Weapons, Ranged, Body, Head/Neck |
||
|- |
|- |
||
| [[Archaic Gears]] |
| [[Archaic Gears]] |
||
| Line 366: | Line 392: | ||
* First three rooms contain [[Archaic Gear]] x4 |
* First three rooms contain [[Archaic Gear]] x4 |
||
* Final large room has [[Archaic Gear]] x4 in the center and [[Archaic Rampart]] x4 in each corner. |
* Final large room has [[Archaic Gear]] x4 in the center and [[Archaic Rampart]] x4 in each corner. |
||
** Each rampart can spawn |
** Each rampart can spawn 7 [[Archaic Gears]] at once by using Reinforcements. [[Archaic Gears]] from the ramparts are each guaranteed to drop at least one [[Alexandrite]]. |
||
'''South Side''' |
'''South Side''' |
||
* First three rooms contain [[Archaic Gear]] x4 |
* First three rooms contain [[Archaic Gear]] x4 |
||
* Final large room has [[Archaic Gear]] x4 in the center and [[Archaic Rampart]] x4 in each corner. |
* Final large room has [[Archaic Gear]] x4 in the center and [[Archaic Rampart]] x4 in each corner. |
||
** Each rampart can spawn |
** Each rampart can spawn 7 [[Archaic Gears]] at once by using Reinforcements. [[Archaic Gears]] from the ramparts are each guaranteed to drop at least one [[Alexandrite]]. |
||
|} |
|} |
||
| Line 387: | Line 413: | ||
|- |
|- |
||
| [[Archaic Chariot]] |
| [[Archaic Chariot]] |
||
| STR, INT, DEX, Magic |
| STR, INT, DEX, Magic, Job Abilities |
||
|} |
|} |
||
|} |
|} |
||
| Line 404: | Line 430: | ||
|} |
|} |
||
'''Notorious Monsters''' |
'''Notorious Monsters''' |
||
:'''[[Khimaira]]''': There is a stationary [[Archaic Rampart]] against the south wall which can use '''Reinforcements''' to spawn [[Khimaira]] (NM) or another [[Archaic Chariot]]. The spawn condition for [[Khimaira]] requires killing [[Armored Chariot]] in under three minutes |
:'''[[Khimaira]]''': There is a stationary [[Archaic Rampart]] against the south wall which can use '''Reinforcements''' to spawn [[Khimaira]] (NM) or another [[Archaic Chariot]]. The spawn condition for [[Khimaira]] requires killing [[Armored Chariot]] in under three minutes. The rampart will only use '''Reinforcements''' once. If you bring the rampart to too low of HP (under ~20%) too quickly, the rampart can have a significant delay (took over 10 minutes in one instance) in using Reinforcements. |
||
::Khimaira uses standard Khimaira TP moves and can use '''Fulmination''' (<30%, possibly 35% like other Khimairas.). |
::Khimaira uses standard Khimaira TP moves and can use '''Fulmination''' (<30%, possibly 35% like other Khimairas.). |
||
== Seventh Floor== |
== Seventh Floor== |
||
'''Notorious Monsters''' |
'''Notorious Monsters''' |
||
:'''[[ |
:'''[[Khrysokhimaira Elder]]''': If [[Khimaira]] was spawned on the sixth floor, the final boss, [[Khrysokhimaira Elder]], will spawn upon entering the last room. If [[Khimaira]] was not previously spawned, it will spawn here instead of [[Khrysokhimaira Elder]]. |
||
:: |
::Khrysokhimaira Elder uses standard Khimaira TP moves and can use '''Fulmination''' and '''Lithic Breath''' (Petrification and Weakness) at low HP (<25%). |
||
::Defeating this boss will yield the title ''Solar Sage''. |
::Defeating this boss will yield the title ''Solar Sage''. |
||
[[Category:Salvage (Level 99)]] |
[[Category:Salvage (Level 99)]] |
||
==Related Links== |
|||
*[[Farming Arrapago Remnants II as THF/PUP]] (Guide) |
|||
Latest revision as of 11:17, 29 May 2018
- The entrance area for Arrapago Remnants II can be reached by using the northwest teleporter on the Nyzul Isle map of the Alzadaal Undersea Ruins.
Notorious Monsters & Drops
| Notorious Monsters | |||
|---|---|---|---|
| Notorious Monster | Location(s) | Plans Dropped | |
| Chigoe Stinger | F1 | Umbrage Plans x1 | |
| Archaic Gear (NM) | F2 | Bloodshed Plans x1 | |
| Chigoe Stinger | F3 (south) | Umbrage Plans x1 Bloodshed Plans x0-1 | |
| Archaic Gear (NM) | F3 (north) | Bloodshed Plans x1 Umbrage Plans x0-1 | |
| Acrolith (NM) | F3 (east), F4 | Umbrage Plans x1-2 Bloodshed Plans x0-1 | |
| Lamia Spoliator | F4 (north) | Bloodshed Plans x1-2 | |
| Qutrub Devourer | F4 (south) | Umbrage Plans x1-2 | |
| Boss Monsters | |||
|---|---|---|---|
| Boss | Available Drops | ||
| Khimaira | C: Genta Gote, Genta Sune-Ate, Idi's Mask, Idi's Gloves, Namru's Tiara, Neit's Pigaches R: Ate's Cuirass, Genta-No-Hakama, Neit's Coat, Neit's Slops R: Linen Coin Purse | ||
| Khrysokhimaira Elder | C: Ate's Cuirass, Genta-No-Hakama, Genta Gote, Idi's Gloves, Neit's Coat, Neit's Slops U: Genta Sune-Ate, Idi's Mask, Namru's Tiara, Neit's Pigaches G: Linen Coin Purse | ||
Optimized Plans Farming
Umbrage Plans
The following route will acquire 5-13 Umbrage Plans and 1-4 Bloodshed Plans. This is the best path for farming Umbrage Plans in any area.
- F1: Chigoe Stinger, teleport anywhere
- F2: Archaic Gear
- F3: East: Defeat Acrolith, then west/south, defeat Chigoe Stinger, teleport south
- F4: South: Defeat Acrolith and Qutrub Devourer
Bloodshed Plans
The following route will acquire 3-9 Bloodshed Plans and 3-6 Umbrage Plans. A better optimized path for farming Bloodshed Plans can be taken in Zhayolm Remnants II.
- F1: Chigoe Stinger, teleport anywhere
- F2: Archaic Gear
- F3: East: Defeat Acrolith, then east/north, defeat Archaic Gear, teleport north
- F4: North: Defeat Acrolith and Lamia Spoliator
First Floor
|
| |||||||||||||||||||||||||
|
Northwest Wing
Southwest Wing
Southeast Wing
Northeast Wing
|
There are four wings which each spiral out to a teleport leading to F2 (no prerequisite necessary to use). Each wing contains four rooms containing four monsters each. Lamia type monsters are found in the first and third hallways between the rooms of each wing.
Notorious Monsters
- Chigoe Stinger: In the second hallway of one of the four wings, an untargetable chigoe will be present. This NM can only be aggroed and fought after clearing all monsters in that particular wing, so checking a wing (use sneak and invisible to avoid aggro) prior to clearing it is advisable.
Second Floor
|
| |||||||||||||||||||||||||||||
|
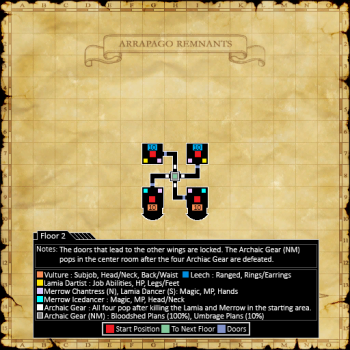
Northwest Room Southwest Room Southeast Room Northeast Room Central Area
|
The location of the room you start in on F2 will correspond to which teleport you used on F1. You may open the door to exit the room without defeating any monsters, but the doors leading to the remaining three rooms will be locked.
Notorious Monsters
- Archaic Gear: Spawns within the center room after defeating all four Archaic Gear.
Third Floor
|
| |||||||||||||||||||||||||||||||||
|
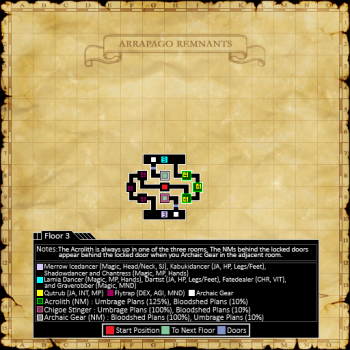
East/North Path
West/South Path
|
East Path Notorious Monsters
- Acrolith: Automatically appears among the Qutrub
- Archaic Gear: Appears in the northern teleporter room after defeating the single Archaic Gear among the Lamia
West Path Notorious Monsters
- Chigoe Stinger: Appears in the southern teleporter room after defeating the single Archaic Gear among the Lamia
Fourth Floor
|
| |||||||||||||||||||||||||||||||||
|
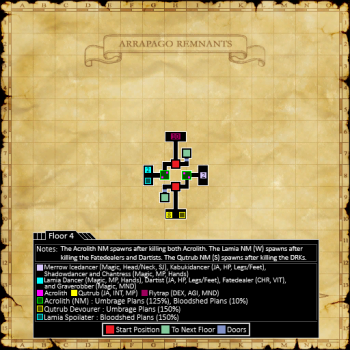
North Side
South Side
|
The half of F4 that you start on is determined by where you teleported from F3. Each side is completely isolated from the other.
North Side Notorious Monsters
- Acrolith: Appears in the Acrolith room after defeating the two Acrolith.
- Lamia Spoliator: Appears in the western room after defeating the Lamia Fatedealers and Lamia Dartists. Uses Eagle Eye Shot.
South Side Notorious Monsters
- Acrolith: Appears in the Acrolith room after defeating the two Acrolith.
- Qutrub Devourer: Appears in the southern room after defeating the 4 Dark Knight Qutrub (they can be differentiated by their weapon - DRKs wield a sword while BLMs wield a dagger).
Fifth Floor
| ||||||||||
| ||||||||||
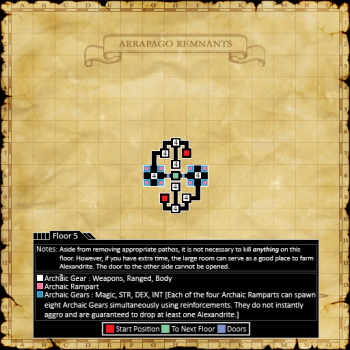
No notorious monsters are known to exist on this floor. It can be used for Alexandrite farming and likely yields ~40 Alexandrite when fully cleared.
Sixth Floor
| ||||||||
|
Central Room
Side Rooms
|
Notorious Monsters
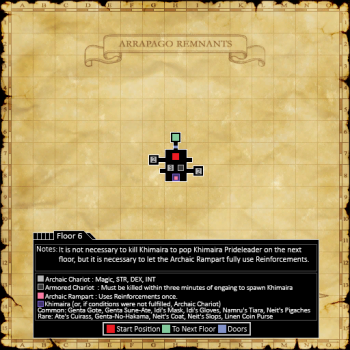
- Khimaira: There is a stationary Archaic Rampart against the south wall which can use Reinforcements to spawn Khimaira (NM) or another Archaic Chariot. The spawn condition for Khimaira requires killing Armored Chariot in under three minutes. The rampart will only use Reinforcements once. If you bring the rampart to too low of HP (under ~20%) too quickly, the rampart can have a significant delay (took over 10 minutes in one instance) in using Reinforcements.
- Khimaira uses standard Khimaira TP moves and can use Fulmination (<30%, possibly 35% like other Khimairas.).
Seventh Floor
Notorious Monsters
- Khrysokhimaira Elder: If Khimaira was spawned on the sixth floor, the final boss, Khrysokhimaira Elder, will spawn upon entering the last room. If Khimaira was not previously spawned, it will spawn here instead of Khrysokhimaira Elder.
- Khrysokhimaira Elder uses standard Khimaira TP moves and can use Fulmination and Lithic Breath (Petrification and Weakness) at low HP (<25%).
- Defeating this boss will yield the title Solar Sage.

