With the lifting of the level cap in Promathia areas, this quest is now relatively trivial in difficulty. The walkthrough below was written for a level cap of 40.
In this area, you have two objectives to complete.
Objective 1
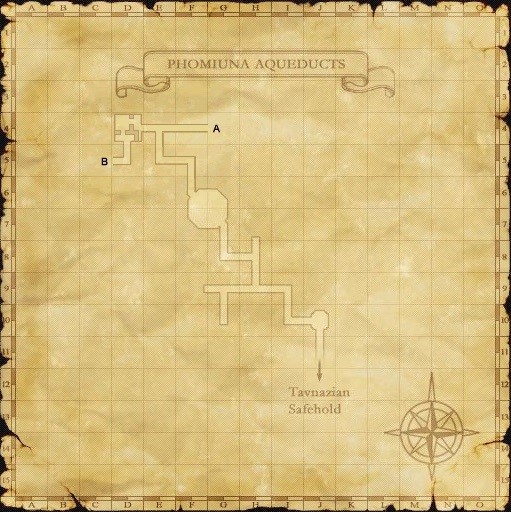
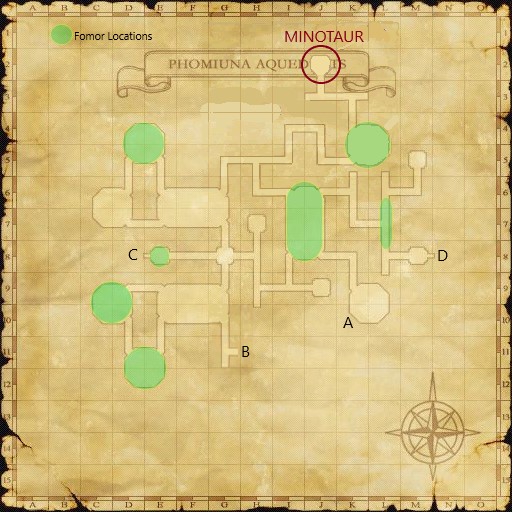
Sneak and Invisible up and make your way toward (J-2) on the second map where the Minotaur is.
You must enter map 2 from point "A" on Map 1. Point "B" will not work.
Climb the ladder at (F-6) then proceed to (F-4) Map 1 where it then becomes (K-10) Map 2 and fall. Head north afterwards.
On Map 2, take the wooden ladder up at (I-6), and then drop at (K-5).
Taurus mobs have True Sight so you will just need to run behind them or wait for them to move as their field of vision is very narrow. Alternatively, one person can travel to the Minotaur since it will draw the entire alliance in when one person aggros it.
Note: the Minotaur will NOT aggro a level 99 character, so using the draw-in method will not work if you get aggro from a level 99 character.
The Taurus (level 37-38) and Stegotaur (level 44-48) in this zone can drop Spruce Lumber (1 is needed for a side-quest).
The Minotaur will use a move called Mortal Ray that inflicts Doom on whoever is standing directly in front of it and facing it. This means the tanks. It can usually be avoided by turning your back but you need to be fast. If you do get doomed, Holy Water and Cursna have a small chance to remove the effect. You will probably need to use multiple waters and/or Cursna to remove it before the person is KOed.
After you defeat the Minotaur, there is no cutscene. Just move out of the area quickly so it doesn't re-aggro you when it spawns again.
Objective 2
Find the Iron Gate at (G-8) on the second map. You can get there from the Minotaur by taking the wooden ladder at (K-5) up and dropping at (G-6).
Beware of the short one-way drop into the water at (G-8), in the room with the Iron Gate. If you fall you will need to run around again.
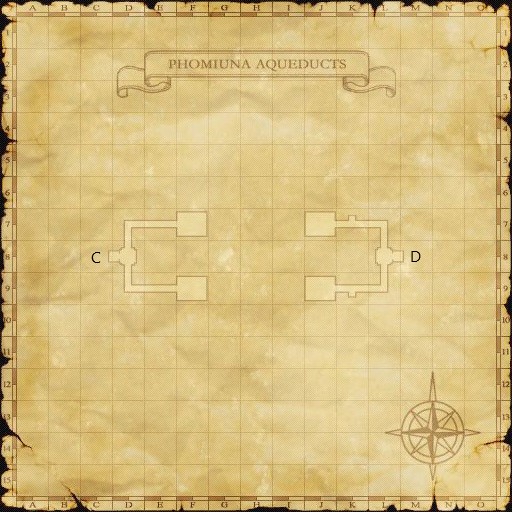
A Thief can pick the lock (for example by trading a Skeleton Key to the gate), or you may defeat Fomors for the Bronze Key to open the door.
After you pass through the Iron Gate, find the Wooden Ladder at (E-8) for a cutscene. Go up the ladder when the cutscene is finished.
This is more than just the brief cutscene where you see yourself climbing the ladder. If you didn't get a cutscene with Nag'molada, go back and make sure you got credit for killing the Minotaur.
Head left through the north door and proceed down the hallway into the first room you see. Beware, as there are Fomor that link in this room and you will likely be attacked immediately if below level 70.
Look for a ??? on a bookshelf in the southwest corner of the room. This will open a secret one way door on the south side of the room that you just ran past. Go through the door.
There are two ??? points in this room. The one immediately in front of you on the east wall is a trap. It will open a door in the eastern wall that will lead to a one-way drop, wasting your bronze key.
Instead, circle right around the bookshelves to the southwest corner of the room for the correct ???, which will open the southern wall-door.
In this hallway, there are several torches on the wall. They are not obvious to see, so you will probably need to use the tab key on your keyboard to target them.
Do not hit the farthest torch and walk into the room as it is a one way door and you will need to run around again.
Look at which Vana'diel day of the week it is (i.e. Firesday, Iceday) and find the oil lamps that correspond to the current day and the one that the day is strong against. The chart below represents the player facing West towards the false door with the lamps on either side.
Firesday
Fire and Ice
. ― ― ― ┏ Door ┓ ― ― ― .
Iceday
Ice and Wind
. ― ― ― ┏ Door ┓ ― ― ― .
Windsday
Wind and Earth
. ― ― ┏ Door ┓ ― ― ― ― .
Earthsday
Earth and Thunder
. ― ― ― ┏ Door ┓ ― ― ― .
Lightningsday
Thunder and Water
. ― ― ― ┏ Door ┓ ― ― ― .
Watersday
Water and Fire
. ― ― ┏ Door ┓ ― ― ― ― .
Lightsday
Light and Dark
. ― ― ― ― ┏ Door ┓ ― ― .
Darksday
Dark and Light
. ― ― ― ― ┏ Door ┓ ― ― .
(The above list should be read like this ex: Firesday = Press Fire & Ice lamps on the wall)
Examine the two corresponding oil lamps within a short period to open the door to the west. You can do this solo or have two players examine both at the same time.
Head through it and make your way to the second Ornate Gate for a cutscene.
Ending the Mission
After both objectives are completed, exit the aqueducts and speak with Justinius at (J-6) on the top floor of Tavnazian Safehold (Home Point #3).
Warning: Any frame rate above 30 FPS, eg. FastCS or a higher FPS through Config's FrameRateDivisor, bugs this upcoming cutscene with Justinius. You can reset your FPS to normal by using config FrameRateDivisor 2.
Print screen seems to also resume the stalled cutscene if you wish to keep fastcs on.
Print screen didn't work for me, but reloading GearInfo did
Unloading FastCS then hitting Print Screen unfroze the CS for me as of Jan 2026