Promathia Mission 4-2

From FFXI Wiki
The Savage
Series Chains of Promathia
Starting NPC Spacial Displacement, Misareaux Coast - (D-6)
Title
  • Mist Melter (defeating Ouryu)
  • Nag'molada's Underling (Mission Completion)
Repeatable No
Description Ulmia is determined to know the truth, and is ready to revisit Bahamut to learn it. Enlist the aid of Tenzen and Justinius to help you find Ulmia before something terrible occurs.
Previous Mission Next Mission
Sheltering Doubt The Secrets of Worship
Rewards

Note: With the lifting of the level cap in Promathia areas, this quest is now relatively trivial in difficulty. The walkthrough below was written for a level cap of 50.

Walkthrough

Preparation

Useful Items to bring:

For canceling Ouryu's flight:

For sneaking past mobs:

For self healing (or bring trusts):

  • Hi-Ether icon.png Potions and Ethers
  • Reraiser icon.png Reraise items
  • Yagudo Drink icon.png MP and HP Regen drinks.

Site B01
  • Head to the Dilapidated Gate at Misareaux Coast (F-7) for a cutscene. Unity level 122/128 nm will teleport you right at the gate.
  • Take the following path to reach Monarch Linn:
  • Head southwest to the Spatial Displacement.
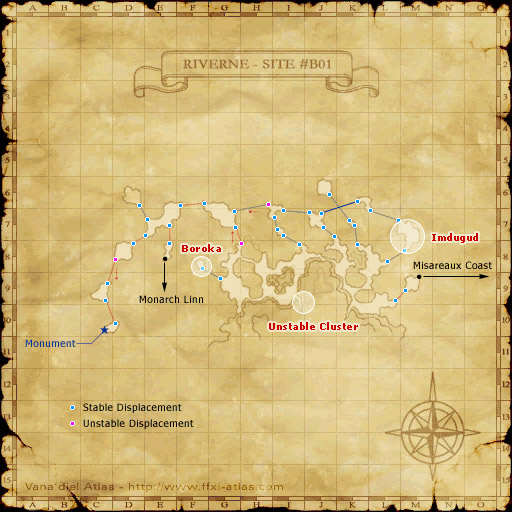
  • Head west-northwest until you reach the Unstable Displacement at (G-8).
    • When your party is ready, trade the Giant Scale to the displacement and pass through.
  • Head northwest to the next Spatial Displacement, and then south to the one after that. This will put you in the uncapped area Monarch Linn.
    • As with the previous missions, use this time to rest, and go over strategies.
  • When your party is ready, check the Spatial Displacement and choose the battlefield "The Savage". Buffs and trusts will wear when entering, so do so inside the battlefield.
    • Warning: Without Mistmelt icon.png Mistmelts the boss will spend most of the fight flying outside melee reach, greatly drawing out the battle and potentially whittling down melee players (even at level 99), while giving them little chance to fight back. As melee attacks can not hit during flight.
      • A lone healing trust is likely sufficient to survive this at high levels, while ranged or magic damage trusts should help speed up the fight.
  • After defeating Ouryu, speak with Justinius in Tavnazian Safehold (J-6) on Map 1 (Home Point #3) to complete the mission.

Side-quests

Boss Fight

Area Name Boss Name Abilties Notes
Monarch Linn Ouryu
  • On the ground:
    • Absolute Terror: Inflicts Terror, halting all actions until it wears.
    • Geotic Breath: Cone Attack dealing Earth damage.
    • Horrid Roar: Single target attack with a Dispel effect removing up to 15 buffs, including food. Also resets enmity.
    • Spike Flail: Area attack dealing physical damage. Used only if someone behind it has hate. Absorbed by shadow images.
    • Typhoon Wing: Frontal area attack dealing physical damage and inflicting Blindness.
  • In the air:
    • Bai Wing: Area attack dealing Earth damage and inflicting Slow.
    • Ochre Blast: Area attack dealing Earth damage.
    • Touchdown: Area attack dealing magical damage. Used when landing if a Mistmelt was not used.
  • Element: Earth Magic: Slowga, Stoneskin, Stonega II
  • Upon entry she will have Stoneskin on so Dispel it if you can.
  • She uses Invincible at couple intervals throughout the fight.
  • Using a Mistmelt while she is in the air will bring her down again so use them accordingly.
  • The best idea is to keep her on the ground where she is more manageable. She can be slept when on the ground to recover MP and HP if need be.
  • If Mistmelts are not used, she will alternate flying for 2 minutes, followed by 2 minutes on the ground.
  • After you get her to about 30% HP, the fight will end.