|
 The Voracious Resurgence |
 
| |
| Prime Weapons • Ultimate Weapons • Ultimate Augments • Abjurations iL119 • JSE Necks • Divergence Augments • Escutcheons | |
| Reforged Armor Artifact: +1 • iL109 • iL119/+2/+3/+4 Relic: +1/+2 • iL109 • iL119/+2/+3/+4 Empyrean: +1/+2 • iL109 • iL119/+2/+3 |
Guides • Crafting • Trusts • Apex Monsters |
User:Randomnick112233/Fantastic Exp Unbotched
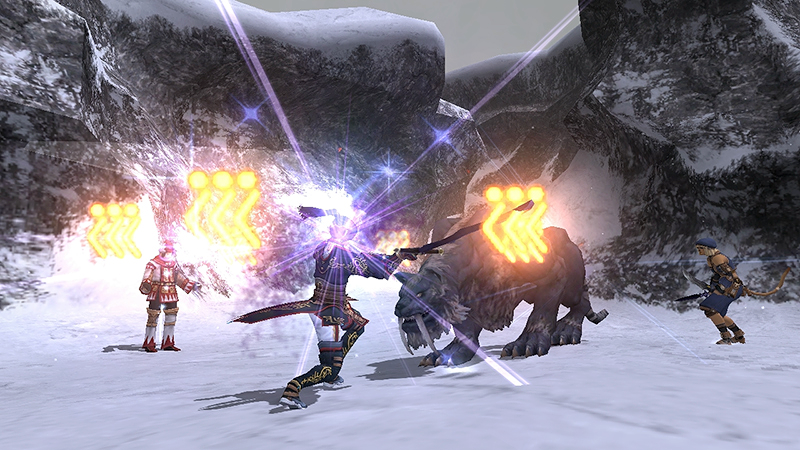 |
Grind into Obscurity!
Fortune favors the bold, but it also favors those who have a damn clue. For that is the duty of this guide. To help give you a damn clue about where to gain Experience and Capacity Points.
This is a collaborative guide, and thus information from various people and sources is included in.
Most of the leveling for EXP is done solo with trusts or with a friend or two. The level ranges of the suggestions are set with that in mind, but you can of course move as you see fit.
This guide assumes that the player has obtained Trusts already.
- Trusts do not level up with the player, and must be recalled in order to be leveled up. They are your level at the time of casting including the casters iLvl armor once applicable.
- A quick way to release all of your trusts is to use the command "/refa all".
Layout
See Template:Fantastic EXP Table, Template:Fantastic CP Table, Template:Fantastic EP Table for the templates to use on this page.
Experience Points
- Be sure to look at our Experience Point Bonuses page, to know how to maximize the total Experience you can earn. Note that some of these bonuses might not be easily obtained by new players.
- In particular, make sure you invest in Experience Rings. Check which ones might be accessible to you.
- Be sure to set applicable Records of Eminence and Fields of Valor or Grounds of Valor objectives.
- These will grant extra experience for something you are already generally fighting.
- Generally, Fields of Valor books are located around Outposts and near the zone entrance/exits. While Grounds of Valor are at zone entrance/exits and somewhere convenient for leveling up.
Bonuses to Experience Points can make leveling much faster, and will often let you stay in each camp for longer than the recommended level range.
Level 1-24
- Level 1-9
- Starter areas outside the three nations
- Camp 1 - (Various)
- Mobs: All
- Aggressive to: Various
- Comments: Not much to say other than do your Records of Eminence, and Fields of Valor and Grounds of Valor objectives. You will out level these places very fast. You could grind these areas to level 12 if you like, but you have to walk through the next ones anyway if you intend to keep leveling.
| Level 8-13 | La Theine Plateau | |||
|---|---|---|---|---|
| Camp | Map | Monster | Detects | Notes |
| Entire zone Start from the beginning of the zone and continue toward Valkurm Dunes |

|
Orcs | Avoid Rams, Elementals and Poltergeists.
Individual Training Pages 4 and 5. | |
| Level 8-13 | Konschtat Highlands | |||
|---|---|---|---|---|
| Camp | Map | Monster | Detects | Notes |
| Entire Zone Start from the beginning of the zone and continue toward Valkurm Dunes. |

|
Quadav | Avoid Rams, Ghosts, Elementals and Poltergeists.
Individual Training Pages 4 and 5. | |
| Level 8-13 | Tahrongi Canyon | |||
|---|---|---|---|---|
| Camp | Map | Monster | Detects | Notes |
| Entire Zone Start at beginning of the zone and work your way toward Buburimu Peninsula. Camp around there and the Crag of Mea. |

|
Yagudo | Avoid Ghosts, Elementals and Poltergeists.
Individual Training Pages 2 and 5. | |
| Level 12-20 | Valkurm Dunes | |||
|---|---|---|---|---|
| Camp | Map | Monster | Detects | Notes |
| L-9/10 M-9/10 |

|
Hill Lizard | 
|
Roam around the whole area. |
| Level 13-25 | Valkurm Dunes | |||
|---|---|---|---|---|
| Camp | Map | Monster | Detects | Notes |
| Oasis Three Beaches etc |

|
Snipper | 
|
Generally you roam the zone, but the camps listed there are historical.
Monsters are listed above in order of level. Individual Training Pages 2, 4 and 5. |
First Time Leveling Up?Upon reaching Level 18 you will be able to unlock your Support Job.
See the Support Job page for details on how it works and how to unlock yours.
A support job, or "sub job", is a secondary job which grants some of its spells, traits, skills, and abilities to your main job.
Sub jobs do not receive experience points or skill ups and their level is limited to half that of the main job.
| Level 15-25 | Korroloka Tunnel | |||
|---|---|---|---|---|
| Camp | Map | Monster | Detects | Notes |
| C-9 Next to Survival Guide |

|
Land Worm |
|
No aggro in the tunnel near the Altepa zone
Individual Training Page 1. |
| Level 20-30 | Qufim Island | |||
|---|---|---|---|---|
| Camp | Map | Monster | Detects | Notes |
| I-8 | 
|
Land Worm | 
|
Undead spawn at night.
Other aggro:
|
| H-7 Around the pond |
|
Land Worm |
|
The Goblin Bounty Hunter that runs around the lake is annoying, but weak. Easily avoidable.
Two ghosts spawn at night which are stronger than the mobs you are fighting. Other aggro:
|


Level 25-50
| Level 25-29 | Qufim island | |||
|---|---|---|---|---|
| Camp | Map | Monster | Detects | Notes |
| H-7 Around the Pond |
|
Clipper |
|
The Goblin Bounty Hunter that runs around the lake is annoying, but weak. Easily avoidable.
Two ghosts spawn at night which are stronger than the mobs you are fighting. Other aggro:
|
| H-6 In the Chasm |

|
Clipper |
|
Undead may spawn and roam somewhat near the camp so keep an eye out.
Individual Training Pages 3. Other aggro:
|
| Level 25-35 | Qufim Island | |||
|---|---|---|---|---|
| Camp | Map | Monster | Detects | Notes |
| G-6 Tower to Coast |
|
Clipper |
|
Undead spawn at night.
Individual Training Pages 3, 4 and 5. Other aggro:
|
First Time Leveling Up?Upon reaching Level 30 you may undertake various quests to unlock Advanced Jobs.
All new jobs acquired after doing the prerequisite job quest for the job you want start at level 1.
| Level 30-40 | Upper Delkfutt's Tower | |||
|---|---|---|---|---|
| Camp | Map | Monster | Detects | Notes |
| Map 1 Use Upper Delkfuutt's Tower HP Warp #1 |

|
Gigas | 
|
Warp to HP #1. Use Sneak Invisible and enter the big room. Drop down the first hole at (H-8). Head SW into the staircase at (G-9). Head down the staircase to the Cermet Door, summon Trusts and open the door. Begin your slaughter of giants going up and down the corridor to the stairs and back. If you have a Delkfutt Key, there is a room on the side with more giants. If you lack the homepoint warp then see this for a walkthrough to the top, but beware it is a long trek. Individual Training Page 1. Other aggro:
|
| Level 31-50 | Oldton Movalpolos | |||
|---|---|---|---|---|
| Camp | Map | Monster | Detects | Notes |
| Everywhere Yes, Really |

|
Oldton Movalpolos |
|
There are very few safe spots. Non-Goblin Bats are not aggressive, but link to Sound. The map in this row will show the level ranges visually:
|
| Level 32-46 | Crawler's Nest | |||
|---|---|---|---|---|
| Camp | Map | Monster | Detects | Notes |
| K-8 Near the entrance. |

|
Worker Crawler |
|
Individual Training Page 1.
Other aggro:
|
| Level 32-46 | Garlaige Citadel | |||
|---|---|---|---|---|
| Camp | Map | Monster | Detects | Notes |
| G-7/I-9 At entrance and Banishing Gate #1 (Map 1) |

|
Siege Bat |
|
Revenants spawn on the way to the Banishing Gate camp and near the camp.
Individual Training Page 2. Other aggro:
|
| Level 44-52 | Rolanberry Fields (S) | |||
|---|---|---|---|---|
| Camp | Map | Monster | Detects | Notes |
| G-11, H-9 to J-10 and E-8 to F-9 Small Blobs of enemies. |
_MidLeveling.jpg)
|
Coppercap |
|
None are aggressive, but do link. Coppercaps are slightly lower leveled. Beware Goobbue Farmers, and especially the Champion Crawlers. |
| Level 45-55 | Bostaunieux Oubliette | |||
|---|---|---|---|---|
| Camp | Map | Monster | Detects | Notes |
| I-6 to G-8 Camp is in Map 2. Drop down at (E-8) in Map 1. |

|
Funnel Bats |
|
Werebats are at G-8. There are Hounds at (G-7). (Map 2)
Individual Training Page 2. Other aggro:
|
| Level 45-55 | Escha - Zi'Tah | |||
|---|---|---|---|---|
| Camp | Map | Monster | Detects | Notes |
| Around (E-8/9) | 
|
Eschan Worm |
|
Entry requires Rhapsodies of Vanadiel Mission 1-1 or later.
|
First Time Leveling Up?You will be level capped and must complete a Limit Break quest every 5 levels after 50.
You can complete the Limit Break quests two at a time by leveling up to 1 EXP until your next level while capped, complete a limit break, level up, and then do the next limit break immediately before returning to leveling in order to save time.
You may do this instantly by completing the RoE Objective: Tutorial → Level Cap Increase → The quest you just completed to level up, and then begin the next quest before returning to level.
Level 51-70
| Level 52-62 | Escha - Zi'Tah | |||
|---|---|---|---|---|
| Camp | Map | Monster | Detects | Notes |
| Around (E-7/8) |
|
Eschan Dhalmel |
|
Entry requires Rhapsodies of Vanadiel Mission 1-1 or later.
|
| Level 55-60 | Kuftal Tunnel | |||
|---|---|---|---|---|
| Camp | Map | Monster | Detects | Notes |
| I-8 At entrance from Western Altepa Desert. |

|
Robber Crab |
|
Lizards have wide Sound linking range.
Individual Training Page 1. Other aggro:
|
| G-3/H-3 Near the exit to Cape Teriggan. |

|
Robber Crab |
|
Lizards have wide Sound linking range.
Individual Training Page 1. Other aggro:
|
| Level 55-65 | Wajaom Woodlands | |||
|---|---|---|---|---|
| Camp | Map | Monster | Detects | Notes |
| K-7 | 
|
Lesser Colibri |
|
Fomors appear at night.
Other aggro:
|
| Level 55-65 | Bhaflau Thickets | |||
|---|---|---|---|---|
| Camp | Map | Monster | Detects | Notes |
| H-9/H-10/I-8 |

|
Lesser Colibri |
|
H-Cells closer to the south entrances/exits. Lower half of I-8.
Fomors appear at night. Other aggro:
|
| Level 58-64 | Cape Teriggan | |||
|---|---|---|---|---|
| Camp | Map | Monster | Detects | Notes |
| G/H-8 | 
|
Beach Bunny | 
|
|
| Level 60-70 | Bostaunieux Oubliette | |||
|---|---|---|---|---|
| Camp | Map | Monster | Detects | Notes |
| F-9/10 Map 3 |

|
Bloodsucker |
|
Pay close attention to the leeches (or use /check) as there is a blue-skinned leech NM Bloodsucker (Notorious Monster) that spawns.
Individual Training Page 4. Other aggro: |
| Level 60-70 | Labyrinth of Onzozo | |||
|---|---|---|---|---|
| Camp | Map | Monster | Detects | Notes |
| F-6 to H-6 | 
|
Torama |
|
Watch out for Ose and Narasimha.
Individual Training Page 5. |
| Level 64-71 | Cape Teriggan | |||
|---|---|---|---|---|
| Camp | Map | Monster | Detects | Notes |
| I-7 |
|
Sand Cockatrice |
|
Focus on Velociraptors early as they are weaker. Eventually just go after Cockatrice full time. |
| Level 65-70 | Bhaflau Thickets | |||
|---|---|---|---|---|
| Camp | Map | Monster | Detects | Notes |
| F-8/G-8 Right outside Halvung(2) entrance. |
|
Colibri |
|
Date Erucas are asleep at night. Colibri reflect magic spells back at the party. |
First Time Leveling Up?Again you will need to complete a quest to uncap your level from 70 and be able to progress to 75, then from 75 to 80.
The Level 70→75 cap Limit Break varies based on your job. See the Limit Break Quests page for the complete list.
Level 70-80
| Level 70-73 | Bibiki Bay | |||
|---|---|---|---|---|
| Camp | Map | Monster | Detects | Notes |
| G-6 | 
|
Tropical Rarab |
|
On the small plateau. Enemies are  and have a short linking range. If you can be patient and don't want to get the extra Tragopan by the Catoblepas, this camp can be started at 67-68. and have a short linking range. If you can be patient and don't want to get the extra Tragopan by the Catoblepas, this camp can be started at 67-68.
|
| Level 70-75 | Bhaflau Thickets | |||
|---|---|---|---|---|
| Camp | Map | Monster | Detects | Notes |
| I-9 Outside Mamook(2) entrance. |

|
Sea Puk |
|
Through Mamool Ja Staging Point.
Other aggro:
|
| Level 70-78 | Zeruhn Mines | |||
|---|---|---|---|---|
| Camp | Map | Monster | Detects | Notes |
| I-9 | 
|
Burrower Worm |
|
Individual Training Pages 3, 4, or 5. |
| Level 70-80 | Bhaflau Thickets | |||
|---|---|---|---|---|
| Camp | Map | Monster | Detects | Notes |
| F-6 Camp is down the ledge after coming out of Alzadaal. |
|
Greater Colibri |
|
From Nyzul Isle Staging Point, take the teleport at G-9. After appearing take the left teleport. Exit to Bhaflau Thickets. Other aggro:
|
| Level 70-83 | Escha - Ru'Aun | |||
|---|---|---|---|---|
| Camp | Map | Monster | Detects | Notes |
| G-10 to I-10 | 
|
Eschan Zdei |
|
Zdei start becoming DC-T instead of EM+ at level 83. |
| Level 72-80 | Kuftal Tunnel | |||
|---|---|---|---|---|
| Camp | Map | Monster | Detects | Notes |
| G-9 on Map 2 Past the rock that will occasionally block your path. |
|
Ovinnik |
|
Start at the top of the path with Ovinnik then as you get stronger venture down and add Greater Cockatrice and then Ladon.
Melees will struggle at the lower end of the level range, as Cockatrices and Wyverns will still check VT-IT at 75. Individual Training Page 7. |
| Level 75 - 79/80 | Misareaux Coast | |||
|---|---|---|---|---|
| Camp | Map | Monster | Detects | Notes |
| G-7 and J-8 | 
|
Seaboard Vulture |
|
Right next to the Survival Guide. Birds do not link and are not aggressive. |
First Time Leveling Up?Two more Limit Break quests for you to complete to progress from 80 to 85 then from 85 to 90.
Level 80-90
| Level 80-89 | Mount Zhayolm | |||
|---|---|---|---|---|
| Camp | Map | Monster | Detects | Notes |
| C-9 | 
|
Orichalcumshell |
|
Take the unity (lvl 135) warp to the zone or use the Home Point for quick access.
Orichalcumshell aggro to sound but do not link. Aggro range increases at night. |
| Level 80-89 | Dangruf Wadi | |||
|---|---|---|---|---|
| Camp | Map | Monster | Detects | Notes |
| I-8 Use the geyser to go up the ledge |

|
Witchetty Grub |
|
Start with the Worms and the goblins just as you land on the ledge from the geyser. From there keep fighting until you are stronger to start fighting Crabs and Opo-Opo (~85+).
Individual Training Pages 4, 5, 6, 7 and 8. |
| Level 80-85 | Caedarva Mire | |||
|---|---|---|---|---|
| Camp | Map | Monster | Detects | Notes |
| F-9 Map 1 Short walk from HP #1 |

|
Slough Skua | These birds are non-aggressive but link from fair distances. | |
| Level 80-84 | Gusgen Mines | |||
|---|---|---|---|---|
| Camp | Map | Monster | Detects | Notes |
| F-8 (Map 2) Straight back and through the left tunnel. |

|
Rockmill | Head straight back and enter through the Iron-framed Oak Door at G-6 on the far left. Worms do not link.
Set RoE Conflict: Gusgen Mines for giggles. | |
| Level 84-94 | Meriphataud Mountains (S) | |||
|---|---|---|---|---|
| Camp | Map | Monster | Detects | Notes |
| F/G-8/9 South of the Recall Point |
-map.jpg)
|
Condor (Monster) |
|
The birds link so pull carefully for the first few levels. Recommended safe spot is near the man-made ramp structure at the southeast cliff edge in the condor area. |
| Level 85-92 | Dangruf Wadi | |||
|---|---|---|---|---|
| Camp | Map | Monster | Detects | Notes |
| J-4 and H-3 |
|
Trimmer |
|
Neither monster aggros, but both link. Trimmer start becoming Decent Challenge at level 91. Individual Training Page 8. |
| Level 85-92 | Rolanberry Fields (S) | |||
|---|---|---|---|---|
| Camp | Map | Monster | Detects | Notes |
| F-8/G-8 | _Map.jpg)
|
Champion Crawler |
|
Champion Crawlers do not aggro, but do link. Recommended to utilize the Ballista platform with the two NPCs for ranged single pulling. |
| Level 85-92 | North Gustaberg (S) | |||
|---|---|---|---|---|
| Camp | Map | Monster | Detects | Notes |
| D-8/E-8 | _Map.png)
|
Drachenlizard |
|
Drachenlizards do not aggro, but do link. |
| Level 85-92 | Vunkerl Inlet (S) | |||
|---|---|---|---|---|
| Camp | Map | Monster | Detects | Notes |
| H-7 | 
|
Duriumshell |
|
A Sprite will at times patrol through the area. It is recommend not to use AoE attacks during the patrol. Elementals can spawn in appropriate weather at this location, but they should only be level 45. |
| Level 85-92 | Jugner Forest (S) | |||
|---|---|---|---|---|
| Camp | Map | Monster | Detects | Notes |
| J-10/K-10 | _Map.jpg)
|
Gnoletrap |
|
Enemies do not aggro or link, but will use a 30 second sleep AoE attack. |
First Time Leveling Up?Almost there! Just two more Limit Break Quests from 90 to 95 then finally from 95 to 99.
Level 90-99
| Level 90-99 | Ceizak Battlegrounds | |||
|---|---|---|---|---|
| Camp | Map | Monster | Detects | Notes |
| J-8/9/10 Near the beaches |

|
Blanched Mandragora | Tends to be a bit crowded.
Roam up and down the coasts. | |
| Level 90-99 | Yahse Hunting Grounds | |||
|---|---|---|---|---|
| Camp | Map | Monster | Detects | Notes |
| Around K-7~10 Near the beaches |

|
Pinetorum |
|
Same Mandragoras as Ceizak, just another name. Can use a 30 Second AoE sleep. Bight Uragnites will spam Gas Shell a lot, do not engage without suitable precautions against poison.
Roam up and down the coasts. Beware Level 100+ Elementals like Wooded Ungeweder. |
| Level 90-99 | Gustav Tunnel | |||
|---|---|---|---|---|
| Camp | Map | Monster | Detects | Notes |
| I-7 | 
|
Boulder Eater |
|
You'll need Sneak and Invis since the Goblins and Skeletons will still aggro.
Individual Training Page 8. |
| Level 90-99 | Kuftal Tunnel | |||
|---|---|---|---|---|
| Camp | Map | Monster | Detects | Notes |
| G-9 on Map 2 Past the rock that will occasionally block your path. |
|
Machairodus |
|
Venture down take the right fork. Past the Ladon and Greater Cockatrice you will see Kuftal Delver and farther in are the Machairodus.
Individual Training Page 8. |
| Level 90-99 | Yahse Hunting Grounds | |||
|---|---|---|---|---|
| Camp | Map | Monster | Detects | Notes |
| J-7) (J-8) (J-9 |

|
Calfcleaving Chapuli |
|
Careful not to pull the Peiste that occasionally spawn in or around the Chapuli spawn area. |
| Level 90-99 | Rala Waterways | |||
|---|---|---|---|---|
| Camp | Map | Monster | Detects | Notes |
| G-6/H-6 Camp at the mouth of the rectangular area. |

|
Depthswalker Crab |
|
Endless crab spawns.
Enter from Western Adoulin (K-8) under the Big Bridge. |
First Time Leveling Up?After you reach level 99, characters cannot level up anymore. Experience Points are still needed for Merit Points, but progression becomes mainly driven by obtaining stronger and stronger equipment instead.
See the Endgame Progression Guide if you need guidance on climbing the gear progression and becoming the strongest that there ever was.
After level 99
- Parallel to the gear progression , there are two additional progression systems: Job Points first, then Master Levels after that.
- See the respective pages for instructions on how to unlock each progression tier.
- Job Points are earned by accumulating CP (Capacity Points) and Master Levels are earned by accumulating EP (Exemplar Points).
- Both can be obtained by farming Apex and Locus enemies.
- All Apex and Locus mobs give both CP and EP.
- Apex Monsters are easier, making them better targets for characters still in the early stages of gear progression, and need to emphasize more CP than EP.
- Locus Monsters are more difficult, but give significantly more CP and EP, making them better targets for characters further ahead in the gear progression.
- Some content will reward you with CP or EP, but your main source of these will be grinding.
Capacity Points Camps (Job Points)
See: the Job Points page for a list of the many Capacity Point bonuses you may have.
((check phrasing)) Since character strength at this stage cannot be measured by level anymore, CP and EP camps are sorted by their Accuracy Requirement instead. If you can't hit a certain target reliably, it's to early to fight it, and you need to acquire better gear.
As you acquire better and better gear, you will be able to hit higher level monsters, earning more CP or EP.
1000 Accuracy
1100 Accuracy
1200 Accuracy
1400 Accuracy
etc
Exemplar Points Camps (Master Levels)
Exemplar Points Camps by accuracy (elaborate):
1200 Accuracy
1300 Accuracy
1400 Accuracy
1500 Accuracy
etc
AoE
These camps are designed with AoE burning in mind.
Resources
- Batcher's Escha Zi'Tah Monster Level Map
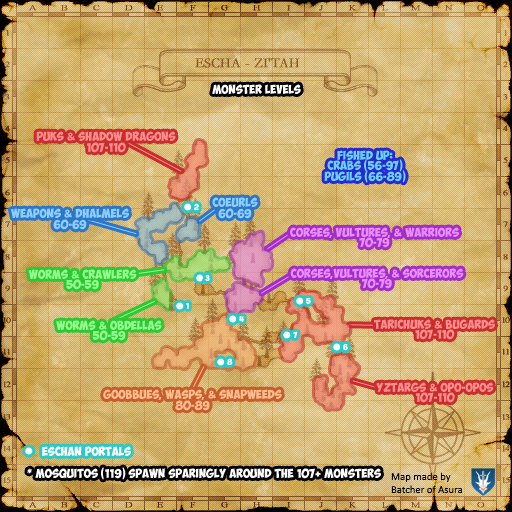 is useful for planning what monsters to fight next based on their levels.
Suggestion
On Level 60-70: Labyrinth of Onzozo, include the additional info:
- RoE Objective: Combat (Region) > Combat (Zilart 2) > Conflict: Labyrinth of Onzozo
- Unity Warp (lv 122) takes right to the leveling spot and next to the Grounds Tome