The Voracious Resurgence | |
| Prime Weapons • Ultimate Weapons • Ultimate Augments • Abjurations iL119 • JSE Necks • Divergence Augments • Escutcheons | |
| Reforged Armor Artifact: +1 • iL109 • iL119/+2/+3/+4 Relic: +1/+2 • iL109 • iL119/+2/+3/+4 Empyrean: +1/+2 • iL109 • iL119/+2/+3 |
Guides • Crafting • Trusts • Apex Monsters |
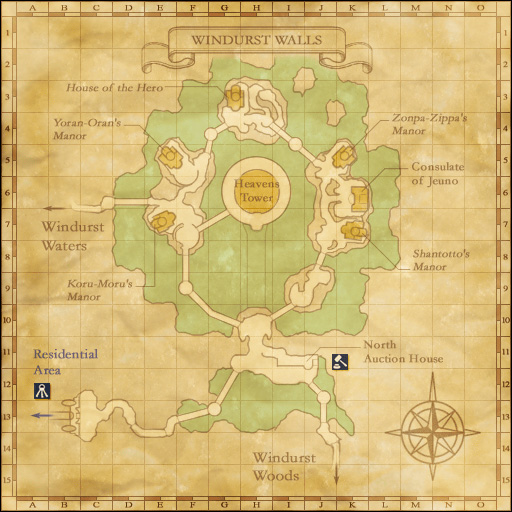
Windurst Walls
From FFXI Wiki
| |||||||||||||||||||||||||||||||||||||||||||||||||||||||||


Zone Information
NPC
| Name | Map | Pos. | Notes |
|---|---|---|---|
| Ambrosius | 1 | (J-12) | |
| Anini | 1 | (H-5) | |
| Aromu-Oromu | 1 | (F-9) | |
| Augu-Maugu | 1 | (G-11) | |
| Bonchacha | 1 | (F-7) | |
| Burute-Sorute | 1 | (H-10) | |
| Chawo Shipeynyo | 1 | (H-7) | |
| Chomomo | 1 | (H-3) | |
| Dabaide-Obaide | 1 | (H-11) | |
| Ekamama | 1 | (K-5) | |
| Esmeralda | 1 | (K-6) | |
| Finene | 1 | (I-5) | |
| Five of Diamonds | 1 | (C-13) | |
| Florencia | 1 | (K-6) | |
| Four of Diamonds | 1 | (C-6) | |
| Gerun-Garun | 1 | (H-4) | |
| Haah Chakaila | 1 | (G-6) | |
| Hiwon-Biwon | 1 | (K-8) | |
| Horuni-Mawoni | 1 | (H-10) | |
| Ignaz | 1 | (K-6) | |
| Jack of Diamonds | 1 | (C-13) | |
| Juna Moshal | 1 | (H-3) | |
| Juvillie | 1 | (D-6) | |
| Kaaya Majiad | 1 | (I-10) | |
| Kalupa-Tawalupa | 1 | (F-7) | |
| Karija-Marija | 1 | (J-12) | |
| Karola | 1 | (K-6) | |
| Keir | 1 | (K-6) | |
| Kenono | 1 | (I-12) | |
| Keo-Horuo | 1 | (H-7) | |
| Kimumu | 1 | (J-11) | |
| Kobunono | 1 | (I-11) | |
| Kohpo-Akuupo | 1 | (G-13) | |
| Komomo | 1 | (C-6) | |
| Komulili | 1 | (J-11) | |
| Koru-Moru | 1 | (E-7) | |
| Lala Gohma | 1 | (I-5) | |
| Luuh Koplehn | 1 | (F-7) | |
| Maan-Pokuun | 1 | (F-7) |
| Name | Map | Pos. | Notes |
|---|---|---|---|
| Malmi-Monmi | 1 | (E-6) | |
| Mehruru | 1 | (H-11) | |
| Migi Centa | 1 | (I-9) | |
| Moan-Maon | 1 | (J-6) | |
| Mukuku | 1 | (G-5) | |
| Naih Arihmepp | 1 | (F-5) | |
| Nine of Diamonds | 1 | (F-7) | |
| Nozaza | 1 | (G-7) | |
| Ojha Rhawash | 1 | (C-13) | |
| Orudoba-Sondeba | 1 | (J-12) | |
| Pakeke | 1 | (E-6) | |
| Pakke-Pokke | 1 | (H-7) | |
| Pakora-Makora | 1 | (H-7) | |
| Pantsa-Karutsa | 1 | (H-10) | |
| Polikal-Ramikal | 1 | (H-5) | |
| Polink-Moink | 1 | (H-10) | |
| Purakoko | 1 | (F-7) | |
| Purere | 1 | (H-10) | |
| Quentin | 1 | (F-9) | |
| Raamimi | 1 | (F-7) | |
| Ran | 1 | (K-6) | |
| Rutango-Botango | 1 | (F-7) | |
| Scavnix | 1 | (H-4) | |
| Selulu | 1 | (I-11) | |
| Seven of Diamonds | 1 | (H-3) | |
| Shantotto | 1 | (K-7) | |
| Shinchai-Tocchai | 1 | (C-13) | |
| Six of Diamonds | 1 | (J-13) | |
| Suhie-Kaihie | 1 | (D-6) | |
| Takoda | 1 | (H-10) | |
| Ten of Diamonds | 1 | (F-7) | |
| Toi-Poi | 1 | (K-5) | |
| Tsuaora-Tsuora | 1 | (J-12) | |
| Uwaine | 1 | (H-10) | |
| Yanakiki | 1 | (G-7) | |
| Yoran-Oran | 1 | (E-5) | |
| Yoriri | 1 | (J-11) | |
| Zayhi-Bauhi | 1 | (F-7) | |
| Zokima-Rokima | 1 | (H-7) |
Quests
| Fame | Name | NPC | Reward |
|---|---|---|---|
| 3 | Blast from the Past | Koru-Moru (E-7) | |
| Blood and Glory | Shantotto (K-7) | Retribution Weapon Skill | |
| Carbuncle Debacle | Carbuncle (G-4) | ||
| Class Reunion | Carbuncle (G-4) | ||
| 4 | Curses, Foiled A-Golem!? | Shantotto (K-7) | |
| 1 | Curses, Foiled Again! | Shantotto (K-7) | |
| 2 | Curses, Foiled...Again!? | Shantotto (K-7) | |
| 1 | Flower Child | Ojha Rhawash (C-13) | Exit to any zone within the city of Windurst from Mog House. |
| I Can Hear a Rainbow | House of the Hero (G-3) | Unlock Summoner | |
| 1 | Mandragora-Mad | Yoran-Oran (E-5) | 120~5,500 gil |
| 8 | Nothing Matters | Koru-Moru (E-7) | 10,000 gil |
| 1 | Star Struck | Koru-Moru (E-7) | |
| 1 | The Postman Always K.O.s Twice | Ambrosius (J-12) | 50~500 gil |
| 1 | The Puppet Master | Carbuncle (G-4) | |
| 2 | To Bee or Not to Bee? | Raamimi (F-7) | |
| If an extensive number of rewards are available, write "See Quest Page" as reward. | |||


Historical Significance
This quiet, residential area of Federation of Windurst provides a home away from home for some of the more respected residents of the Federation. Accessible from all other areas of Windurst, the Walls district also provides access to the North Auction House. To the extreme north of the Walls district is the abandoned House of the Hero, underneath which is a hidden and guarded passageway into the Toraimarai Canal.
