The Voracious Resurgence | |
| Prime Weapons • Ultimate Weapons • Ultimate Augments • Abjurations iL119 • JSE Necks • Divergence Augments • Escutcheons | |
| Reforged Armor Artifact: +1 • iL109 • iL119/+2/+3/+4 Relic: +1/+2 • iL109 • iL119/+2/+3/+4 Empyrean: +1/+2 • iL109 • iL119/+2/+3 |
Guides • Crafting • Trusts • Apex Monsters |
Arrapago Reef
From FFXI Wiki
| ||||||||||||||||||||||||||||||||||||||||||||||||||||||||||||||||||||||||||||||||||||||||||||||||||||||||||||||||


Zone Information
| Fishing | ||
|---|---|---|
| Catch | Cap | Body of Water |
| 46 | All | |
| 53 | ||
| 72 | ||
| 86 | ||
| 90 | ||
NPCs
| Name | Map | Pos. | Notes |
|---|---|---|---|
| Meyaada | 2 | (G-5) | Assault Personnel |
| Name | Map | Pos. | Notes |
|---|---|---|---|
| Mission Name | Mission Number | NPC | Storyline |
|---|---|---|---|
| Aht Urhgan Mission 31 | Treasures of Aht Urhgan |
Notorious Monsters
| Notorious Monsters | ||||
|---|---|---|---|---|
| Lv. | Name | Genus | Drops | Map |
| Bloody Bones DRK· Lottery: Draugar Servant DRK every 21-24 hours |
Skeleton |  (I-6) Map 2 | ||
| ~80 | Euryale Timed: |
Lamiae |  (I-6) Map 1 | |
| 78-83 | Giant Orobon Fished Up |
Orobon | ||
| Lamie No.7 COR· Timed: |
Lamiae | (E-10) Map 2 | ||
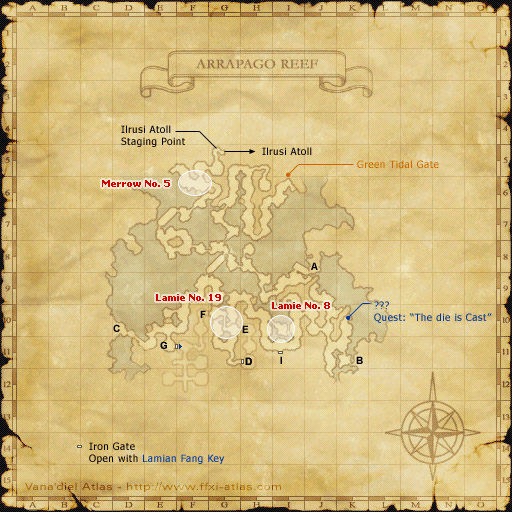
| Lamie No.8 RNG· Timed: |
Lamiae | (I-10) Map 2 | ||
| ~80 | Lamie No.9 SMN· Timed: ~72 hours |
Lamiae |  (J-6) Map 3 | |
| 78 | Lamie No.19 BLM· Lottery: May spawn when a player dies in the area of (E-11) - (F-9) of Map 2 |
Lamiae | (E-11)-(F-9) Map 2 | |
| 80-85 | Lil' Apkallu MNK· Forced: Trade Greenling to ??? |
Apkallu | (I-9) Map 1 | |
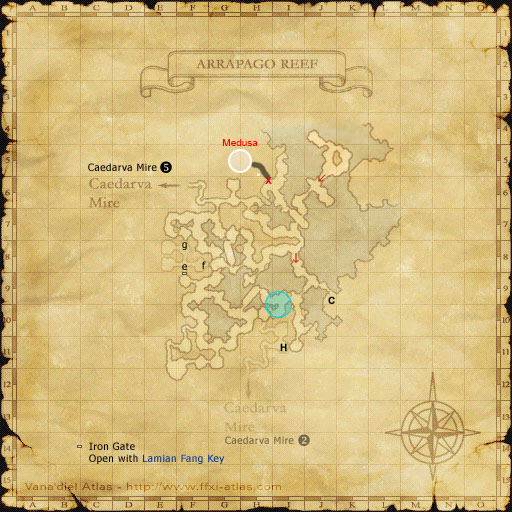
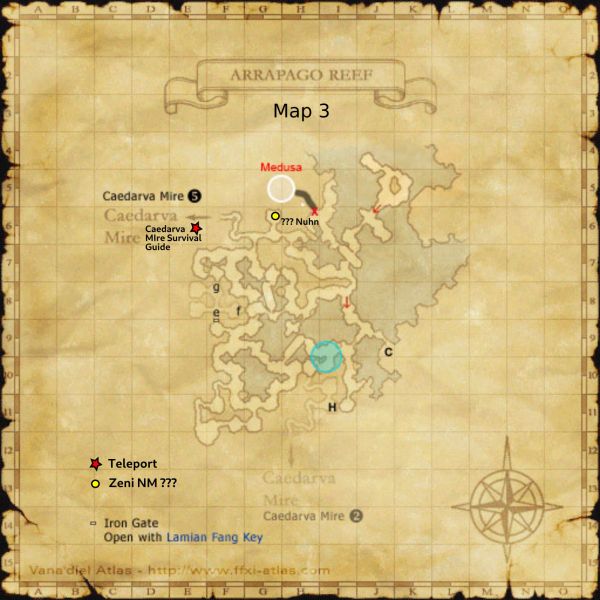
| Medusa RNG· Timed: ~1 hour |
Lamiae | (G-5) Map 3 | ||
| 82-85 | Merrow No.5 BRD· Timed: 48-72 hours |
Lamiae | (F-6) Map 2 | |
| 80-90 | Nuhn Forced: Trade Rose Scampi to ??? |
Orobon | (G-6) Map 3 | |
| Velionis RDM· Forced: Trade Golden Teeth to ??? |
Skeleton | (G-11) Map 1 | ||
| 80-90 | Zareehkl the Jubilant Forced: Trade Merrow No. 11 Molting to ??? |
Qutrub | (I-10) Map 2 | |
| Bukki BLM· Quest: The Die Is Cast |
Imp | |||
| Ornery Orobon Quest: The Art of War |
Orobon | |||
| Lamia Palace Guard RNG, COR· Archaic Mirror: |
Lamiae | |||
| Dimgruzub Voidwatch: |
Qutrub |
|
(G-8), (I-10) Map 1 | |
| ||||


Adversaries
| Adversaries | ||||
|---|---|---|---|---|
| Lv. | Name | Genus | Drops | Spawns |
| - | Archaic Mirror Timed: ?min. |
Structure | 8 | |
| 70-72 | Arrapago Apkallu MNK Timed: ?min. |
Apkallu | 25 | |
| 73-74 | Arrapago Leech Fished Up |
Leech | 1 | |
| 71-74 | Ashakku Timed: ?min. |
Leech | 15 | |
| 75-76 | Chimera Clot Fished Up |
Slime | 1 | |
| 80-80 | Dark Elemental DRK Weather: |
Elemental | 4 | |
| 79-81 | Draugar Servant BLM, DRK, DRG, or THF Timed: ?min. |
Skeleton | 36 | |
| 68-74 | Draugar's Wyvern Timed: ?min. |
Wyvern_(Dragoon_Pet) | 10 | |
| 81-83 | Emperor Apkallu MNK Timed: ?min. |
Apkallu | 14 | |
| 68-70 | Ephramadian Shade MNK, RNG, RDM, or COR Timed: ?min. |
Fomor | 8 | |
| 72-74 | Fallen Imperial Trooper DRK Timed: ?min. |
Fomor | 11 | |
| 72-74 | Fallen Imperial Wizard BLM Timed: ?min. |
Fomor | 9 | |
| 71-73 | Fallen Volunteer WAR Timed: ?min. |
Fomor | 10 | |
| 72-74 | Heraldic Imp BLM Timed: ?min. |
Imp | 9 | |
| 80-80 | Ice Elemental BLM·RDM Weather: |
Elemental | 5 | |
| 72-77 | Jnun Timed: ?min. |
Doomed | 22 | |
| 76-79 | Lahama Timed: ?min. |
Sea Monk | 8 | |
| 81-81 | Lamia Bellydancer SMN Timed: ?min. |
Lamiae | 1 | |
| 73-75 | Lamia Dancer SMN Timed: ?min. |
Lamiae | 2 | |
| 73-75 | Lamia Dartist RNG Timed: ?min. |
Lamiae | 2 | |
| 73-75 | Lamia Deathdancer COR Timed: ?min. |
Lamiae | 1 | |
| - | Lamia Exon COR, BLM Timed: ?min. |
Lamiae | 4 | |
| 73-75 | Lamia Fatedealer COR Timed: ?min. |
Lamiae | 3 | |
| 73-75 | Lamia Graverobber BLM Timed: 16 min. |
Lamiae | 3 | |
| 79-81 | Lamia Idolater BLM, DRK Timed: ?min. |
Qutrub | 24 | |
| 81-83 | Lamia Necromancer BLM Timed: ?min. |
Lamiae | 1 | |
| - | Lamia Palace Guard RNG, COR Timed: ?min. |
Lamiae | 16 | |
| 77-80 | Lamia Toxophilite RNG Timed: ?min. |
Lamiae | 2 | |
| - | Lamia's Avatar Timed: ?min. |
Avatar | 1 | |
| - | Lamia's Elemental Timed: ?min. |
Elemental | 5 | |
| - | Lamia's Skeleton Timed: ?min. |
Skeleton | 2 | |
| 81-83 | Lamie Bellydancer SMN Timed: ?min. |
Lamiae | 2 | |
| 77-80 | Lamie Deathdancer COR Timed: ?min. |
Lamiae | 1 | |
| 81-83 | Lamie Necromancer BLM Timed: ?min. |
Lamiae | 2 | |
| 77-80 | Lamie Toxophilite RNG Timed: ?min. |
Lamiae | 2 | |
| 76-78 | Llamhigyn Y Dwr Fished Up |
Orobon | 1 | |
| 81-83 | Merrow Bladedancer RDM Timed: ?min. |
Lamiae | 2 | |
| 73-75 | Merrow Chantress RNG Timed: ?min. |
Lamiae | 9 | |
| 73-75 | Merrow Icedancer COR Timed: ?min. |
Lamiae | 4 | |
| 73-75 | Merrow Kabukidancer SAM Timed: ?min. |
Lamiae | 3 | |
| 73-75 | Merrow Shadowdancer RDM Timed: ?min. |
Lamiae | 5 | |
| 81-83 | Merrow Songstress BRD Timed: ?min. |
Lamiae | 3 | |
| 81-83 | Merrow Typhoondancer SAM Timed: ?min. |
Lamiae | 3 | |
| 81-83 | Merrow Wavedancer COR Timed: ?min. |
Lamiae | 3 | |
| 88-88 | Nergal Timed: ?min. |
Leech | 18 | |
| 72-73 | Nipper PLD Timed: ?min. |
Crab | 17 | |
| 81-83 | Nix Bladedancer RDM Timed: ?min. |
Lamiae | 1 | |
| 81-83 | Nix Songstress BRD Timed: ?min. |
Lamiae | 2 | |
| 81-83 | Nix Typhoondancer SAM Timed: ?min. |
Lamiae | 2 | |
| 81-83 | Nix Wavedancer COR Timed: ?min. |
Lamiae | 1 | |
| 73-74 | Phasma WAR/BLM Timed: ?min. |
Ghost | 10 | |
| 72-73 | Purgatory Bat Timed: ?min. |
Bat | 9 | |
| 77-77 | Qiqirn Trailer RNG Timed: ?min. |
Qiqirn | 1 | |
| 77-77 | Qiqirn Treasure Hunter THF Timed: ?min. |
Qiqirn | 1 | |
| 73-74 | Qutrub BLM, DRK Timed: ?min. |
Qutrub | 23 | |
| 72-74 | Reserve Draugar BLM, DRK, DRG, or THF Timed: 16 min. |
Skeleton | 41 | |
| 77-78 | Seneschal Imp BLM Timed: ?min. |
Imp | 4 | |
| 79-82 | Soulflayer BLM Timed: ?min. |
Soulflayer | 10 | |
| 70-71 | Wootzshell PLD Fished Up |
Crab | 1 | |
| ||||
Notes
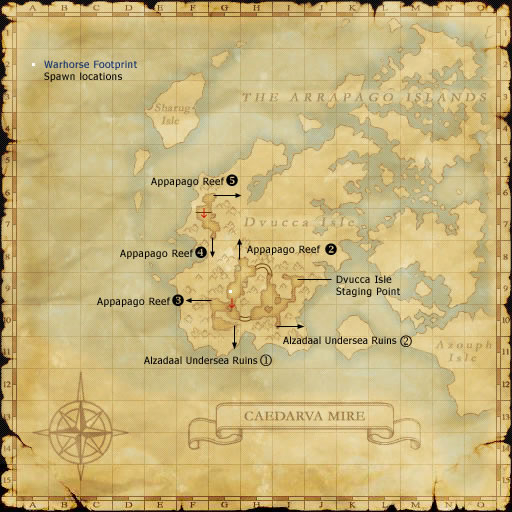
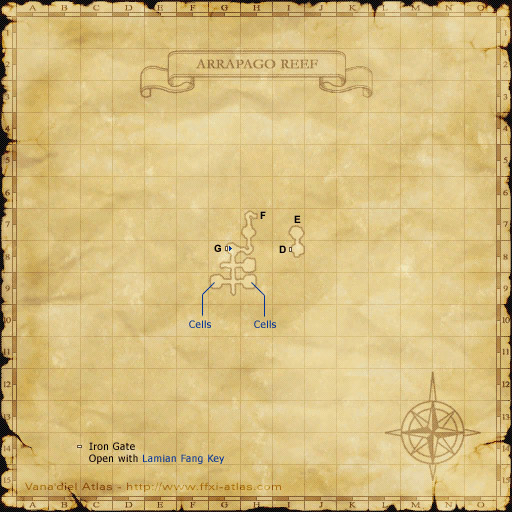
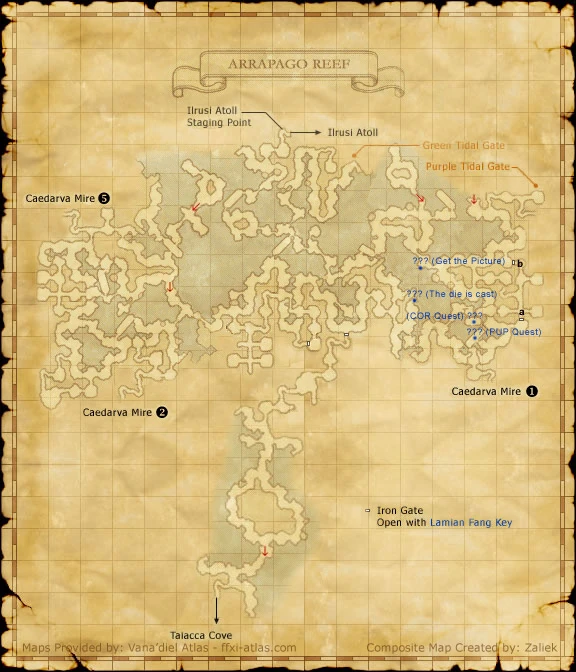
- Escapes to Caedarva Mire (I-6).
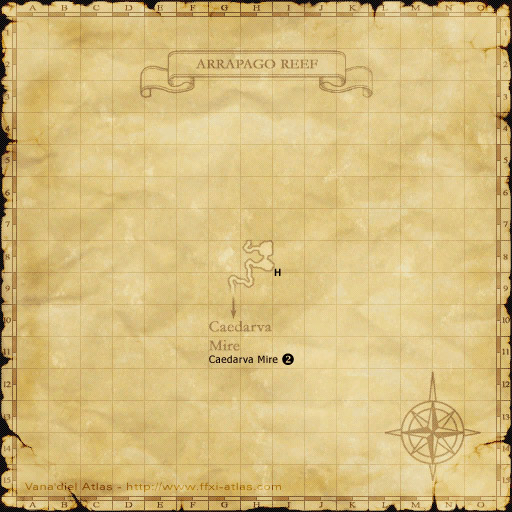
- [1] This Surival Guide is displayed as a point of interest in Map 3 of Arrapago Reef (E-6) due to its location being extremely close to where the two areas - Arrapago Reef, Map 3 (F-6) and Caedarva Mire, Map 2 (G-6) - are connected.
Lore
This highly treacherous area is legendary for stranding many a ship. It is for this reason that Arrapago Reef became the final bastion for a kingdom that was destroyed by an attack from Aht Urhgan. It is said that the kingdom's immense treasures still rest in the coastal caverns. However, the Lamiae are currently using the reef as their stronghold, guarded by the sleepless undead. Infiltrating Arrapago Reef would be no easy task.
