The Voracious Resurgence | |
| Prime Weapons • Ultimate Weapons • Ultimate Augments • Abjurations iL119 • JSE Necks • Divergence Augments • Escutcheons | |
| Reforged Armor Artifact: +1 • iL109 • iL119/+2/+3/+4 Relic: +1/+2 • iL109 • iL119/+2/+3/+4 Empyrean: +1/+2 • iL109 • iL119/+2/+3 |
Guides • Crafting • Trusts • Apex Monsters |
Sunbreeze Festival Guide
 |
|||||||||||||||||||
Event Schedule
| |||||||||||||||||||
The Green Festival
- See The Green Festival for information reguarding that campaign.
Sunbreeze Festival Venues

Fireworks displays, Sunbreeze dances, and other festivities will commence each day at nightfall in the following locations:
- West Ronfaure / East Ronfaure
- Southern San d'Oria / Northern San d'Oria / Port San d'Oria
- North Gustaberg / South Gustaberg
- Bastok Mines / Bastok Markets / Port Bastok
- East Sarutabaruta / West Sarutabaruta
- Windurst Waters / Windurst Walls / Windurst Woods / Port Windurst
- Eastern Altepa Desert / Western Altepa Desert
- Rabao
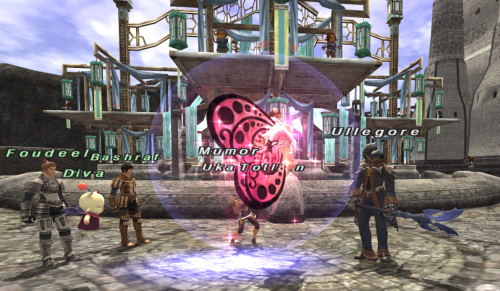
Superheroine Stage Show
Only with your spirited show of support can Mighty Maidens Mumor and Uka hope to prevail in their battle against evil! Find out more about how you can lend a hand to our irresistibly adorable heroines by speaking to a moogle posted near the show's venues at the following locations:
![]() Northern San d'Oria (G-8) /
Northern San d'Oria (G-8) / ![]() Bastok Markets (I-7) /
Bastok Markets (I-7) / ![]() Windurst Walls (G-11)
Windurst Walls (G-11)
Interested in the Superheroine Stage Show? You can see Mumor in all her splendor in the following locations:
![]() Northern San d'Oria (D-8) /
Northern San d'Oria (D-8) / ![]() Bastok Markets (G-8) /
Bastok Markets (G-8) / ![]() Windurst Walls (H-10)
Windurst Walls (H-10)
Those who aid Mumor in her fight against Ullegore will receive an Agent (♂) / Starlet (♀) costume as well as other rewards! Be the envy of all your friends!

Walkthrough
- Speak to the MHMU Moogle in one of the following positions:
- Northern San d'Oria (G-8), Bastok Markets (I-7), Windurst Walls (G-11)
- Travel to the stage area for that city and wait for the performance to begin.
- When the "fight" starts, target Mumor and alternate using the /cheer motion, /wave motion, & /clap motion emotes to encourage her. Having macros of these can help you alternate these emotes as rapidly as possible. The more emotes all players perform, the faster the fight goes, though it is possible to solo this event.
- When Diva the Moogle says "Keep at it!", stop emoting and target Uka.
- While still targeting Uka, perform the following dances:
- When Mumor uses "Shining Summer Samba", use /dance1 motion.
- When Mumor uses "Lovely Miracle Waltz", use /dance2 motion.
- When Mumor uses "Neo Crystal Jig", use /dance3 motion.
- When Mumor uses "Super Crusher Jig", use /dance4 motion.
- You will see a message stating that your dancing has been synchronized with Mumor per dance emote if done correctly.
- Uka will then perform the same dance to counterattack Mumor. (You can ignore this part)
- When Uka reaches ~20% HP or below, she will snap out of her trance and come back to the aid of Mumor.
- Ullegore will transform into a cloaked Elvaan and become targetable. At this point, you should target Ullegore and perform the previous dance emotes in sync with Mumor. This phase is called "Firesday Night Fever", and Mumor will perform a total of 4 random dances.
- When the performance is over, return to the MHMU Moogle around the corner to receive your prize
- The prize that you receive may be dependent on how many times your dances were synchronized. With no synchronized dances, you will not receive a prize.
- You might receive 15 to 440 fireworks.
- If the Moogle tells you that your performance makes you the MVP, you will receive a set of either Agent or Starlet armor, as long as you synchronized all four of Mumor's Firesday Night Fever dances during a single performance.
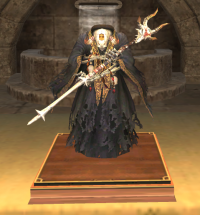
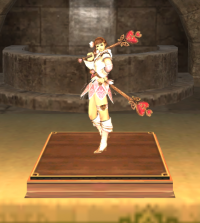
Gender Slot ♂ ♀ Head  Agent Hood
 Starlet Flower
Body  Agent Coat
 Starlet Jabot
Hands  Agent Cuffs
 Starlet Gloves
Legs  Agent Pants
 Starlet Skirt
Feet  Agent Boots
 Starlet Boots


- If you didn't synchronize all 4 dances, you may receive
 Cipher: Mumor instead.
 - Upon receiving your Agent or Starlet armor, redoing the event again with 10+ synced dances will result in the following rewards from the Moogle:
- Cipher: Mumor (if you didn't already receive it)
 Mumor II
- If you participate in the show while wearing the full Agent or Starlet Armor set, you must recieve all 4 "overflowing with trust" messages during Firesday Night Fever to receive the trust. You can receive Mumor II regardless of whether you are in possession of Cipher: Mumor. You will get a short cutscene and learn the trust spell immediately (you don't receive a second cipher item).
- If you participate in the show while wearing the full Agent or Starlet Armor set, you must recieve all 4 "overflowing with trust" messages during Firesday Night Fever to receive the trust. You can receive Mumor II regardless of whether you are in possession of
- The designs are used to craft a
 Celestial Globe furnishing, alongside the other two rewards from other Sunbreeze minigames.
 - The Key Item is used to enter a battlefield (see below).
- The designs are used to craft a
- If you come into the event late and do not have many synced dances, you may save your current amount for the next showing, as it carries over. However, zoning will reset progress.
- If you didn't synchronize all 4 dances, you may receive


Support Your Heroines!
After the curtain has closed on the Superheroine Stage Show, Mumor, Uka, and either Foudeel, Bashraf, or Wahboud will appear to sell a variety of items for your perusal!
Purchasing items between shows results in faster synchronization with Mumor (a message will be displayed in the chat log to that effect).
|
Item Name |
Price (gil) |
|---|---|
| 125 | |
| 125 | |
| 125 | |
| 10,000 | |
| 10,000 | |
| 10,000 |


The After Party
Upon receiving your ![]() After-party pass from the "Fantastic Fraulein Mumor's Superheroine Show" you may opt to participate in the after party. Which is a battlefield known as Mumor's Encore.
After-party pass from the "Fantastic Fraulein Mumor's Superheroine Show" you may opt to participate in the after party. Which is a battlefield known as Mumor's Encore.
This fight is intended for Item Level >117 players (CL117), and Trusts may not be called.
Any reasonably geared DD sub Ninja for shadows should be able to solo this fight, as Ullegore's most threatening aspect is his casting of single target tier 5 elemental magic.
- See Mumor's Encore for more fight specifics.
The key item is lost upon entering the battlefield. Upon victory, 6x ![]() Ullegore Statues will drop. Return to the MHMU Moogle in one of the following positions to receive a
Ullegore Statues will drop. Return to the MHMU Moogle in one of the following positions to receive a ![]() Mumor Statue as well:
Mumor Statue as well:


- Northern San d'Oria (G-8), Bastok Markets (I-7), Windurst Walls (G-11)
Street Shops
The Superheroine Stage Show is certainly a spectacle to behold, but why limit yourself to sticking to the sidelines? Several minigames are available for you to enjoy in the three locations listed below. "To the victor go the spoils!" – winning a minigame will reward you with some fabulous prizes only available during the Sunbreeze Festival. Act now, before it's too late!
Estiliphire Southern San d'Oria (H-9) / Klass Port Bastok (K-8) / Rokor-Makor Windurst Woods (K-12)
All minigames cost 10 gil to play each time. While wearing your Agent or Starlet outfit you will be able to play the game in "hard mode".
Completion of "hard mode" in any of the 3 nation's minigames will reward a player with a ![]() Comet Fragment for crafting their
Comet Fragment for crafting their ![]() Celestial Globe.
Celestial Globe.

![]() San d'Oria:
San d'Oria:
The goal is to spot the difference in each scene. Failing means you must start over.
- Two Elvaan females walking and using emotes. Either their walking speed, turning, or emote will vary.
- Four Elvaan males doing the "/hurray" emote in pairs. One pair will have different weapons.
- Six Tarutarus running towards you in pairs. Select the pair that have different hair colors.
- Two Hume males wearing armor. The camera tilts up, and one of their armor pieces will varies. It may be anything except their leg slot.
- A large group of varied races. Matching poses will nod in pairs and you need to spot the one shaking their head.
- A pair of Tarutarus running past a post to the left and right. Each of the pairs will have one Tarutaru with blonde hair and the one with red hair. When the identical tarutarus are facing each other press enter.
Scenes will cycle back. Normal mode requires 7 differences in a row. Hard mode requires 9.
Note: Ensure FastCS.lua is not loaded if you use Windower. Otherwise, the scenes will not play at the intended speed and it will make the game more difficult.
![]() Bastok:
Bastok:
Quick Draw McGraw! You have one minute to shoot as many enemies as possible while avoiding hitting a Pixie.
A target will pop up for a brief moment and you will be prompted to "shoot" or "wait" which will skip to the next target. Shooting a pixie will end the game so choose wait to save time and move to the next target.
You must shoot Sabotenders, Goblins, and Mandragoras.
Normal requires 20 targets hit while hard mode requires 30.
![]() Windurst:
Windurst:
It's your lucky day, kupo! That's right, it's time to pick up some chicks!
You will have one minute once again in order to move your chocobo left or right in order to collect the baby chocobos. Beware as there are Mandragora mixed into this as well. Yes, you guessed it; collecting a Mandragora immediately ends the game in failure.
Timing is everything in this game. You will need to get a feel for it, but collecting a chick needs to be done slightly before the line.
Normal requires 20 chicks, and hard mode requires 35.
Piscine Pursuits
As is tradition for the Sunbreeze Festival, the ever popular goldfish scoop will be held once more. Don't let those slippery little buggers get away! Try your hand in the following locations:
West Ronfaure (G-10) / South Gustaberg (E-8) / East Sarutabaruta (H-8) / Rabao (F-7)
Obtaining 60 points from goldfish scooping will reward a player with a ![]() Puny Planet Kit for crafting their
Puny Planet Kit for crafting their ![]() Celestial Globe.
Celestial Globe.

NPCs for goldfish scooping may be located in the following locations:
|
Location |
NPC Name |
|---|---|
| West Ronfaure (G-10) "Knightswell" |
Saradorial |
| South Gustaberg (E-8) "The Fumaroles" |
Fish Eyes |
| East Sarutabaruta (H-8) "Nompipi River" |
Kesha Shopehllok |
| Rabao (F-7) "Rabao Spring" |
Mei |
Upon arriving speak with the NPC and choose "I'd like a bowl" to receive a ![]() Goldfish Basket. You must then buy
Goldfish Basket. You must then buy ![]() Super Scoops for 100 gil each.
Super Scoops for 100 gil each.


- Equip the basket and the scoop in your ranged and ammo equipment slots and then get into the water to begin scooping for fish either by typing /fish or selecting fish from the menu.
The following equipment assists with scooping and may be purchased from the moogles at the following locations: Northern San d'Oria (D-8) / Bastok Mines (H-8) / Windurst Waters (G-10) / Upper Jeuno (G-7)
Goldfish scooping success rate increases:


Allows you to catch multiple (1~3) Tiny Goldfish or Black Bubble-Eye at once:


There are optimal times to catch a goldfish after receiving a message. In general players want to simply wait ~2 seconds after receiving a message. Players will receive two messages before a fish escapes.
- "A goldfish approaches!"
- "Hurry, before the goldfish sees you!"
Messages break down per fish in the following manner:
|
Fish |
Discovery Message |
Points |
Best Time to Catch |
|---|---|---|---|
| A tiny goldfish approaches! | 1 | 2-3 seconds after first message | |
| A plump, black goldfish approaches! | 2 | 2-3 seconds after the first message | |
| A fat, juicy goldfish approaches! | 10 | 1-2 seconds after the "Hurry!" message | |
| A fat, juicy goldfish approaches! | 30 | 2-3 seconds after the "Hurry!" message | |
| A fat, juicy goldfish approaches! | 30 | 2-3 seconds after the "Hurry!" message |


Once you have a decent haul, trade your fish back to the NPC to receive your points.
Points may be exchanged for the following:
|
Game Description |
Reward |
Point Cost |
|---|---|---|
| Super Scoop | 5 | |
| Bag of fireworks | Random fireworks | 15 |
| Large Fans | 25 | |
| Colored drop | Candies that provide their associated stat +5 for 15 minutes. |
30 |
| FES Gobbiedial Key (Once per Earth day) | 40 | |
| Mystery box | 50 | |
| A stellar surprise | Used to craft the |
60 |
| Other mystery box | Used to craft a |
65 |
| Yet another mystery box | Varies based on location:
These items are used to create their associated furnishings: |
70 |
| Mystery Box Part four |
|
80 |


Moogle Teleportation Service
Adventurers who have equipped the Agent/Starlet armor sets available as a luscious awards from the Superheroine Stage Show need but speak to the moogles located in the following areas to teleport between the three nations at any time.
Southern San d'Oria (I-8) / Port Bastok (L-7) / Windurst Woods (K-10)
Item Vendors
Moogle vendors selling swimwear and robes during the summer Celestial Nights and Sunbreeze Festival Seasonal Events are available at:
| NQ Swimsuits | |||||
|---|---|---|---|---|---|
| Male | Female | Cost (Gil) | Male | Female | Cost (Gil) |
| 5,000 | 5,000 | ||||
| 5,000 | 5,000 | ||||
| 5,000 | 5,000 | ||||
| 5,000 | 5,000 | ||||
| 5,000 | 5,000 | ||||
| 5,000 | 5,000 | ||||
| 5,000 | 5,000 | ||||
| 5,000 | 5,000 | ||||
| 5,000 | 5,000 | ||||
| 5,000 | 5,000 | ||||
| 5,000 | 5,000 | ||||
| 5,000 | 5,000 | ||||
| 5,000 | 5,000 | ||||


| Far Eastern Robes | |||||
|---|---|---|---|---|---|
| Male | Female | Cost (Gil) | Male | Female | Cost (Gil) |
| 2,500 | 3,750 | ||||
| 5,000 | 7,500 | ||||
| 10,000 | 12,500 | ||||
| 15,000 | 15,000 | ||||
| 15,000 | |||||


- Recommended: HQ Swimsuit body equipment available for sale are able to warp you to Purgonorgo Isle, skipping the boat ride. Note that you must have entered Bibiki Bay once before the warp will work.
The Green Festival
When both the Green Festival and the Sunbreeze Festival are active, a second Cafe Maid begins to sell special food in Lower Jeuno at the Morbol Cafe (G-9).
| Morbol Cafe Maid #2's Wares | |||||
|---|---|---|---|---|---|
| Food | Cost (Gil) | ||||
| 3,900 | |||||
| 3,900 | |||||
| 390 | |||||
| 3,900 | |||||
| 3,900 | |||||
| 390 | |||||
| 4,147 | |||||
| 561 | |||||
| 561 | |||||
| 561 | |||||
| 561 | |||||
| 700 | |||||
| 931 | |||||
| 2,284 | |||||
| 390 | |||||
| 931 | |||||


