The Voracious Resurgence | |
| Prime Weapons • Ultimate Weapons • Ultimate Augments • Abjurations iL119 • JSE Necks • Divergence Augments • Escutcheons | |
| Reforged Armor Artifact: +1 • iL109 • iL119/+2/+3/+4 Relic: +1/+2 • iL109 • iL119/+2/+3/+4 Empyrean: +1/+2 • iL109 • iL119/+2/+3 |
Guides • Crafting • Trusts • Apex Monsters |
A Scholar's Continuing Education
|
|
 |
Authors
This guide was created by Silversean of Asura, formerly Shiva and formatted by Spicyryan of Asura, formerly Pandemonium.
General Information
Scholars were military tacticians during the Crystal War and are able to use both schools of magic: black and white, between which they would switch based on the situation at hand. While SCH isn’t effective as BLM with nukes or WHM with cures it excels in over-time healing and damage. SCHs gain access to Regen 5, a potent healing spell and Helices, formidable damage over time spells. Scholar is about stratagem management.
Roles
Scholar is similar to Red Mage or Blue Mage in that it fills multiple roles. It can main heal, main nuke, enfeeble, stun, self-skillchain, and etc.
Scholars have to pay close attention to the battle as to see if they can improve the situation with their unique spells and abilities.
Abilities
 Light Arts
Grants a bonus to healing, enhancing, and enfeebling magic that is white magic based. While lowering proficiency for black magic (increased recast time, cast time, MP cost, and less potency for black magic). Reduces cast time, recast time and MP of associated white magic spells by 20% respectively, and allows access to Stratagems that provide bonuses to white magic.
- Penury
- Reduces MP cost of next white magic spell by 50%
- Addendum: White
- Allows access to additional white magic spells
- Celerity
- Reduces the casting time and the recast time of your next white magic spell by 50%.
- Accession
- Extends the effect of your next healing or enhancing white magic spell to party members within range. MP cost and casting time are doubled.
- Rapture
- Enhances the potency of your next white magic spell. (does not work with enhancing magic)
- Altruism (
 )
)
- Increases the accuracy of your next White Magic spell.
- Tranquility ()
- Your next white magic spell will generate less enmity.
- Perpetuance
- Increases the enhancement effect duration of your next white magic spell. (doubles the duration)
 Dark Arts
Grants a bonus to elemental, dark, and enfeebling magic that is black magic based. While lowering proficiency for white magic (increased recast time, cast time, MP cost, and less potency for white magic). Reduces cast time, recast time and MP of associated black magic spells by 20% respectively, and allows access to Stratagems that provide bonuses to black magic.
- Parsimony
- Reduces the MP cost of your next black magic spell by 50%.
- Alacrity
- Reduces the casting and the recast time of your next black magic spell by 50%.
- Addendum: Black
- Allows access to additional black magic spells
- Manifestation
- Extends the effect of your next enfeebling black magic spell to targets within range. MP cost and casting time are doubled. (works with the enhancing spell Klimaform)
- Ebullience
- Enhances the potency of your next black magic spell.
- Focalization ()]
- Increases the accuracy of your next black magic spell.
- Equanimity ()
- Your next black magic spell will generate less enmity.
- Immanence
- Makes it possible for your next elemental magic spell to be used in a skillchain, but not a magic burst.
 Special Abilities
Special abilities A.K.A. "1 hours" are your special abilities with a default cool down of 1 hour. This is reduced to 45 minutes after obtaining 2100 Job Points on scholar.
- Tabula Rasa
- Restores all stratagems, allows unlimited stratagem use, and gives access to two unique spells:
- Kaustra
- Powerful DoT, only available during 1 hour. Consumes 20% of total MP to cast.
- Embrava
- Powerful buff, only available during 1 hr.
- Grants a 72hp/tic Regen, 6 mp/tic Refresh, and 25.9% Haste and because it’s a special buff will stack with Regen, Refresh, and Haste. Consumes 20% of total MP to cast.
- Embrava can be cast on an alliance even though you’re only in one party. Accession + Embrava your party, Accession + Embrava while targeting another person within in the alliance and not inside your party to apply Embrava to that party, do the same to the third party. Embrava gives 72 hp/tic Regen, but can stack with Regen 5. So 72 hp/tic from Embrava + 100 hp/tic from Regen 5 = 172 hp/tic.
- Powerful buff, only available during 1 hr.
- Kaustra
- Restores all stratagems, allows unlimited stratagem use, and gives access to two unique spells:
- Caper Emissarius
- Transfers enmity to a party member of your choice.
Other Abilities
- Sublimation
- Stores MP while reducing HP. The effect ends once the MP limit has been reached, or HP is too low. Stored MP is gained when the ability is reactivated.
Increases damage done by helix spells while lowering spell duration by 50%.
- Enlightenment ()
- Optimizes both white and black magic capabilities and allows access to both addenda for your next spell.
- Libra
- Examines the target's enmity level.
Merits
Group 1
- Grimoire Recast: Shorten recast time of Light Arts and Dark Arts by 2 seconds.
- Modus Veritas Duration: Increase duration of effect for Modus Veritas by 10%.
- Helix Magic Accuracy/Magic Attack Bonus: Increase magic accuracy by 3 and magic attack bonus by 2 for Helix spells.
- Max Sublimation: Increase the maximum amount of MP available via Sublimation by 10.
Group 2
- Altruism: Light Arts Stratagem. Increases the accuracy of your next white magic spell. Increase magic accuracy by 5.
- Focalization: Dark Arts Stratagem. Increases the accuracy of your next black magic spell. Increase magic accuracy by 5.
- Tranquility: Light Arts Stratagem. Your next white magic spell will generate less enmity. Reduce enmity by 10.
- Equanimity: Dark Arts Stratagem. Your next black magic spell will generate less enmity. Reduce enmity by 10.
- Enlightenment: Optimizes both white and black magic capabilities and allows access to both addenda for your next spell. Recast: 5min. +5 bonus to INT and MND.
- Stormsurge: Storm-type spells grant a bonus to attributes associated with their element. Initial bonus value: +3. Increase bonus value by 1.
Traits
- Conserve MP II
- Max MP Boost II
- Occult Acumen III
- Resist Silence III
- Stormsurge ()
Support Jobs
 White Mage
- I have no idea why you'd use WHM as a sub job, the only thing you gain is Curaga and Divine Seal, with Accession SCH natively has a Curaga IV.
Equipment
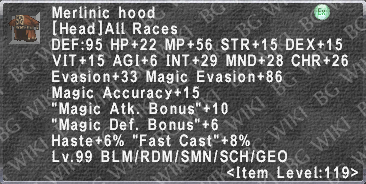
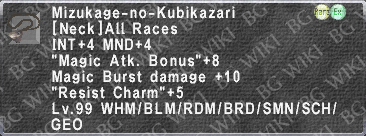
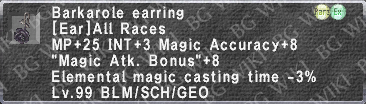
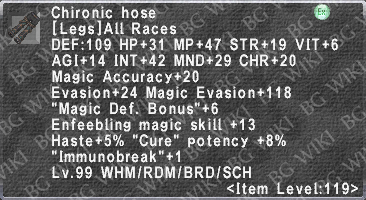
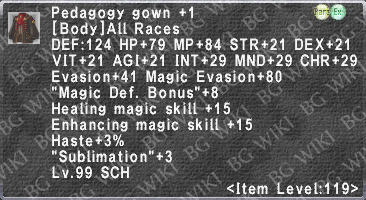
Light Arts Sets
|
|


|
|
|
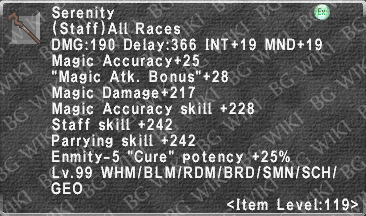


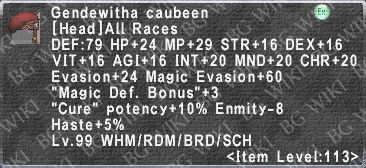


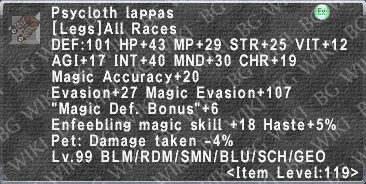
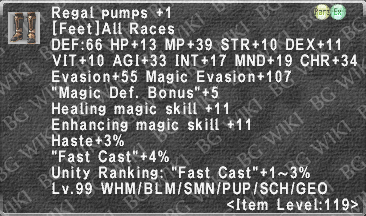
|
|
|
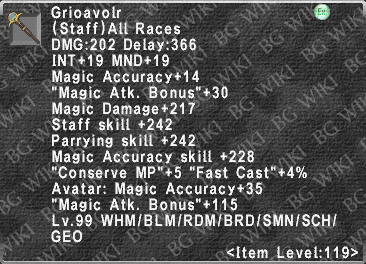


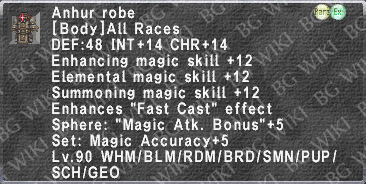
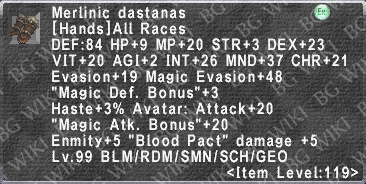


|
|
|


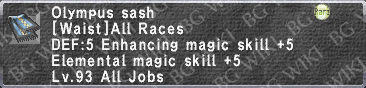
|
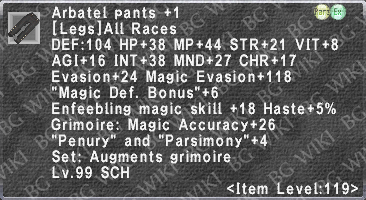
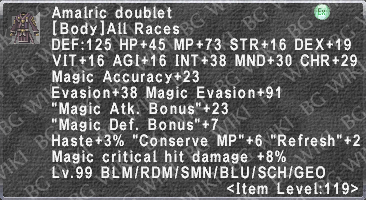
Dark Arts Sets
|
|


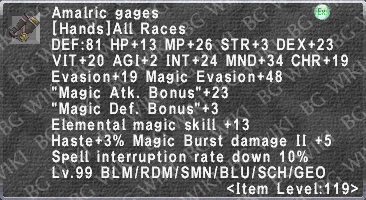


|
|
|


|
|
|


|
Regular Nukes (non-MB)
|
For regular nukes I would just use your Magic Burst set, because ideally your burst set would have enough MACC/MAB that it would be better than other gear you could use. some Jhakri +1 pieces may have a few more MACC than Merlinic. You can build a regular nuking set that is more defined and isn't your Burst gear, but at endgame regular nukes aren't really a concern so I don't see a point in defining a new set for them. |
Idle
|
|


|
|
|


|
Necessary Reforged
|
|
|


|
|


|
Macros
This is my macro setup and I've found it to be the easiest and quickest way to navigate through Light and Dark Arts, Stratagems, and Skillchains. I recommend fooling around on the job fora bit before you write your macros so you can write them how you play the job and what abilities you use the most.
Light Arts
For Light Arts I put /ja "Light Arts" <me> as Control 1 and the associated abilities under Light Arts preceding from the Light Arts macro and on the same macro line.

Dark Arts
I do the same for Dark Arts as I do for Light Arts.
Self Skillchains
My self skillchain macros are on a different macro page, away from my other macros so I don't accidentally hit it and start a skillchain at the wrong time. The macros are named so I can quickly see the element and the skillchain at a glance, ex. "Fusi/Fire".

I recommend following my template for self skillchains as I found it to be succint, fit on one macro, and adequately notify the party so that they can land magic bursts. IF YOU FOLLOW MY TEMPLATE ENSURE THAT YOU ARE LOCKSTYLED AND YOUR WEAPON IS LOCKED OR THE DELAY BETWEEN THE ANIMATION OF SWITCHING GEAR MAY MESS UP THE TIMING OF THE SPELLS AND THEREFORE MESS UP THE SKILLCHAIN
Macro Template
- Macro Name: Fusi/Fire (tells me the name of the SC and its element at a glance)
- Macro Line 1: /party (Starting Gear) (Skillchain) (Fusion) MB: (Fire)
- Macro Line 2: /ja “Immanence” <me> <wait1>
- Macro Line 3: /ma “Fire” <t> <wait5>
- Macro Line 4: /p (Closed Position) (Skillchain in 3) <call20>
- Macro Line 5: /ja “Immanence” <me> <wait1>
- Macro Line 6: /ma “Thunder” <t>
Stratagem Mangement
Scholar is about managing stratagems, without them you're a crappy BLM/WHM. This means being smart when using stratagems so that you don't waste 1 while buffing and then not have enough to skillchain when you're asked to skillchain. Below is an example.
Cool Example
- You're a Scholar in a party, your job is to buff and to self skillchain.
- You start buffing and use Light Arts, Accession, and Perpetuance and then cast Protect (3 stratagems remaining).
- You then use Accession and Perpetuance and then cast Shell (1 stratagem remaining).
- Your next stratagem is available in 35 seconds and you have two more buff to apply, plus you need stratagems to self skillchain
Bad. You failed and now the party has to wait, let buffs wear, etc.
What you should have done:
- Instead of wasting Perpetuance x2 on Protect and Shell which should have 20-30 minute durations without Perpetuance you should use Perpetuance on the more important buffs.
- Light Arts and Accession to cast Protect. Accession to cast Shell (3 stratagems remaining)
- Accession and Perpetuance to cast Regen 5 (1 stratagem remaining, 5-7 seconds until next stratagem)
- Accession and Perpetuance to cast Storm II (0-1 stratagem remaining depending on your timing between spell cast)
- Now your party is fully buffed with the spells that matter the most receiving the benefit of extended duration from Perpetuance rather than Protect and Shell.
- Wait 1 minute to be at 3-4 stratagems, enough to perform 1-2 self skillchains.
Noteable Spells
- Kaustra
- Powerful DoT, only available during 1 hour. Consumes 20% of total MP to cast.
- Embrava
- Powerful buff, only available during 1 hr. Gives 72hp/tic Regen, 7 mp/tic Refresh, and 30% Haste and because it’s a special buff will stack with Regen, Refresh, and Haste. Consumes 20% of total MP to cast.
- Example/Tips:
- Embrava can be cast on an alliance even though you’re only in one party. [[Accession + Embrava your party, Accession + Embrava while targeting another person within in the alliance and not inside your party to apply Embrava to that party, do the same to the third party.
- Embrava caps potency at 500 Enhancing Skill. It gives 72 hp/tic Regen, but can stack with Regen 5. So 72 hp/tic from Embrava + 100 hp/tic from Regen 5 = 172 hp/tic.
- Storms
- Storms enhance the effects of associated element spells and elemental weapon skills. There are tiered storm spells with Storms II being available after 100 job points. Single-tier storms provide single weather effects; double-tiered storm spells provide double weather effects.
- These do not stack with current weather and Helices automatically gain the effect of weather even without weather spells.
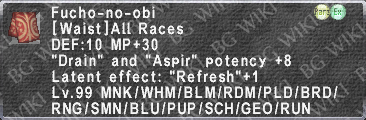
- Weather 2 gives a 33%-50% chance of increasing the weather-element associated spells and weapon skills a 25% damage increase, Hachirin-no-Obi increases the damage increase chance to 100%.
- Klimaform
- Klimaform is a spell that gives increased magic accuracy for spells of matching weather.
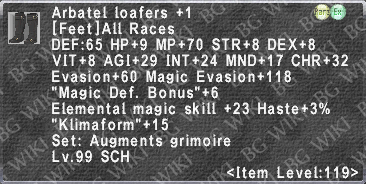
- Note: the spell does not increase damage without Arbatel Loafers
- The magic accuracy bonus is a flat +15 magic accuracy. Klimaform can be extended to party members using the Dark Arts stratagem Manifestation even though the help text of Manifestation says it only applies to enfeebling magic.
- Example/Tips:
- +15-25% damage increase from Storms II + 10-15% damage increase from Klimaform = +25-40% damage increase from 2 spells (#nerfBLU).
- Helices
- A powerful DoT only available to scholars that do the initial damage of the spell per tic (technically it’s per “toc”, which is 1-10 seconds after the landing the helix and then that number of seconds for every toc), but the toc damage caps at 10k. Example: I land a 14k Pyrohelix 2, it will do 10k damage per tic due to the damage being capped.
Modus Veritas
Modus Veritas is a job ability that you can use only after a helix has been applied which doubles the damage of the helix (doubles the DoT damage), but decreases duration of the helix by 50%. The duration decreases can be nullified with merits.
Modus is extremely hard to land because SE nerfed it. Before the SE nerf a Scholar would land a helix and then use Modus doubling the damage, another SCH would Modus doubling that damage, another SCH used Modus, etc. which would allow 99k/tic damage, which is why SE nerfed it.
Now the accuracy of Modus is based entirely on the amount of time since helix was cast. I need to do some testing, but it seems 30-50 seconds after landing helix is the time needed to wait to land Modus Veritas (note: landing Modus Veritas on NMs is harder and you may need to wait longer to land it, if it’s even possible to land it)
- Example/Tips:
- If you have more than 1 Scholar in a party, only 1 Scholar should burst Helix as Helix will be overwritten by another Helix. Helix 2 overwrites Helix 1, Helix 1 will not overwrite Helix 2.
Helix Mote File
- If you use Gearswap, add this line to the mote files OR YOUR GEARSWAP WILL NOT CHANGE GEAR FOR HELICES 2.
- The file path is: windower 4 > addons > gearswap > libs> mote-mappings
- Copy and Paste what is below this bullet at line 194 in the above file path
['Pyrohelix']='Helix',['Cryohelix']='Helix',['Anemohelix']='Helix',['Geohelix']='Helix',['Ionohelix']='Helix',['Hydrohelix']='Helix',['Luminohelix']='Helix',['Noctohelix']='Helix',
['Firestorm']='Storm',['Hailstorm']='Storm',['Windstorm']='Storm',['Sandstorm']='Storm',['Thunderstorm']='Storm',['Rainstorm']='Storm',['Aurorastorm']='Storm',['Voidstorm']='Storm',
['Pyrohelix II']='Helix',['Cryohelix II']='Helix',['Anemohelix II']='Helix',['Geohelix II']='Helix',['Ionohelix II']='Helix',['Hydrohelix II']='Helix',['Luminohelix II']='Helix',['Noctohelix II']='Helix',
['Firestorm II']='Storm',['Hailstorm II']='Storm',['Windstorm II']='Storm',['Sandstorm II']='Storm',['Thunderstorm II']='Storm',['Rainstorm II']='Storm',['Aurorastorm II']='Storm',['Voidstorm II']='Storm',
Self Skillchains
I recommend following my template for self skillchains as I found it to be succint, fit on one macro, and adequately notify the party so that they can land magic bursts. IF YOU FOLLOW MY TEMPLATE ENSURE THAT YOU ARE LOCKSTYLED AND YOUR WEAPON IS LOCKED OR THE DELAY BETWEEN THE ANIMATION OF SWITCHING GEAR MAY MESS UP THE TIMING OF THE SPELLS AND THEREFORE MESS UP THE SKILLCHAIN
Macro Template
- Macro Name: Fusi/Fire (tells me the name of the SC and its element at a glance)
- Macro Line 1: /party (Starting Gear) (Skillchain) (Fusion) MB: (Fire)
- Macro Line 2: /ja “Immanence” <me> <wait1>
- Macro Line 3: /ma “Fire” <t> <wait5>
- Macro Line 4: /p (Closed Position) (Skillchain in 3) <call20>
- Macro Line 5: /ja “Immanence” <me> <wait1>
- Macro Line 6: /ma “Thunder” <t>
Skillchain Spells
Level 1
- Liquefaction: Stone > Fire or Thunder > Fire
- Burst:

- Burst:
- Scission: Fire > Stone or Aero > Stone
- Burst:

- Burst:
- Reverberation: Stone > Water or Luminohelix > Water
- Burst:

- Burst:
- Detonation: Stone > Aero or Thunder > Wind
- Burst:

- Burst:
- Induration: Water > Blizzard
- Burst:

- Burst:
- Impaction: Water > Thunder or Blizzard > Thunder
- Burst:

- Burst:
- Transfixion: Noctohelix > Luminohelix
- Burst:

- Burst:
- Compression: Blizzard > Noctohelix or
- Burst:

- Burst:
Level 2
- Fragmentation: Blizzard > Water
- Burst: /
- Burst:
- Fusion: Fire > Thunder
- Burst: /
- Burst:
- Gravitation: Aero > Noctohelix
- Burst: /
- Burst:
- Distortion: Luminohelix > Stone
- Burst: /
- Burst:
- Tips:
- Use the T1 version of the spells as they cast the quickest.
- It is always best to attempt to close a skillchain with a spell that is not the same element as the magic burst. This is due to the resist wall players face when using the same element consecutively.
- You may be familiar with this due to how Black Mages wait three seconds between landing Deaths. This is the same concept, and it applies to all magical damage.
- This can tend to involve helix spells which have a longer recast. So you will be at the mercy of your timers on this one. Rotate Level 1 and 2 in this case.
Acknowledgements
- Spicyryan of Asura, formerly Pandemonium – Formatting, Advice, Proofreading
- Verbannt of Asura, formerly Sylph – Advice, Proofreading
- Byrne of Asura, formerly Sylph – Advice, Proofreading
- Ashtopcat of Lakshmi – Scholar Mote File Change (http://www.ffxiah.com/forum/topic/48948/maximizing-helix/)
- Sawtelle of Odin – Created the original Scholar Guide on FFXIAH: “A Scholar’s Education (Guide)”, which this guide is a continuation of. (http://www.ffxiah.com/forum/topic/32145/a-scholars-education-guide/)
- Hiep of Shiva - Created the Scholar Self-SC Guide on FFXIAH (http://www.ffxivpro.com/forum/topic/47029/sch-solo-skillchain-help/#2936304)
- Boogerballs of Asura, formerly Bahamut - Continually pushed me to play Scholar
- Everyone else who have endured my nagging questions, told me when I had something wrong, and pushed me to be better. There are too many to name.
SCH.lua
- If you made it this far, are interested in Scholar and need a .lua for Scholar, I'll link mine.
- Link to my SCH.lua: https://goo.gl/A5AWb2
