The Voracious Resurgence | |
| Prime Weapons • Ultimate Weapons • Ultimate Augments • Abjurations iL119 • JSE Necks • Divergence Augments • Escutcheons | |
| Reforged Armor Artifact: +1 • iL109 • iL119/+2/+3/+4 Relic: +1/+2 • iL109 • iL119/+2/+3/+4 Empyrean: +1/+2 • iL109 • iL119/+2/+3 |
Guides • Crafting • Trusts • Apex Monsters |
User:Favre/Sandbox/WarriorGuide
Abilities and Traits
Support Jobs
 Dragoon
- With a wide variety of valuable Job Traits, this subjob features excellent damage output in exchange for limited utility. Preferred subjob for Fencer-focused builds. High Jump and Super Jump provide a welcome way to reduce enmity in protracted fights.
 Ninja
Ninja
- The premier defensive subjob against enemies which utilize physical damage, thanks to Utsusemi. Also provides the fastest attacks when Dual Wielding. Preferred subjob for Decimation-focused builds.
- The premier defensive subjob against enemies which utilize physical damage, thanks to Utsusemi. Also provides the fastest attacks when Dual Wielding. Preferred subjob for Decimation-focused builds.
 Dancer
- A high-utility subjob which provides Dual Wield and Job Ability Haste in the form of Haste Samba; survivability via Curing Waltz and Healing Waltz; debuffs such as Quickstep and Box Step; Sneak and Invisible via Spectral Jig, and self-Skillchains with Reverse Flourish. More ideal for soloing content which doesn't allow Trusts or subjects you to frequent debuffs.
Merits
| Group 1 | |||
|---|---|---|---|
| Name | Description | Level | Notes |
| Berserk Recast | Shorten recast time by 10 seconds. | 5/5 | No brainer. This substantially raises your Berserk uptime. |
| Defender Recast | Shorten recast time by 6 seconds. | 0/5 | Doesn't get much use. |
| Warcry Recast | Shorten recast time by 10 seconds. | 0/5 | Falls short of the other categories, even with Savagery. |
| Aggressor Recast | Shorten recast time by 10 seconds. | 0~5/5 | You may choose to merit this to align the recasts of Berserk and Aggressor, but Double Attack is usually more valuable. |
| Double Attack Rate | Increase dobule attack rate by 1 percent. | 0~5/5 | Typically the best category, but with current gear it is possible to reach 100% Double Attack rate without these merits. |
| Group 2 | |||
|---|---|---|---|
| Name | Description | Level | Notes |
| Warrior's Charge | Will double your next attack. Recast: 5min. Increase chance of triple attack by 5 percent. | 0~1/5 | Warrior's current armory and total traits giving a ridiculous high rate of Double Attack renders this skill's benefits marginal. Don't bother beyond a single level, if at all. |
| Tomahawk | Expends a throwing tomahawk to inflict a special defense down effect on an enemy. Recast: 3min. Increase duration of effect by 15 seconds. | 4~5/5 | Rarely useful, but indispensable when needed. The worst part of this skill is its recast. |
| Savagery | Adds TP bonus effect to Warcry. Increase weapon skill TP bonus by 100. | 5/5 | Affects your entire party, and synergizes well with many strong Weapon Skills. You will be expected to have this at 5/5. |
| Aggressive Aim | Adds ranged accuracy bonus to Aggressor. Increase ranged accuracy bonus by 4. | 0/5 | Warrior does not utilize ranged attacks in any meaningful capacity. Even if it did, the accuracy boost is too minor to give up the other options. |
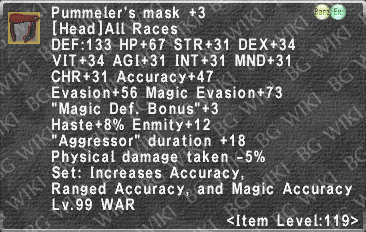
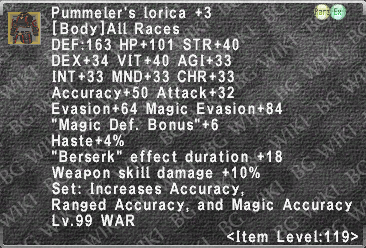
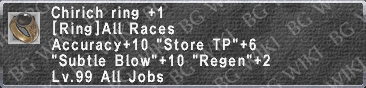
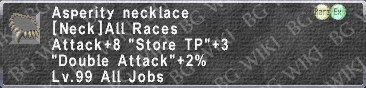
Job-Specific Equipment
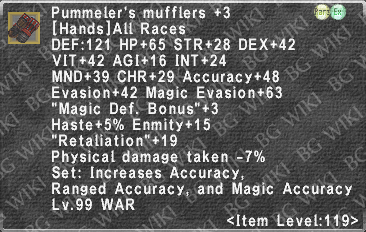
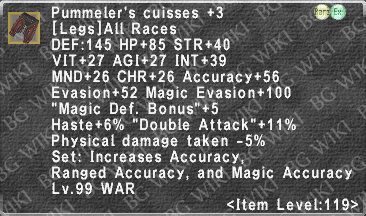
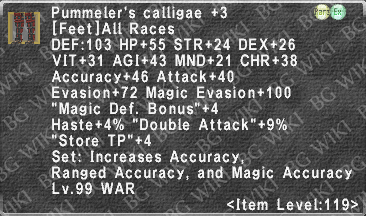
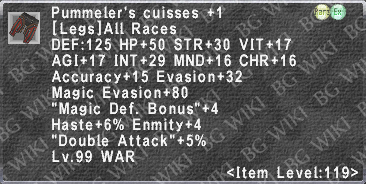
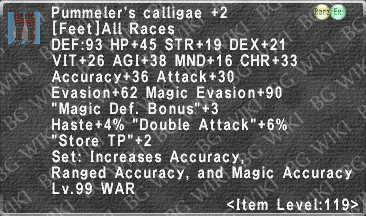
| Artifact Armor - Pummeler's Armor Set +3 | |||
|---|---|---|---|
| Image | Description | ||
|
|||
|
|||
|
|||
|
|||
|
|||
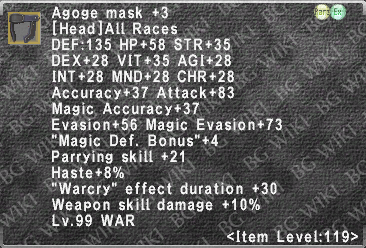
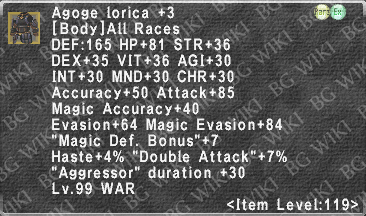
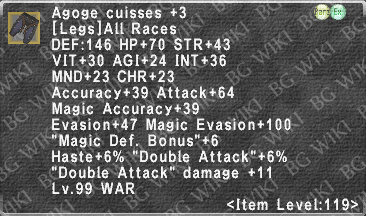
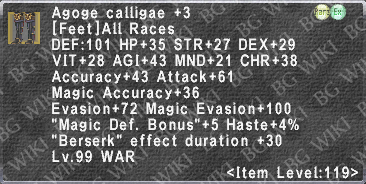
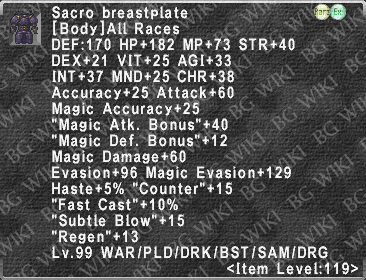
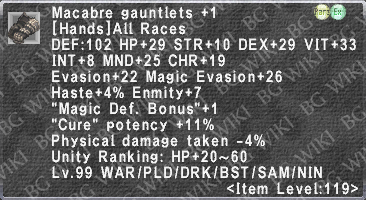
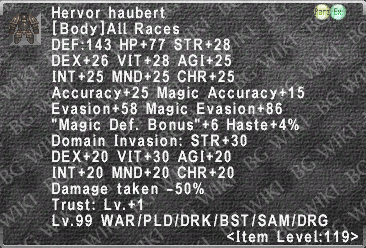
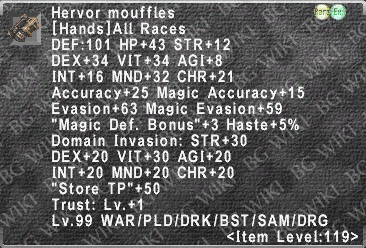
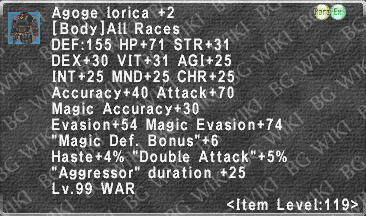
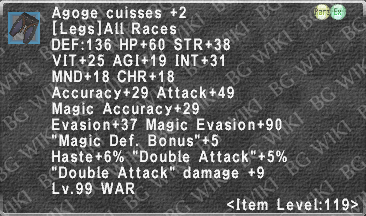
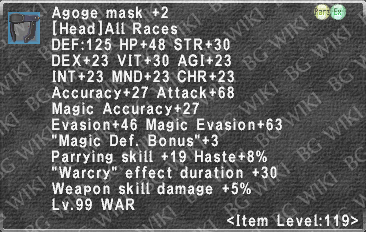
| Relic Armor - Agoge Armor Set +3 | |||
|---|---|---|---|
| Image | Description | ||
|
|||
|
|||

|
|||
|
|||
|
|||
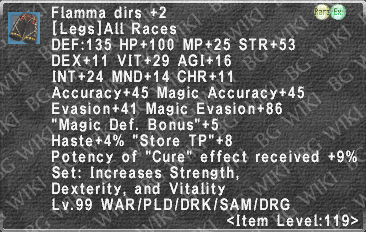
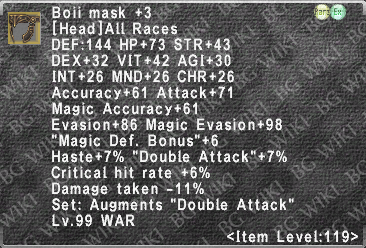
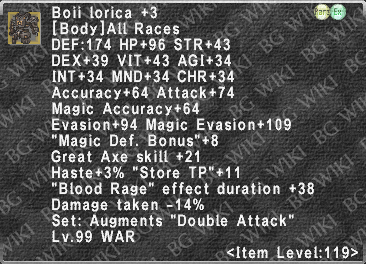
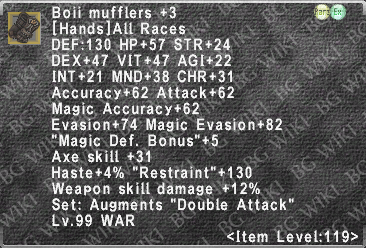
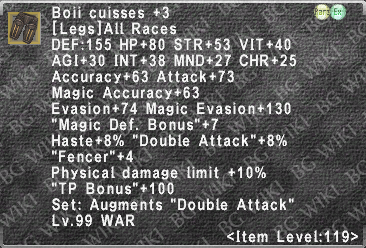
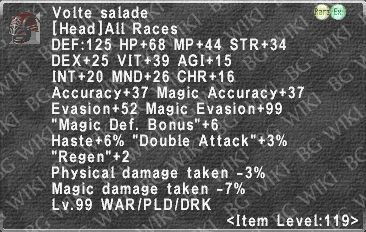
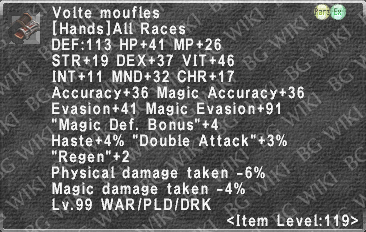
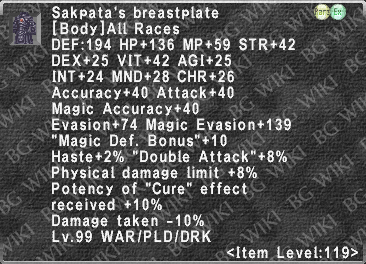
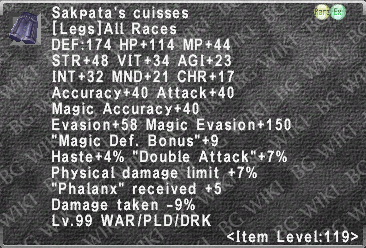
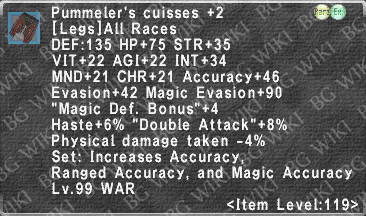
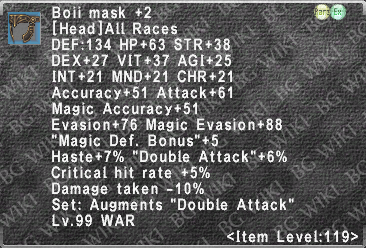
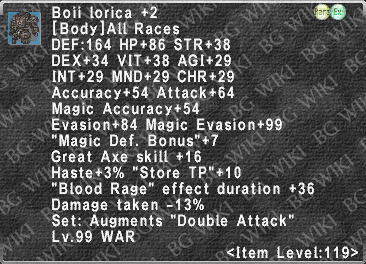
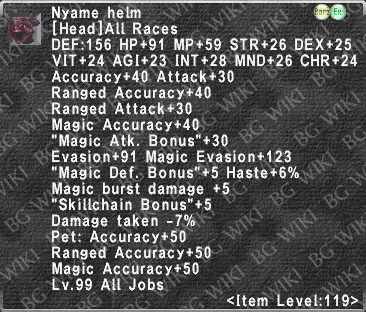
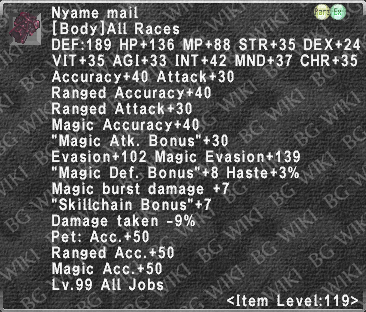
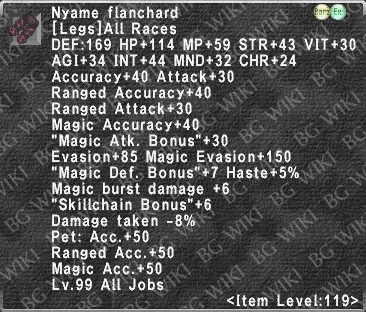
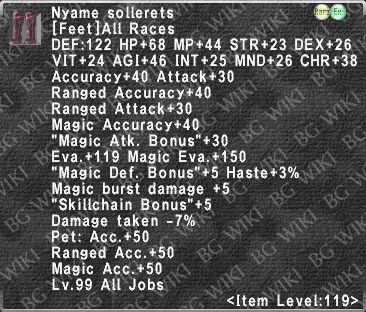
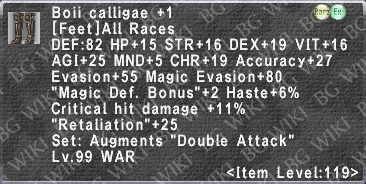
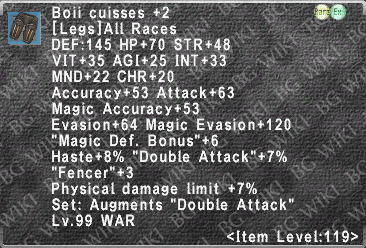
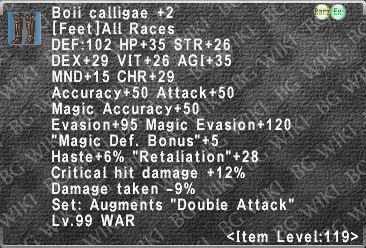
| Empyrean Armor - Boii Armor Set +3 | |||
|---|---|---|---|
| Image | Description | ||
|
|||
|
|||
|
|||
|
|||

|
|||
Weapons
Warrior can use a wide variety of weapon types quite well, allowing you to take advantage of an enemy's weakness and work around their strengths. While leveling, stick to Great Axes and just try to upgrade your weapon every 5-10 levels to increase your DPS. We'll be focusing on gear for level 99 and beyond in this guide.
Great Axes
The Great Axe is Warrior's bread and butter. It is your primary weapon when skillchaining matters and also features the Break line of weaponskills that weaken the enemy.
![]() Eminent Voulge
Eminent Voulge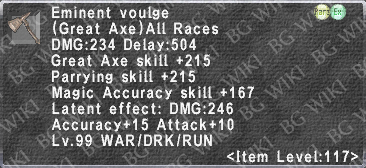 - Baby's first Great Axe, if you haven't been to Adoulin yet. Otherwise skip to a weapon below. Purchased from a Sparks NPC.
![]() Homestead Labrys
Homestead Labrys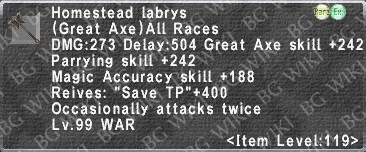 - Newer players only. As soon as you can raise enough Bayld and get to Adoulin, make your way to the Peacekeepers' Coalition in Eastern Adoulin where Craggy Bluff is to buy this. You can convert previously gained Copper Vouchers to at least 3,000 Bayld in order to buy this swiftly. You probably want some of the Gorney Armor Set +1 from Vesca as well, so raise 12,100 Bayld if this applies to you.
![]() Minos
Minos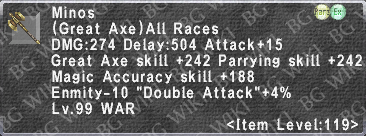 - Obtained from Oboro and will require some resources to put together and augment, where it becomes a more significant upgrade from the Homestead Labrys. It is entirely possible (and preferable) to skip this one by doing lower tier Ambuscade or qualifying to use the Hepatizon Axe, but I'll leave it here for the time being for those operating at a different pace.
![]() Voluspa Chopper
Voluspa Chopper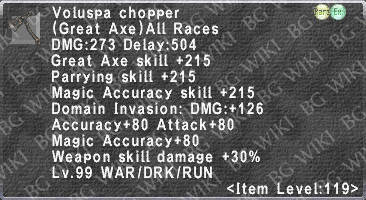 - If you started collecting Domain Points from Domain Invasion, this is an easy iLvl 119 Great Axe. An added bonus is Volupsa Chopper gains large stat increases during Domain Invasion. Cost: 80 Domain Points from Zurim.
![]() Hepatizon Axe
Hepatizon Axe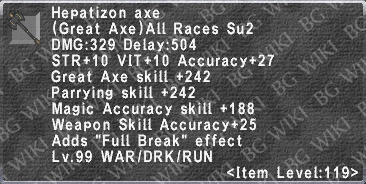 - If you have more Job Points than you know what to do with, but have yet somehow avoided Ambuscade, this or the HQ version of it is a nice pick up until you advance through some of the Lycurgos stages. Note that this is a su2 piece of equipment, which requires 100 Job Points spent for Warrior.
![]() Lycurgos
Lycurgos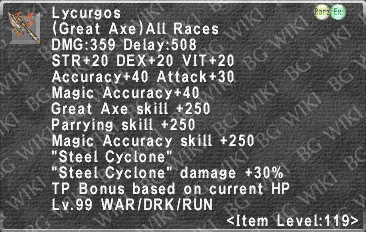 - More established players can start here. The final form of the Ambuscade Great Axe. Note that you can probably upgrade from the an earlier weapon once this weapon is at Ajja Chopper stage. At the time of this writing, you can use this Great Axe until you make one of the two options below.
Great Swords
Great Swords were once the "me too!" Bandwagon Warriors' weapon of choice for zerging, but Resolution has been outshined by a new hotness. Good.
Regardless, Resolution is still a perfectly fine weapon skill and Shockwave enables a Warrior to land Sleep on a group of mobs themselves. Useful for some scenarios.
![]() Montante +1
Montante +1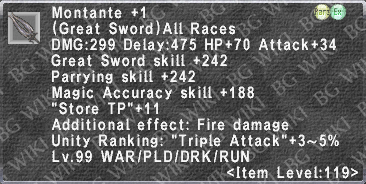 - Obtained from the Unity Concord NM Sarama, which you'll need some help with. A fantastic Great Sword that saw a life extension thanks to augmenting through Lustreless Wings. If you already have this one from earlier, you may consider sticking with it augmented rather than making the next option.
![]() Nandaka
Nandaka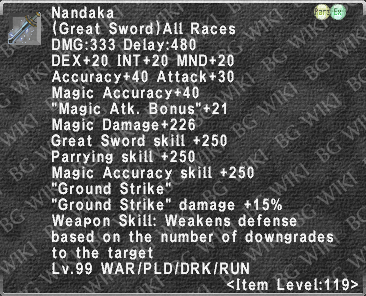 - The final form of the Ambuscade Great Sword. I'd imagine these days, most Warriors will just start with this line of Great Swords when expanding their armory.
Swords
Sword-and-board Warrior has come back in style -- it's not just for newbies in the Dunes anymore!
Thanks to Warrior's Fencer trait and some relatively newer gear, Savage Blade is the new defacto Warrior weaponskill of choice for mindless zerging with others. Swords should only be used when skillchaining doesn't matter.
![]() Naegling
Naegling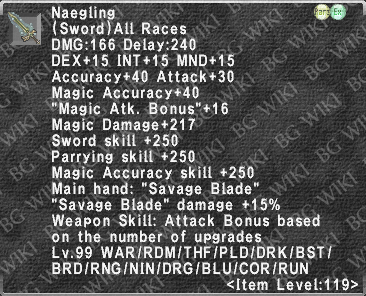 - The final form of the Ambuscade Sword. As of the time of this writing, this is basically a must have for Warriors at this point and really the only sword you need for now. The Kaja Sword and earlier stages of the weapon will do fine as you work towards it, but the boost to Savage Blade doesn't kick in until the Kaja Sword. When completed, it will often outperform even REMA weapons in fully buffed content.
Dual Wield option(s):
![]() Sangarius +1
Sangarius +1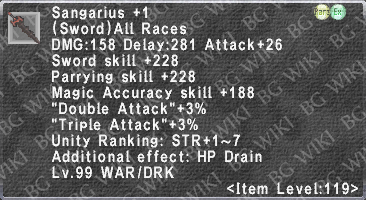 - A weapon introduced with Unity Wanted fights from [Lumbering Jill]]. Updated with augmented stats (DMG +35, Accuracy & Magic Accuracy +30 , and Quadruple Attack +3%) making it a fun offhand option.
![]() Zantetsuken
Zantetsuken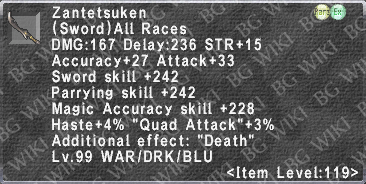 - Similar to an augmented Sangarius +1, your mileage may vary on how well it performs against one. Just like a Sangarius +1, this is primarily an offhand weapon. Chance droprate from Odin Prime High Tier Mission Battle, via a Stygian Pact phantom gem.
Axes
Remember Axes? Warrior can use them, and use them well! They don't get a lot of press these days, though.
![]() Dolichenus
Dolichenus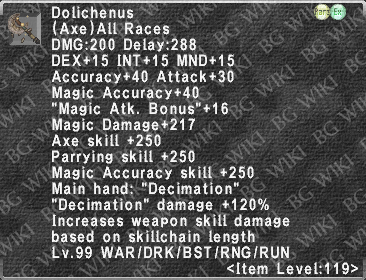 - The final form of the Ambuscade Axe. Like the other Ambuscade weapons, you get a boost to a weapon skill starting at the Kaja stage. Some very respectable numbers can be seen from Decimation using it.
Dual Wield option(s):
![]() Barbarity
Barbarity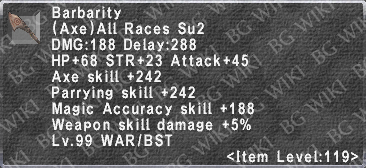 /
/ ![]() Barbarity +1
Barbarity +1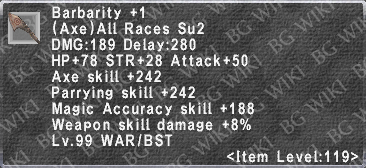 - Warrior's Superior 2 (SU2) weapon. Sporting a rather large increase in HP, STR, Attack as well as Weapon Skill Damage +5/+8, makes for a great companion weapon for big-hitter one-hit weapon skills. Craftable & purchasable on the Auction House.
![]() Renaud's Axe +2
Renaud's Axe +2 /
/ ![]() Fernagu
Fernagu - A relic (pun not intended) of the pre-Adoulin, level cap 99 days courtesy of the Trial of the Magians upgrading & augmenting system. Where it fall short in base damage and accuracy, if you follow the correct upgrade path, you gain a massive TP Bonus +1,000. Essentially closing the gap between a single wield Fencer build and a Dual Wield build.
![]() Ikenga's Axe
Ikenga's Axe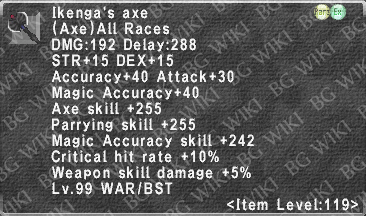 - Added in the introduction of Odyssey, Ikenga's Axe is a more advanced Item Level version to Renaud's Axe +2 / Fernagu. Fair Warning: Requires a boss clear AND Rank points to reach its full potential augmented "TP Bonus +500" but is well worth the hassle. By the time you are able to equip and use this properly, you'll be at the top of the food chain.
Polearms
A Warrior's best piercing weapon choice.
![]() Shining One
Shining One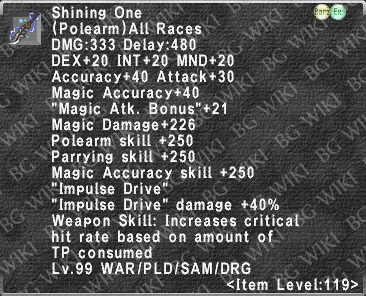 - The final form of the Ambuscade Polearm. Like the other Ambuscade weapons, you get a boost to a weaponskill starting at the Kaja stage. You'll want one of these in your toolkit, especially if doing Odyssey.
Clubs
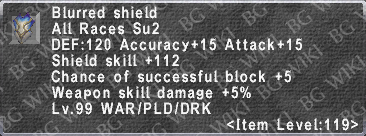
Clubs provide a source of Blunt damage for Warriors.
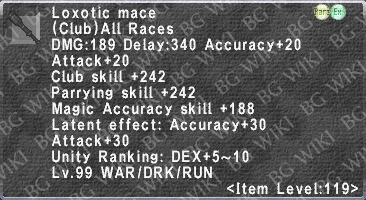
![]() Loxotic Mace +1
Loxotic Mace +1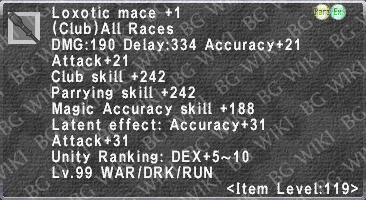 - Obtained from the Unity Concord NM Grand Grenade. This can be augmented through the Odyssey item Lustreless Hides. Fully Augmented, Loxotic Mace +1 sports an additional DMG +33, Accuracy & Magic Accuracy +40, and Weapon Skill Damage +10%. With this Mace, you're capable of putting out some really nice numbers through Judgement or Black Halo. Part of a Warrior's expected toolkit for Odyssey, allowing you to beat down the Undead and other slashing resistant monsters. When /DRG and doing any Slashing-resistant monsters, just swap from Naegling to this.
Ranged
Sometimes Provoke is down or should be saved. Sometimes you need the distance so you can thin the mob herd a little. Sometimes you want to pull a mob while waiting for buffs to finish being setup.
![]() Dart
Dart - An under-appreciated hero. Darts are cheap and fast, but what makes them great is you can swap to a Dart from any other ammo slot piece and not lose TP. There's really no reason to not carry a stack of these and be able to use them when the need arises.
![]() Throwing Tomahawk
Throwing Tomahawk - Necessary to utilize the merited Tomahawk ability. Don't leave them in the Mog House and feel like a goober the rare times you can utilize it.
Ultimate Weapons
![]() Chango
Chango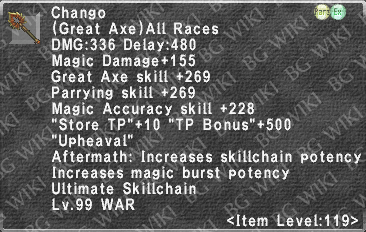 - The Aeonic Great Axe that unlocks the ability to perform Ultimate Skillchains. This will require grouping with others for some more difficult content, which might even require you leveling additional jobs to partake in. If you have access to the help, a great weapon to work on as an upgrade from your Lycurgos.
![]() Ukonvasara (Level 119 III)
Ukonvasara (Level 119 III)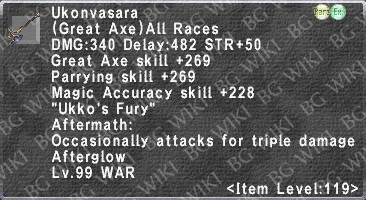 - The Empyrean Great Axe is a white damage beast. Making this weapon will require accumulating more resources over a large number of stages, but a person with fewer connections with others could work on this more easily over time.
![]() Labraunda
Labraunda - The Divergence Great Axe. Offers three augment paths, making it into a mini-Empyrean, a hybrid Mythic, or a hybrid version of an Empyrean.
![]() Laphria (Level 119 III)
Laphria (Level 119 III) - The Prime Great Axe. Will get a proper write up when more is known about it.
![]() Conqueror (Level 119 III)
Conqueror (Level 119 III) - The Mythic Great Axe. Not worth the effort at this time either.
![]() Bravura (Level 119 III)
Bravura (Level 119 III)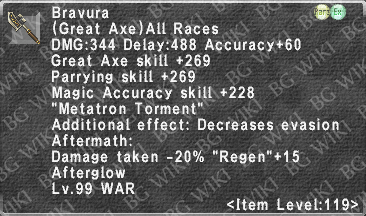 - Most of the Relic Weapons are lagging behind at the time of this writing. Hopefully something is done with them eventually.
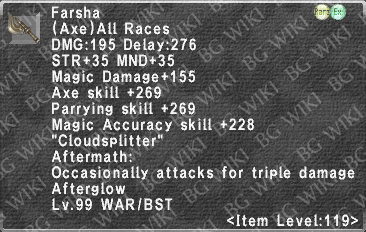
![]() Farsha
Farsha - The other Empyrean Weapon that Warrior can wield. It might seem like an afterthought that Warrior is on this BST weapon, but Empyrean Aftermath from Cloudsplitter can generate impressive white damage numbers with the extra crit rate from Fencer. Can also generate respectable damage numbers using Calamity and Mistral Axe once Aftermath is active.
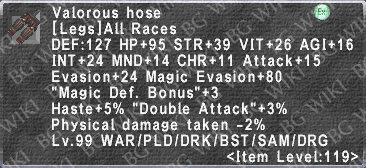
Idle & Utility Sets
There are a number of pieces of "Idle" gear. Use this section as a benchmark to gauge where you are at personally and where you can make improvements based on the circumstances. Your priorities (in order) should be:
- Maximize Damage Taken (DT-50%).
- Gain high Magic Evasion. (Advanced sets will utilize Elemental Resistance as well)
- Take advantage of Utility stats.
- Work in Progress
Idle
|


|


Utility
|


|


TP Sets Section
- Here's where the pavement meets the road. Or, your weapon meets your foe's skull. Depending upon your weapon choice, there are three (3) standardized TP modes you should consider:
- Single Wield
- Dual Wield
- Two-Handed
- When using a One-Handed weapon, you are either using a single weapon and shield, or Dual Wielding two (2) weapons. There are reasons for both builds and you should make considerations for both.
- Two-Handed builds are fairly self-explanatory and just like with One-Handed builds, there is a time and place to use them.
- Will slowly be reconfiguring the TP Section (and beyond) so please bare with me!
- Work in Progress
Starting Out
|


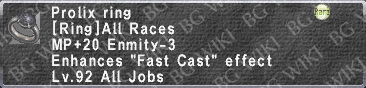
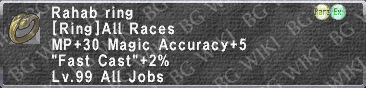
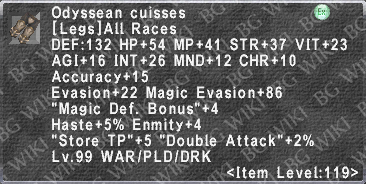
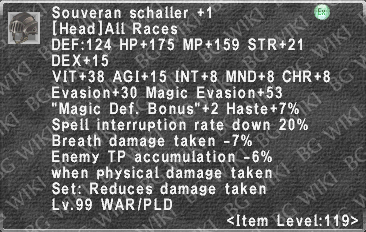
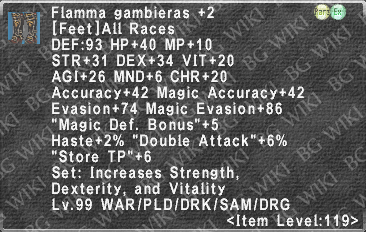
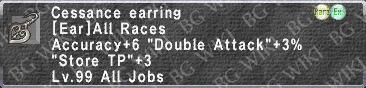
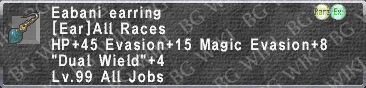
Single Wield TP Sets
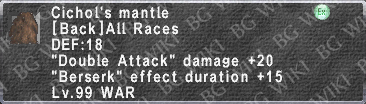
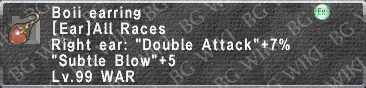
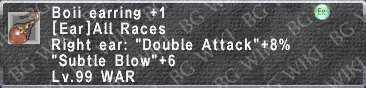
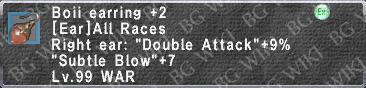
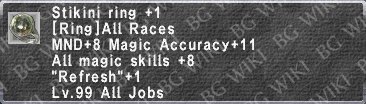
- These sets are functional for any single wield weapon, such as Naegling or Loxotic Mace +1. If you are lacking a +1 Boii Earring or +2 Warrior's Beads, you can swap Cichol's Mantle's Store TP augment to Double Attack.
- Sets herein serve as benchmark targets to gauge gear progression.
|


|


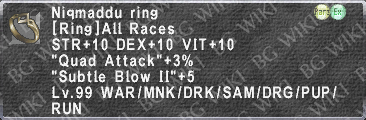
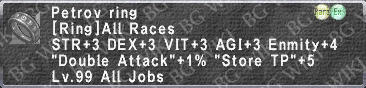
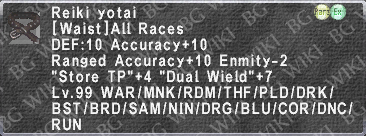
Dual Wield TP Sets
- These sets are functional for a variety of Main-hand / Off-hand weapon combinations, not just the ones listed.
- Sets herein serve as benchmark targets to gauge gear progression.
|
|
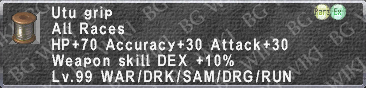
Two-Handed TP Sets
- Two-Handed Sets will apply for Great Axe, Great Sword, and Polearm (Content & Build depending). Perhaps in some far flung scenario Staff.
- Sets herein serve as benchmark targets to gauge gear progression.
|

|
Great Axe Weaponskill Sets
Work In Progress
Upheaval
- Upheaval is an interesting Weapon Skill. Depending on your TP threshold , Upheaval can be used two ways:
- At low TP threshold (1,000 ~ 1,749 TP), it benefits more from a multi-hit approach.
- At mid to high TP threshold (1,750+ TP), it benefits more from a front loaded Weapon Skill Damage (WSD) approach.
- For beginners, just focus on landing it accurately. And as your WSD and Multi-hit options improve, craft sets for both scenarios.
|


The sets for Upheaval herein can effectively be copy/pasted to King's Justice--which utilizes a Strength modifier instead of Vitality, and has a lower fTP multiplier.
Upheaval sets are nearly identical to King's Justice and to save time and space this subsection will be used for both.
|
|


Ukko's Fury
|

Metraton's Torment / Disaster
- TBD
Misc Great Axe WS
|


Sword Weaponskill Sets
Savage Blade
Savage Blade is the current weaponskill of choice for pure zerging with other melee when skillchaining doesn't matter or might be detrimental (like when skillchain elements can heal the target). This is largely in part thanks to the overpowered Ambuscade Sword weapon, Naegling (Naegling being its final form).
Most front-line jobs can spam Savage Blade without a care currently, and contribute fairly well. Warrior as a job with its Fencer trait and access to its damage dealer friendly job abilities, does this very well.
|


|
Axe Weaponskill Sets
Decimation & Ruinator
Decimation only gains physical accuracy with higher TP thresholds and as such doesn't benefit as much from a Fencer build. Given this fact, Decimation becomes a spam at 1,000 TP Weapon Skill.
The sets for Decimation herein can effectively be copy/pasted to Ruinator--the key difference being ruinator gains a 10% (1.1) attack bonus. To save time and space this subsection will be used for both weapon skills.
|
Mistral Axe & Calamity
- Given both Mistral Axe & Calamity's damage scale with TP, they both follow a similar gearing route as Savage Blade. However, for this section the focus will be on Dual Wield sets.
- So while sets can effectively be copypasta'd from the Savage Blade section above, let's see what differences pop up when using Offhand options.
|
|
Cloudsplitter
|
Club Weaponskill Sets
Judgment
- Judgment can essentially be geared the same as Savage Blade.
|
|
Great Sword Weaponskill Sets
Resolution
|


|
Shockwave
|