The Voracious Resurgence | |
| Prime Weapons • Ultimate Weapons • Ultimate Augments • Abjurations iL119 • JSE Necks • Divergence Augments • Escutcheons | |
| Reforged Armor Artifact: +1 • iL109 • iL119/+2/+3/+4 Relic: +1/+2 • iL109 • iL119/+2/+3/+4 Empyrean: +1/+2 • iL109 • iL119/+2/+3 |
Guides • Crafting • Trusts • Apex Monsters |
User:Cii/Sandbox
|
|
This is just intended to help with getting your summoner to the level where you can start seeing some nice numbers.
Recommended GS LUA (and helpful tools) by Pergatory: Link.
Getting Started
As a new level 99 SMN, I recommend focusing your efforts on the following:
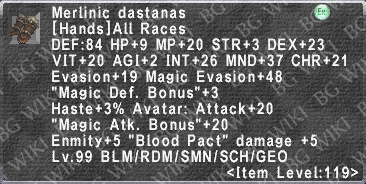
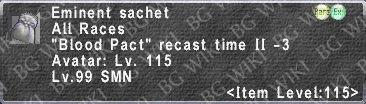
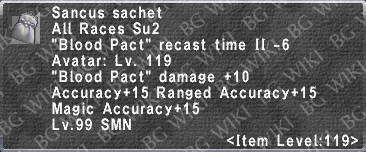
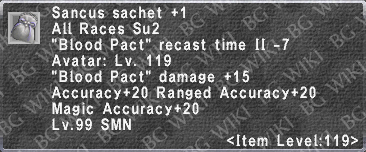
- Obtain an Epitaph or grab an Eminent Sachet while you work towards your 100 JP gift to equip a Sancus Sachet +1
- Create Blood Pact (BP) sets to improve your avatar's maximum damage per offensive ability
- Create a BP delay set to improve the frequency that you can perform Blood Pacts
- Create an idle set with enough Avatar perpetuation cost - to offset your avatar's constant MP drain/upkeep, and enough DT- to survive being hit with AOEs in content like Dyna D
- Obtain the 1200 JP Gift and eventually reach Master SMN
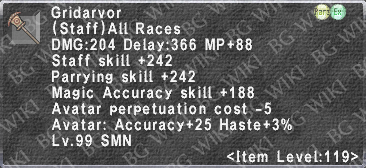
An additional note: Flaming Crush is going to be your highest damage Blood Pact against almost anything that doesn't resist it. Embrace Ifrit.
Merits
Group 1:
- Avatar Physical Accuracy: 0
- Avatar Physical Attack: 5
- Avatar Magical Accuracy: 0
- Avatar Magical Attack: 5
- Summoning Magic Cast Time: Do not merit this. Build a Fast Cast set instead.
You can switch Magical Attack to Physical Accuracy and vise versa if you feel like you are having a problem with accuracy for a certain Blood Pact that you're using often. A good example of this is for AFAC strategies on Reisenjima HELMS - Physical Accuracy is very important there because you almost exclusively use Volt Strike.
Group 2:
- Meteor Strike: 5
- Heavenly Strike: 1
- Wind Blade: 1
- Geocrush: 1
- Thunderstorm: 1
- Grand Fall: 1
You can merit whichever one of these you're using most often with the full 5 merits, Meteor Strike is recommended here because of the offensive power of Flaming Crush, and the ability to use Apogee to burst off of the skillchains it creates.
Good examples of times to merit other blood pacts: Geocrush for sortie bosses A and E magic burst strat, Thunderstorm if you're mostly attacking with Volt Strike from Ramuh, or Heavenly Strike if you're bursting on Darkness.
Idle Set
Most gearswap files will have a separate set for idling with and without your avatar.
This set is for the former, and the goal here is to reach the perpetuation cost cap of -14 MP/tic first and foremost.
Once you have reached the cap, avatars will cost at most 1 MP/tic, even with Avatar's Favor up, so your Auto Refresh will easily cover that.
- Reach the cap of -14 avatar perpetuation cost in pet idle set
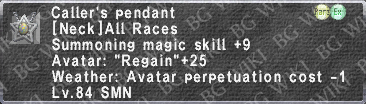
- Obtain a Caller's Pendant to grant your avatar free TP while standing around
- Fill the remaining slots on Refresh or defense stats afterward.
- Note that Avatar's Favor effects are tiered off based on total skill and Favor+ gear.
|
|


Some Notes:
Both of these sets should be somewhere around -40% DT- (and 10+ refresh!), so a simple swap of one piece (Bunzi's Pants for example) should be enough for your DT- set to be at or near -50%.
Evoker's Ring is good, but very skippable. Shadow Ring is a fairly easy to obtain tanky alternative for your second slot.
Most of the pieces listed above and hereafter are interchangeable with their NQ and HQ variants. Customize your set based on available gear.
Cheapest / Entry Damage Set
|
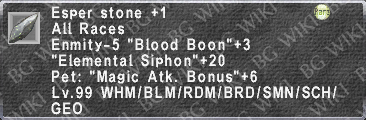
Other Useful Items
|


More Advanced Blood Pact Sets
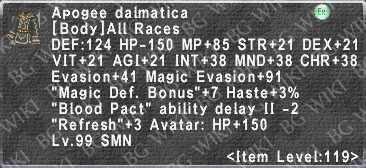
Blood Pacts are generally categorized as either physical or magical damage, with the exception that Ifrit's Burning Strike and Flaming Crush are considered hybrid damage.In the event you have a Nirvana and HQ Apogee pieces at hand, see Pergatory's LUA file above on gear choices while Garland's Aftermath is up.
- For physical BPs, you will want stats such as BP Damage, Accuracy, Attack, and Pet: Double Attack.
- For magical BPs, you will want BP Damage, Magic Attack, and perhaps Pet: TP Bonus. Avatars seem to have naturally high magic accuracy for their associated element
- For hybrid BPs, there is usually a mixture of physical and magical BP stats, with a heavy emphasis on the magical end.
None of these sets will include REMA weapons, or very expensive minor upgrades like +2 JSE necks.
|
|


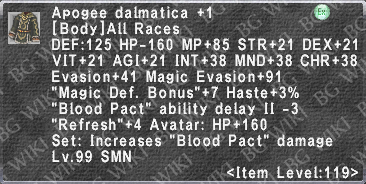
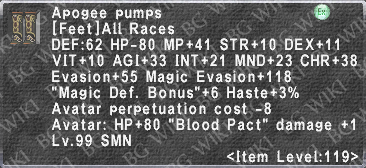
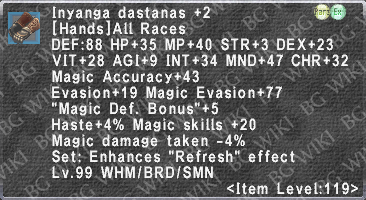
Some Notes: You can use Apogee Attire Set +1 boots and hat for your physical set, but with the Helios Attire Set being easily attainable, I'd really recommend against buying a second pair of Apogee +1 for physical unless you're made of money. The Helios is typically better anyways - just requires some time to augment.
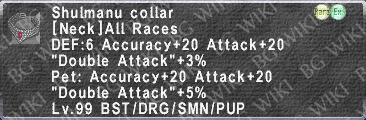
The Shulmanu Collar is probably not worth chasing just for SMN, as the Smn. Collar +1 is better when fully augmented. Its mostly in this set in case you already have one for a different job.
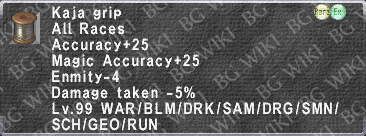
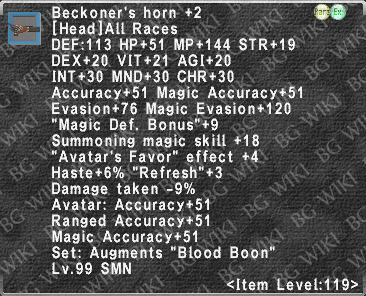
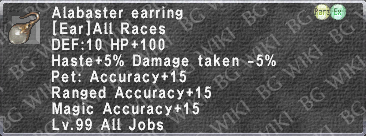
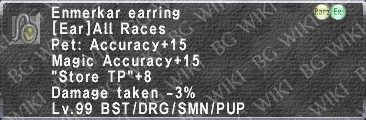
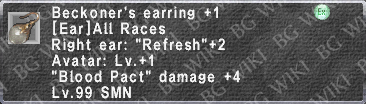
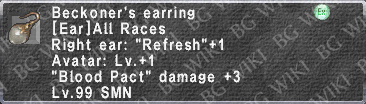
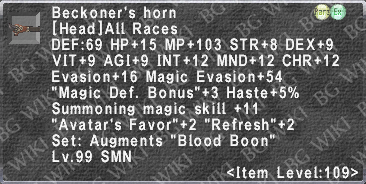
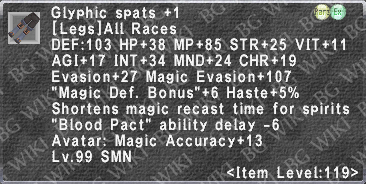
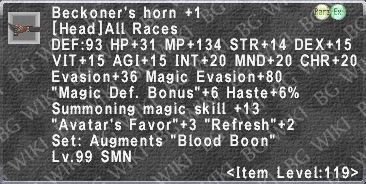
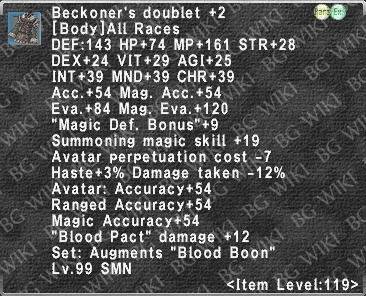
The Sroda Earring is BIS as long as you've got enough accuracy in your set. The only reason the Beck. Earring +1 is in mine is because the Glyphic Doublet +3 has 0 Pet: Accuracy.
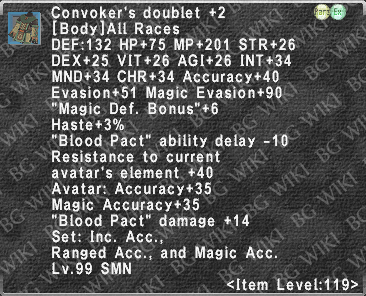
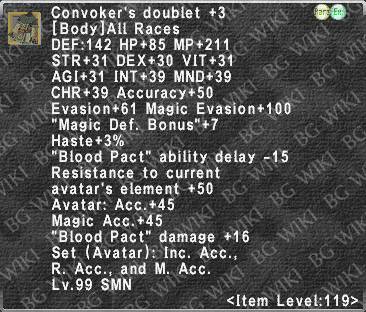
Lastly, with Apollyon points being so accessible due to ???'s being shouted out every 3 days or so, i'd really recommend getting the Con. Doublet +4. You don't ever need to make the Glyphic Doublet +3 like I have, because of previously mentioned accuracy issues.
|
|
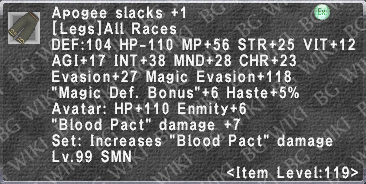
Some Notes: The Apogee Slacks +1 are only better than the Enticer's Pants if you have the blood pact fully merited, or have TP over 1500. You don't really need a second pair of these, just stick with the Enticer's Pants.
C. Palug Crown is BIS for magic/hybrid BPs, but its hard to obtain, so its not in my recommended set.
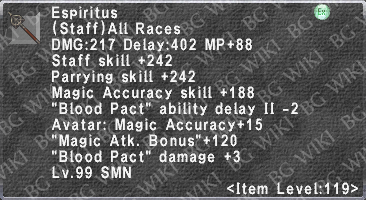
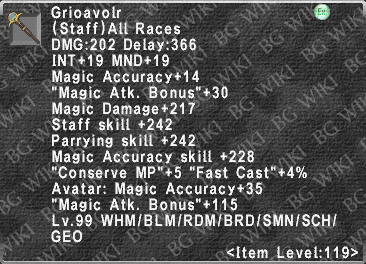
Grioavolr is only better than Espiritus with a near perfect roll, so its not worth going for unless you really enjoy the job.
|
|
Some Notes:
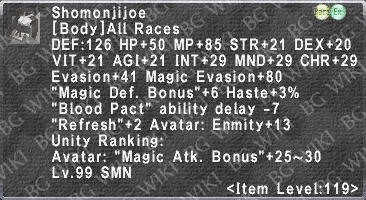
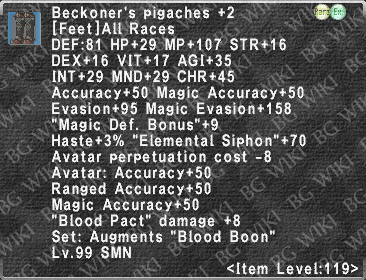
The most important stat for Flaming Crush is Blood Pact Damage, as its counted twice: once on the physical hits, and once on the magical. That's the the Gelos Earring is recommended over the Beck. Earring here. Of course, if you already have a Beck. Earring, there's no reason to do the quest for the Gelos Earring. The damage difference is pretty minimal.
C. Palug Crown is BIS for magic/hybrid BPs, but its hard to obtain, so its not in my recommended set.
Grioavolr is only better than Espiritus with a near perfect roll, so its not worth going for unless you really enjoy the job.
Apogee Slacks +1 (Path A) should be more damage than (Path D) for Flaming Crush. However, (Path D) is fine, so this upgrade is fairly unnecessary. With this same logic, the Apogee Dalmatica +1 may be similar damage to the Con. Doublet +4 - but the extra +60 accuracy on that top plays a huge role for Flaming Crush. If you miss either of the initial melee hits, your overall damage will completely plummet, because the magic hit's damage is based on the first two hits' damage.
Do not fret if you are missing the Omen/Vagary accessories; the bulk of your avatar's damage comes from your armor and weapon choices.
BP Delay Reduction Gear
Blood Pact delays have a combined cap of -30 seconds from player gear and gifts, and no more than -15 seconds can be applied per delay tier.
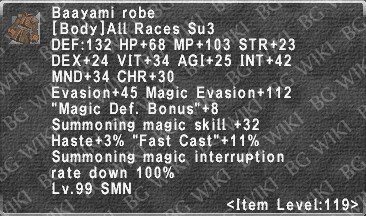
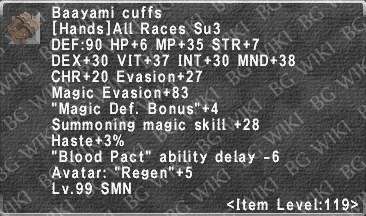
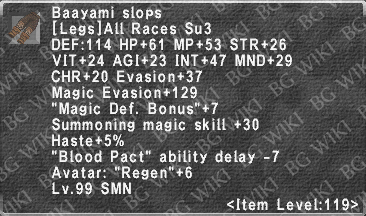
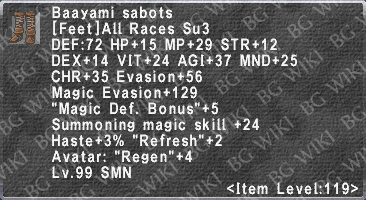
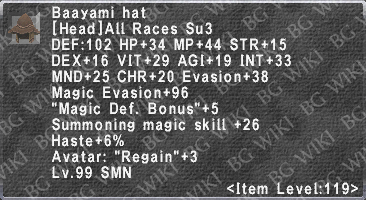
Once you have obtained the 500 JP (Superior 3) gift, the HQ Sancus Sachet and Baayami Attire Set can help you reach the BP delay cap while providing copious amounts of Summoning Magic Skill.
An Espiritus can provide additional BP delay II if you do not mind potentially losing TP on swapping weapons.
- Reach the cap of -30 seconds through gear and JP gifts
- Fill remaining slots with Summoning Skill and Favor+ gear to improve Avatar's Favor tier - the final 'tier' is at 670+ total skill.
NOTE: Depending on your gearswap file, your BP delay set may be listed as a precast or midcast set.
The delay set should equip as soon as a BP command is sent, and similarly, your BP damage sets should equip once your avatar begins its BP animation.
Some Notes: More than fully capped BP delay with 1200JP, plus 676 Summoning Magic Skill at ML22 |
|
|
|
|
|


Buff Duration / Summoning Skill Scaling Sets
Some Notes:
|
Some Notes:
|
|


SMN at a Glance
Here is where I attempt to answer questions and grossly generalize SMN at the same time:
Skillchains and Magic Bursts
Physical and Hybrid BPs are analogous to player WSs and each have their own skillchain properties.
Magic BPs are analogous to player spells and can be used in a magic burst.
In general, there is a short delay between using a BP command when the BP is executed, so time your BPs accordingly.
| Solo Skillchains (2-Step) | |||
|---|---|---|---|
| Opening WS | Closing WS | Skillchain | Magic Burst1 |
| Solo Skillchain (3-step) | ||||
|---|---|---|---|---|
| Weapon Skill #1 | Weapon Skill #2 | Skillchain #1 | Weapon Skill #3 | Skillchain #2 |
|
1 Requires Apogee to BP twice in a row | ||||
| Multi-SMN Skillchains | |||
|---|---|---|---|
| Opening WS | Closing WS | Skillchain | Magic Burst |
Blood Pacts and when to use them
A summary of useful BPs I have encountered for solo and group play. This list is not exhaustive.
| I really need to... | |||
|---|---|---|---|
| Blood Pact: Rage | Blood Pact: Ward | Potential Uses | |
| Cleave targets | |||
| Curb enemy offense |
| ||
| Buff party's offense |
|
| |
| Buff party's defense |
|
| |
| Dispel enemy buffs | |||
| Sleep nearby enemies | |||
| Stun the enemy |
Helps Gessho tank CP mobs. Dynamis - Divergence | ||
| Heal my party |
Self-explanatory. | ||
| Remove status ailments |
Self-explanatory. | ||
| Run really fast |
Self-explanatory. | ||
| Give party member Reraise |
Self-explanatory. | ||
| Deal hybrid damage |
Best damage while unresisted - check your monster beforehand. Fire/Magic/High Melee resist will chunk your damage. - example: Dynamis - Bastok (D)(Green pull only)/Dynamis - Jeuno (D) | ||
| Deal melee damage |
| ||
| Deal magic damage |
| ||
|
2 Requires Astral Flow to activate BP | |||
AFAC Strategy
Given the large amount of pet stats gained from SMN gifts and JP categories, I highly recommend maxing the Astral Flow/Astral Conduit effects and acquiring all the physical BP related stats (1710+ JP) prior to attempting an AFAC.
Secondly, if you are using Gearswap, ensure that you are not accidentally swapping into a precast or aftercast set during Astral Conduit.
At the time of this writing, Pergatory's LUA will equip an idle set following conduit BPs and assumes the user will stagger BPs approximately 1.25 seconds apart.
If this proves inconvenient, you may opt to equip your BP set and //gs disable all during Astral Conduit [or] add code to disable his idle() function calls while conduit is up.
Generic AFAC Algorithm
- Receive pre-fight buffs
- Activate Avatar's Favor
- If using 119 Nirvana, build 3000 TP and gain AM3 on fodder
- Pop NM
- Wait for GEO bubbles and offensive spells/JAs
- Hit Astral Flow
- Hit Astral Conduit
- Spam BPs
- Receive Mana Powder / Mana Mist during Astral Conduit from back line jobs if in Escha zone
- Watch your mana bar closely during your AFAC, and hit Convert if you ever drop below 300 - the goal is to get through two full mana bars during your AFAC if possible
- Once Astral Conduit wears:
- Apogee, then BP (x2)
- Reset Apogee and Astral Flow + Astral Conduit via COR JAs and/or Super Revitalizer if in Escha zone
- Repeat until you or the boss dies
| Job Summary | |||||||||
|---|---|---|---|---|---|---|---|---|---|
| Blood Pact | SMN Food | Indi-Spell | Geo-Spell | Entrust | Offensive spells | COR Roll #1 | COR Roll #2 | RUN JAs | BRD Songs |
| Indi-Torpor | Geo-Frailty | Defensive spell or Indi-Refresh | Dia II + Impact | Beast Roll | Drachen Roll | Odyllic Subterfuge | Ballads | ||
| Flaming Crush |
Indi-Frailty | Geo-Malaise | Indi-Torpor or Indi-Languor | Dia II + Impact | Beast Roll | Puppet Roll | Ballads + Fire Threnody | ||
| Indi-Languor | Geo-Malaise | Defensive spell or Indi-Refresh | Impact | Puppet Roll | Companion's Roll | Ballads + Fire Threnody | |||
|
Impact, Odyllic Subterfuge, and Refresh effects may be omitted based on NM and groups' comfort zone. | |||||||||
Just use grape daifuku - there are other food options, but grapes are good for everything. | |||||||||
Acknowledgements
I took some of this straight from Prismfang's Sandbox, (especially the bottom half with info on what pacts do - I think its much nicer than having two pages open), with edits based on what I think is most realistic for someone newish to the job in 2025-2026.
Thanks to Pergatory of Asura for providing constructive feedback and all the SMNs on the FFXIAH.com forums for sharing their knowledge.
