The Voracious Resurgence | |
| Prime Weapons • Ultimate Weapons • Ultimate Augments • Abjurations iL119 • JSE Necks • Divergence Augments • Escutcheons | |
| Reforged Armor Artifact: +1 • iL109 • iL119/+2/+3/+4 Relic: +1/+2 • iL109 • iL119/+2/+3/+4 Empyrean: +1/+2 • iL109 • iL119/+2/+3 |
Guides • Crafting • Trusts • Apex Monsters |
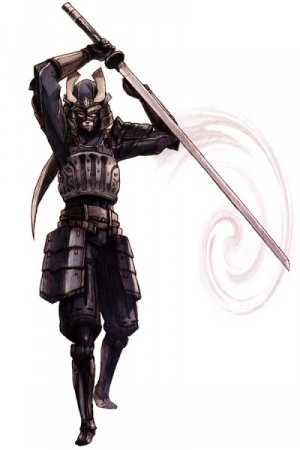
Community Samurai Guide
|
Latest Updates
- Slowly parsing through, and updating section by section, best as I can. --Brahmsz (talk) 08:31, 1 October 2025 (UTC)
- Added Food & Medicine section, to bring in line with other more recent guides. Corrected small errors and tighted up some explanations. Moved the Skillchain section from the bottom of the guide for quicker reference. --Brahmsz (talk) 16:39, 3 October 2025 (UTC)
- Still to be done:
- Weaponskill section: WIP.
- Armor Sections (TP, Hybrid TP, DT & MEva, Utility).
- JSE: Updated.
General Information
Available after completing the quest Forge Your Destiny, the Samurai (SAM) job focuses on the mastery of weapon skills and skillchains. Samurai excel at the use of Weapon Skills due to their ability to rapidly gain Tactical Points and use them to their advantage. Their mainstay weapon is the Great Katana, but they also have respectable skill in Polearms and Archery.
Take this mumeito. This blade was forged fer ya. Pledge your life t' her an' she won't let ya down. - Gilgamesh
Roles
Warriors from the Far East. Demon Killers. Samurai are experts in wielding the Great Katana and manipulating Tactical Points, allowing the player to unleash a flurry of skills on their enemies quicker than any other class in Vana'diel. A Samurai's primary and most effective role is dealing high frequencies of damage. Samurai's versatility lies in the ability to output high bursts of damage with various abilities and traits that enable them to use Weapon Skills more frequently than any other job.
Introduced in the Rise of Zilart expansion pack/North American launch, Samurai was originally imagined as a tank counterpart to Paladin. The playerbase however... upon seeing Samurai's TP manipulation and damaged potential reinterpreted the job as a DPS. The rest is history.
Food & Medicine
Food
Accuracy Options:
- HP+20, STR+2, VIT+3, Acc./R.Acc.+10% (Max. 80), Att./R.Att.+10% (Max. 50), MAB+3.
- Purchased from the Curio Moogle for 4,000 gil, 48,000 a stack.
- HP+20, STR+2, VIT+3, Acc./R.Acc.+10% (Max. 80), Att./R.Att.+10% (Max. 50), MAB+3.
- DEX/MND+7, Acc./R.Acc.+20% (Max. 70), Eva./M.Eva.+12% (Max. 60).
- Purchased from the Auction House. Crafted only.
- DEX/MND+7, Acc./R.Acc.+20% (Max. 70), Eva./M.Eva.+12% (Max. 60).
- HP+40, MP+20, STR/CHR+6, DEX+7, MND-3, Acc./R.Acc.+10% (Max. 100), Resist Slow+1.
- Purchased from the Auction House. Crafted only.
- HP+40, MP+20, STR/CHR+6, DEX+7, MND-3, Acc./R.Acc.+10% (Max. 100), Resist Slow+1.
Attack Options:
- Att./R.Att.+23% (Max. 150), Demon Killer+4.
- Purchased from the Curio Moogle for 7,000 gil, 84,000 a stack.
- Att./R.Att.+23% (Max. 150), Demon Killer+4.
- Att./R.Att.+20% (Max. 130), Eva./M.Eva.+12% (Max. 60).
- Purchased from the Auction House. Crafted only.
- Att./R.Att.+20% (Max. 130), Eva./M.Eva.+12% (Max. 60).
- HP+14% (Max. 175), MP+10, STR+4, VIT+2, INT-3, Att.+17% (Max. 65), Store TP+6.
- Purchased from the Curio Moogle for 4,000 gil, 48,000 a stack.
- HP+14% (Max. 175), MP+10, STR+4, VIT+2, INT-3, Att.+17% (Max. 65), Store TP+6.
- DEX/VIT/CHR+6.
- Enhances Riceball Effect Equipment Att.+60, Def.+40, Triple Attack+1. (Per Equipment Piece. Must stay equipped!)
- Purchased from the Auction House. Crafted only.
- DEX/VIT/CHR+6.
Specialty Options:
- Acc./R.Acc+14% (Max 90), Att./R.Att+18% (Max. 80), Amorph Killer+5.
- Purchased from the Auction House. Crafted only.
- Acc./R.Acc+14% (Max 90), Att./R.Att+18% (Max. 80), Amorph Killer+5.
- HP+90, Acc./R.Acc/M.Acc.+90.
- Purchased from the Auction House. Crafted only.
- HP+90, Acc./R.Acc/M.Acc.+90.
- Double Attack+5%, Weaponskill Damage+5%.
- Purchased from the Auction House. Crafted only.
- Double Attack+5%, Weaponskill Damage+5%.
Defense Options:
- HP+11% (Max. 150), VIT/MND+7, Acc.+11% (80), Def.+11% (120), Enm.+4.
- Purchased from the Auction House. Crafted only.
- HP+11% (Max. 150), VIT/MND+7, Acc.+11% (80), Def.+11% (120), Enm.+4.
Medicines
 Antidote: Cures Poison.
 Echo Drops: Cures Silence.
- Antidote: Cures Curse, Bane, and Doom (Sometimes).
 Remedy: Cures most status effects covered by -na line. (Virus/Plague and Curses/Doom not included)
 Panacea: Cures most status effects curable by Erase.
 Vile Elixir: Emergency heal (50% HP).
 Vile Elixir +1: Emergency heal (FULL HP).
 Antacid: Clears current food status.
 Reraiser
 Hi-Reraiser
 Instant Reraise
 Instant Reraise III
Job Traits and Job Point Gifts
Job Traits
The following table specifically lists the Job Traits of a level 99 Samurai and their effects at that level. For more information about these Job Traits (ei. their tiers and the respective levels they are granted), each is linked to their BG-Wiki page. These Job Traits are the defining qualities of Samurai: a fast TP-generating front-line Physical Damaged Dealer with strong Weapon Skills and access to a variety of Skillchain properties.
| Job Traits | |
|---|---|
| Resist Blind | 30% chance of fully resisting Blind. |
| Store TP | +30 Store TP at level 99, merits add two each (five total, +10). |
| Zanshin | +50% rate at level 99, merits add +1% each (five total, +5%). |
| Demon Killer | 10% intimidation rate against Demons. |
| Ikishoten | +30 Base TP (before Store TP) to Zanshin per merit level (five total, +150). |
| Overwhelm | +5% Weapon Skill Damage for the first three merit levels, and +2% for the subsequent levels (Total: +19%). |
| Skillchain Bonus | Skillchain Damage Bonus. Grants +16% at level 98. |
Job Gifts
| Gift | Cumulative Bonus |
|---|---|
| Capacity Point Bonus | 320% |
| Physical Defense Bonus | 70 |
| Physical Attack Bonus | 70 |
| Physical Evasion Bonus | 43 |
| Physical Accuracy Bonus | 36 |
| Magic Evasion Bonus | 36 |
| Magic Accuracy Bonus | 36 |
| "Zanshin" Effect Bonus | 10% |
| Hasso and Seigan Effect | Increases Maximum Zanshin effects by 10% |
| Skillchain Bonus | 6% Skillchain Bonus |
| Superior 1 | Enables the player to equip items marked as Superior 1 (Su1) |
| Superior 2 | Enables the player to equip items marked as Superior 2 (Su2) |
| Superior 3 | Enables the player to equip items marked as Superior 3 (Su3) |
| Store TP Effect | 8% Store TP |
| Third Eye Effect | Increases the number of evasions from Third Eye by 1 |
★Job Mastery: Attained after investing 2,100 Job Points. Grants the designation "Master Mononofu." Decreases the recast time of one-hour abilities by 15 minutes.
Job Abilities, and Merit Abilities/Traits
Notes on Hasso & Seigan
Samurai makes use of two distinct Job Ability Stances: Hasso and Seigan.
- Primarily, these two stances focus on the Samurai's damage output or survival. Both stances increase magic casting and recast timers by +50%. Hasso and Seigan share an ability timer, and as such only one may be active at a time.
- Hasso increases your physical attack speed (+10% Job Ability based Haste) and grants minor bonuses to STR and Physical Accuracy (+10 each).
- Seigan reduces the recast timer of Third Eye to 30 seconds. Seigan+Third Eyes also negates multiple physical attacks while active (similar to Blink and Utsusemi) and the chance to counter enemy attacks as well.
Job Abilities
Base Abilities The majority of Samurai's abilities are focused on increasing your offensive attributes.
- Warding Circle grants you +15% for: damage against demons, resistance against demons, and some degree of Demon Killer.
- Meditate grants you a passive 200 TP/tick generation, for a total of 1000 TP gain (can be increased by gear).
- Sekkanoki makes your next Weaponskill consume only 1000 TP. Weaponskills used with Sekkanoki active will only count as 1000TP potency (also affected by gear).
- Konzen-ittai "readies your enemy for a skillchain". What this means is, it will treat the enemy as if it has been hit by a weaponskill once, and the next weaponskill will trigger a skillchain.
Merit Abilities and Traits (Lv.75+)
- Shikikoyo is the first of your merited abilities. It will grant any TP above 1000TP that the Samurai has, and transfer it over to another player. Example scenario is listed in the corresponding page.
- Blade Bash is an attack that deals no damage, but has a chance to stun the enemy and inflict plague.
- Sengikori grants a bonus to skillchain damage if used on an opening weaponskill; otherwise will grant bonus magic burst damage if used on a closing weaponskill.
- Hamanoha is specifically for demons, and will debuff them with -20 accuracy, evasion, magic accuracy, magic evasion and Store TP.
- Hagakure grants your next WS with 400 Save TP and 1000 TP Bonus.
Merits
| Group I | Effect |
|---|---|
| Third Eye Recast | Shorten recast time by 2 seconds per merit level each. 1 minute recast (30 second recast with Seigan active). |
| Warding Circle Recast | Shorten recast time by 10 seconds per merit level. 5 minute recast. |
| Store TP Effect | Increases the amount TP returned by 2 TP per merit level. |
| Meditate Recast | Shorten recast time by 6 seconds per merit level. 3 minute recast. |
| Zanshin Attack Rate | Increases Zanshin attack rate by 1 percent per merit level. |
Group I Merit Recommendations:
- 5/5 Zanshin Attack Rate *
- 5/5 Store TP Effect
Note: STP is a must. SAM relies heavily on large amounts of STP to have ideal "x-hit" builds. Other alternatives may seem attractive, but aren't as potentially beneficial. With the currently available gear, Zanshin Attack rate is considered your priority. Alternatively, could put some points into meditate recast.
| Group II | Effect |
|---|---|
| Shikikoyo | Share TP above 1000 with a party member. 5 minute recast. |
| Blade Bash | Delivers an attack that can stun the target and occasionally causes Plague. 3 minute recast. |
| Ikishoten | Adds 30 base TP (before Store TP) to Zanshin procs per merit level. |
| Overwhelm | Grants +5% Weapon Skill Damage when directly facing the enemy for the first three merit levels, and +2% for the subsequent merit levels. |
Group II Merits Recommendations:
Note: Overwhelm is a must. That said, Ikishoten can allow some leeway for Shikikoyo and Blade Bash. Shikikoyo's effect can be useful for pre-fight prep for your fellow DD, Blade Bash can potentially inflict plague and/or stun. It's not a bad idea to have one point on each, but not necessary. Up to you.
Support Jobs
Based on your play style and/or the current Content you're participating in (along with what weapons you have access to), Support Jobs will vary:
 Warrior is usually first and most accessible option for DPS, due to abilities such as Berserk and Warcry, as well as its innate Double Attack trait (Lv.25) and fairly early access to the Smite trait (Lv.35).
 Dragoon has become the endgame subjob choice with its unique WS Damage Boost (a free +7% WSD multiplier) trait starting at lv.45. High Jump is an excellent hate management tool in a tight spot as well as extra dmg/tp. Conserve TP is also nice too!
 Dark Knight is an alternative option that focuses on higher physical attack. Earliest access to the Smite trait (Tier I Lv.25, Tier II Lv. 35). Your Mileage May Vary based on party buff support scenarios.
 Ninja is your ideal alternative for survivability if you have to depend on shadows. Suffice to say, if you're using Hasso/Seigan, make sure to have a decent Fast Cast/Utsusemi set.
 Rune Fencer is your ideal alternative for survivability if you have to depend on mitigating elemental damage and shadows aren't an option.
Weaponskills & Skillchains
Weaponskills
- Work in Progress
Notes on Skillchains
No Samurai is complete without some SC (Skillchain) knowledge. Period.
Skillchaining is important due to the extra damage they provide--much more than your weaponskills by themselves. "Multi-stepping" (creating/building multiple skillchains off of previous skillchains) exponentially increases their damage each step further. The window to create a following skillchain step becomes shorter each time. Initially, the window for a skillchain starts at 10 seconds between weaponskills. Each step reduces that window by about two (2) seconds, until you reach a maximum window of three (3) seconds.
Overall, thanks to massive amounts of Store TP (and various ways to gain it), it's easy to multi-step by yourself.
All Weaponskill properties have a priority order.
- Level One properties can be linked together to create Level Two skillchains, and Level Two properties can be linked together to create Level Three skillchains.
- Level Three properties can only ever be matched (Light ←/→ Light and Darkness ←/→ Darkness) to make a Level Three skillchain.
- Empyrean and Relic weaponskills are the only WS's with a Level Three (Light or Darkness) property.
- With an Aeonic Weapon equipped, their merit equivalent weaponskills gain a Light or Darkness property. They are also the only weapons able to create Level Four skillchains (Radiance and/or Umbra), stronger more advanced versions of Level Three skillchains.
So, if a WS has a secondary property you wish to use, it won't work unless the primary property is ignored to make a skillchain first. (see below)
Skillchain Properties and How They Connect
Level 1 → 2:
 Liquefaction →
  Impaction =
  Fusion
 Induration →
  Reverberation =
  Fragmentation
 Detonation →
  Compression =
  Gravitation
 Transfixion →
  Scission =
  Distortion
Level 2 → 3:
- Gravitation → Fragmentation = Fragmentation
- Distortion → Fusion = Fusion
- Fusion → Gravitation = Gravitation
- Fragmentation → Distortion = Distortion
- Fusion ↔ Fragmentation =
 Light
Light - Gravitation ↔ Distortion =
 Dark
Dark
Level 3:
- Light ↔ Light = Light
- Dark ↔ Dark = Dark
- You can make a double Light or Darkness skillchain, but they must be built up from a Level 2 → 3 skillchain. This results in a Level Three, followed up the matching Level Three property to create the second Light or Darkness.
- Level Three skillchains can not make double Light or Darkness off of themselves.
- You can make a double Light or Darkness skillchain, but they must be built up from a Level 2 → 3 skillchain. This results in a Level Three, followed up the matching Level Three property to create the second Light or Darkness.
Suggested Skillchains
Note: ![]() denotates the need of Dojikiri Yasutsuna to continue the SC.
denotates the need of Dojikiri Yasutsuna to continue the SC.
- Light Skillchains
 Tachi: Shoha → Tachi: Shoha = Light
- Tachi: Shoha → Tachi: Kasha (Light) → Tachi: Fudo = Light
- If using , ends in Radiance.
- If using
- Tachi: Fudo → Tachi: Kasha (Fusion) → Tachi: Shoha (Light) → Tachi: Fudo = Light
- If using , ends in Radiance.
- If using
- Tachi: Shoha → Tachi: Fudo (Distortion) → Tachi: Kasha (Fusion) → Tachi: Shoha (Light) → Tachi: Fudo = Light
- If using , ends in Radiance.
- If using
- Tachi: Ageha → Tachi: Yukikaze (Detonation) → Tachi: Kasha (Gravitation) → Tachi: Shoha (Fragmentation) → Tachi: Kasha (Light) → Tachi: Fudo = Light
- If using , ends in Radiance.
- If using
- Darkness Skillchains
- Tachi: Rana ←/→ Tachi: Fudo = Darkness
- Tachi: Shoha → Tachi: Fudo (Distortion) → Tachi: Rana = Darkness
- Tachi: Kasha → Tachi: Rana (Gravitation) → Tachi: Fudo = Darkness
- Tachi: Rana → Tachi: Shoha (Fragmentation) → Tachi: Fudo (Distortion) → Tachi: Rana = Darkness
- Tachi: Ageha → Tachi: Yukikaze (Detonation) → Tachi: Kasha (Gravitation) → Tachi: Fudo = Darkness
Weapons
Samurai, generally, will exclusively use Great Katana, and occasionally, Polearm. Most players goal will Samurai's Ultimate Weapons (or as they're more commonly known, PREMA, which will be covered later).
Great Katanas
While REMA is arguably "the ideal", there are various weapons leading up to these that will assist you in the process of gearing up Samurai.
- JSE Weapon obtained from Oboro.
- Can be further augmented to provide Accuracy +70, Weaponskill Damage +5%, Double Attack +5%.
- At best, this weapon functions as a stepping stone for better alternatives.
- Penultimate step of the ambuscade weapon upgrade line for Great Katanas.
- Comparable to Ichigo or Umaru.
- That said, lack of store TP and Zanshin bonus may affect your TP gain by a variable margin, so you'll want to take this into consideration when gearing.
- Tachi: Kasha bonus lends this weapon to more potent light skillchain combinations.
- Final upgrade in the ambuscade weapon GK line.
- Grants an amount of multi-attack dependent on total +Store TP--where +1sTP = 1% Double Attack up to 100, 101~200 adds +1% Triple Attack and 201+ adds Quadruple Attack.
- As an example, a Samurai with +137sTP would have 100% DA and 37% TA.
- A multi-hit swing will fix your TP/Hit to 127, so two hits will be 254, so on. Refer to item page for details.
- This means that your outgoing damage is potentially greater because of increased number of swings, but you'll also feed the enemy TP in the same way. Exercise caution.
- Possible reward from Brittlis, an Escha - Zi'Tah T2 NM.
- A good starter GK for those entering into Escha for the first time.
- Augment with Path A, for accuracy and Store TP.
- Possible weapon drop from Kammavaca, an Escha - Ru'Aun T2 NM.
- Augment Paths:
- Path A for pure damage (if/when accuracy isn't a concern).
- Path B or C depends on your accuracy needs (B would be better, as 5 accuracy can be made up for elsewhere and 20STR will be a bigger benefit than 20 attack).
- Weapon drop from Sarsaok, a Reisenjima T2 NM.
- Augmented via Oseem, via use of various stones.
- Ideally, your upgrades would reflect DMG+20 or higher, STR+10 or higher, Acc/Atk.+20 or higher, and the special ability could vary.
- Of these special abilities, beneficial ones could be Double Attack, Weaponskill Damage, or Store TP.
- Arguably, a well-augmented Umaru is your best non-REMA weapon (marginally edging out Ichigo). However, the cost involved for those random augments might not be worth the investment. Take this into consideration.
- Possible Coffer Reward from Unity NM Volatile Cluster.
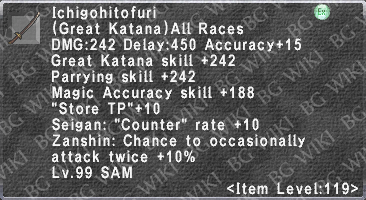
- Otherwise referred to as "Soboro 119", this weapon effectively fills the same role as its predecessor.
- This is a situational GK, you will not be maining this unless you're doing sub-objectives on Omen, or need a low dmg, high atk rate GK.
- Note: Don't sweat it if you don't get "perfect" augments - you can always keep trying later on. These are just guidelines.
Polearms
SE decided polearms are back in business.
Ambuscade weapons shook the meta a fair bit, making them more viable for content with appropriate gear.
With the release of Odyssey, multiple damage types are crucial. As such, these are your options.
- Penultimate step of the ambuscade weapon upgrade line for polearms.
- Grants the Impulse Drive.
- Lacks the crit modifier provided by Shining One, but still includes the damage boost to Impulse Drive.
- While you won't see the massive damage spikes granted by the crit rate buff of Shining One, it's still fairly respectable damage.
- Final result of the ambuscade weapon upgrades for polearms.
- Does comparable damage to high-end weapons with a proper weapon skill set utilizing Impulse Drive.
- High crit rate bonus mechanic; WS over 2000 TP averages at least a crit WS every other attempt.
- Best available polearm at this time.
![]() Exalted Spear / +1:
Exalted Spear / +1:
- Crafted.
- Requires Su2, which means you won't be allowed to equip it until you've invested a minimum of 100 Job Points.
- Your only other "real" alternative, this spear doesn't have nearly the same power as the above, but grants you access to Wheeling Thrust (for SC purposes, at best) and provides a fair amount of accuracy and weapon skill accuracy.
![]() Raetic Halberd / +1:
Raetic Halberd / +1:
- Crafted.
- Requires Su3, which means you won't be allowed to equip it until you've invested a minimum of 500 Job Points.
- Ideal use in scenarios where the fight is a short zerg and you can maintain the MP mechanic throughout. +1 shines thanks to the benefit of the added Store TP.
Ultimate Weapons 'PREMA'
![]() Amanomurakumo (Level 119 III):
Amanomurakumo (Level 119 III):
- This is Samurai's Relic Weapon.
- This weapon grants the user the weaponskill Tachi: Kaiten and gives 40% increase in damage when used (at 119-III).
- Hidden Effect: Does 2.5x Damage on the first swing of an attack round 16% of the time (will not proc on multi-attack hits).
- High accuracy can make this situationally useful.
- Aftermath grants Store TP+10 and Zanshin+10 for its duration.
- Afterglow gives an Accuracy/Ranged Accuracy boost (+15) to party.
- Additional Effect: Attack Down has a 10% chance to proc on melee hits and can overwrite itself.
![]() Kogarasumaru (Level 119 III) :
Kogarasumaru (Level 119 III) :
- This is Samurai's Mythic Weapon.
- This weapon grants the user the weaponskill Tachi: Rana and gives 30% increase in damage when used (at 119-III).
- Aftermath grants a different effect based on amount of TP. Level 1 grants accuracy for 1.5 minutes, Level 2 grants attack for 2 minutes, and Level 3 grants Occ. Attacks Twice (40%) or Thrice (20%) for 3 minutes.
- Afterglow gives an Attack/Ranged Attack boost (+15) to party.
- "Enhances Third Eye effect V" provides the following:
- Increases anticipation rate about 15%.
- Increases the rate of counters by 25%.
- This is Samurai's Empyrean Weapon.
- This weapon grants the user the weaponskill Tachi: Fudo.
- Aftermath grants varying degrees of triple damage rate, for different durations, depending on amount of TP. Level 1 grants 30% rate for 60 seconds, level 2 grants 40% rate for 120 seconds and level 3 grants 50% rate for 180 seconds.
- Afterglow grants a Critical Hit Rate boost (+5%).
- This is Samurai's Aeonic Weapon.
- Allows the user to perform an Ultimate Skillchain.
- This weapon grants the user the Merit Point weaponskill Tachi: Shoha at full "Rank 5" strength with no merit points invested.
- Aftermath grants Skillchain and Magic Burst potency increase, and varies by the amount of TP the user has. More details at Aeonic Aftermath page.
- This is Samurai's Prime Weapon.
- This weapon grants the user the weaponskill Tachi: Mumei.
- Hidden Effect: Stage four (119 II) Deals 2x Damage. Stage five (119 III) deals triple damage similar to Relic weapon.
- Aftermath grants a scaling bonus to Physical Damage Limit up to 10%.
In summary:
- In terms of PREMA, Masamune, Dojikiri, and Kusanagi are high value goals for any Samurai player. Each weapon can potentially edge the other out in terms of DPS depending on the activity, gear, and buffs used.
- Masamune beats Dojikiri in raw physical damage--with Tachi: Fudo as your main WS.
- Dojikiri beats Masamune in magical & skillchain damage--with Tachi: Jinpu as your main WS.
- Kusanagi should perform similarly to Masamune, but does lose ground with its Double Attack+10% stat. This is of course with Tachi: Mumei as your main WS.
- Amano and Koga aren't recommended as often as a result, for particular reasons:
- Amano provides good accuracy, and is useful for situations where you need that extra push. The damage is solid, and Kaiten is a good weaponskill. The aftermath isn't awful, but it's not great, especially in an era where so much STP gear exists. As such, it is at best considered "adequate".
- Koga used to be considered the best of its kind.. however, due to the flourishing of multi-attack gear (QA/TA/DA), the aftermath effect that made it stand out is now far less noticeable. The Third Eye effect isn't particularly amazing (it's nice to have, but that's it). Tachi: Rana is an okay weaponskill.. it's outperformed for physical direct physical damage (like most Great Katana weaponskills) by Tachi: Fudo.
Job-Specific Equipment
Samurai's Artifact, Relic and Empyrean armors are particularly key towards different facets of your abilities. JSE serve different purposes, some as key relevant pieces and some as simple macro swap.
Priorities and reasoning will be included with each piece.
Artifact Armor
| Wakido Armor Set | ||
|---|---|---|
| Item | Upgrade? | Notes |
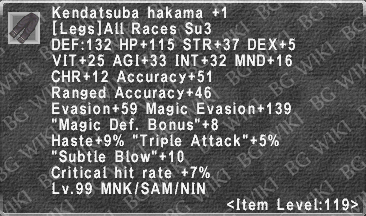
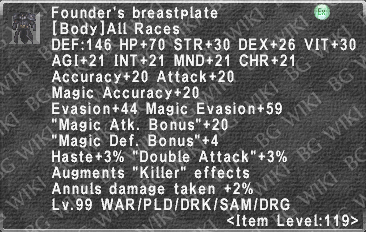
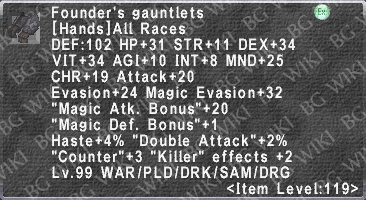
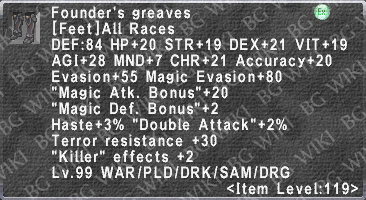
Wakido Kabuto +4 
|
Maybe | Offers an extra two ticks of Meditate. Current highest Regain rate attainable in slot. Use case for Artifact "Max. Accuracy Build." Also, serves as a swap-in piece for extending the duration of Warding Circle. Your Mileage May Vary. |
Wakido Domaru +4 
|
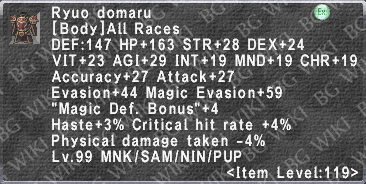
Yes | Remnants of Samurai's tank origins. While not the highest amount of Damage Taken-% or Store TP+ in slot, is a good consideration for alternative Hybrid DT-% TP gear builds. |
Wakido Kote +4 
|
Yes | A fundamental part of Samurai TP builds, due in part to the additional Job Ability-based Haste granted while under the affect of Hasso. High priority. |
Wakido Haidate +4 
|
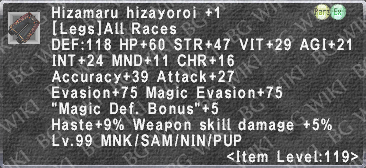
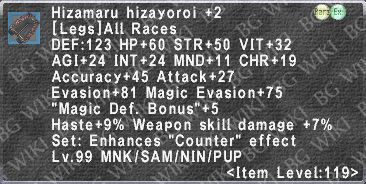
Yes | Second highest Weaponskill Damage piece in slot--second only to max augment Nyame Flanchard. Until +3 stage, a pair of Hiza. Hizayoroi +2 will outperform them. High priority. |
Wakido Sune. +4 
|
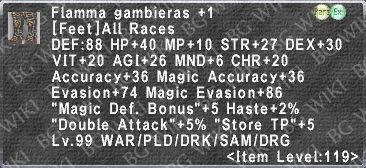
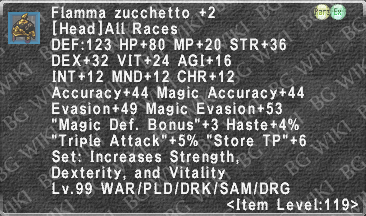
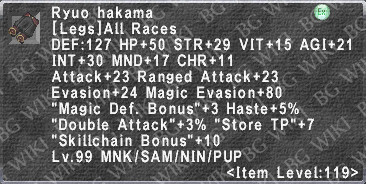
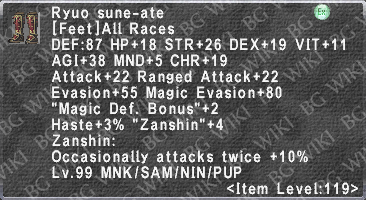
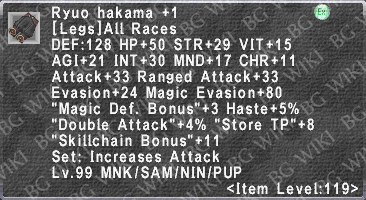
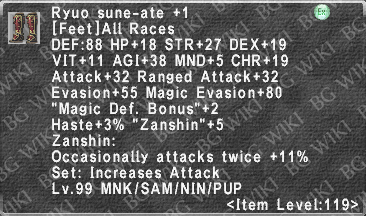
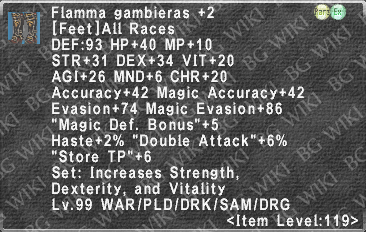
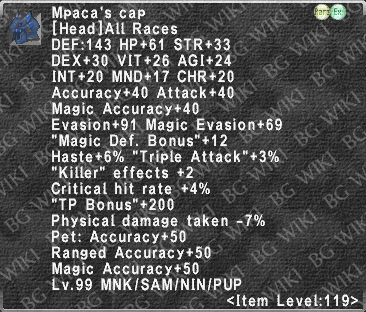
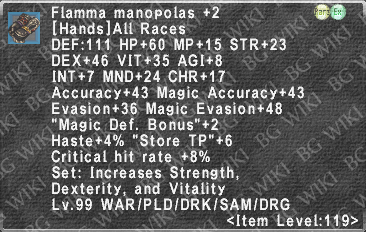
No | While these offer a Hasso boost, similar to the hands, they are outperformed by more attainable options--such as Flam. Gambieras +2, and Ryuo Sune-Ate (and their +1 variant). |
Relic Armor
| Sakonji Armor Set | ||
|---|---|---|
| Item | Upgrade? | Notes |
Sakonji Kabuto +4  Enhances "Ikishoten" |
Maybe. | Main (and probably only) use is as a ranged attack piece. Serious ranged Samurais are few and far in between for a myriad reasons, so it'd only be recommended to those seeking to pursue that venue. |
Sakonji Domaru +4  Enhances "Overwhelm" |
Yes! | Hands down, one of the strongest weaponskill damage pieces. High priority piece. |
Sakonji Kote +4  Enhances "Blade Bash" |
Yes. | Meditate duration macro swap. Good PDT alternative, if necessary. |
Sakonji Haidate +4  Enhances "Shikikoyo" |
Maybe. | Seigan Counter piece. Will see niche situational use, but for those looking for defensive options, this is a good piece to hold onto. |
Sakonji Sune. +4  Enhances "Meikyo Shisui" |
No. | Unfortunately, these feet are subpar. The augment only works while the feet are equipped. |
| Divergence Weapon | ||
|---|---|---|
| Item | Upgrade? | Notes |
Fusenaikyo  Multiple Augment Paths. |
Yes. | Shown previously in the weapon section, this Divergence-based Great Katana is quite useful when augmented and used appropriately. Has two relevant augment paths which turn it into either a mini-Empyrean, or a mini-Mythic. The third path is questionable but may have some use. The HQ1 variant Sakonji-no-Tachi, is also a decent alternative. |
| Divergence Neck Accessory | ||
|---|---|---|
| Item | Upgrade? | Notes |
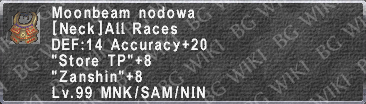
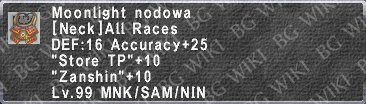
Sam. Nodowa +2 
|
Yes! | Divergence-based neck slot. Don't settle for less than the HQ1 variant, Sam. Nodowa +1. |
Empyrean Armor
| Kasuga Armor Set | ||
|---|---|---|
| Item | Upgrade? | Notes |
Kasuga Kabuto +3 
|
Yes. | Hybrid DT-% TP piece. |
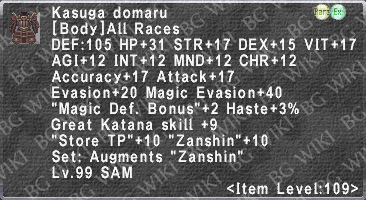
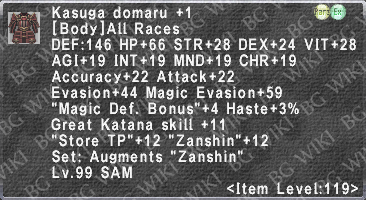
Kasuga Domaru +3 
|
Yes. | Hybrid DT-% TP piece. Can be paired with the Sajonki Haidate for a Seigan/Third Eye counter build. |
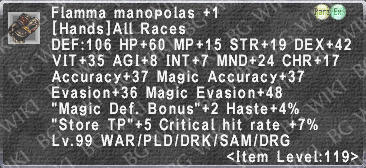
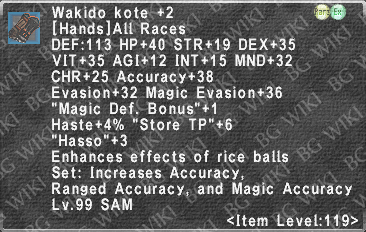
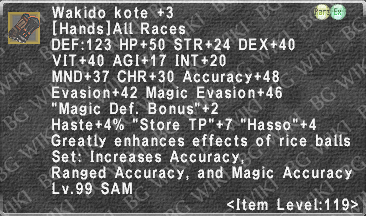
Kasuga Kote +3 
|
Yes. | Very strong alternative for physical weaponskill damage outside of Nyame Gauntlets. |
Kasuga Haidate +3 
|
Yes. | Hybrid DT-% TP piece. Third piece in SAM's JSE to contribute to Hasso Job Ability-based Haste. |
Kas. Sune-Ate +3 
|
Yes. | Niche weaponskill swap piece for "Attack Capped" scenarios. Extra Conserve TP is also nice to have. |
| Empyrean Armor Accessories | ||
|---|---|---|
| Item | Upgrade? | Notes |
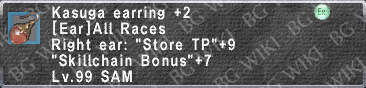
Kasuga Earring +2  Acc/M.Acc+16~20 WSD+3%~5% STR/DEX+7~15 |
N/A | One of the strongest Weapon Skill earrings currently available. Period. HQ1 is a bare minimum for swapping into any builds. |
TP Sets
These sets are by no means set in stone. +1's (or +2's in ambuscade equipment's case) are not a hard requirement in any of these—but as always, they're welcome advantages. The "gearing up" process establishes a baseline set with low accuracy requirements but sufficient Store TP to maintain an x-hit build—however—these sets are built around a typical party composition (bard, geo), but excluding SAM roll for any extra cushion in regards to TP. TP overflow is a good thing anyway.
- Note: These sets are geared towards zerging purposes. You are not meeting any particular accuracy checks beyond what the party buffs are providing you.
| Set descriptions | |
| Starter | Assumes access to delve, ambuscade and at least reforge +1, but not escha abjuration gear onwards. |
| Mid | Assumes clearing most of Escha except for the "tougher" targets (Reisen T3, Gods/Kouryu, WoC, etc) as well as access to omen midboss gear, reforge +2 and Vagary wins. |
| Max | High tier means you have access to pretty much everything. |
| Sortie | Access to +3 Empyrean and +2 Earrings. |
|
|
| |||||||||||||||||||||||||||||||||||||||||||||||||||||||||||||||||||||
|
|
|


|
|

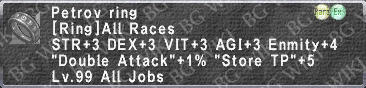
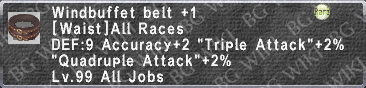
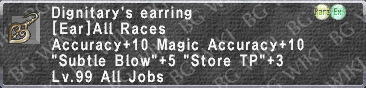
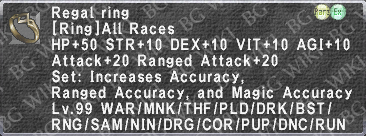
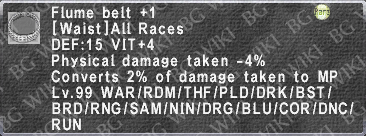
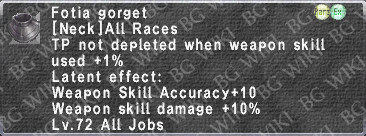
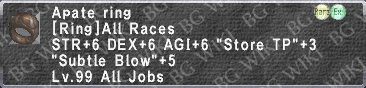
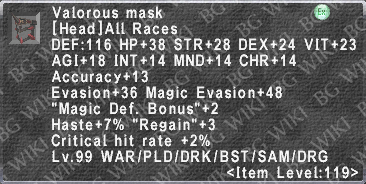
- Moonlight Nodowa This allows you to reach 102 Zanshin as Master.
- Cape stays DA+10.
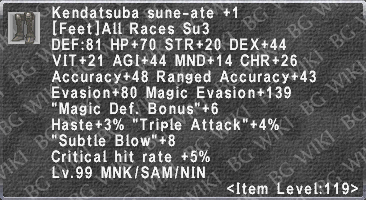
- Ryuo Sune-Ate +1 need 5 STP augment.
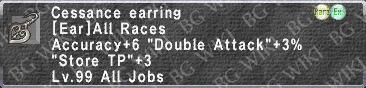
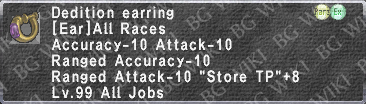
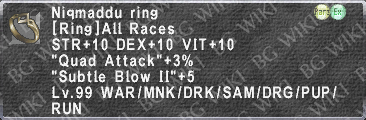
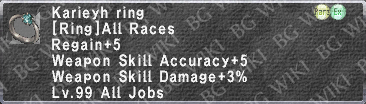
- If you do not have Kasuga Earring +2 you MUST make up the STP loss elsewhere via Chirich Ring +1, Dedition Earring, etc.
- Tatena. Gote +1 assume no Unity bonus.
- This set is exclusively built around Masamune's 137 delay and TP return of 123.82
- A +8 Samurai Roll will grant a 3 hit.
Gearing for Accuracy
The sets listed above, as mentioned earlier, are intended to be for scenarios where you don't require accuracy outside of what your buffs and food give you. For the things that do need more accuracy, then these tiered sets start filling in.
It's important to note that the accuracy listed on these sets is prior to any buffs (e.g. Hasso, cheers, food, etc). To determine the appropriate level of accuracy you need to jump to, it's important you understand what buffs you'll be receiving relative to your party composition and the estimated required accuracy of your target.
|
|
| |||||||||||||||||||||||||||||||||||||||||||||||||||||||||||||||||||||
|
|
|
For more info, verify the accuracy cheat sheet further down this guide.
Survival Sets
In short, the sets for when you don't want to die to a single TP move or magic spell, or avoid annoying status ailments.
|
| ||||||||||||||||||||||||||||||||||||||||||||||
|
|


WS Sets
Most weaponskills for Samurai share the same set as you would gear for Fudo or Shoha. The WS sets for the "gearing up" stage can apply to all WS. I'll separate the "max" level into a "shoha" and a "fudo" set for those looking to get that top deeps.
For clarification, Nyame isn't included in any of these sets. You're limited to 1 set of armor, and the path you choose drastically alters your use-case for them. Where you want to make those changes is, first and foremost, YOUR decision. Gauge if it's worth replacing any gear vs. how accessible augmenting the gear is.
| Set descriptions | |
| Starter | Assumes access to delve, ambuscade and at least reforge +1, but not escha abjuration gear onwards. |
| Mid | Assumes clearing most of Escha except for the "tougher" targets (Reisen T3, Gods/Kouryu, WoC, etc) as well as access to omen midboss gear, reforge +2 and Vagary wins. |
| Max | High tier means you have access to pretty much everything. |
|
|
| |||||||||||||||||||||||||||||||||||||||||||||||||||||||||||||||||||||
|
|


Now, it's important to understand that the sets listed above are a functional set for your primary physical weaponskills - e.g. Fudo, Kasha, Gekko, Yukikaze.
As for your other options, we have the following:
|
|
| |||||||||||||||||||||||||||||||||||||||||||||||||||||||||||||||||||||
|
|
|

Resources
| Accuracy Cheat Sheet | |||
|---|---|---|---|
| Item / Ability | Accuracy Granted | ||
| Hasso | 10 Accuracy | ||
| Honor March | 42 Accuracy; each +March adds 4 Accuracy for a max. of 58. | ||
| Sword Madrigal | 45 Accuracy; each +Madrigal adds 4 Accuracy for a max. of 85. (there's some weird rounding halfway through, ergo the extra 1 acc). | ||
| Blade Madrigal | 60 Accuracy; each +Madrigal adds 6 Accuracy for a max. of 114. | ||
| Hunter's Roll | 5 Accuracy at unlucky; 50 Accuracy at 11 "Phantom Roll"+ = +5 Accuracy each Job modifier = +15 Accuracy ⇊ Crooked bonus = +20% ⇊ Crooked Regal 11 w/ job bonus = 120 Accuracy total ↳without Job Bonus = 102 Accuracy total Crooked Rostam 11 w/ Job Bonus = 126 Accuracy Total ↳without Job Bonus = 108 | ||
| (Indi- or Geo-)Precision | 900 skill cast = +50 Accuracy Dunna/Nepote Bell = +25 Accuracy JSE Neck +1 = +30 Accuracy JSE Neck +2 = +35 accuracy Idris = +50 Accuracy *Note: "Geomancy" effects don't stack. Highest takes prio. | ||
| Sublime Sushi | 10% of total accuracy, capping at 100 acc + 7 DEX (approx. +5 Acc.) | ||
