The Voracious Resurgence | |
| Prime Weapons • Ultimate Weapons • Ultimate Augments • Abjurations iL119 • JSE Necks • Divergence Augments • Escutcheons | |
| Reforged Armor Artifact: +1 • iL109 • iL119/+2/+3 Relic: +1/+2 • iL109 • iL119/+2/+3 Empyrean: +1/+2 • iL109 • iL119/+2/+3 |
Guides • Crafting • Trusts • Apex Monsters |
Harvest Festival Guide: Difference between revisions
FaeQueenCory (talk | contribs) |
m (Update to event on October 26 on PlayOnline changed Ancient Battle Tunes reward to 7 Pumpkins.) |
||
| (83 intermediate revisions by 15 users not shown) | |||
| Line 16: | Line 16: | ||
| align=center | 2020 |
| align=center | 2020 |
||
| align=center | Saturday, October 24, at 1:00 a.m. (PDT) to Saturday, November 7, at 6:59 a.m. |
| align=center | Saturday, October 24, at 1:00 a.m. (PDT) to Saturday, November 7, at 6:59 a.m. |
||
|- |
|||
| align=center | 2021 |
|||
| align=center | Monday, October 25, at 1:00 a.m. (PDT) to Monday, November 8, at 6:59 a.m. |
|||
|- |
|||
| align=center | 2022 |
|||
| align=center | Monday, October 24, at 1:00 a.m. (PDT) to Monday, November 7, at 6:59 a.m. |
|||
|- |
|||
| align=center | 2023 |
|||
| align=center | Monday, October 23, 2023, at 1:00 a.m. (PDT) to Monday, November 6, at 6:59 a.m. |
|||
|} |
|} |
||
| Line 27: | Line 36: | ||
*[[Autumn Tree]] |
*[[Autumn Tree]] |
||
Additionally, a unique {{Ex}} food is available during the Login Campaign this month. They are 750 points each: |
Additionally, a unique {{Ex}} food [[Rol. Turkey]] is available during the Login Campaign this month. They are 750 points each: |
||
[[Image:Rol._Turkey_description.png|Rol. Turkey]] |
[[Image:Rol._Turkey_description.png|link=Rol. Turkey]] |
||
== Trick or Treat!== |
== Trick or Treat!== |
||
| Line 134: | Line 143: | ||
If you do not relinquish your light, face off against the spooky Ahriman [[Pyracmon]]. If he is defeated, you can earn the prizes below. |
If you do not relinquish your light, face off against the spooky Ahriman [[Pyracmon]]. If he is defeated, you can earn the prizes below. |
||
*Pyracmon will try to dispel this en-light via |
*Pyracmon will try to dispel this en-light via its only TP move '''Monocular Scowl'''. This is a gaze move and may be evaded simply by facing away while it is used. |
||
:*If you are hit by this you will need to zone and start over. |
:*If you are hit by this you will need to zone and start over. |
||
:**He will not regenerate health if you zone. |
:**He will not regenerate health if you zone. |
||
| Line 191: | Line 200: | ||
===[[File:Pitchfork +1 icon.png|link=]] Pitchfork +1=== |
===[[File:Pitchfork +1 icon.png|link=]] Pitchfork +1=== |
||
Obtaining the <span class="has-image-popup">[[Pitchfork +1]]<span class="image-popup" style="z-index: 10;width: ??? px; padding: 1px; background-color: #; border: 1px solid #DDDDDD; text-align: center;">[[File:Pitchfork +1 description.png|link=Pitchfork +1]]</span></span> is somewhat similar. You must again make a 2-person party, but this time you both must have the [[Pitchfork]] and both be in a nation different where both of you first obtained it. |
Obtaining the <span class="has-image-popup">[[Pitchfork +1]]<span class="image-popup" style="z-index: 10;width: ??? px; padding: 1px; background-color: #; border: 1px solid #DDDDDD; text-align: center;">[[File:Pitchfork +1 description.png|link=Pitchfork +1]]</span></span> is somewhat similar. You must again make a 2-person party, but this time you both must have and equip the [[Pitchfork]] (with no grip) and both be in a nation different where both of you first obtained it. |
||
This time around you will need to get the costume of the Beastmen that lives near your home nation([[Bastok]] = [[:Category:Quadav|Quadav]], [[San d'Oria]] = [[:Category:Orc|Orc]], and [[Windurst]] = [[:Category:Yagudo|Yagudo]]). If done correctly, instead of getting that Beastmen's form, you will instead get a Goblin costume. Meet under bomb decorations and you will receive your reward. |
This time around you will need to get the costume of the Beastmen that lives near your home nation([[Bastok]] = [[:Category:Quadav|Quadav]], [[San d'Oria]] = [[:Category:Orc|Orc]], and [[Windurst]] = [[:Category:Yagudo|Yagudo]]). If done correctly, instead of getting that Beastmen's form, you will instead get a Goblin costume. Meet under bomb decorations and you will receive your reward. |
||
| Line 327: | Line 336: | ||
|} |
|} |
||
===Spectral Mount=== |
===Spectral Chair Mount=== |
||
[[File:Category-Corpselight.jpg|right|thumb|Cyhiraeth, [[Corpselight]]|125px|link=]] |
[[File:Category-Corpselight.jpg|right|thumb|Cyhiraeth, [[Corpselight]]|125px|link=]] |
||
Form a party of ''two'' people. Find an NPC dressed as a [[Cyhiraeth]] (the floating skull). A list of these NPCs can be found in the table above. Both party members should trade a sweet until you both are turned into the same costume. You can get other rewards before becoming the [[Cyhiraeth]] costume (which lasts |
Form a party of ''two'' people. Find an NPC dressed as a [[Cyhiraeth]] (the floating skull). A list of these NPCs can be found in the table above. Both party members should trade a sweet until you both are turned into the same costume. You can get other rewards before becoming the [[Cyhiraeth]] costume (which lasts 5 minutes). Once '''both''' members are a [[Cyhiraeth]], head to the bomb decoration in the zone and |
||
'''both''' stand under the bomb balloon decorations to receive the |
'''both''' stand under the bomb balloon decorations to receive the [[Spectral Chair Mount]]. |
||
'''Note''': If you fail for any reason, you have to wait till the next game day to start over again. |
'''Note''': If you fail for any reason, you have to wait till the next game day to start over again. |
||
| Line 343: | Line 352: | ||
==[[File:Witch Hat icon.png|link=]] Wake of the Lilies == |
==[[File:Witch Hat icon.png|link=]] Wake of the Lilies == |
||
There are two ghosts of the Dark Lilies in each city, in the areas listed below.<br /> |
There are two ghosts of the Dark Lilies in each city, in the areas listed below.<br /> |
||
To begin this portion of the event simply talk to one of the above NPC. He will assign you one of them to follow. This will be the less difficult of the two. If you are successful, you will be given the <span class="has-image-popup">[[Witch Hat]]<span class="image-popup" style="z-index: 10;width: ??? px; padding: 1px; background-color: #; border: 1px solid #DDDDDD; text-align: center;">[[File:Witch Hat description.png|link=Witch Hat]]</span></span>.<br /> |
To begin this portion of the event simply talk to one of the above NPC. He will assign you one of them to follow. This will be the less difficult of the two. You MUST be wearing a costume given out when trading sweets to one of the costumed NPCs to receive progress messages, starting with "You've joined the procession." If you are successful, you will be given the <span class="has-image-popup">[[Witch Hat]]<span class="image-popup" style="z-index: 10;width: ??? px; padding: 1px; background-color: #; border: 1px solid #DDDDDD; text-align: center;">[[File:Witch Hat description.png|link=Witch Hat]]</span></span>.<br /> |
||
If you talk to the exorcist again with the <span class="has-image-popup">[[Witch Hat]]<span class="image-popup" style="z-index: 10;width: ??? px; padding: 1px; background-color: #; border: 1px solid #DDDDDD; text-align: center;">[[File:Witch Hat description.png|link=Witch Hat]]</span></span> equipped, he will assign to the second and harder Dark Lily to follow. This time, if you are successful, you will be rewarded a <span class="has-image-popup">[[Coven Hat]]<span class="image-popup" style="z-index: 10;width: ??? px; padding: 1px; background-color: #; border: 1px solid #DDDDDD; text-align: center;">[[File:Coven Hat description.png|link=Coven Hat]]</span></span>. |
If you talk to the exorcist again with the <span class="has-image-popup">[[Witch Hat]]<span class="image-popup" style="z-index: 10;width: ??? px; padding: 1px; background-color: #; border: 1px solid #DDDDDD; text-align: center;">[[File:Witch Hat description.png|link=Witch Hat]]</span></span> equipped, he will assign to the second and harder Dark Lily to follow. This time, if you are successful, you will be rewarded a <span class="has-image-popup">[[Coven Hat]]<span class="image-popup" style="z-index: 10;width: ??? px; padding: 1px; background-color: #; border: 1px solid #DDDDDD; text-align: center;">[[File:Coven Hat description.png|link=Coven Hat]]</span></span>. |
||
| Line 420: | Line 429: | ||
==Pumpkin Hunt== |
==Pumpkin Hunt== |
||
New |
New starting in 2020 is a pumpkin hunt similar to the [[Let's Go! Vana'diel Day!]] event held in October 2017. |
||
Examining a pumpkin grants a specific item. When rearranged correctly, all of the first letters spell '''ADVENTURE'''. |
|||
On the official forums, developers hinted to "use your eyes and ears" to help locate pumpkins.<br />In these zones during the event a new BGM plays called "Devils' Delight", the song accessed from {{KI}} [[Sheet of harvest tunes]]. |
On the official forums, developers hinted to "use your eyes and ears" to help locate pumpkins.<br />In these zones during the event a new BGM plays called "Devils' Delight", the song accessed from {{KI}} [[Sheet of harvest tunes]]. |
||
===2020 Pumpkin Locations=== |
|||
{|class="sortable overflow-visible" style="background: #E76A02;" max-width="1100px" cellpadding="1" cellspacing="1" |
|||
Examining a pumpkin grants a specific item. When rearranged correctly, all of the first letters spell '''ADVENTURE'''. |
|||
{|class="overflow-visible" style="background: #E76A02;" max-width="1100px" cellpadding="0" cellspacing="1" |
|||
| |
|||
{|class="sortable overflow-visible" cellpadding="1" cellspacing="1" |
|||
|- style="background: #5D2A00; color:#E76A02; text-align:center;" |
|- style="background: #5D2A00; color:#E76A02; text-align:center;" |
||
! Pumpkin Locations |
! Pumpkin Locations |
||
| Line 433: | Line 445: | ||
|- BGCOLOR="#f5f5f5" |
|- BGCOLOR="#f5f5f5" |
||
|[[Port San d'Oria]] (G-7) behind the counter inside the '''Rusty Anchor'''. |
|[[Port San d'Oria]] (G-7) behind the counter inside the '''Rusty Anchor'''. |
||
|[[Home Point]] #1 |
|[[Home Point]] #1 |
||
|{{ItemIcon|Apple Juice|20}} [[Apple Juice|'''<big>A</big>'''pple Juice]] |
|||
|[[Apple Juice|'''<big>A</big>'''pple Juice]] |
|||
|- BGCOLOR="#f5f5f5" |
|- BGCOLOR="#f5f5f5" |
||
|[[Western Altepa Desert]] (H-7) in the tunnel off of the square. |
|[[Western Altepa Desert]] (H-7) in the tunnel off of the square. |
||
|[[Unity]] CL125 to [[Western Altepa Desert]], drop off the rock into the subterranean hallway and navigate to the tunnel. |
|[[Unity]] CL125 to [[Western Altepa Desert]], drop off the rock into the subterranean hallway and navigate to the tunnel. |
||
|{{ItemIcon|Datechochin|20}} [[Datechochin|'''<big>D</big>'''atechochin]] x10 |
|||
|[[Datechochin|'''<big>D</big>'''atechochin]] x10 |
|||
|- BGCOLOR="#f5f5f5" |
|- BGCOLOR="#f5f5f5" |
||
|[[Tahrongi Canyon]] (E 5) located behind the [[Stone Monument]]. |
|[[Tahrongi Canyon]] (E 5) located behind the [[Stone Monument]]. |
||
|[[Survival Guide]] to [[Tahrongi Canyon]] |
|[[Survival Guide]] to [[Tahrongi Canyon]] |
||
|{{ItemIcon|Vegetable Broth|20}} [[Vegetable Broth|'''<big>V</big>'''egetable Broth]] |
|||
|[[Vegetable Broth|'''<big>V</big>'''egetable Broth]] |
|||
|- BGCOLOR="#f5f5f5" |
|- BGCOLOR="#f5f5f5" |
||
|[[Port Bastok]] (I-8) near [[Juroro]]. |
|[[Port Bastok]] (I-8) near [[Juroro]]. |
||
|[[Home Point]] #1 |
|[[Home Point]] #1 |
||
|{{ItemIcon|Echo Drops|20}} [[Echo Drops|'''<big>E</big>'''cho Drops]] x12 |
|||
|[[Echo Drops|'''<big>E</big>'''cho Drops]] x12 |
|||
|- BGCOLOR="#f5f5f5" |
|- BGCOLOR="#f5f5f5" |
||
|[[Attohwa Chasm]] (J-9) on the edge of the top of Parrado Tor. |
|[[Attohwa Chasm]] (J-9) on the edge of the top of Parrado Tor. |
||
|[[Proto-Waypoint]] |
|[[Proto-Waypoint]] |
||
|{{ItemIcon|Navarin|20}} [[Navarin|'''<big>N</big>'''avarin]] |
|||
|[[Navarin|'''<big>N</big>'''avarin]] |
|||
|- BGCOLOR="#f5f5f5" |
|- BGCOLOR="#f5f5f5" |
||
|[[East Ronfaure]] (G-11) located at the [[Stone Monument]]. |
|[[East Ronfaure]] (G-11) located at the [[Stone Monument]]. |
||
|[[Voidwatch]] to [[King Ranperre's Tomb]] |
|[[Voidwatch]] to [[King Ranperre's Tomb]] |
||
|{{ItemIcon|Trail Cookie|20}} [[Trail Cookie|'''<big>T</big>'''rail Cookie]] |
|||
|[[Trail Cookie|'''<big>T</big>'''rail Cookie]] |
|||
|- BGCOLOR="#f5f5f5" |
|- BGCOLOR="#f5f5f5" |
||
|[[Lufaise Meadows]] (J-6) in a box facing the wall. |
|[[Lufaise Meadows]] (J-6) in a box facing the wall. |
||
|[[Unity]] CL125 to [[Lufaise Meadows]] |
|[[Unity]] CL125 to [[Lufaise Meadows]] |
||
|{{ItemIcon|Uberkuchen|20}} [[Uberkuchen|'''<big>U</big>'''berkuchen]] |
|||
|[[Uberkuchen|'''<big>U</big>'''berkuchen]] |
|||
|- BGCOLOR="#f5f5f5" |
|- BGCOLOR="#f5f5f5" |
||
|[[Rolanberry Fields]] (K-11) located at the [[Stone Monument]]. |
|[[Rolanberry Fields]] (K-11) located at the [[Stone Monument]]. |
||
|[[Survival Guide]] to [[Rolanberry Fields]] or [[Mount]] from the [[Lower Jeuno]] exit. |
|[[Survival Guide]] to [[Rolanberry Fields]] or [[Mount]] from the [[Lower Jeuno]] exit. |
||
|{{ItemIcon|Rolan. Daifuku|20}} [[Rolanberry Daifuku|'''<big>R</big>'''olanberry Daifuku]] |
|||
|[[Rolanberry Daifuku|'''<big>R</big>'''olanberry Daifuku]] |
|||
|- BGCOLOR="#f5f5f5" |
|- BGCOLOR="#f5f5f5" |
||
|[[Port Windurst]] (G-5) behind the children behind the Warehouses. |
|[[Port Windurst]] (G-5) behind the children behind the Warehouses. |
||
|[[Home Point]] #1 or #3 (M) |
|[[Home Point]] #1 or #3 (M) |
||
|[[Elshena|'''<big>E</big>'''lshena]] |
|{{ItemIcon|Elshena|20}} [[Elshena|'''<big>E</big>'''lshena]] |
||
|} |
|||
|- style="background: #5D2A00; color:#E76A02; text-align:center;" |
|- style="background: #5D2A00; color:#E76A02; text-align:center;" |
||
!colspan="3"| {{H:text|These are rewarded in addition to the individual pumpkin rewards above.|Additional Rewards}} |
!colspan="3"| {{H:text|These are rewarded in addition to the individual pumpkin rewards above.|Additional Rewards}} |
||
|- style="background: #f3e9eb; text-align:center;" |
|- style="background: #f3e9eb; text-align:center;" |
||
|colspan="3"|Finding five pumpkins rewards players with the <span class="mbt-hover">{{ItemIcon|Cait Sith Subligar|24}} [[Cait Sith Subligar]]<span class="mbt-tooltip">[[Image:Cait Sith Subligar Appearance.jpg|link=]]</span></span>. |
|colspan="3"|Finding five pumpkins rewards players with the <span class="mbt-hover">{{ItemIcon|Cait Sith Subligar|24}} [[Cait Sith Subligar]]<span class="mbt-tooltip">[[Image:Cait Sith Subligar Appearance.jpg|link=]]</span></span>. |
||
|- style="background: #f3e9eb; text-align:center;" |
|- style="background: #f3e9eb; text-align:center;" |
||
|colspan="3"|Finding all nine pumpkins grants the {{KI}} [[Sheet of harvest tunes]]. |
|colspan="3"|Finding all nine pumpkins grants the {{KI}} [[Sheet of harvest tunes]]. |
||
|} |
|} |
||
===2021 Pumpkin Locations=== |
|||
Examining a pumpkin grants a specific item. When rearranged correctly, all of the first letters spell '''DISCOVERY'''. |
|||
{|class="overflow-visible" style="background: #E76A02;" max-width="1100px" cellpadding="0" cellspacing="1" |
|||
| |
|||
{|class="sortable overflow-visible" cellpadding="1" cellspacing="1" |
|||
|- style="background: #5D2A00; color:#E76A02; text-align:center;" |
|||
! Pumpkin Locations |
|||
! Closest Warp |
|||
! Rewards |
|||
|- BGCOLOR="#f5f5f5" |
|||
|[[Windurst Woods]] (J-3) by Nanaa Mihgo. |
|||
|Home Point #1 |
|||
|{{ItemIcon|Date Tea|20}} [[Date Tea|'''<big>D</big>'''ate Tea]] |
|||
|- BGCOLOR="#f5f5f5" |
|||
|[[La Vaule (S)]] (J-7) on your right after opening the gate. |
|||
|Survival guide warp to Jugner Forest (S). |
|||
|{{ItemIcon|Iga Shuriken|20}} [[Iga Shuriken|'''<big>I</big>'''ga Shuriken]] |
|||
|- BGCOLOR="#f5f5f5" |
|||
|[[Gusgen Mines]](G-8) Map 2 in a box. |
|||
|Survival Guide |
|||
||{{ItemIcon|Spectral Serum|20}} [[Spectral Serum|'''<big>S</big>'''pectral Serum]] |
|||
|- BGCOLOR="#f5f5f5" |
|||
|[[West Ronfaure]] (G-11) by Lake. |
|||
|Survival or Outpost warp |
|||
|{{ItemIcon|Carp Sushi|20}} [[Carp Sushi|'''<big>C</big>'''arp Sushi]] |
|||
|- BGCOLOR="#f5f5f5" |
|||
|Ship from Selbina to Mhaura in front of the cargo at the front of the ship. |
|||
| |
|||
|{{ItemIcon|Oden|20}} [[Oden|'''<big>O</big>'''den]] |
|||
|- BGCOLOR="#f5f5f5" |
|||
|[[Vunkerl Inlet (S)]] (G-4) on a chair. |
|||
|Survival guide warp to Vunkerl Inlet (S). |
|||
|{{ItemIcon|Vampire Juice|20}} [[Vampire Juice|'''<big>V</big>'''ampire Juice]] |
|||
|- BGCOLOR="#f5f5f5" |
|||
|[[Castle Zvahl Baileys (S)]] (H-8) Map 3 from Map 2 drop, near the gargouilles (NE hole). Drop down from the '''SW side of the hole.''' |
|||
|Survival Guide Warp or Campaign. |
|||
|{{ItemIcon|Egg Sandwich|20}} [[Egg Sandwich|'''<big>E</big>'''gg Sandwich]] |
|||
|- BGCOLOR="#f5f5f5" |
|||
|[[Castle Zvahl Baileys]] (G-8/9) Map 3 from Map 2 drop, near the Yagudo (SW hole). Drop down from the '''NE side of the hole'''. |
|||
|Survival Guide |
|||
|{{ItemIcon|Rainbow Powder|20}} [[Rainbow Powder|'''<big>R</big>'''ainbow Powder]] |
|||
|- BGCOLOR="#f5f5f5" |
|||
|[[Fort Karugo-Narugo (S)]] (E-7) at the Stone Monument. |
|||
|Campaign or Survival Guide Warp |
|||
|{{ItemIcon|Yayla Corbasi|20}} [[Yayla Corbasi|'''<big>Y</big>'''ayla Corbasi]] |
|||
|} |
|||
|- style="background: #5D2A00; color:#E76A02; text-align:center;" |
|||
!colspan="3"| {{H:text|These are rewarded in addition to the individual pumpkin rewards above.|Additional Rewards}} |
|||
|- style="background: #f3e9eb; text-align:center;" |
|||
|colspan="3"|Finding five pumpkins rewards players with the <span class="mbt-hover">{{ItemIcon|Cait Sith Subligar|24}} [[Cait Sith Subligar]]<span class="mbt-tooltip">[[Image:Cait Sith Subligar Appearance.jpg|link=]]</span></span> and {{KI}} [[Sheet of harvest tunes]]. |
|||
|- style="background: #f3e9eb; text-align:center;" |
|||
|colspan="3"|Finding all nine pumpkins grants the {{KI}} [[Sheet of ancient tunes]]. |
|||
|} |
|||
===2022 Pumpkin Locations=== |
|||
Examining a pumpkin grants a specific item. When rearranged correctly, all of the first letters spell '''BON VOYAGE'''. |
|||
{|class="overflow-visible" style="background: #E76A02;" max-width="1100px" cellpadding="0" cellspacing="1" |
|||
| |
|||
{|class="sortable overflow-visible" cellpadding="1" cellspacing="1" |
|||
|- style="background: #5D2A00; color:#E76A02; text-align:center;" |
|||
! Pumpkin Locations |
|||
! Closest Warp |
|||
! Rewards |
|||
|- BGCOLOR="#f5f5f5" |
|||
|[[Upper Jeuno]] (G-8) inside the house inside the fireplace behind [[Ilumida]]. |
|||
|[[Home Point]] #3 or #1 |
|||
|{{ItemIcon|Boscaiola|20}} [[Boscaiola|'''<big>B</big>'''oscaiola]] |
|||
|- BGCOLOR="#f5f5f5" |
|||
|[[Port Windurst]] (H-9) floating in the water near the Weapon Shop. |
|||
|[[Home Point]] #1 or #3 |
|||
|{{ItemIcon|Oden|20}} [[Oden|'''<big>O</big>'''den]] |
|||
|- BGCOLOR="#f5f5f5" |
|||
|[[Port San d'Oria]] (J-8) inside Regine's Magic Mart |
|||
|Home Point #2 |
|||
|{{ItemIcon|Nebimonite Bake|20}} [[Nebimonite Bake|'''<big>N</big>'''ebimonite Bake]] |
|||
|- BGCOLOR="#f5f5f5" |
|||
|[[Port Bastok]] (E-6) inside Steaming Sheep Restaurant in front of [[Sawyer]] |
|||
|Home Point #3 |
|||
|{{ItemIcon|Vegetable Gruel|20}} [[Vegetable Gruel|'''<big>V</big>'''egetable Gruel]] |
|||
|- BGCOLOR="#f5f5f5" |
|||
|[[Yorcia Weald]] (J-8) west of Frontier Station |
|||
|Frontier Station WayPoint warp |
|||
|{{ItemIcon|Orange Kuchen|20}} [[Orange Kuchen|'''<big>O</big>'''range Kuchen]] |
|||
|- BGCOLOR="#f5f5f5" |
|||
| |
|||
[[Airship, Jeuno - Bastok]] Top floor, above rear prop.<br> |
|||
[[Airship, Jeuno - San d'Oria]] Top floor, above rear prop.<br> |
|||
[[Airship, Jeuno - Windurst]] Top floor, above rear prop. |
|||
|Leave from [[Port Jeuno]] or the three cities |
|||
|{{ItemIcon|Yagudo Drink|20}} [[Yagudo Drink|'''<big>Y</big>'''agudo Drink]] |
|||
|- BGCOLOR="#f5f5f5" |
|||
|[[The Sanctuary of Zi'Tah]] (I/J-7) Head off the map at (J-9), follow it north-west to the pumpkin. It is on a rock between two logs that form a bridge. It is before the Cermet Headstone. |
|||
|[[Survival Guide]] Warp or Outpost Warp |
|||
|{{ItemIcon|Antacid|20}} [[Antacid|'''<big>A</big>'''ntacid]] |
|||
|- BGCOLOR="#f5f5f5" |
|||
|[[Eastern Adoulin]] (J-8) in the flowers by the exorcist place. |
|||
|Castle Adoulin WayPoint |
|||
|{{ItemIcon|Ground Wasabi|20}} [[Ground Wasabi|'''<big>G</big>'''round Wasabi]] |
|||
|- BGCOLOR="#f5f5f5" |
|||
|[[North Gustaberg (S)]] (F-8) on the bridge. |
|||
|[[Survival Guide]] Warp |
|||
|{{ItemIcon|Elysian Eclair|20}} [[Elysian Eclair|'''<big>E</big>'''lysian Eclair]] |
|||
|} |
|||
|- style="background: #5D2A00; color:#E76A02; text-align:center;" |
|||
!colspan="3"| {{H:text|These are rewarded in addition to the individual pumpkin rewards above.|Additional Rewards}} |
|||
|- style="background: #f3e9eb; text-align:center;" |
|||
|colspan="3"|Finding five pumpkins rewards players with the <span class="mbt-hover">{{ItemIcon|Cait Sith Subligar|24}} [[Cait Sith Subligar]]<span class="mbt-tooltip">[[Image:Cait Sith Subligar Appearance.jpg|link=]]</span></span>, {{KI}} [[Sheet of harvest tunes]], and {{KI}} [[Sheet of ancient tunes]]. |
|||
|- style="background: #f3e9eb; text-align:center;" |
|||
|colspan="3"|Finding all nine pumpkins grants the {{KI}} [[Sheet of ancient battle tunes]] |
|||
|} |
|||
===2023 Pumpkin Locations=== |
|||
Examining a pumpkin grants a specific item. When rearranged correctly, all of the first letters spell '''EXPLORERS'''. |
|||
{|class="overflow-visible" style="background: #E76A02;" max-width="1100px" cellpadding="0" cellspacing="1" |
|||
| |
|||
{|class="sortable overflow-visible" cellpadding="1" cellspacing="1" |
|||
|- style="background: #5D2A00; color:#E76A02; text-align:center;" |
|||
! Pumpkin Locations |
|||
! Closest Warp |
|||
! Rewards |
|||
|- BGCOLOR="#f5f5f5" |
|||
|[[Meriphataud Mountains (S)]] (J-10) at Stone Monument |
|||
|[[Survival Guide]] or [[Recall-Meriph]] |
|||
|{{ItemIcon|Earth Cluster|20}} [[Earth Cluster|'''<big>E</big>'''arth Cluster]] x12 |
|||
|- BGCOLOR="#f5f5f5" |
|||
|[[Marjami Ravine]] (F-8) near the Lair Reive |
|||
|Bivouac #4 or [[Home Point]] #1 |
|||
|{{ItemIcon|X-Potion|20}} [[X-Potion|'''<big>X</big>'''-Potion]] |
|||
|- BGCOLOR="#f5f5f5" |
|||
|[[Windurst Waters]] (J-9) South near [[Leepe-Hoppe]] second floor of Rhinostery. |
|||
|[[Home Point]] #3 |
|||
|{{ItemIcon|Pumpkin Pie +1|20}} [[Pumpkin Pie +1|'''<big>P</big>'''umpkin Pie +1]] x12 |
|||
|- BGCOLOR="#f5f5f5" |
|||
|[[Tavnazian Safehold]] (K-10) in [[Despachiaire]]'s room (go down the ramps past him on the right and it's around the corner on the right) |
|||
|[[Home Point]] #3 |
|||
|{{ItemIcon|Leremieu Taco|20}} [[Leremieu Taco|'''<big>L</big>'''eremieu Taco]] x3 |
|||
|- BGCOLOR="#f5f5f5" |
|||
|[[Uleguerand Range]] (F-9) before you fall off the south cliff. |
|||
|Walk from [[Home Point]] #1 |
|||
|{{ItemIcon|O. Snow Cone|20}} [[O. Snow Cone|'''<big>O</big>'''. Snow Cone]] x12 |
|||
|- BGCOLOR="#f5f5f5" |
|||
|[[Ordelle's Caves]] Map 3 (I-10) in Morbolger Room |
|||
|Zone in from [[Proto-Waypoint]] [[La Theine Plateau]] |
|||
|{{ItemIcon|Rancid Coffee|20}} [[Rancid Coffee|'''<big>R</big>'''ancid Coffee]] x4 |
|||
|- BGCOLOR="#f5f5f5" |
|||
|[[Den of Rancor]] (E-5) just outside the gate. |
|||
|[[Home Point]] #1 |
|||
|{{ItemIcon|Egg Sandwich|20}} [[Egg Sandwich|'''<big>E</big>'''gg Sandwich]]x2 |
|||
|- BGCOLOR="#f5f5f5" |
|||
|[[Bostaunieux Oubliette]] (F-8) above ground in the room near the sewer entrance. |
|||
|Walk from [[Chateau d'Oraguille]] |
|||
|{{ItemIcon|Royal Tea|20}} [[Royal Tea|'''<big>R</big>'''oyal Tea]] |
|||
|- BGCOLOR="#f5f5f5" |
|||
|[[Bastok Mines]] (G-8) 2nd Floor near [[Deadly Spider]]. |
|||
|[[Home Point]] #1 or [[Survival Guide]] |
|||
|{{ItemIcon|Slime Oil|20}} [[Slime Oil|'''<big>S</big>'''lime Oil]] x12 |
|||
|} |
|||
|- style="background: #5D2A00; color:#E76A02; text-align:center;" |
|||
!colspan="3"| {{H:text|These are rewarded in addition to the individual pumpkin rewards above.|Additional Rewards}} |
|||
|- style="background: #f3e9eb; text-align:center;" |
|||
|colspan="3"|Finding five pumpkins rewards players with the <span class="mbt-hover">{{ItemIcon|Cait Sith Subligar|24}} [[Cait Sith Subligar]]<span class="mbt-tooltip">[[Image:Cait Sith Subligar Appearance.jpg|link=]]</span></span>, {{KI}} [[Sheet of harvest tunes]], {{KI}} [[Sheet of ancient tunes]]. |
|||
|- style="background: #f3e9eb; text-align:center;" |
|||
|colspan="3"| Finding Seven pumpkins rewards you with {{KI}} [[Sheet of ancient battle tunes]]. |
|||
|- style="background: #f3e9eb; text-align:center;" |
|||
|colspan="3"|Finding all nine pumpkins grants the {{KI}} [[Sheet of chocobo tunes]] |
|||
[[Category:Seasonal Event Guides]] |
[[Category:Seasonal Event Guides]] |
||
Latest revision as of 00:02, 5 November 2023
Event Dates

| Edition | Campaign Period |
|---|---|
| 2018 | Tuesday, October 24, at 1:00 a.m. (PDT) to Monday, November 7, at 6:59 a.m. |
| 2019 | Thursday, October 24, at 1:00 a.m. (PDT) to Thursday, November 7, at 6:59 a.m. |
| 2020 | Saturday, October 24, at 1:00 a.m. (PDT) to Saturday, November 7, at 6:59 a.m. |
| 2021 | Monday, October 25, at 1:00 a.m. (PDT) to Monday, November 8, at 6:59 a.m. |
| 2022 | Monday, October 24, at 1:00 a.m. (PDT) to Monday, November 7, at 6:59 a.m. |
| 2023 | Monday, October 23, 2023, at 1:00 a.m. (PDT) to Monday, November 6, at 6:59 a.m. |
October Login Campaign
While these items are rewards from the Harvest Festival they are part of this month's Repeat Login Campaign harvest theme.
You may pick them up at your will for 300 login points each:
 Harvest Pastry
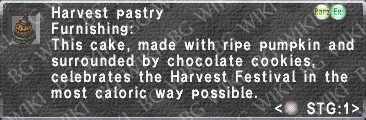 - Big pumpkin Mog House furniture.
 Kakai Cap
 - Head costume armor.
- Picking up two and synergizing them will create a
 Kakai Cap +1
 which will turn you into a random ghoul costume.
- Picking up two and synergizing them will create a
Additionally, a unique ![]() food Rol. Turkey is available during the Login Campaign this month. They are 750 points each:
food Rol. Turkey is available during the Login Campaign this month. They are 750 points each:

Trick or Treat!
NPCs are dressed in costumes. Trade them sweets to obtain items.
♦Costumed NPCs:
![]() Southern San d'Oria / Northern San d'Oria
Southern San d'Oria / Northern San d'Oria
![]() Bastok Mines / Bastok Markets
Bastok Mines / Bastok Markets
![]() Windurst Waters / Windurst Woods
Windurst Waters / Windurst Woods
- NPCs will accept most sweets, with certain exceptions that do not appeal to their finicky palates.
Recommended "Sweets"
 Garlic Cracker (3~4 gil) Sold by Ghebi Damomohe in Lower Jeuno, (I-7)
 Acorn Cookie (21~81 gil) - Sold by Ness Rugetomal in Windurst Waters (North), (F-10)
- If Windurst is in 2nd then Cinna-cookies work and are cheaper, but just use crackers.
- Trade via the macro /item "Item Name" <t>
- /item "Garlic Cracker" <t>
Trick or Treat Rewards
Trade roaming costumed NPCs sweets over and over again to obtain the following NQ items.
To obtain the HQ variant you must equip that item, and not any of the other Trick or Treat items and trade the NPCs more.
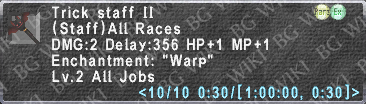
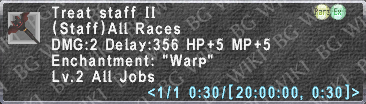
Note: You may not wear a grip while trying to obtain the staff. ![]()
|
NQ Item |
HQ Item |
|---|---|

|

|

|

|

|

|
|
|

|

|
| You will only obtain the flan masque from trading Flan costumed NPCs sweets. | |
Costume Contest

Take Part in the Pink Masquerade Costume Contest! The Pink Masquerade costume competition will be held on each festival ground. Speak to the Ensemble Maven and trade them a treat to begin the contest. The judge will evaluate your currently equipped outfit. Receive a high evaluation to win a prize.
♦Costume Contest Areas
![]() Southern San d'Oria (I-8) / Northern San d'Oria (F-6)
Southern San d'Oria (I-8) / Northern San d'Oria (F-6)
![]() Bastok Mines (H-8) / Bastok Markets (G-8)
Bastok Mines (H-8) / Bastok Markets (G-8)
![]() Windurst Waters (G-9) / Windurst Woods (H-11)
Windurst Waters (G-9) / Windurst Woods (H-11)
♦Prizes
Speak to the Ensemble Maven to receive a Botulus Suit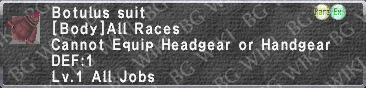 .
.
- You are free to participate in the contest wearing the suit.
To participate in the "contest" you must first make a contest outfit. Put on some event reward equipment.
- Only the main weapon, sub weapon, head, body, hands, legs, and feet slots count.
- You may wear any special event equipment, including items from the Repeat Login Campaign.
After creating your costume, trade the Ensemble Maven a random type of accepted sweet (same kinds you can trade to the NPCs for costumes) and to receive your score.
- The current top 3 scores have their outfits displayed on the mannequins next to the Ensemble Mavens.
- Scores of 20+ are rewarded with a Botulus Suit +1
 .
.
- Scores seem mostly random so just keep trading your Garlic Crackers.
Your Purple-winged Partners
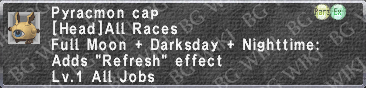
See one of the moogles below to begin and sync to level one. You must begin charging your enlight lazer via defeating bats as your ordinary melee attacks do nothing to Pyracmon.
Each bat you defeat will give you an enlight effect of 1 damage. There is no notification that your lazer charged or your current strength. The effect caps at 30 damage.
Return to the moogle after defeating bats to gain the enlight effect.
♦Moogle Locations
![]() West Ronfaure (I-6) / East Ronfaure (G-6)
West Ronfaure (I-6) / East Ronfaure (G-6)
![]() North Gustaberg (L-8) / South Gustaberg (J-7)
North Gustaberg (L-8) / South Gustaberg (J-7)
![]() West Sarutabaruta (J-8) / East Sarutabaruta] (G-11)
West Sarutabaruta (J-8) / East Sarutabaruta] (G-11)
Relinquishing Enlight Rewards
If you relinquish your light to the triple bats Magivore Ternion that appear after you gain the effect from the moogle, the prizes below will be rewarded.
- NQ items do not need to be worn in order to obtain the HQ.
- After obtaining the HQ, the bats do not return and try to leech your Enlight.
|
Rewards |
Notes |
|---|---|

|
Defeat 25+ bats. |
|
Obtained after obtaining the NQ. Defeat 30 bats. |
Pyracmon Rewards
If you do not relinquish your light, face off against the spooky Ahriman Pyracmon. If he is defeated, you can earn the prizes below.
- Pyracmon will try to dispel this en-light via its only TP move Monocular Scowl. This is a gaze move and may be evaded simply by facing away while it is used.
- If you are hit by this you will need to zone and start over.
- He will not regenerate health if you zone.
- If you are hit by this you will need to zone and start over.
- You may use the regen bonus from the grounds of valor book after syncing to make this easier.
After defeating the Ahriman, return to the moogle to receive your reward.
- He may direct drop:
|
Rewards |
Notes |
|---|---|

|
Defeat 11+ bats. |

|
Obtained after obtaining the NQ. Defeat 11+ bats. |
|
Obtained after defeating the Pyracmon while in possession of both the Eerie Cloak and Eerie Cloak +1 Complete the event in |

|
Obtained after defeating the Pyracmon while in possession of both the Eerie Cloak and Eerie Cloak +1 Complete the event in |

|
Obtained after defeating the Pyracmon while in possession of both the Eerie Cloak and Eerie Cloak +1 Complete the event in |
|
Subsequent completions (After obtaining a previous furnishing in that region) |
Bomb Decorations
Throughout the festivities, players will be able to enjoy the illumination of the now-famous bomb decorations. As in previous Harvest Festivals this will reward Pitchforks, and now a mount.
 Pitchfork
To obtain the Pitchfork you must make a two-person party and meet under specific Bomb Decorations with two specific costumes. Which costumes are based on area. Below is a list of the correct combinations and which NPCs can give them to you. The NPCs will not accept every type of sweet to turn you into a costume. If you get "Thank you..." with nothing else, try another sweet or wait a game-day to reset and try again. Once you get a costume, you must wait a game-day if trying to get the same costume from the same NPC with the same sweet. Alternatively, try another sweet if it's on the same day.
- Bastok Markets: Ghost + Hound (Trick Specter + Trick Ghost)
- Bastok Mines: Skeleton + Shade (Emaliveulaux G-6 + Neigepance J-9)
- Northern San d'Oria: Shade + Hound (Trick Phantom + Trick Skeleton)
- Southern San d'Oria: Ghost + Skeleton (Phamelise K-9 + Corua G-9) (Meet under bomb decorations by Moogle House at L-7)
- Windurst Waters: Skeleton + Hound (Trick Spirit + Trick Shadow)
- Windurst Woods: Ghost + Shade (Taraihi-Perunhi J-10 + Quesse K-12)
 Pitchfork +1
Obtaining the Pitchfork +1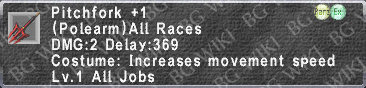 is somewhat similar. You must again make a 2-person party, but this time you both must have and equip the Pitchfork (with no grip) and both be in a nation different where both of you first obtained it.
This time around you will need to get the costume of the Beastmen that lives near your home nation(Bastok = Quadav, San d'Oria = Orc, and Windurst = Yagudo). If done correctly, instead of getting that Beastmen's form, you will instead get a Goblin costume. Meet under bomb decorations and you will receive your reward.
- Bastok Markets: Orc(Trick Spirit), Quadav(Trick Phantom), and Yagudo(Trick Skeleton).
- Northern San d'Oria: Orc(Trick Shadow), Quadav(Trick Bones), and Yagudo(Trick Ghast).
- Windurst Waters: Orc(Trick Bones), Quadav(Trick Shade), and Yagudo(Trick Ghost).
NPC and Costume List
Since all NPC's always give the same type of costume, it can be convenient to know which to use for obtaining the Pitchfork items.
There are both special event roaming NPC's, and pre-existing NPC's that have been dressed up just for the event. Stationary NPC's can often be indoors and more difficult to use seeing as how costumes do not allow interaction with doors.
|
NPC and Costumes | ||
|---|---|---|
| Stationary Costumed NPCs Antonian (J-8): Hound |
Special Event NPCs Trick Bones: Quadav |
Stationary Costumed NPCs Apairemant (K-9): Fomor |
| Stationary Costumed NPCs Belizieg (F-8): Orc |
Special Event NPCs Trick Bones: Ghost |
Stationary Costumed NPCs Aulavia (G-7): Ghost |
| Stationary Costumed NPCs Ahyeekih (H-10): Fomor |
Special Event NPCs Trick Bones: Orc |
Stationary Costumed NPCs Bin Stejihna (G-8): Skeleton |
Spectral Chair Mount

Form a party of two people. Find an NPC dressed as a Cyhiraeth (the floating skull). A list of these NPCs can be found in the table above. Both party members should trade a sweet until you both are turned into the same costume. You can get other rewards before becoming the Cyhiraeth costume (which lasts 5 minutes). Once both members are a Cyhiraeth, head to the bomb decoration in the zone and both stand under the bomb balloon decorations to receive the Spectral Chair Mount.
Note: If you fail for any reason, you have to wait till the next game day to start over again.
Note: Trading a different type of sweet will allow you to have another chance at getting the costume. You can only obtain one reward per Vana'diel day per sweet type, per NPC.
Example:
- The NPC at the Auction House in Southern San d'Oria is in this costume and will grant it for a sweet. Proceed to the bomb balloons in the costume near the Mog House at (L-7) to gain the mount:

 Wake of the Lilies
There are two ghosts of the Dark Lilies in each city, in the areas listed below.
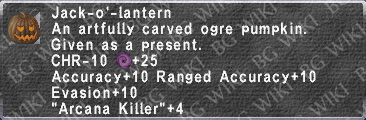
To begin this portion of the event simply talk to one of the above NPC. He will assign you one of them to follow. This will be the less difficult of the two. You MUST be wearing a costume given out when trading sweets to one of the costumed NPCs to receive progress messages, starting with "You've joined the procession." If you are successful, you will be given the Witch Hat .
.
If you talk to the exorcist again with the Witch Hat equipped, he will assign to the second and harder Dark Lily to follow. This time, if you are successful, you will be rewarded a Coven Hat .
.
Being spotted by the NPC remove your costume, and you must start over. When you have completed the task, you will be notified via the message: "Alright! It's time to collect your reward!"
Further successful attempts will be rewared with a random number of Papillions.
♦Exorcist Locations
- Gertrude in Northern San d'Oria (D-8)
- Brian in Bastok Markets (G-8)
- Roger in Windurst Waters (north side) (F-5)
- Note: After successfully completing an exorcist's request, players must wait until the next game day before accepting another.
Lilly Locations
![]() San d'Oria:
San d'Oria:
- First Dark Lily: Poseaulloie, roams around "Parade Ground", fountain area. (Elvaan/Female)
- Second Dark Lily: Maryse, roams around "Laborman's Way" area. (Hume/Female)
![]() Bastok:
Bastok:
- First Dark Lily: Selma, roams around "Gold Street" area. (Hume/Female)
- Second Dark Lily: Pretty Heart, roams around surrounding "Metalworks" area. (Galka/Male)
![]() Windurst:
Windurst:
- First Dark Lily: Bikho Ronpotteh, roams around "Huntsman's Court" area. (Mithra/Female)
- Second Dark Lily: Guwanana, roams around far south "Rhinostery" area. (Tarutaru/Female)
Event Stalls
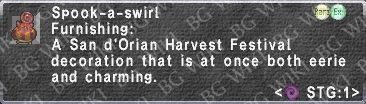
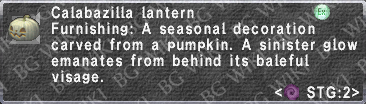
Special Harvest Festival stalls will make an appearance in the following areas, offering all manner of seasonal goodies for sale. Furthermore, decorate your Mog House with three new lanterns available in each nation, and your moogle just might have a surprise for you the next time you speak with him!
- This special gift may still be obtained after the Harvest Festival has ended, as long as the necessary conditions have been met.
♦Stall Locations
![]() Northern San d'Oria (D-8)
Northern San d'Oria (D-8)
![]() Bastok Mines (H-9)
Bastok Mines (H-9)
![]() Windurst Waters (north side) (G-10)
Windurst Waters (north side) (G-10)
|
Item |
Cost (Gil) |
Location |
|---|---|---|
|
1,000 | All |

|
5,000 | All |

|
5,000 | All |

|
5,000 | All |
|
10,000 | |

|
10,000 | |
|
10,000 |
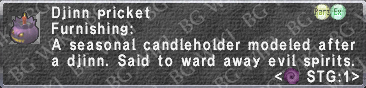
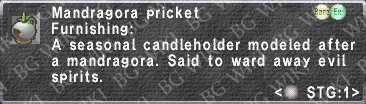
 Korrigan Pricket
You may obtain a Korrigan Pricket from your moogle if you set Jack-o'-Pricket, Djinn Pricket, and Mandragora Pricket in your Mog House layout.
This must be done from the Mog Safe 1 and not 2.
After the next conquest tally your moogle will reward you with the Pricket. If it does not then you must remove any conflicting items such as the Galley Kitchen first, and then wait for the next tally.
Pumpkin Hunt
New starting in 2020 is a pumpkin hunt similar to the Let's Go! Vana'diel Day! event held in October 2017.
On the official forums, developers hinted to "use your eyes and ears" to help locate pumpkins.
In these zones during the event a new BGM plays called "Devils' Delight", the song accessed from ![]() Sheet of harvest tunes.
Sheet of harvest tunes.
2020 Pumpkin Locations
Examining a pumpkin grants a specific item. When rearranged correctly, all of the first letters spell ADVENTURE.
| ||||||||||||||||||||||||||||||
| Additional Rewards | ||||||||||||||||||||||||||||||
|---|---|---|---|---|---|---|---|---|---|---|---|---|---|---|---|---|---|---|---|---|---|---|---|---|---|---|---|---|---|---|
Finding five pumpkins rewards players with the 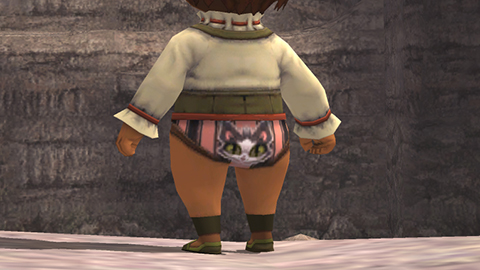 . .
| ||||||||||||||||||||||||||||||
| Finding all nine pumpkins grants the | ||||||||||||||||||||||||||||||
2021 Pumpkin Locations
Examining a pumpkin grants a specific item. When rearranged correctly, all of the first letters spell DISCOVERY.
| ||||||||||||||||||||||||||||||
| Additional Rewards | ||||||||||||||||||||||||||||||
|---|---|---|---|---|---|---|---|---|---|---|---|---|---|---|---|---|---|---|---|---|---|---|---|---|---|---|---|---|---|---|
| Finding five pumpkins rewards players with the and | ||||||||||||||||||||||||||||||
| Finding all nine pumpkins grants the | ||||||||||||||||||||||||||||||
2022 Pumpkin Locations
Examining a pumpkin grants a specific item. When rearranged correctly, all of the first letters spell BON VOYAGE.
| ||||||||||||||||||||||||||||||
| Additional Rewards | ||||||||||||||||||||||||||||||
|---|---|---|---|---|---|---|---|---|---|---|---|---|---|---|---|---|---|---|---|---|---|---|---|---|---|---|---|---|---|---|
| Finding five pumpkins rewards players with the , | ||||||||||||||||||||||||||||||
| Finding all nine pumpkins grants the | ||||||||||||||||||||||||||||||
2023 Pumpkin Locations
Examining a pumpkin grants a specific item. When rearranged correctly, all of the first letters spell EXPLORERS.
| ||||||||||||||||||||||||||||||
| Additional Rewards | ||||||||||||||||||||||||||||||
|---|---|---|---|---|---|---|---|---|---|---|---|---|---|---|---|---|---|---|---|---|---|---|---|---|---|---|---|---|---|---|
| Finding five pumpkins rewards players with the , | ||||||||||||||||||||||||||||||
| Finding Seven pumpkins rewards you with | ||||||||||||||||||||||||||||||
| Finding all nine pumpkins grants the |
||||||||||||||||||||||||||||||
