|
The effect of Building Flourish depends on the number of Finishing Moves available when using it. The maximum number of Finishing Moves it consumes is 3.
| Number of FMs |
Effect
|
| 1 |
Accuracy bonus
|
| 2 |
Accuracy bonus, attack +25%
|
| 3 |
Accuracy bonus, attack +25%, critical hit rate bonus
|
Flourishes III
Our most devastating Abilities!!!
Flourishes III consume Finishing Moves in exchange for offensive buffs.
| Flourishes III |
Recast |
FMs consumed |
Effect
|
| Climactic Flourish |
90 seconds |
1-5 |
Enforces a Critical hit for the first hit of a certain number of attack rounds.
Adds a base damage bonus of 50% CHR to those hits.
|
| Striking Flourish |
30 seconds |
2 |
Enforces a Double attack for the next attack round.
Adds a base damage bonus of 100% CHR for the first hit.
|
| Ternary Flourish |
30 seconds |
2 |
Enforces a Triple attack for the next attack round.
Adds a base damage bonus of 100% CHR for the first hit.
|
Climactic Flourish enforces a critical hit for the first hit of one attack around per consumed Finishing Move. A perfect match with Rudra's Storm, your premier single-hit WS. Performing back to back critical Rudra'ses to make a Darkness skillchain can deal devastating amounts of damage very fast.
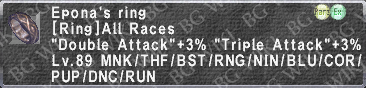
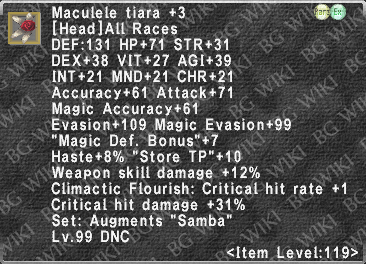
Maculele Tiara +3 is crucial for Climactic Flourish. Wearing it upon activation adds another critical hit, and wearing it during the actual hits grants you a 25% critical attack bonus, which is a huge boost to weapon skills that deal the majority (or all) of their damage on the initial hit.
|
It's a little bit complicated to create a solo Skillchain involving Climactic Flourish, because it consumes all Finishing Moves. You can perform a Step, preferably with Presto, after activating Climactic Flourish and before your weapon skill and/or use No Foot Rise after your weapon skill. Stepping before the first weapon skill means you have more TP towards your second weapon skill. For the same reason, No Foot Rise is used after your first weapon skill, because it also grants you TP when used with an augmented Horos Casaque +4.
An easier way to perform solo Skillchains with Climactic Flourish is using Sekkanoki when using a Samurai sub job.
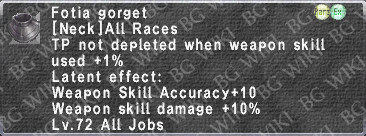
Striking Flourish and Ternary Flourish on the other hand are best used with Dancer's multi-hit weapon skills, especially Pyrrhic Kleos. When using Fotia Belt and Fotia Gorget for this weapon skill, each extra hit adds another 1.95 fTP to damage calculation.
The CHR bonus works exactly like Sneak Attack and Trick Attack: It is added to the base damage outside the fTP term:
Quote:
WS damage = ((DMG + fSTR + WSC) * fTP + (CHR bonus)) * pDIF
SP Abilities
| Ability |
Effect
|
| Trance |
Reduces the TP cost of all Job Abilities to 0 and reduces recast timers for all Waltzes.
|
| Grand Pas |
Grants 5 Finishing Moves.
Resets recast timers for Flourishes to 0 while active and Flourishes don't consume Finishing Moves.
|
Trance used to be your emergency button for when you really need to spam Waltzes in quick succession. Thanks to Job Points, it now grants you up to 2,000 TP when using it too, turning it into another source of instant TP.
Grand Pas also can be used for that purpose by repeatedly using Reverse Flourish. Most of the time, Grand Pas is used as a zerg tool by chaining multiple weapon skills, possibly stacked with Climactic Flourish, in short order.
The best way is to use these two SP's simultaneously and perform devastating Climactic Rudra's back-to-back in a very short window. Have your steps ready, prepare 3,000 TP, and:
Outside of Escha:
Climactic > Rudra > RF > Grand Pas > Rudra > RF Rudra > Trance > Rudra > RF Rudra > RF Rudra > engage, generate TP > Climactic > Rudra > generate TP > Rudra = a total of 8 Climactic Rudras
In Escha:
Climactic > Rudra > RF > Grand Pas > Rudra > RF Rudra > Trance > Rudra > RF Rudra > RF Rudra > Revitalizer > Climactic > RF Rudra > Lucid Wings II Rudra > Daedalus Wing Rudra - 9 Climactic Rudras without TPing (could go for 10 with TPing before Revitalizer)
|
Merits
Dancer's group I merits are pretty clear: 5/5 Haste Samba effect and 5/5 Reverse Flourish effect. Steps don't need any extra help with accuracy between their innate accuracy bonus of +10 and Presto. As for Building Flourish... can be easily used when CF timer is down for WS.
| Group II |
Effect
|
| Closed Position |
Increases accuracy and evasion by 3 per merit level when face-to-face with the enemy.
|
| Fan Dance |
Reduces physical damage taken and gives "Enmity +15".
Reduces Waltz recast timers by 5% for each merit level past the first one. Renders Sambas unusable.
|
| No Foot Rise |
Grants 1 Finishing Move per merit level.
|
| Saber Dance |
Increases Double Attack rate. Increases Samba duration by 5% for each merit level past the first one.
Renders Waltzes unusable.
|
The recast timers on Fan Dance, Saber Dance and No Foot Rise are all 3 minutes.
The group II merits used to be more complicated and the "right" setup has changed many times during the last few years.
These days, the most common setup is this one after Relic +3 Upgrades:
3/5 No Foot Rise feels like the right number, because it caps Finishing Moves from scratch with just one extra Step. It also provides enough TP by itself to get to 1,000 TP with Reverse Flourish after a WS and 1-2 attack rounds for a self-Skillchain (when used with Horos Casaque +4.)
Support Jobs
Based on your play style and/or the Content you're participating in, along with what REMA you're using, Support Jobs may vary:
- Warrior is usually the go to option if you wanted to maximize your DPS, especially with
 Twashtar (Level 119 III) Twashtar (Level 119 III)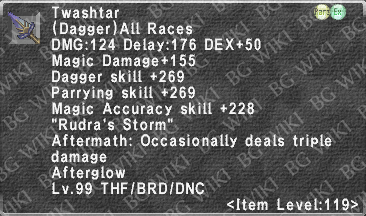 since your white Damage will gain a major boost from the Double Attack traits. since your white Damage will gain a major boost from the Double Attack traits.
- Dragoon has the usual attractive aspects for melee DPS jobs - 7% Weapon Skill Damage (that actually works on multi-hit WS) and Super Jump/High Jump to shed enmity.
- Dark Knight is also a valid option and can add extra power to your DPS, rarely used though due to capped attack situations these days from support jobs in your party.
- Samurai is another attractive option for DPS and becomes a great candidate if you're a Mythic wielder due to its native Store TP trait and how
 Terpsichore (Level 119 III) Terpsichore (Level 119 III) works. works.
- Ninja and Rune Fencer are great for physical and magical defensive purposes respectively, if you truly need survivability.
- These are mentioned for completeness. Frankly, if you can't survive something with 50% DT in your engaged set and Dancer's existing tools, you likely shouldn't bother to solo it. But Utsusemi is still incredible when it actually works on whatever you're fighting.
Weapons
Dancers are super proficient at wielding daggers... and super non-proficient at wielding other weapons. They're not even on  Naegling Naegling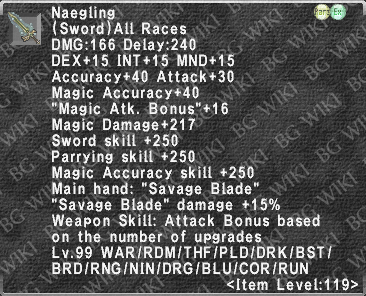 , so their only relevant non-piercing damage type option in Odyssey is , so their only relevant non-piercing damage type option in Odyssey is  Karambit Karambit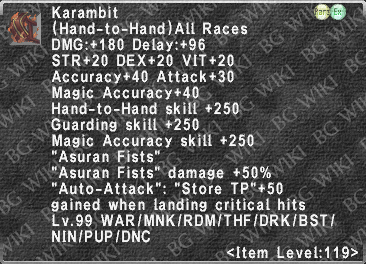 . .
Let's talk Daggers:
- Generally, the Terpsichore (Level 119 III) + Twashtar (Level 119 III) combination is preferred for maximum DPS in situations where Accuracy is also needed.
- With this combination you don't have to worry that much about WS order in fights with other DPS members and will definitely cause severe damage overall, also it will make life easier on steps and tanking without losing that much of your overall DPS with AM3 up.
- However, especially in situations where you have lots of buffs from other party members,
 Centovente Centovente 's 1000 TP Bonus augment is also very popular. Just note that it doesn't have any Dagger Skill or Accuracy on it, so you'll have to make up that 250+ Accuracy loss in gear and buffs. 's 1000 TP Bonus augment is also very popular. Just note that it doesn't have any Dagger Skill or Accuracy on it, so you'll have to make up that 250+ Accuracy loss in gear and buffs.
 Terpsichore (Level 119 III): Terpsichore (Level 119 III):
- Dancer's Mythic Weapon. Requires a lot of time and also 30,000
 Alexandrite Alexandrite and so on. and so on.
- Allows you to use the weaponskill Pyrrhic Kleos without completing Unlocking a Myth (Dancer) and substantially boosts its damage (At maximum (R15) augment, +49.5% damage.)
- Aftermath 3 from a 3,000 TP WS gives "Occasionally Attacks Twice (40%) or Thrice (20%)" for 3 minutes, generating lots of TP. You know you love TP.
- Gives one extra Finishing Move per Step.
 Twashtar (Level 119 III): Twashtar (Level 119 III):
- Dancer's Empyrean Weapon. Get ready to make friends with Glavoid.
- Afterglow gives a 5% Critical Hit Rate boost to your whole party. The harder-hitting among your allies will particularly enjoy this.
- Aftermath 3 from a 3,000 TP WS gives a 50% chance to deal triple damage on all regular melee hits (not WS). This makes a lot of white damage happen.
 Aeneas: Aeneas:
- Dancer's Aeonic Weapon.
- Relatively easier to get than the other REMAP options, and while weaker than the other options it's certainly not useless.
- Enables you to perform an Ultimate Skillchain. You'll have difficulty making Light Skillchains without this or
 Mpu Gandring (Level 119 III) Mpu Gandring (Level 119 III)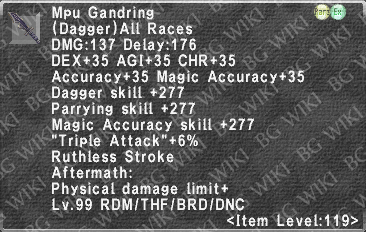 . .
- Allows you to use the Merit Point weaponskill Exenterator at full "Rank 5" strength regardless of the actual number of merit points invested in it.
- The TP Bonus from this weapon is not applied to weapon skills unless it's being wielded in the MAIN hand. (Magian Trial weapons have TP Bonus augments, which are the only exception to this rule.)
Earlier Weapon Options:
 Tauret: Tauret:
 Centovente: Centovente:
- See the Dagger Trials of the Magians page.
- You're aiming for the +1000 TP Bonus augment from the path ending in Trial 3201.
- This weapon is level 99 - meaning you're giving up aout 250 accuracy relative to even a
 Kaja Knife Kaja Knife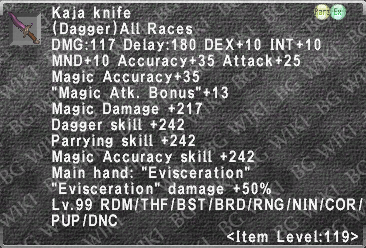 - but in return, this TP Bonus augment does work in the offhand, supercharging your weaponskills. - but in return, this TP Bonus augment does work in the offhand, supercharging your weaponskills.
- A great tool any time you have the accuracy to hit what you're fighting, and likely to become your best friend sooner rather than later.
For players brand new to 99 with no other levelled jobs:
Job Specific Equipment
Artifact Armor
| Maxixi Attire Set
|
| Item
|
Upgrade?
|
Notes
|

|
No, +1
|
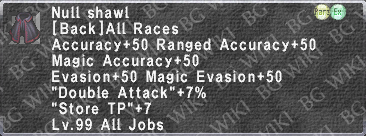
This is primarily useful for the Samba duration, which is maxed out at +1. Step Accuracy is largely unnecessary.
|

|
Yes, +3
|
Take this to +3. This is a critical piece for Waltz abilities.
|

|
Yes, +4
|
Incredible WSD piece - competitive with Nyame in situations where -damage taken isn't needed and much easier to get. Max this out.
|

|
No
|
Don't even bother. Skillchain Bonus may sound decent on paper, but realistically you should make  Horos Tights +4 Horos Tights +4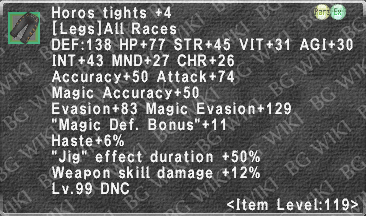 instead. instead.
|

|
No, +1
|
Utility piece for Jig Duration and Waltz Potency. If you need the Waltz Potency, reforge this beyond +1. If you don't, you don't. (See the math discussed briefly above.)
|
Relic Armor
| Horos Attire Set
|
| Item
|
Upgrade?
|
Notes
|


Enhances "Trance" effect (80s duration)
|
Maybe, +1
|
Swap piece for Trance, and a Waltz Potency piece. If you don't want  Anwig Salade Anwig Salade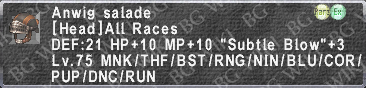 for -2 seconds recast on Waltz, take this to +3 and adjust your Waltz Potency sets accordingly. Otherwise, leave it at +1. for -2 seconds recast on Waltz, take this to +3 and adjust your Waltz Potency sets accordingly. Otherwise, leave it at +1.
|

Enhances "No Foot Rise" effect (+50 tp/merit)
|
No, +1
|
A swap piece for No Foot Rise, and thus it can stay at +1.
|

Enhances "Fan Dance" effect (+1% min -PDT per merit)
|
No
|
They have to be worn to maintain the effect. Not worth making unless you're exploring DNC tanking... in which case, honestly, you should try to make  Regal Gloves Regal Gloves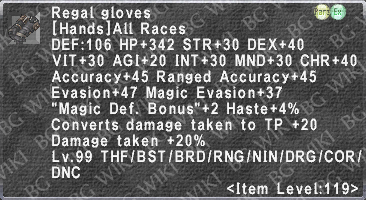 work instead despite its +20% Damage Taken. work instead despite its +20% Damage Taken.
|

Enhances "Saber Dance" effect (+1% min DA per merit)
|
Yes, +4
|
Priority piece. Incredible WSD pants that compete with R25 Nyame, and are much easier to get. Jig Duration as a bonus.
|

Enhances "Closed Position" effect (+3 STP per merit)
|
Yes, +3
|
Prior to Empyrean +2/+3 pieces, these were the go-to TPing boots. They are still an overall higher value for STP, assuming Closed Position is in effect, but Empy boots are have -DT% and are much safer to wear. They're still worth making, but are lower priority than they used to be, and will largely be for the Steps discount.
|
Empyrean Armor
| Maculele Attire Set
|
| Item
|
Upgrade?
|
Notes
|

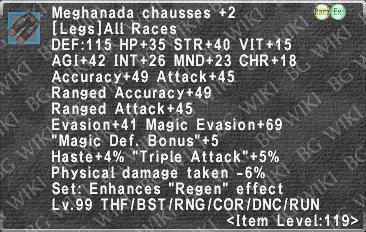
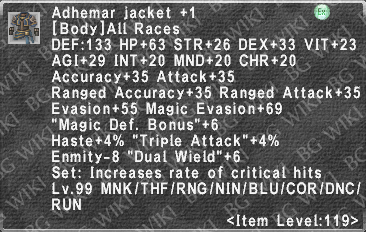
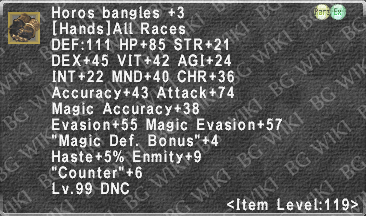
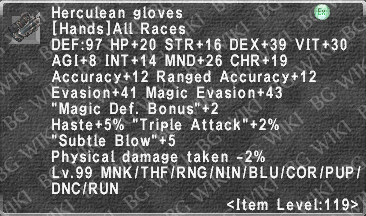
|
Yes, +3
|
High priority. An incredible WSD piece, a good TP piece, and the Climactic Flourish modifier is extremely valuable.
|

|
Maybe
|
A niche body for TPing at low haste values, as well as a high -DT piece for idling. Alternatively you can simply wear Nyame for its superior Magic Evasion values, given the broad availability of -DT gear.
|

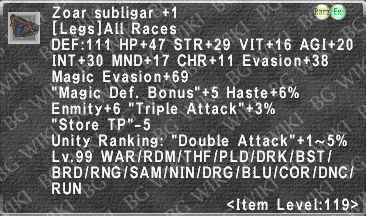
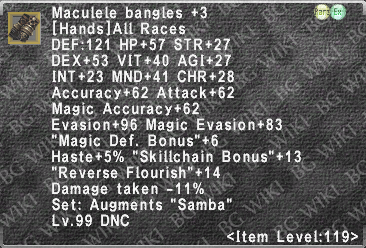
|
Yes, +3
|
Essential swap piece for Reverse Flourish. Worth upgrading to +3, but extremely potent even at +1.
|

|
Eventually, +3
|
+10% PDL has huge potential, but its value is going to depend on the rest of your gear and how often you play in attack capped situations. Worth upgrading to +3, but not urgent.
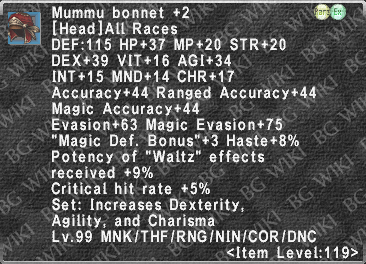
|

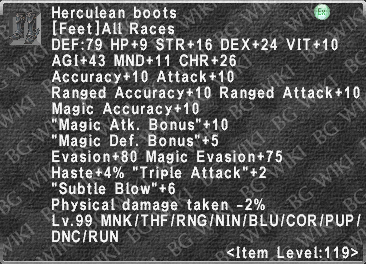
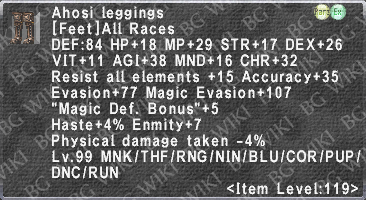
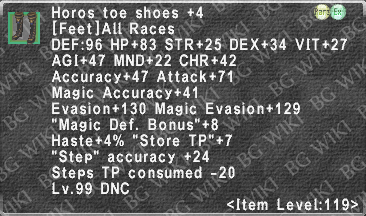
|
Yes, +3
|
High priority. Your go-to TPing shoes when -DT is needed and you can't benefit from Closed Position. Additionally, another 6% crit rate for Feather Step.
|
Equipment Sets
For fancy best-in-slot sets, see the All Jobs Gear Sets/Dancer page to give you something to aspire to.
- Also possibly go a few revisions back so you don't see nothing but Su5 Limbus gear, if that grind isn't your style.
|


 procs. Rarely will you use any of these for their intended purposes.


_description.png)
_description.png)


_description.png)