The Voracious Resurgence | |
| Prime Weapons • Ultimate Weapons • Ultimate Augments • Abjurations iL119 • JSE Necks • Divergence Augments • Escutcheons | |
| Reforged Armor Artifact: +1 • iL109 • iL119/+2/+3/+4 Relic: +1/+2 • iL109 • iL119/+2/+3/+4 Empyrean: +1/+2 • iL109 • iL119/+2/+3 |
Guides • Crafting • Trusts • Apex Monsters |
Community White Mage Guide
|
Latest Updates
- Adjusting placement and format of certain sections to fall more in line with other Community Guides. --Brahmsz (talk)
General Information
- Some say it's the easiest job to gear up, some say it's the hardest job in FFXI. For a new player, WHM can be an opportunity.. but it can also be a nightmare.
- A successful WHM comes down to 3 things:
- Know your enemy and spell priority;
- Use strategy to buy more reaction time;
- Have good macros.
- This guide will cover topics useful for an Endgame WHM. From macros setup, JA and spells priority, gear sets to useful tips in battles.
Strategies, Tips, and Advice
Everything About Priority
- Playing WHM is all about making decisions on the priority of each casting task. Every spell has a global 3 second delay after it's done/casted. And 3 seconds is long enough window to wipe the entire party if wrong choices were made. Therefore the key to keep everyone alive is to cast the high priority spells (such as cure) first, but work on low priority spells (such as Boost-Stat or Auspice) when you have time. This avoids all the tasks clog together if tons of high priority tasks come up in a short period of time.
- The priority of each spell isn't always the same, it can change depending on party setup, strategy, or circumstance. But most of the time cure is the absolute highest priority.
- When in doubt, prioritize cure over everything else.
- In dangerous fights, put magic defensive buffs such as Bar spell and Shell V on higher priority list. DDs without Shell V or Bar spell often get one shotted by magic damage with no chance to save them.
- Doom, magic defense down and defense down needs to be erased ASAP. I would still put cure on higher priority than removing Doom or defense down. If you need to buy yourself time to -na and erase everyone, use bigger cureskin on the DDs before working on those status ailments.
- Status ailments such as Sleep, Paralyze or Petrification don't kill a DD, put them on the lower priority.
- Put the rest of the WHM buffs on the lowest priority. Since you can refresh the buffs by overwriting them anytime you want, it can be a good idea to rebuff the party when you have time even if these buffs haven't wear off.
- Debuff priorities are strategy dependant. Some mobs can be very dangerous without silence, so silence them first! Another debuff that a WHM can work on at start is Dia II.
See the spells section for more details about priority.
Pre-emptive Casting
Pre-emptive casting is a technique that WHM starts casting before a mob TP move completes. This really speeds up the process of getting the casting tasks done. A good WHM will react to situations fast, a great WHM will move before bad things happen.
Use different visual hints in game to decide when to start pre-emptive casting. Some examples:
- Mobs like Dahak, Dynamis D Wave 1 bosses, and certain beastmen has very noticable "jump" animation before their AoE attack. Start casting Curagas when you see them jump, curaga will land right after party takes damage!
- Certain Ambuscade mobs has predictable moves based on HP percentage. Cast appropriate -na and cures as soon as TP move red line appears.
- Some beastmen mobs have TP move that drawn-in or knock back, which interrupts casting and slows down -na and cures. Start casting Esuna when you see TP move animation starts so everyone gets erased before knock back spell interruption.
- If you have battlemod, it's possible to predict TP moves from chat log.
Abilities, Traits, Merits and Job Points
Abilities and Traits
|
| ||||||||||||||||||||||||||||||||||||||||||||||||||||||||||||||||||||||||||||||||||||||||||


Merits
| Group 1 | |||
|---|---|---|---|
| Name | Description | Notes | Investment |
| Divine Seal Recast | Shorten recast time by 20 seconds. | This is not really a needed upgrade and the points are better spent elsewhere. | 0/5 |
| Cure Cast Time | Shorten cast time of all Cure spells by 4 percent. | This is not needed with how quickly it is to hit the Fast Cast + Cure Casting Time 80% limit. | 0/5 |
| Bar Spell Effect | Increase potency of Bar spells and add a magic defense bonus of 2 points. | The most important upgrade in Group 1. 5/5 Always. | 5/5 |
| Banish Effect | Increase damage of Banish by 2, and length of def. down effect by 2 seconds. | This is not really a needed upgrade and the points are better spent elsewhere. | 0/5 |
| Regen Effect | Increase the amount of HP recovered each interval by 1. | This get used more often than everything else. | 5/5 |
| Group 2 | |||
|---|---|---|---|
| Name | Description | Notes | Investment |
| Martyr | Sacrifices HP to heal a party member double the amount. Recast: 10min. Increase amount of HP healed by 5 percent. |
Generally used for emergency recovery if silence/mute is on. Put 1 point into it to unlock it, add more points for fights that potentially needs it. |
1/5 |
| Devotion | Sacrifices HP to grant a party member the same amount in MP. Recast: 10min. Increase amount of MP granted by 5 percent. |
Useful for recovering tank and GEO MP. Put 1 point into it to unlock it, add more points for fights that potentially needs it. |
4/5 |
| Animus Solace | Increases the maximum damage absorbed by Stoneskin applied by certain healing spells during Afflatus Solace. Increases maximum damage absorbed by 2%. |
The most important upgrade in Group 2, 5/5 always. | 5/5 |
| Animus Misery | Increases the maximum total damage stored during Afflatus Misery. Increases maximum total damage stored by 5%. | This is not really a needed upgrade and the points are better spent elsewhere. | 0/5 |
Job Points & Gifts
| Job Points | ||
|---|---|---|
| Job Point Category | Effect | Total Value |
| Benediction Effect | Recovers caster's MP when Benediction is activated | 20% |
| Asylum Effect | Increases magic evasion while under the effects of Asylum. | 80 |
| Divine Seal Effect | Reduces the amount of enmity accrued by casting Cure spells while under the effects of Divine Seal. | -60 |
| Magic Accuracy Bonus | Increases magical accuracy. | 20 |
| Afflatus Solace Effect | Increases potency of Cure while under the effects of Afflatus Solace. | 20* |
| Afflatus Misery Effect | Increases the potency of Banish and Auspice while under the effects of Afflatus Misery. | 40 |
| Divine Caress Duration | Increases the duration of strong resistance to status ailments dispelled while under the effects of Divine Caress. | 40s |
| Sacrosanctity Effect | Increases the minimum value of magic defense that weakens over time while under the effects of Sacrosanctity. | 20 |
| Regen Duration | Increases the effect duration of Regen. | 60s |
| Bar Spell Effect | Increases potency of Bar spells. | 40 |
| Gifts | ||
|---|---|---|
| Gift Category | Description | Value |
| Cure Potency Bonus | Increased Cure potency | 23 |
| Magic Accuracy Bonus | Increased Magic Accuracy | 50 |
| Magic Attack Bonus | Increased Magic Attack | 22 |
| Magic Defense Bonus | Increased Magic Defense | 50 |
| Magic Evasion Bonus | Increased Magic Evasion | 50 |
| Physical Accuracy Bonus | Increase Physical and Ranged Accuracy | 14 |
| Healing Magic Skill Bonus | Increased Healing Magic Skill | 36 |
| Divine Magic Skill Bonus | Increased Divine Magic Skill | 36 |
| Healing Magic Cast Time Decrease | Reduced cast time of healing magic | 8% |
| Capacity Point Bonus | Increased Capacity Points Earned | 320% |
| Milestone Gifts | ||
| Superior 1 (50) | Enables the player to equip items marked as Superior 1 (Su1) | |
| Superior 2 (100) | Enables the player to equip items marked as Superior 2 (Su2) | |
| New Spells (100) | Reraise IV | |
| Superior 3 (500) | Enables the player to equip items marked as Superior 3 (Su3) | |
| Regen Bonus (550) | Increased amount of HP restored by Regen spells by 5 | |
| Superior 4 (1200) | Enables the player to equip items marked as Superior 4 (Su4) | |
| New Spell(1200) | Full Cure | |
| Superior 5 (2100) | Enables the player to equip items marked as Superior 5 (Su5) | |
| ★Master! (2100) | Reduces the recast of Benediction and Asylum | |
Support Jobs
|
|
|
|
Notes on Spells
This section will explain common WHM spells, as well as their priority.
Cure (Single target)
Single target cures are fast, and they add cureskin on the target under Afflatus Solace. Pick your cure tiers base on your cure potency set and situation.
- Cure IV is your default single target cures to save lives. It's strong enough to recover at least 50% of HP of your DD, it can be accessioned and AoE cure different party in an alliance. In old zones such as HTBC/UNM/Master Trial fights, please be mindful that it can generate more enmity than Cure V and VI.
- Cure III is useful to apply cureskin on DD if you feel they can be one shotted. Since they have low MP cost its possible to spam Cure III on a DD and keep cureskin up entire time. If you have really good cure potency set then it can also replace Cure IV as default single target cures.
- Use Cure V if your DDs are really dying. This spell generates static enmity, a good default cure choice if enmity is an issue. If you see a really, really nasty TP move coming, feel free to use Cure V for a very strong cureskin and save them.
- Cure VI isn't worth using unless your DD is a DRK with 6k+ HP.
- If mob has potential to one shot a tank, a common endgame strategy is to use Full Cure for very strong cureskin then recover MP with Sublimation charges, Vile Elixirs(+1) or WS Mystic Boon.
Curagas
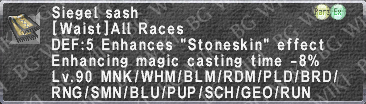
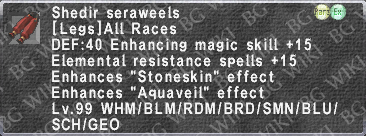
Stoneskin
WHM has 2 "wall building" spells that buys reaction time: Stoneskin(or cureskin) and Regen IV. Stoneskin acts as HP extension which makes DD harder to get one shotted.
- Since majority of risks in higher level endgame are high damage one shot moves, IMO any spare Accession charges should be spent on Stoneskin if you do not need AoE -na nor fast cast Arise.
- Compare with cureskin, Stoneskin may be weaker than a higher tier cureskin but they last longer, and they are more MP efficient than cureskin. Thus they can be keep up more easily. If you have stoneskin up then you can't have cureskin, so choose wisely.
Regen IV
Another "wall building" spell similar to Stoneskin, Regen IV buys reaction time for the healer to do something else or make mistakes.
- Since majority of the risks come from strong one shot move, Stoneskin should be on higher priority than Regen IV most of the time.
- Regen IV is only really good if you have top tier regen potency set. Without good regen potency and duration enhancement gears its not really worth the cast time since they wear off too fast don't really save lives in today's fast paced endgame.
- Without top tier potency and duration set they don't really worth an Accession book charge most of the time. Save Accession book charges on other JA unless you have absolutely nothing to spend book charges on.
- However, if you are fighting something with strong DoT aura, it can be convenient to keep Regen IV up.
Protect and Shell
Protect V and Shell V reduces damage taken from phyaical and magical attacks. Protect V increases defense by 220 and Shell V reduces damage taken by 29%.
- If your DD died or dispelled and needs rebuff, Shell V should be on higher priority than Protect V. Shell V is percentage based damage taken reduction, so it can be the difference between life or death in magic damage heavy fights. People without Shell V on can die really really fast, put the shell V on ASAP!
- However, if mob has no magic damage TP move/spells then feel free to skip it if you can't afford casting it.
Bar Spells
Bar Spells raise your magic evasion for that specific element/status. See the chart below for the element of each debuff.
Debuff Association Element Aligment  Fire
Fire
Plague, Amnesia, Addle, Burn, and Magic Attack Down  Earth
Earth
Slow, Petrify, Terror, Rasp, and Accuracy Down  Water
Water
Poison, Drown, and Attack Down  Wind
Wind
Gravity, Silence, Choke, and Defense Down  Ice
Ice
Paralyze, Bind, Frost, Evasion Down  Thunder
Stun, Shock, and Magic Defense Down  Light
Light
Charm, Certain Sleeps, Dia, Flash, Finale, and Magic Accuracy Down  Dark
Dark
Certain Sleeps, Bio, Blind, Dispel, and Magic Evasion Down
- Stacking Bar-Status spell and the same Bar-element will increase the chance of resisting them. For example casting Baraera and Barsilencera will have greater Silence resist chance than only having Barsilencera on.
- Before a fight, check BG-Wiki and learn about the Bar spells that are required and plan accordingly.
- You can give yourself different Bar Spells from the rest of the party if you run away from the them. It's useful if mob gives different debuffs that hurts certain job type more than another. For example, you can cast Baramnesiara on DDs, run away then cast Barsilencera on yourself.
- Be prepared to change your Bar spell mid fight. For example in Dynamis D every circle needs different Bar element, Volte BLU needs Barstone, but Volte DNC THF needs Baraero and so on. Setup your macros in a way that's easy to change elements quickly.
- Bar spells are high priority in most fights. If mob has strong elemental magical damage, keep it on entire time.
Boost-Stats
The main purpose of Boost-Stats is to increase DD DPS.
- Normally it's STR, DEX, AGI or VIT depending on DD WS type. If you have multiple DD and not sure what to use, STR is a safe choice since it's part of damage formula for physical WS.
- If you have time, you can run away from the DDs and self buff Boost-MND for a bit more cure/enfeeble power. But they aren't on high priority.
- The priority of Boost-Stats are pretty low. It's not the end of the world if DD lose their 25 STR. You can ignore it if you are busy but they are easy to rebuff. Try to refresh this buff often when you have time so DD maintain their output.
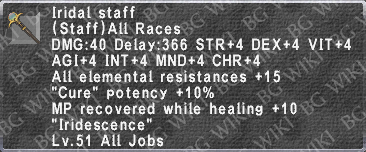
Aurorastorm
You should always have Aurorastorm on. This makes your cure stronger if you are using elemental obi, Twilight Cape and Iridal/Chantoyant Staff.
- Put Aurorastorm on high priority and refresh it when you can before it wears.
-Na Spells
Esuna
Notes on Macro Setups
An effective macro will greatly improve WHM performance in endgame.
- Cures are your highest priority, arrange your Cure spells in a way that's easily accessible.
- For other spells, place the relevant JA and spells next to each other.
- Pressing up and down to change Macro sets will slow you down. Avoid using too many pages when you build your macro.
- For spells like Cure that needs to be FAST, avoid using commands like that needs extra steps for target selection.
- Press Ctrl/Alt+numbers to quickly use a macro.
Here's an example of WHM macro.
Setting Up Cures for Party Members
Normally, a fast way to quickly use single target cure on a member is to select your party member with F1 to F6, then use /ma "Cure IV" <t> macro. However this requires 2 clicks.
The absolute fastest way to setup your cure macro is use <p0> to <p5>.Your cure will fire off instantly on the correct target, without ever need to click up and down to select the member.
Create a macro that looks like this line in it and name it C1:
/ma "Cure IV" <p0>
Then create another macro with this and name it C2:
/ma "Cure IV" <p1>
Repeat until you have 6 macros for all 6 members. Your macro should looks like this:
![]()
If you need to cure, press Alt+1 to cure yourself, press Alt+2 to cure the 2nd member, or Alt+6 to cure the 6th. You only need to press a button once to cure a person, and never need to press up and down for the target select which slows you down.
Now you have 4 more spaces. Let's add Curaga III and IV for AoE cures.
/ma "Curaga III" <t>
In the battle, press F1 to F6 to quickly select a member, then click the macro to instantly heal that member and people around them.
- For any spell, <t> is faster than <stal> because <stal> will make you press the confirm button twice. <stal> let you select a target after you select a spell, since you are using F1 to F6 for fast targetting, this step isn't necessary.
After Curagas are done your macro should look like this:
![]()
2 more spaces left, which can be anything you want, you can change them depend on content. Such as smaller cure for cureskin, bigger cure like Cure V, another hot key for Curaga that directly cures a frontline member or a -na or erase.
Setting Up Cures for Alliance Members
In alliance content, it's much harder to take care of members from a different party. But shit can happen and sometimes having a WHM who cures from a different party aggressively makes a difference.
However, targeting an alliance member takes even more time than party members. If you use windower, you can quickly select the right alliance target with Alt or Ctrl+F1-F6 hot keys. But creating a short cut for cures is still much faster, especially for none windower users.
In an alliance, tanks and DDs are jobs that get hit the most, if they die alliance performance will suffer more than supports such as BRD dying. Since endgame alliance only has 2 tanks and 2 DDs per party, create cure short cuts for 2 tanks and 2 DDs from a different party using <a10> to <a15> and <a20> to <a25>.
If your tank is the 3rd member in the first party of an alliance, on the same macro set, creat a macro like this:
/ma "Cure IV" <a12>
If you want to cure a DD in the second party 5th slot, create a macro like this:
/ma "Cure IV" <a24>
Since Accessions can turn Cure IV into AoE, put Accession right next to your Tank 1/2 and DD 1/2. Your alliance Cure palette should look like this:
![]()
If your Tank 1 in tank party lose HP, press Ctrl+4 to cure Tank 1. If your DD 1 from another DD party lose HP, press Ctrl+6 to cure that DD.
If you want to cure the entire tank party, press Ctrl+3 then Ctrl+4 to instantly AoE cure the entire tank party. This applies to 2nd DD party. Press Ctrl+3 then Ctrl+6 to instantly AoE cure the 2nd party.
This way you never need to go through the painful process of selecting the right member in the alliance when they need a quick cure.
Even though DD and tank takes damage most of the time, sometimes it's still necessary to cure your supports. But you will run out of space very quickly if you create a cure short cut for everyone, so save yourself some macro space with quick target macro like this:
/ta <a14>
This will instantly target the 5th member of the first party in an alliance. From there press up or down to get the right target then use /ma "Cure IV" <t> macro to cure.
- If you use windower, save yourself macro space by selecting alliance members with Alt or Ctrl + F1-F6 hot keys.
Cure Macro Palette Position
After your cure macros are done, use different palette for buffs, debuffs and -na. But your Cure macro set should be in the center of everything else. If you put all your cures on #1 then put buffs/debuffs on #10 and -na on #2. This way it's possible to go back to your cure macros as fast as possible after a raise/buff/na spell.
Put Relevant JA and Spells Together
Put JA and Spells that are relevant right next to each other to save time. For example, WHM use Stoneskin and Accession together for AoE Stoneskin buffs, therefore put them right next to each other.
![]()
Since Celerity and Penury are useful for Arise/Reraise IV, put them together.
![]()
WHM often needs to switch stance for Sacrifice/Esuna bonus effect. Put Solace/Misery close to the spells and switch stance depending on what you need to cast.
![]()
Finally, put Accession, Divine Seal and Divine Caress right next to -na and erase spells to use them quickly for status ailments removal.
Additional Note: If you use Windower, get the shortcuts addon. Being able to type "/c4 win" to Cure IV someone with the name "Windower" makes curing a full alliance a lot easier.
Equipment
Job-Specific Equipment
Artifact Armor
| Item | Upgrade? | Notes |
|---|---|---|
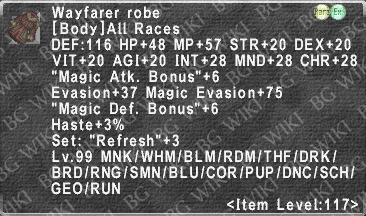
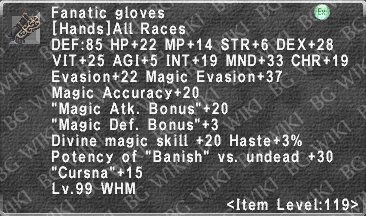
Theo. Cap +4 
|
Yes #5 | Set bonus enfeebles |
Theo. Bliaut +4 
|
Yes #3 | Cure Potency II and set bonus enfeebles |
Theo. Mitts +4 
|
Yes #4 | Cure Potency II |
Theo. Pant. +4 
|
Yes #1 | Cursna and Regen |
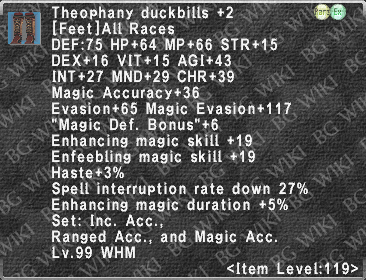
Theo. Duckbills +4 
|
Yes #2 | Enhancing Duration and set bonus enfeebles |
Relic Armor
| Item | Upgrade? | Notes |
|---|---|---|
Piety Cap +4 
|
Yes #3 | Don't need to take all the way to +3, just used as a macro piece for Devotion. |
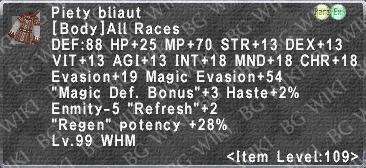
Piety Bliaut +4 
|
Yes #2 | Regen Potency and Benediction |
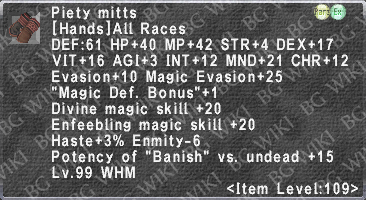
Piety Mitts +4 
|
No | Banish piece only |
Piety Panta. +4 
|
Yes #1 | Bar spells |
Piety Duckbills +4 
|
No | Do not need this piece.× |
Empyrean Armor
| Item | Upgrade? | Notes |
|---|---|---|
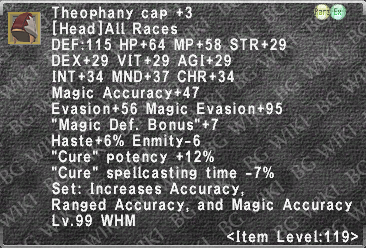
Ebers Cap +3 
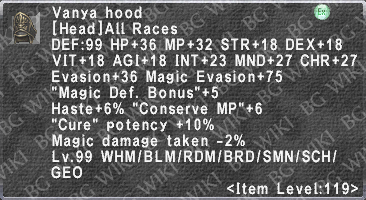
|
Yes #4 | Divine Veil if no Yagrush, best Fast Cast, and set bonus with Bar spells. |
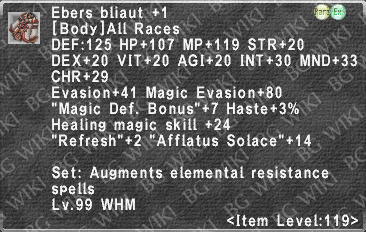
Ebers Bliaut +3 
|
Yes #2 | Cure 1-6 with Solace, idle if no Shamash Robe, and set bonus with Bar spells. |
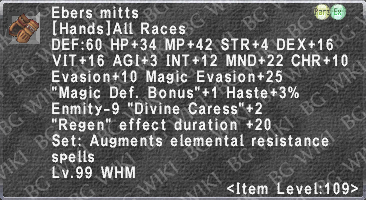
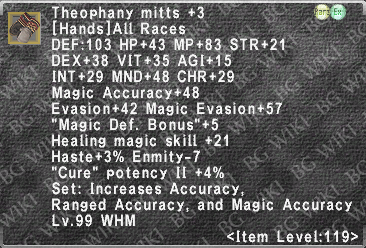
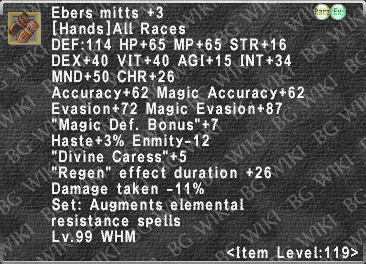
Ebers Mitts +3 
|
Yes #3 | Regen duration, Divine Caress, and set bonus with Bar spells. |
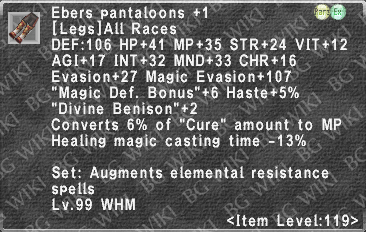
Ebers Pant. +3 
|
Yes #1 | Curing. You want this for all things cure. This is a must. |
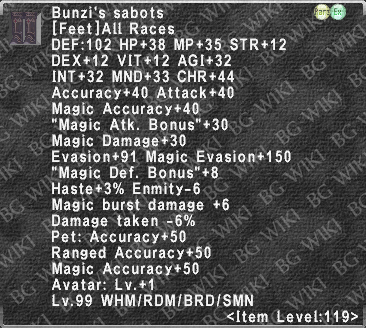
Ebers Duckbills +3 
|
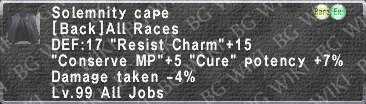
Yes #5 | Auspice and set bonus with Bar spells. |
- Gear from Ambuscade is great for a starting DT set and select pieces are still used well into High-End Equipment Sets.
- https://www.bg-wiki.com/bg/Category:Ambuscade_Rewards
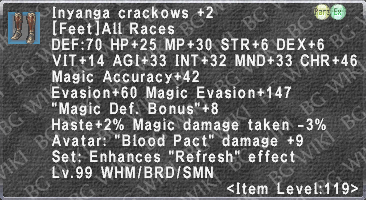
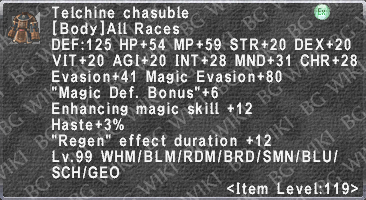
- Inyanga Tiara +2 - Regen Potency
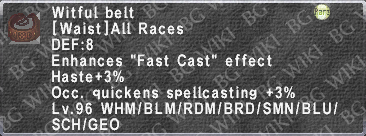
- Inyanga Jubbah +2 - Cannot go wrong with 14% Fast Cast
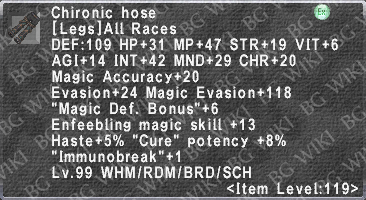
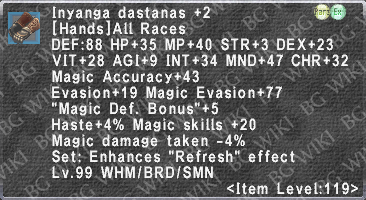
- Inyanga Dastanas +2 - Great enfeebling hands
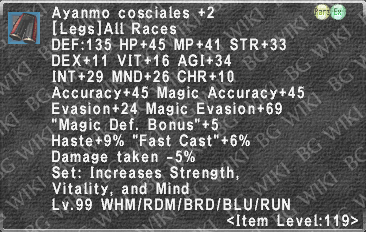
- Ayanmo Cosciales +2 - 6% Fast Cast when the highest is 8% at the moment.
Idle Sets
- Idle sets can cover an array of situations from restoring HP, MP, maintaining a defensive build while weakened and more.
- A new WHM will have harder time with MP, more so in lower tier content in a party setup without RDM. So aim for some refresh gears first.
|
|
|
|


Casting Focus Sets
- For a new WHM, your top priorities are to build a capped Cure potency set(50%) as well as a combined capped Cure Casting Speed/Fast Cast set (80%).
- Building upon thos two central sets, add any Cure Potency II obtainable.
Fast Cast
- The priority here is to cap Fast Cast 80% for Cures.
- Good news is that Fast Cast for Cures are easier to cap than other spells since you get 20% from merits, and many good cure potency gears has Cure Spell Casting Time- on them.
- SCH subbed will give you 2% fast cast in light arts and RDM subbed will give you 15% fast cast from job traits. These can also be your Arise/Raise sets, as Fast Cast is also counted towards recast time.
80% Fast Cast = 40% recast reduction at cast
- SCH subbed will give you 2% fast cast in light arts and RDM subbed will give you 15% fast cast from job traits. These can also be your Arise/Raise sets, as Fast Cast is also counted towards recast time.
|
|
|


Cure Potency Sets
- Again, for a new WHM, one of your top priorities is to build a capped Cure potency set (50%), then add any Cure Potency II obtainable.
- For remaining slots that can not get cure potency, it is highly recommended to stack DT, Defense, Magic Defense, and Magic Evasion in their High-End endgame sets for surviability or Conserve MP if you do HTBC/UNM/Master Trials.
- If you want full cure power you can add more MND or healing magic skill, or conserve MP if you do not have a BRD in the party.
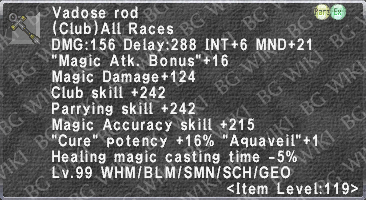
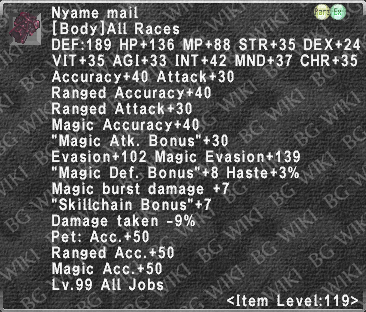
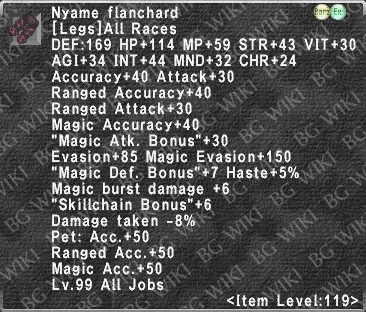
Cure
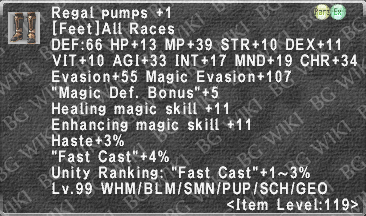
- Regardless of your gear, always use empyrean pants in your cure sets.
|
|
|


Curaga
- Afflatus Solace doesn't work on Curagas so swap out Afflatus Solace gears for Curagas. They can be DT- or any Cure Potency II gears that you have.
|
|


Enhancing Magic Skill
The only spells that you need to worry about using Enhancing Magic Skill are Boost Spells, Bar spells, Stoneskin, Aquaveil, and Phalanx (if subbed RDM); all capping at 500 skill. Bar spell is one of the most important gear set for high level endgame. Most mobs have high magic damage or debuffs.
|
|
|


|
|
|


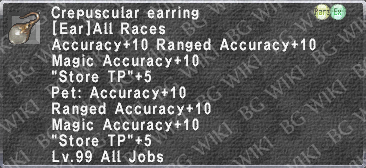
Enfeebling Magic Skill
- Enfeebling should always be a minor priority, unless you do not have a Red Mage in your party/alliance. Even then, helping your Red Mage debuff a mob while they are taking care of everything else, really helps in the long term, especially if you help get Immunobreak off.
A bit about the gear sets below:
Inyanga Dastanas +2 = 110 Macc
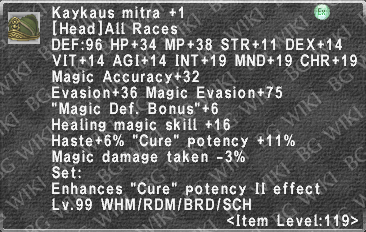
Theophany Mitts +3 = 111 Macc
Ebers Mitts +3 = 112
Kaykaus Bliaut +1 = 116 Macc
Regal Cuffs = 85 Macc
When comparing on Dstat = 1 Macc. The 4 first hands are pretty close, and a fast way to save some gil/inventory by reusing from another set.
Whatever the 20% duration on Regal Cuffs are worth the Macc drop is up to you to decide. I would be careful and not use it until you have a close-to-done, if not done, enfeebling set.
Hydrocera vs Pemphredo Tathlum has a minuscule difference. MND does help two-ways in Slow/Paralyze with both landing the spells, and also with the strength of the spells effect. If you wish to save another inventory slot it's an easy choice to drop Hydrocera and just keep Pemphredo Tathlum (You will need Pemphredo Tathlum for other sets as well).
Metamor. Ring +1 vs Stikini Ring +1 vs Kishar Ring. Kishar ring gives you extra duration but at the cost of Macc and MND. Just like with Regal Cuffs a personal decision needs to be made. if you are uncomfortable with the lack of Macc feel free to swap it for any of the other 2 rings. Metamor. Ring +1 does more for your para and slows than Stikini +1, Metamor. Ring +1 also can come ahead in Macc depending on unity bonus and Dstat. If you are already rocking 2x Stikini +1 for the refresh, you can skip Metamor. Ring +1, or vice versa if you already have Metamor. Ring +1 you can skip a Stikini ring +1 (If you don't need it for refresh or other skill based sets).
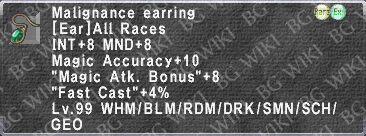
Malignance Earring is a good contender for an ear slot too in the HQ sets.
|
|
|


Divine Magic Skill
Holy and Banish won't be used too often, but sometimes, every little bit of damage helps. Banish has a unique trait that weakens undead enemies. Repose is also in this listing, which is a sleep that cannot be overwritten by any other sleep, and Flash which is great for pulling mobs that you later want slept.
|
|


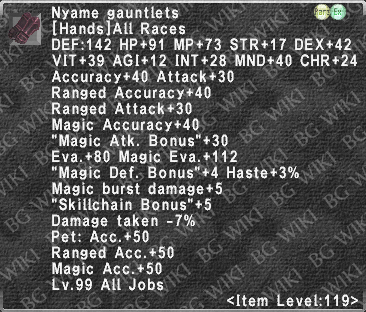
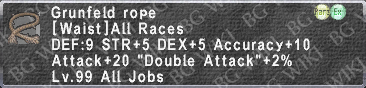
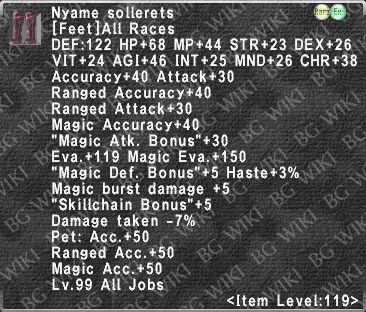
Melee Focused
TP Set
|
|


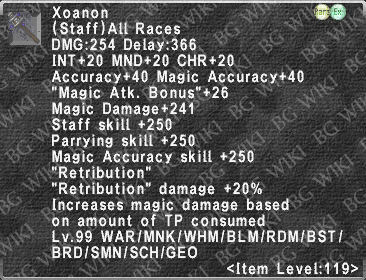
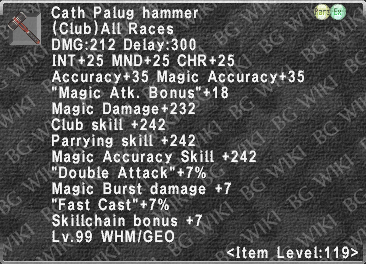
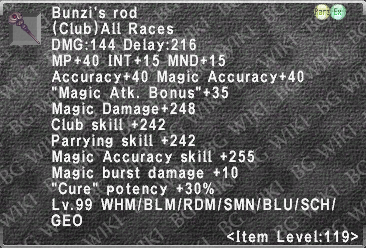
Weaponskill Sets
Multi step skillchains:
![]() Randgrith → Randgrith = Light
Randgrith → Randgrith = Light
Hexa Strike → Randgrith → Randgrith = Light
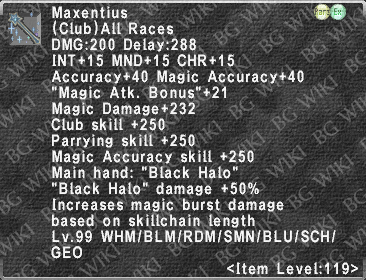
Skullbreaker → Flash Nova (Fragmentation) → Realmrazer (Light) → Realmrazer = Light
![]() Realmrazer → Black Halo (Light) → Realmrazer = Radiance
Realmrazer → Black Halo (Light) → Realmrazer = Radiance
|
|
|