The Voracious Resurgence | |
| Prime Weapons • Ultimate Weapons • Ultimate Augments • Abjurations iL119 • JSE Necks • Divergence Augments • Escutcheons | |
| Reforged Armor Artifact: +1 • iL109 • iL119/+2/+3 Relic: +1/+2 • iL109 • iL119/+2/+3 Empyrean: +1/+2 • iL109 • iL119/+2/+3 |
Guides • Crafting • Trusts • Apex Monsters |
Quicksand Caves: Difference between revisions
From FFXI Wiki
mNo edit summary |
m (→Notorious Monsters: - scrolls scrolls scrolls scrolls) |
||
| (31 intermediate revisions by 15 users not shown) | |||
| Line 1: | Line 1: | ||
{{Zone Preliminary |
|||
[[Category:Stubs]] |
|||
|Table_1= |
|||
{{Zone |
{{Zone Geography Table |
||
|Zone Geography Row= |
|||
|Introduction to Zone= |
|||
{{Zone Geography Row |
|||
|Map=Quicksand Caves - Map.jpg |
|||
|Geography.Zone=Chamber of Oracles |
|||
|AreaImage= Quicksand Caves header.jpg |
|||
|Geography.Entrance_Map=Quicksand_Caves-map5.jpg |
|||
|Description of AreaImage= }} |
|||
|Geography.Entrance_Position=D-4 |
|||
|Geography.Exit_Map=Chamber_of_Oracles_-_Map.jpg |
|||
{{Connected Zone Table |
|||
|Geography.Exit_Position= |
|||
|Insert Connected Zone Template1= |
|||
{{Connected Zone |
|||
|Connecting Zone=Chamber of Oracles |
|||
|Position (pos)= (D-4) (F-4) |
|||
}} |
}} |
||
{{Zone Geography Row |
|||
{{Connected Zone |
|||
| |
|Geography.Zone=Chamber of Oracles |
||
|Geography.Entrance_Map=Quicksand_Caves-map5.jpg |
|||
|Position (pos)= (C-9) |
|||
|Geography.Entrance_Position=F-4 |
|||
|Geography.Exit_Map=Chamber_of_Oracles_-_Map.jpg |
|||
|Geography.Exit_Position= |
|||
}} |
}} |
||
{{Zone Geography Row |
|||
{{Connected Zone |
|||
|Geography.Zone=Cloister of Tremors |
|||
|Connecting Zone=Eastern Altepa Desert |
|||
|Geography.Entrance_Map=Quicksand_Caves-map1.jpg |
|||
|Position (pos)= (D-5) (L-4) (J-8) |
|||
|Geography.Entrance_Position=C-9 |
|||
|Geography.Exit_Map=Cloister_of_Tremors_-_Map.jpg |
|||
|Geography.Exit_Position= |
|||
}} |
}} |
||
{{Zone Geography Row |
|||
|Insert Connected Zone Template2= |
|||
|Geography.Zone=Eastern Altepa Desert |
|||
{{Connected Zone |
|||
|Geography.Entrance_Map=Quicksand_Caves-map1.jpg |
|||
|Connecting Zone=Western Altepa Desert |
|||
|Geography.Entrance_Position=D-5 |
|||
|Position (pos)= (C-13) (J-9) (N-4) (H-4) (J-11) (D-8) (I-5) (D-5) (L-5) (C-6) |
|||
|Geography.Exit_Map=Eastern_Altepa_Desert_-_Map.jpg |
|||
|Geography.Exit_Position=H-8 |
|||
}} |
}} |
||
{{Zone Geography Row |
|||
|Geography.Zone=Eastern Altepa Desert |
|||
|Geography.Entrance_Map=Quicksand_Caves-map1.jpg |
|||
|Geography.Entrance_Position=L-4 |
|||
|Geography.Exit_Map=Eastern_Altepa_Desert_-_Map.jpg |
|||
|Geography.Exit_Position=K-7 |
|||
}} |
}} |
||
{{Zone Geography Row |
|||
|Geography.Zone=Eastern Altepa Desert |
|||
|Geography.Entrance_Map=Quicksand_Caves-map1.jpg |
|||
|Geography.Entrance_Position=J-8 |
|||
|Geography.Exit_Map=Eastern_Altepa_Desert_-_Map.jpg |
|||
|Geography.Exit_Position=H-8 |
|||
}} |
|||
{{Zone Geography Row |
|||
|Geography.Zone=Western Altepa Desert |
|||
|Geography.Entrance_Map=Quicksand_Caves-map2.jpg |
|||
|Geography.Entrance_Position=C-13 |
|||
|Geography.Exit_Map=Western_Altepa_Desert.jpg |
|||
|Geography.Exit_Position=H-9 |
|||
}} |
|||
{{Zone Geography Row |
|||
|Geography.Zone=Western Altepa Desert |
|||
|Geography.Entrance_Map=Quicksand_Caves-map3.jpg |
|||
|Geography.Entrance_Position=J-9 |
|||
|Geography.Exit_Map=Western_Altepa_Desert.jpg |
|||
|Geography.Exit_Position=J-9 |
|||
}} |
|||
{{Zone Geography Row |
|||
|Geography.Zone=Western Altepa Desert |
|||
|Geography.Entrance_Map=Quicksand_Caves-map3.jpg |
|||
|Geography.Entrance_Position=N-4 |
|||
|Geography.Exit_Map=Western_Altepa_Desert.jpg |
|||
|Geography.Exit_Position=J-7 |
|||
}} |
|||
{{Zone Geography Row |
|||
|Geography.Zone=Western Altepa Desert |
|||
|Geography.Entrance_Map=Quicksand_Caves-map5.jpg |
|||
|Geography.Entrance_Position=J-11 |
|||
|Geography.Exit_Map=Western_Altepa_Desert.jpg |
|||
|Geography.Exit_Position=D-12 |
|||
}} |
|||
{{Zone Geography Row |
|||
|Geography.Zone=Western Altepa Desert |
|||
|Geography.Entrance_Map=Quicksand_Caves-map5.jpg |
|||
|Geography.Entrance_Position=H-4 |
|||
|Geography.Exit_Map=Western_Altepa_Desert.jpg |
|||
|Geography.Exit_Position=D-10 |
|||
}} |
|||
{{Zone Geography Row |
|||
|Geography.Zone=Western Altepa Desert |
|||
|Geography.Entrance_Map=Quicksand_Caves-map7.jpg |
|||
|Geography.Entrance_Position=I-5 |
|||
|Geography.Exit_Map=Western_Altepa_Desert.jpg |
|||
|Geography.Exit_Position=G-5 |
|||
}} |
|||
{{Zone Geography Row |
|||
|Geography.Zone=Western Altepa Desert |
|||
|Geography.Entrance_Map=Quicksand_Caves-map7.jpg |
|||
|Geography.Entrance_Position=D-8 |
|||
|Geography.Exit_Map=Western_Altepa_Desert.jpg |
|||
|Geography.Exit_Position=F-6 |
|||
}} |
|||
{{Zone Geography Row |
|||
|Geography.Zone=Western Altepa Desert |
|||
|Geography.Entrance_Map=Quicksand_Caves-map8.jpg |
|||
|Geography.Entrance_Position=D-5 |
|||
|Geography.Exit_Map=Western_Altepa_Desert.jpg |
|||
|Geography.Exit_Position=F-6 |
|||
}} |
|||
{{Zone Geography Row |
|||
|Geography.Zone=Western Altepa Desert |
|||
|Geography.Entrance_Map=Quicksand_Caves-map4.jpg |
|||
|Geography.Entrance_Position=C-6 |
|||
|Geography.Exit_Map=Western_Altepa_Desert.jpg |
|||
|Geography.Exit_Position=G-9 |
|||
}} |
|||
{{Zone Geography Row |
|||
|Geography.Zone=Western Altepa Desert |
|||
|Geography.Entrance_Map=Quicksand_Caves-map6.jpg |
|||
|Geography.Entrance_Position=L-5 |
|||
|Geography.Exit_Map=Western_Altepa_Desert.jpg |
|||
|Geography.Exit_Position=D-11 |
|||
}} |
|||
{{Zone Geography Row |
|||
|Geography.Zone=Western Altepa Desert |
|||
|Geography.Entrance_Map=Quicksand_Caves-map8.jpg |
|||
|Geography.Entrance_Position=K-11 |
|||
|Geography.Exit_Map=Western_Altepa_Desert.jpg |
|||
|Geography.Exit_Position=I-6 |
|||
}} |
|||
}} |
|||
{{Zone Quick Travel Table |
|||
|Zone Quick Travel Row= |
|||
{{Zone Quick Travel Row |
|||
|Travel Option= [[Home Point]] #1 |
|||
|Via= [[Kuzotz]] |
|||
|Zone Position= D-5 |
|||
|Map Number= 5 |
|||
|Travel Map= Quicksand Caves-map5.jpg |
|||
}} |
|||
{{Zone Quick Travel Row |
|||
|Travel Option= [[Home Point]] #2 |
|||
|Via= [[Kuzotz]] |
|||
|Zone Position= C-8 |
|||
|Map Number= 1 |
|||
|Travel Map= Quicksand Caves-map1.jpg |
|||
}} |
|||
{{Zone Quick Travel Row |
|||
|Travel Option= [[Unity Warp]] (Level 125) |
|||
|Via= [[Unity NPC]] |
|||
|Zone Position= J-5 |
|||
|Map Number= 1 |
|||
|Travel Map= Quicksand Caves-map1.jpg |
|||
}} |
|||
}} |
|||
{{Zone Battle Content Table |
|||
|Zone Battle Content Row= |
|||
{{Zone Battle Content Row |
|||
|Content=Grounds_of_Valor#Quicksand Caves{{!}}Grounds of Valor |
|||
|Position=L-3)<br />(J-8)<br />(J-11)<br />(F-4)<br />(J-5 |
|||
|Notes=Map 1<br />Map 2<br />Map 4<br />Map 4<br />Map 5 |
|||
}} |
|||
{{Zone Battle Content Row |
|||
|Content=Hunts/Other_Signet#Quicksand Caves{{!}}Hunts |
|||
|Position= |
|||
|Notes= See [[Hunts]] Page |
|||
}} |
|||
}} |
|||
{{Zone Map Table |
|||
|Zone Maps= |
|||
{{Zone Map |
|||
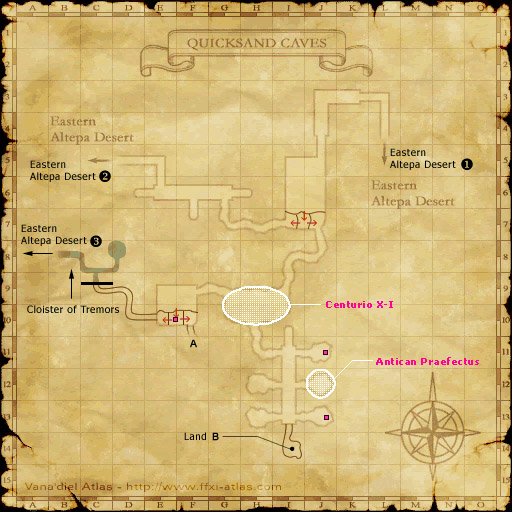
|Map=Quicksand Caves-map1.jpg |
|||
|Map Text=Map 1 |
|||
}} |
|||
{{Zone Map |
|||
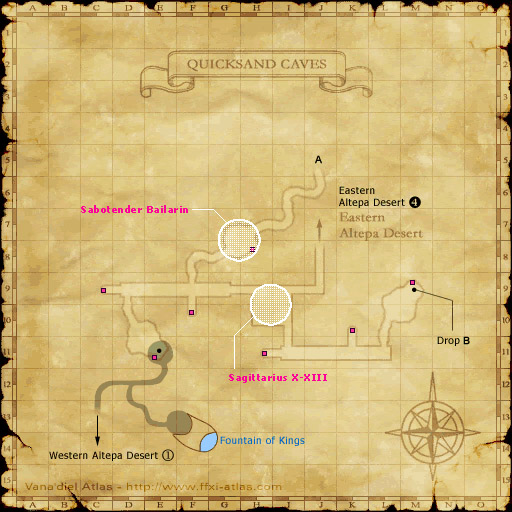
|Map=Quicksand Caves-map2.jpg |
|||
|Map Text=Map 2 |
|||
}} |
|||
{{Zone Map |
|||
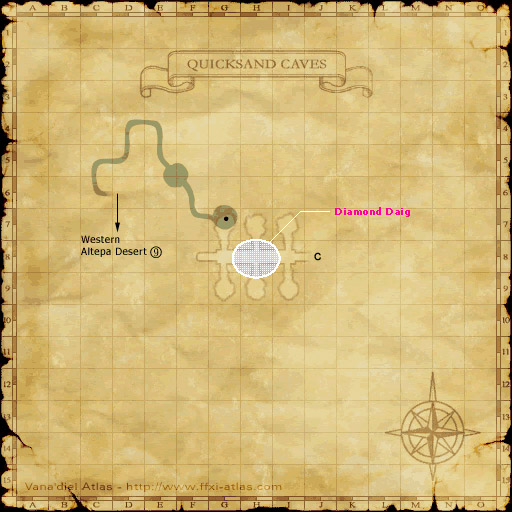
|Map=Quicksand Caves-map3.jpg |
|||
|Map Text=Map 3 |
|||
}} |
|||
{{Zone Map |
|||
|Map=Quicksand Caves-map4.jpg |
|||
|Map Text=Map 4 |
|||
}} |
|||
{{Zone Map |
|||
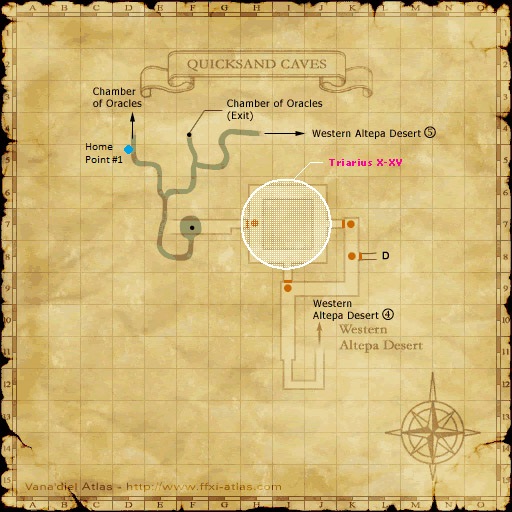
|Map=Quicksand Caves-map5.jpg |
|||
|Map Text=Map 5 |
|||
}} |
|||
{{Zone Map |
|||
|Map=Quicksand Caves-map6.jpg |
|||
|Map Text=Map 6 |
|||
}} |
|||
{{Zone Map |
|||
|Map=Quicksand Caves-map7.jpg |
|||
|Map Text=Map 7 |
|||
}} |
|||
{{Zone Map |
|||
|Map=Quicksand Caves-map8.jpg |
|||
|Map Text=Map 8 |
|||
}} |
|||
{{Zone Map |
|||
|Map=altepa-quicksand.gif |
|||
|Map Text=Composite Map |
|||
}} |
|||
}} |
|||
|Table_2= |
|||
{{Zone Description Table |
|||
|Description.Image= Quicksand Caves header.jpg |
|||
|Description.Japanese=流砂洞 |
|||
|Description.Requires={{Zilart}} |
|||
|Description.Map_Acquisition=coffer |
|||
|Description.Timeline=Present |
|||
|Description.Continent=Zepwell Island |
|||
|Description.Region=Kuzotz |
|||
|Description.Zone_Type=Dungeon |
|||
|Description.Activities={{Fishing Icon}} |
|||
|Description.Restrictions= |
|||
|Notes=Once a thriving metropolis for the proud Galka, these caves still house numerous monolithic pillars and statues that, in many places, remain untouched by the sands of time. However, long ago, the Antica drove the Galka from their homes, and the tunnels were transformed into a giant nest.<br/>As a result of the constant digging of entrances and exits by the insect-like beings, the caves are relentlessly bombarded with a flow of sand from the desert above. It will not be long before the caves are completely filled and a piece of Galkan history is lost forever. However, this is of no concern to the Antica... |
|||
}} |
|||
}} |
|||
==Zone Information== |
|||
{{Table Flex |
|||
|Table 1= |
|||
{{Category:Treasure Coffer|transcludesection=Quicksand Caves Coffer}} |
|||
|Table 2= |
|||
|Table 3= |
|||
== Maps for {{PAGENAME}} == |
|||
<Gallery align="center"> |
|||
Image:Quicksand Caves map1.jpg|{{PAGENAME}} - Map 1 |
|||
Image:Quicksand Caves map2.jpg|{{PAGENAME}} - Map 2 |
|||
Image:Quicksand Caves map3.jpg|{{PAGENAME}} - Map 3 |
|||
Image:Quicksand Caves map4.jpg|{{PAGENAME}} - Map 4 |
|||
Image:Quicksand Caves map5.jpg|{{PAGENAME}} - Map 5 |
|||
Image:Quicksand Caves map6.jpg|{{PAGENAME}} - Map 6 |
|||
Image:Quicksand Caves map7.jpg|{{PAGENAME}} - Map 7 |
|||
Image:Quicksand Caves map8.jpg|{{PAGENAME}} - Map 8 |
|||
</gallery> |
|||
}} |
|||
{{Zone Quests Table |
|||
==Quests== |
|||
{{Quest List Table |
|||
{{Zone Quests |
|||
|Quest List Color=709bcc |
|||
|Fame Level=N/A |
|||
|Quest List Row= |
|||
|Quest Name=Beastmen Treasure: Kuzotz |
|||
{{Quest List Row |
|||
|Fame=N/A |
|||
|Name=Peddlestox's Treasure Box: Kuzotz |
|||
|Reward= Various |
|Reward= Various |
||
| |
|NPC=Peddlestox |
||
|Position |
|Position=L-7 |
||
|Zone=Western Altepa Desert |
|||
}} |
}} |
||
{{Quest List Row |
|||
{{Zone Quests |
|||
|Fame |
|Fame=[[Windurst]] Fame 5 |
||
| |
|Name=Crying Over Onions |
||
|Reward= [[Star Necklace]] |
|Reward= [[Star Necklace]] |
||
| |
|NPC=Kohlo-Lakolo |
||
|Position |
|Position=G-5 |
||
|Zone=Port Windurst |
|||
}} |
}} |
||
{{Quest List Row |
|||
{{Zone Quests |
|||
|Fame |
|Fame=N/A |
||
| |
|Name=Old Wounds |
||
|Reward= [[Savage Blade]] |
|Reward= [[Savage Blade]] |
||
| |
|NPC=Curilla |
||
|Position |
|Position=I-9 |
||
|Zone=Chateau d'Oraguille |
|||
}} |
}} |
||
{{Quest List Row |
|||
{{Zone Quests |
|||
|Fame |
|Fame=[[Rabao]] Fame 4 |
||
| |
|Name=The Missing Piece |
||
|Reward= [[Teleport-Altep (Scroll)]] |
|Reward= [[Teleport-Altep (Scroll)|Scroll of Teleport-Altep]] |
||
| |
|NPC=Alfesar |
||
|Position |
|Position=H-7 |
||
|Zone=Rabao |
|||
}} |
}} |
||
}} |
}} |
||
==Missions== |
|||
{{Zone |
{{Zone Missions Table |
||
|Insert Zone Missions Template= |
|||
|Name of Minigame=Fishing |
|||
{{Zone Missions |
|||
|Insert Zone Minigame Heading Template= |
|||
|Mission Name=Bastok Mission 8-1 |
|||
{{Zone Minigame Heading |
|||
|Starting Zone=Bastok |
|||
|Heading 1=Catch / Recommended Bait |
|||
|Mission Type= Fight |
|||
|Heading 2=Level Cap / Area |
|||
|Expansion={{Zilart}} |
|||
}} |
}} |
||
{{Zone Missions |
|||
|Insert Zone Minigame Content= |
|||
|Mission Name=Kupo Mission 9{{!}}Rescue! A Moogle's Labor of Love |
|||
{{Zone Minigame |
|||
|Starting Zone= |
|||
|Left Column Text=Cave Cherax / |
|||
|Mission Type= Quest |
|||
|Right Column Text=100 / All |
|||
|Expansion= |
|||
}} |
|||
{{Zone Missions |
|||
|Mission Name=San d'Oria Mission 8-1 |
|||
|Starting Zone=San d'Oria |
|||
|Mission Type= Fight |
|||
|Expansion={{Zilart}} |
|||
}} |
|||
{{Zone Missions |
|||
|Mission Name=Windurst Mission 9-2 |
|||
|Starting Zone=Windurst |
|||
|Mission Type= Quest |
|||
|Expansion={{Zilart}} |
|||
}} |
|||
{{Zone Missions |
|||
|Mission Name=Zilart Mission 12 |
|||
|Starting Zone=Norg |
|||
|Mission Type= NM |
|||
|Expansion={{Zilart}} |
|||
}} |
}} |
||
|Minigame Maps= |
|||
<Gallery align="center"> |
|||
Image:mapimage.jpg|Map Name 1 |
|||
</gallery><br> |
|||
}} |
}} |
||
== Notorious Monsters == |
|||
{{Zone Bestiary Table |
|||
{{Zone NM Table 2 |
|||
|Insert Zone Bestiary Content Template= |
|||
|Zone NM Row= |
|||
{{Zone NM Row 2 |
|||
|Monster Name=Ancient Vessel |
|||
|NM.Name=Antican Consul |
|||
|Level Range=72 |
|||
|NM.Family=Antica |
|||
|Pop Position (pos)= (I-8) |
|||
|NM.Main=WAR |
|||
|Notable Drops= |
|||
|NM.Sub= |
|||
|Spawn Condition=Zilart Mission 12 |
|||
|NM.Aggressive=Y |
|||
|Aggros To=Magic |
|||
|NM.Detects={{True Sound}} |
|||
|Monster Family Type=Magic Pot |
|||
|NM.Level=75 |
|||
|NM.Spawn_Condition='''Timed''': 21-24 Hr. |
|||
|NM.Treasure= |
|||
* {{ItemIcon|Berserker's Axe|22}} {{tooltip|text=[[Berserker's Axe]]|tooltip=[[File:Berserker's Axe description.png]]}} |
|||
* {{ItemIcon|Antican Pauldron|22}} {{tooltip|text=[[Antican Pauldron]]|tooltip=[[File:Antican Pauldron description.png]]}} |
|||
* {{ItemIcon|Darksteel Ore|22}} {{tooltip|text=[[Darksteel Ore]]|tooltip=[[File:Darksteel Ore description.png]]}} |
|||
* {{ItemIcon|War. Testimony|22}} {{tooltip|text=[[Warrior's Testimony]]|tooltip=[[File:War. Testimony description.png]]}} |
|||
|NM.Steal= |
|||
|NM.Position=(E-8)<br />Map ? |
|||
|NM.Map= |
|||
}} |
}} |
||
{{Zone |
{{Zone NM Row 2 |
||
| |
|NM.Name=Antican Legatus |
||
|NM.Family=Antica |
|||
|Level Range=75 |
|||
|NM.Main=PLD |
|||
|Pop Position (pos)= (E-8) |
|||
|NM.Sub= |
|||
|Notable Drops= |
|||
|NM.Aggressive=Y |
|||
*[[Berserker's Axe]] |
|||
|NM.Detects={{True Sound}} |
|||
|Spawn Condition=Timed |
|||
|NM.Level=72-74 |
|||
|Aggros To=True Sound |
|||
|NM.Spawn_Condition='''Timed''': 20 Min. |
|||
|Monster Family Type=Antica |
|||
|NM.Treasure= |
|||
* {{ItemIcon|Company Sword|22}} {{tooltip|text=[[Company Sword]]|tooltip=[[File:Company Sword description.png]]}} |
|||
* {{ItemIcon|Antican Pauldron|22}} {{tooltip|text=[[Antican Pauldron]]|tooltip=[[File:Antican Pauldron description.png]]}} |
|||
* {{ItemIcon|Darksteel Ore|22}} {{tooltip|text=[[Darksteel Ore]]|tooltip=[[File:Darksteel Ore description.png]]}} |
|||
* {{ItemIcon|Pld. Testimony|22}} {{tooltip|text=[[Paladin's Testimony]]|tooltip=[[File:Pld. Testimony description.png]]}} |
|||
|NM.Steal= |
|||
|NM.Position=(E-8)<br />Map ? |
|||
|NM.Map= |
|||
}} |
}} |
||
{{Zone |
{{Zone NM Row 2 |
||
| |
|NM.Name=Antican Magister |
||
|NM.Family=Antica |
|||
|Level Range=72-74 |
|||
|NM.Main=WAR |
|||
|Pop Position (pos)= (E-8) |
|||
|NM.Sub= |
|||
|Notable Drops= |
|||
|NM.Aggressive=Y |
|||
*[[Company Sword]] |
|||
|NM.Detects={{Sound}} |
|||
|Spawn Condition=Timed |
|||
|NM.Level=66 |
|||
|Aggros To=True Sound |
|||
|NM.Spawn_Condition='''Lottery''': various Antica |
|||
|Monster Family Type=Antica |
|||
|NM.Treasure= |
|||
* {{ItemIcon|Arcanabane|22}} {{tooltip|text=[[Arcanabane]]|tooltip=[[File:Arcanabane description.png]]}} |
|||
* {{ItemIcon|Mythril Ore|22}} {{tooltip|text=[[Mythril Ore]]|tooltip=[[File:Mythril Ore description.png]]}} |
|||
* {{ItemIcon|Antican Pauldron|22}} {{tooltip|text=[[Antican Pauldron]]|tooltip=[[File:Antican Pauldron description.png]]}} |
|||
|NM.Steal= |
|||
|NM.Position=(C-6)<br />Map ? |
|||
|NM.Map= |
|||
}} |
}} |
||
{{Zone |
{{Zone NM Row 2 |
||
| |
|NM.Name=Antican Praefectus |
||
|NM.Family=Antica |
|||
|Level Range=66 |
|||
|NM.Main=PLD |
|||
|Pop Position (pos)= (C-6) |
|||
|NM.Sub= |
|||
|Notable Drops= |
|||
|NM.Aggressive=Y |
|||
*[[Arcanabane]] |
|||
|NM.Detects={{Sound}} |
|||
|Spawn Condition=Lottery |
|||
|NM.Level=65 |
|||
|Aggros To=Sound |
|||
|NM.Spawn_Condition='''Lottery''': various Antica |
|||
|Monster Family Type=Antica |
|||
|NM.Treasure= |
|||
* {{ItemIcon|Save the Queen|22}} {{tooltip|text=[[Save the Queen]]|tooltip=[[File:Save the Queen description.png]]}} |
|||
* {{ItemIcon|Mythril Ore|22}} {{tooltip|text=[[Mythril Ore]]|tooltip=[[File:Mythril Ore description.png]]}} |
|||
* {{ItemIcon|Antican Pauldron|22}} {{tooltip|text=[[Antican Pauldron]]|tooltip=[[File:Antican Pauldron description.png]]}} |
|||
|NM.Steal= |
|||
|NM.Position=(J-12)<br />Map ? |
|||
|NM.Map= |
|||
}} |
}} |
||
{{Zone |
{{Zone NM Row 2 |
||
| |
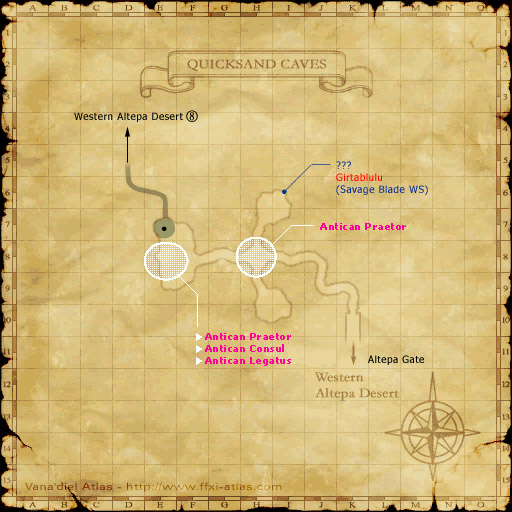
|NM.Name=Antican Praetor |
||
|NM.Family=Antica |
|||
|Level Range=65 |
|||
|NM.Main=BLM |
|||
|Pop Position (pos)= (J-12) |
|||
|NM.Sub= |
|||
|Notable Drops= |
|||
|NM.Aggressive=Y |
|||
*[[Save the Queen]] |
|||
|NM.Detects={{True Sound}} |
|||
|Spawn Condition=Lottery |
|||
|NM.Level=72-74 |
|||
|Aggros To=Sound |
|||
|NM.Spawn_Condition='''Timed''': 20 Min. |
|||
|Monster Family Type=Antica |
|||
|NM.Treasure= |
|||
* {{ItemIcon|Stone IV (Scroll)|22}} {{tooltip|text=[[Stone IV]]|tooltip=[[File:Stone IV (Scroll) description.png]]}} |
|||
* {{ItemIcon|Stonega III (Scroll)|22}} {{tooltip|text=[[Stonega III]]|tooltip=[[File:Stonega III (Scroll) description.png]]}} |
|||
* {{ItemIcon|Blm. Testimony|22}} {{tooltip|text=[[Blm. Testimony|Black Mage's Testimony]]|tooltip=[[File:Blm. Testimony description.png]]}} |
|||
* {{ItemIcon|Darksteel Ore|22}} {{tooltip|text=[[Darksteel Ore]]|tooltip=[[File:Darksteel Ore description.png]]}} |
|||
* {{ItemIcon|Iron Ore|22}} {{tooltip|text=[[Iron Ore]]|tooltip=[[File:Iron Ore description.png]]}} |
|||
* {{ItemIcon|Antican Robe|22}} {{tooltip|text=[[Antican Robe]]|tooltip=[[File:Antican Robe description.png]]}} |
|||
|NM.Steal= |
|||
|NM.Position=(E-8), (H-8)<br />Map ? |
|||
|NM.Map= |
|||
}} |
}} |
||
{{Zone |
{{Zone NM Row 2 |
||
| |
|NM.Name=Antican Proconsul |
||
|NM.Family=Antica |
|||
|Level Range=72-74 |
|||
|NM.Main=BLM |
|||
|Pop Position (pos)= (E-8) (H-8) |
|||
|NM.Sub= |
|||
|Notable Drops= |
|||
|NM.Aggressive=Y |
|||
*[[Scroll of Stonega III]] |
|||
|NM.Detects={{Sound}} |
|||
*[[Scroll of Stone IV]] |
|||
|NM.Level=65 |
|||
|Spawn Condition=Timed |
|||
|NM.Spawn_Condition='''Lottery''': [[Antican Signifer]] |
|||
|Aggros To=Sound |
|||
|NM.Treasure= |
|||
|Monster Family Type=Antica |
|||
* {{ItemIcon|Stone IV (Scroll)|22}} {{tooltip|text=[[Stone IV]]|tooltip=[[File:Stone IV (Scroll) description.png]]}} |
|||
* {{ItemIcon|Stonega III (Scroll)|22}} {{tooltip|text=[[Stonega III]]|tooltip=[[File:Stonega III (Scroll) description.png]]}} |
|||
* {{ItemIcon|Mythril Ore|22}} {{tooltip|text=[[Mythril Ore]]|tooltip=[[File:Mythril Ore description.png]]}} |
|||
* {{ItemIcon|Antican Robe|22}} {{tooltip|text=[[Antican Robe]]|tooltip=[[File:Antican Robe description.png]]}} |
|||
|NM.Steal= |
|||
|NM.Position=(G-10)-(H-11)<br />Map ? |
|||
|NM.Map= |
|||
}} |
}} |
||
{{Zone |
{{Zone NM Row 2 |
||
| |
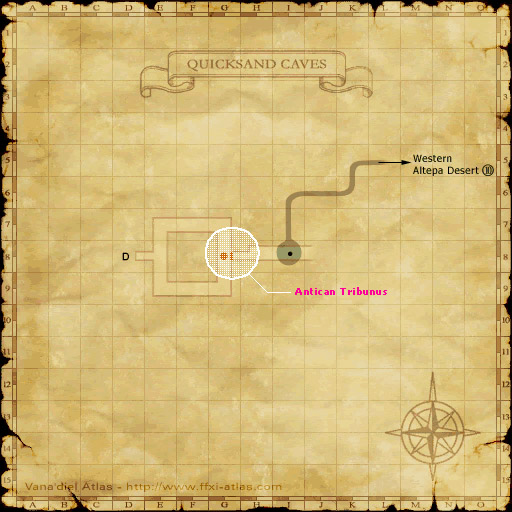
|NM.Name=Antican Tribunus |
||
|NM.Family=Antica |
|||
|Level Range=65 |
|||
|NM.Main=RNG |
|||
|Pop Position (pos)= (G-10) - (H-11) |
|||
|NM.Sub= |
|||
|Notable Drops= |
|||
|NM.Aggressive=Y |
|||
*[[Elder Staff]] |
|||
|NM.Detects={{Sound}} |
|||
|Spawn Condition=Lottery |
|||
|NM.Level=72-74 |
|||
|Aggros To=Sound |
|||
|NM.Spawn_Condition='''Lottery''': various Antica |
|||
|Monster Family Type=Antica |
|||
|NM.Treasure= |
|||
* {{ItemIcon|Pharaoh's Bow|22}} {{tooltip|text=[[Pharaoh's Bow]]|tooltip=[[File:Pharaoh's Bow description.png]]}} |
|||
|NM.Steal= |
|||
|NM.Position=(H-6)-(J-8)<br />Map ? |
|||
|NM.Map= |
|||
}} |
}} |
||
{{Zone |
{{Zone NM Row 2 |
||
| |
|NM.Name=Centurio X-I |
||
|NM.Family=Antica |
|||
|Level Range=72-74 |
|||
|NM.Main=BLM |
|||
|Pop Position (pos)= (H-6) - (J-8) |
|||
|NM.Sub= |
|||
|Notable Drops= |
|||
|NM.Aggressive=Y |
|||
*[[Pharaoh's Bow]] |
|||
|NM.Detects={{Sound}} |
|||
|Spawn Condition=Lottery |
|||
|NM.Level=56-58 |
|||
|Aggros To=Sound |
|||
|NM.Spawn_Condition='''Lottery''': [[Antican Signifer]] |
|||
|Monster Family Type=Antica |
|||
|NM.Treasure= |
|||
* {{ItemIcon|Shaman's Cloak|22}} {{tooltip|text=[[Shaman's Cloak]]|tooltip=[[File:Shaman's Cloak description.png]]}} |
|||
* {{ItemIcon|Quake (Scroll)|22}} {{tooltip|text=[[Quake]]|tooltip=[[File:Quake (Scroll) description.png]]}} |
|||
* {{ItemIcon|Stone III (Scroll)|22}} {{tooltip|text=[[Stone III]]|tooltip=[[File:Stone III (Scroll) description.png]]}} |
|||
* {{ItemIcon|Stone IV (Scroll)|22}} {{tooltip|text=[[Stone IV]]|tooltip=[[File:Stone IV (Scroll) description.png]]}} |
|||
* {{ItemIcon|Stonega II (Scroll)|22}} {{tooltip|text=[[Stonega II]]|tooltip=[[File:Stonega II (Scroll) description.png]]}} |
|||
* {{ItemIcon|Stonega III (Scroll)|22}} {{tooltip|text=[[Stonega III]]|tooltip=[[File:Stonega III (Scroll) description.png]]}} |
|||
* {{ItemIcon|Adaman Ore|22}} {{tooltip|text=[[Adaman Ore]]|tooltip=[[File:Adaman Ore description.png]]}} |
|||
* {{ItemIcon|Darksteel Ore|22}} {{tooltip|text=[[Darksteel Ore]]|tooltip=[[File:Darksteel Ore description.png]]}} |
|||
* {{ItemIcon|Mythril Ore|22}} {{tooltip|text=[[Mythril Ore]]|tooltip=[[File:Mythril Ore description.png]]}} |
|||
* {{ItemIcon|Iron Ore|22}} {{tooltip|text=[[Iron Ore]]|tooltip=[[File:Iron Ore description.png]]}} |
|||
* {{ItemIcon|Antican Robe|22}} {{tooltip|text=[[Antican Robe]]|tooltip=[[File:Antican Robe description.png]]}} |
|||
|NM.Steal= |
|||
|NM.Position=(H-9/10)<br />Map ? |
|||
|NM.Map= |
|||
}} |
}} |
||
{{Zone |
{{Zone NM Row 2 |
||
| |
|NM.Name=Diamond Daig |
||
|NM.Family=Beetle |
|||
|Level Range=70 |
|||
|NM.Main=PLD |
|||
|Pop Position (pos)= (G-11) |
|||
|NM.Sub= |
|||
|Notable Drops= |
|||
|NM.Aggressive=Y |
|||
|Spawn Condition=Bastok Mission 8-1 |
|||
|NM.Detects={{Sight}} |
|||
|Aggros To=Sound |
|||
|NM.Level=70 |
|||
|Monster Family Type=Antica |
|||
|NM.Spawn_Condition='''Lottery [[Helm Beetle]] during Double {{earth}} weather''' |
|||
|NM.Treasure= |
|||
* {{ItemIcon|Prt. Bangles|22}} {{tooltip|text=[[Prt. Bangles|Protecting Bangles]]|tooltip=[[File:Prt. Bangles description.png]]}} |
|||
|NM.Steal= |
|||
|NM.Position=(H-8)<br />Map ? |
|||
|NM.Map= |
|||
}} |
}} |
||
{{Zone |
{{Zone NM Row 2 |
||
| |
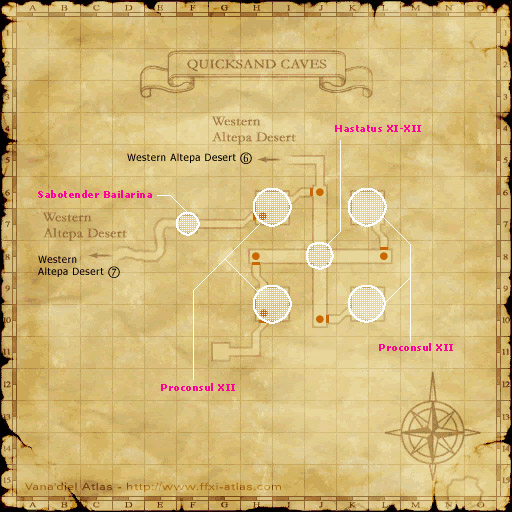
|NM.Name=Hastatus XI-XII |
||
|NM.Family=Antica |
|||
|Level Range=56-58 |
|||
|NM.Main=WAR |
|||
|Pop Position (pos)= (H-9) - (H-10) |
|||
|NM.Sub= |
|||
|Notable Drops= |
|||
|NM.Aggressive=Y |
|||
*[[Shaman's Cloak]] |
|||
|NM.Detects={{Sound}} |
|||
|Spawn Condition=Lottery |
|||
|NM.Level=65-68 |
|||
|Aggros To=Sound |
|||
|NM.Spawn_Condition='''Lottery''': [[Antican Triarius]] |
|||
|Monster Family Type=Antica |
|||
|NM.Treasure= |
|||
* {{ItemIcon|Xhifhut Head|22}} {{tooltip|text=[[Xhifhut Head]]|tooltip=[[File:Xhifhut Head description.png]]}} |
|||
|NM.Steal= |
|||
|NM.Position=(J-7)<br />Map ? |
|||
|NM.Map= |
|||
}} |
}} |
||
{{Zone |
{{Zone NM Row 2 |
||
| |
|NM.Name=Nussknacker |
||
|NM.Family=Lizard |
|||
|Level Range=70 |
|||
|NM.Main=WAR |
|||
|Pop Position (pos)= (H-8) |
|||
|NM.Sub= |
|||
|Notable Drops= |
|||
|NM.Aggressive=Y |
|||
*[[Protecting Bangles]] |
|||
|NM.Detects={{Sound}} |
|||
|Spawn Condition=Earth Weather |
|||
|NM.Level=60 |
|||
|Aggros To=Sound |
|||
|NM.Spawn_Condition='''Lottery [[Sand Lizard]] during Double {{earth}} weather''' |
|||
|Monster Family Type=Beetle |
|||
|NM.Treasure= |
|||
* {{ItemIcon|Sand Gloves|22}} {{tooltip|text=[[Sand Gloves]]|tooltip=[[File:Sand Gloves description.png]]}} |
|||
|NM.Steal= |
|||
|NM.Position=(J-5)-(K-6)<br />Map ? |
|||
|NM.Map= |
|||
}} |
}} |
||
{{Zone |
{{Zone NM Row 2 |
||
| |
|NM.Name=Proconsul XII |
||
|NM.Family=Antica |
|||
|Level Range= |
|||
|NM.Main=PLD |
|||
|Pop Position (pos)= (I-6) |
|||
|NM.Sub= |
|||
|Notable Drops= |
|||
|NM.Aggressive=Y |
|||
|Spawn Condition=Quest |
|||
| |
|NM.Detects={{Sound}} |
||
|NM.Level=72 |
|||
|Monster Family Type=Scorpion |
|||
|NM.Spawn_Condition='''Timed''': 2 Hr. |
|||
|NM.Treasure= |
|||
* {{ItemIcon|Dainslaif|22}} {{tooltip|text=[[Dainslaif]]|tooltip=[[File:Dainslaif description.png]]}} |
|||
|NM.Steal= |
|||
|NM.Position=(H-6),(K-6),(I-10),(L-10)<br />Map ? |
|||
|NM.Map= |
|||
}} |
}} |
||
{{Zone |
{{Zone NM Row 2 |
||
| |
|NM.Name=Sabotender Bailarin |
||
|NM.Family=Sabotender |
|||
|Level Range=65-68 |
|||
|NM.Main=WAR |
|||
|Pop Position (pos)= (J-8) |
|||
|NM.Sub= |
|||
|Notable Drops= |
|||
|NM.Aggressive=Y |
|||
*[[Xhifhut Head]] |
|||
|NM.Detects={{Sound}} |
|||
|Spawn Condition=Lottery |
|||
|NM.Level=68-70 |
|||
|Aggros To=Sound |
|||
|NM.Spawn_Condition='''Lottery''': [[Sabotender Bailaor]] |
|||
|Monster Family Type=Antica |
|||
|NM.Treasure= |
|||
* {{ItemIcon|Bailathorn|22}} {{tooltip|text=[[Bailathorn]]|tooltip=[[File:Bailathorn description.png]]}} |
|||
|NM.Steal= |
|||
|NM.Position=(H-8)<br />Map ? |
|||
|NM.Map= |
|||
}} |
}} |
||
{{Zone |
{{Zone NM Row 2 |
||
|NM.Name=Sabotender Bailarina |
|||
|Monster Name=Honor |
|||
|NM.Family=Sabotender |
|||
|Level Range= |
|||
|NM.Main=WAR |
|||
|Pop Position (pos)= (F-14) - (G-14) |
|||
|NM.Sub= |
|||
|Notable Drops= |
|||
|NM.Aggressive=Y |
|||
|Spawn Condition=San d'Oria Mission 8-1 |
|||
| |
|NM.Detects={{Sound}} |
||
|NM.Level=80-82 |
|||
|Monster Family Type=Sea Monk |
|||
|NM.Spawn_Condition='''Lottery''': [[Spelunking Sabotender]] |
|||
|NM.Treasure= |
|||
* {{ItemIcon|Dune Boots|22}} {{tooltip|text=[[Dune Boots]]|tooltip=[[File:Dune Boots description.png]]}} {{gdrop}} |
|||
|NM.Steal= |
|||
|NM.Position=(F-7)<br />Map ? |
|||
|NM.Map= |
|||
}} |
}} |
||
{{Zone |
{{Zone NM Row 2 |
||
|NM.Name=Sagittarius X-XIII |
|||
|Monster Name=Mimic |
|||
|NM.Family=Antica |
|||
|Level Range= |
|||
|NM.Main=RNG |
|||
|Pop Position (pos)= Various |
|||
|NM.Sub= |
|||
|Notable Drops= |
|||
|NM.Aggressive=Y |
|||
|Spawn Condition=Failed Lock Pick |
|||
| |
|NM.Detects={{Sound}} |
||
|NM.Level=57-58 |
|||
|Monster Family Type=Mimic |
|||
|NM.Spawn_Condition='''Lottery''': [[Antican Princeps]] |
|||
|NM.Treasure= |
|||
* {{ItemIcon|Loxley Bow|22}} {{tooltip|text=[[Loxley Bow]]|tooltip=[[File:Loxley Bow description.png]]}} |
|||
|NM.Steal= |
|||
|NM.Position=(H-9)-(I-10)<br />Map ? |
|||
|NM.Map= |
|||
}} |
}} |
||
{{Zone |
{{Zone NM Row 2 |
||
| |
|NM.Name=Triarius X-XV |
||
|NM.Family=Antica |
|||
|Level Range=60 |
|||
|NM.Main=WAR |
|||
|Pop Position (pos)= (J-5) - (K-6) |
|||
|NM.Sub= |
|||
|Notable Drops= |
|||
|NM.Aggressive=Y |
|||
*[[Sand Gloves]] |
|||
|NM.Detects={{Sound}} |
|||
|Spawn Condition=Earth Weather/Lottery |
|||
|NM.Level=72-74 |
|||
|Aggros To=Sound |
|||
|NM.Spawn_Condition='''Lottery''': [[Antican Triarius]] |
|||
|Monster Family Type=Lizard |
|||
|NM.Treasure= |
|||
* {{ItemIcon|Pendragon Axe|22}} {{tooltip|text=[[Pendragon Axe]]|tooltip=[[File:Pendragon Axe description.png]]}} |
|||
|NM.Steal= |
|||
|NM.Position=(I-7)<br />Map ? |
|||
|NM.Map= |
|||
}} |
}} |
||
{{Zone |
{{Zone NM Row 2 |
||
| |
|NM.Name=Tribunus VII-I |
||
|NM.Family=Antica |
|||
|Level Range=70 |
|||
|NM.Main=WAR |
|||
|Pop Position (pos)= (G-11) |
|||
|NM.Sub= |
|||
|Notable Drops= |
|||
|NM.Aggressive=Y |
|||
|Spawn Condition=Bastok Mission 8-1 |
|||
| |
|NM.Detects={{Sound}} |
||
|NM.Level=60-62 |
|||
|Monster Family Type=Antica |
|||
|NM.Spawn_Condition='''Forced''': trade [[Antican Tag]] to '''???''' |
|||
|NM.Treasure= |
|||
* {{ItemIcon|Tungi|22}} {{tooltip|text=[[Tungi]]|tooltip=[[File:Tungi description.png]]}} |
|||
|NM.Steal= |
|||
|NM.Position=(D-9)<br />Map ? |
|||
|NM.Map= |
|||
}} |
}} |
||
{{Zone |
{{Zone NM Row 2 |
||
| |
|NM.Name=Ancient Vessel |
||
|NM.Family=Magic Pot |
|||
|Level Range=72 |
|||
|NM.Main=RDM |
|||
|Pop Position (pos)= (I-7), (I-9), (K-7), or (K-9) |
|||
|NM.Sub= |
|||
|Notable Drops= |
|||
|NM.Aggressive=Y |
|||
*[[Dainslaif]] |
|||
|NM.Detects={{Magic}} |
|||
|Spawn Condition=Timed |
|||
|NM.Level=72 |
|||
|Aggros To=Sound |
|||
|NM.Spawn_Condition='''Mission''': [[The Mithra and the Crystal|Zilart Mission 12 - The Mithra and the Crystal]] |
|||
|Monster Family Type=Antica |
|||
|NM.Treasure= |
|||
|NM.Steal= |
|||
|NM.Position=()<br />Map ? |
|||
|NM.Map= |
|||
}} |
}} |
||
{{Zone |
{{Zone NM Row 2 |
||
| |
|NM.Name=Centurio IV-VII |
||
|NM.Family=Antica |
|||
|Level Range= |
|||
|NM.Main=WAR |
|||
|Pop Position (pos)= (G-7) - (H-8) |
|||
|NM.Sub= |
|||
|Notable Drops= |
|||
|NM.Aggressive=Y |
|||
*[[Bailathorn]] |
|||
|NM.Detects={{Sound}} |
|||
|Spawn Condition=Lottery |
|||
|NM.Level=70 |
|||
|Aggros To=Sound |
|||
|NM.Spawn_Condition='''Mission''': [[Bastok Mission 8-1|Bastok Mission 8-1 - The Chains That Bind Us]] |
|||
|Monster Family Type=Sabotender |
|||
|NM.Treasure= |
|||
|NM.Steal= |
|||
|NM.Position=()<br />Map ? |
|||
|NM.Map= |
|||
}} |
}} |
||
{{Zone |
{{Zone NM Row 2 |
||
|NM.Name=Girtablulu |
|||
|Monster Name=Sabotender Bailarina |
|||
|NM.Family=Scorpion |
|||
|Level Range=80-82 |
|||
|NM.Main=WAR |
|||
|Pop Position (pos)= (F-7) |
|||
|NM.Sub= |
|||
|Notable Drops= |
|||
|NM.Aggressive= |
|||
*[[Dune Boots]] |
|||
|NM.Detects={{Sound}} |
|||
|Spawn Condition=Lottery |
|||
|NM.Level= |
|||
|Aggros To=Sound |
|||
|NM.Spawn_Condition='''Quest''': [[Old Wounds]] |
|||
|Monster Family Type=Sabotender |
|||
|NM.Treasure= |
|||
|NM.Steal= |
|||
|NM.Position=()<br />Map ? |
|||
|NM.Map= |
|||
}} |
}} |
||
{{Zone |
{{Zone NM Row 2 |
||
|NM.Name=Honor |
|||
|Monster Name=Sagittarius X-XIII |
|||
|NM.Family=Sea Monk |
|||
|Level Range=57-58 |
|||
|NM.Main= |
|||
|Pop Position (pos)= (H-9) - (I-10) |
|||
|NM.Sub= |
|||
|Notable Drops= |
|||
|NM.Aggressive=Y |
|||
*[[Loxley Bow]] |
|||
|NM.Detects={{Sound}} |
|||
|Spawn Condition=Lottery |
|||
|NM.Level= |
|||
|Aggros To=Sound |
|||
|NM.Spawn_Condition='''Mission''': [[San d'Oria Mission 8-1|San d'Oria Mission 8-1 - Coming of Age]] |
|||
|Monster Family Type=Antica |
|||
|NM.Treasure= |
|||
|NM.Steal= |
|||
|NM.Position=()<br />Map ? |
|||
|NM.Map= |
|||
}} |
}} |
||
{{Zone |
{{Zone NM Row 2 |
||
| |
|NM.Name=Princeps IV-XLV |
||
|NM.Family=Antica |
|||
|Level Range=70 |
|||
|NM.Main=PLD |
|||
|Pop Position (pos)= (G-11) |
|||
|NM.Sub= |
|||
|Notable Drops= |
|||
|NM.Aggressive=Y |
|||
|Spawn Condition=Bastok Mission 8-1 |
|||
| |
|NM.Detects={{Sound}} |
||
|NM.Level=70 |
|||
|Monster Family Type=Antica |
|||
|NM.Spawn_Condition='''Mission''': [[Bastok Mission 8-1|Bastok Mission 8-1 - The Chains That Bind Us]] |
|||
|NM.Treasure= |
|||
|NM.Steal= |
|||
|NM.Position=()<br />Map ? |
|||
|NM.Map= |
|||
}} |
}} |
||
{{Zone |
{{Zone NM Row 2 |
||
| |
|NM.Name=Triarius IV-XIV |
||
|NM.Family=Antica |
|||
|Level Range=72-74 |
|||
|NM.Main=BLM |
|||
|Pop Position (pos)= (H-6) - (J-8) |
|||
|NM.Sub= |
|||
|Notable Drops= |
|||
|NM.Aggressive=Y |
|||
*[[Pendragon Axe]] |
|||
|NM.Detects={{Sound}} |
|||
|Spawn Condition=Lottery |
|||
|NM.Level=70 |
|||
|Aggros To=Sound |
|||
|NM.Spawn_Condition='''Mission''': [[Bastok Mission 8-1|Bastok Mission 8-1 - The Chains That Bind Us]] |
|||
|Monster Family Type=Antica |
|||
|NM.Treasure= |
|||
|NM.Steal= |
|||
|NM.Position=()<br />Map ? |
|||
|NM.Map= |
|||
}} |
}} |
||
{{Zone |
{{Zone NM Row 2 |
||
| |
|NM.Name=Valor |
||
|NM.Family=Sea Monk |
|||
|Level Range=60-62 |
|||
|NM.Main=MNK |
|||
|Pop Position (pos)= (D-9) |
|||
|NM.Sub= |
|||
|Notable Drops= |
|||
|NM.Aggressive=Y |
|||
*[[Tungi]] |
|||
|NM.Detects={{Sound}} |
|||
|Spawn Condition=[[Antican Tag]] |
|||
|NM.Level= |
|||
|Aggros To=Sound |
|||
|NM.Spawn_Condition='''Mission''': [[San d'Oria Mission 8-1|San d'Oria Mission 8-1 - Coming of Age]] |
|||
|Monster Family Type=Antica |
|||
|NM.Treasure= |
|||
|NM.Steal= |
|||
|NM.Position=()<br />Map ? |
|||
|NM.Map= |
|||
}} |
}} |
||
{{Zone |
{{Zone NM Row 2 |
||
| |
|NM.Name=Centurio XX-I |
||
|NM.Family=Antica |
|||
|Level Range= |
|||
|NM.Main=BLM |
|||
|Pop Position (pos)= (G-4) - (F-4) |
|||
|NM.Sub=WHM |
|||
|Notable Drops= |
|||
|NM.Aggressive=Y |
|||
|Spawn Condition=San d'Oria Mission 8-1 |
|||
|NM.Detects= |
|||
|Aggros To=Sound |
|||
|NM.Level=125 |
|||
|Monster Family Type=Sea Monk |
|||
|NM.Spawn_Condition='''[[:Category:Unity_Concord#Wanted_Battles|UNM]]''': 2,100 Unity Accolades |
|||
|NM.Treasure= |
|||
* {{ItemIcon|Centurio's Coffer|22}} {{tooltip|text=[[Centurio XX-I's Coffer]]|tooltip=[[File:Centurio's Coffer description.png]]}} ({{Gdrop}}) |
|||
:* {{ItemIcon|Centurio's Armor|22}} {{tooltip|text=[[Centurio's Armor]]|tooltip=[[File:Centurio's Armor description.png]]}} {{cdrop}} |
|||
:* {{ItemIcon|Cohort Cloak|22}} {{tooltip|text=[[Cohort Cloak]]|tooltip=[[File:Cohort Cloak description.png]]}} |
|||
:* {{ItemIcon|Cohort Cloak +1|22}} {{tooltip|text=[[Cohort Cloak +1]]|tooltip=[[File:Cohort Cloak +1 description.png]]}} |
|||
:* {{ItemIcon|Kentarch Belt|22}} {{tooltip|text=[[Kentarch Belt]]|tooltip=[[File:Kentarch Belt description.png]]}} {{udrop}} |
|||
:* {{ItemIcon|Kentarch Belt +1|22}} {{tooltip|text=[[Kentarch Belt +1]]|tooltip=[[File:Kentarch Belt +1 description.png]]}} |
|||
|NM.Steal= |
|||
|NM.Position=Map 1 :<br />(H-12)<br />(I-5)<br />(I-9) |
|||
|NM.Map= |
|||
}} |
|||
{{Zone NM Row 2 |
|||
|NM.Name=Malleator Maurok |
|||
|NM.Family=Scorpion |
|||
|NM.Main= |
|||
|NM.Sub= |
|||
|NM.Aggressive=Y |
|||
|NM.Detects= |
|||
|NM.Level= |
|||
|NM.Spawn_Condition='''[[:Category:Voidwatch#Voidwatch_Ops|Voidwatch]]''': {{KI}} [[Ashen stratum abyssite]] and {{KI}} [[Voidstone]] |
|||
|NM.Treasure= |
|||
* {{ItemIcon|Pandinus Beret|22}} {{tooltip|text=[[Pandinus Beret]]|tooltip=[[File:Pandinus Beret description.png]]}} {{vdrop}} |
|||
* {{ItemIcon|Chela Cape|22}} {{tooltip|text=[[Chela Cape]]|tooltip=[[File:Chela Cape description.png]]}} {{rdrop}} |
|||
* Level 81-95 spell scrolls {{udrop}} |
|||
* Various crafting materials {{cdrop}} |
|||
* {{ItemIcon|Silver Mirror|22}} {{tooltip|text=[[Silver Mirror]]|tooltip=[[File:Silver Mirror description.png]]}} {{udrop}} |
|||
* {{KI}} {{tooltip|text=[[Dusky periapt of adaptability]]|tooltip=[[File:Dusky periapt of adaptability.jpg]]}} |
|||
|NM.Steal= |
|||
|NM.Position=(G-9)<br />Map 3 |
|||
|NM.Map= |
|||
}} |
}} |
||
}} |
}} |
||
== Adversaries == |
|||
{{Zone Monsters Table |
|||
{{Zone Adversaries Table 2 |
|||
|Insert Zone Bestiary Content Template= |
|||
|Zone Adversaries Row 2= |
|||
{{Zone Monsters |
|||
{{Zone Adversaries Row 2 |
|||
|Monster Name=Antican Aedilis |
|||
|Adversaries.Name=Antican Aedilis |
|||
|Level Range=62-72 |
|||
|Adversaries.Family=Antica |
|||
|Pop Position (pos)= |
|||
|Adversaries.Main=RNG |
|||
|Number of Spawns=25 |
|||
|Adversaries.Sub= |
|||
|Aggros To=Sound |
|||
|Adversaries.Aggressive=Y |
|||
|Type=Antica |
|||
|Adversaries.Detects={{Sound}} {{Scent}} {{Links}} |
|||
|Adversaries.Minimum_Level=62 |
|||
|Adversaries.Maximum_Level=75 |
|||
|Adversaries.Spawns=25 |
|||
|Adversaries.Spawn_Condition='''Timed''': ?min. |
|||
|Adversaries.Treasure= |
|||
|Adversaries.Steal= |
|||
}} |
}} |
||
{{Zone |
{{Zone Adversaries Row 2 |
||
| |
|Adversaries.Name=Antican Antesignanus |
||
|Adversaries.Family=Antica |
|||
|Level Range=62-72 |
|||
|Adversaries.Main=PLD |
|||
|Pop Position (pos)= |
|||
|Adversaries.Sub= |
|||
|Number of Spawns=28 |
|||
|Adversaries.Aggressive=Y |
|||
|Aggros To=Sound |
|||
|Adversaries.Detects={{Sound}} {{Scent}} {{Links}} |
|||
|Type=Antica |
|||
|Adversaries.Minimum_Level=62 |
|||
|Adversaries.Maximum_Level=72 |
|||
|Adversaries.Spawns=28 |
|||
|Adversaries.Spawn_Condition='''Timed''': ?min. |
|||
|Adversaries.Treasure= |
|||
|Adversaries.Steal= |
|||
}} |
}} |
||
{{Zone |
{{Zone Adversaries Row 2 |
||
| |
|Adversaries.Name=Antican Hastatus |
||
|Adversaries.Family=Antica |
|||
|Level Range=52-59 |
|||
|Adversaries.Main=WAR |
|||
|Pop Position (pos)= |
|||
|Adversaries.Sub= |
|||
|Number of Spawns=46 |
|||
|Adversaries.Aggressive=Y |
|||
|Aggros To=Sound |
|||
|Adversaries.Detects={{Sound}} {{Scent}} {{Links}} |
|||
|Type=Antica |
|||
|Adversaries.Minimum_Level=52 |
|||
|Adversaries.Maximum_Level=59 |
|||
|Adversaries.Spawns=46 |
|||
|Adversaries.Spawn_Condition='''Timed''': ?min. |
|||
|Adversaries.Treasure= |
|||
*{{ItemIcon|Qsd. Coffer Key|22}} {{imgpop|[[Quicksand Coffer Key]]|Qsd. Coffer Key description.png|link=}} |
|||
|Adversaries.Steal= |
|||
}} |
}} |
||
{{Zone |
{{Zone Adversaries Row 2 |
||
| |
|Adversaries.Name=Antican Princeps |
||
|Adversaries.Family=Antica |
|||
|Level Range=52-59 |
|||
|Adversaries.Main=PLD |
|||
|Pop Position (pos)= |
|||
|Adversaries.Sub= |
|||
|Number of Spawns=51 |
|||
|Adversaries.Aggressive=Y |
|||
|Aggros To=Sound |
|||
|Adversaries.Detects={{Sound}} {{Scent}} {{Links}} |
|||
|Type=Antica |
|||
|Adversaries.Minimum_Level=52 |
|||
|Adversaries.Maximum_Level=59 |
|||
|Adversaries.Spawns=51 |
|||
|Adversaries.Spawn_Condition='''Timed''': ?min. |
|||
|Adversaries.Treasure= |
|||
*{{ItemIcon|Qsd. Coffer Key|22}} {{imgpop|[[Quicksand Coffer Key]]|Qsd. Coffer Key description.png|link=}} |
|||
|Adversaries.Steal= |
|||
}} |
}} |
||
{{Zone |
{{Zone Adversaries Row 2 |
||
| |
|Adversaries.Name=Antican Quaestor |
||
|Adversaries.Family=Antica |
|||
|Level Range=62-72 |
|||
|Adversaries.Main=BLM |
|||
|Pop Position (pos)= |
|||
|Adversaries.Sub= |
|||
|Number of Spawns=29 |
|||
|Adversaries.Aggressive=Y |
|||
|Aggros To=Sound |
|||
|Adversaries.Detects={{Sound}} {{Scent}} {{Links}} |
|||
|Type=Antica |
|||
|Adversaries.Minimum_Level=62 |
|||
|Adversaries.Maximum_Level=72 |
|||
|Adversaries.Spawns=29 |
|||
|Adversaries.Spawn_Condition='''Timed''': ?min. |
|||
|Adversaries.Treasure= |
|||
|Adversaries.Steal= |
|||
}} |
}} |
||
{{Zone |
{{Zone Adversaries Row 2 |
||
| |
|Adversaries.Name=Antican Signifer |
||
|Adversaries.Family=Antica |
|||
|Level Range=52-59 |
|||
|Adversaries.Main=BLM |
|||
|Pop Position (pos)= |
|||
|Adversaries.Sub= |
|||
|Number of Spawns=47 |
|||
|Adversaries.Aggressive=Y |
|||
|Aggros To=Sound |
|||
|Adversaries.Detects={{Sound}} {{Scent}} {{Links}} |
|||
|Type=Antica |
|||
|Adversaries.Minimum_Level=52 |
|||
|Adversaries.Maximum_Level=59 |
|||
|Adversaries.Spawns=47 |
|||
|Adversaries.Spawn_Condition='''Timed''': ?min. |
|||
|Adversaries.Treasure= |
|||
*{{ItemIcon|Qsd. Coffer Key|22}} {{imgpop|[[Quicksand Coffer Key]]|Qsd. Coffer Key description.png|link=}} |
|||
|Adversaries.Steal= |
|||
}} |
}} |
||
{{Zone |
{{Zone Adversaries Row 2 |
||
| |
|Adversaries.Name=Antican Triarius |
||
|Adversaries.Family=Antica |
|||
|Level Range=62-72 |
|||
|Adversaries.Main=WAR |
|||
|Pop Position (pos)= |
|||
|Adversaries.Sub= |
|||
|Number of Spawns=28 |
|||
|Adversaries.Aggressive=Y |
|||
|Aggros To=Sound |
|||
|Adversaries.Detects={{Sound}} {{Scent}} {{Links}} |
|||
|Type=Antica |
|||
|Adversaries.Minimum_Level=62 |
|||
|Adversaries.Maximum_Level=72 |
|||
|Adversaries.Spawns=28 |
|||
|Adversaries.Spawn_Condition='''Timed''': ?min. |
|||
|Adversaries.Treasure= |
|||
|Adversaries.Steal= |
|||
}} |
}} |
||
{{Zone |
{{Zone Adversaries Row 2 |
||
| |
|Adversaries.Name=Girtab |
||
|Adversaries.Family=Scorpion |
|||
|Level Range=62-65 |
|||
|Adversaries.Main= |
|||
|Pop Position (pos)= |
|||
|Adversaries.Sub= |
|||
|Number of Spawns=19 |
|||
|Adversaries.Aggressive=Y |
|||
|Aggros To=Sound |
|||
|Adversaries.Detects={{Sound}} {{Scent}} {{Links}} |
|||
|Type=Scorpion |
|||
|Adversaries.Minimum_Level=62 |
|||
|Adversaries.Maximum_Level=65 |
|||
|Adversaries.Spawns=19 |
|||
|Adversaries.Spawn_Condition='''Timed''': ?min. |
|||
|Adversaries.Treasure= |
|||
|Adversaries.Steal= |
|||
}} |
}} |
||
{{Zone |
{{Zone Adversaries Row 2 |
||
| |
|Adversaries.Name=Helm Beetle |
||
|Adversaries.Family=Beetle |
|||
|Level Range=51-58 |
|||
|Adversaries.Main= |
|||
|Pop Position (pos)= |
|||
|Adversaries.Sub= |
|||
|Number of Spawns=35 |
|||
|Adversaries.Aggressive= |
|||
|Aggros To=Sight |
|||
|Adversaries.Detects={{Sight}} {{Scent}} {{Links}} |
|||
|Type=Beetle |
|||
|Adversaries.Minimum_Level=51 |
|||
|Adversaries.Maximum_Level=58 |
|||
|Adversaries.Spawns=35 |
|||
|Adversaries.Spawn_Condition='''Timed''': ?min. |
|||
|Adversaries.Treasure= |
|||
*{{ItemIcon|Qsd. Coffer Key|22}} {{imgpop|[[Quicksand Coffer Key]]|Qsd. Coffer Key description.png|link=}} |
|||
|Adversaries.Steal= |
|||
}} |
}} |
||
{{Zone |
{{Zone Adversaries Row 2 |
||
| |
|Adversaries.Name=Sabotender Bailaor |
||
|Adversaries.Family=Sabotender |
|||
|Level Range=52-59 |
|||
|Adversaries.Main= |
|||
|Pop Position (pos)= |
|||
|Adversaries.Sub= |
|||
|Number of Spawns=25 |
|||
|Adversaries.Aggressive=Y |
|||
|Aggros To=Sound |
|||
|Adversaries.Detects={{Sound}} |
|||
|Type=Sabotender |
|||
|Adversaries.Minimum_Level=52 |
|||
|Adversaries.Maximum_Level=59 |
|||
|Adversaries.Spawns=25 |
|||
|Adversaries.Spawn_Condition='''Timed''': ?min. |
|||
|Adversaries.Treasure= |
|||
*{{ItemIcon|Qsd. Coffer Key|22}} {{imgpop|[[Quicksand Coffer Key]]|Qsd. Coffer Key description.png|link=}} |
|||
|Adversaries.Steal= |
|||
}} |
}} |
||
{{Zone |
{{Zone Adversaries Row 2 |
||
| |
|Adversaries.Name=Sand Digger |
||
|Adversaries.Family=Worm |
|||
|Level Range=62-65 |
|||
|Adversaries.Main= |
|||
|Pop Position (pos)= |
|||
|Adversaries.Sub= |
|||
|Number of Spawns=4 |
|||
|Adversaries.Aggressive=Y |
|||
|Aggros To=Sound |
|||
|Adversaries.Detects={{Sound}} {{Links}} |
|||
|Type=Worm |
|||
|Adversaries.Minimum_Level=62 |
|||
|Adversaries.Maximum_Level=65 |
|||
|Adversaries.Spawns=4 |
|||
|Adversaries.Spawn_Condition='''Timed''': ?min. |
|||
|Adversaries.Treasure= |
|||
|Adversaries.Steal= |
|||
}} |
}} |
||
{{Zone |
{{Zone Adversaries Row 2 |
||
| |
|Adversaries.Name=Sand Eater |
||
|Adversaries.Family=Worm |
|||
|Level Range=51-59 |
|||
|Adversaries.Main= |
|||
|Pop Position (pos)= |
|||
|Adversaries.Sub= |
|||
|Number of Spawns=32 |
|||
|Adversaries.Aggressive= |
|||
|Aggros To=Sound |
|||
|Adversaries.Detects={{Sound}} {{Links}} |
|||
|Type=Worm |
|||
|Adversaries.Minimum_Level=51 |
|||
|Adversaries.Maximum_Level=59 |
|||
|Adversaries.Spawns=32 |
|||
|Adversaries.Spawn_Condition='''Timed''': ?min. |
|||
|Adversaries.Treasure= |
|||
*{{ItemIcon|Qsd. Coffer Key|22}} {{imgpop|[[Quicksand Coffer Key]]|Qsd. Coffer Key description.png|link=}} |
|||
|Adversaries.Steal= |
|||
}} |
}} |
||
{{Zone |
{{Zone Adversaries Row 2 |
||
| |
|Adversaries.Name=Sand Lizard |
||
|Adversaries.Family=Lizard |
|||
|Level Range=56-59 |
|||
|Adversaries.Main= |
|||
|Pop Position (pos)= |
|||
|Adversaries.Sub= |
|||
|Number of Spawns=27 |
|||
|Adversaries.Aggressive= |
|||
|Aggros To=Sound |
|||
|Adversaries.Detects={{Sound}} {{Links}} |
|||
|Type=Lizard |
|||
|Adversaries.Minimum_Level=56 |
|||
|Adversaries.Maximum_Level=59 |
|||
|Adversaries.Spawns=27 |
|||
|Adversaries.Spawn_Condition='''Timed''': ?min. |
|||
|Adversaries.Treasure= |
|||
*{{ItemIcon|Qsd. Coffer Key|22}} {{imgpop|[[Quicksand Coffer Key]]|Qsd. Coffer Key description.png|link=}} |
|||
|Adversaries.Steal= |
|||
}} |
}} |
||
{{Zone |
{{Zone Adversaries Row 2 |
||
| |
|Adversaries.Name=Sand Spider |
||
|Adversaries.Family=Spider |
|||
|Level Range=51-55 |
|||
|Adversaries.Main= |
|||
|Pop Position (pos)= |
|||
|Adversaries.Sub= |
|||
|Number of Spawns=16 |
|||
|Adversaries.Aggressive= |
|||
|Aggros To=Sound |
|||
|Adversaries.Detects={{Sound}} {{Links}} |
|||
|Type=Spider |
|||
|Adversaries.Minimum_Level=51 |
|||
|Adversaries.Maximum_Level=55 |
|||
|Adversaries.Spawns=16 |
|||
|Adversaries.Spawn_Condition='''Timed''': ?min. |
|||
|Adversaries.Treasure= |
|||
*{{ItemIcon|Qsd. Coffer Key|22}} {{imgpop|[[Quicksand Coffer Key]]|Qsd. Coffer Key description.png|link=}} |
|||
|Adversaries.Steal= |
|||
}} |
}} |
||
{{Zone |
{{Zone Adversaries Row 2 |
||
| |
|Adversaries.Name=Sand Tarantula |
||
|Adversaries.Family=Spider |
|||
|Level Range=65-68 |
|||
|Adversaries.Main= |
|||
|Pop Position (pos)= |
|||
|Adversaries.Sub= |
|||
|Number of Spawns=12 |
|||
|Adversaries.Aggressive=Y |
|||
|Aggros To=Sound |
|||
|Adversaries.Detects={{Sound}} {{Links}} |
|||
|Type=Spider |
|||
|Adversaries.Minimum_Level=65 |
|||
|Adversaries.Maximum_Level=68 |
|||
|Adversaries.Spawns=12 |
|||
|Adversaries.Spawn_Condition='''Timed''': ?min. |
|||
|Adversaries.Treasure= |
|||
|Adversaries.Steal= |
|||
}} |
}} |
||
{{Zone |
{{Zone Adversaries Row 2 |
||
| |
|Adversaries.Name=Spelunking Sabotender |
||
|Adversaries.Family=Sabotender |
|||
|Level Range=62-68 |
|||
|Adversaries.Main= |
|||
|Pop Position (pos)= |
|||
|Adversaries.Sub= |
|||
|Number of Spawns=11 |
|||
|Adversaries.Aggressive=Y |
|||
|Aggros To=Sound |
|||
|Adversaries.Detects={{Sound}} |
|||
|Type=Sabotender |
|||
|Adversaries.Minimum_Level=62 |
|||
|Adversaries.Maximum_Level=68 |
|||
|Adversaries.Spawns=11 |
|||
|Adversaries.Spawn_Condition='''Timed''': ?min. |
|||
|Adversaries.Treasure= |
|||
|Adversaries.Steal= |
|||
}} |
}} |
||
}} |
}} |
||
== Notes == |
== Notes == |
||
*Quicksand Caves was added to FFXI with the Rise of the Zilart expansion pack activated on 4/15/03. |
*Quicksand Caves was added to FFXI with the Rise of the Zilart expansion pack activated on 4/15/03. |
||
*Goblin Footprint is located at (L-4) of the first map. |
*Goblin Footprint is located at (L-4) of the first map. |
||
*[[Escape]]s to [[Eastern Altepa Desert]] (J-8). |
|||
===Notable Landmarks=== |
|||
*Fountain of Kings |
|||
[[Fountain of Kings]] |
|||
== Related Links == |
|||
[[Category:Translation]] [[Category:Proofreading]] |
|||
Latest revision as of 01:35, 2 April 2023
| |||||||||||||||||||||||||||||||||||||||||||||||||||||||||||||||||||||||||||||||||||||||||||||||||||||||||||||||||||||||||||||||||||||||||||||||||||||||||||||||


Zone Information
| Quicksand Caves Coffer |
|---|
| With Corresponding Quest |
| Maps |


Quests
| Fame | Name | NPC | Pos. | Zone | Rewards |
|---|---|---|---|---|---|
| N/A | Peddlestox's Treasure Box: Kuzotz | Peddlestox | L-7 | Western Altepa Desert | Various |
| Windurst Fame 5 | Crying Over Onions | Kohlo-Lakolo | G-5 | Port Windurst | Star Necklace |
| N/A | Old Wounds | Curilla | I-9 | Chateau d'Oraguille | Savage Blade |
| Rabao Fame 4 | The Missing Piece | Alfesar | H-7 | Rabao | Scroll of Teleport-Altep |
Missions
| Mission Name | Mission Number | NPC | Storyline |
|---|---|---|---|
| Bastok Mission 8-1 | |||
| Rescue! A Moogle's Labor of Love | |||
| San d'Oria Mission 8-1 | |||
| Windurst Mission 9-2 | |||
| Zilart Mission 12 |
Notorious Monsters


_description.png)
_description.png)


_description.png)
_description.png)
_description.png)


Adversaries
| Adversaries | ||||
|---|---|---|---|---|
| Lv. | Name | Genus | Drops | Spawns |
| 62-75 | Antican Aedilis RNG Timed: ?min. |
Antica | 25 | |
| 62-72 | Antican Antesignanus PLD Timed: ?min. |
Antica | 28 | |
| 52-59 | Antican Hastatus WAR Timed: ?min. |
Antica | 46 | |
| 52-59 | Antican Princeps PLD Timed: ?min. |
Antica | 51 | |
| 62-72 | Antican Quaestor BLM Timed: ?min. |
Antica | 29 | |
| 52-59 | Antican Signifer BLM Timed: ?min. |
Antica | 47 | |
| 62-72 | Antican Triarius WAR Timed: ?min. |
Antica | 28 | |
| 62-65 | Girtab Timed: ?min. |
Scorpion | 19 | |
| 51-58 | Helm Beetle Timed: ?min. |
Beetle | 35 | |
| 52-59 | Sabotender Bailaor Timed: ?min. |
Sabotender | 25 | |
| 62-65 | Sand Digger Timed: ?min. |
Worm | 4 | |
| 51-59 | Sand Eater Timed: ?min. |
Worm | 32 | |
| 56-59 | Sand Lizard Timed: ?min. |
Lizard | 27 | |
| 51-55 | Sand Spider Timed: ?min. |
Spider | 16 | |
| 65-68 | Sand Tarantula Timed: ?min. |
Spider | 12 | |
| 62-68 | Spelunking Sabotender Timed: ?min. |
Sabotender | 11 | |
| ||||

Notes
- Quicksand Caves was added to FFXI with the Rise of the Zilart expansion pack activated on 4/15/03.
- Goblin Footprint is located at (L-4) of the first map.
- Escapes to Eastern Altepa Desert (J-8).
Notable Landmarks
- Fountain of Kings
