The Voracious Resurgence | |
| Prime Weapons • Ultimate Weapons • Ultimate Augments • Abjurations iL119 • JSE Necks • Divergence Augments • Escutcheons | |
| Reforged Armor Artifact: +1 • iL109 • iL119/+2/+3 Relic: +1/+2 • iL109 • iL119/+2/+3 Empyrean: +1/+2 • iL109 • iL119/+2/+3 |
Guides • Crafting • Trusts • Apex Monsters |
Category:Odyssey: Difference between revisions
| Line 82: | Line 82: | ||
*Only the player opening the [[:Category:Odyssey#Izzat|Chest/Coffer/Aurum Strongbox]] will receive the message should their Moogle Mastery upgrade. |
*Only the player opening the [[:Category:Odyssey#Izzat|Chest/Coffer/Aurum Strongbox]] will receive the message should their Moogle Mastery upgrade. |
||
:*Other players' Moogle Mastery will increase as well, but they won't receive the message in Sheol. {{Information Needed}} |
:*Other players' Moogle Mastery will increase as well, but they won't receive the message in Sheol. {{Information Needed}} |
||
*Up to Tier |
*Up to Tier 45 Moogle Mastery has been observed. |
||
*It is |
*It is currently unknown how to increase Moogle Mastery in Sheol Gaol. |
||
===Izzat=== |
===Izzat=== |
||
Revision as of 01:48, 12 May 2021
|
|
|
Odyssey Overview
This section is a basic introduction of the Odyssey content. Each Odyssey area has special rules and restrictions that apply. Be sure to overview the Sheol section on this page for limitations unique to that area before partaking in the content.
Sheol A, B and C Overview
- To enter, each player needs to be in possession of a
 Moglophone.
- Examining the ??? in Rabao near the Veridical Conflux at (G-6) allows you to speak with the Pilgrim Moogle.
- This moogle will grant the player the temporary Moglophone upon request.
Nearest Home Point: Kuzotz > Rabao (#2)
- You may receive another Moglophone once twenty hours have passed from when you received the previous one.
- Only 1 Moglophone may be held at a time.
- It is possible to be able to do 2 runs in one day if you collect a Moglophone, then wait 20 hours before using it. This will allow you to pick up a new Moglophone right after you exit your run.
- It is possible to be able to do 2 runs in one day if you collect a
- You may receive another
- Examining the Veridical Conflux in Rabao at (G-6) and selecting a Sheol instance will transport all party members to Walk of Echoes.
- All held Moglophones by party members will be consumed upon entry.
- Once inside, each player will be given a
 Moglophone in their inventory. This is used to exit the instanced area before time expires.
- Once inside, each player will be given a
- All held
- Parties must consist of 1 and 6 people.
- Trusts may be called within any Sheol instance.
- The number of Trusts you can summon is limited based on the number of people who entered.
- E.g. should only 2 people enter, and break their party; only 4 trusts total may be called within the instance.
- Trusts are enhanced by the effect of "Moogle Mastery" after it is unlocked.
- Sheol locations must be completed in order for the first time using a Records of Eminence Objective to unlock the next one.
- Clearing Sheol A with the objective set will unlock access to Sheol B, Sheol B will unlock Sheol C, and Sheol C will unlock Sheol Gaol.
Sheol Gaol Overview
- To enter, each player needs to be in possession of THREE Moglophone IIs.
- By talking to the Pilgrim Moogle by examining the ??? in Rabao near the Veridical Conflux at (G-6) after clearing the ROE for Sheol C, it will mumble something about the Darkness then eventually give you 3 Moglophone II Key Items for free.
- Subsequent Moglophone IIs will cost 3000 Moogle Segments each, purchased from the Pilgrim Moogle.
- Moogle Segments can be earned by defeating foes or opening chests successfully within Sheol A, B, and C.
- Each Boss attempt will exhaust 1 Moglophone II.
- Additionally all party members must have at least 3 jobs at 99 in order to enter.
Content Objective
- Battle the various foes and Notorious Monsters among the multiple floors of the instance as you make your way to the exit.
- Examining the Otherworldly Vortex of each Odyssey will complete the Records of Eminence Objective. You do not need to kill any mobs or NMs to complete this objective. The Otherworldly Vortex is located on a different floor of each Sheol Zone and should not be confused with the Veridical Conflux, which allows you to ascend or descend floors within the Sheol Zone.
- See the individual Sheol sections on this page for the Otherworldly Vortex locations and maps.
- Sheol A, B and C have Translocators within them. These are essentially warps in order to easily access different areas of that Sheol. They cannot be used until you interact with each one in order to activate it for your character. See each Sheol area below on this page for locations of these Translocators. Many players may expect you to have all of these unlocked, so be sure to do this on your own.
- All Nostos enemies in Sheol A, B or C have a chance to drop


 Lustreless items.
- Monsters increase in level and difficulty for each consecutively higher floor within a Sheol. Higher level enemies on higher floors have a higher drop rate of Lustreless items.
- Treasure Hunter increases the drop rate of Lustreless items up to a max of 3 Lustreless items dropped per Nostos mob.
- The various enemies in Odyssey are all aggressive.
They come in two varieties, and all behave accordingly to their real world brethren. All monsters take reduced AoE damage similar to mobs in Domain Invasion and Dynamis Divergence. Anomalies for mob aggro rules have been observed within the Sheol areas. It's safest to assume that all mobs will aggro both sight and sound, and that any mob that has true sight or sound aggro will also have true sight or sound aggro within Odyssey. Hide will work to shed aggro/enmity on nearly all foes except ones who track by scent.
Area Progression
Initially, players have access to only Sheol A. In order to progress to higher level areas, the Records of Eminence Objective pertaining to each Sheol needs to be completed:
- Completing the Records of Eminence Objective for Sheol A will unlock the ability to augment Unity Equipment where Lustreless Scales are used to
 augment that equipment, reward a Large Lustreless Scale Box, and unlock access to Sheol B.
 - Completing the Records of Eminence Objective for Sheol B will unlock the ability to augment Unity Equipment where Lustreless Hides are used to augment that equipment, reward a Large Lustreless Hide Box, and unlock access to Sheol C.
- Completing the Records of Eminence Objective for Sheol C will unlock the ability to augment Unity Equipment where Lustreless Wings are used to augment that equipment, reward a Large Lustreless Wing Box, and unlock access to Sheol - Gaol.
Moogle Mastery Effects
Moogle Mastery is an effect that is granted within all Odyssey areas. The benefits from this effect include:
- Moogle Mastery will decrease the number of UNM pop items required to spawn a Notorious Monster in that particular wing of Sheol.
- Each level decreases the required amount of pop items by 1.
- This benefit is specific to the Mastery Tier of the Sheol wing in question.
- For example, if you have Mog Mastery I in Sheol B and Mog Mastery XV in Sheol A, you will not receive any pop item reductions in Sheol B.
- Moogle Mastery will increase the strength of Trusts.
- It is currently unknown how this specifically boosts Trusts, as it doesn't increase their HP/MP as per +Level. It is thought to increase their ilevel, DT-,. Base Stats and/or their Derived Stats by increasing amounts by tier.
- Moogle Mastery and its benefits are carried into Sheol - Gaol.
Increasing Moogle Mastery
One's Moogle Mastery effect is increased:
- When 100+ total Nostos enemies of that wing is defeated
- Minorly when defeating Nostos Enemies and when opening Chests.
- Largely when opening Coffers.
- Greatly when defeating Notorious Monsters or when opening Aurum Strongboxes.
The increase to Moogle Mastery is an ambiguous system where each of the above actions works towards increasing Moogle Mastery's "meter".
- Defeating Notorious Monsters and opening Aurum Strongboxes will increase Moogle Mastery very quickly compared to opening chests alone.
- There are certain nonspecific requirements that must be met for certain tiers to be reached, where players won't increase rank until defeating a certain number of NMs a certain number of times, or a minimum number of total Nostos defeated, etc.
When a player's Moogle Mastery increases within Sheol, a message will be displayed stating that "your Moogle Mastery is now XX".
- Only the player opening the Chest/Coffer/Aurum Strongbox will receive the message should their Moogle Mastery upgrade.
- Other players' Moogle Mastery will increase as well, but they won't receive the message in Sheol.

- Other players' Moogle Mastery will increase as well, but they won't receive the message in Sheol.
- Up to Tier 45 Moogle Mastery has been observed.
- It is currently unknown how to increase Moogle Mastery in Sheol Gaol.
Izzat
Players earn izzat, a special currency unique to Odyssey, as they vanquish monsters within Sheol A, B or C.
- Izzat is shared among all party members.
- All Izzat will be lost once you leave the zone, it is only a temporary currency.
- Players will receive 1 izzat for every 5 monsters defeated and 10 izzat for fully clearing an Agon Halo and all its surrounding beastmen.
- Izzat is also used to spawn various Notorious Monsters from Ethereal Junctions that appear after defeating Agon Halos and all their accompanying Beastmen, for a cost of 10 izzat.
Moogle Segments
Moogle Segments are a form of points, which are used for Odyssey. They were introduced in the November 2020 Version Update. The main purpose of Moogle Segments is to purchase the ![]() Moglophone II to enter Sheol - Gaol, but lustreless items are also available for purchase. See the Pilgrim Moogle page for details.
Moglophone II to enter Sheol - Gaol, but lustreless items are also available for purchase. See the Pilgrim Moogle page for details.
Segments are earned throughout Odyssey, in each of Sheol A, B and C. The total amount of Segments earned increases with the difficulty of the content. Accordingly, the most segments can be earned within Sheol C. Each Sheol section on this page details the amount of Moogle Segments that can be earned within that area.
As of the May 2021 Version Update, a bonus amount of segments is rewarded upon examining the Otherworldly Vortex at the end of Sheol A, B, or C. This bonus is dependent on the amount of moogle segments earned during that foray of Odyssey. The bonus appears to be around 25% of the segments earned.
Sheol A
- All Nostos mobs will grant 5 Moogle Segments each on the first floor, scaling up by 2 per floor up to a max of 17 Segments per mob on floor 7.
- A Coffer grants 100, Coffer grants 150, and an Aurum Strongbox will grant 200. Opening a Chest using keys or tools will grant only 10% of the Moogle Segments you would have gotten opening it with Izzat.
- While the Halo and the individual beastmen themselves will not grant Moogle Segments, successfully clearing an Agon Halo and all its surrounding Beastmen will grant Segments ranging from 50~410 based on the floor you are on.
- Killing an NM will grant a number of Segments ranging from 80~200 based on the floor it is spawned on.
Sheol B
- All Nostos mobs will grant 13 Moogle Segments each on the first floor, scaling up by 2 per floor up to a max of 23 Segments per mob on floor 6.
- A Chest grants 75, Coffer grants 100, and an Aurum Strongbox will grant ???. Opening a Chest using keys or tools will grant only 10% of the Moogle Segments you would have gotten opening it with Izzat.
- While the Halo and the individual beastmen themselves will not grant Moogle Segments, successfully clearing an Agon Halo and all its surrounding Beastmen will grant Segments ranging from 220~520 based on the floor you are on.
- Killing an NM will grant a number of Segments ranging from 150~250 based on the floor it is spawned on.
Sheol C
- All Nostos mobs will grant 25 Moogle Segments each on the first floor, scaling up by 2 per floor up to a max of 31 Segments per mob on floor 4.
- A Coffer grants 100, Coffer grants 150, and an Aurum Strongbox will grant 200. Opening a Chest using keys or tools will grant only 10% of the Moogle Segments you would have gotten opening it with Izzat.
- While the Halo and the individual beastmen themselves will not grant Moogle Segments, successfully clearing an Agon Halo and all its surrounding Beastmen will grant Segments ranging from 450~630 based on the floor you are on.
- Killing an NM will grant a number of Segments ranging from 280~340 based on the floor it is spawned on.
"Nostos" type
Common enemies. All aggro by their family's typical detection method, plus Sight.
- They cluster in groups of 10 mobs.
- Each Sheol has a fixed set of enemy types, but their placement is randomized on each run.
- They do not link.
- They are susceptible to Charm.
- For every 5 defeated, the party will be granted 1 izzat.
- Hide may be used to shed hate in emergency, except on foes that track by scent.
 "Agon" Beastmen type
Agon Halos do not have fixed spawn locations, and differ each entry to Sheol areas. Around each Agon Halo, semi-invisible enemies spawn that cannot be interacted with until their appropriate Agon Halo is destroyed.
- Although they cannot be targeted, Nostos can and will aggro players before the Agon Halo is destroyed.
- Agon Beastmen will link with each other, but not with the Agon Halo.
- Agon Beastmen possess both True Sight and True Sound.
- Agon Beastmen cannot be slept, enfeebled or acted on via AoE or any spells/actions in any way until the Agon Halo has been destroyed.
- Using an AoE ability or spell, however, will generate hate on all Angon foes as if they were affected by it normally, so a tank could hold the aggro while the party destroys the Agon Halo.
- Halos emit elemental damage corresponding to its element, similar to Dynamis - Divergence wave 3. Halos also take 50% additional damage to the element strong to its element, and 5% damage from the same element.
- Destroying the Halo makes all Agon Beastmen around it targetable.
- When all Beastmen around an Agon Halo are defeated, the player will be granted 10 izzat, a number of Segments depending on which Sheol and what floor it is on, and an Ethereal Junction will spawn in the location of Agon Halo. If the player successfully examines that Sheol's Otherworldly Vortex before time runs out, they will also be granted a Lustreless Item Box in their personal reward issuance.
- The Ethereal Junction that spawns after clearing the Agon Halo and its surrounding beastmen may be used pop a random Notorious Monster at a cost of 10 izzat. This is different from any Ethereal Junctions that were already in the instance before the Agon Halo was cleared; those Junctions will spawn NMs only if you trade it the appropriate amount of UNM pop items.
- See the Notorious Monster section in each Sheol area on this page for details.
Notorious Monsters
- Trading UNM materials to an Ethereal Junction (that was not spawned by defeating an Agon Halo and its Beastmen) will spawn a matching NM to the UNM whose materials were traded.
- Ethereal Junctions spawned from Agon Halos and their accompanying Beastmen demand an izzat payment of 10, and will spawn any one of the Notorious Monsters of that Sheol wing at random.
- All Notorious Monsters have access to various SP Abilities.
- All Notorious Monsters can drop the Lustreless item of that Sheol with the possibility to also drop a
 a Lustreless Box of the corresponding Sheol when defeated.
 - Once a specific Notorious Monster has been spawned, it may not be spawned again in that same Odyssey run.
Chests
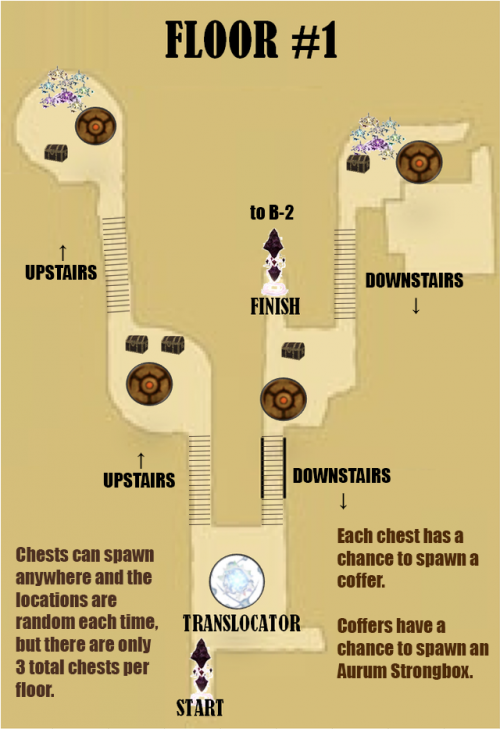
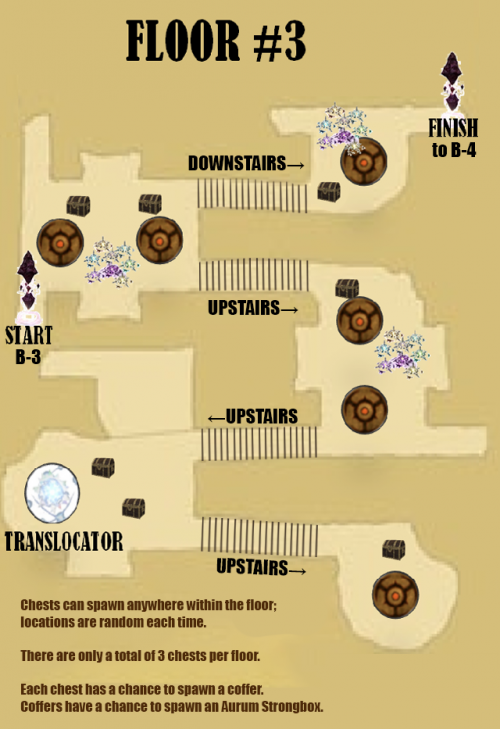
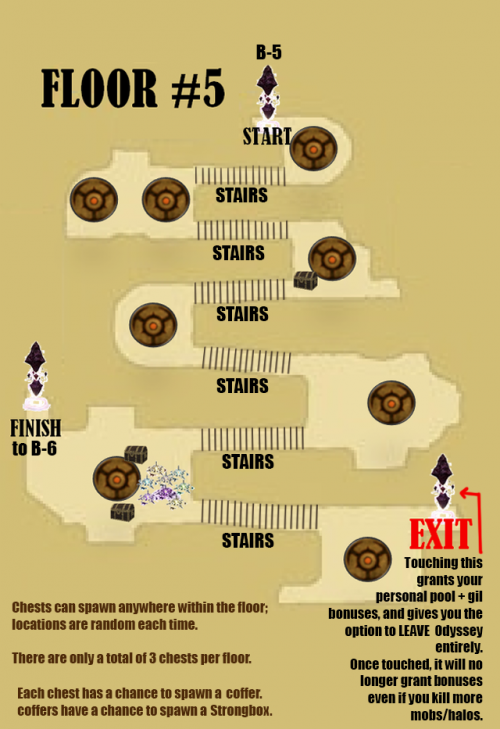
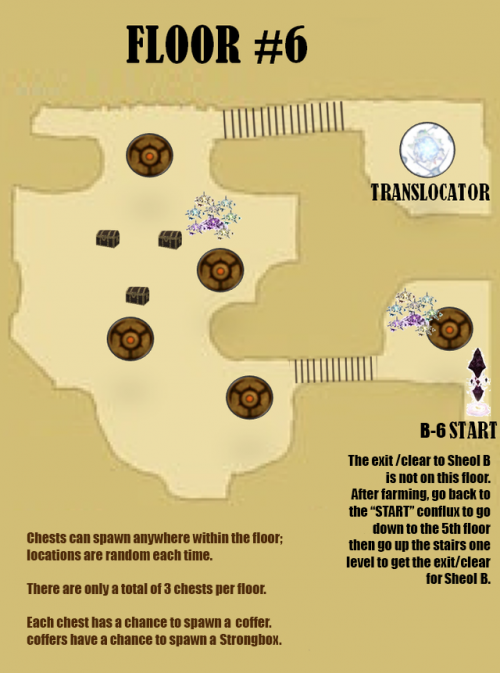
- In Sheol A, B and C, 3 Chests can spawn per floor.
- Chest spawn locations are random each time, but they do not spawn on stairs.
- Chests can be opened by a Thief with
 Thief's Tools,
  Living Key, or
  Skeleton Key can open chests within Odyssey Sheol A, B or C. Opening chests this way will result in one of three results:
- 1) the chest will be opened
- 2) the key or tool will be used up with the message "However, it has no effect", or
- 3) The key or tool is used up and the chest turns into a Mimic NM.
- The more times a key or tool fails, the higher the chance it has to become a Mimic.
- Skeleton Keys return the lowest failure rate, followed by Living Keys, then Thief's Tools.
- Only a Thief main can open chests using keys or tools. /THF as a subjob will not work.
- Chests can contain multiple Lustreless items and possibly
 Lustreless Boxes.
 - Successfully opening a chest grants a chance to spawn an upgraded Coffer in the same location where the chest spawned.
- Coffers have a greater chance of rewarding Lustreless Boxes. Successfully opening a coffer grants a chance to spawn an Aurum Strongbox.
- Aurum Strongboxes contain more scales than ordinary chests, and only Aurum Strongboxes may contain Large Lustreless item boxes.
- The contents of chests, coffers and strongboxes are added to the party's treasure pool, not to individual rewards or to the person opening the chest.
- Chests can also be opened using Izzat. Normal chests (
 ) are opened by spending 10 izzat.
- The izzat cost for opening chests is reduced by 1 for every 10 chests opened in that Sheol wing opened.
- This reduction caps at -5 izzat.
- e.g. with 28 chests opened, the cost to open a normal chest will be 8 izzat, while with 77 chests opened, the cost to open a normal chest will be 5 izzat.
- After opening a normal chest, there is a chance for a coffer (
 ) to spawn that can be opened for 15 izzat.
- The izzat cost for opening coffers is reduced by 1 for every 10 coffers in that Sheol path opened.
- This reduction caps at -7 izzat.
- After opening a coffer, there is a chance for an Aurum Strongbox (
 ) to spawn that can be opened for 20 izzat.
- The izzat cost for opening strongboxes is reduced by 1 for every 10 strongbox in that Sheol path opened.
- This reduction caps at -10 izzat.
- The izzat cost for opening
- The izzat cost for opening
- The izzat cost for opening
- Opening a chest with Izzat greatly increases the chance of a higher tier coffer spawning, compared to using keys or tools.
- Opening a chest with Izzat will grant a number of segments depending on which Sheol zone it is.
Mimics
- Mimics posses high attack and defense, and take reduced damage from magic and skillchains.
- Mimics will use draw in and have rapid hate decay. This causes them to shift targets regularly and draw them in.
- Mimics have an aggro range of 20', and will reaggro the Thief which spawned it, even after a full party wipe and reraise.
- The Thief must never return to within 20' of an idle Mimic or it will reaggro.
- Mimics will not reaggro other party members after a wipe, regardless of their range, unless the party member is within sight aggro of the mimic.
- A Thief may place a party member or Trusts on a Mimic and run away to be defeated by other foes out of range. The Thief will then be able to safely reraise afterwards, but will still gain aggro if they come within 20' of the Mimic again.
- If a Thief is able to use a pillar or other environmental assets (such as the "spike" found at each corner of the fountains) to block line of sight prior to opening a chest, if that chest turns into a Mimic then it will not aggro. This is dependent on luck as the chest locations are randomized each time.
- The stun effect from these moves may be resisted by increasing ones Magic Evasion and with thunder resistance enhancements such as Carols, Runes, and Barthunder.
- Successfully defeating a Mimic will grant a Large Lustreless Box to a player's personal pool upon successfully examining the Otherworldly Vortex.
Individually Issued Rewards
- Successfully reaching the end of Sheol A, B, or C, examining the Otherworldly Vortex rewards the player with an amount of
 Gil (based on amount of Nostos mobs killed) and possible Lustreless Boxes (based on amount of Agon Halos and their surrounding beastmen cleared, and/or NMs+
 ), or
), or  Large Lustreless Boxes (based on amount of mimics killed or clearing the RoE quest for the first time) of the Sheol wing.
 - Examining the Otherworldly Vortex will issue individual rewards, you do not have to leave the instance. Each character must examine it themselves in order to receive their personal pool reward. Once you receive your individual reward you may no longer receive any additional individual rewards for that session, even if you kill more Nostos mobs or clear more agon halos and beastmen afterwards. For this reason, it is advised to save claiming individual rewards until the very end of your run.
- Players may not examine the Portal if they or anyone else in their party has aggro.
Upgrading UNM Equipment
- To begin augmenting UCNM equipment, you must complete the item's corresponding Sheol wing's RoE Quest by examining the Otherworldly Vortex.
- You will need 1,190 Lustreless items (12 stacks and 2 single) to fully upgrade to
 .
.
- Trade 1 of the corresponding Lustreless item, the equipment, and pay the one-time fee of 30,000 Accolades. Unlike the +1 upgrade, there is no game day wait.
- Sheol A related items are Lustreless Scale based.
- Sheol B related items are Lustreless Hide based.
- Sheol C related items are Lustreless Wing based.
- See the Unity Rewards page for which equipment requires which Lustreless item to upgrade it.
- Sheol A related items are
- You will need 1,190 Lustreless items (12 stacks and 2 single) to fully upgrade to
Sheol A
- The time limit is 30 minutes per entry. This cannot be increased.
- Running out of time will eject all party members.
- Using the Moglophone temporary item will allow you to leave the instance before time expires.
Notorious Monsters (including Mimics):
All Sheol A Monsters:
|
- Otherworldly Vortex location: Topmost (7th) level.
- Examining it will complete the RoE Objective, Content → Odyssey → Sheol A.
- All Nostos enemies in Sheol A have a chance to drop Lustreless Scales.
- See the Unity Rewardss page to see which armor pieces they are used to upgrade, and for further details.
- The HP of foes depends on their level, which increases with each level climbed. Sheol A mob HP: ~30,000 to ~65,000.
- Higher level enemies on higher floors have a higher drop rate.
- Treasure Hunter increases the drop rate of Lustreless items up to a max of 3 Lustreless items dropped per Nostos mob.
- Each Nostos Enemy defeated in Sheol A will grant 5 Moogle Segments starting on the first floor, and scale up 2 segments per floor up to 17 Moogle Segments per Nostos Mob defeated on the last (7th) floor.
- Each successfully opened Chest in Sheol A will grant 5 Moogle Segments regardless of Floor. Coffers will grant 7 Moogle Segments, and Aurum Strongboxes will grant 9.
- Every Nostos Enemy defeated, regardless of floor, adds +5,000 gil to each player's individual reward.
- Every Notorious Monster defeated, regardless of floor, adds + gil to each player's individual reward.
- Defeating 1 Agon Halo and all its accompanying Agon Beastemen adds 1 Lustreless Scale Box to each player's individual reward.
- Defeating 1 Mimic spawned from a chest adds 1 Large Lustreless Scale Box to each player's individual reward.
- Mimics in Sheol A will exclusively use Death Trap which is an AoE Stun and Poison.
- Agon Halos will only appear on floors: 1, 3, 5, and 7 in Sheol A.
- These Halos are guarded by Quadav, Orc, and Yagudo beastmen.
- Floor 7 Agon Beastmen in Sheol A may contain Beastmen Leader type variants in their groups.
- These Beastmen Leaders will have access to their appropriate SP Abilities.
Translocator Locations
- 3 Translocators are located in Sheol A. Once registered by examining one, you may warp between them at any point.
- This is not lost or reset when an Odyssey is completed, and may be used to gain access to the Otherwordly Portal more quickly.
- You are unable to use the Translocators if you or anyone in your party currently has aggro.
 #1: Near the start on the first floor.
- #2: On the third floor, close to the western side of the large main area.
- #3: On the fifth floor, past the giant doors south of the starting point, and all the way down the stairs.
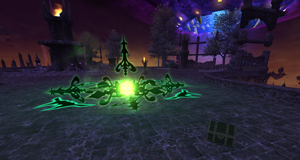
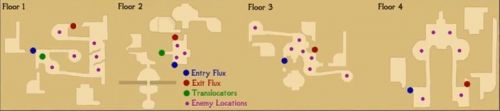
Sheol A Maps |
|---|
|
|


|
Notorious Monsters
- Various Notorious Monsters may be spawned by trading UCNM Materials to various Ethereal Junctions within the instance.
Sheol B
The requirements to enter are as follows:
- Players must have completed the Records of Eminence Objective; Content → Odyssey → Sheol A.
- The time limit is 30 minutes per entry. This cannot be increased.
- Running out of time will eject all party members.
- Using the Moglophone temporary item will allow you to leave the instance before time expires.
Notorious Monsters (including Mimics):
All Sheol B Monsters:
Both rules above exclude popped NM adds. |
- Otherworldly Vortex location: 5th level. (NOT the top floor)
- There is a floor 6, but there is no exit on this floor. Pay attention to the Conflux you use.
- Examining it will complete the RoE Objective, Content → Odyssey → Sheol B.
- All Nostos enemies in Sheol B have a chance to drop Lustreless Hides.
- See the Unity Rewardss page to see which armor pieces they are used to upgrade, and for further details.
- The HP of foes depends on their level, which increases with each level climbed. Sheol B mob HP: ~ to ~.
- Higher level enemies on higher floors have a higher drop rate.
- Treasure Hunter increases the drop rate of Lustreless items up to a max of 3 Lustreless items dropped per Nostos mob.
- Each Nostos Enemy defeated in Sheol B will grant 13 Moogle Segments starting on the first floor, and scaling up 2 segments per floor up to 23 Moogle Segments per Nostos Mob defeated on the last (6th) floor.
- Each successfully opened Chest in Sheol B will grant 10 Moogle Segments regardless of Floor. Coffers will grant ?? Moogle Segments and Aurum Strongboxes will grant ???.
- Every Nostos Enemy defeated, regardless of floor, adds +6,000 gil to each player's individual reward.
- Every Notorious Monster defeated, regardless of floor, adds + gil to each player's individual reward.
- Defeating 1 Agon Halo and all its accompanying Agon Beastemen adds 1
 Lustreless Hide Box to each player's individual reward.
 - Defeating 1 Mimic spawned from a chest adds 1
 Large Lustreless Hide Box to each player's individual reward.
- Mimics in Sheol B will exclusively use Hell Trap, an enhanced version of Death Trap which also reduces players TP by 50%.
- Agon Halos will only appear on floors: 1, 3, 5, and 6 in Sheol B.
- These Halos are guarded by Antica, Sahagin, and Tonberry beastmen.
- Floor 7 Agon Beastmen in Sheol A and all Angon Beastmen in Sheol C may contain Beastmen Leader type variants in their groups.
- These Beastmen Leaders will have access to their appropriate SP Abilities.
Translocator Locations
- 3 Translocators are located in Sheol B. Once registered by examining one, you may warp between them at any point.
- This is not lost or reset when an Odyssey is completed, and may be used to gain access to the Otherworldly Vortex to unlock personal rewards faster. For example, it is quicker to warp to Floor 6 then run back down to Floor 5, vs starting at the very bottom Floor 5 and having to run up all 6 flights of stairs to access the Otherworldly Vortex.
- You are unable to use the Translocators if anyone in your party currently has aggro.
- #1: Near the start on the first floor
- #2: On the third floor, south of where you start, hug the right wall.
- #3: On the sixth floor, north of where you start, hug the right wall.
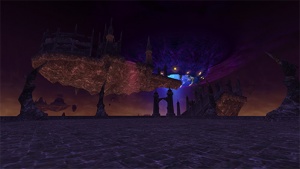
Sheol B Maps |
|---|
|
|


|
Notorious Monsters
- Various Notorious Monsters may be spawned by trading UCNM Materials to various Ethereal Junctions within the instance.
|
Sheol C
The requirements to enter are as follows:
- Players must have completed the Records of Eminence Objective; Content → Odyssey → Sheol B.
- The time limit is 30 minutes per entry. This cannot be increased.
- Running out of time will eject all party members.
- Using the Moglophone temporary item will allow you to leave the instance before time expires.
Notorious Monsters (including Mimics):
All Sheol C Monsters:
|
- Otherworldly Vortex location: Floor 4.
- Examining it will complete the Records of Eminence Objective, Content → Odyssey → Sheol C.
- This is a one time objective and will unlock Sheol - Gaol.
- All Nostos enemies in Sheol C have a chance to drop Lustreless Wings.
- See the Unity Rewardss page to see which armor pieces they are used to upgrade, and for further details.
- The HP of foes depends on their level, which increases with each level climbed. Sheol C mob HP: ~ to ~.
- Higher level enemies on higher floors have a higher drop rate.
- Treasure Hunter increases the drop rate of Lustreless items up to a max of 3 Lustreless items dropped per Nostos mob.
- Each Nostos Enemy defeated in Sheol C will grant 25 Moogle Segments starting on the first floor, and scaling up 2 segments per floor up to 31 Moogle Segments per Nostos Mob defeated on the last (4th) floor.
- Each successfully opened Chest will grant 100 Moogle Segments regardless of Floor. Coffers will grant 150 Moogle Segments and Aurum Strongboxes will grant ???.
- Every Nostos Enemy defeated, regardless of floor, adds +7,000 gil to each player's individual reward.
- Every Nostos Enemy defeated will grant 25 Moogle Segments to all players starting on Floor 1, and scaling by 2 pts per floor up to 31 Moogle Segments per enemy defeated on the top floor.
- Every Notorious Monster defeated, regardless of floor, adds + gil to each player's individual reward.
- Defeating 1 Agon Halo and all its accompanying Agon Beastemen adds
 Lustreless Wing Box to each player's individual reward.
 - Defeating 1 Mimic spawned from a chest adds
 Large Lustreless Wing Box to each player's individual reward.
- Mimics in Sheol C will exclusively use Hell Trap, an enhanced version of Death Trap which also reduces players TP by 50%.
- Agon Halos appear on every floor in Sheol C.
- These Halos are guarded by Lamia, Troll, and Mamool Ja beastmen.
- All Angon Beastmen in Sheol C may contain Beastmen Leader type variants in their groups.
- These Beastmen Leaders will have access to their appropriate SP Abilities.
Translocator Locations
- 2 Translocators are located in Sheol C. Once registered by examining one, you may warp between them at any point.
- This is not lost or reset when an Odyssey is completed.
- You are unable to use the Translocators if anyone in your party currently has aggro.
- #1: Near the start on the first floor
- #2: On the second floor, east then north of where you start, hug the left wall up the stairs.
Sheol C Maps |
|---|
|
|

|
Notorious Monsters
- Various Notorious Monsters may be spawned by trading UCNM Materials to various Ethereal Junctions within the instance.
|
Sheol Gaol
The requirements to enter are as follows:
- Players must have completed the Records of Eminence Objective; Content → Odyssey → Sheol C.
- Sheol Gaol is a boss gauntlet area. Each Boss battle has a hard 15 minute time limit, with the ability to challenge up to three bosses in each entry. This results in a maximum of 45 minutes within the instance.
- Players must have 3 Moglophone II to enter the battlefield.
- By talking to the Pilgrim Moogle by examining the ??? in Rabao near the Veridical Conflux at (G-6) after clearing the ROE for Sheol C, it will mumble something about the Darkness then eventually give you 3 Moglophone II Key Items for free.
- Unlike the Moglophone, There is no timer on obtaining a Moglophone II. The only requirement is that you have the 3,000 Moogle Segments on hand in order to purchase the Key Item.
- Subsequent Moglophone IIs will cost 3000 Moogle Segments each, purchased from the Pilgrim Moogle.
- Each Boss attempt will exhaust 1 Moglophone II.
- As mentioned, each player needs 3 Moglophone IIs to enter Sheol Gaol, but you do not need to spend all three each time you enter. Leftover Moglophone IIs will be retained if players exit after one fight.
- By talking to the Pilgrim Moogle by examining the ??? in Rabao near the Veridical Conflux at (G-6) after clearing the ROE for Sheol C, it will mumble something about the Darkness then eventually give you 3
|
Upon entering, players arrive into a Waiting Area with a 15 minute time limit to prepare for the various boss battles. The 15 minute Waiting Area timer starts counting down as soon as you zone in and will continue from where it stopped after you kill each boss and get sent back.
- For this reason, it is advised that you have job assignments worked out in advance with all the equipment you need already on you, so that you spend as little time as possible preparing for each boss.
Upon defeating a boss, players are warped back to the Waiting Area (with the remainder of the 15 minute Waiting Area time limit) to change jobs and prep gear. The 15 minute Waiting Area timer will not reset. E.g. If you take 5 minutes prepping and then your party enters the battlefield killing a chosen boss, you will be sent back to the Waiting Area with 10 minutes remaining to job change and prepare for the next boss.
- Access is given to your main inventory and Mog Wardrobes, as well as Mog Satchel, Sack, Case, Safe and Locker, but not Mog Storage.
- Note: As of the May 2021 update there is now a Porter Moogle available.
- Players cannot use the same main job used in a previous fight. Players cannot be the same job during the same fight. Sub-jobs are not available/restricted.
- For example, if the setup PLD RDM COR GEO is used to fight one boss, then when you return to the waiting room, you cannot enter the next fight with any of those jobs present.
- A simlar universal rule is applied to Trusts: Once a trust is called, they are locked out from reuse for the present or remaining two battles.
- Trusts can be summoned mid-fight even if the player has enmity on the target.
At the opposite end of the room, there is a Veridical Conflux; examining it will warp you to the boss area.
- You will need to select which NM to warp to.
- For each Atonement, you do not have to kill the NMs in any particular order.
Note: There is only one known reason to stay in the zone and use more than one Key Item, which means dealing with job and trust restrictions. If your group fails to defeat any NM, you can change your jobs and re-challenge the NM at significantly reduced HP. It regenerates slightly from where you were defeated, though.
Otherwise, players have been warping out after defeating one boss in order to reset their restrictions, as the other two ![]() Moglophone II are retained. The theory that players may have earn more RP for Boss #2 and #3 has been pretty much debunked.[1]
Moglophone II are retained. The theory that players may have earn more RP for Boss #2 and #3 has been pretty much debunked.[1]
Notorious Monsters & Rewards
Atonement 1 monsters can be fought immediately upon unlocking Sheol Gaol.
|
Atonement 2 monsters can be fought only once the party leader has defeated all four NMs in Atonement 1.
|
Atonement 3 monsters can be fought only once the party leader has defeated all six NMs in Atonement 2.
|
Atonement 4 monsters can be fought only once the party leader has defeated all six NMs in Atonement 3.
|
Sheol Gaol Rewards
- Defeating NMs in Sheol - Gaol provides the corresponding "Information on ..." key items in the tables listed above.
- The starting price for all equipment is fixed, see below for the initial costs. Subsequent world kills lowers the price.
- Price reductions appear to be tied directly to server kill count and are not bound to a period of time check.
- How many world kills equates to a price reduction are unknown. More data needed.
- Atonement 1 equipment starts at 2,000,000 Gil.
- Atonement 2 equipment starts at 3,000,000 Gil.
- Atonement 3 weapons start at 4,500,000 Gil, and armor starts at 6,000,000 Gil.
- Atonement 4 equipment starts at 7,500,000 Gil.
- The starting price for all equipment is fixed, see below for the initial costs. Subsequent world kills lowers the price.
Augmenting Rewards
Before players can spend Reinforcement Points on an item, they must unlock rank tiers on each piece of equipment.
To increase an item's maximum augment rank, players must defeat the corresponding NM (where said equipment originated from) at a higher "Vengeance" difficulty than that items currently max rank. Although this sounds confusing, it is quite simple.
Example: To unlock the rank of 20, you must defeat the NM on "Vengeance+15". Refer to the table below:
| NM Vengeance | Item Maximum Rank |
|---|---|
| +0 | 5 |
| +5 | 10 |
| +10 | 15 |
| +15 | 20 |
Modifying "Vengeance"
Atonement 1
The Vengeance level of a NM determines its strength and abilities that it can use. After ALL Atonement 1's NMs initial defeat, "Vengeance+1-5" difficulties are then accessible for each NM.
- Defeating the NM on "Vengeance+5" then unlocks "Vengeance+6"-"Vengeance+10". Defeating it on "Vengeance+10" then unlocks "Vengeance+11"-"Vengeance+15", and so on.
- Defeating all Atonement 1 bosses on "Vengeance+5" or greater unlocks Atonement 2's "Vengeance+1"-"Vengeance+5".
- Similarly, by defeating all 4 types of "Vengeance+10"-"Vengeance+15" bosses in Atonement 1, "Vengeance+6"-"Vengeance+10" and "Vengeance+11"-"Vengeance+15" of the Atonement 2 bosses will be unlocked.
- The same rules apply to Atonement 3 bosses and adjusting their "Vengeance" according to progress made on Atonement 2 "Vengeance".
- It is possible to take along another player with no progress in any Atonement area or "Vengeance" ranks to skip their grind.
- Similarly, by defeating all 4 types of "Vengeance+10"-"Vengeance+15" bosses in Atonement 1, "Vengeance+6"-"Vengeance+10" and "Vengeance+11"-"Vengeance+15" of the Atonement 2 bosses will be unlocked.
The rules above are applied the same way to Atonement 2, 3 and 4 areas.
Earning RP
Reinforcement Points are earned whether or not you successfully defeat the NM chosen. RP accumulates based on the Vengeance level that you partake. Note: You do not need to own armor in order to accumulate RP.
- RP earned can be used by interacting with the ??? (Pilgrim Moogle) in Rabao at (G-6), and then trading your desired piece of gear in order to enhance the augment.
- RP earned is unique per NM, and can only be spent on that NM's corresponding equipment.
- After unlocking an item's maximum rank, it is then possible to grind lower difficulties to earn RP. Naturally, more RP is gained on higher difficulties though.
- Unneeded RP can be exchanged at a 1:1 ratio for Moogle Segments.
RP is earned with the following formula: 40% * Total RP needed for previous rank (See RP Allocation table below) = RP Earned for successful kill
The following is an example for Vengeance +10:
0.4*480=192 [2]
| Vengeance | RP Earned |
|---|---|
| +0 | 0 |
| +1 | 0 |
| +2 | 20 |
| +3 | 32 |
| +4 | 48 |
| +5 | 68 |
| +6 | 88 |
| +7 | 112 |
| +8 | 136 |
| +9 | 164 |
| +10 | 192 |
| +11 | 224 |
| +12 | 260 |
| +13 | 300 |
| +14 | 344 |
| +15 | 392 |
If you are unsuccessful at defeating an NM, you will still earn RP. Earned RP depends on how much damage was dealt to the NM that was not successfully defeated.
As an example, a Vengeance +15 NM taken down to 20% would earn 156 RP with the following formula:
floor(0.4*980*.8/2 = 156.8) [3]
RP Allocation
The following table specifies how many Reinforcement Points need to be allocated to reach each rank for an item.
| Rank | RP To Next Level | Total RP |
|---|---|---|
| 1 | 50 | 0 |
| 2 | 80 | 50 |
| 3 | 120 | 130 |
| 4 | 170 | 250 |
| 5 | 220 | 420 |
| 6 | 280 | 640 |
| 7 | 340 | 920 |
| 8 | 410 | 1260 |
| 9 | 480 | 1670 |
| 10 | 560 | 2150 |
| 11 | 650 | 2710 |
| 12 | 750 | 3360 |
| 13 | 860 | 4110 |
| 14 | 980 | 4970 |
| 15 | 1110 | 5950 |
| 16 | 1250 | 7060 |
| 17 | 1410 | 8310 |
| 18 | 1580 | 9720 |
| 19 | 1760 | 11300 |
| 20 | 1960 | 13060 |
References
- Naming Designation of nonNM Type Enemies (Akihiko_Matsui, Oficial Forums)
- Level Growth of Nostos mobs (ごまだら, 日本語 Twitter)
- Lv131 (Sheol A Floor 7) Nostos Flytrap HP (ごまだら, 日本語 Twitter)
- Nostos Mobs are Charmable (shamgi, FFXIAH)
- Agon Beastmen kill Rewards (Bahamut.Lexouritis, FFXIAH)
- Killing Mimics rewards Boxes at the end of a successful Odyssey (Carbuncle.Papesse, FFXIAH)
- Moogle Mastery Requires NM wins (Ragnarok.Inx, FFXIAH)
- Moogle Master goes up to V (Asura.Geriond, FFXIAH)
- Moogle Mastery VI with only 500 Nostos (Siren.Codegen, FFXIAH)
- UCNM Material Cost to pop NMs (alamihgo, FFXIAH)
