The Voracious Resurgence | |
| Prime Weapons • Ultimate Weapons • Ultimate Augments • Abjurations iL119 • JSE Necks • Divergence Augments • Escutcheons | |
| Reforged Armor Artifact: +1 • iL109 • iL119/+2/+3/+4 Relic: +1/+2 • iL109 • iL119/+2/+3/+4 Empyrean: +1/+2 • iL109 • iL119/+2/+3 |
Guides • Crafting • Trusts • Apex Monsters |
User:Blason
Disclaimer: This page is meant to be used as a personal resource only.
Useful Pages & Links
Returning to Vana'diel Aventuring Primer WhereisDI Filtration Station Inventory 101 Fame Fantastic EXP Endgame Progression Guide User:Millsih/Simple Mission Guide Monthly Stop Asking What to Buy with Login Points Guide Race Specific Armor Mog Garden Artifact Armor
Helpful Commands/Controls
- Party or alliance commands: /pcmd or /acmd add playername to invite a player or party to the party or alliance. leader playername to pass leader or alliance leader. leave to leave the alliance or party. kick playername to kick the player or alliance.
- You can use a combination of Ctrl + F1~F6 and Alt + F1~F6 to target other party members in your alliance.
- Ctrl + E: Equipment Menu
- Ctrl + B: Pet Command Menu
- Ctrl + R: Reply to last /tell received. Press multiple times to cycle recent player names from /tell.
- Ctrl + P: Party Chat
- Ctrl + L or X: Linkshell chat, L is for LS1 and X is for LS2
- /keyitem
- /mission
- /case or /sack or satchel or wardrobe or wardrobe2, etc
- /areaeffect: Turns AoE display on/off. Used to show where AoE spells/abilities will hit, but it is barely useful.
- /away: Now you won't get tells.
- /autotarget: Turns autotarget on off. Only works with monsters in combat that you face.
- /checkparam: Checks the paramaters (accuracy, attack, etc) of your target. Works on you and your pets.
- /displayhead: Toggles the visibility of your head armor.
- /ignoretrust: Prevents you from targeting other player's Trusts.
- /hidetrust: Makes the trusts of other players invisible. Very helpful for events where a lot of players may call trusts in a small area at once.
- /returntrust all or /retr all: Releases all your trusts. You may also single target this instead.
- /names: Hides other players names.
- /partyinfo showtp: Makes the TP of other party members (not trusts or NPCs) visible.
- /statustimer: Shows the time remaining of buff/debuff icons at the top of your screen.
- /statusparty: Shows the buffs and debuffs of your targeted party member.
- /focustarget playername: Similar to statusparty, but only for one party member, and they don't need to be selected. Reissue the command to remove it or change the target.
- /pcmd or /acmd
- /friendlist or /flist
Friend List
- To List: Displays your friends, and their online status.
- Online Stat.: This displays your online status to your friends.
Under the Online Friends section, players can see who is online via POL, in FFXI, and in-game. When Tetra Master was in service, it could also display if that friend was playing Tetra Master.
- If the person is on POL, it shows them as Online but no blue "XI" icon shows by their name.
- If they are within FFXI, only a blue "XI" icon shows up.
- If the friend is playing FFXI on your same world you are, it shows their character name as well as the zone they are in on the right.
- If that player is on a different world than you, only <World> will display on the right. You can still send PlayOnline messages to them, but obviously cannot /tell.
Levels 99-119
Step 1
Primary Goals:
|
Secondary Goals:
Optional: |
Optional:
|
Intermediate RoE: Follow the RoE Intermediate Guide half way to Always Stand on 117 which is easy to solo. However, the next step of Taming the Wilds is not, and comes in step 2. This will leave you with a new weapon and full Sparks ilvl 117 armor.
RoV and VW
- Next, complete RoV chapter 2. Afterwards you will obtain a "Rhapsody in Mauve" which allows you to purchase Phase Displacers for 1,000 gil per pop from Ardrick at the Outpost in Jugner Forest. Displacers are traded to a Voidwatch NM conflux before spawning it to significantly weaken it.
- So, take some displacers with you and go easily complete the quest Guardian of the Void with your trusts. This will reward you with some Cruor for Abyssea as well as enable you to unlock Empyrean Weapon Skills for your jobs, which is the real goal.
- You may go about completing the mini story for Voidwatch, but you should probably just save your stones for one of the Voidwatch Adventurer Campaigns. If you are manage to walk up to or shout for a group to do Aello, Uptala, Qilin, Morta, or Bismarck then you are set even as a brand new player. Just make sure you empty the box at the end of each fight.
Relic and Empyrean Armor:
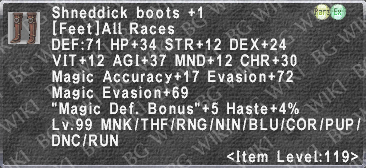
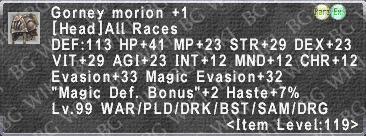
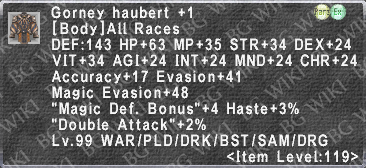
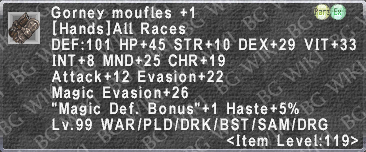
- Obtain Relic Armor and Empyrean Armor so that you may later reforge these lower level pieces into their ilvl 119 versions.
- Dynamis is a simple event in which you enter with an hour, gain another hour by defeating five statues for time extensions and then proc enemies based on some simple factors for currency to build Relic Weapons. You do not need to proc mobs for the armor, and with the Treasure Hunter trait it drops pretty easily. Also, you should not be building a Relic Weapon until later.
- Note: GEO and RUN obtain their Artifact, Relic, and Empyrean armor differently via quests and commissions.
- Abyssea is a bit less simple as the procing takes is a little more complex and you have a limit to how long you may be in the zone based on a timer. While you can just go to town right away in Dynamis, you should make a detour before you start farming Empyrean Armor.
- You may reduce the recast time on your Traverser stones via three key items; each taking off four hours per key item:
- Ivory abyssite of celerity - Defeat tonberries in Abyssea - Konschtat and it will pop in your chat log.
Crimson abyssite of celerity- Quest - Whither the Whisker. You need fame 3 (via quests in Abyssea - Vunkerl only) in the zone to unlock this quest which defeats the point in the short run.- Ivory abyssite of celerity - Purchased for 4,500 cruor from a Cruor Prospector in either Abyssea Altpea, Grauberg, or Uleguerand.
- You should already have this cruor handy from doing Guardian of the Void.
- During special campaigns, sometimes including Login Campaigns, Kupon I-Seals are available. Which may be traded to a Dealer Moogle for any +1 Empyrean Armor piece.
Weapon Skills:
Step 2
Primary Goals:
|
Secondary Goals:
Optional:
|
|
Intermediate RoE:
- Continue on with and finish these with the RoE Guide. Wildskeeper Reives (WKR) will probably be your largest obstacle. Go check if the NM is up (select the area you enter and view progress) then go back to town and do a few /yells and people may show up. Otherwise, during WKR Adventurer Campaigns people will spam the fights for HP Bayld.
Wildskeeper Reives:
- Wildskeeper Reives are accessed after Seekers of Adoulin Mission 1-6 Life on the Frontier. You will need to do Coalition Assignments and Reives to build up bayld in order to start doing these.
- Old Adoulin bayld gear or WKR armor/weapons may be traded to Runje Desaali for free bayld.
- Make sure you flag the Content → WKR RoE objectives.
- WKRs also drop good starting armor which is augmentable via Prah Janimhar in Western Adoulin at the Inventor's Coalition. Don't be fooled by the fact the item level is 115 (give Runje the ilvl 106 junk) and lower than the ilvl 117 and 119 gear you may obtain right now. The stats are what counts, and something like the ilvl 115 Otomi Helm or Ejekamal Boots after augments from Prah are easily better than the sparks 117 or bayld 119 pieces. Mix and match the best pieces along the way up, comparing stats should be easy on these pieces.
- Also, as long as you have accuracy, the WKR 115 weapons with an augment of occasionally attacks twice (OAT) are some of the best stopgap weapons you can use atm for melees. This is especially true for offhand weapons for 1H jobs, for instance the Atoyac dagger with OAT for a Thief or Dancer.
- When you are in need of accuracy these weapons quickly drop off in performance, and good 119 gear replaces them later regardless.
JSE Capes
- JSE Capes are best obtained from WKRs, but may also be obtained from Reives in Marjami Ravine, Yorcia Weald, Kamihr Drifts, and Ra'Kaznar at a lower frequency. They also drop from Incursion coffers except those already will have augments on them.
- Capes may be augmented via trading Detrovio a Refractive Crystal (from the AH or Unity NM coffers) along with your cape.
- Lastly, Makel-Pakel in the Celennia Memorial Library will exchange three unagumented capes for one of your choice. You may also have him remove the augments from a cape.
Bayld Sets
- After a few Reives you will easily have enough bayld to start picking up some quick ilvl 119 weapons from Craggy Bluff and armor from Vesca in Eastern Adoulin at the Peacekeeper's Coalition. These will work fine for now, but are about some of the lowest quality 119 items there are.
|
|
| |||||||||||||||||||||||||||||||||||||||||||||||||||||||||||||||||||||
There is a Dual Wield Cheat Sheet on the wiki and that is all you really need most of the time. Match your tier DW trait up with how much haste you are receiving, and bam there is your instant answer to how much DW you need. | |||||||||||||||||||||||||||||||||||||||||||||||||||||||||||||||||||||||


Alluvion Skirmish
- You will come across Skirmish and Alluvion Skirmish as a result of your progression and the RoE Guide. As a result this will serve as the immediate boost to your gear after the last step. Use some of the stones available to you from the event or maybe even do a couple of rounds. Remember /yelling for things is your friend and how you actually make them to get things done.
- Stones are overpriced due to a lack of supply so do not go nuts trying to get augments for what is probably better than anything you currently have on. You will replace this gear soon enough with Escha Rewards.
- See Alluvion Skirmish Weapons and Alluvion Skirmish Armor for augment details.
SKCNMs
- Or Macrocosmic Orb battlefields are what you should be teaming up to farm after you finish your Intermediate RoE objectives. These will grant you Rem's Tales 1-5 (ilvl 109) for Reforged Artifact Armor, and are easier than other battlefields which grant chapters 6-10 (ilvl 119).
- Tackle these on Normal with a couple of people and your trusts. This provides a good effort to reward ratio for newer players.
- If you are solo instead then you will have to spend more seals for less reward. Others using an orbs in the group will grant you a personal pool of free chapters based on the difficulty selected so find someone else to duo with at least.
- Completing one of these on "Difficult" will unlock access to JSE Weapons.
Unity
- Meanwhile, there is Unity, which you should start breaking into. Ironhorn Baldurno drops a Bleating Mantle for DDs still working on their ambuscade cape. So depending on your equipment there is a lot of stuff here you can pick up.
- See Unity Rewards.
- Alternatively there are a few uses for the trophy rewards from these coffers. They are not simply just for upgrading that UNMs rewards, but are also used in popping common NMs in Escha or reforging AF +3. This means if you have spare accolades, you and your trusts can go about making some decent gil AHing the trophy items. Not to mention the sparks from defeating UNNs.
Delve
- Delve will provide you temporarily with some armor and weapons for your jobs. However, given the other options mentioned before this you will likely pass most of it on the way up. Given that it takes three people to enter Delve you will have a slight barrier to entry. Trusts can be called in here though after entering. You may even take in mules and disband to call 5 trusts.
- Important materials for popping some Escha NMs, to crafting, and more over upgrading some of your Reforged Armor come from Delve.
- Completing any Delve also unlocks access to JSE Weapons if you want to go this route.
Pro Tip: A.M.A.N. Reclaimer NPCs will accept most ilvl gear you don't want and trade you back points for Copper Vouchers.
Incursion
- Last and somewhat least here is Incursion.
- Incursion has some useful pieces from it still, even at 99. You also may farm augmented and improved JSE Capes from it, and the Grand Coffers are used for popping Reisenjima Tier 2 NMs for good weapons.
- Most important though is that you obtain Mecistopins Mantles from the coffers in this event. These are randomly augmented back pieces with one purpose, and that is to increase your Capacity Points by up to 50% depending on which augment you get.
Walk of Echoes (Surged Walks)
- A couple of the Walk of Echoes Battlefield Rewards accessories are still the best for certain jobs such as the Windbuffet Belt +1 or Flume Belt +1. However, no one does WoEs until an event that keeps the battlefields in constant Surge is active. Which then drives down the price of currency for Walk of Echoes Weapons, used to unlock Empyrean Weapon Skills
Step 3
Primary Goals:
|
Secondary Goals:
|
|
Optional:
|
The Arciela Directive
- The Mog Garden part was not thrilling, but it wasn't hard and just took time. Spam Revival Tree Roots and your Garden Furrows will level faster than the other areas.
- There are several Adoulin Quests that you will want to do for the rewards anyway. You'll aslo get the Ygnas Trust.
High-Tier Battlefields:
- High-Tier Mission Battlefields These fights grant some useful armor and the Rem's Tales #6-10 for Reforged Armor. With TH on "Normal" difficulty, the drop rate for armor from the fights is mediocre, and poor without it. On "Difficult" and beyond a piece of gear will always drop, even without TH. So once again, team up with your trusts here. You don't need a full party for "Difficult", but a trio should work fine with trusts.
Sinister Reign:
- Sinister Reign is another random augment system that provides some good pieces of gear as well as some trusts, most notably Cipher: August.
Vagary:
- Vagary is an event players seem to have a harder time with. It also favors mage setups over DDs most of the time. This event unlocks players ability to make 119 Empyrean Armor which is the only set of the three that requires the 119 being unlocked before reforging. Otherwise a couple of useful items come from Vagary, but overall the boss materials for reforging or crafting are the most important.
- Remember to set your Vagary RoE objectives when you do it for a free one time material.
- Make or join Volume 1 E (easy) shouts and you can reach NQ gear pretty quickly with +1 soon to follow. After that N should be getting within in reach for even more points.
- Points are lost after each version update (not from random maintenance) and the fight changes monthly. So sometimes GEO, RDM, BRD, etc may be in huge demand, and other months it may be made useless by that month's fight mechanics.
- Ambuscade takes a little bit of research each month for people as the fights are never really basic and tend to have some rather significant mechanics/gimmicks (maybe endeath, or a massive regen, etc) that need to be understood.
- While you can upgrade NQ armor to +1, this is a big waste. You may only upgrade two pieces of equipment to +2 a month, and it costs half of the materials to make a +1 as it does a +2. Which means you essentially can make 0-1 +2s an entire month if you upgrade an NQ piece to +1. Conversely +1 pieces are regularly available from grinding out some extra Gallantry. This isn't a bad thing as Ambuscade is flush with items to spend extra Hallmarks on and sell on the AH. Ambuscade is a real money maker if you spam it well.
- Generally you don't want to start taking a second and incomplete party to NMs you may be struggling with if they don't offer a real benefit. Such an example of benefit would be sticking the tank and WHM in the outside party to get more DDs into the main party for buffs.
- Players may either join an alliance or just solo it themselves, and enter into a "card farm". Which is basically Omen with the NMs taken out and just ordinary monsters with objectives left. Completing more objectives results in obtaining more cards. These cards are used for creating Reforged Artifact Armor +2 and +3. Meaning players can solo their 119 +2 AF if they really want to.
- Increasing the number of participants does not increase the HP of the opponents in Omen like it does in Delve or Escha.
- So the great news is that farming cards is the biggest bulk of making a +3, and AF 119 +2 requires no boss materials. However, +3s require a boss drop in order to forge. The good news is that the item is a 100% drop and people already want these NMs for armor and crafting materials. So changes are good that no one else in your group really wants a scale. Even then, you can farm up all the cards on your own in your spare time, +2 your AF armor, and be ready for +3ing all by yourself if you choose to.
- Otherwise Omen boss runs and their rewards are for Eschan tier geared players. The bosses drop some of the best armor/accessories as well as materials for crafting.
- Remember to set your Omen Boss RoE objectives when you do it for a free one time scale.
Divergence Level 75 era Dynamis reborn for the highest content levels. This is where you will go to reforge your 119 relic armor to +2 and +3.
- The event has a two hour time limit, similar to the old Dynamis system. Upon entering the area, you are given a one hour time limit. There are two methods to extend your time, +30 minutes in wave one and +30 minutes in wave two. Both time extensions are obtained in the same way for both waves; Every statue you defeat grants a one minute extension to your time, for a maximum of 30 additional minutes. If you did not defeat 30 statues in wave one or wave two, both wave bosses grant the additional time you did not receive (up to 30 minutes) upon defeat.
- The event somewhat scales be design where you can enter with an initial one hour time limit and simply pull statues (which spawns enemies) and beat them up for
 Rusted I. Cards and "shard" item drops. Shards are used for +2 items with the slot based on the zone. Now that shards may be simply purchased off the auction house (misc 3.) it largely defeats the purpose of the cards which are exchanged at a 300:1 ratio.
- At any point you may fight the zone mid-boss statue previously mentioned which is much harder than ordinary monsters, but honestly not that crazy for any decent group to take down. The statue just chills at some point in the zone waiting for you, and upon defeat all other remaining statues and monsters will despawn and then respawn.
- The monsters from these new statues are noticeably more difficult than before and will also now drop
 Black. I. Cards instead of Rusted I. Cards. Furthermore a new zone boss will spawn near the mog house of the zone. This zone boss is of a significant difficulty to even the most well geared players. If you need a comparison, Omen bosses are a walk in the park compared to Divergence bosses. Defeating these Wave 2 bosses is necessary in order to progress to Wave 3.
- Wave 3's main purpose is to unlock access to the Ultimate Weapon Augments system. In short, "Item Level 119 III" variants of the Ultimate Weapons can now be augmented with some additional stats to push their level further. See that page for details on this system.
- The other purpose of Wave 3 is for
 Old I. Cards. These are traded for Demon's Medals, which in-turn are traded for materials to synthesize Job Master (Su 5) weapons. These weapons require the Escutcheons to craft. Most of them are rather lackluster for the price, but some prove to be rather useful. See Su5 Equipment page for details.
- Some things to keep in mind:
- You must unlock access to reforging each slot of gear for each job:
- Reforged Relic Armor +2 may be unlocked simply by entering the zone on the job you wish to reforge with.
- Reforged Relic Armor +3 may be unlocked by defeating the mid-boss statue on the job you wish to reforge with.
- Each of the four Divergence zones unlocks a specific slot of armor: feet, hands, head, and legs. Bodies unlock after you unlock all four other slots on a job.
- There is nothing to keep track of this other than the fact Aurix won't reforge for you until you unlock the armor slot on that job.
- Aurix will allow you to exchange your rusted and black cards (100:1) for
 Beastmen's Medal and
  Kindred's Medals respectively and then for the shards and voids (3:1) you need to upgrade items.
- Shard and Void items have a terrible drop rate, and only drop from the monster of the same job/sub job.
- You may receive medals in a personal pool. Each player in the alliance obtaining the mid-boss win for the first time will open up a drop slot which may potentially drop multiple medals directly to players. This feature is only a players initial win, not a win for a subsequent job they are unlocking armor for.
- Wave one boss granting beastman and the wave two boss kindred.
- For more information read through the Divergence page. Each zone divergence zone page is also done nicely with maps, details, etc.
Additional Content
Collect Vorseals
Raise a Chocobo and Turn it into a Mount
Monstrosity
Ultimate Weapons
Master Trials
Augmenting Reisenjima Gear
Out of Game Resources & Addons
[Windower] [Ashita] [Quest Log Addon]
Useful Gearswap Commands
//gs reload: - reloads GS
//gs showswaps: - toggles a text based check in your chat log to show if your GS is working. Perform an action and it should show you that your gear is changing, and lists out what changes. :*If something is on during precast, and not listed in midcast/aftercast then the same piece is being used.
//gs validate: - compares your inventory against items called in the gearswap file and reports what isn't in your inventory. Useful for finding spelling errors or missing gear.
//gs export: - exports your current set into a lua file within the data folder in an export folder.Useful for adding augmented gear to gearswap, or just for adding sets via copy paste.
Gear Sets