The Voracious Resurgence | |
| Prime Weapons • Ultimate Weapons • Ultimate Augments • Abjurations iL119 • JSE Necks • Divergence Augments • Escutcheons | |
| Reforged Armor Artifact: +1 • iL109 • iL119/+2/+3 Relic: +1/+2 • iL109 • iL119/+2/+3 Empyrean: +1/+2 • iL109 • iL119/+2/+3 |
Guides • Crafting • Trusts • Apex Monsters |
Category:Odyssey: Difference between revisions
| (247 intermediate revisions by 41 users not shown) | |||
| Line 1: | Line 1: | ||
{{disambiguation|Odyssey Rewards}} |
|||
{{stub}} |
|||
<center>This page hasn't been fully updated for the February 2021 update yet, and could use some extra information in general.<br/>Some users have edited and added to the page since the January and February updates landed though. Thank you very much!<br/>If you wish to contribute then [[Special:UserLogin|Join the wiki]], wait 2 hours for the anti-bot cool down, and make a difference in your online community today.</center> |
|||
---- |
|||
{{Category Page Header |
{{Category Page Header |
||
|ToC= |
|ToC= |
||
|Float= |
|Float= |
||
|Image=Odyssey.jpg |
|Image=Odyssey.jpg |
||
|Image Size=384 |
|Image Size=384 |
||
|Image Link= |
|Image Link= |
||
|Intro Text='''Odyssey''', introduced in the March 2020 update<sup>[http://forum.square-enix.com/ffxi/threads/56575-March-10-2020-%28JST%29-Version-Update?p=625237&viewfull=1#post625237]</sup>, is exploratory battle content in which players progress through an area of [[Walk of Echoes]] known as a Sheol.<br />Materials you acquire in |
|Intro Text='''Odyssey''', introduced in the March 2020 update<sup>[http://forum.square-enix.com/ffxi/threads/56575-March-10-2020-%28JST%29-Version-Update?p=625237&viewfull=1#post625237]</sup>, is exploratory battle content in which players progress through an area of [[Walk of Echoes]] known as a Sheol.<br />Materials you acquire in Sheol instances can be used to {{icon|aug}} [[:Category:Unity Rewards|'''augment''' UCNM equipment]]. |
||
[[:Category:Odyssey Rewards|'''Odyssey Rewards''']] include{{ItemIcon|Lustreless Scale|26}} [[Lustreless Scale]]s, {{ItemIcon|Lustreless Hide|26}} [[Lustreless Hide]]s, and {{ItemIcon|Lustreless Wing|26}} [[Lustreless Wing]]s and gil from Sheol A, B, and C.<br />Emerging triumphant from Sheol - Gaol instances will unlock powerful weapons and armor available for purchase. |
|||
|Secondary Text= |
|Secondary Text= |
||
}} |
|||
==Getting Started== |
|||
{| style="float: right" |
|||
*For '''Sheol A, B, and C''', to enter you will need to be in possession of a {{keyItem}} [[Moglophone (Key Item)|Moglophone]]. |
|||
| __TOC__ |
|||
:*Examining the ??? in [[Rabao]] near the [[Veridical Conflux]] at (G-6) grants the player the temporary {{KeyItem}} [[Moglophone (Key Item)|Moglophone]].<br />[[Home Point|Nearest Home Point]]: [[Kuzotz]] > [[Rabao]] (#2) |
|||
|} |
|||
==Odyssey Overview== |
|||
This section is a basic introduction of the Odyssey content. Each Odyssey area has special rules and restrictions that apply. Be sure to overview the Sheol section on this page for limitations unique to that area before partaking in the content. |
|||
===Sheol A, B and C Overview=== |
|||
[[File:Odyseey.jpg|thumb]] |
|||
*To enter, each player needs to be in possession of a {{keyItem}} [[Moglophone (Key Item)|Moglophone]]. |
|||
:*Examining the ??? in [[Rabao]] near the [[Veridical Conflux]] at (G-6) allows you to speak with the [[Pilgrim Moogle]]. |
|||
:*This moogle will grant the player the temporary {{KeyItem}} [[Moglophone (Key Item)|Moglophone]] upon request.<br />[[Home Point|Nearest Home Point]]: [[Kuzotz]] > [[Rabao]] (#2) |
|||
::*You may receive another {{keyItem}} [[Moglophone (Key Item)|Moglophone]] once '''''twenty hours''''' have passed from when you received the previous one. |
::*You may receive another {{keyItem}} [[Moglophone (Key Item)|Moglophone]] once '''''twenty hours''''' have passed from when you received the previous one. |
||
::*Only 1 {{keyItem}} [[Moglophone (Key Item)|Moglophone]] may be held at a time. |
::*Only 1 {{keyItem}} [[Moglophone (Key Item)|Moglophone]] may be held at a time. |
||
:::*It is possible to be able to do 2 runs in one day if you collect a {{keyItem}} [[Moglophone (Key Item)|Moglophone]], then wait 20 hours before using it. This will allow you to pick up a new {{keyItem}} [[Moglophone (Key Item)|Moglophone]] right after you exit your run. |
:::*It is possible to be able to do 2 runs in one day if you collect a {{keyItem}} [[Moglophone (Key Item)|Moglophone]], then wait 20 hours before using it. This will allow you to pick up a new {{keyItem}} [[Moglophone (Key Item)|Moglophone]] right after you exit your run. |
||
*Examining the [[Veridical Conflux]] in [[Rabao]] at (G-6) and selecting |
*Examining the [[Veridical Conflux]] in [[Rabao]] at (G-6) and selecting a Sheol instance will transport all party members to [[Walk of Echoes]]. |
||
:*All {{keyItem}} [[Moglophone (Key Item)|Moglophone]]s will be consumed upon entry. |
:*All held {{keyItem}} [[Moglophone (Key Item)|Moglophone]]s by party members will be consumed upon entry. |
||
::*Once inside, each player will be given a {{Tmp}} [[Moglophone]] in their inventory. This is used to exit the instanced area before time expires. |
|||
*Parties must be between 1 and 6 people. |
|||
*Parties must consist of between 1 and 6 people. |
|||
:*[[Trust]]s may be called within Sheol. |
|||
:*[[Trust]]s may be called within any Sheol instance. |
|||
::*The number of Trusts you can summon is limited based on the number of people who ''entered''. |
::*The number of Trusts you can summon is limited based on the number of people who ''entered''. |
||
:::*E.g. should only 2 people enter, and break their party; only 4 trusts total may be called within the instance. |
:::*E.g. should only 2 people enter, and break their party; only 4 trusts total may be called within the instance. |
||
::*Trusts are enhanced by the effect of "'''[[Moogle Mastery]]'''" after it is unlocked. |
::*Trusts are enhanced by the effect of "'''[[Moogle Mastery]]'''" after it is unlocked. |
||
*Sheol locations must be completed in order for the first time using a [[:Category:Records_of_Eminence#Content_.28Odyssey.29|Records of Eminence Objective]] to unlock the next one. |
|||
:*Clearing Sheol A with the objective set will unlock access to Sheol B, Sheol B will unlock Sheol C, and Sheol C will unlock Sheol Gaol. |
|||
===Sheol Gaol Overview=== |
|||
*For '''Sheol Gaol''', you will need 3 {{keyItem}} [[Moglophone II]]s and have cleared the Records of Eminence: Sheol C in order to enter. |
|||
*To enter, each player needs to be in possession of all '''three''' {{keyItem}} [[Moglophone II]]s. |
|||
:*By talking to the Pilgrim Moogle by examining the ??? in [[Rabao]] near the [[Veridical Conflux]] at (G-6) after clearing the ROE for Sheol C, it will mumble something about the Darkness then eventually give you 3 [[Moglophone II]] Key Items for free. |
:*By talking to the Pilgrim Moogle by examining the ??? in [[Rabao]] near the [[Veridical Conflux]] at (G-6) after clearing the ROE for Sheol C, it will mumble something about the Darkness then eventually give you 3 [[Moglophone II]] Key Items for free. |
||
:*Subsequent Moglophone IIs will cost 3000 [[Moogle Segments]] each, purchased from the Pilgrim Moogle. |
:*Subsequent Moglophone IIs will cost 3000 [[Moogle Segments]] each, purchased from the Pilgrim Moogle. |
||
::*[[Moogle Segments]] can be earned by defeating foes or opening chests successfully within Sheol A, B, and C. |
::*[[Moogle Segments]] can be earned by defeating foes or opening chests successfully within Sheol A, B, and C. |
||
:*Each Boss attempt will exhaust 1 [[Moglophone II]]. |
:*Each Boss attempt will exhaust 1 [[Moglophone II]]. |
||
*Additionally all party members must have at least 3 jobs at 99 in order to enter. |
|||
:*You need 3 [[Moglophone II]]s to ''enter'' Sheol Gaol, but you do not need to spend all 3 each time you enter. |
|||
}} |
|||
==Sheol A, B, C Progression== |
|||
<div style="float: right;">[[File:Odyssey2.jpg|300px|link=]]</div> |
|||
*There is a time limit of '''30 minutes'''. |
|||
===Content Objective=== |
|||
*Battle the various foes and Notorious Monsters among the multiple floors of the instance as you make your way to the exit. |
*Battle the various foes and Notorious Monsters among the multiple floors of the instance as you make your way to the exit. |
||
:*Examining the [[Veridical Conflux|Otherworldly |
:*Examining the [[Veridical Conflux|Otherworldly Vortex]] of each Odyssey will complete the [[:Category:Records_of_Eminence#Content_.28Odyssey.29|Records of Eminence Objective]]. You do not need to kill any mobs or NMs to complete this objective. The [[Veridical Conflux|Otherworldly Vortex]] is located on a different floor of each Sheol Zone and should not be confused with the [[Veridical Conflux]], which allows you to ascend or descend floors within the Sheol Zone. |
||
::*See the individual Sheol sections on this page for the [[Veridical Conflux|Otherworldly Vortex]] locations and maps. |
|||
:*Running out of time will eject all party members. |
|||
::*Sheol A, B and C have Translocators within them. These are essentially warps in order to easily access different areas of that Sheol. They cannot be used until you interact with each one in order to activate it for your character. See each Sheol area below on this page for locations of these Translocators. Many players may expect you to have all of these unlocked, so be sure to do this on your own. |
|||
:*Using the [[Moglophone]] temporary item will allow you to leave the instance. |
|||
::*The temporary [[Moglophone]] item will be automatically granted to all players upon entering Sheol. |
|||
==Sheol A, B, C Rewards== |
|||
*All Nostos enemies in Sheol A, B or C have a chance to drop [[file:Lustreless Scale icon.png|26px|link=]] [[file:Lustreless Hide icon.png|26px|link=]] [[file:Lustreless Wing icon.png|26px|link=]] Lustreless items. |
*All Nostos enemies in Sheol A, B or C have a chance to drop [[file:Lustreless Scale icon.png|26px|link=]] [[file:Lustreless Hide icon.png|26px|link=]] [[file:Lustreless Wing icon.png|26px|link=]] Lustreless items. |
||
:*Higher level enemies on higher floors have a higher drop rate. |
:*Monsters increase in level and difficulty for each consecutively higher floor within a Sheol. Higher level enemies on higher floors have a higher drop rate of Lustreless items. |
||
:*[[Treasure Hunter]] increases the drop rate of Lustreless items |
:*[[Treasure Hunter]] increases the drop rate of Lustreless items to a max of 3 per Nostos. |
||
*All foes in Odyssey are aggressive. |
|||
:*Each [[{{PAGENAME}}#Foes|Nostos Enemy]] defeated in Sheol A will grant 5 [[Moogle Segments]] starting on the first floor, and scaling up 2 segments per floor up to 17 [[Moogle Segments]] per Nostos Mob defeated on the last (7th) floor. |
|||
:*They come in two varieties, and all generally behave accordingly to their [[Bestiary|real world brethren]] with a few exceptions such as Flans aggroing magic. |
|||
::*Each successfully opened Chest in Sheol A will grant 5 [[Moogle Segments]] regardless of Floor. Coffers will grant 7 [[Moogle Segments]] and Aurum Strongboxes will grant 9. |
|||
::*It's safest to assume that all mobs will aggro both sight and sound, and that any mob that has true sight or sound aggro will also have true sight or sound aggro within Odyssey. |
|||
:*Each [[{{PAGENAME}}#Foes|Nostos Enemy]] defeated in Sheol B will grant 13 [[Moogle Segments]] starting on the first floor, and scaling up 2 segments per floor up to 23 [[Moogle Segments]] per Nostos Mob defeated on the last (6th) floor. |
|||
::*[[Hide]] will work to shed aggro/enmity on nearly all foes except ones who track by scent. |
|||
::*Each successfully opened Chest in Sheol B will grant 10 [[Moogle Segments]] regardless of Floor. Coffers will grant ?? [[Moogle Segments]] and Aurum Strongboxes will grant ???. |
|||
:*While weaknesses such as {{Piercing}} damage to Birds have not been changed. Foes in Sheol B and C gain a specific resistance which is detailed below. |
|||
:*Each [[{{PAGENAME}}#Foes|Nostos Enemy]] defeated in Sheol C will grant 25 [[Moogle Segments]] starting on the first floor, and scaling up 2 segments per floor up to 31 [[Moogle Segments]] per Nostos Mob defeated on the last (4th) floor. |
|||
*All monsters take reduced AoE damage similar to mobs in [[Domain Invasion]] and [[Dynamis Divergence]]. |
|||
::*Each successfully opened Chest will grant ?? [[Moogle Segments]] regardless of Floor. Coffers will grant ?? [[Moogle Segments]] and Aurum Strongboxes will grant ???. |
|||
:*Completing the [[Records of Eminence]] Objective for Sheol A will unlock the ability to augment Unity Equipment and reward a Large Lustreless Scale Box, and unlock access to Sheol B. |
|||
::*Completing the [[Records of Eminence]] Objective for Sheol B will unlock the ability to augment additional Unity Equipment and reward a Large Lustreless Hide Box, and unlock access to Sheol C. |
|||
:::*Completing the [[Records of Eminence]] Objective for Sheol C will unlock the ability to augment additional Unity Equipment and reward a Large Lustreless Wing Box, and unlock access to Sheol Gaol. |
|||
===Area Progression=== |
|||
==Individually Issued Rewards== |
|||
Initially, players have access to only Sheol A. In order to progress to higher level areas, the [[:Category:Records_of_Eminence#Content_.28Odyssey.29|Records of Eminence Objective]] pertaining to each Sheol needs to be completed: |
|||
*Successfully reaching the end of Sheol A, B, or C, examining the [[Veridical Conflux|Otherworldly Portal]] rewards the player with an amount of {{ItemIcon|Counterfeit Gil|26}} Gil (based on amount of Nostos mobs killed) and possible [[File:Lu. Scale Box icon.png|26px|link=]] Lustreless Boxes (based on amount of Angon Halos and their surrounding beastmen cleared, and/or NMs+{{question}}), or [[File:L. Lu. Scale Box icon.png|26px|link=]] Large Lustreless Boxes (based on amount of mimics killed or clearing the RoE quest for the first time) of the Sheol wing. |
|||
*Completing the [[:Category:Records_of_Eminence#Content_.28Odyssey.29|Records of Eminence Objective]] for Sheol A will unlock the ability to augment Unity Equipment where [[file:Lustreless Scale icon.png|26px|link=]] [[Lustreless Scale]]s are used to {{Aug}} augment that equipment. |
|||
*'''Examining''' the Otherworldly Portal will issue individual rewards, you do not have to leave the instance. ''Each character'' must examine it themselves in order to receive their personal pool reward. Once you receive your individual reward you may no longer receive any additional individual rewards for that session, even if you kill more Nostos mobs or clear more angon halos and beastmen afterwards. For this reason, it is advised to save claiming individual rewards until the very end of your run. |
|||
:*This also rewards a [[Large Lustreless Scale Box]] and unlocks access to Sheol B. |
|||
:*Players may not examine the Portal if they ''or anyone else'' in their party has aggro. |
|||
*Completing the [[:Category:Records_of_Eminence#Content_.28Odyssey.29|Records of Eminence Objective]] for Sheol B will unlock the ability to augment Unity Equipment where [[file:Lustreless Hide icon.png|26px|link=]] [[Lustreless Hide]]s are used to {{Aug}} augment that equipment. |
|||
:*This also rewards a [[Large Lustreless Hide Box]] and unlocks access to Sheol C. |
|||
*Completing the [[:Category:Records_of_Eminence#Content_.28Odyssey.29|Records of Eminence Objective]] for Sheol C will unlock the ability to augment Unity Equipment where [[file:Lustreless Wing icon.png|26px|link=]] [[Lustreless Wing]]s are used to {{Aug}} augment that equipment. |
|||
:*This also rewards a [[Large Lustreless Wing Box]] and unlocks access to Sheol - Gaol. |
|||
=== |
===Moogle Mastery Effects=== |
||
Moogle Mastery is an effect that is granted within all Odyssey areas, including Sheol - Gaol. |
|||
<hr width="600px"> |
|||
*Every [[{{PAGENAME}}#Foes|Nostos Enemy]] defeated, regardless of floor, adds +5,000 gil to each player's individual reward. |
|||
*Every [[{{PAGENAME}}#Additional_Objectives|Notorious Monster]] defeated, regardless of floor, adds +{{question}} gil to each player's individual reward. |
|||
*Defeating 1 [[{{PAGENAME}}#Foes|Agon Halo and all its accompanying Agon Beastemen]] adds 1 [[File:Lu. Scale Box icon.png|26px|link=]] [[Lustreless Scale Box]] to each player's individual reward. |
|||
*Defeating 1 [[{{PAGENAME}}#Izzat|Mimic spawned from a chest]] adds 1 [[File:L. Lu. Scale Box icon.png|26px|link=]] [[Large Lustreless Scale Box]] to each player's individual reward. |
|||
===Sheol B=== |
|||
<hr width="600px"> |
|||
*Every [[{{PAGENAME}}#Foes|Nostos Enemy]] defeated, regardless of floor, adds +6,000 gil to each player's individual reward. |
|||
*Every [[{{PAGENAME}}#Additional_Objectives|Notorious Monster]] defeated, regardless of floor, adds +{{question}} gil to each player's individual reward. |
|||
*Defeating 1 [[{{PAGENAME}}#Foes|Agon Halo and all its accompanying Agon Beastemen]] adds 1 [[File:Lu. Hide Box icon.png|26px|link=]] [[Lustreless Hide Box]] to each player's individual reward. |
|||
*Defeating 1 [[{{PAGENAME}}#Izzat|Mimic spawned from a chest]] adds 1 [[File:L. Lu. Hide Box icon.png|26px|link=]] [[Large Lustreless Hide Box]] to each player's individual reward. |
|||
===Sheol C=== |
|||
<hr width="600px"> |
|||
*Every [[{{PAGENAME}}#Foes|Nostos Enemy]] defeated, regardless of floor, adds +7,000 gil to each player's individual reward. |
|||
*Every [[{{PAGENAME}}#Foes|Nostos Enemy]] defeated will grant 25 [[Moogle Segments]] to all players starting on Floor 1, and scaling by 2 pts per floor up to 31 [[Moogle Segments]] per enemy defeated on the top floor. |
|||
*Every [[{{PAGENAME}}#Additional_Objectives|Notorious Monster]] defeated, regardless of floor, adds +{{question}} gil to each player's individual reward. |
|||
*Defeating 1 [[{{PAGENAME}}#Foes|Agon Halo and all its accompanying Agon Beastemen]] adds [[File:L. Wing Box icon.png|26px|link=]] [[Lustreless Wing Box]] to each player's individual reward. |
|||
*Defeating 1 [[{{PAGENAME}}#Izzat|Mimic spawned from a chest]] adds [[File:L. Lu. Wing Box icon.png|26px|link=]] [[Large Lustreless Wing Box]] to each player's individual reward. |
|||
Moogle Mastery will increase the strength of [[Trusts]], but doesn't increase their HP/MP as per +Level. Benefits include: |
|||
==Upgrading UNM Equipment== |
|||
*iLvl +1 for every 5 tiers of Mastery for a max of +9. |
|||
*To begin [[:Category:Unity Rewards|augmenting UCNM equipment]], you must complete the item's corresponding Sheol wing's [[:Category:Records_of_Eminence#Content_.28Odyssey.29|RoE Quest]] by examining the Otherworldly Portal. |
|||
:*This does not stack with the {{KI}} [[Filled memory gem]] from [[Marjory]]. |
|||
:*You will need '''1,190 ''' Lustreless items (12 stacks and 2 single) to fully upgrade to {{aug|15}}. |
|||
*A -Damage Taken benefit to trusts of -2% per every 3 tiers for a max of -15%. |
|||
::*Trade 1 of the corresponding Lustreless item, the equipment, and pay the fee of 30,000 Accolades. Unlike the +1 upgrade, there is no game day wait. |
|||
:::*Sheol A related items are [[File:Lustreless Scale icon.png|26px|link=]] [[Lustreless Scale]] based. |
|||
:::*Sheol B related items are [[File:Lustreless Hide icon.png|26px|link=]] [[Lustreless Hide]] based. |
|||
:::*Sheol C related items are [[File:Lustreless Wing icon.png|26px|link=]] [[Lustreless Wing]] based. |
|||
::::*See the '''[[Unity Rewards]]''' page for which equipment requires which Lustreless item to upgrade it. |
|||
==Moogle Mastery |
====Increasing Moogle Mastery==== |
||
One's Moogle Mastery effect is increased: |
|||
*When certain totals of Nostos enemies of that wing are defeated, starting at 100+. |
|||
*When defeating Notorious Monsters. |
|||
:*''Minorly'' when defeating [[{{PAGENAME}}#Foes|Nostos Enemies]] and when opening [[:Category:Odyssey#Izzat|Chests]]. |
|||
*When opening [[:Category:Odyssey#Izzat|Aurum Strongboxes]]. |
|||
:*'''''Greatly''''' when defeating Notorious Monsters or when opening [[:Category:Odyssey#Izzat|Aurum Strongboxes]]. |
|||
*The increase to Moogle Mastery is an ambiguous system where each of the above actions works towards increasing Moogle Mastery's "meter". |
|||
:*Defeating Notorious Monsters and opening [[:Category:Odyssey#Izzat|Aurum Strongboxes]] will increase Moogle Mastery very quickly compared to opening chests alone. |
|||
:*There are certain nonspecific requirements that must be met for certain tiers to be reached, where players won't increase rank until defeating a certain number of NMs a certain number of times, or a minimum number of total Nostos defeated, etc. |
|||
*When a player's Moogle Mastery increases within Sheol, a message will be displayed stating that "your Moogle Mastery is now ''XX''". |
|||
:*Only the player opening the [[:Category:Odyssey#Izzat|Chest/Coffer/Aurum Strongbox]] will receive the message should their Moogle Mastery upgrade. |
|||
::*Other players' Moogle Mastery will increase as well, but they won't receive the message in Sheol. {{Information Needed}} |
|||
:*Up to Tier XVII (17) Moogle Mastery has been observed. |
|||
:*It is currrently unknown how to increase Moogle Mastery in Sheol Gaol. |
|||
When a player's Moogle Mastery increases within Sheol, a message will be displayed stating that "your Moogle Mastery is now ''XX''". |
|||
==Moogle Mastery Effects== |
|||
*Only the player opening the [[:Category:Odyssey#Izzat|Chest/Coffer/Aurum Strongbox]] will receive the message should their Moogle Mastery upgrade. |
|||
*Moogle Mastery will decrease the number of UCNM pop items required to spawn a Notorious Monster in that particular wing of Sheol. |
|||
:*Other players will rank up even if they don't see this message if they meet the same prerequisites below. |
|||
:*Each level decreases the required amount of pop items by 1. |
|||
*Moogle Mastery caps at 15 per zone for a total of 45. |
|||
:*This benefit is specific to the Mastery Tier of the Sheol wing in question. |
|||
::*For example, if you have Mog Mastery I in Sheol B and Mog Mastery XV in Sheol A, you will not receive any pop item reductions in Sheol B. |
|||
*Moogle Mastery will increase the strength of [[Trusts]]. |
|||
:*It is currently unknown how this specifically boosts Trusts, as it doesn't increase their HP/MP as per +Level. It is thought to increase their [[Base Stat]]s and/or their [[Derived Stat]]s by increasing amounts by tier. |
|||
:*Moogle Mastery and its benefits are carried into Sheol Goal. |
|||
Additionally, each zone has requirements to unlock possible levels (similar to the [[Limit Break]] system). The specifics are challenging to determine exactly, but the total requirements involve defeating 1,600 Nostos foes, opening 16 Coffers, 16 Aurum Strongboxes, and defeating each Unity Notorious Monster a certain number of times separately per zone. |
|||
==Sheol A, B, C Foes== |
|||
*Sheol A requires the defeat of every NM 6 times. |
|||
The various enemies in Odyssey are all aggressive.<br />They come in two varieties, and all behave accordingly to their [[Bestiary|real world brethren]] and take reduced AoE damage similar to mobs in [[Domain Invasion]] and [[Dynamis Divergence]]. Anomalies for mob aggro rules have been observed within Sheol. It's safest to assume that all mobs will aggro both sight and sound, and that any mob that has true sight or sound aggro will also have true sight or sound aggro within Odyssey. [[Hide]] will work to shed aggro/enmity on nearly all foes except ones who track by scent. |
|||
*Sheol B requires the defeat of every NM 3 times. |
|||
*Sheol C requires the defeat of every NM 9 times. |
|||
===Izzat=== |
|||
The HP of foes depends on their level, which increases with each level climbed. |
|||
Players earn izzat, a special currency unique to Odyssey, as they vanquish monsters within Sheol A, B or C. |
|||
*'''Sheol A''' |
|||
*Izzat is shared among all party members. |
|||
:*~30,000 to ~65,000 HP |
|||
*All Izzat will be lost once you leave the zone, it is only a temporary currency. |
|||
*'''Sheol B''' |
|||
*Players will receive 1 izzat for every 5 monsters defeated and 10 izzat for fully clearing an Agon Halo and all its surrounding beastmen. |
|||
:*{{Information Needed}} |
|||
*Izzat is also used to spawn [[:Category:Odyssey#Additional_Objectives|various Notorious Monsters]] from '''''Ethereal Junctions''''' that appear after defeating [[:Category:Odyssey#.22Agon.22_Beastmen_type|Agon Halos and all their accompanying Beastmen]], for a cost of 10 izzat. |
|||
*'''Sheol C''' |
|||
:*{{Information Needed}} |
|||
===Moogle Segments=== |
|||
Moogle Segments are a form of points, which are used for Odyssey. They were introduced in the [https://forum.square-enix.com/ffxi/threads/57421-November-10-2020-%28JST%29-Version-Update November 2020 Version Update]. The main purpose of Moogle Segments is to purchase the {{KI}} [[Moglophone II (Key Item)|Moglophone II]] to enter Sheol - Gaol, but lustreless items are also available for purchase. See the [[Pilgrim Moogle]] page for details. |
|||
Segments are earned throughout Odyssey, in each of Sheol A, B and C. The total amount of Segments earned increases with the difficulty of the content. Accordingly, the most segments can be earned within Sheol C. Each Sheol section on this page details the amount of Moogle Segments that can be earned within that area. |
|||
As of the [https://forum.square-enix.com/ffxi/threads/58129-May-10-2021-%28JST%29-Version-Update May 2021 Version Update], a bonus amount of segments is rewarded upon examining the '''Otherworldly Vortex''' at the end of Sheol A, B, or C. This bonus is dependent on the amount of moogle segments earned during that foray of Odyssey. The bonus appears to be around 25% of the segments earned. |
|||
'''Sheol A''' |
|||
:*All Nostos mobs will grant '''5''' Moogle Segments each on the first floor, scaling up by 2 per floor up to a max of '''17''' Segments per mob on floor 7. |
|||
:*A Chest grants '''50''', Coffer grants '''75''', and an Aurum Strongbox will grant '''100'''. Opening a Chest using keys or tools will grant only 10% of the Moogle Segments you would have gotten opening it with Izzat. |
|||
:*While the Halo and the individual beastmen themselves will not grant Moogle Segments, successfully clearing an Agon Halo and all its surrounding Beastmen will grant Segments ranging from 50~410 based on the floor you are on. |
|||
:*Defeating an NM will grant a number of Segments ranging from 80~200 based on the floor it is spawned on. |
|||
'''Sheol B''' |
|||
:*All Nostos mobs will grant '''13''' Moogle Segments each on the first floor, scaling up by 2 per floor up to a max of '''23''' Segments per mob on floor 6. |
|||
:*A Chest grants '''75''', Coffer grants '''100''', and an Aurum Strongbox will grant '''150'''. Opening a Chest using keys or tools will grant only '''10%''' of the Moogle Segments you would have gotten opening it with Izzat. |
|||
:*While the Halo and the individual beastmen themselves will not grant Moogle Segments, successfully clearing an Agon Halo and all its surrounding Beastmen will grant Segments ranging from '''220~520''' based on the floor you are on. |
|||
:*Defeating an NM will grant a number of Segments ranging from '''150~250''' based on the floor it is spawned on. |
|||
'''Sheol C''' |
|||
:*All Nostos mobs will grant '''25''' Moogle Segments each on the first floor, scaling up by 2 per floor up to a max of '''31''' Segments per mob on floor 4. |
|||
:*A Chest grants '''100''', Coffer grants '''150''', and an Aurum Strongbox will grant '''200'''. Opening a Chest using keys or tools will grant only '''10%''' of the Moogle Segments you would have gotten opening it with Izzat. |
|||
:*While the Halo and the individual beastmen themselves will not grant Moogle Segments, successfully clearing an Agon Halo and all its surrounding Beastmen will grant Segments ranging from '''450~630''' based on the floor you are on. |
|||
:*Defeating an NM will grant a number of Segments ranging from '''280~340''' based on the floor it is spawned on. |
|||
==="Nostos" type=== |
==="Nostos" type=== |
||
<hr style="width: 100%"> |
<hr style="width: 100%"> |
||
Common enemies |
Common enemies. All aggro by their [[Bestiary|family's]] typical detection method, '''plus Sight'''. |
||
*They cluster in groups of 10 mobs. |
*They cluster in groups of 10 mobs. |
||
**Each Sheol has a fixed set of enemy types, but their placement is randomized on each run. |
|||
:*The type of mob is randomly determined each time. |
|||
*They do not link. |
*They do not link. |
||
*They are [[Charm]] |
*They are susceptible to [[Charm]]. |
||
*For every 5 defeated, the |
*For every 5 defeated, the party will be granted 1 izzat. |
||
*Hide may be used to shed hate in emergency, except on foes that track by scent. |
*[[Hide]] may be used to shed hate in emergency, except on foes that track by scent. |
||
===[[File:Earth Gyve.png|38px|link=]]"Agon" [[Beastmen]] type [[File:Thunder Gyve.png|38px|link=]]=== |
===[[File:Earth Gyve.png|38px|link=]]"Agon" [[Beastmen]] type [[File:Thunder Gyve.png|38px|link=]]=== |
||
<hr |
<hr> |
||
Agon Halos do not have fixed spawn locations, and differ each entry to Sheol areas. Around each Agon Halo, semi-invisible enemies spawn that cannot be interacted with until their appropriate [[Fetter|Agon Halo]] is destroyed. |
|||
*Although they cannot be targeted, Nostos can ''and will'' aggro players ''before'' the [[Fetter|Agon Halo]] is destroyed. |
*Although they cannot be targeted, Nostos can ''and will'' aggro players ''before'' the [[Fetter|Agon Halo]] is destroyed. |
||
:*Agon Beastmen will link with each other, but ''not'' with the [[Fetter|Agon Halo]]. |
:*Agon Beastmen will link with each other, but ''not'' with the [[Fetter|Agon Halo]]. |
||
:*Agon Beastmen possess both '''True Sight''' and '''True Sound'''. |
:*Agon Beastmen possess both '''True Sight''' and '''True Sound'''. |
||
*Agon Beastmen cannot be slept, enfeebled or acted on via AoE or any spells/actions in |
*Agon Beastmen cannot be slept, enfeebled or acted on via AoE or any spells/actions in any way until the [[Fetter|Agon Halo]] has been destroyed. |
||
:*Using an AoE ability or spell, however, '''will''' generate hate on all Angon foes as if they were affected by it normally, so a tank could hold the aggro while the party destroys the [[Fetter|Agon Halo]]. |
:*Using an AoE ability or spell, however, '''will''' generate hate on all Angon foes as if they were affected by it normally, so a tank could hold the aggro while the party destroys the [[Fetter|Agon Halo]]. |
||
*Halos emit elemental damage corresponding to its element, similar to [[Dynamis - Divergence]] wave 3. Halos also take 50% additional damage to the element strong to its element, and 5% damage from the same element. |
|||
*[[Fetter|Agon Halo]]s will only appear on floors: '''1''', '''3''', '''5''', and '''7''' in Sheol A. |
|||
*Destroying the Halo makes all Agon Beastmen around it targetable. |
|||
:*Floor 7 Agon Beastmen in Sheol A and all Angon Beastmen in Sheol C may contain '''Beastmen Leader''' type variants in their groups. |
|||
*Agon Beastmen in Sheol B and C have resistances to specific damage types. |
|||
:*See tables in the corresponding Sheol sections of the page. |
|||
*When '''all''' Beastmen around an [[Fetter|Agon Halo]] are defeated, the player will be granted 10 izzat and an '''''Ethereal Junction''''' will spawn in the location of [[Fetter|Agon Halo]]. If the player successfully examines that Sheol's [[Veridical Conflux|Otherworldly Portal]] before time runs out, they will also be granted a Lustreless Item Box in their personal reward issuance. |
|||
*When '''all''' Beastmen around an [[Fetter|Agon Halo]] are defeated, the player will be granted 10 izzat, a number of Segments depending on which Sheol and what floor it is on, and an '''''Ethereal Junction''''' will spawn in the location of [[Fetter|Agon Halo]]. If the player successfully examines that Sheol's [[Veridical Conflux|Otherworldly Vortex]] before time runs out, they will also be granted a Lustreless Item Box in their personal reward issuance. |
|||
:*The Ethereal Junction that spawns after clearing the Angon Halo and its surrounding beastmen may be used pop a random Notorious Monster at a cost of 10 izzat. This is different from any Ethereal Junctions that were already in the instance before the Angon Halo was cleared; those Junctions will spawn NMs only if you trade it the appropriate amount of UNM pop items (see below). |
|||
:*The Ethereal Junction that spawns after clearing the Agon Halo and its surrounding beastmen may be used pop a random Notorious Monster at a cost of 10 izzat. This is different from any Ethereal Junctions that were already in the instance before the Agon Halo was cleared; those Junctions will spawn NMs only if you trade it the appropriate amount of UNM pop items. |
|||
::*See the Notorious Monster section in each Sheol area on this page for details. |
|||
===Notorious Monsters=== |
===Notorious Monsters=== |
||
*Trading UNM materials to |
*Trading UNM materials to a numbered '''''Ethereal Junction''''' (one that was not spawned by defeating an Agon Halo and its Beastmen) will spawn a matching NM to the UNM whose materials were traded. The number of materials required permanently decreases with each NM popped. |
||
*'''''Ethereal Junctions''''' spawned from Agon Halos and their accompanying Beastmen demand an [[izzat]] payment of 10, and will spawn any one of the Notorious Monsters of that Sheol wing at random. |
*'''''Ethereal Junctions''''' spawned from Agon Halos and their accompanying Beastmen demand an [[izzat]] payment of 10, and will spawn any one of the Notorious Monsters of that Sheol wing at random. |
||
*All Notorious Monsters have access to various [[SP Abilities]]. |
*All Notorious Monsters have access to various [[SP Abilities]]. |
||
**Notorious Monsters will reset enmity upon using their SP Ability. {{verification}} |
|||
:*In Sheol B, the Notorious Monster will spawn 2 copies after it is used. |
|||
::*The copies have less hit points, but provide a buff to the main Notorious monster while they are alive. |
|||
:::*The buff scales with the number of adds alive. |
|||
:*In Sheol C, the Notorious Monster will {{Information Needed}}. |
|||
*All Notorious Monsters can drop the Lustreless item of that Sheol with the possibility to also drop a [[File:Lu. Scale Box icon.png|22px|link=]] a Lustreless Box of the corresponding Sheol when defeated. |
*All Notorious Monsters can drop the Lustreless item of that Sheol with the possibility to also drop a [[File:Lu. Scale Box icon.png|22px|link=]] a Lustreless Box of the corresponding Sheol when defeated. |
||
*Once a specific Notorious Monster has been spawned, it may not be spawned again in that same Odyssey run. |
*Once a specific Notorious Monster has been spawned, it may not be spawned again in that same Odyssey run. |
||
===Izzat=== |
|||
Players earn izzat, a special currency unique to Odyssey, as they vanquish monsters within Sheol A, B or C. |
|||
*Izzat is shared among all party members. |
|||
*All Izzat will be lost once you leave the zone. |
|||
*Players will receive 1 izzat for every 5 monsters defeated and 10 izzat for fully clearing an Agon Halo and all its surrounding beastmen. |
|||
*Izzat is also used to spawn [[:Category:Odyssey#Additional_Objectives|various Notorious Monsters]] from '''''Ethereal Junctions''''' that appear after defeating [[:Category:Odyssey#.22Agon.22_Beastmen_type|Agon Halos and all their accompanying Beastmen]], for a cost of 10 izzat. |
|||
===Chests=== |
===Chests=== |
||
*In Sheol A, B and C, 3 Chests spawn per floor. |
|||
:*Chest spawn locations |
:*There are fixed Chest spawn locations on each floor, three of which are selected randomly each time. |
||
::*None of these locations are on stairs. |
|||
:*Chests can be opened by a [[Thief]] with [[file:Thief's Tools icon.png|26px|link=]] [[Thief's Tools]], [[file:Living Key icon.png|26px|link=]] [[Living Key]], or [[file:Skeleton Key icon.png|26px|link=]] [[Skeleton Key]] can open chests within Odyssey Sheol A, B or C. Opening chests this way will result in one of three results: 1) the chest will be opened, 2) the key or tool will be used up with the message "However, it has no effect", or 3) The key or tool is used up and the chest turns into a [[:Category:Mimic|Mimic NM]]. The more times a key or tool fails, the higher the chance it has to become a Mimic. |
|||
*Successfully opening a Chest can cause a Coffer to spawn in the same location where the Chest spawned. |
|||
:*[[Skeleton Key]]s return the lowest failure rate, followed by [[Living Key]]s, then [[Thief's Tools]]. |
|||
*Successfully opening a Coffer can cause an Aurum Strongbox to spawn in the same location where the Coffer spawned. |
|||
:*Only a Thief main can open chests using keys or tools. /THF as a subjob will not work. |
|||
*Chests, coffers, and strongboxes can be opened using [[Izzat]] or by a [[Thief]] main with [[file:Thief's Tools icon.png|26px|link=]] [[Thief's Tools]], [[file:Living Key icon.png|26px|link=]] [[Living Key]], or [[file:Skeleton Key icon.png|26px|link=]] [[Skeleton Key]]. |
|||
:*Opening a chest with Izzat will grant a number of segments depending on which Sheol zone it is. |
|||
:*Successfully opening a chest grants a chance to spawn an upgraded Coffer in the same location where the chest spawned. |
|||
:*Opening a chest with Izzat will greatly increase the chance of a higher tier coffer spawning (relative to using Thief, where it is about a 10% chance). |
|||
::*Coffers have a greater chance of rewarding Lustreless Boxes. Successfully opening a coffer grants a chance to spawn an Aurum Strongbox. |
|||
::*This may be proportional to the number of that tier of chest you have opened. |
|||
::*Aurum Strongboxes contain more scales than ordinary chests, and only Aurum Strongboxes may contain Large Lustreless item boxes. |
|||
:::*I.e. the more Chests you have opened (regardless of method), the higher your odds of spawning a Coffer when you open a Chest with izzat. |
|||
::*The contents of chests, coffers and strongboxes are added to the party's treasure pool, not to individual rewards or to the person opening the chest. |
|||
*The contents of chests, coffers, and strongboxes are added to the party's treasure pool, not to individual rewards or to the person opening the chest. |
|||
:*Chests can also be opened using [[Izzat]]. Normal chests ([[file:Basic Chest.png|35px|link=]]) are opened by spending 10 izzat. |
|||
*Chests ([[file:Basic Chest.png|35px|link=]]) contain multiple [[file:Lustreless Scale icon.png|26px|link=]] [[file:Lustreless Hide icon.png|26px|link=]] [[file:Lustreless Wing icon.png|26px|link=]] Lustreless items and possibly [[File:Lu. Scale Box icon.png|26px|link=]] Lustreless Boxes. |
|||
::*The izzat cost for opening [[file:Basic Chest.png|35px|link=]] chests is reduced by ''1 for every 10 chests'' opened in that Sheol wing opened. |
|||
:*Chests can be opened by spending 10 izzat. |
|||
:*The izzat cost for opening [[file:Basic Chest.png|35px|link=]] chests is reduced by ''1 for every 10 chests'' the player has opened in that Sheol wing. |
|||
::::*e.g. with 28 chests opened, the cost to open a normal chest will be 8 izzat, while with 77 chests opened, the cost to open a normal chest will be 5 izzat. |
|||
::*This reduction caps at -5 izzat. |
|||
::*After opening a normal chest, there is a chance for a coffer ([[file:Gold Lined Chest.png|35px|link=]]) to spawn that can be opened for 15 izzat. |
|||
:::*E.g. the 10th chest you open in Sheol A will cost 10 Izzat, but the 11th chest you open will cost 9. All chests after the 51st would cost 5 izzat. |
|||
:::*The izzat cost for opening [[file:Gold Lined Chest.png|35px|link=]] coffers is reduced by ''1 for every 10 coffers'' in that Sheol path opened. |
|||
*Coffers ([[file:Gold Lined Chest.png|35px|link=]]) also contain multiple [[file:Lustreless Scale icon.png|26px|link=]] [[file:Lustreless Hide icon.png|26px|link=]] [[file:Lustreless Wing icon.png|26px|link=]] Lustreless items and have a higher chance of containing [[File:Lu. Scale Box icon.png|26px|link=]] Lustreless Boxes than normal chests. |
|||
::::*This reduction caps at -7 izzat. |
|||
:*Coffers can be opened by spending 15 izzat. |
|||
:::*After opening a coffer, there is a chance for an Aurum Strongbox ([[file:Gold Chest.png|35px|link=]]) to spawn that can be opened for 20 izzat. |
|||
:*The izzat cost for opening [[file:Gold Lined Chest.png|35px|link=]] coffers is reduced ''irregularly for every 10 coffers'' the player has opened in that Sheol wing. |
|||
::*The 11th coffer costs 14, the 21st coffer costs 13, the 31st coffer costs 12, the 41st coffer costs 10, and the 51st coffer costs 8. |
|||
:::::*This reduction caps at -10 izzat. |
|||
::*This reduction caps at -7 izzat. |
|||
*Opening a chest with Izzat greatly increases the chance of a higher tier coffer spawning, compared to using keys or tools. |
|||
*Aurum Strongboxes ([[file:Gold Chest.png|35px|link=]]) contain multiple [[file:Lustreless Scale icon.png|26px|link=]] [[file:Lustreless Hide icon.png|26px|link=]] [[file:Lustreless Wing icon.png|26px|link=]] Lustreless items, [[File:Lu. Scale Box icon.png|26px|link=]] Lustreless Boxes, and can contain [[File:L. Lu. Scale Box icon.png|26px|link=]] Large Lustreless Boxes. |
|||
:*Aurum Strongboxes can be opened by spending 20 izzat. |
|||
:*The izzat cost for opening [[file:Gold Chest.png|35px|link=]] strongboxes is reduced by ''2 for every 10 strongbox'' the player has opened in that Sheol wing. |
|||
::*This reduction caps at -10 izzat. |
|||
*Opening chests using keys will yield one of three results: |
|||
:*1) The chest will open. |
|||
:*2) The key or tool will be lost with the message "However, it has no effect." |
|||
:*3) The key or tool is lost, and the chest turns into a [[:Category:Mimic|Mimic NM]]. |
|||
::*The more times a key or tool fails, the higher the chance it has to become a Mimic. |
|||
::*[[Skeleton Key]]s have the lowest failure rate, followed by [[Living Key]]s, then [[Thief's Tools]]. |
|||
===Mimics=== |
===Mimics=== |
||
| Line 202: | Line 199: | ||
:*A Thief may place a party member or Trusts on a Mimic and run away to be defeated by other foes out of range. The Thief will then be able to safely reraise afterwards, but will still gain aggro if they come within 20' of the Mimic again. |
:*A Thief may place a party member or Trusts on a Mimic and run away to be defeated by other foes out of range. The Thief will then be able to safely reraise afterwards, but will still gain aggro if they come within 20' of the Mimic again. |
||
:*If a Thief is able to use a pillar or other environmental assets (such as the "spike" found at each corner of the fountains) to block line of sight prior to opening a chest, if that chest turns into a Mimic then it will not aggro. This is dependent on luck as the chest locations are randomized each time. |
:*If a Thief is able to use a pillar or other environmental assets (such as the "spike" found at each corner of the fountains) to block line of sight prior to opening a chest, if that chest turns into a Mimic then it will not aggro. This is dependent on luck as the chest locations are randomized each time. |
||
*Mimics in Sheol A will exclusively use '''Death Trap''' which is an AoE Stun and Poison. |
|||
*Mimics in Sheol B will exclusively use '''Hell Trap''', an enhanced version of '''Death Trap''' which also reduces players TP by 50%. |
|||
*Mimics in Sheol C will exclusively use {{Information Needed}}. |
|||
:*The stun effect from these moves may be resisted by increasing ones Magic Evasion and with thunder resistance enhancements such as Carols, Runes, and Barthunder. |
:*The stun effect from these moves may be resisted by increasing ones Magic Evasion and with thunder resistance enhancements such as Carols, Runes, and Barthunder. |
||
:*Successfully defeating a Mimic will grant a Large Lustreless Box to a player's personal pool upon successfully examining the Otherworldly |
:*Successfully defeating a Mimic will grant a Large Lustreless Box to a player's personal pool upon successfully examining the Otherworldly Vortex. |
||
===Individually Issued Rewards=== |
|||
*Successfully reaching the end of Sheol A, B, or C, examining the [[Veridical Conflux|Otherworldly Vortex]] rewards the player with an amount of {{ItemIcon|Counterfeit Gil|26}} Gil (based on amount of Nostos mobs killed) and possible [[File:Lu. Scale Box icon.png|26px|link=]] Lustreless Boxes (based on amount of Agon Halos and their surrounding beastmen cleared, and/or NMs+{{question}}), or [[File:L. Lu. Scale Box icon.png|26px|link=]] Large Lustreless Boxes (based on amount of mimics killed or clearing the RoE quest for the first time) of the Sheol wing. |
|||
*'''Examining''' the Otherworldly Vortex will issue individual rewards, you do not have to leave the instance. ''Each character'' must examine it themselves in order to receive their personal pool reward. Once you receive your individual reward you may no longer receive any additional individual rewards for that session, even if you kill more Nostos mobs or clear more agon halos and beastmen afterwards. For this reason, it is advised to save claiming individual rewards until the very end of your run. |
|||
:*Players may not examine the Portal if they ''or anyone else'' in their party has aggro. |
|||
====Upgrading UNM Equipment==== |
|||
*To begin [[:Category:Unity Rewards|augmenting UCNM equipment]], you must complete the item's corresponding Sheol wing's [[:Category:Records_of_Eminence#Content_.28Odyssey.29|RoE Quest]] by examining the Otherworldly Vortex. |
|||
:*You will need '''1,191 ''' Lustreless items (12 stacks and 3 singles) to fully upgrade to {{aug|15}}. |
|||
::*Trade 1 of the corresponding Lustreless item, the equipment, and pay the one-time fee of 30,000 Accolades. Unlike the +1 upgrade, there is no game day wait. |
|||
:::*Sheol A related items are [[File:Lustreless Scale icon.png|26px|link=]] [[Lustreless Scale]] based. |
|||
:::*Sheol B related items are [[File:Lustreless Hide icon.png|26px|link=]] [[Lustreless Hide]] based. |
|||
:::*Sheol C related items are [[File:Lustreless Wing icon.png|26px|link=]] [[Lustreless Wing]] based. |
|||
::::*See the '''[[Unity Rewards]]''' page for which equipment requires which Lustreless item to upgrade it. |
|||
==Sheol A== |
==Sheol A== |
||
<div style="float: right;">[[File:Odyssey2.jpg|325px|link=]]</div> |
|||
:'''Primary Reward''': {{ItemIcon|Lustreless Scale|26}} [[Lustreless Scale]]. |
|||
*The time limit is '''30 minutes''' per entry. This cannot be increased. |
|||
{|style="padding-left:20px;" |
|||
:*Running out of time will eject all party members. |
|||
| |
|||
:*Using the {{Tmp}} [[Moglophone]] temporary item will allow you to leave the instance before time expires. |
|||
{|class="BorderlessStandard R1-White" style="background: #A379A3; max-width:800px;" |
|||
|- style="background: #3a1d23" |
|||
{| style="width: 100%; max-width: 600px;" |
|||
| style="border:2px dashed #FFA99F; line-height:10x; padding:2px;" | |
|||
{{color|white|style=normal|Sheol A Floor Statistics}} |
|||
:'''Unique Sheol A Adjustments''' |
|||
|- |
|||
'''Notorious Monsters (including Mimics):''' |
|||
| |
|||
*Offensive [[Indicolure]] effects are reduced by: -75%. {{Verification}} |
|||
{| class="R-Highlight-Purple C1-Bold" style="text-align: center; max-width:800px;" |
|||
'''All Sheol A Monsters:''' |
|||
|- style="background: #956595" |
|||
*AoE offensive spells and damage to secondary targets are reduced by: -90%. {{Verification}} |
|||
! style="padding: 3px;"| Floor |
|||
! style="padding: 3px;"| Foe Level |
|||
! style="padding: 3px;"| NM Level |
|||
! style="padding: 3px;"| Mimic Level |
|||
! style="padding: 3px;"| UCNM Pop Items Required |
|||
|- style="background: #B592B5" |
|||
| 1 |
|||
| style="background: #C0A2C0"| 119 |
|||
| 122 |
|||
| style="background: #C0A2C0"| 124 |
|||
| 1 |
|||
|- style="background: #B592B5" |
|||
| 2 |
|||
| style="background: #C0A2C0"| 121 |
|||
| 124 |
|||
| style="background: #C0A2C0"| 126 |
|||
| 3 |
|||
|- style="background: #B592B5" |
|||
| 3 |
|||
| style="background: #C0A2C0"| 123 |
|||
| 126 |
|||
| style="background: #C0A2C0"| 128 |
|||
| 5 |
|||
|- style="background: #B592B5" |
|||
| 4 |
|||
| style="background: #C0A2C0"| 125 |
|||
| 128 |
|||
| style="background: #C0A2C0"| 130 |
|||
| 10 |
|||
|- style="background: #B592B5" |
|||
| 5 |
|||
| style="background: #C0A2C0"| 127 |
|||
| 130 |
|||
| style="background: #C0A2C0"| 132 |
|||
| 15 |
|||
|- style="background: #B592B5" |
|||
| 6 |
|||
| style="background: #C0A2C0"| 129 |
|||
| 132 |
|||
| style="background: #C0A2C0"| 134 |
|||
| 20 |
|||
|- style="background: #B592B5" |
|||
| 7 |
|||
| style="background: #C0A2C0"| 131 |
|||
| 134 |
|||
| style="background: #C0A2C0"| 136 |
|||
| 25 |
|||
|} |
|} |
||
|} |
|||
|} |
|||
===Main objective=== |
|||
*Reaching the [[Veridical Conflux|Otherworldly Portal]] at the topmost (7th) level will complete the RoE Objective, Content → Odysssey → Sheol A. |
|||
:*This is a one time objective and will unlock Sheol B and the ability to augment Unity Items that require Lustreless Scales for upgrades. |
|||
*In each of the floors 1~6, there is a [[Veridical Conflux]]; examining it will let you ascend to the next higher floor and increases the foes' level by +2. You can also use them to descend and go back down to a previous floor if needed. |
|||
*[[Veridical Conflux|Otherworldly Vortex]] location: Topmost (7th) level. |
|||
===Additional Objectives=== |
|||
**Examining it will complete the RoE Objective, Content → Odyssey → Sheol A. |
|||
*Various Notorious Monsters may be spawned by trading [[UCNM Materials]] to various '''''Ethereal Junctions''''' within the instance. |
|||
*All Nostos enemies in Sheol A have a chance to drop [[file:Lustreless Scale icon.png|26px|link=]] [[Lustreless Scale]]s. |
|||
{|style="padding-left:20px;" |
|||
**See the [[Unity Rewards]] page to see which armor pieces they are used to upgrade, and for further details. |
|||
| |
|||
*The HP of foes depends on their level, which increases with each level climbed. Sheol A mob HP: ~30,000 to ~65,000. |
|||
{|class="BorderlessStandard R1-White" style="background: #A379A3; width: 100%; max-width:800px;" |
|||
:*Higher level enemies on higher floors have a higher drop rate. |
|||
|- style="background: #3a1d23" |
|||
:*[[Treasure Hunter]] increases the drop rate of Lustreless items up to a max of 3 Lustreless items dropped per Nostos mob. |
|||
!style="text-align:center;"| |
|||
:*Each Nostos Enemy defeated in Sheol A will grant 5 [[Moogle Segments]] starting on the first floor, and scale up 2 segments per floor up to 17 [[Moogle Segments]] per Nostos Mob defeated on the last (7th) floor. |
|||
===={{color|white|style=normal|Sheol A Notorious Monsters}}==== |
|||
::*Each successfully opened Chest in Sheol A will grant 50 [[Moogle Segments]] regardless of Floor. Coffers will grant 75 [[Moogle Segments]], and Aurum Strongboxes will grant 100. |
|||
|- |
|||
::*Each successfully lockpicked Chest in Sheol A will grant 5 [[Moogle Segments]] regardless of Floor. Coffers will grant 7 [[Moogle Segments]], and Aurum Strongboxes will grant 10. |
|||
| |
|||
*Every Nostos Enemy defeated, regardless of floor, adds +5,000 gil to each player's individual reward. |
|||
{| class="R-Highlight-Purple sortable C1-Bold" style="text-align: center; width: 100%; max-width:800px;" |
|||
*Every Notorious Monster defeated, regardless of floor, adds +1 [[Job Points|Job Point]] to each player's individual reward. |
|||
|- style="background: #956595" |
|||
*Defeating 1 Agon Halo and all its accompanying Agon Beastemen adds 1 [[File:Lu. Scale Box icon.png|26px|link=]] [[Lustreless Scale Box]] to each player's individual reward. |
|||
! Notorious Monster |
|||
*Defeating 1 Mimic spawned from a chest adds 1 [[File:L. Lu. Scale Box icon.png|26px|link=]] [[Large Lustreless Scale Box]] to each player's individual reward. |
|||
! Family |
|||
**Mimics in Sheol A will exclusively use '''Death Trap''' which is an AoE Stun and Poison. |
|||
! UCNM Pop Item |
|||
*[[Fetter|Agon Halo]]s will only appear on floors: '''1''', '''3''', '''5''', and '''7''' in Sheol A. |
|||
:*These Halos are guarded by [[Quadav]], [[Orc]], and [[Yagudo]] beastmen. |
|||
:*All of the Agon Beastmen can be slept or lullabied, unlike in Sheols B and C where they are immune. |
|||
:*Floor 7 Agon Beastmen in Sheol A contain '''Beastmen Leader''' type variants in their groups. |
|||
::*These Beastmen Leaders will have access to their appropriate [[SP Abilities]]. |
|||
===Translocator Locations=== |
|||
*3 '''Translocators''' are located in Sheol A. Once registered by examining one, you may warp between them at any point. |
|||
:*This is not lost or reset when an Odyssey is completed, and may be used to gain access to the Otherwordly Portal more quickly. |
|||
::*'''You are unable to use the Translocators if you or anyone in your party currently has aggro'''. |
|||
:[[File:Translocator.png|22px|link=]] '''#1:''' Near the start on the first floor. |
|||
:[[File:Translocator.png|22px|link=]] '''#2:''' On the third floor, close to the Eastern side of the large main area. |
|||
:[[File:Translocator.png|22px|link=]] '''#3:''' On the fifth floor, past the giant doors south of the starting point, and all the way down the stairs. |
|||
===Sheol A Maps=== |
|||
{{imgpop|[[File:Sheol_A_Perdition_A-1_Map.png|128px]]|Sheol_A_Perdition_A-1_Map.png|width=512px}} |
|||
{{imgpop|[[File:Sheol_A_Perdition_A-2_Map.png|128px]]|Sheol_A_Perdition_A-2_Map.png|width=512px}} |
|||
{{imgpop|[[File:Sheol_A_Perdition_A-3_Map.png|128px]]|Sheol_A_Perdition_A-3_Map.png|width=512px}} |
|||
{{imgpop|[[File:Sheol_A_Perdition_A-4_Map.png|128px]]|Sheol_A_Perdition_A-4_Map.png|width=512px}} <br> |
|||
{{imgpop|[[File:Sheol_A_Perdition_A-5_Map.png|128px]]|Sheol_A_Perdition_A-5_Map.png|width=512px}} |
|||
{{imgpop|[[File:Sheol_A_Perdition_A-6_Map.png|128px]]|Sheol_A_Perdition_A-6_Map.png|width=512px}} |
|||
{{imgpop|[[File:Sheol_A_Perdition_A-7_Map.png|128px]]|Sheol_A_Perdition_A-7_Map.png|width=512px}} |
|||
===Sheol A Notorious Monsters=== |
|||
Various Notorious Monsters may be spawned by trading [[UCNM Materials]] to various '''''Ethereal Junctions''''' within the instance. |
|||
Sheol A NMs begin emitting their aura upon the use of their listed SP. |
|||
{| class="R-Highlight-Purple sortable C1-Bold odyssey" cellpadding=4 style="text-align: center; width: 100%; max-width:700px; border-collapse: collapse" |
|||
|- |
|||
! NM |
|||
! Pop Item |
|||
! SP Ability |
! SP Ability |
||
! Aura |
! Aura |
||
|- |
|||
|- style="background: #B592B5" |
|||
|[[Aegypius]] |
|[[Aegypius]]<br />([[Lesser Bird]]) |
||
| style="background: #C0A2C0"| [[Lesser Bird]] |
|||
|[[file:Abyssdiver Feather icon.png|22px|link=Abyssdiver's Feather]] [[Abyssdiver's Feather]] |
|[[file:Abyssdiver Feather icon.png|22px|link=Abyssdiver's Feather]] [[Abyssdiver's Feather]] |
||
| [[Perfect Dodge]] |
|||
|Encumbrance |
|Encumbrance |
||
|- |
|||
|- style="background: #B592B5" |
|||
|[[Ailuros]] |
|[[Ailuros]]<br />([[:Category:Coeurl|Coeurl]]) |
||
| style="background: #C0A2C0"| [[:Category:Coeurl|Coeurl]] |
|||
|[[file:Voso's Hide icon.png|22px|link=Voso's Hide]] [[Voso's Hide]] |
|[[file:Voso's Hide icon.png|22px|link=Voso's Hide]] [[Voso's Hide]] |
||
| [[Perfect Dodge]] |
|||
|Magic Accuracy Down |
|Magic Accuracy Down |
||
|- |
|||
|- style="background: #B592B5" |
|||
|[[Brachys]] |
|[[Brachys]]<br />([[Crab]]) |
||
| style="background: #C0A2C0"| [[Crab]] |
|||
|[[file:Arthro's Shell icon.png|22px|link=Arthro's Shell]] [[Arthro's Shell]] |
|[[file:Arthro's Shell icon.png|22px|link=Arthro's Shell]] [[Arthro's Shell]] |
||
| [[Invincible]] |
|||
|Attack Down |
|Attack Down |
||
|- |
|||
|- style="background: #B592B5" |
|||
|[[Cynara]] |
|[[Cynara]]<br />([[:Category:Sabotender|Sabotender]]) |
||
| style="background: #C0A2C0"| [[:Category:Sabotender|Sabotender]] |
|||
|[[file:Veloz's Needle icon.png|22px|link=Veloz's Needle]] [[Veloz's Needle]] |
|[[file:Veloz's Needle icon.png|22px|link=Veloz's Needle]] [[Veloz's Needle]] |
||
| [[Hundred Fists]] |
|||
|Avoidance Down |
|Avoidance Down |
||
|- |
|||
|- style="background: #B592B5" |
|||
|[[Damysus]] |
|[[Damysus]]<br />([[:Category:Goobbue|Goobbue]]) |
||
| style="background: #C0A2C0"| [[:Category:Goobbue|Goobbue]] |
|||
|[[file:Joyous's Moss icon.png|22px|link=Joyous's Moss]] [[Joyous's Moss]] |
|[[file:Joyous's Moss icon.png|22px|link=Joyous's Moss]] [[Joyous's Moss]] |
||
| [[Blood Weapon]] |
|||
|Defense Down |
|Defense Down |
||
|- |
|||
|- style="background: #B592B5" |
|||
|[[Dione]] |
|[[Dione]]<br />([[:Category:Flytrap|Flytrap]]) |
||
| style="background: #C0A2C0"| [[:Category:Flytrap|Flytrap]] |
|||
|[[file:Orcfeltrap's Leaf icon.png|22px|link=Orcfeltrap's Leaf]] [[Orcfeltrap's Leaf]] |
|[[file:Orcfeltrap's Leaf icon.png|22px|link=Orcfeltrap's Leaf]] [[Orcfeltrap's Leaf]] |
||
| [[Blood Weapon]] |
|||
|Magic Evasion Down |
|Magic Evasion Down |
||
|- |
|||
|- style="background: #B592B5" |
|||
|[[Eurytus]] |
|[[Eurytus]]<br />([[:Category:Goobbue|Goobbue]]) |
||
| style="background: #C0A2C0"| [[:Category:Goobbue|Goobbue]] |
|||
|[[file:Heiligtum's Moss icon.png|22px|link=Heiligtum's Moss]] [[Heiligtum's Moss]] |
|[[file:Heiligtum's Moss icon.png|22px|link=Heiligtum's Moss]] [[Heiligtum's Moss]] |
||
| [[Mighty Strikes]] |
|||
|Evasion Down |
|Evasion Down |
||
|- |
|||
|- style="background: #B592B5" |
|||
|[[Gloios]] |
|[[Gloios]]<br />([[Slime]]) |
||
| style="background: #C0A2C0"| [[Slime]] |
|||
|[[file:G. Gel's Mucus icon.png|22px|link=Garbage Gel's Mucus]] [[Garbage Gel's Mucus]] |
|[[file:G. Gel's Mucus icon.png|22px|link=Garbage Gel's Mucus]] [[Garbage Gel's Mucus]] |
||
| [[Mighty Strikes]] |
|||
|Defense Down |
|Defense Down |
||
|- |
|||
|- style="background: #B592B5" |
|||
|[[Harpe (Notorious Monster)|Harpe]] |
|[[Harpe (Notorious Monster)|Harpe]]<br />([[Evil Weapon]]) |
||
| style="background: #C0A2C0"| [[Evil Weapon]] |
|||
|[[file:Malatrix's Shard icon.png|22px|link=Malatrix's Shard]] [[Malatrix's Shard]] |
|[[file:Malatrix's Shard icon.png|22px|link=Malatrix's Shard]] [[Malatrix's Shard]] |
||
| [[Chainspell]] |
|||
|Magic Defense Down |
|Magic Defense Down |
||
|- |
|||
|- style="background: #B592B5" |
|||
|[[Kusarikku]] |
|[[Kusarikku]]<br />([[:Category:Bugard|Bugard]]) |
||
| style="background: #C0A2C0"| [[:Category:Bugard|Bugard]] |
|||
|[[file:Immani. Hide icon.png|22px|link=Immanibugard's Hide]] [[Immanibugard's Hide]] |
|[[file:Immani. Hide icon.png|22px|link=Immanibugard's Hide]] [[Immanibugard's Hide]] |
||
| [[Blood Weapon]] |
|||
|Evasion Down |
|Evasion Down |
||
|- |
|||
|- style="background: #B592B5" |
|||
|[[Leucippe]] |
|[[Leucippe]]<br />([[Bat]]) |
||
| style="background: #C0A2C0"| [[Bat]] |
|||
|[[file:Tiyanak's Fang icon.png|22px|link=Tiyanak's Fang]] [[Tiyanak's Fang]] |
|[[file:Tiyanak's Fang icon.png|22px|link=Tiyanak's Fang]] [[Tiyanak's Fang]] |
||
| [[Perfect Dodge]] |
|||
|Attack Down |
|Attack Down |
||
|- |
|||
|- style="background: #B592B5" |
|||
|[[Megaera]] |
|[[Megaera]]<br />([[:Category:Cockatrice|Cockatrice]]) |
||
| style="background: #C0A2C0"| [[:Category:Cockatrice|Cockatrice]] |
|||
|[[file:Warblade's Hide icon.png|22px|link=Warblade's Hide]] [[Warblade's Hide]] |
|[[file:Warblade's Hide icon.png|22px|link=Warblade's Hide]] [[Warblade's Hide]] |
||
| [[Blood Weapon]] |
|||
|Magic Attack Down |
|Magic Attack Down |
||
|- |
|||
|- style="background: #B592B5" |
|||
|[[Physis]] |
|[[Physis]]<br />([[:Category:Morbol|Morbol]]) |
||
| style="background: #C0A2C0"| [[:Category:Morbol|Morbol]] |
|||
|[[file:Samantha's Vine icon.png|22px|link=Samantha's Vine]] [[Samantha's Vine]] |
|[[file:Samantha's Vine icon.png|22px|link=Samantha's Vine]] [[Samantha's Vine]] |
||
| [[Blood Weapon]] |
|||
|Evasion Down |
|Evasion Down |
||
|- |
|||
|- style="background: #B592B5" |
|||
|[[Ptelea]] |
|[[Ptelea]]<br />([[:Category:Treant|Treant]]) |
||
| style="background: #C0A2C0"| [[:Category:Treant|Treant]] |
|||
|[[file:Mender's Log icon.png|22px|link=Mender's Log]] [[Mender's Log]] |
|[[file:Mender's Log icon.png|22px|link=Mender's Log]] [[Mender's Log]] |
||
| [[Mighty Strikes]] |
|||
|Slow |
|Slow |
||
|- |
|||
|- style="background: #B592B5" |
|||
|[[Salmandra]]<br />([[:Category:Eft|Eft]]) |
|||
|[[Salamandra]] |
|||
| style="background: #C0A2C0"| [[:Category:Eft|Eft]] |
|||
|[[file:Intuila's Hide icon.png|22px|link=Intuila's Hide]] [[Intuila's Hide]] |
|[[file:Intuila's Hide icon.png|22px|link=Intuila's Hide]] [[Intuila's Hide]] |
||
| [[Perfect Dodge]] |
|||
|Paralyze |
|Paralyze |
||
|- |
|||
|- style="background: #B592B5" |
|||
|[[Tipuli]] |
|[[Tipuli]]<br />([[Fly]]) |
||
| style="background: #C0A2C0"| [[Fly]] |
|||
|[[file:Imperator's Wing icon.png|22px|link=Imperator's Wing]] [[Imperator's Wing]] |
|[[file:Imperator's Wing icon.png|22px|link=Imperator's Wing]] [[Imperator's Wing]] |
||
| [[Mighty Strikes]] |
|||
|Magic Defense Down |
|Magic Defense Down |
||
|} |
|||
|} |
|||
|} |
|||
===Translocator Locations=== |
|||
*3 '''Translocators''' are located in Sheol A. Once registered by examining one, you may warp between them at any point. |
|||
:*This is not lost or reset when an Odyssey is completed, and may be used to gain access to the Otherwordly Portal more quickly. |
|||
::*'''You are unable to use the Translocators if you or anyone in your party currently has aggro'''. |
|||
:[[File:Translocator.png|22px|link=]] '''#1:''' Near the start on the first floor. |
|||
:[[File:Translocator.png|22px|link=]] '''#2:''' On the third floor, close to the western side of the large main area. |
|||
:[[File:Translocator.png|22px|link=]] '''#3:''' On the fifth floor, past the giant doors south of the starting point, and all the way down the stairs. |
|||
{|class="BorderlessStandard R1-White overflow-visible" style="background: #b592b5; max-width:800px;" |
|||
|- style="background: #3a1d23" |
|||
!style="text-align:center;"| |
|||
==={{color|white|style=normal|Sheol A Maps}}=== |
|||
|- |
|||
| |
|||
<span class="mbt-hover">[[File:Sheol A Map F1.png|100px]]<span class="mbt-tooltip">[[File:Sheol A Map F1.png|500px|link=]]</span></span> |
|||
<span class="mbt-hover">[[File:Sheol A Map F2.png|100px]]<span class="mbt-tooltip">[[File:Sheol A Map F2.png|500px|link=]]</span></span> |
|||
<span class="mbt-hover">[[File:Sheol A Map F3.png|100px]]<span class="mbt-tooltip">[[File:Sheol A Map F3.png|500px|link=]]</span></span> |
|||
<span class="mbt-hover">[[File:Sheol A Map F4.png|100px]]<span class="mbt-tooltip">[[File:Sheol A Map F4.png|500px|link=]]</span></span> |
|||
<span class="mbt-hover">[[File:Sheol A Map F5.png|100px]]<span class="mbt-tooltip">[[File:Sheol A Map F5.png|500px|link=]]</span></span> |
|||
<span class="mbt-hover">[[File:Sheol A Map F6.png|100px]]<span class="mbt-tooltip">[[File:Sheol A Map F6.png|500px|link=]]</span></span> |
|||
<span class="mbt-hover">[[File:Sheol A Map F7.png|100px]]<span class="mbt-tooltip">[[File:Sheol A Map F7.png|500px|link=]]</span></span> |
|||
|- |
|||
|} |
|} |
||
==Sheol |
===Sheol A Floor Statistics=== |
||
{| class="R-Highlight-Purple C1-Bold odyssey" cellpadding=4 style="text-align: center; width: 100%; max-width:700px; border-collapse: collapse" |
|||
:'''Primary Reward''': {{ItemIcon|Lustreless Hide|26}} [[Lustreless Hide]]. |
|||
*'''Note''': Players must have completed the Records of Eminence objective; Content → Odyssey → Sheol A in order to enter Sheol B |
|||
{|style="padding-left:20px;" |
|||
| |
|||
{|class="BorderlessStandard R1-White" style="background: #A379A3; max-width:800px;" |
|||
|- style="background: #3a1d23" |
|||
!style="text-align:center;"| |
|||
{{color|white|style=normal|Sheol B Floor Statistics}} |
|||
|- |
|- |
||
! Floor |
|||
| |
|||
! Foe Level |
|||
{| class="R-Highlight-Purple C1-Bold" style="text-align: center; max-width:800px;" |
|||
! NM Level |
|||
|- style="background: #956595" |
|||
! Mimic Level |
|||
! style="padding: 3px;"| Floor |
|||
! NM Pop Items Required |
|||
! style="padding: 3px;"| Foe Level |
|||
! Segments Per Kill |
|||
! style="padding: 3px;"| NM Level |
|||
|- |
|||
! style="padding: 3px;"| Mimic Level |
|||
! style="padding: 3px;"| UCNM Pop Items Required |
|||
|- style="background: #B592B5" |
|||
| 1 |
| 1 |
||
| 119 |
|||
| style="background: #C0A2C0"| 124 |
|||
| 122 |
|||
| 127 {{verification}} |
|||
| 124 |
|||
| style="background: #C0A2C0"| 129 {{verification}} |
|||
| 1 |
| 1 |
||
| 5 |
|||
|- style="background: #B592B5" |
|||
|- |
|||
| 2 |
| 2 |
||
| 121 |
|||
| style="background: #C0A2C0"| {{Information Needed}} |
|||
| 124 |
|||
| {{Information Needed}} |
|||
| 126 |
|||
| style="background: #C0A2C0"| {{Information Needed}} |
|||
| {{Information Needed}} |
|||
|- style="background: #B592B5" |
|||
| 3 |
| 3 |
||
| 7 |
|||
| style="background: #C0A2C0"| {{Information Needed}} |
|||
|- |
|||
| {{Information Needed}} |
|||
| 3 |
|||
| style="background: #C0A2C0"| {{Information Needed}} |
|||
| 123 |
|||
| {{Information Needed}} |
|||
| 126 |
|||
|- style="background: #B592B5" |
|||
| 128 |
|||
| 5 |
|||
| 9 |
|||
|- |
|||
| 4 |
| 4 |
||
| 125 |
|||
| style="background: #C0A2C0"| {{Information Needed}} |
|||
| 128 |
|||
| {{Information Needed}} |
|||
| 130 |
|||
| style="background: #C0A2C0"| {{Information Needed}} |
|||
| 10 |
|||
| {{Information Needed}} |
|||
| 11 |
|||
|- style="background: #B592B5" |
|||
|- |
|||
| 5 |
| 5 |
||
| 127 |
|||
| style="background: #C0A2C0"| {{Information Needed}} |
|||
| 130 |
|||
| {{Information Needed}} |
|||
| 132 |
|||
| style="background: #C0A2C0"| {{Information Needed}} |
|||
| 15 |
|||
| {{Information Needed}} |
|||
| 13 |
|||
|- style="background: #B592B5" |
|||
|- |
|||
| 6 |
| 6 |
||
| 129 |
|||
| style="background: #C0A2C0"| {{Information Needed}} |
|||
| 132 |
|||
| {{Information Needed}} |
|||
| 134 |
|||
| style="background: #C0A2C0"| {{Information Needed}} |
|||
| 20 |
|||
| {{Information Needed}} |
|||
| 15 |
|||
|- |
|||
| 7 |
|||
| 131 |
|||
| 134 |
|||
| 136 |
|||
| 25 |
|||
| 17 |
|||
|} |
|} |
||
==Sheol B== |
|||
'''The requirements to enter are as follows:''' |
|||
*Players must have completed the [[:Category:Records_of_Eminence#Content_.28Odyssey.29|Records of Eminence Objective]]; Content → Odyssey → Sheol A. |
|||
*The time limit is '''30 minutes''' per entry. This cannot be increased. |
|||
:*Running out of time will eject all party members. |
|||
:*Using the {{Tmp}} [[Moglophone]] temporary item will allow you to leave the instance before time expires. |
|||
{| style="width: 100%; max-width: 600px;" |
|||
| style="border:2px dashed #FFA99F; line-height:10x; padding:2px;" | |
|||
:'''Unique Sheol B Adjustments''' |
|||
'''Notorious Monsters (including Mimics):''' |
|||
*Offensive [[Indicolure]] effects are reduced by: -85%. {{Verification}} |
|||
'''All Sheol B Monsters:''' |
|||
*AoE offensive spells and damage to secondary targets are reduced by: -90%. {{Verification}} |
|||
*Spawned NMs are not resistant to AoE damage or Indiclosures, however. |
|||
*All monsters have a particular -25% resistance to a specific damage type, and NMs a 37.5% see table below. |
|||
:*These resistances are not defined by typical family values. |
|||
::*For instance, Crabs and Pugil aren't ordinarily slashing resistant. |
|||
|} |
|} |
||
|} |
|||
===Main objective=== |
|||
<onlyinclude>{{#ifeq:{{{transcludesection|Sheol B}}}|Sheol B|{{{!}} class="R-Highlight-Purple odyssey" cellpadding=4 style="text-align: center; width: 100%; max-width:700px; border-collapse: collapse" |
|||
*Reaching the [[Veridical Conflux|Otherworldly Portal]] on level 5 will complete the Odyssey. |
|||
{{!}}- style="color: white" |
|||
:*There is a floor 6, but there is no exit on this floor. Pay attention to the Conflux you use. |
|||
! colspan="11" {{!}} Sheol B Monster Resistances |
|||
*At the "end" of a floor, there is a [[Veridical Conflux]]; examining it warps you to the next higher floor and increases the foes' level by +2. |
|||
{{!}}- |
|||
===Additional Objectives=== |
|||
! colspan="11" {{!}} -25% {{Slashing}} Slashing Damage |
|||
*Complete the [[:Category:Records_of_Eminence#Content_.28Odyssey.29|Records of Eminence Objective]], Content → Odysssey → Sheol B |
|||
{{!}}- |
|||
:This is a one time objective and will unlock Sheol C. |
|||
{{!}} '''''Aquan''''' |
|||
Various Notorious Monsters may be spawned by trading [[UCNM Materials]] to various '''''Ethereal Junctions''''' within the instance. |
|||
{{!}} Crab |
|||
{|style="padding-left:20px;" |
|||
{{!}} {{Icon|Yes}} |
|||
| |
|||
{{!}} Pugil |
|||
{|class="BorderlessStandard R1-White" style="background: #A379A3; width: 100%; max-width:800px;" |
|||
{{!}} {{Icon|Yes}} |
|||
|- style="background: #3a1d23" |
|||
{{!}} Sea Monk |
|||
!style="text-align:center;"| |
|||
{{!}} {{Icon|Yes}} |
|||
===={{color|white|style=normal|Sheol B Notorious Monsters}}==== |
|||
{{!}} colspan="4" {{!}} |
|||
|- |
|||
{{!}}- |
|||
| |
|||
{{!}} '''''Undead''''' |
|||
{| class="R-Highlight-Purple sortable C1-Bold" style="text-align: center; width: 100%; max-width:800px;" |
|||
{{!}} Skeleton |
|||
|- style="background: #956595" |
|||
{{!}} {{Icon|No}} |
|||
!Notorious Monster |
|||
{{!}} Ghost |
|||
{{!}} {{Icon|No}} |
|||
{{!}} Corse |
|||
{{!}} {{Icon|No}} |
|||
{{!}} Doomed |
|||
{{!}} {{Icon|No}} |
|||
{{!}} Hound |
|||
{{!}} {{Icon|No}} |
|||
{{!}}- |
|||
! colspan="11" {{!}} -25% {{Blunt}} Blunt Damage |
|||
{{!}}- |
|||
{{!}} '''''Lizard''''' |
|||
{{!}} Lizard |
|||
{{!}} {{Icon|Yes}} |
|||
{{!}} Raptor |
|||
{{!}} {{Icon|Yes}} |
|||
{{!}} Bugard |
|||
{{!}} {{Icon|Yes}} |
|||
{{!}} colspan="4" {{!}} |
|||
{{!}}- |
|||
{{!}} '''''Bird''''' |
|||
{{!}} Lesser Bird |
|||
{{!}} {{Icon|Yes}} |
|||
{{!}} Bat |
|||
{{!}} {{Icon|No}} |
|||
{{!}} Cockatrice |
|||
{{!}} {{Icon|Yes}} |
|||
{{!}} Roc |
|||
{{!}} {{Icon|Yes}} |
|||
{{!}} Apkallu |
|||
{{!}} {{Icon|Yes}} |
|||
{{!}}- |
|||
{{!}} '''''Dragon''''' |
|||
{{!}} Wyvern |
|||
{{!}} {{Icon|Yes}} |
|||
{{!}} Puk |
|||
{{!}} {{Icon|Yes}} |
|||
{{!}} colspan="6" {{!}} |
|||
{{!}}- |
|||
! colspan="11" {{!}} -25% {{Piercing}} Piercing Damage |
|||
{{!}}- |
|||
{{!}} rowspan="2" {{!}} '''''Beast''''' |
|||
{{!}} Dhalmel |
|||
{{!}} {{Icon|Yes}} |
|||
{{!}} Sheep |
|||
{{!}} {{Icon|Yes}} |
|||
{{!}} Ram |
|||
{{!}} {{Icon|Yes}} |
|||
{{!}} Tiger |
|||
{{!}} {{Icon|Yes}} |
|||
{{!}} Coeurl |
|||
{{!}} {{Icon|Yes}} |
|||
{{!}}- |
|||
{{!}} Manticore |
|||
{{!}} {{Icon|Yes}} |
|||
{{!}} Marid |
|||
{{!}} {{Icon|Yes}} |
|||
{{!}} Buffalo |
|||
{{!}} {{Icon|Yes}} |
|||
{{!}} Opo-opo |
|||
{{!}} {{Icon|Yes}} |
|||
{{!}} colspan="2" {{!}} |
|||
{{!}}- |
|||
{{!}} '''''Arcana''''' |
|||
{{!}} Bombs |
|||
{{!}} {{Icon|No}} |
|||
{{!}} Weapons |
|||
{{!}} {{Icon|Yes}} |
|||
{{!}} Magic Pot |
|||
{{!}} {{Icon|No}} |
|||
{{!}} colspan="4" {{!}} |
|||
{{!}}- |
|||
{{!}} '''''Demon''''' |
|||
{{!}} Ahriman |
|||
{{!}} {{Icon|No}} |
|||
{{!}} Taurus |
|||
{{!}} {{Icon|No}} |
|||
{{!}} colspan="6" {{!}} |
|||
{{!}}- |
|||
! colspan="11" {{!}} -25% {{Magic}} Magical Damage |
|||
{{!}}- |
|||
{{!}} '''''Amorph''''' |
|||
{{!}} Worm |
|||
{{!}} {{Icon|Yes}} |
|||
{{!}} Leech |
|||
{{!}} {{Icon|No}} |
|||
{{!}} Slime |
|||
{{!}} {{Icon|Yes}} |
|||
{{!}} Flan |
|||
{{!}} {{Icon|No}} |
|||
{{!}} Hecteye |
|||
{{!}} {{Icon|No}} |
|||
{{!}}- |
|||
{{!}} '''''Plantoid''''' |
|||
{{!}} Cactuar |
|||
{{!}} {{Icon|Yes}} |
|||
{{!}} Treant |
|||
{{!}} {{Icon|Yes}} |
|||
{{!}} Sapling |
|||
{{!}} {{Icon|Yes}} |
|||
{{!}} Goobbue |
|||
{{!}} {{Icon|Yes}} |
|||
{{!}} Morbol |
|||
{{!}} {{Icon|No}} |
|||
{{!}}- |
|||
{{!}} rowspan="2" {{!}} '''''Vermin''''' |
|||
{{!}} Bee |
|||
{{!}} {{Icon|Yes}} |
|||
{{!}} Beetle |
|||
{{!}} {{Icon|Yes}} |
|||
{{!}} Crawler |
|||
{{!}} {{Icon|Yes}} |
|||
{{!}} Fly |
|||
{{!}} {{Icon|Yes}} |
|||
{{!}} Scorpion |
|||
{{!}} {{Icon|Yes}} |
|||
{{!}}- |
|||
{{!}} Spider |
|||
{{!}} {{Icon|Yes}} |
|||
{{!}} Wamoura |
|||
{{!}} {{Icon|Yes}} |
|||
{{!}} colspan="6" {{!}} |
|||
{{!}}- |
|||
{{!}} colspan="11" {{!}} Susceptible to [[Cruel Joke|<span style="color: black;">'''Cruel Joke'''</span>]] {{Icon|Yes}} or {{Icon|No}} |
|||
{{!}}- style="color: white" |
|||
! colspan="11"{{!}} Beastmen Resistances |
|||
{{!}}- |
|||
{{!}} '''Tonberry''' |
|||
{{!}} colspan="2" {{!}} -37.5% {{Slashing}} '''Slashing''' |
|||
{{!}} colspan="2" {{!}} -37.5% {{Breath}} '''Breath''' |
|||
{{!}} colspan="6" {{!}} |
|||
{{!}}- |
|||
{{!}} '''Sahagin''' |
|||
{{!}} colspan="2" {{!}} -37.5% {{Piercing}} '''Piercing''' |
|||
{{!}} colspan="2" {{!}} |
|||
{{!}} colspan="6" {{!}} |
|||
{{!}}- |
|||
{{!}} '''Antica''' |
|||
{{!}} colspan="2" {{!}} -37.5% {{Blunt}} '''Blunt''' |
|||
{{!}} colspan="2" {{!}} -37.5% {{Breath}} '''Breath''' |
|||
{{!}} colspan="6" {{!}} |
|||
{{!}}} }}</onlyinclude> |
|||
*[[Veridical Conflux|Otherworldly Vortex]] location: 5th level. (NOT the top floor) |
|||
**There is a floor 6, but there is no exit on this floor. Pay attention to the Conflux you use. |
|||
**Examining it will complete the RoE Objective, Content → Odyssey → Sheol B. |
|||
*All Nostos enemies in Sheol B have a chance to drop {{ItemIcon|Lustreless Hide|26}} [[Lustreless Hide]]s. |
|||
**See the [[Unity Rewards]] page to see which armor pieces they are used to upgrade, and for further details. |
|||
*The HP of foes depends on their level, which increases with each level climbed. Sheol B mob HP: ~{{Information Needed}} to ~{{Information Needed}}. |
|||
:*Higher level enemies on higher floors have a higher drop rate. |
|||
:*[[Treasure Hunter]] increases the drop rate of Lustreless items up to a max of 3 Lustreless items dropped per Nostos mob. |
|||
:*Each Nostos Enemy defeated in Sheol B will grant 13 [[Moogle Segments]] starting on the first floor, and scaling up 2 segments per floor up to 23 [[Moogle Segments]] per Nostos Mob defeated on the last (6th) floor. |
|||
::*Each successfully opened Chest in Sheol B will grant 75 [[Moogle Segments]] regardless of Floor. Coffers will grant 100 [[Moogle Segments]] and Aurum Strongboxes will grant 150. |
|||
*Every Nostos Enemy defeated, regardless of floor, adds +6,000 gil to each player's individual reward. |
|||
*Every Notorious Monster defeated, regardless of floor, adds +1 [[Job Points|Job Point]] to each player's individual reward. |
|||
*Defeating 1 Agon Halo and all its accompanying Agon Beastemen adds 1 [[File:Lu. Hide Box icon.png|26px|link=]] [[Lustreless Hide Box]] to each player's individual reward. |
|||
*Defeating 1 Mimic spawned from a chest adds 1 [[File:L. Lu. Hide Box icon.png|26px|link=]] [[Large Lustreless Hide Box]] to each player's individual reward. |
|||
**Mimics in Sheol B will exclusively use '''Hell Trap''', an enhanced version of '''Death Trap''' which also reduces players TP by 50%. |
|||
*[[Fetter|Agon Halo]]s will only appear on floors: '''1''', '''3''', '''5''', and '''6''' in Sheol B. |
|||
:*These Halos are guarded by [[Antica]], [[Sahagin]], and [[Tonberry]] beastmen. |
|||
:*Floor 6 Agon Beastmen in Sheol A and all Angon Beastmen in Sheol C may contain '''Beastmen Leader''' type variants in their groups. |
|||
::*These Beastmen Leaders on floor 6 will have access to their appropriate [[SP Abilities]]. |
|||
===Translocator Locations=== |
|||
*3 '''Translocators''' are located in Sheol B. Once registered by examining one, you may warp between them at any point. |
|||
:*This is not lost or reset when an Odyssey is completed, and may be used to gain access to the Otherworldly Vortex to unlock personal rewards faster. For example, it is quicker to warp to Floor 6 then run back down to Floor 5, vs starting at the very bottom Floor 5 and having to run up all 6 flights of stairs to access the Otherworldly Vortex. |
|||
::*'''You are unable to use the Translocators if anyone in your party currently has aggro'''. |
|||
:[[File:Translocator.png|22px|link=]] '''#1:''' Near the start on the first floor |
|||
:[[File:Translocator.png|22px|link=]] '''#2:''' On the third floor, south of where you start, hug the right wall. |
|||
:[[File:Translocator.png|22px|link=]] '''#3:''' On the sixth floor, north of where you start, hug the right wall. |
|||
===Sheol B Maps=== |
|||
{{imgpop|[[File:Sheol_B_Perdition_B-1_Map.png|128px]]|Sheol_B_Perdition_B-1_Map.png|width=512px}} |
|||
{{imgpop|[[File:Sheol_B_Perdition_B-2_Map.png|128px]]|Sheol_B_Perdition_B-2_Map.png|width=512px}} |
|||
{{imgpop|[[File:Sheol_B_Perdition_B-3_Map.png|128px]]|Sheol_B_Perdition_B-3_Map.png|width=512px}} |
|||
{{imgpop|[[File:Sheol_B_Perdition_B-4_Map.png|128px]]|Sheol_B_Perdition_B-4_Map.png|width=512px}} |
|||
{{imgpop|[[File:Sheol_B_Perdition_B-5_Map.png|128px]]|Sheol_B_Perdition_B-5_Map.png|width=512px}} |
|||
{{imgpop|[[File:Sheol_B_Perdition_B-6_Map.png|128px]]|Sheol_B_Perdition_B-6_Map.png|width=512px}} |
|||
<p>The following are additionally marked up maps that visualize the placing of mobs, halos and roughly that of chests.<br> |
|||
The actual positions of mob ''types'', halos, chests and junctions are randomized on entry! Do not use these maps to try to locate chests and/or NMs</p> |
|||
<!--It was agreed that the "information" of former maps should be conserved.--> |
|||
<!--These were also redrawn to fit with the new set of maps and a request to the former uploader has been sent to replace these.--> |
|||
{{imgpop|[[File:Sheol B Map F1.png|64px]]|Sheol B Map F1.png|width=320px}} |
|||
{{imgpop|[[File:Sheol B Map F2.png|64px]]|Sheol B Map F2.png|width=320px}} |
|||
{{imgpop|[[File:Sheol B Map F3.png|64px]]|Sheol B Map F3.png|width=320px}} |
|||
{{imgpop|[[File:Sheol B Map F4.png|64px]]|Sheol B Map F4.png|width=320px}} |
|||
{{imgpop|[[File:Sheol B Map F5.png|64px]]|Sheol B Map F5.png|width=320px}} |
|||
{{imgpop|[[File:Sheol B Map F6.png|64px]]|Sheol B Map F6.png|width=320px}} |
|||
===Sheol B Notorious Monsters=== |
|||
Various Notorious Monsters may be spawned by trading [[UCNM Materials]] to various '''''Ethereal Junctions''''' within the instance.<br />Each possess a -37.5% resistance. Which is of the same type as their family for the zone.<br /> |
|||
All Sheol B NMs will spawn adds on the use of their SP. While the adds are alive, the NM possesses the listed aura. Defeating the adds removes the aura. |
|||
{| class="R-Highlight-Purple sortable C1-Bold odyssey" cellpadding=4 style="text-align: center; width: 100%; max-width:720px; border-collapse: collapse" |
|||
|- style="backr: white" |
|||
! Notorious Monster |
|||
! Family |
! Family |
||
! UCNM Pop Item |
! UCNM Pop Item |
||
! SP Ability |
! SP Ability |
||
! |
! Aura |
||
|- |
|||
|- style="background: #B592B5" |
|||
|[[Akidu]] |
|[[Akidu]] |
||
| [[Fly]] |
|||
|[[file:Vermillion's Wing icon.png|22px|link=Vermillion's Wing]] [[Vermillion Fishfly's Wing]] |
|[[file:Vermillion's Wing icon.png|22px|link=Vermillion's Wing]] [[Vermillion Fishfly's Wing]] |
||
| [[Mighty Strikes]] |
|||
|Defense Up |
|Defense Up |
||
|- |
|||
|- style="background: #B592B5" |
|||
|[[Allergorhai]] |
|[[Allergorhai]] |
||
| [[Worm]] |
|||
|[[file:Specter's Ore icon.png|22px|link=Specter's Ore]] [[Chunk Of Specter's Ore]] |
|[[file:Specter's Ore icon.png|22px|link=Specter's Ore]] [[Chunk Of Specter's Ore]] |
||
| [[Perfect Dodge]] |
|||
|Defense Up |
|Defense Up |
||
|- |
|||
|- style="background: #B592B5" |
|||
|[[Apollinaris VII-II]] |
|[[Apollinaris VII-II]] |
||
| [[Antica]] |
|||
|[[file:Centurio's Armor icon.png|22px|link=Centurio's Armor]] [[Centurio's Armor]] |
|[[file:Centurio's Armor icon.png|22px|link=Centurio's Armor]] [[Centurio's Armor]] |
||
| [[Manafont]] |
|||
|Defense Up |
|Defense Up |
||
|- |
|||
|- style="background: #B592B5" |
|||
|[[Azdaha]] |
|[[Azdaha]] |
||
| [[:Category:Wyvern|Wyvern]] |
|||
|[[file:Coca's Wing icon.png|22px|link=Coca's Wing]] [[Coca's Wing]] |
|[[file:Coca's Wing icon.png|22px|link=Coca's Wing]] [[Coca's Wing]] |
||
| [[Perfect Dodge]] |
|||
| Regain |
|||
|[[???]] |
|||
|- |
|||
|- style="background: #B592B5" |
|||
|[[Bendigeidfran]] |
|[[Bendigeidfran]] |
||
| [[Golem]] |
|||
|[[file:Largantua's Shard icon.png|22px|link=Largantua's Shard]] [[Largantua's Shard]] |
|[[file:Largantua's Shard icon.png|22px|link=Largantua's Shard]] [[Largantua's Shard]] |
||
| [[Blood Weapon]] |
|||
|Magic Absorption |
|Magic Absorption |
||
|- |
|||
|- style="background: #B592B5" |
|||
|[[Bes]] |
|[[Bes]] |
||
| [[:Category:Hecteyes|Hecteyes]] |
|||
|[[file:Azrael's Eye icon.png|22px|link=Azrael's Eye]] [[Azrael's Eye]] |
|[[file:Azrael's Eye icon.png|22px|link=Azrael's Eye]] [[Azrael's Eye]] |
||
| [[Chainspell]] |
|||
|Defense Up |
|Defense Up |
||
|- |
|||
|- style="background: #B592B5" |
|||
|[[Chelamma]] |
|[[Chelamma]] |
||
| [[Scorpion]] |
|||
|[[file:Mephitas's Claw icon.png|22px|link=Mephitas's Claw]] [[Mephitas's Claw]] |
|[[file:Mephitas's Claw icon.png|22px|link=Mephitas's Claw]] [[Mephitas's Claw]] |
||
| [[Blood Weapon]] |
|||
|Defense Up |
|Defense Up |
||
|- |
|||
|- style="background: #B592B5" |
|||
|[[Chnubis]] |
|[[Chnubis]] |
||
| [[Manticore]] |
|||
|[[file:Glazemane's Fang icon.png|22px|link=Glazemane's Fang]] [[Glazemane's Fang]] |
|[[file:Glazemane's Fang icon.png|22px|link=Glazemane's Fang]] [[Glazemane's Fang]] |
||
| [[Invincible]] |
|||
|Attack Up |
|Attack Up |
||
|- |
|||
|- style="background: #B592B5" |
|||
|[[Count Malefis]] |
|[[Count Malefis]] |
||
| [[Vampyr]] |
|||
|[[file:Vidmapire's Claw icon.png|22px|link=Vidmapire's Claw]] [[Vidmapire's Claw]] |
|[[file:Vidmapire's Claw icon.png|22px|link=Vidmapire's Claw]] [[Vidmapire's Claw]] |
||
| [[Blood Weapon]] |
|||
|Regen |
|Regen |
||
|- |
|||
|- style="background: #B592B5" |
|||
|[[Fleet-footed Lokberry]] |
|[[Fleet-footed Lokberry]] |
||
| [[Tonberry]] |
|||
|[[file:Clawberry's Coat icon.png|22px|link=Clawberry's Coat]] [[Clawberry's Coat]] |
|[[file:Clawberry's Coat icon.png|22px|link=Clawberry's Coat]] [[Clawberry's Coat]] |
||
| [[Astral Flow]] |
|||
| {{question}} |
|||
|[[???]] |
|||
|- |
|||
|- style="background: #B592B5" |
|||
|[[Fornax]] |
|[[Fornax]] |
||
| [[:Category:Cluster|Cluster]] |
|||
|[[file:V. Cluster's Ash icon.png|22px|link=V. Cluster's Ash]] [[Pinch of Volatile Cluster's Ash]] |
|[[file:V. Cluster's Ash icon.png|22px|link=V. Cluster's Ash]] [[Pinch of Volatile Cluster's Ash|Volatile Cluster's Ash]] |
||
| [[Blood Weapon]] |
|||
|Magic Absorption |
|Magic Absorption |
||
|- |
|||
|- style="background: #B592B5" |
|||
|[[Gandji]] |
|[[Gandji]] |
||
| [[Greater Bird]] |
|||
|[[file:Arke's Wing icon.png|22px|link=Arke's Wing]] [[Arke's Wing]] |
|[[file:Arke's Wing icon.png|22px|link=Arke's Wing]] [[Arke's Wing]] |
||
| [[Mighty Strikes]] |
|||
|Attack Up |
|Attack Up |
||
|- |
|||
|- style="background: #B592B5" |
|||
|[[Gravehaunter]] |
|[[Gravehaunter]] |
||
| [[:Category:Corse|Corse]] |
|||
|[[file:Muut's Vestment icon.png|22px|link=Muut's Vestment]] [[Muut's Vestment]] |
|[[file:Muut's Vestment icon.png|22px|link=Muut's Vestment]] [[Muut's Vestment]] |
||
| [[Manafont]] |
|||
|Regen |
|Regen |
||
|- |
|||
|- style="background: #B592B5" |
|||
|[[Ishum]] |
|[[Ishum]] |
||
| [[:Category:Bomb|Bomb]] |
|||
|[[file:G. Grenade's Ash icon.png|22px|link=G. Grenade's Ash]] [[Pinch of Grand Grenade's Ash]] |
|[[file:G. Grenade's Ash icon.png|22px|link=G. Grenade's Ash]] [[Pinch of Grand Grenade's Ash|Grand Grenade's Ash]] |
||
| [[Perfect Dodge]] |
|||
|Magic Absorption |
|Magic Absorption |
||
|- |
|||
|- style="background: #B592B5" |
|||
|[[Kuk]] |
|[[Kuk]] |
||
| [[:Category:Dragon|Dark Dragon]] |
|||
|[[file:Beist's Blood icon.png|22px|link=Beist's Blood]] [[Beist's Blood]] |
|[[file:Beist's Blood icon.png|22px|link=Beist's Blood]] [[Beist's Blood]] |
||
| [[Mighty Strikes]] |
|||
| Regain |
|||
|[[???]] |
|||
|- |
|||
|- style="background: #B592B5" |
|||
|[[Langmeidong]] |
|[[Langmeidong]] |
||
| [[Greater Bird]] |
|||
|[[file:Vedrfolnir's Wing icon.png|22px|link=Vedrfolnir's Wing]] [[Vedrfolnir's Wing]] |
|[[file:Vedrfolnir's Wing icon.png|22px|link=Vedrfolnir's Wing]] [[Vedrfolnir's Wing]] |
||
| [[Perfect Dodge]] |
|||
|Attack Up |
|Attack Up |
||
|- |
|||
|- style="background: #B592B5" |
|||
|[[Man-kheper-re]] |
|[[Man-kheper-re]] |
||
| [[Beetle]] |
|||
|[[file:Jill's Spittle icon.png|22px|link=Jill's Spittle]] [[Vial Of Lumber Jill's Spittle]] |
|[[file:Jill's Spittle icon.png|22px|link=Jill's Spittle]] [[Vial Of Lumber Jill's Spittle|Lumber Jill's Spittle]] |
||
| [[Invincible]] |
|||
|Defense Up |
|Defense Up |
||
|- |
|||
|- style="background: #B592B5" |
|||
|[[Maverick Maude]] |
|[[Maverick Maude]] |
||
| [[:Category:Morbol|Morbol]] |
|||
|[[file:Celine's Vine icon.png|22px|link=Celine's Vine]] [[Celine's Vine]] |
|[[file:Celine's Vine icon.png|22px|link=Celine's Vine]] [[Celine's Vine]] |
||
| [[Mighty Strikes]] |
|||
|Defense Up |
|Defense Up |
||
|- |
|||
|- style="background: #B592B5" |
|||
|[[Nerites]] |
|[[Nerites]] |
||
| [[Crab]] |
|||
|[[file:Ayapec's Shell icon.png|22px|link=Ayapec's Shell]] [[Ayapec's Shell]] |
|[[file:Ayapec's Shell icon.png|22px|link=Ayapec's Shell]] [[Ayapec's Shell]] |
||
| [[Hundred Fists]] |
|||
|Regen |
|Regen |
||
|- |
|||
|- style="background: #B592B5" |
|||
|[[Ptesan Wi]] |
|[[Ptesan Wi]] |
||
| [[:Category:Buffalo|Buffalo]] |
|||
|[[file:Camahueto's Fur icon.png|22px|link=Camahueto's Fur]] [[Camahueto's Fur]] |
|[[file:Camahueto's Fur icon.png|22px|link=Camahueto's Fur]] [[Camahueto's Fur]] |
||
| [[Mighty Strikes]] |
|||
|Attack Up |
|Attack Up |
||
|- |
|||
|- style="background: #B592B5" |
|||
|[[Shara]] |
|[[Shara]] |
||
| [[Evil Weapon]] |
|||
|[[file:Douma's Shard icon.png|22px|link=Douma's Shard]] [[Douma's Shard]] |
|[[file:Douma's Shard icon.png|22px|link=Douma's Shard]] [[Douma's Shard]] |
||
| [[Hundred Fists]] |
|||
|Magic Absorption |
|Magic Absorption |
||
|- |
|||
|- style="background: #B592B5" |
|||
|[[Simir]] |
|[[Simir]] |
||
| [[:Category:Colibri|Colibri]] |
|||
|[[file:Mhuufya's Beak icon.png|22px|link=Mhuufya's Beak]] [[Mhuufya's Beak]] |
|[[file:Mhuufya's Beak icon.png|22px|link=Mhuufya's Beak]] [[Mhuufya's Beak]] |
||
| [[Perfect Dodge]] |
|||
|Attack Up |
|Attack Up |
||
|- |
|||
|- style="background: #B592B5" |
|||
|[[Spyrysyon]] |
|[[Spyrysyon]] |
||
| [[Fomor]] |
|||
|[[file:Ethereal Incense icon.png|22px|link=Ethereal Incense]] [[Ethereal Incense]] |
|[[file:Ethereal Incense icon.png|22px|link=Ethereal Incense]] [[Ethereal Incense]] |
||
| [[Invincible]] |
|||
|Regen |
|Regen |
||
|- |
|||
|- style="background: #B592B5" |
|||
|[[Tabitjet]] |
|[[Tabitjet]] |
||
| [[Scorpion]] |
|||
|[[file:Uropygid's Needle icon.png|22px|link=Uropygid's Needle]] [[Uropygid's Needle]] |
|[[file:Uropygid's Needle icon.png|22px|link=Uropygid's Needle]] [[Uropygid's Needle]] |
||
| [[Mighty Strikes]] |
|||
|Defense Up |
|Defense Up |
||
|- |
|||
|- style="background: #B592B5" |
|||
|[[Taniwha]] |
|[[Taniwha]] |
||
| [[:Category:Sea Monk|Sea Monk]] |
|||
|[[file:Bakunawa's Ink icon.png|22px|link=Bakunawa's Ink]] [[Bakunawa's Ink]] |
|[[file:Bakunawa's Ink icon.png|22px|link=Bakunawa's Ink]] [[Bakunawa's Ink]] |
||
| [[Hundred Fists]] |
|||
|Regen |
|Regen |
||
|- |
|||
|- style="background: #B592B5" |
|||
|[[Tripix]] |
|[[Tripix]] |
||
| [[Goblin]] |
|||
|[[file:Bambrox's Shawl icon.png|22px|link=Bambrox's Shawl]] [[Bambrox's Shawl]] |
|[[file:Bambrox's Shawl icon.png|22px|link=Bambrox's Shawl]] [[Bambrox's Shawl]] |
||
| [[Eagle Eye Shot]] |
|||
|Attack Up |
|Attack Up |
||
|- |
|||
|- style="background: #B592B5" |
|||
|[[Zacatzontli]] |
|[[Zacatzontli]] |
||
| [[Greater Bird]] |
|||
|[[file:Strix's Tailfeather icon.png|22px|link=Strix's Tailfeather]] [[Strix's Tailfeather]] |
|[[file:Strix's Tailfeather icon.png|22px|link=Strix's Tailfeather]] [[Strix's Tailfeather]] |
||
| [[Benediction]] |
|||
|Attack Up |
|Attack Up |
||
|} |
|||
|} |
|||
|} |
|} |
||
===Sheol B Floor Statistics=== |
|||
===Translocator Locations=== |
|||
{| class="R-Highlight-Purple C1-Bold odyssey" cellpadding=4 style="text-align: center; width: 100%; max-width:700px; border-collapse: collapse" |
|||
*3 '''Translocators''' are located in Sheol B. Once registered by examining one, you may warp between them at any point. |
|||
|- style="backr: white" |
|||
:*This is not lost or reset when an Odyssey is completed, and may be used to gain access to the Otherworldly Portal to unlock personal rewards faster. For example, it is quicker to warp to Floor 6 then run back down to Floor 5, vs starting at the very bottom Floor 5 and having to run up all 6 flights of stairs to access the Otherworldly Portal. |
|||
! Floor |
|||
::*'''You are unable to use the Translocators if anyone in your party currently has aggro'''. |
|||
! Foe Level |
|||
:[[File:Translocator.png|22px|link=]] '''#1:''' Near the start on the first floor |
|||
! NM Level |
|||
:[[File:Translocator.png|22px|link=]] '''#2:''' On the third floor, south of where you start, hug the right wall. |
|||
! Mimic Level |
|||
:[[File:Translocator.png|22px|link=]] '''#3:''' On the sixth floor, north of where you start, hug the right wall. |
|||
! NM Pop Items Required |
|||
{|class="BorderlessStandard R1-White overflow-visible" style="background: #b592b5; max-width:800px;" |
|||
! Segments Per Kill |
|||
|- style="background: #3a1d23" |
|||
|- |
|||
!style="text-align:center;"| |
|||
| 1 |
|||
==={{color|white|style=normal|Sheol B Maps}}=== |
|||
| 124 |
|||
|- |
|||
| 127 |
|||
| |
|||
| 129 |
|||
<span class="mbt-hover">[[File:Sheol B Map F1.png|100px]]<span class="mbt-tooltip">[[File:Sheol B Map F1.png|500px|link=]]</span></span> |
|||
<span class="mbt-hover">[[File:Sheol B Map F2.png|100px]]<span class="mbt-tooltip">[[File:Sheol B Map F2.png|500px|link=]]</span></span> |
|||
<span class="mbt-hover">[[File:Sheol B Map F3.png|100px]]<span class="mbt-tooltip">[[File:Sheol B Map F3.png|500px|link=]]</span></span> |
|||
<span class="mbt-hover">[[File:Sheol B Map F4.png|100px]]<span class="mbt-tooltip">[[File:Sheol B Map F4.png|500px|link=]]</span></span> |
|||
<span class="mbt-hover">[[File:Sheol B Map F5.png|100px]]<span class="mbt-tooltip">[[File:Sheol B Map F5.png|500px|link=]]</span></span> |
|||
<span class="mbt-hover">[[File:Sheol B Map F6.png|100px]]<span class="mbt-tooltip">[[File:Sheol B Map F6.png|500px|link=]]</span></span> |
|||
|} |
|||
==Sheol C== |
|||
:'''Primary Reward''': {{ItemIcon|Lustreless Wing|26}} [[Lustreless Wing]]. |
|||
*'''Note''': Players must have completed the Records of Eminence objective; Content → Odyssey → Sheol B in order to enter Sheol C |
|||
{|style="padding-left:20px;" |
|||
| |
|||
{|class="BorderlessStandard R1-White" style="background: #A379A3; max-width:800px;" |
|||
|- style="background: #3a1d23" |
|||
!style="text-align:center;"| |
|||
{{color|white|style=normal|Sheol C Floor Statistics}} |
|||
|- |
|||
| |
|||
|- style="background: #B592B5" |
|||
| |
|||
{| class="R-Highlight-Purple C1-Bold" style="text-align: center; max-width:800px;" |
|||
|- style="background: #956595" |
|||
! style="padding: 3px;"| Floor |
|||
! style="padding: 3px;"| Foe Level |
|||
! style="padding: 3px;"| NM Level |
|||
! style="padding: 3px;"| Mimic Level |
|||
! style="padding: 3px;"| UCNM Pop Items Required |
|||
|- style="background: #B592B5" |
|||
| 1 |
| 1 |
||
| 13 |
|||
| style="background: #C0A2C0"| {{Information Needed}} |
|||
|- |
|||
| {{Information Needed}} |
|||
| style="background: #C0A2C0"| {{Information Needed}} |
|||
| {{Information Needed}} |
|||
|- style="background: #B592B5" |
|||
| 2 |
| 2 |
||
| 126 |
|||
| style="background: #C0A2C0"| {{Information Needed}} |
|||
| 129 |
|||
| {{Information Needed}} |
|||
| 131 |
|||
| style="background: #C0A2C0"| {{Information Needed}} |
|||
| {{Information Needed}} |
|||
|- style="background: #B592B5" |
|||
| 3 |
| 3 |
||
| 15 |
|||
| style="background: #C0A2C0"| {{Information Needed}} |
|||
|- |
|||
| {{Information Needed}} |
|||
| 3 |
|||
| style="background: #C0A2C0"| {{Information Needed}} |
|||
| 128 |
|||
| {{Information Needed}} |
|||
| 131 |
|||
|- style="background: #B592B5" |
|||
| 133 |
|||
| 5 |
|||
| 17 |
|||
|- |
|||
| 4 |
| 4 |
||
| 130 |
|||
| style="background: #C0A2C0"| {{Information Needed}} |
|||
| 133 |
|||
| {{Information Needed}} |
|||
| 135 |
|||
| style="background: #C0A2C0"| {{Information Needed}} |
|||
| 10 |
|||
| {{Information Needed}} |
|||
| |
| 19 |
||
|- |
|||
| 5 |
|||
| 132 |
|||
| 135 |
|||
| 137 |
|||
| 15 |
|||
| 21 |
|||
|- |
|||
| 6 |
|||
| 134 |
|||
| 137 |
|||
| 139 |
|||
| 20 |
|||
| 23 |
|||
|} |
|} |
||
==Sheol C== |
|||
'''The requirements to enter are as follows:''' |
|||
*Players must have completed the [[:Category:Records_of_Eminence#Content_.28Odyssey.29|Records of Eminence Objective]]; Content → Odyssey → Sheol B. |
|||
*The time limit is '''30 minutes''' per entry. This cannot be increased. |
|||
:*Running out of time will eject all party members. |
|||
:*Using the {{Tmp}} [[Moglophone]] temporary item will allow you to leave the instance before time expires. |
|||
{| style="width: 100%; max-width: 600px;" |
|||
| style="border:2px dashed #FFA99F; line-height:10x; padding:2px;" | |
|||
:'''Unique Sheol C Adjustments''' |
|||
'''Notorious Monsters (including Mimics):''' |
|||
*Offensive [[Indicolure]] effects are reduced by: -95%. {{Verification}} |
|||
'''All Sheol C Monsters:''' |
|||
*AoE offensive spells and damage to secondary targets are reduced by: -90%. {{Verification}} |
|||
*All monsters have a particular -50% resistance to a specific damage type, and NMs a 62.5% see table below. |
|||
:*These resistances are not defined by typical family values. |
|||
::*For instance, Crabs and Pugil aren't ordinarily slashing resistant. |
|||
|- |
|||
|} |
|} |
||
===Main objective=== |
|||
*Reaching the [[Veridical Conflux|Otherworldly Portal]] on level {{Question}} will complete the Odyssey. |
|||
*At the "end" of a floor, there is a [[Veridical Conflux]]; examining it warps you to the next higher floor and increases the foes' level by +2. |
|||
<onlyinclude>{{#ifeq:{{{transcludesection|Sheol C}}}|Sheol C| {{{!}} class="R-Highlight-Purple odyssey" cellpadding=4 style="text-align: center; width: 100%; max-width:700px; border-collapse: collapse" |
|||
===Additional Objectives=== |
|||
{{!}}- style="color: white" |
|||
*Complete the [[:Category:Records_of_Eminence#Content_.28Odyssey.29|Records of Eminence Objective]], Content → Odysssey → Sheol C |
|||
! colspan="9" {{!}} Sheol C Monster Resistances |
|||
:This is a one time objective. |
|||
{{!}}- |
|||
! colspan="9" {{!}} -50% {{Slashing}} Slashing Damage |
|||
{{!}}- |
|||
{{!}} '''''Aquan''''' |
|||
{{!}} Crab |
|||
{{!}} {{Icon|Yes}} |
|||
{{!}} Pugil |
|||
{{!}} {{Icon|Yes}} |
|||
{{!}} colspan="4" {{!}} |
|||
{{!}}- |
|||
{{!}} '''''Undead''''' |
|||
{{!}} Skeleton |
|||
{{!}} {{Icon|No}} |
|||
{{!}} Ghost |
|||
{{!}} {{Icon|No}} |
|||
{{!}} Qutrub |
|||
{{!}} {{Icon|No}} |
|||
{{!}} colspan="2" {{!}} |
|||
{{!}}- |
|||
! colspan="9" {{!}} -50% {{Blunt}} Blunt Damage |
|||
{{!}}- |
|||
{{!}} '''''Lizard''''' |
|||
{{!}} Raptor |
|||
{{!}} {{Icon|Yes}} |
|||
{{!}} Bugard |
|||
{{!}} {{Icon|Yes}} |
|||
{{!}} colspan="4" {{!}} |
|||
{{!}}- |
|||
{{!}} rowspan="2" {{!}} '''''Bird''''' |
|||
{{!}} Lesser Bird |
|||
{{!}} {{Icon|Yes}} |
|||
{{!}} Bat |
|||
{{!}} {{Icon|No}} |
|||
{{!}} Cockatrice |
|||
{{!}} {{Icon|Yes}} |
|||
{{!}} Roc |
|||
{{!}} {{Icon|No}} |
|||
{{!}}- |
|||
{{!}} Colibri |
|||
{{!}} {{Icon|Yes}} |
|||
{{!}} Apkallu |
|||
{{!}} {{Icon|Yes}} |
|||
{{!}} colspan="4" {{!}} |
|||
{{!}}- |
|||
{{!}} '''''Dragon''''' |
|||
{{!}} Dahak |
|||
{{!}} {{Icon|No}} |
|||
{{!}} Wyvern |
|||
{{!}} {{Icon|Yes}} |
|||
{{!}} Puk |
|||
{{!}} {{Icon|Yes}} |
|||
{{!}} colspan="2" {{!}} |
|||
{{!}}- |
|||
! colspan="9" {{!}} -50% {{Piercing}} Piercing Damage |
|||
{{!}}- |
|||
{{!}} rowspan="2" {{!}} '''''Beast''''' |
|||
{{!}} Rabbit |
|||
{{!}} {{Icon|Yes}} |
|||
{{!}} Sheep |
|||
{{!}} {{Icon|Yes}} |
|||
{{!}} Ram |
|||
{{!}} {{Icon|No}} |
|||
{{!}} Tiger |
|||
{{!}} {{Icon|No}} |
|||
{{!}}- |
|||
{{!}} Coeurl |
|||
{{!}} {{Icon|Yes}} |
|||
{{!}} Manticore |
|||
{{!}} {{Icon|No}} |
|||
{{!}} Marid |
|||
{{!}} {{Icon|Yes}} |
|||
{{!}} colspan="2" {{!}} |
|||
{{!}}- |
|||
{{!}} '''''Arcana''''' |
|||
{{!}} Bomb Cluster |
|||
{{!}} {{Icon|No}} |
|||
{{!}} Weapons |
|||
{{!}} {{Icon|No}} |
|||
{{!}} colspan="4" {{!}} |
|||
{{!}}- |
|||
{{!}} '''''Demon''''' |
|||
{{!}} Imp |
|||
{{!}} {{Icon|No}} |
|||
{{!}} Soulflayer |
|||
{{!}} {{Icon|No}} |
|||
{{!}} colspan="4" {{!}} |
|||
{{!}}- |
|||
{{!}} '''''Amorph''''' |
|||
{{!}} Worm |
|||
{{!}} {{Icon|No}} |
|||
{{!}} Leech |
|||
{{!}} {{Icon|No}} |
|||
{{!}} Slime |
|||
{{!}} {{Icon|No}} |
|||
{{!}} Flan |
|||
{{!}} {{Icon|No}} |
|||
{{!}}- |
|||
! colspan="9" {{!}} -50% {{Magic}} Magical Damage |
|||
{{!}}- |
|||
{{!}} rowspan="2" {{!}} '''''Plantoid''''' |
|||
{{!}} Funguar |
|||
{{!}} {{Icon|No}} |
|||
{{!}} Treant |
|||
{{!}} {{Icon|Yes}} |
|||
{{!}} Sapling |
|||
{{!}} {{Icon|Yes}} |
|||
{{!}} Mandragora |
|||
{{!}} {{Icon|Yes}} |
|||
{{!}}- |
|||
{{!}} Goobbue |
|||
{{!}} {{Icon|Yes}} |
|||
{{!}} Morbol |
|||
{{!}} {{Icon|No}} |
|||
{{!}} Flytrap |
|||
{{!}} {{Icon|Yes}} |
|||
{{!}} colspan="2" {{!}} |
|||
{{!}}- |
|||
{{!}} rowspan="2" {{!}} '''''Vermin''''' |
|||
{{!}} Bee |
|||
{{!}} {{Icon|Yes}} |
|||
{{!}} Chigoe |
|||
{{!}} {{Icon|No}} |
|||
{{!}} Crawler |
|||
{{!}} {{Icon|Yes}} |
|||
{{!}} Fly |
|||
{{!}} {{Icon|Yes}} |
|||
{{!}}- |
|||
{{!}} Scorpion |
|||
{{!}} {{Icon|No}} |
|||
{{!}} Spider |
|||
{{!}} {{Icon|No}} |
|||
{{!}} Diremite |
|||
{{!}} {{Icon|No}} |
|||
{{!}} Wamouras |
|||
{{!}} {{Icon|Yes}} |
|||
{{!}}- |
|||
{{!}} colspan="9" {{!}} Susceptible to [[Cruel Joke|<span style="color: black;">'''Cruel Joke'''</span>]] {{Icon|Yes}} or {{Icon|No}} |
|||
{{!}}- style="color: white" |
|||
! colspan="9"{{!}} Beastmen Resistances |
|||
{{!}}- |
|||
{{!}} '''Lamiae''' |
|||
{{!}} colspan="2" {{!}} -62.5% {{Slashing}} '''Slashing''' |
|||
{{!}} colspan="2" {{!}} -62.5% {{Breath}} Breath |
|||
{{!}} colspan="2" {{!}} -12.5% {{Magical}} '''Magic''' |
|||
{{!}} colspan="2" {{!}} |
|||
{{!}}- |
|||
{{!}} '''Mamool Ja''' |
|||
{{!}} colspan="2" {{!}} -62.5% {{Piercing}} '''Piercing''' |
|||
{{!}} colspan="2" {{!}} -12.5% {{Breath}} Breath |
|||
{{!}} colspan="2" {{!}} -12.5% {{Slashing}} '''Slashing''' |
|||
{{!}} colspan="2" {{!}} |
|||
{{!}}- |
|||
{{!}} '''Trolls''' |
|||
{{!}} colspan="2" {{!}} -62.5% {{Blunt}} '''Blunt''' |
|||
{{!}} colspan="2" {{!}} -62.5% {{Breath}} Breath |
|||
{{!}} colspan="2" {{!}} -12.5% {{Piercing}} '''Piercing''' |
|||
{{!}} colspan="2" {{!}} |
|||
{{!}}} }}</onlyinclude> |
|||
*[[Veridical Conflux|Otherworldly Vortex]] location: Floor 4. |
|||
:*Examining it will complete the [[:Category:Records_of_Eminence#Content_.28Odyssey.29|Records of Eminence Objective]], Content → Odyssey → Sheol C. |
|||
::*This is a one time objective and will unlock Sheol - Gaol. |
|||
*All Nostos enemies in Sheol C have a chance to drop {{ItemIcon|Lustreless Wing|26}} [[Lustreless Wing]]s. |
|||
:*Higher level enemies on higher floors have a higher drop rate. |
|||
:*[[Treasure Hunter]] increases the drop rate of Lustreless items up to a max of 3 Lustreless items dropped per Nostos mob. |
|||
:*See the [[Unity Rewards]] page to see which armor pieces they are used to upgrade, and for further details. |
|||
*The HP of foes depends on their level, which increases with each level climbed. Sheol C mob HP: ~60,000 to ~{{Information Needed}}. |
|||
:*Each Nostos Enemy defeated in Sheol C will grant 25 [[Moogle Segments]] starting on the first floor, and scaling up 2 segments per floor up to 31 [[Moogle Segments]] per Nostos Mob defeated on the last (4th) floor. |
|||
::*Each successfully opened Chest will grant 100 [[Moogle Segments]] regardless of Floor. Coffers will grant 150 [[Moogle Segments]] and Aurum Strongboxes will grant 200. |
|||
*Every Nostos Enemy defeated, regardless of floor, adds +7,000 gil to each player's individual reward. |
|||
*Every Nostos Enemy defeated will grant 25 [[Moogle Segments]] to all players starting on Floor 1, and scaling by 2 pts per floor up to 31 [[Moogle Segments]] per enemy defeated on the top floor. |
|||
*Every Notorious Monster defeated, regardless of floor, adds +1 [[Job Points|Job Point]] to each player's individual reward. |
|||
*Defeating 1 Agon Halo and all its accompanying Agon Beastemen adds 1 [[File:L. Wing Box icon.png|26px|link=]] [[Lustreless Wing Box]] to each player's individual reward. |
|||
*Defeating 1 Mimic spawned from a chest adds 1 [[File:L. Lu. Wing Box icon.png|26px|link=]] [[Large Lustreless Wing Box]] to each player's individual reward. |
|||
**Mimics in Sheol C will exclusively use '''Hell Trap''', an enhanced version of '''Death Trap''' which also reduces players TP by 50%. |
|||
*[[Fetter|Agon Halo]]s appear on every floor in Sheol C. |
|||
:*These Halos are guarded by [[Lamia]], [[Troll]], and [[Mamool Ja]] beastmen. |
|||
:*All Angon Beastmen Leaders in Sheol C on floor 4 will have access to their appropriate [[SP Abilities]]. |
|||
===Translocator Locations=== |
|||
*2 '''Translocators''' are located in Sheol C. Once registered by examining one, you may warp between them at any point. |
|||
:*This is not lost or reset when an Odyssey is completed. |
|||
::*'''You are unable to use the Translocators if anyone in your party currently has aggro'''. |
|||
:[[File:Translocator.png|22px|link=]] '''#1:''' Near the start on the first floor |
|||
:[[File:Translocator.png|22px|link=]] '''#2:''' On the second floor, east then north of where you start, hug the left wall up the stairs. |
|||
===Sheol C Maps=== |
|||
{{imgpop|[[File:Sheol_C_Perdition_C-1_Map.png|128px]]|Sheol_C_Perdition_C-1_Map.png|width=512px}} |
|||
{{imgpop|[[File:Sheol_C_Perdition_C-2_Map.png|128px]]|Sheol_C_Perdition_C-2_Map.png|width=512px}} |
|||
{{imgpop|[[File:Sheol_C_Perdition_C-3_Map.png|128px]]|Sheol_C_Perdition_C-3_Map.png|width=512px}} |
|||
{{imgpop|[[File:Sheol_C_Perdition_C-4_Map.png|128px]]|Sheol_C_Perdition_C-4_Map.png|width=512px}} |
|||
===Sheol C Notorious Monsters=== |
|||
Various Notorious Monsters may be spawned by trading [[UCNM Materials]] to various '''''Ethereal Junctions''''' within the instance. |
Various Notorious Monsters may be spawned by trading [[UCNM Materials]] to various '''''Ethereal Junctions''''' within the instance. |
||
{|style="padding-left:20px;" |
|||
| |
|||
{|class="BorderlessStandard R1-White" style="background: #A379A3; width: 100%; max-width:800px;" |
|||
|- style="background: #3a1d23" |
|||
!style="text-align:center;"| |
|||
Sheol C NMs reset enmity upon the use of their listed SP and when they Level Up. |
|||
===={{color|white|style=normal|Sheol C Notorious Monsters}}==== |
|||
*Level ups occur starting every 60-100 seconds after the SP usage, up to ten times. |
|||
|- |
|||
{| class="R-Highlight-Purple sortable C1-Bold odyssey" cellpadding=4 style="text-align: center; width: 100%; max-width:700px; border-collapse: collapse" |
|||
| |
|||
|- style="color: white" |
|||
{| class="R-Highlight-Purple sortable C1-Bold" style="text-align: center;" width="100%" |
|||
! Notorious Monster |
|||
|- style="background: #956595" |
|||
! Family |
|||
!Notorious Monster |
|||
! UCNM Pop Item |
|||
!Family |
|||
! SP Ability |
|||
!UCNM Pop Item(s) |
|||
! Resists |
|||
!SP Ability |
|||
|- |
|||
!Aura |
|||
|- style="background: #B592B5" |
|||
|[[Asena]] |
|[[Asena]] |
||
| |
| | [[Cerberus]] |
||
|[[file:Sarama's Hide icon.png|22px|link=Sarama's Hide]] [[Sarama's Hide]] |
|[[file:Sarama's Hide icon.png|22px|link=Sarama's Hide]] [[Sarama's Hide]] |
||
| |
| | [[Hundred Fists]] |
||
|{{ |
| {{Piercing}} |
||
|- |
|||
|- style="background: #B592B5" |
|||
|[[Bygul]] |
|[[Bygul]] |
||
| |
| | [[:Category:Khimaira|Khimaira]] |
||
|[[file:Shedu's Mane icon.png|22px|link=Shedu's Mane]] [[Shedu's Mane]] |
|[[file:Shedu's Mane icon.png|22px|link=Shedu's Mane]] [[Shedu's Mane]] |
||
| |
| | [[Perfect Dodge]] |
||
|{{ |
|{{Piercing}} |
||
|- |
|||
|- style="background: #B592B5" |
|||
|[[Chaos Steward]] |
|[[Chaos Steward]] |
||
| |
| | [[:Category:Dvergr|Dvergr]] |
||
|[[file:Tumult's Blood icon.png|22px|link=Tumult's Blood]] [[Tumult's Blood]] |
|[[file:Tumult's Blood icon.png|22px|link=Tumult's Blood]] [[Tumult's Blood]] |
||
| |
| | [[Manafont]] |
||
|{{ |
|{{Piercing}} |
||
|- |
|||
|- style="background: #B592B5" |
|||
|[[Dabbat al-Ard]] |
|[[Dabbat al-Ard]] |
||
| |
| | [[:Category:Behemoth|Behemoth]] |
||
|[[file:Sovereign's Hide icon.png|22px|link=Sovereign's Hide]] [[Sovereign's Hide]] |
|[[file:Sovereign's Hide icon.png|22px|link=Sovereign's Hide]] [[Sovereign's Hide]] |
||
| |
| | [[Hundred Fists]] |
||
|{{ |
|{{Piercing}} |
||
|- |
|||
|- style="background: #B592B5" |
|||
|[[Kurmajara]] |
|[[Kurmajara]] |
||
| |
| | [[:Category:Adamantoise|Adamantoise]] |
||
|[[file:Tolba's Shell icon.png|22px|link=Tolba's Shell]] [[Tolba's Shell]] |
|[[file:Tolba's Shell icon.png|22px|link=Tolba's Shell]] [[Tolba's Shell]] |
||
| |
| | [[Invincible]] |
||
|{{ |
|{{Slashing}} |
||
|- |
|||
|- style="background: #B592B5" |
|||
|[[Lotanu]] |
|[[Lotanu]] |
||
| |
| | [[Wyrm]] |
||
|[[file:Hidhaegg's Scale icon.png|22px|link=Hidhaegg's Scale]] [[Hidhaegg's Scale]] |
|[[file:Hidhaegg's Scale icon.png|22px|link=Hidhaegg's Scale]] [[Hidhaegg's Scale]] |
||
| |
| | [[Mighty Strikes]] |
||
|{{ |
|{{Blunt}} |
||
|- |
|||
|- style="background: #B592B5" |
|||
|[[Wayra Tata]] |
|[[Wayra Tata]] |
||
| |
| | [[Hydra]] |
||
|[[file:Thu'ban's Scale icon.png|22px|link=Thu'ban's Scale]] [[Thu'ban's Scale]] |
|[[file:Thu'ban's Scale icon.png|22px|link=Thu'ban's Scale]] [[Thu'ban's Scale]] |
||
| |
| | [[Invincible]] |
||
|{{ |
|{{Blunt}} |
||
|} |
|||
|} |
|||
|} |
|} |
||
===Sheol C Floor Statistics=== |
|||
====Translocator Locations==== |
|||
{| class="R-Highlight-Purple C1-Bold odyssey" cellpadding=4 style="text-align: center; width: 100%; max-width:700px; border-collapse: collapse" |
|||
*2 '''Translocators''' are located in Sheol C. Once registered by examining one, you may warp between them at any point. |
|||
|- style="color: white" |
|||
:*This is not lost or reset when an Odyssey is completed. |
|||
! Floor |
|||
::*'''You are unable to use the Translocators if anyone in your party currently has aggro'''. |
|||
! Foe Level |
|||
:[[File:Translocator.png|22px|link=]] '''#1:''' Near the start on the first floor |
|||
! NM Level |
|||
:[[File:Translocator.png|22px|link=]] '''#2:''' On the second floor, east then north of where you start, hug the left wall up the stairs. |
|||
! Mimic Level |
|||
{|class="BorderlessStandard R1-White overflow-visible" style="background: #b592b5; max-width:800px;" |
|||
! UCNM Pop Items Required |
|||
|- style="background: #3a1d23" |
|||
! Segments Per Kill |
|||
!style="text-align:center;"| |
|||
|- |
|||
| 1 |
|||
==={{color|white|style=normal|Sheol C Maps}}=== |
|||
| | 129 |
|||
|- |
|||
| 132 |
|||
| |
|||
| | 134 |
|||
<span class="mbt-hover style="padding: 5px">[[File:Sheol C Map ALLF.jpg]]<span class="mbt-tooltip">[[File:Sheol C Map ALLF.jpg|500px|link=]]</span></span> |
|||
| 1 |
|||
<!-- UNCOMMENT WHEN BETTER MAPS ARE MADE |
|||
| | 25 |
|||
<span class="mbt-hover style="padding: 5px">[[File:Sheol C Map F1.png|100px]]<span class="mbt-tooltip">[[File:Sheol C Map F1.png|500px|link=]]</span></span> |
|||
|- |
|||
<span class="mbt-hover style="padding: 5px">[[File:Sheol C Map F2.png|100px]]<span class="mbt-tooltip">[[File:Sheol C Map F2.png|500px|link=]]</span></span> |
|||
| 2 |
|||
<span class="mbt-hover style="padding: 5px">[[File:Sheol C Map F3.png|100px]]<span class="mbt-tooltip">[[File:Sheol C Map F3.png|500px|link=]]</span></span> |
|||
| | 131 |
|||
<span class="mbt-hover style="padding: 5px">[[File:Sheol C Map F4.png|100px]]<span class="mbt-tooltip">[[File:Sheol C Map F4.png|500px|link=]]</span></span> |
|||
| 134 |
|||
--> |
|||
| | 136 |
|||
| 3 |
|||
| | 27 |
|||
|- |
|||
| 3 |
|||
| | 133 |
|||
| 136 |
|||
| | 138 |
|||
| 5 |
|||
| | 29 |
|||
|- |
|||
| 4 |
|||
| | 135 |
|||
| 138 |
|||
| | 140 |
|||
| 10 |
|||
| | 31 |
|||
|} |
|} |
||
==Sheol Gaol== |
==Sheol Gaol== |
||
'''The requirements to enter are as follows:''' |
|||
:'''Primary Reward''': Gear unlocks and upgrades based upon the NM's killed. |
|||
* |
*Players must have completed the [[:Category:Records_of_Eminence#Content_.28Odyssey.29|Records of Eminence Objective]]; Content → Odyssey → Sheol C. |
||
*All party members must have at least 3 jobs at 99 in order to enter and should have different jobs at 99 if wishing to enter as a party. |
|||
*'''Note''': Players must have 3 Moglophone IIs to enter the battlefield. |
|||
:*This means if a party of 6 players wishes to enter then they should have 18 different jobs at 99 in total between them. |
|||
*Sheol Gaol is a boss gauntlet area. Each Boss battle has a hard 15 minute time limit, with the ability to challenge up to three bosses in each entry. This results in a maximum of 45 minutes within the instance. |
|||
*Players must have 3 {{KI}} [[Moglophone II (Key Item)|Moglophone II]] to enter the battlefield. |
|||
:*By talking to the Pilgrim Moogle by examining the ??? in [[Rabao]] near the [[Veridical Conflux]] at (G-6) after clearing the ROE for Sheol C, it will mumble something about the Darkness then eventually give you 3 {{KI}} [[Moglophone II (Key Item)|Moglophone II]] Key Items for free. |
|||
:*Unlike the {{KI}} [[Moglophone (Key Item)|Moglophone]], There is no timer on obtaining a {{KI}} [[Moglophone II (Key Item)|Moglophone II]]. The only requirement is that you have the 3,000 [[Moogle Segments]] on hand in order to purchase the Key Item. |
|||
:*Subsequent Moglophone IIs will cost 3000 [[Moogle Segments]] each, purchased from the Pilgrim Moogle. |
|||
:*Each Boss attempt will exhaust 1 {{KI}} [[Moglophone II (Key Item)|Moglophone II]]. |
|||
:*As mentioned, each player needs 3 {{KI}} [[Moglophone II (Key Item)|Moglophone II]]s to ''enter'' Sheol Gaol, but you do not need to spend all three each time you enter. Leftover {{KI}} [[Moglophone II (Key Item)|Moglophone II]]s will be retained if players exit after one fight. |
|||
:**'''NOTE:''' If one player chooses to leave the area after expending a {{KI}} [[Moglophone II (Key Item)|Moglophone II]], the rest of the party will be unable to enter any further fights due to the party composition changing. |
|||
{| style="min-width: 400px; max-width: 600px;" |
|||
| style="border:2px dashed #FFA99F; line-height:10x; padding:2px;" | |
|||
:'''Unique Sheol Limitations''' |
|||
*[[Support Job]]s are restricted. |
|||
*[[Trust]] magic can be used regardless of enmity. |
|||
|} |
|||
Upon entering, players arrive into a Waiting Area with a 15 minute time limit to prepare for the various boss battles. The 15 minute Waiting Area timer starts counting down as soon as you zone in and will continue from where it stopped after you kill each boss and get sent back. |
|||
===Main objective=== |
|||
*For this reason, it is advised that you have job assignments worked out in advance with all the equipment you need already on you, so that you spend as little time as possible preparing for each boss. |
|||
*Boss Gauntlet area. |
|||
Upon defeating a boss, players are warped back to the Waiting Area (with the remainder of the 15 minute Waiting Area time limit) to change jobs and prep gear. '''The 15 minute Waiting Area timer will not reset.''' E.g. If you take 5 minutes prepping and then your party enters the battlefield killing a chosen boss, you will be sent back to the Waiting Area with 10 minutes remaining to job change and prepare for the next boss. |
|||
*Each Boss battle has a hard 15 minute time limit. |
|||
*Access is given to your main inventory and Mog Wardrobes, as well as Mog Satchel, Sack, Case, Safe and Locker, but '''not''' Mog Storage. |
|||
*Players are first entered into a Waiting Area with a 15 minute time limit to prepare for the various boss battles. The 15 minute Waiting Area timer starts counting down as soon as you zone in and will continue from where it stopped after you kill each boss and get sent back. |
|||
*'''Note: As of the May 2021 update there is now a Porter Moogle available.''' |
|||
**For this reason, it is advised that you have job assignments worked out in advance with all the equipment you need already on you, so that you spend as little time as possible preparing for each boss. |
|||
*Players cannot use the same main job used in a previous fight. Players cannot be the same job during the same fight. Sub-jobs are not available/restricted. |
|||
*Upon defeating a boss, players are warped back to the Waiting Area (with the remainder of the 15 minute Waiting Area time limit) to change jobs and prep gear. '''The 15 minute Waiting Area timer will not reset.''' E.g. If you take 5 minutes prepping and then your party enters the battlefield killing a chosen boss, you will be sent back to the Waiting Area with 10 minutes remaining to job change and prepare for the next boss. |
|||
**For example, if the setup PLD RDM COR GEO is used to fight one boss, then when you return to the waiting room, you cannot enter the next fight with any of those jobs present. |
|||
**Access is given to your main inventory and Mog Wardrobes, as well as Mog Satchel, Sack, Case, Safe and Locker, but '''not''' Mog Storage. |
|||
**A similar universal rule is applied to Trusts: Once a trust is called, they are locked out from reuse for the present or remaining two battles. |
|||
**'''Note: There is no Porter Moogle available.''' Retrieve your equipment from slip storage ''before'' entering. |
|||
***Trusts can be summoned mid-fight even if the player has enmity on the target. |
|||
**Players cannot use the same main job used in a previous fight. Players cannot be the same job during the same fight. Sub-jobs are not available/restricted. |
|||
At the opposite end of the room, there is a Veridical Conflux; examining it will warp you to the boss area. |
|||
***For example, if the setup PLD RDM COR GEO is used to fight one boss, then when you return to the waiting room, you cannot enter the next fight with any of those jobs present. |
|||
*You will need to select which NM to warp to. |
|||
***A simlar universal rule is applied to Trusts: Once a trust is call, they are locked out from reuse for the present or remaining two battles. |
|||
*For each Atonement, you do not have to kill the NMs in any particular order. |
|||
****Trusts can be summoned mid-fight even if the player has enmity on the target. |
|||
*At the opposite end of the room, there is a Veridical Conflux; examining it will warp you to the boss area. |
|||
**You will need to select which NM to warp to. |
|||
**You do not have to kill the NM's in any particular order. |
|||
===Notorious Monsters & Rewards=== |
===Notorious Monsters & Rewards=== |
||
Atonement 1 monsters can be fought immediately upon unlocking Sheol Gaol. |
Atonement 1 monsters can be fought immediately upon unlocking Sheol Gaol. |
||
{|style="padding-left:20px;" |
{|class="BorderlessStandard R1-White odyssey" style="padding-left: 20px; width: 100%; max-width: 800px;" |
||
|- style=" |
|||
| |
|||
{|class="BorderlessStandard R1-White" style="background: #A379A3; width: 100%; max-width:1200px;" |
|||
|- style="background: #3a1d23" |
|||
!style="text-align:center;"| |
!style="text-align:center;"| |
||
===={{color|white|style=normal|Atonement 1}}==== |
|||
===={{color|white|style=normal|Atonement 1 Notorious Monsters}}==== |
|||
|- |
|- |
||
| |
| |
||
{| class="R-Highlight-Purple sortable C1-Bold" style= |
{| class="R-Highlight-Purple sortable C1-Bold odyssey" style=" width:100%; max-width: 800px;" |
||
|- style= |
|- style=" |
||
! |
! style="padding: 3px; width: 15%"| Monster |
||
! style="padding: 3px; width: 15%"| Family |
|||
!Family |
|||
! Corresponding Equipment |
|||
!Adds |
|||
|- style=" |
|||
!{{KI}} Key Item |
|||
| [[Dealan-dhe]] |
|||
!Corresponding Equipment |
|||
| style="| [[:Category:Twitherym|Twitherym]] |
|||
|- style="background: #B592B5" |
|||
| style=" text-align: center"| {{ItemIcon|Hesperiidae|25}} [[Hesperiidae]] |
|||
|[[Dealan-dhe]] |
|||
|- style=" |
|||
| style="background: #C0A2C0"| [[:Category:Twitherym|Twitherym]] |
|||
| [[Sgili]] |
|||
|[[Dealan-dhe's Twitherym]] |
|||
| style= |
| style="| [[:Category:Umbril|Umbril]] |
||
|{{ItemIcon| |
| style=" text-align: center"| {{ItemIcon|Epitaph|25}} [[Epitaph]] |
||
|- style= |
|- style=" |
||
|[[ |
| [[U Bnai]] |
||
| style= |
| style="| [[:Category:Acuex|Acuex]] |
||
| style=" text-align: center"| {{ItemIcon|Neo Animator|25}} [[Neo Animator]] |
|||
|[[Sgili's Umbril]] |
|||
|- style=" |
|||
| style="background: #C0A2C0"| [[Information on Sgili]] |
|||
| [[Gogmagog]] |
|||
|{{ItemIcon|Epitaph|24}} [[Epitaph]] |
|||
| |
| style="| [[:Category:Dullahan|Dullahan]] |
||
| style=" text-align: center"| {{ItemIcon|Coiste Bodhar|25}} [[Coiste Bodhar]] |
|||
|[[U Bnai]] |
|||
| style="background: #C0A2C0"| [[:Category:Acuex|Acuex]] |
|||
|[[U Bnai's Acuex]] |
|||
| style="background: #C0A2C0"| [[Information on U Bnai]] |
|||
|{{ItemIcon|Neo Animator|24}} [[Neo Animator]] |
|||
|- style="background: #B592B5" |
|||
|[[Gogmagog]] |
|||
| style="background: #C0A2C0"| [[:Category:Dullahan|Dullahan]] |
|||
|[[Gogmagog's Dullahan]] |
|||
| style="background: #C0A2C0"| [[Information on Gogmagog]] |
|||
|{{ItemIcon|Coiste Bodhar|24}} [[Coiste Bodhar]] |
|||
|} |
|||
|} |
|} |
||
|} |
|} |
||
Atonement 2 monsters can be fought only |
Atonement 2 monsters can be fought only once the party leader has defeated all four NMs in Atonement 1. |
||
{|style="padding-left:20px;" |
{|class="BorderlessStandard R1-White odyssey" style="padding-left: 20px; width: 100%; max-width:800px;" |
||
|- style=" |
|||
| |
|||
{|class="BorderlessStandard R1-White" style="background: #A379A3; width: 100%; max-width:1200px;" |
|||
|- style="background: #3a1d23" |
|||
!style="text-align:center;"| |
!style="text-align:center;"| |
||
===={{color|white|style=normal|Atonement 2 |
===={{color|white|style=normal|Atonement 2}}==== |
||
|- |
|- |
||
| |
| |
||
{| class="R-Highlight-Purple sortable C1-Bold" style=" |
{| class="R-Highlight-Purple sortable C1-Bold odyssey" style=" width: 100%; max-width:1000px;" |
||
|- style= |
|- style=" |
||
! |
! style="padding: 3px; width: 15%"| Monster |
||
! style="padding: 3px; width: 15%"| Family |
|||
!Family |
|||
! Corresponding Equipment |
|||
!Adds |
|||
|- style=" |
|||
!{{KI}} Key Item |
|||
| [[Aristaeus]] |
|||
!Corresponding Equipment |
|||
| |
| style="| [[:Category:Chapuli|Chapuli]] |
||
| style=" text-align: center"| {{ItemIcon|Acrontica|25}} [[Acrontica]] |
|||
|[[Aristaeus]] |
|||
|- style=" |
|||
| style="background: #C0A2C0"| [[:Category:Chapuli|Chapuli]] |
|||
| [[Raskovniche]] |
|||
|[[Aristaeus's Chapuli]] |
|||
| style= |
| style="| [[:Category:Snapweed|Snapweed]] |
||
|{{ItemIcon| |
| style=" text-align: center"| {{ItemIcon|Beithir Ring|25}} [[Beithir Ring]] |
||
|- style= |
|- style=" |
||
|[[Marmorkrebs]] |
| [[Marmorkrebs]] |
||
| style= |
| style="| [[:Category:Craklaw|Craklaw]] |
||
| style=" text-align: center"| {{ItemIcon|Tsuru|25}} [[Tsuru]] |
|||
|[[Marmorkrebs's Craklaw]] |
|||
|- style=" |
|||
| style="background: #C0A2C0"| [[Information on Marmorkrebs]] |
|||
| [[Gigelorum]] |
|||
|{{ItemIcon|Tsuru|24}} [[Tsuru]] |
|||
| |
| style="| [[:Category:Matamata|Matamata]] |
||
| style=" text-align: center"| {{ItemIcon|Schere Earring|25}} [[Schere Earring]] |
|||
|[[Gigelorum]] |
|||
|- style=" |
|||
| style="background: #C0A2C0"| [[:Category:Matamata|Matamata]] |
|||
| [[Procne]] |
|||
|[[Gigelorum's Matamata]] |
|||
| style= |
| style="| [[:Category:Tulfaires|Tulfaire]] |
||
|{{ItemIcon| |
| style=" text-align: center"| {{ItemIcon|Tellen Belt|25}} [[Tellen Belt]] |
||
|- style= |
|- style=" |
||
|[[ |
| [[Henwen]] |
||
| style= |
| style="| [[:Category:Raaz|Raaz]] |
||
| style=" text-align: center"| {{ItemIcon|Obstin. Sash|25}} [[Obstinate Sash]] |
|||
|[[Raskovniche's Snapweed]] |
|||
| style="background: #C0A2C0"| [[Information on Raskovniche]] |
|||
|{{ItemIcon|Beithir Ring|24}} [[Beithir Ring]] |
|||
|- style="background: #B592B5" |
|||
|[[Procne]] |
|||
| style="background: #C0A2C0"| [[:Category:Tulfaires|Tulfaire]] |
|||
|[[Procne's Tulfaire]] |
|||
| style="background: #C0A2C0"| [[Information on Procne]] |
|||
|{{ItemIcon|Tellen Belt|24}} [[Tellen Belt]] |
|||
|- style="background: #B592B5" |
|||
|[[Henwen]] |
|||
| style="background: #C0A2C0"| [[:Category:Raaz|Raaz]] |
|||
|[[Henwen's Raaz]] |
|||
| style="background: #C0A2C0"| [[Information on Henwen]] |
|||
|{{ItemIcon|Obstin. Sash|24}} [[Obstinate Sash]] |
|||
|} |
|||
|} |
|} |
||
|} |
|} |
||
Atonement 3 monsters can be fought only |
Atonement 3 monsters can be fought only once the party leader has defeated all six NMs in Atonement 2. |
||
{|style="padding-left:20px;" |
{|class="BorderlessStandard R1-White odyssey" style="padding-left: 20px; width: 100%; max-width:800px;" |
||
|- style=" |
|||
!style="text-align:center;"| |
|||
===={{color|white|style=normal|Atonement 3}}==== |
|||
|- |
|||
| |
| |
||
{|class=" |
{| class="R-Highlight-Purple sortable C1-Bold odyssey" style=" width: 100%; max-width:800px;" |
||
|- style= |
|- style=" |
||
! style="padding: 3px; width: 15%"| Monster |
|||
! style="padding: 3px; width: 15%"| Family |
|||
! Corresponding Equipment |
|||
|- style=" |
|||
| [[Xevioso]] |
|||
| style="| [[Bztavian]] |
|||
| style=""| {{ItemIcon|Ikenga's Hat|25}} [[Ikenga's Attire Set|Ikenga's Attire]] · {{ItemIcon|Ikenga's Axe|25}} [[Ikenga's Axe]] · {{ItemIcon|Ikenga's Lance|25}} [[Ikenga's Lance]] · {{ItemIcon|Kunimitsu|25}} [[Kunimitsu]] |
|||
|- style=" |
|||
| [[Ngai]] |
|||
| style="| [[Rockfin]] |
|||
| style=""| {{ItemIcon|Gleti's Mask|25}} [[Gleti's Armor Set|Gleti's Armor]] · {{ItemIcon|Gleti's Crossbow|25}} [[Gleti's Crossbow]] · {{ItemIcon|Gleti's Knife|25}} [[Gleti's Knife]] · {{ItemIcon|Gekkei|25}} [[Gekkei]] |
|||
|- style=" |
|||
| [[Kalunga]] |
|||
| style="| [[Gabbrath]] |
|||
| style=""| {{ItemIcon|Sakpata's Helm|25}} [[Sakpata's Armor Set|Sakpata's Armor]] · {{ItemIcon|Sakpata's Fists|25}} [[Sakpata's Fists]] · {{ItemIcon|Sakpata's Sword|25}} [[Sakpata's Sword]] |
|||
|- style=" |
|||
| [[Ongo]] |
|||
| style="| [[Waktza]] |
|||
| style="| {{ItemIcon|Agwu's Cap|25}} [[Agwu's Attire Set|Agwu's Attire]] · {{ItemIcon|Agwu's Axe|25}} [[Agwu's Axe]] · {{ItemIcon|Agwu's Claymore|25}} [[Agwu's Claymore]] · {{ItemIcon|Agwu's Scythe|25}} [[Agwu's Scythe]] |
|||
|- style=" |
|||
| [[Mboze]] |
|||
| style="| [[Yggdreant]] |
|||
| style="| {{ItemIcon|Bunzi's Hat|25}} [[Bunzi's Attire Set|Bunzi's Attire]] · {{ItemIcon|Bunzi's Chopper|25}} [[Bunzi's Chopper]] · {{ItemIcon|Bunzi's Rod|25}} [[Bunzi's Rod]] |
|||
|- style=" |
|||
| [[Arebati]] |
|||
| style="| [[Cehuetzi]] |
|||
| style="| {{ItemIcon|Mpaca's Cap|25}} [[Mpaca's Attire Set|Mpaca's Attire]] · {{ItemIcon|Mpaca's Bow|25}} [[Mpaca's Bow]] · {{ItemIcon|Mpaca's Staff|25}} [[Mpaca's Staff]] |
|||
|} |
|||
|} |
|||
Atonement 4 monsters can be fought only once the party leader has defeated all six NMs in Atonement 3. |
|||
{|class="BorderlessStandard R1-White odyssey" style="padding-left: 20px; width: 100%; max-width:800px;" |
|||
|- style=" |
|||
!style="text-align:center;"| |
!style="text-align:center;"| |
||
===={{color|white|style=normal|Atonement |
===={{color|white|style=normal|Atonement 4}}==== |
||
|- |
|- |
||
| |
| |
||
{| class="R-Highlight-Purple sortable C1-Bold" style=" |
{| class="R-Highlight-Purple sortable C1-Bold odyssey" style=" width: 100%; max-width:800px;" |
||
|- style= |
|- style=" |
||
! |
! style="padding: 3px; width: 15%"| Monster |
||
! style="padding: 3px; width: 15%"| Family |
|||
!Family |
|||
! Corresponding Equipment |
|||
!{{KI}} Key Item |
|||
|- style=" |
|||
!Corresponding Equipment |
|||
| [[Bumba]] |
|||
|- style="background: #B592B5" |
|||
| style="| [[Wyrm]] |
|||
|[[Xevioso]] |
|||
| style=" text-align: center"| {{ItemIcon|Nyame Helm|25}} [[Nyame Armor Set|Nyame Armor]] |
|||
| style="background: #C0A2C0"| [[Bztavian]] |
|||
| [[Information on Xevioso]] |
|||
| style="background: #C0A2C0"| {{ItemIcon|Ikenga's Hat|24px}} [[Ikenga's Attire Set]] |
|||
{{ItemIcon|Ikenga's Axe|24px}} [[Ikenga's Axe]] · {{ItemIcon|Ikenga's Lance|24px}} [[Ikenga's Lance]] · {{ItemIcon|Kunimitsu|24px}} [[Kunimitsu]] |
|||
|- style="background: #B592B5" |
|||
|[[Ngai]] |
|||
| style="background: #C0A2C0"| [[Rockfin]] |
|||
| [[Information on Ngai]] |
|||
| style="background: #C0A2C0"| {{ItemIcon|Gleti's Mask|24px}} [[Gleti's Armor Set]] |
|||
{{ItemIcon|Gleti's Crossbow|24px}} [[Gleti's Crossbow]] · {{ItemIcon|Gleti's Knife|24px}} [[Gleti's Knife]] · {{ItemIcon|Gekkei|24px}} [[Gekkei]] |
|||
|- style="background: #B592B5" |
|||
|[[Kalunga]] |
|||
| style="background: #C0A2C0"| [[Gabbrath]] |
|||
| [[Information on Kalunga]] |
|||
| style="background: #C0A2C0"| {{ItemIcon|Sakpata's Helm|24px}} [[Sakpata's Armor Set]] |
|||
{{ItemIcon|Sakpata's Fists|24px}} [[Sakpata's Fists]] · {{ItemIcon|Sakpata's Sword|24px}} [[Sakpata's Sword]] |
|||
|- style="background: #B592B5" |
|||
|[[Ongo]] |
|||
| style="background: #C0A2C0"| [[Waktza]] |
|||
| [[Information on Ongo]] |
|||
| style="background: #C0A2C0"|{{ItemIcon|Agwu's Cap|24px}} [[Agwu's Attire Set]] |
|||
{{ItemIcon|Agwu's Axe|24px}} [[Agwu's Axe]] · {{ItemIcon|Agwu's Claymore|24px}} [[Agwu's Claymore]] · {{ItemIcon|Agwu's Scythe|24px}} [[Agwu's Scythe]] |
|||
|- style="background: #B592B5" |
|||
|[[Mboze]] |
|||
| style="background: #C0A2C0"| [[Yggdreant]] |
|||
| [[Information on Mboze]] |
|||
| style="background: #C0A2C0"|{{ItemIcon|Bunzi's Hat|24px}} [[Bunzi's Attire Set]] |
|||
{{ItemIcon|Bunzi's Chopper|24px}} [[Bunzi's Chopper]] · {{ItemIcon|Bunzi's Rod|24px}} [[Bunzi's Rod]] |
|||
|- style="background: #B592B5" |
|||
|[[Arebati]] |
|||
| style="background: #C0A2C0"| [[Cehuetzi]] |
|||
| [[Information on Arebati]] |
|||
| style="background: #C0A2C0"|{{ItemIcon|Mpaca's Cap|24px}} [[Mpaca's Attire Set]] |
|||
{{ItemIcon|Mpaca's Bow|24px}} [[Mpaca's Bow]] · {{ItemIcon|Mpaca's Staff|24px}} [[Mpaca's Staff]] |
|||
|} |
|||
|} |
|} |
||
|} |
|} |
||
===Sheol Gaol Rewards=== |
===Sheol Gaol Rewards=== |
||
*Defeating NMs in Sheol - Gaol provides the corresponding {{KI}} "Information on ..." key items |
*Defeating NMs in Sheol - Gaol provides the corresponding {{KI}} "Information on ..." key items from the corresponding foe and allows players to purchase the equipment. |
||
**The starting price for all equipment is fixed, see below for the initial costs. Subsequent world kills lowers the price. |
**The starting price for all equipment is fixed, see below for the initial costs. Subsequent world kills lowers the price. |
||
***Price reductions are tied directly to server win count and are not bound to a period of time check. |
|||
***Attonement 1 and Attonement 2 equipment starts at 2,000,000 [[Gil]]. |
|||
** |
**Atonement 1 equipment starts at 2,000,000 [[Gil]]. |
||
**Atonement 2 equipment starts at 3,000,000 [[Gil]]. |
|||
**Atonement 3 weapons start at 4,500,000 [[Gil]], and armor starts at 6,000,000 [[Gil]]. |
|||
**Atonement 4 equipment starts at 7,500,000 [[Gil]]. |
|||
===Augmenting Rewards=== |
===Augmenting Rewards=== |
||
Before players can spend Reinforcement Points on an item, they must unlock rank tiers on each piece of equipment. |
Before players can spend Reinforcement Points on an item, they must unlock rank tiers on each piece of equipment. '''In order to unlock the augment system, you must defeat at least 1 NM above V+0.''' |
||
To increase an item's maximum augment rank, players must defeat the |
To increase an item's maximum augment rank, players must defeat the NM who originally unlocked the equipment for purchase on higher Vengeance levels. |
||
* Defeating the NM on any Vengeance level allows augmentation up to Rank 15. |
|||
* Defeating the NM on Veng+15 or above allows augmentation up to Rank 20. |
|||
* Defeating the NM on Veng+20 or above allows augmentation up to Rank 25. |
|||
* Defeating the NM on Veng+25 allows augmentation up to Rank 30. |
|||
{| class="BGBlue1 R-Highlight-WikiBlue" style="width: 100%; max-width: 400px;" |
|||
{| class="BGBlue1 R-Highlight-WikiBlue altrowgrey" style="width: 100%; max-width: 400px;" |
|||
|- style="background: #4696CF; color: #FFFFFF; border-bottom: 3px solid #FF8000;" |
|- style="background: #4696CF; color: #FFFFFF; border-bottom: 3px solid #FF8000;" |
||
! NM Vengeance |
! NM Vengeance |
||
! Item Maximum Rank |
|||
|- |
|- |
||
| +0 |
| +0 |
||
| 15 |
|||
|- |
|- |
||
| + |
| +15 |
||
| 20 |
|||
|- |
|- |
||
| + |
| +20 |
||
| 25 |
|||
|- |
|- |
||
| + |
| +25 |
||
| 30 |
|||
|} |
|} |
||
====Modifying "Vengeance"==== |
|||
The Vengeance level of a NM determines its strength and the abilities it can use. After ''all'' initial defeats of the Atonement Tier NMs, "'''Vengeance+1-5'''" difficulties are then accessible for each NM in the specific tier cleared. |
|||
*Defeating an NM on "'''Vengeance+5'''" unlocks "'''Vengeance+6'''"-"'''Vengeance+10'''". |
|||
*Defeating an NM on "'''Vengeance+10'''" then unlocks "'''Vengeance+11'''"-"'''Vengeance+15'''", and so on. |
|||
*Defeating all Atonement 1 NMs on "'''Vengeance+5'''" or greater unlocks Atonement 2's "'''Vengeance+1'''"-"'''Vengeance+5'''". |
|||
:*Similarly, by defeating all 4 types of "Vengeance+10"-"Vengeance+15" bosses in Atonement 1, "Vengeance+6"-"Vengeance+10" and "Vengeance+11"-"Vengeance+15" of the Atonement 2 bosses will be unlocked. |
|||
::*The same rules apply to Atonement 3 bosses and adjusting their "Vengeance" according to progress made on Atonement 2 "Vengeance". |
|||
::*It is possible to take along another player with no progress in any Atonement area or "Vengeance" ranks to skip their grind. |
|||
:::*E.g. A player may clear all T3s on V15 then go back and climb T1/T2 and will then automatically have access to the T3 V15s without clearing them all over. |
|||
'''''The rules above are also applied to Atonement 2, 3 and 4 areas.''''' |
|||
*Killing all NMs in Atonement 1, then talking to [[Pilgrim Moogle]] will let you modify "Vengeance" difficulty of an NM from +0 up to a maximum of +15. |
|||
**After an NM's initial defeat, "Vengeance+5" difficulty is then accessible. |
|||
**"Vengeance" maximum difficulty increases by +2 for each win. |
|||
***Example: Defeating an NM at "Vengeance+5" will unlock up to "Vengeance+7". |
|||
****It is possible to take along a player to all Attonement areas with no tier progress to skip their grind. |
|||
====Earning RP==== |
====Earning RP==== |
||
Reinforcement Points are earned whether or not you successfully defeat the NM |
[[Reinforcement Points]] are earned when you fight an NM of Vengeance +1 or higher, whether or not you successfully defeat the NM. RP earned is based on the Vengeance level, the amount of damage dealt, and the use of [[Moogle Amplifier]]s. |
||
*RP earned |
* RP is earned for each 5% of the NM's HP removed. You must deal at least 5% of the NM's HP before timing out in order to earn RP. |
||
* Using a [[Moogle Amplifier]] will triple the RP rewards. See its page or the table below for details. |
|||
**RP earned is unique per NM, and can only be spent on that NM's corresponding equipment. |
|||
* You will not earn RP if you leave the zone before winning or timing out, e.g. by using [[Warp]] or a [[Moglophone II]]. |
|||
**Unneeded RP can be exchanged at a 1:1 ratio for Segments. |
|||
* You may earn RP even if you do not yet own the equipment it augments. |
|||
* There is cap of '''50,000''' RP stored per NM. Spending down RP by augmenting equipment will allow you to continue earning RP. |
|||
RP can be used by interacting with the '''???''' ([[Pilgrim Moogle]]) in Rabao at (G-6), and then trading your desired piece of gear in order to enhance the augment. |
|||
RP is earned with the following formula: 40% * Total RP needed for previous rank (See RP Allocation table below) = RP Earned for successful kill |
|||
* RP earned is unique per NM, and can only be spent on that NM's corresponding equipment. |
|||
* The [[Pilgrim Moogle]] can also tell you which Vengeance level you've defeated and how many RP you are holding from each NM. |
|||
* Unneeded RP can be exchanged at a 1:1 ratio for Moogle Segments. |
|||
The base amount of RP earned for a kill is equal to the NextRP for the previous rank (Veng - 1) divided by 5. Veng+1 NM's are treated as having a previous rank NextRP of 30. This value can also be found in the table below. |
|||
The following is an example for Vengeance +10: |
|||
[[File:BaseRP.png]] |
|||
0.4*480=192 <ref>https://www.ffxiah.com/forum/topic/54555/the-odyssey-strategy-and-discussion/69/#3560115</ref> |
|||
The exact amount of RP received can be calculated via the following formula: |
|||
{| class="BGBlue1 R-Highlight-WikiBlue" style="width: 100%; max-width: 400px;" |
|||
|- style="background: #4696CF; color: #FFFFFF; border-bottom: 3px solid #FF8000;" |
|||
[[File:Gaol RP 3.png]] |
|||
! Vengeance !! RP Earned |
|||
The HP% used is the lowest the NM had been, rounded to the nearest 5% (e.g. if you timed out at 43%, use 45% for the formula). |
|||
When using a [[Moogle Amplifier]], you will also receive an additional amount equal to 4x the base value. Afterwards, the value is floored. |
|||
A charged [[Moogle Amplifier]] will also give a bonus of 6x the RP of a 100% kill for the average Veng level (rounded down) of the charge. |
|||
{| style="border:2px dashed blue; line-height:20px; padding:5px; background:#d5c4fa;" |
|||
|- |
|- |
||
!''Example: V19 Bumba Taken to 23%, [[Moogle Amplifier]] used with a V25 charge'' |
|||
| +0 || 0 |
|||
|- |
|- |
||
| <br />baseRP = 1580 (R18 RP to Next Level) / 5 = 316 |
|||
| +1 || 0 |
|||
<br />RP = (316 * ((100 - 25) / 100)) + (floor((100 - 25) / 100) * 316) + (4 * 316) |
|||
<br />RP = (316 * 0.75) + (0 * 316) + (4 * 316) |
|||
<br />RP = 237 (for taking down 75%) + 0 (win bonus) + 1,264 (amp bonus) |
|||
<br />RP = 1,501 + (1,164 * 6) (V25 Charge Bonus) |
|||
<br />RP = 8485 |
|||
|} |
|||
<br /> |
|||
{| class="BGBlue1 R-Highlight-WikiBlue altrowgrey" style="width: 100%; max-width: 1000px;" |
|||
|+ '''Gaol RP Values''' |
|||
|- |
|- |
||
! Veng !! BaseRP !! 94% !! 89% !! 84% !! 79%<sup>††</sup> !! 74% !! 69% !! 64% !! 59% !! 54% !! 49% !! 44% !! 39% !! 34% !! 29% !! 24% !! 19% !! 14% !! 9% !! 4% !! 0% !! Amp Bonus !! Charge Bonus<sup>†</sup> |
|||
| +2 || 20 |
|||
|- |
|- |
||
| +1 || 6 || 0 || 0 || 0 || 1 || 1 || 1 || 2 || 2 || 2 || 3 || 3 || 3 || 3 || 4 || 4 || 4 || 5 || 5 || 5 || 12 || 24 || 72 |
|||
| +3 || 32 |
|||
|- |
|- |
||
| +2 || 10 || 0 || 1 || 1 || 2 || 2 || 3 || 3 || 4 || 4 || 5 || 5 || 6 || 6 || 7 || 7 || 8 || 8 || 9 || 9 || 20 || 40 || 120 |
|||
| +4 || 48 |
|||
|- |
|- |
||
| +3 || 16 || 0 || 1 || 2 || 3 || 4 || 4 || 5 || 6 || 7 || 8 || 8 || 9 || 10 || 11 || 12 || 12 || 13 || 14 || 15 || 32 || 64 || 192 |
|||
| +5 || 68 |
|||
|- |
|- |
||
| +4 || 24 || 1 || 2 || 3 || 4 || 6 || 7 || 8 || 9 || 10 || 12 || 13 || 14 || 15 || 16 || 18 || 19 || 20 || 21 || 22 || 48 || 96 || 288 |
|||
| +6 || 88 |
|||
|- |
|- |
||
| +5 || 34 || 1 || 3 || 5 || 6 || 8 || 10 || 11 || 13 || 15 || 17 || 18 || 20 || 22 || 23 || 25 || 27 || 28 || 30 || 32 || 68 || 136 || 408 |
|||
| +7 || 112 |
|||
|- |
|- |
||
| +6 || 44 || 2 || 4 || 6 || 8 || 11 || 13 || 15 || 17 || 19 || 22 || 24 || 26 || 28 || 30 || 33 || 35 || 37 || 39 || 41 || 88 || 176 || 528 |
|||
| +8 || 136 |
|||
|- |
|- |
||
| +7 || 56 || 2 || 5 || 8 || 11 || 14 || 16 || 19 || 22 || 25 || 28 || 30 || 33 || 36 || 39 || 42 || 44 || 47 || 50 || 53 || 112 || 224 || 672 |
|||
| +9 || 164 |
|||
|- |
|- |
||
| +8 || 68 || 3 || 6 || 10 || 13 || 17 || 20 || 23 || 27 || 30 || 34 || 37 || 40 || 44 || 47 || 51 || 54 || 57 || 61 || 64 || 136 || 272 || 816 |
|||
| +10 || 192 |
|||
|- |
|- |
||
| +9 || 82 || 4 || 8 || 12 || 16 || 20 || 24 || 28 || 32 || 36 || 41 || 45 || 49 || 53 || 57 || 61 || 65 || 69 || 73 || 77 || 164 || 328 || 984 |
|||
| +11 || 224 |
|||
|- |
|- |
||
| +10 || 96 || 4 || 9 || 14 || 19 || 24 || 28 || 33 || 38 || 43 || 48 || 52 || 57 || 62 || 67 || 72 || 76 || 81 || 86 || 91 || 192 || 384 || 1,152 |
|||
| +12 || 260 |
|||
|- |
|- |
||
| +11 || 112 || 5 || 11 || 16 || 22 || 28 || 33 || 39 || 44 || 50 || 56 || 61 || 67 || 72 || 78 || 84 || 89 || 95 || 100 || 106 || 224 || 448 || 1,344 |
|||
| +13 || 300 |
|||
|- |
|- |
||
| +12 || 130 || 6 || 13 || 19 || 26 || 32 || 39 || 45 || 52 || 58 || 65 || 71 || 78 || 84 || 91 || 97 || 104 || 110 || 117 || 123 || 260 || 520 || 1,560 |
|||
| +14 || 344 |
|||
|- |
|- |
||
| +13 || 150 || 7 || 15 || 22 || 30 || 37 || 45 || 52 || 60 || 67 || 75 || 82 || 90 || 97 || 105 || 112 || 120 || 127 || 135 || 142 || 300 || 600 || 1,800 |
|||
| +15 || 392 |
|||
|- |
|- |
||
| +14 || 172 || 8 || 17 || 25 || 34 || 43 || 51 || 60 || 68 || 77 || 86 || 94 || 103 || 111 || 120 || 129 || 137 || 146 || 154 || 163 || 344 || 688 || 2,064 |
|||
| +16 || 444 |
|||
|- |
|- |
||
| +15 || 196 || 9 || 19 || 29 || 39 || 49 || 58 || 68 || 78 || 88 || 98 || 107 || 117 || 127 || 137 || 147 || 156 || 166 || 176 || 186 || 392 || 784 || 2,352 |
|||
| +17 || 500 |
|||
|- |
|- |
||
| +16 || 222 || 11 || 22 || 33 || 44 || 55 || 66 || 77 || 88 || 99 || 111 || 122 || 133 || 144 || 155 || 166 || 177 || 188 || 199 || 210 || 444 || 888 || 2,664 |
|||
| +18 || 564 |
|||
|- |
|- |
||
| +17 || 250 || 12 || 25 || 37 || 50 || 62 || 75 || 87 || 100 || 112 || 125 || 137 || 150 || 162 || 175 || 187 || 200 || 212 || 225 || 237 || 500 || 1,000 || 3,000 |
|||
| +19 || 632 |
|||
|- |
|- |
||
| +18 || 282 || 14 || 28 || 42 || 56 || 70 || 84 || 98 || 112 || 126 || 141 || 155 || 169 || 183 || 197 || 211 || 225 || 239 || 253 || 267 || 564 || 1,128 || 3,384 |
|||
| +20 || 704 |
|||
|- |
|- |
||
| +19 || 316 || 15 || 31 || 47 || 63 || 79 || 94 || 110 || 126 || 142 || 158 || 173 || 189 || 205 || 221 || 237 || 252 || 268 || 284 || 300 || 632 || 1,264 || 3,792 |
|||
| +21 || 784 |
|||
|- |
|- |
||
| +20 || 352 || 17 || 35 || 52 || 70 || 88 || 105 || 123 || 140 || 158 || 176 || 193 || 211 || 228 || 246 || 264 || 281 || 299 || 316 || 334 || 704 || 1,408 || 4,224 |
|||
| +22 || 868 |
|||
|- |
|- |
||
| +21 || 392 || 19 || 39 || 58 || 78 || 98 || 117 || 137 || 156 || 176 || 196 || 215 || 235 || 254 || 274 || 294 || 313 || 333 || 352 || 372 || 784 || 1,568 || 4,704 |
|||
| +23 || 960 |
|||
|- |
|- |
||
| +22 || 434 || 21 || 43 || 65 || 86 || 108 || 130 || 151 || 173 || 195 || 217 || 238 || 260 || 282 || 303 || 325 || 347 || 368 || 390 || 412 || 868 || 1,736 || 5,208 |
|||
| +24 || 1060 |
|||
|- |
|- |
||
| +23 || 480 || 24 || 48 || 72 || 96 || 120 || 144 || 168 || 192 || 216 || 240 || 264 || 288 || 312 || 336 || 360 || 384 || 408 || 432 || 456 || 960 || 1,920 || 5,760 |
|||
| +25 || 1164 |
|||
|- |
|||
| +24 || 530 || 26 || 53 || 79 || 106 || 132 || 159 || 185 || 212 || 238 || 265 || 291 || 318 || 344 || 371 || 397 || 424 || 450 || 477 || 503 || 1,060 || 2,120 || 6,360 |
|||
|- |
|||
| +25 || 582 || 29 || 58 || 87 || 116 || 145 || 174 || 203 || 232 || 261 || 291 || 320 || 349 || 378 || 407 || 436 || 465 || 494 || 523 || 552 || 1,164 || 2,328 || 6,984 |
|||
|} |
|} |
||
<sup>†</sup>Grants the bonus RP for the average Veng level of the 3 NMs used to charge, regardless of the Veng level of the fight the charge is used on. |
|||
If you are unsuccessful at defeating an NM, you will still earn RP. Earned RP depends on how much damage was dealt to the NM that was not successfully defeated. |
|||
As an example, a Vengeance +15 NM taken down to 20% would earn 156 RP with the following formula: |
|||
<sup>††</sup>Rewards increase at 5% HP intervals, so 24% damage dealt (to avoid adds) is equivalent to only 20%. |
|||
floor(0.4*980*.8/2 = 156.8) <ref>https://www.ffxiah.com/forum/topic/54555/the-odyssey-strategy-and-discussion/69/#3560115</ref> |
|||
<br /> |
|||
* A chart showing the Amplified-specific values can be found on the [[Moogle Amplifier]] page. |
|||
Using the same example for the formula above, you can also use this chart to find the RP value. <br /> |
|||
RP = '''237''' (V19 24% HP Threshold) + '''1,264''' (V19 Amp Bonus) + '''6,984''' (V25 Charge Bonus)<br /> |
|||
RP = '''8,485'''<br /> |
|||
Vengeance-based strategic tradeoffs: |
|||
* Dealing at least 55% damage to a Veng+19 NM grants more RP than dealing 24% damage to a Veng+20 NM to avoid adds. |
|||
* Dealing at least 65% damage to a Veng+24 NM grants more RP than dealing 24% damage to a Veng+25 NM. |
|||
====RP Allocation==== |
====RP Allocation==== |
||
The following table specifies how many Reinforcement Points need to be allocated to reach each rank for an item. |
The following table specifies how many [[Reinforcement Points]] need to be allocated to reach each rank for an item. |
||
{{:Reinforcement Points}} |
{{:Reinforcement Points}} |
||
==Guides== |
|||
*[[Sheol Shop]] |
|||
==References== |
==References== |
||
*[https://forum.square-enix.com/ffxi/threads/56549-Announcing-the-March-Version-Update?p=624983&highlight=trash+mobs#post624983 Naming Designation of nonNM Type Enemies (Akihiko_Matsui, Oficial Forums)] |
|||
*[https://twitter.com/long_horned/status/1237846673793015812 Level Growth of Nostos mobs (ごまだら, 日本語 Twitter)] |
*[https://twitter.com/long_horned/status/1237846673793015812 Level Growth of Nostos mobs (ごまだら, 日本語 Twitter)] |
||
*[https://twitter.com/long_horned/status/1238231004155760642 Lv131 (Sheol A Floor 7) Nostos Flytrap HP (ごまだら, 日本語 Twitter)] |
*[https://twitter.com/long_horned/status/1238231004155760642 Lv131 (Sheol A Floor 7) Nostos Flytrap HP (ごまだら, 日本語 Twitter)] |
||
Latest revision as of 16:06, 13 March 2024
|
|
|
Odyssey Overview
This section is a basic introduction of the Odyssey content. Each Odyssey area has special rules and restrictions that apply. Be sure to overview the Sheol section on this page for limitations unique to that area before partaking in the content.
Sheol A, B and C Overview

- To enter, each player needs to be in possession of a
 Moglophone.
- Examining the ??? in Rabao near the Veridical Conflux at (G-6) allows you to speak with the Pilgrim Moogle.
- This moogle will grant the player the temporary Moglophone upon request.
Nearest Home Point: Kuzotz > Rabao (#2)
- You may receive another Moglophone once twenty hours have passed from when you received the previous one.
- Only 1 Moglophone may be held at a time.
- It is possible to be able to do 2 runs in one day if you collect a Moglophone, then wait 20 hours before using it. This will allow you to pick up a new Moglophone right after you exit your run.
- It is possible to be able to do 2 runs in one day if you collect a
- You may receive another
- Examining the Veridical Conflux in Rabao at (G-6) and selecting a Sheol instance will transport all party members to Walk of Echoes.
- All held Moglophones by party members will be consumed upon entry.
- Once inside, each player will be given a
 Moglophone in their inventory. This is used to exit the instanced area before time expires.
- Once inside, each player will be given a
- All held
- Parties must consist of between 1 and 6 people.
- Trusts may be called within any Sheol instance.
- The number of Trusts you can summon is limited based on the number of people who entered.
- E.g. should only 2 people enter, and break their party; only 4 trusts total may be called within the instance.
- Trusts are enhanced by the effect of "Moogle Mastery" after it is unlocked.
- Sheol locations must be completed in order for the first time using a Records of Eminence Objective to unlock the next one.
- Clearing Sheol A with the objective set will unlock access to Sheol B, Sheol B will unlock Sheol C, and Sheol C will unlock Sheol Gaol.
Sheol Gaol Overview
- To enter, each player needs to be in possession of all three Moglophone IIs.
- By talking to the Pilgrim Moogle by examining the ??? in Rabao near the Veridical Conflux at (G-6) after clearing the ROE for Sheol C, it will mumble something about the Darkness then eventually give you 3 Moglophone II Key Items for free.
- Subsequent Moglophone IIs will cost 3000 Moogle Segments each, purchased from the Pilgrim Moogle.
- Moogle Segments can be earned by defeating foes or opening chests successfully within Sheol A, B, and C.
- Each Boss attempt will exhaust 1 Moglophone II.
- Additionally all party members must have at least 3 jobs at 99 in order to enter.
Content Objective
- Battle the various foes and Notorious Monsters among the multiple floors of the instance as you make your way to the exit.
- Examining the Otherworldly Vortex of each Odyssey will complete the Records of Eminence Objective. You do not need to kill any mobs or NMs to complete this objective. The Otherworldly Vortex is located on a different floor of each Sheol Zone and should not be confused with the Veridical Conflux, which allows you to ascend or descend floors within the Sheol Zone.
- See the individual Sheol sections on this page for the Otherworldly Vortex locations and maps.
- Sheol A, B and C have Translocators within them. These are essentially warps in order to easily access different areas of that Sheol. They cannot be used until you interact with each one in order to activate it for your character. See each Sheol area below on this page for locations of these Translocators. Many players may expect you to have all of these unlocked, so be sure to do this on your own.
- All Nostos enemies in Sheol A, B or C have a chance to drop


 Lustreless items.
- Monsters increase in level and difficulty for each consecutively higher floor within a Sheol. Higher level enemies on higher floors have a higher drop rate of Lustreless items.
- Treasure Hunter increases the drop rate of Lustreless items to a max of 3 per Nostos.
- All foes in Odyssey are aggressive.
- They come in two varieties, and all generally behave accordingly to their real world brethren with a few exceptions such as Flans aggroing magic.
- It's safest to assume that all mobs will aggro both sight and sound, and that any mob that has true sight or sound aggro will also have true sight or sound aggro within Odyssey.
- Hide will work to shed aggro/enmity on nearly all foes except ones who track by scent.
- While weaknesses such as
 damage to Birds have not been changed. Foes in Sheol B and C gain a specific resistance which is detailed below.
- All monsters take reduced AoE damage similar to mobs in Domain Invasion and Dynamis Divergence.
Area Progression
Initially, players have access to only Sheol A. In order to progress to higher level areas, the Records of Eminence Objective pertaining to each Sheol needs to be completed:
- Completing the Records of Eminence Objective for Sheol A will unlock the ability to augment Unity Equipment where Lustreless Scales are used to
 augment that equipment.
- This also rewards a Large Lustreless Scale Box and unlocks access to Sheol B.
- Completing the Records of Eminence Objective for Sheol B will unlock the ability to augment Unity Equipment where Lustreless Hides are used to augment that equipment.
- This also rewards a Large Lustreless Hide Box and unlocks access to Sheol C.
- Completing the Records of Eminence Objective for Sheol C will unlock the ability to augment Unity Equipment where Lustreless Wings are used to augment that equipment.
- This also rewards a Large Lustreless Wing Box and unlocks access to Sheol - Gaol.
Moogle Mastery Effects
Moogle Mastery is an effect that is granted within all Odyssey areas, including Sheol - Gaol.
Moogle Mastery will increase the strength of Trusts, but doesn't increase their HP/MP as per +Level. Benefits include:
- iLvl +1 for every 5 tiers of Mastery for a max of +9.
- This does not stack with the Filled memory gem from Marjory.
- This does not stack with the
- A -Damage Taken benefit to trusts of -2% per every 3 tiers for a max of -15%.
Increasing Moogle Mastery
One's Moogle Mastery effect is increased:
- When certain totals of Nostos enemies of that wing are defeated, starting at 100+.
- When defeating Notorious Monsters.
- When opening Aurum Strongboxes.
When a player's Moogle Mastery increases within Sheol, a message will be displayed stating that "your Moogle Mastery is now XX".
- Only the player opening the Chest/Coffer/Aurum Strongbox will receive the message should their Moogle Mastery upgrade.
- Other players will rank up even if they don't see this message if they meet the same prerequisites below.
- Moogle Mastery caps at 15 per zone for a total of 45.
Additionally, each zone has requirements to unlock possible levels (similar to the Limit Break system). The specifics are challenging to determine exactly, but the total requirements involve defeating 1,600 Nostos foes, opening 16 Coffers, 16 Aurum Strongboxes, and defeating each Unity Notorious Monster a certain number of times separately per zone.
- Sheol A requires the defeat of every NM 6 times.
- Sheol B requires the defeat of every NM 3 times.
- Sheol C requires the defeat of every NM 9 times.
Izzat
Players earn izzat, a special currency unique to Odyssey, as they vanquish monsters within Sheol A, B or C.
- Izzat is shared among all party members.
- All Izzat will be lost once you leave the zone, it is only a temporary currency.
- Players will receive 1 izzat for every 5 monsters defeated and 10 izzat for fully clearing an Agon Halo and all its surrounding beastmen.
- Izzat is also used to spawn various Notorious Monsters from Ethereal Junctions that appear after defeating Agon Halos and all their accompanying Beastmen, for a cost of 10 izzat.
Moogle Segments
Moogle Segments are a form of points, which are used for Odyssey. They were introduced in the November 2020 Version Update. The main purpose of Moogle Segments is to purchase the ![]() Moglophone II to enter Sheol - Gaol, but lustreless items are also available for purchase. See the Pilgrim Moogle page for details.
Moglophone II to enter Sheol - Gaol, but lustreless items are also available for purchase. See the Pilgrim Moogle page for details.
Segments are earned throughout Odyssey, in each of Sheol A, B and C. The total amount of Segments earned increases with the difficulty of the content. Accordingly, the most segments can be earned within Sheol C. Each Sheol section on this page details the amount of Moogle Segments that can be earned within that area.
As of the May 2021 Version Update, a bonus amount of segments is rewarded upon examining the Otherworldly Vortex at the end of Sheol A, B, or C. This bonus is dependent on the amount of moogle segments earned during that foray of Odyssey. The bonus appears to be around 25% of the segments earned.
Sheol A
- All Nostos mobs will grant 5 Moogle Segments each on the first floor, scaling up by 2 per floor up to a max of 17 Segments per mob on floor 7.
- A Chest grants 50, Coffer grants 75, and an Aurum Strongbox will grant 100. Opening a Chest using keys or tools will grant only 10% of the Moogle Segments you would have gotten opening it with Izzat.
- While the Halo and the individual beastmen themselves will not grant Moogle Segments, successfully clearing an Agon Halo and all its surrounding Beastmen will grant Segments ranging from 50~410 based on the floor you are on.
- Defeating an NM will grant a number of Segments ranging from 80~200 based on the floor it is spawned on.
Sheol B
- All Nostos mobs will grant 13 Moogle Segments each on the first floor, scaling up by 2 per floor up to a max of 23 Segments per mob on floor 6.
- A Chest grants 75, Coffer grants 100, and an Aurum Strongbox will grant 150. Opening a Chest using keys or tools will grant only 10% of the Moogle Segments you would have gotten opening it with Izzat.
- While the Halo and the individual beastmen themselves will not grant Moogle Segments, successfully clearing an Agon Halo and all its surrounding Beastmen will grant Segments ranging from 220~520 based on the floor you are on.
- Defeating an NM will grant a number of Segments ranging from 150~250 based on the floor it is spawned on.
Sheol C
- All Nostos mobs will grant 25 Moogle Segments each on the first floor, scaling up by 2 per floor up to a max of 31 Segments per mob on floor 4.
- A Chest grants 100, Coffer grants 150, and an Aurum Strongbox will grant 200. Opening a Chest using keys or tools will grant only 10% of the Moogle Segments you would have gotten opening it with Izzat.
- While the Halo and the individual beastmen themselves will not grant Moogle Segments, successfully clearing an Agon Halo and all its surrounding Beastmen will grant Segments ranging from 450~630 based on the floor you are on.
- Defeating an NM will grant a number of Segments ranging from 280~340 based on the floor it is spawned on.
"Nostos" type
Common enemies. All aggro by their family's typical detection method, plus Sight.
- They cluster in groups of 10 mobs.
- Each Sheol has a fixed set of enemy types, but their placement is randomized on each run.
- They do not link.
- They are susceptible to Charm.
- For every 5 defeated, the party will be granted 1 izzat.
- Hide may be used to shed hate in emergency, except on foes that track by scent.
 "Agon" Beastmen type
Agon Halos do not have fixed spawn locations, and differ each entry to Sheol areas. Around each Agon Halo, semi-invisible enemies spawn that cannot be interacted with until their appropriate Agon Halo is destroyed.
- Although they cannot be targeted, Nostos can and will aggro players before the Agon Halo is destroyed.
- Agon Beastmen will link with each other, but not with the Agon Halo.
- Agon Beastmen possess both True Sight and True Sound.
- Agon Beastmen cannot be slept, enfeebled or acted on via AoE or any spells/actions in any way until the Agon Halo has been destroyed.
- Using an AoE ability or spell, however, will generate hate on all Angon foes as if they were affected by it normally, so a tank could hold the aggro while the party destroys the Agon Halo.
- Halos emit elemental damage corresponding to its element, similar to Dynamis - Divergence wave 3. Halos also take 50% additional damage to the element strong to its element, and 5% damage from the same element.
- Destroying the Halo makes all Agon Beastmen around it targetable.
- Agon Beastmen in Sheol B and C have resistances to specific damage types.
- See tables in the corresponding Sheol sections of the page.
- When all Beastmen around an Agon Halo are defeated, the player will be granted 10 izzat, a number of Segments depending on which Sheol and what floor it is on, and an Ethereal Junction will spawn in the location of Agon Halo. If the player successfully examines that Sheol's Otherworldly Vortex before time runs out, they will also be granted a Lustreless Item Box in their personal reward issuance.
- The Ethereal Junction that spawns after clearing the Agon Halo and its surrounding beastmen may be used pop a random Notorious Monster at a cost of 10 izzat. This is different from any Ethereal Junctions that were already in the instance before the Agon Halo was cleared; those Junctions will spawn NMs only if you trade it the appropriate amount of UNM pop items.
- See the Notorious Monster section in each Sheol area on this page for details.
Notorious Monsters
- Trading UNM materials to a numbered Ethereal Junction (one that was not spawned by defeating an Agon Halo and its Beastmen) will spawn a matching NM to the UNM whose materials were traded. The number of materials required permanently decreases with each NM popped.
- Ethereal Junctions spawned from Agon Halos and their accompanying Beastmen demand an izzat payment of 10, and will spawn any one of the Notorious Monsters of that Sheol wing at random.
- All Notorious Monsters have access to various SP Abilities.
- Notorious Monsters will reset enmity upon using their SP Ability.

- Notorious Monsters will reset enmity upon using their SP Ability.
- All Notorious Monsters can drop the Lustreless item of that Sheol with the possibility to also drop a
 a Lustreless Box of the corresponding Sheol when defeated.
 - Once a specific Notorious Monster has been spawned, it may not be spawned again in that same Odyssey run.
Chests
- In Sheol A, B and C, 3 Chests spawn per floor.
- There are fixed Chest spawn locations on each floor, three of which are selected randomly each time.
- None of these locations are on stairs.
- Successfully opening a Chest can cause a Coffer to spawn in the same location where the Chest spawned.
- Successfully opening a Coffer can cause an Aurum Strongbox to spawn in the same location where the Coffer spawned.
- Chests, coffers, and strongboxes can be opened using Izzat or by a Thief main with
 Thief's Tools,
  Living Key, or
  Skeleton Key.
- Opening a chest with Izzat will grant a number of segments depending on which Sheol zone it is.
- Opening a chest with Izzat will greatly increase the chance of a higher tier coffer spawning (relative to using Thief, where it is about a 10% chance).
- This may be proportional to the number of that tier of chest you have opened.
- I.e. the more Chests you have opened (regardless of method), the higher your odds of spawning a Coffer when you open a Chest with izzat.
- The contents of chests, coffers, and strongboxes are added to the party's treasure pool, not to individual rewards or to the person opening the chest.
- Chests (
 ) contain multiple Lustreless items and possibly
  Lustreless Boxes.
- Chests can be opened by spending 10 izzat.
- The izzat cost for opening chests is reduced by 1 for every 10 chests the player has opened in that Sheol wing.
- This reduction caps at -5 izzat.
- E.g. the 10th chest you open in Sheol A will cost 10 Izzat, but the 11th chest you open will cost 9. All chests after the 51st would cost 5 izzat.
- Coffers (
 ) also contain multiple Lustreless items and have a higher chance of containing Lustreless Boxes than normal chests.
- Coffers can be opened by spending 15 izzat.
- The izzat cost for opening coffers is reduced irregularly for every 10 coffers the player has opened in that Sheol wing.
- The 11th coffer costs 14, the 21st coffer costs 13, the 31st coffer costs 12, the 41st coffer costs 10, and the 51st coffer costs 8.
- This reduction caps at -7 izzat.
- Aurum Strongboxes (
 ) contain multiple Lustreless items, Lustreless Boxes, and can contain
  Large Lustreless Boxes.
- Aurum Strongboxes can be opened by spending 20 izzat.
- The izzat cost for opening strongboxes is reduced by 2 for every 10 strongbox the player has opened in that Sheol wing.
- This reduction caps at -10 izzat.
- Opening chests using keys will yield one of three results:
- 1) The chest will open.
- 2) The key or tool will be lost with the message "However, it has no effect."
- 3) The key or tool is lost, and the chest turns into a Mimic NM.
- The more times a key or tool fails, the higher the chance it has to become a Mimic.
- Skeleton Keys have the lowest failure rate, followed by Living Keys, then Thief's Tools.
Mimics
- Mimics posses high attack and defense, and take reduced damage from magic and skillchains.
- Mimics will use draw in and have rapid hate decay. This causes them to shift targets regularly and draw them in.
- Mimics have an aggro range of 20', and will reaggro the Thief which spawned it, even after a full party wipe and reraise.
- The Thief must never return to within 20' of an idle Mimic or it will reaggro.
- Mimics will not reaggro other party members after a wipe, regardless of their range, unless the party member is within sight aggro of the mimic.
- A Thief may place a party member or Trusts on a Mimic and run away to be defeated by other foes out of range. The Thief will then be able to safely reraise afterwards, but will still gain aggro if they come within 20' of the Mimic again.
- If a Thief is able to use a pillar or other environmental assets (such as the "spike" found at each corner of the fountains) to block line of sight prior to opening a chest, if that chest turns into a Mimic then it will not aggro. This is dependent on luck as the chest locations are randomized each time.
- The stun effect from these moves may be resisted by increasing ones Magic Evasion and with thunder resistance enhancements such as Carols, Runes, and Barthunder.
- Successfully defeating a Mimic will grant a Large Lustreless Box to a player's personal pool upon successfully examining the Otherworldly Vortex.
Individually Issued Rewards
- Successfully reaching the end of Sheol A, B, or C, examining the Otherworldly Vortex rewards the player with an amount of
 Gil (based on amount of Nostos mobs killed) and possible Lustreless Boxes (based on amount of Agon Halos and their surrounding beastmen cleared, and/or NMs+
 ), or Large Lustreless Boxes (based on amount of mimics killed or clearing the RoE quest for the first time) of the Sheol wing.
 - Examining the Otherworldly Vortex will issue individual rewards, you do not have to leave the instance. Each character must examine it themselves in order to receive their personal pool reward. Once you receive your individual reward you may no longer receive any additional individual rewards for that session, even if you kill more Nostos mobs or clear more agon halos and beastmen afterwards. For this reason, it is advised to save claiming individual rewards until the very end of your run.
- Players may not examine the Portal if they or anyone else in their party has aggro.
Upgrading UNM Equipment
- To begin augmenting UCNM equipment, you must complete the item's corresponding Sheol wing's RoE Quest by examining the Otherworldly Vortex.
- You will need 1,191 Lustreless items (12 stacks and 3 singles) to fully upgrade to
 .
.
- Trade 1 of the corresponding Lustreless item, the equipment, and pay the one-time fee of 30,000 Accolades. Unlike the +1 upgrade, there is no game day wait.
- Sheol A related items are Lustreless Scale based.
- Sheol B related items are Lustreless Hide based.
- Sheol C related items are Lustreless Wing based.
- See the Unity Rewards page for which equipment requires which Lustreless item to upgrade it.
- Sheol A related items are
- You will need 1,191 Lustreless items (12 stacks and 3 singles) to fully upgrade to
Sheol A

- The time limit is 30 minutes per entry. This cannot be increased.
- Running out of time will eject all party members.
- Using the Moglophone temporary item will allow you to leave the instance before time expires.
Notorious Monsters (including Mimics):
All Sheol A Monsters:
|
- Otherworldly Vortex location: Topmost (7th) level.
- Examining it will complete the RoE Objective, Content → Odyssey → Sheol A.
- All Nostos enemies in Sheol A have a chance to drop Lustreless Scales.
- See the Unity Rewards page to see which armor pieces they are used to upgrade, and for further details.
- The HP of foes depends on their level, which increases with each level climbed. Sheol A mob HP: ~30,000 to ~65,000.
- Higher level enemies on higher floors have a higher drop rate.
- Treasure Hunter increases the drop rate of Lustreless items up to a max of 3 Lustreless items dropped per Nostos mob.
- Each Nostos Enemy defeated in Sheol A will grant 5 Moogle Segments starting on the first floor, and scale up 2 segments per floor up to 17 Moogle Segments per Nostos Mob defeated on the last (7th) floor.
- Each successfully opened Chest in Sheol A will grant 50 Moogle Segments regardless of Floor. Coffers will grant 75 Moogle Segments, and Aurum Strongboxes will grant 100.
- Each successfully lockpicked Chest in Sheol A will grant 5 Moogle Segments regardless of Floor. Coffers will grant 7 Moogle Segments, and Aurum Strongboxes will grant 10.
- Every Nostos Enemy defeated, regardless of floor, adds +5,000 gil to each player's individual reward.
- Every Notorious Monster defeated, regardless of floor, adds +1 Job Point to each player's individual reward.
- Defeating 1 Agon Halo and all its accompanying Agon Beastemen adds 1 Lustreless Scale Box to each player's individual reward.
- Defeating 1 Mimic spawned from a chest adds 1 Large Lustreless Scale Box to each player's individual reward.
- Mimics in Sheol A will exclusively use Death Trap which is an AoE Stun and Poison.
- Agon Halos will only appear on floors: 1, 3, 5, and 7 in Sheol A.
- These Halos are guarded by Quadav, Orc, and Yagudo beastmen.
- All of the Agon Beastmen can be slept or lullabied, unlike in Sheols B and C where they are immune.
- Floor 7 Agon Beastmen in Sheol A contain Beastmen Leader type variants in their groups.
- These Beastmen Leaders will have access to their appropriate SP Abilities.
Translocator Locations
- 3 Translocators are located in Sheol A. Once registered by examining one, you may warp between them at any point.
- This is not lost or reset when an Odyssey is completed, and may be used to gain access to the Otherwordly Portal more quickly.
- You are unable to use the Translocators if you or anyone in your party currently has aggro.
 #1: Near the start on the first floor.
- #2: On the third floor, close to the Eastern side of the large main area.
- #3: On the fifth floor, past the giant doors south of the starting point, and all the way down the stairs.
Sheol A Maps

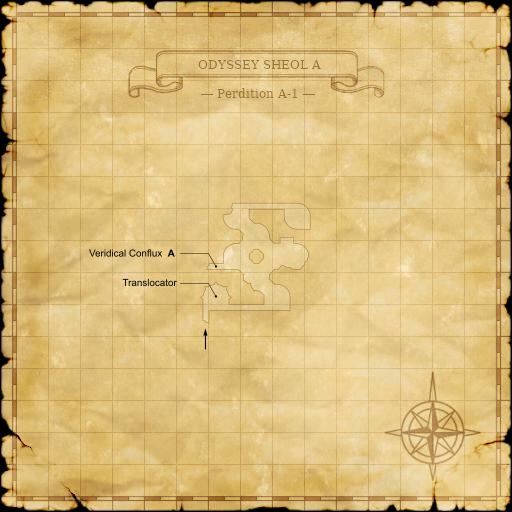


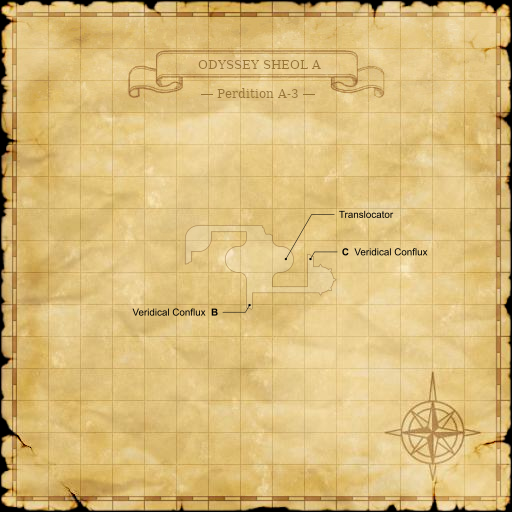


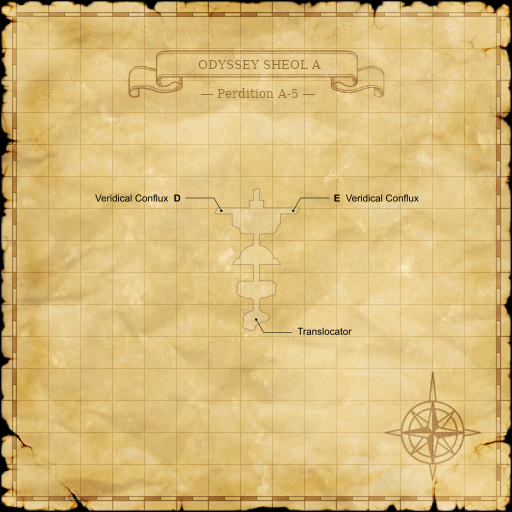

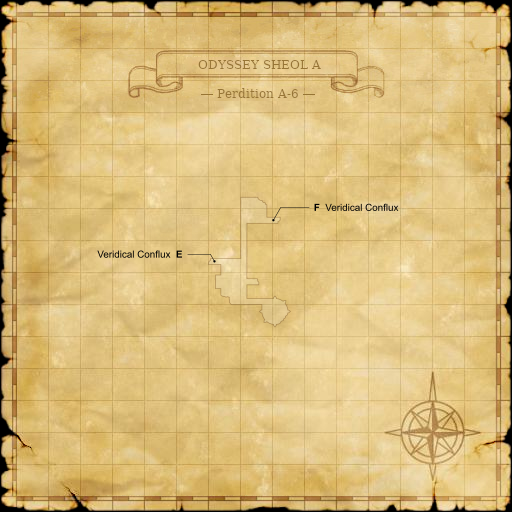


Sheol A Notorious Monsters
Various Notorious Monsters may be spawned by trading UCNM Materials to various Ethereal Junctions within the instance.
Sheol A NMs begin emitting their aura upon the use of their listed SP.
| NM | Pop Item | SP Ability | Aura |
|---|---|---|---|
| Aegypius (Lesser Bird) |
Perfect Dodge | Encumbrance | |
| Ailuros (Coeurl) |
Perfect Dodge | Magic Accuracy Down | |
| Brachys (Crab) |
Invincible | Attack Down | |
| Cynara (Sabotender) |
Hundred Fists | Avoidance Down | |
| Damysus (Goobbue) |
Blood Weapon | Defense Down | |
| Dione (Flytrap) |
Blood Weapon | Magic Evasion Down | |
| Eurytus (Goobbue) |
Mighty Strikes | Evasion Down | |
| Gloios (Slime) |
Mighty Strikes | Defense Down | |
| Harpe (Evil Weapon) |
Chainspell | Magic Defense Down | |
| Kusarikku (Bugard) |
Blood Weapon | Evasion Down | |
| Leucippe (Bat) |
Perfect Dodge | Attack Down | |
| Megaera (Cockatrice) |
Blood Weapon | Magic Attack Down | |
| Physis (Morbol) |
Blood Weapon | Evasion Down | |
| Ptelea (Treant) |
Mighty Strikes | Slow | |
| Salmandra (Eft) |
Perfect Dodge | Paralyze | |
| Tipuli (Fly) |
Mighty Strikes | Magic Defense Down |
Sheol A Floor Statistics
| Floor | Foe Level | NM Level | Mimic Level | NM Pop Items Required | Segments Per Kill |
|---|---|---|---|---|---|
| 1 | 119 | 122 | 124 | 1 | 5 |
| 2 | 121 | 124 | 126 | 3 | 7 |
| 3 | 123 | 126 | 128 | 5 | 9 |
| 4 | 125 | 128 | 130 | 10 | 11 |
| 5 | 127 | 130 | 132 | 15 | 13 |
| 6 | 129 | 132 | 134 | 20 | 15 |
| 7 | 131 | 134 | 136 | 25 | 17 |
Sheol B
The requirements to enter are as follows:
- Players must have completed the Records of Eminence Objective; Content → Odyssey → Sheol A.
- The time limit is 30 minutes per entry. This cannot be increased.
- Running out of time will eject all party members.
- Using the Moglophone temporary item will allow you to leave the instance before time expires.
Notorious Monsters (including Mimics):
All Sheol B Monsters:
|
| Sheol B Monster Resistances | ||||||||||
|---|---|---|---|---|---|---|---|---|---|---|
| -25% | ||||||||||
| Aquan | Crab | Pugil | Sea Monk | |||||||
| Undead | Skeleton | Ghost | Corse | Doomed | Hound | |||||
| -25% | ||||||||||
| Lizard | Lizard | Raptor | Bugard | |||||||
| Bird | Lesser Bird | Bat | Cockatrice | Roc | Apkallu | |||||
| Dragon | Wyvern | Puk | ||||||||
| -25% | ||||||||||
| Beast | Dhalmel | Sheep | Ram | Tiger | Coeurl | |||||
| Manticore | Marid | Buffalo | Opo-opo | |||||||
| Arcana | Bombs | Weapons | Magic Pot | |||||||
| Demon | Ahriman | Taurus | ||||||||
| -25% | ||||||||||
| Amorph | Worm | Leech | Slime | Flan | Hecteye | |||||
| Plantoid | Cactuar | Treant | Sapling | Goobbue | Morbol | |||||
| Vermin | Bee | Beetle | Crawler | Fly | Scorpion | |||||
| Spider | Wamoura | |||||||||
| Susceptible to Cruel Joke | ||||||||||
| Beastmen Resistances | ||||||||||
| Tonberry | -37.5% |
-37.5% |
||||||||
| Sahagin | -37.5% |
|||||||||
| Antica | -37.5% |
-37.5% |
||||||||
- Otherworldly Vortex location: 5th level. (NOT the top floor)
- There is a floor 6, but there is no exit on this floor. Pay attention to the Conflux you use.
- Examining it will complete the RoE Objective, Content → Odyssey → Sheol B.
- All Nostos enemies in Sheol B have a chance to drop Lustreless Hides.
- See the Unity Rewards page to see which armor pieces they are used to upgrade, and for further details.
- The HP of foes depends on their level, which increases with each level climbed. Sheol B mob HP: ~
 to ~.
to ~.
- Higher level enemies on higher floors have a higher drop rate.
- Treasure Hunter increases the drop rate of Lustreless items up to a max of 3 Lustreless items dropped per Nostos mob.
- Each Nostos Enemy defeated in Sheol B will grant 13 Moogle Segments starting on the first floor, and scaling up 2 segments per floor up to 23 Moogle Segments per Nostos Mob defeated on the last (6th) floor.
- Each successfully opened Chest in Sheol B will grant 75 Moogle Segments regardless of Floor. Coffers will grant 100 Moogle Segments and Aurum Strongboxes will grant 150.
- Every Nostos Enemy defeated, regardless of floor, adds +6,000 gil to each player's individual reward.
- Every Notorious Monster defeated, regardless of floor, adds +1 Job Point to each player's individual reward.
- Defeating 1 Agon Halo and all its accompanying Agon Beastemen adds 1
 Lustreless Hide Box to each player's individual reward.
 - Defeating 1 Mimic spawned from a chest adds 1
 Large Lustreless Hide Box to each player's individual reward.
- Mimics in Sheol B will exclusively use Hell Trap, an enhanced version of Death Trap which also reduces players TP by 50%.
- Agon Halos will only appear on floors: 1, 3, 5, and 6 in Sheol B.
- These Halos are guarded by Antica, Sahagin, and Tonberry beastmen.
- Floor 6 Agon Beastmen in Sheol A and all Angon Beastmen in Sheol C may contain Beastmen Leader type variants in their groups.
- These Beastmen Leaders on floor 6 will have access to their appropriate SP Abilities.
Translocator Locations
- 3 Translocators are located in Sheol B. Once registered by examining one, you may warp between them at any point.
- This is not lost or reset when an Odyssey is completed, and may be used to gain access to the Otherworldly Vortex to unlock personal rewards faster. For example, it is quicker to warp to Floor 6 then run back down to Floor 5, vs starting at the very bottom Floor 5 and having to run up all 6 flights of stairs to access the Otherworldly Vortex.
- You are unable to use the Translocators if anyone in your party currently has aggro.
- #1: Near the start on the first floor
- #2: On the third floor, south of where you start, hug the right wall.
- #3: On the sixth floor, north of where you start, hug the right wall.
Sheol B Maps

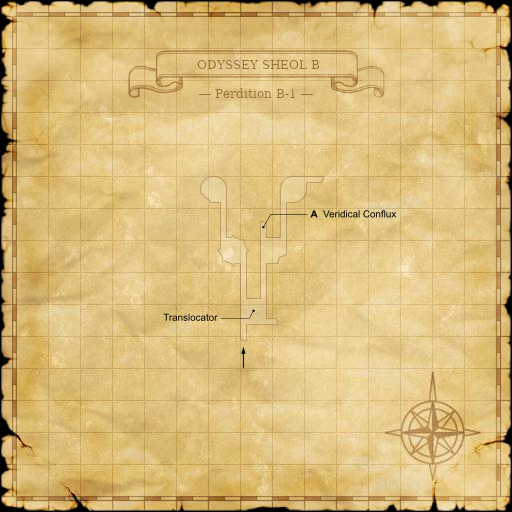


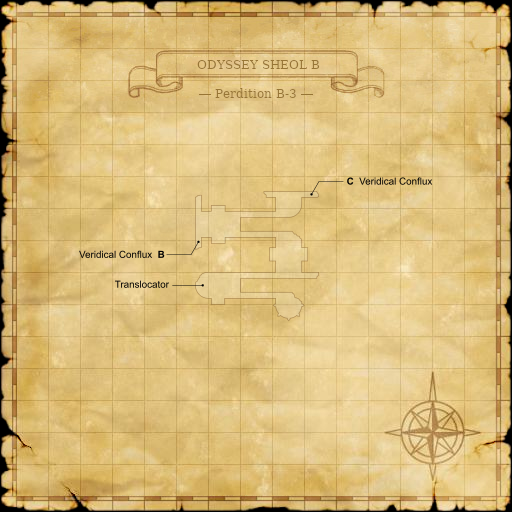


The following are additionally marked up maps that visualize the placing of mobs, halos and roughly that of chests.
The actual positions of mob types, halos, chests and junctions are randomized on entry! Do not use these maps to try to locate chests and/or NMs


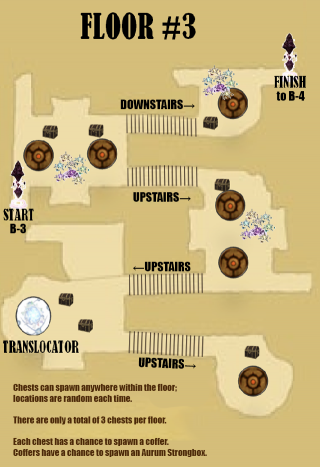

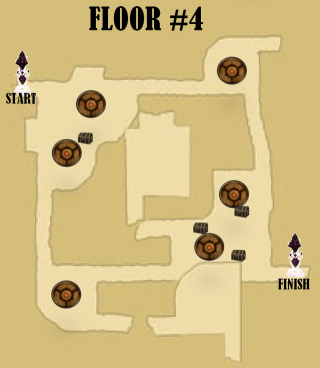


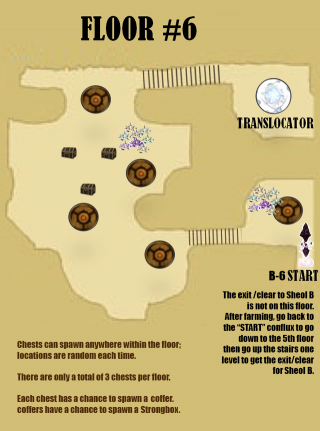
Sheol B Notorious Monsters
Various Notorious Monsters may be spawned by trading UCNM Materials to various Ethereal Junctions within the instance.
Each possess a -37.5% resistance. Which is of the same type as their family for the zone.
All Sheol B NMs will spawn adds on the use of their SP. While the adds are alive, the NM possesses the listed aura. Defeating the adds removes the aura.
Sheol B Floor Statistics
| Floor | Foe Level | NM Level | Mimic Level | NM Pop Items Required | Segments Per Kill |
|---|---|---|---|---|---|
| 1 | 124 | 127 | 129 | 1 | 13 |
| 2 | 126 | 129 | 131 | 3 | 15 |
| 3 | 128 | 131 | 133 | 5 | 17 |
| 4 | 130 | 133 | 135 | 10 | 19 |
| 5 | 132 | 135 | 137 | 15 | 21 |
| 6 | 134 | 137 | 139 | 20 | 23 |
Sheol C
The requirements to enter are as follows:
- Players must have completed the Records of Eminence Objective; Content → Odyssey → Sheol B.
- The time limit is 30 minutes per entry. This cannot be increased.
- Running out of time will eject all party members.
- Using the Moglophone temporary item will allow you to leave the instance before time expires.
Notorious Monsters (including Mimics):
All Sheol C Monsters:
|
| Sheol C Monster Resistances | ||||||||
|---|---|---|---|---|---|---|---|---|
| -50% | ||||||||
| Aquan | Crab | Pugil | ||||||
| Undead | Skeleton | Ghost | Qutrub | |||||
| -50% | ||||||||
| Lizard | Raptor | Bugard | ||||||
| Bird | Lesser Bird | Bat | Cockatrice | Roc | ||||
| Colibri | Apkallu | |||||||
| Dragon | Dahak | Wyvern | Puk | |||||
| -50% | ||||||||
| Beast | Rabbit | Sheep | Ram | Tiger | ||||
| Coeurl | Manticore | Marid | ||||||
| Arcana | Bomb Cluster | Weapons | ||||||
| Demon | Imp | Soulflayer | ||||||
| Amorph | Worm | Leech | Slime | Flan | ||||
| -50% | ||||||||
| Plantoid | Funguar | Treant | Sapling | Mandragora | ||||
| Goobbue | Morbol | Flytrap | ||||||
| Vermin | Bee | Chigoe | Crawler | Fly | ||||
| Scorpion | Spider | Diremite | Wamouras | |||||
| Susceptible to Cruel Joke | ||||||||
| Beastmen Resistances | ||||||||
| Lamiae | -62.5% |
-62.5% |
-12.5% |
|||||
| Mamool Ja | -62.5% |
-12.5% |
-12.5% |
|||||
| Trolls | -62.5% |
-62.5% |
-12.5% |
|||||
- Otherworldly Vortex location: Floor 4.
- Examining it will complete the Records of Eminence Objective, Content → Odyssey → Sheol C.
- This is a one time objective and will unlock Sheol - Gaol.
- All Nostos enemies in Sheol C have a chance to drop Lustreless Wings.
- Higher level enemies on higher floors have a higher drop rate.
- Treasure Hunter increases the drop rate of Lustreless items up to a max of 3 Lustreless items dropped per Nostos mob.
- See the Unity Rewards page to see which armor pieces they are used to upgrade, and for further details.
- The HP of foes depends on their level, which increases with each level climbed. Sheol C mob HP: ~60,000 to ~.
- Each Nostos Enemy defeated in Sheol C will grant 25 Moogle Segments starting on the first floor, and scaling up 2 segments per floor up to 31 Moogle Segments per Nostos Mob defeated on the last (4th) floor.
- Each successfully opened Chest will grant 100 Moogle Segments regardless of Floor. Coffers will grant 150 Moogle Segments and Aurum Strongboxes will grant 200.
- Every Nostos Enemy defeated, regardless of floor, adds +7,000 gil to each player's individual reward.
- Every Nostos Enemy defeated will grant 25 Moogle Segments to all players starting on Floor 1, and scaling by 2 pts per floor up to 31 Moogle Segments per enemy defeated on the top floor.
- Every Notorious Monster defeated, regardless of floor, adds +1 Job Point to each player's individual reward.
- Defeating 1 Agon Halo and all its accompanying Agon Beastemen adds 1
 Lustreless Wing Box to each player's individual reward.
 - Defeating 1 Mimic spawned from a chest adds 1
 Large Lustreless Wing Box to each player's individual reward.
- Mimics in Sheol C will exclusively use Hell Trap, an enhanced version of Death Trap which also reduces players TP by 50%.
- Agon Halos appear on every floor in Sheol C.
- These Halos are guarded by Lamia, Troll, and Mamool Ja beastmen.
- All Angon Beastmen Leaders in Sheol C on floor 4 will have access to their appropriate SP Abilities.
Translocator Locations
- 2 Translocators are located in Sheol C. Once registered by examining one, you may warp between them at any point.
- This is not lost or reset when an Odyssey is completed.
- You are unable to use the Translocators if anyone in your party currently has aggro.
- #1: Near the start on the first floor
- #2: On the second floor, east then north of where you start, hug the left wall up the stairs.
Sheol C Maps


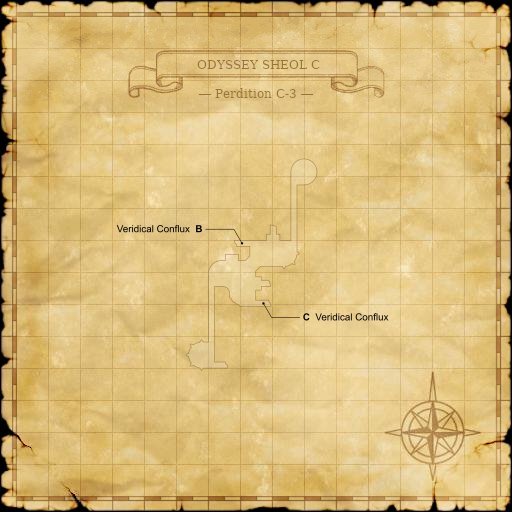

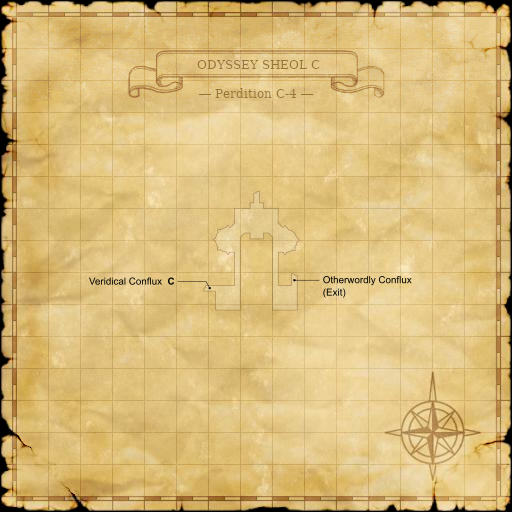
Sheol C Notorious Monsters
Various Notorious Monsters may be spawned by trading UCNM Materials to various Ethereal Junctions within the instance.
Sheol C NMs reset enmity upon the use of their listed SP and when they Level Up.
- Level ups occur starting every 60-100 seconds after the SP usage, up to ten times.
| Notorious Monster | Family | UCNM Pop Item | SP Ability | Resists |
|---|---|---|---|---|
| Asena | Cerberus | Hundred Fists | ||
| Bygul | Khimaira | Perfect Dodge | ||
| Chaos Steward | Dvergr | Manafont | ||
| Dabbat al-Ard | Behemoth | Hundred Fists | ||
| Kurmajara | Adamantoise | Invincible | ||
| Lotanu | Wyrm | Mighty Strikes | ||
| Wayra Tata | Hydra | Invincible |
Sheol C Floor Statistics
| Floor | Foe Level | NM Level | Mimic Level | UCNM Pop Items Required | Segments Per Kill |
|---|---|---|---|---|---|
| 1 | 129 | 132 | 134 | 1 | 25 |
| 2 | 131 | 134 | 136 | 3 | 27 |
| 3 | 133 | 136 | 138 | 5 | 29 |
| 4 | 135 | 138 | 140 | 10 | 31 |
Sheol Gaol
The requirements to enter are as follows:
- Players must have completed the Records of Eminence Objective; Content → Odyssey → Sheol C.
- All party members must have at least 3 jobs at 99 in order to enter and should have different jobs at 99 if wishing to enter as a party.
- This means if a party of 6 players wishes to enter then they should have 18 different jobs at 99 in total between them.
- Sheol Gaol is a boss gauntlet area. Each Boss battle has a hard 15 minute time limit, with the ability to challenge up to three bosses in each entry. This results in a maximum of 45 minutes within the instance.
- Players must have 3 Moglophone II to enter the battlefield.
- By talking to the Pilgrim Moogle by examining the ??? in Rabao near the Veridical Conflux at (G-6) after clearing the ROE for Sheol C, it will mumble something about the Darkness then eventually give you 3 Moglophone II Key Items for free.
- Unlike the Moglophone, There is no timer on obtaining a Moglophone II. The only requirement is that you have the 3,000 Moogle Segments on hand in order to purchase the Key Item.
- Subsequent Moglophone IIs will cost 3000 Moogle Segments each, purchased from the Pilgrim Moogle.
- Each Boss attempt will exhaust 1 Moglophone II.
- As mentioned, each player needs 3 Moglophone IIs to enter Sheol Gaol, but you do not need to spend all three each time you enter. Leftover Moglophone IIs will be retained if players exit after one fight.
- NOTE: If one player chooses to leave the area after expending a Moglophone II, the rest of the party will be unable to enter any further fights due to the party composition changing.
- NOTE: If one player chooses to leave the area after expending a
- By talking to the Pilgrim Moogle by examining the ??? in Rabao near the Veridical Conflux at (G-6) after clearing the ROE for Sheol C, it will mumble something about the Darkness then eventually give you 3
|
Upon entering, players arrive into a Waiting Area with a 15 minute time limit to prepare for the various boss battles. The 15 minute Waiting Area timer starts counting down as soon as you zone in and will continue from where it stopped after you kill each boss and get sent back.
- For this reason, it is advised that you have job assignments worked out in advance with all the equipment you need already on you, so that you spend as little time as possible preparing for each boss.
Upon defeating a boss, players are warped back to the Waiting Area (with the remainder of the 15 minute Waiting Area time limit) to change jobs and prep gear. The 15 minute Waiting Area timer will not reset. E.g. If you take 5 minutes prepping and then your party enters the battlefield killing a chosen boss, you will be sent back to the Waiting Area with 10 minutes remaining to job change and prepare for the next boss.
- Access is given to your main inventory and Mog Wardrobes, as well as Mog Satchel, Sack, Case, Safe and Locker, but not Mog Storage.
- Note: As of the May 2021 update there is now a Porter Moogle available.
- Players cannot use the same main job used in a previous fight. Players cannot be the same job during the same fight. Sub-jobs are not available/restricted.
- For example, if the setup PLD RDM COR GEO is used to fight one boss, then when you return to the waiting room, you cannot enter the next fight with any of those jobs present.
- A similar universal rule is applied to Trusts: Once a trust is called, they are locked out from reuse for the present or remaining two battles.
- Trusts can be summoned mid-fight even if the player has enmity on the target.
At the opposite end of the room, there is a Veridical Conflux; examining it will warp you to the boss area.
- You will need to select which NM to warp to.
- For each Atonement, you do not have to kill the NMs in any particular order.
Notorious Monsters & Rewards
Atonement 1 monsters can be fought immediately upon unlocking Sheol Gaol.
Atonement 1 | |||||||||||||||
|---|---|---|---|---|---|---|---|---|---|---|---|---|---|---|---|
|
Atonement 2 monsters can be fought only once the party leader has defeated all four NMs in Atonement 1.
Atonement 2 | |||||||||||||||||||||
|---|---|---|---|---|---|---|---|---|---|---|---|---|---|---|---|---|---|---|---|---|---|
|
Atonement 3 monsters can be fought only once the party leader has defeated all six NMs in Atonement 2.
Atonement 3 | |||||||||||||||||||||
|---|---|---|---|---|---|---|---|---|---|---|---|---|---|---|---|---|---|---|---|---|---|
|
Atonement 4 monsters can be fought only once the party leader has defeated all six NMs in Atonement 3.
Atonement 4 | ||||||
|---|---|---|---|---|---|---|
|
Sheol Gaol Rewards
- Defeating NMs in Sheol - Gaol provides the corresponding "Information on ..." key items from the corresponding foe and allows players to purchase the equipment.
- The starting price for all equipment is fixed, see below for the initial costs. Subsequent world kills lowers the price.
- Price reductions are tied directly to server win count and are not bound to a period of time check.
- Atonement 1 equipment starts at 2,000,000 Gil.
- Atonement 2 equipment starts at 3,000,000 Gil.
- Atonement 3 weapons start at 4,500,000 Gil, and armor starts at 6,000,000 Gil.
- Atonement 4 equipment starts at 7,500,000 Gil.
- The starting price for all equipment is fixed, see below for the initial costs. Subsequent world kills lowers the price.
Augmenting Rewards
Before players can spend Reinforcement Points on an item, they must unlock rank tiers on each piece of equipment. In order to unlock the augment system, you must defeat at least 1 NM above V+0.
To increase an item's maximum augment rank, players must defeat the NM who originally unlocked the equipment for purchase on higher Vengeance levels.
- Defeating the NM on any Vengeance level allows augmentation up to Rank 15.
- Defeating the NM on Veng+15 or above allows augmentation up to Rank 20.
- Defeating the NM on Veng+20 or above allows augmentation up to Rank 25.
- Defeating the NM on Veng+25 allows augmentation up to Rank 30.
| NM Vengeance | Item Maximum Rank |
|---|---|
| +0 | 15 |
| +15 | 20 |
| +20 | 25 |
| +25 | 30 |
Modifying "Vengeance"
The Vengeance level of a NM determines its strength and the abilities it can use. After all initial defeats of the Atonement Tier NMs, "Vengeance+1-5" difficulties are then accessible for each NM in the specific tier cleared.
- Defeating an NM on "Vengeance+5" unlocks "Vengeance+6"-"Vengeance+10".
- Defeating an NM on "Vengeance+10" then unlocks "Vengeance+11"-"Vengeance+15", and so on.
- Defeating all Atonement 1 NMs on "Vengeance+5" or greater unlocks Atonement 2's "Vengeance+1"-"Vengeance+5".
- Similarly, by defeating all 4 types of "Vengeance+10"-"Vengeance+15" bosses in Atonement 1, "Vengeance+6"-"Vengeance+10" and "Vengeance+11"-"Vengeance+15" of the Atonement 2 bosses will be unlocked.
- The same rules apply to Atonement 3 bosses and adjusting their "Vengeance" according to progress made on Atonement 2 "Vengeance".
- It is possible to take along another player with no progress in any Atonement area or "Vengeance" ranks to skip their grind.
- E.g. A player may clear all T3s on V15 then go back and climb T1/T2 and will then automatically have access to the T3 V15s without clearing them all over.
The rules above are also applied to Atonement 2, 3 and 4 areas.
Earning RP
Reinforcement Points are earned when you fight an NM of Vengeance +1 or higher, whether or not you successfully defeat the NM. RP earned is based on the Vengeance level, the amount of damage dealt, and the use of Moogle Amplifiers.
- RP is earned for each 5% of the NM's HP removed. You must deal at least 5% of the NM's HP before timing out in order to earn RP.
- Using a Moogle Amplifier will triple the RP rewards. See its page or the table below for details.
- You will not earn RP if you leave the zone before winning or timing out, e.g. by using Warp or a Moglophone II.
- You may earn RP even if you do not yet own the equipment it augments.
- There is cap of 50,000 RP stored per NM. Spending down RP by augmenting equipment will allow you to continue earning RP.
RP can be used by interacting with the ??? (Pilgrim Moogle) in Rabao at (G-6), and then trading your desired piece of gear in order to enhance the augment.
- RP earned is unique per NM, and can only be spent on that NM's corresponding equipment.
- The Pilgrim Moogle can also tell you which Vengeance level you've defeated and how many RP you are holding from each NM.
- Unneeded RP can be exchanged at a 1:1 ratio for Moogle Segments.
The base amount of RP earned for a kill is equal to the NextRP for the previous rank (Veng - 1) divided by 5. Veng+1 NM's are treated as having a previous rank NextRP of 30. This value can also be found in the table below.
![]()
The exact amount of RP received can be calculated via the following formula:

The HP% used is the lowest the NM had been, rounded to the nearest 5% (e.g. if you timed out at 43%, use 45% for the formula).
When using a Moogle Amplifier, you will also receive an additional amount equal to 4x the base value. Afterwards, the value is floored.
A charged Moogle Amplifier will also give a bonus of 6x the RP of a 100% kill for the average Veng level (rounded down) of the charge.
| Example: V19 Bumba Taken to 23%, Moogle Amplifier used with a V25 charge |
|---|
baseRP = 1580 (R18 RP to Next Level) / 5 = 316
|
| Veng | BaseRP | 94% | 89% | 84% | 79%†† | 74% | 69% | 64% | 59% | 54% | 49% | 44% | 39% | 34% | 29% | 24% | 19% | 14% | 9% | 4% | 0% | Amp Bonus | Charge Bonus† |
|---|---|---|---|---|---|---|---|---|---|---|---|---|---|---|---|---|---|---|---|---|---|---|---|
| +1 | 6 | 0 | 0 | 0 | 1 | 1 | 1 | 2 | 2 | 2 | 3 | 3 | 3 | 3 | 4 | 4 | 4 | 5 | 5 | 5 | 12 | 24 | 72 |
| +2 | 10 | 0 | 1 | 1 | 2 | 2 | 3 | 3 | 4 | 4 | 5 | 5 | 6 | 6 | 7 | 7 | 8 | 8 | 9 | 9 | 20 | 40 | 120 |
| +3 | 16 | 0 | 1 | 2 | 3 | 4 | 4 | 5 | 6 | 7 | 8 | 8 | 9 | 10 | 11 | 12 | 12 | 13 | 14 | 15 | 32 | 64 | 192 |
| +4 | 24 | 1 | 2 | 3 | 4 | 6 | 7 | 8 | 9 | 10 | 12 | 13 | 14 | 15 | 16 | 18 | 19 | 20 | 21 | 22 | 48 | 96 | 288 |
| +5 | 34 | 1 | 3 | 5 | 6 | 8 | 10 | 11 | 13 | 15 | 17 | 18 | 20 | 22 | 23 | 25 | 27 | 28 | 30 | 32 | 68 | 136 | 408 |
| +6 | 44 | 2 | 4 | 6 | 8 | 11 | 13 | 15 | 17 | 19 | 22 | 24 | 26 | 28 | 30 | 33 | 35 | 37 | 39 | 41 | 88 | 176 | 528 |
| +7 | 56 | 2 | 5 | 8 | 11 | 14 | 16 | 19 | 22 | 25 | 28 | 30 | 33 | 36 | 39 | 42 | 44 | 47 | 50 | 53 | 112 | 224 | 672 |
| +8 | 68 | 3 | 6 | 10 | 13 | 17 | 20 | 23 | 27 | 30 | 34 | 37 | 40 | 44 | 47 | 51 | 54 | 57 | 61 | 64 | 136 | 272 | 816 |
| +9 | 82 | 4 | 8 | 12 | 16 | 20 | 24 | 28 | 32 | 36 | 41 | 45 | 49 | 53 | 57 | 61 | 65 | 69 | 73 | 77 | 164 | 328 | 984 |
| +10 | 96 | 4 | 9 | 14 | 19 | 24 | 28 | 33 | 38 | 43 | 48 | 52 | 57 | 62 | 67 | 72 | 76 | 81 | 86 | 91 | 192 | 384 | 1,152 |
| +11 | 112 | 5 | 11 | 16 | 22 | 28 | 33 | 39 | 44 | 50 | 56 | 61 | 67 | 72 | 78 | 84 | 89 | 95 | 100 | 106 | 224 | 448 | 1,344 |
| +12 | 130 | 6 | 13 | 19 | 26 | 32 | 39 | 45 | 52 | 58 | 65 | 71 | 78 | 84 | 91 | 97 | 104 | 110 | 117 | 123 | 260 | 520 | 1,560 |
| +13 | 150 | 7 | 15 | 22 | 30 | 37 | 45 | 52 | 60 | 67 | 75 | 82 | 90 | 97 | 105 | 112 | 120 | 127 | 135 | 142 | 300 | 600 | 1,800 |
| +14 | 172 | 8 | 17 | 25 | 34 | 43 | 51 | 60 | 68 | 77 | 86 | 94 | 103 | 111 | 120 | 129 | 137 | 146 | 154 | 163 | 344 | 688 | 2,064 |
| +15 | 196 | 9 | 19 | 29 | 39 | 49 | 58 | 68 | 78 | 88 | 98 | 107 | 117 | 127 | 137 | 147 | 156 | 166 | 176 | 186 | 392 | 784 | 2,352 |
| +16 | 222 | 11 | 22 | 33 | 44 | 55 | 66 | 77 | 88 | 99 | 111 | 122 | 133 | 144 | 155 | 166 | 177 | 188 | 199 | 210 | 444 | 888 | 2,664 |
| +17 | 250 | 12 | 25 | 37 | 50 | 62 | 75 | 87 | 100 | 112 | 125 | 137 | 150 | 162 | 175 | 187 | 200 | 212 | 225 | 237 | 500 | 1,000 | 3,000 |
| +18 | 282 | 14 | 28 | 42 | 56 | 70 | 84 | 98 | 112 | 126 | 141 | 155 | 169 | 183 | 197 | 211 | 225 | 239 | 253 | 267 | 564 | 1,128 | 3,384 |
| +19 | 316 | 15 | 31 | 47 | 63 | 79 | 94 | 110 | 126 | 142 | 158 | 173 | 189 | 205 | 221 | 237 | 252 | 268 | 284 | 300 | 632 | 1,264 | 3,792 |
| +20 | 352 | 17 | 35 | 52 | 70 | 88 | 105 | 123 | 140 | 158 | 176 | 193 | 211 | 228 | 246 | 264 | 281 | 299 | 316 | 334 | 704 | 1,408 | 4,224 |
| +21 | 392 | 19 | 39 | 58 | 78 | 98 | 117 | 137 | 156 | 176 | 196 | 215 | 235 | 254 | 274 | 294 | 313 | 333 | 352 | 372 | 784 | 1,568 | 4,704 |
| +22 | 434 | 21 | 43 | 65 | 86 | 108 | 130 | 151 | 173 | 195 | 217 | 238 | 260 | 282 | 303 | 325 | 347 | 368 | 390 | 412 | 868 | 1,736 | 5,208 |
| +23 | 480 | 24 | 48 | 72 | 96 | 120 | 144 | 168 | 192 | 216 | 240 | 264 | 288 | 312 | 336 | 360 | 384 | 408 | 432 | 456 | 960 | 1,920 | 5,760 |
| +24 | 530 | 26 | 53 | 79 | 106 | 132 | 159 | 185 | 212 | 238 | 265 | 291 | 318 | 344 | 371 | 397 | 424 | 450 | 477 | 503 | 1,060 | 2,120 | 6,360 |
| +25 | 582 | 29 | 58 | 87 | 116 | 145 | 174 | 203 | 232 | 261 | 291 | 320 | 349 | 378 | 407 | 436 | 465 | 494 | 523 | 552 | 1,164 | 2,328 | 6,984 |
†Grants the bonus RP for the average Veng level of the 3 NMs used to charge, regardless of the Veng level of the fight the charge is used on.
††Rewards increase at 5% HP intervals, so 24% damage dealt (to avoid adds) is equivalent to only 20%.
- A chart showing the Amplified-specific values can be found on the Moogle Amplifier page.
Using the same example for the formula above, you can also use this chart to find the RP value.
RP = 237 (V19 24% HP Threshold) + 1,264 (V19 Amp Bonus) + 6,984 (V25 Charge Bonus)
RP = 8,485
Vengeance-based strategic tradeoffs:
- Dealing at least 55% damage to a Veng+19 NM grants more RP than dealing 24% damage to a Veng+20 NM to avoid adds.
- Dealing at least 65% damage to a Veng+24 NM grants more RP than dealing 24% damage to a Veng+25 NM.
RP Allocation
The following table specifies how many Reinforcement Points need to be allocated to reach each rank for an item.
| Rank | RP To Next Level | Total RP |
|---|---|---|
| 1 | 50 | 0 |
| 2 | 80 | 50 |
| 3 | 120 | 130 |
| 4 | 170 | 250 |
| 5 | 220 | 420 |
| 6 | 280 | 640 |
| 7 | 340 | 920 |
| 8 | 410 | 1260 |
| 9 | 480 | 1670 |
| 10 | 560 | 2150 |
| 11 | 650 | 2710 |
| 12 | 750 | 3360 |
| 13 | 860 | 4110 |
| 14 | 980 | 4970 |
| 15 | 1110 | 5950 |
| 16 | 1250 | 7060 |
| 17 | 1410 | 8310 |
| 18 | 1580 | 9720 |
| 19 | 1760 | 11300 |
| 20 | 1960 | 13060 |
| 21 | 2170 | 15020 |
| 22 | 2400 | 17190 |
| 23 | 2650 | 19590 |
| 24 | 2910 | 22240 |
| 25 | 3180 | 25150 |
| 26 | 3460 | 28330 |
| 27 | 3760 | 31790 |
| 28 | 4070 | 35550 |
| 29 | 4400 | 39620 |
| 30 | 44020 |
Guides
References
- Level Growth of Nostos mobs (ごまだら, 日本語 Twitter)
- Lv131 (Sheol A Floor 7) Nostos Flytrap HP (ごまだら, 日本語 Twitter)
- Nostos Mobs are Charmable (shamgi, FFXIAH)
- Agon Beastmen kill Rewards (Bahamut.Lexouritis, FFXIAH)
- Killing Mimics rewards Boxes at the end of a successful Odyssey (Carbuncle.Papesse, FFXIAH)
- Moogle Mastery Requires NM wins (Ragnarok.Inx, FFXIAH)
- Moogle Master goes up to V (Asura.Geriond, FFXIAH)
- Moogle Mastery VI with only 500 Nostos (Siren.Codegen, FFXIAH)
- UCNM Material Cost to pop NMs (alamihgo, FFXIAH)
