The Voracious Resurgence | |
| Prime Weapons • Ultimate Weapons • Ultimate Augments • Abjurations iL119 • JSE Necks • Divergence Augments • Escutcheons | |
| Reforged Armor Artifact: +1 • iL109 • iL119/+2/+3 Relic: +1/+2 • iL109 • iL119/+2/+3 Empyrean: +1/+2 • iL109 • iL119/+2/+3 |
Guides • Crafting • Trusts • Apex Monsters |
Category:Sortie: Difference between revisions
mNo edit summary |
|||
| (108 intermediate revisions by 31 users not shown) | |||
| Line 8: | Line 8: | ||
|Intro Text='''Sortie''', introduced in the August 2022 update<sup>[https://forum.square-enix.com/ffxi/threads/59789]</sup>, is exploratory battle content in which players progress through an alternative area of [[Outer Ra'Kaznar (U)]].<br />Materials you acquire in Sortie instances can be used to acquire [[Reforged Empyrean Armor +2]]/[[Reforged Empyrean Armor +3|+3]]. |
|Intro Text='''Sortie''', introduced in the August 2022 update<sup>[https://forum.square-enix.com/ffxi/threads/59789]</sup>, is exploratory battle content in which players progress through an alternative area of [[Outer Ra'Kaznar (U)]].<br />Materials you acquire in Sortie instances can be used to acquire [[Reforged Empyrean Armor +2]]/[[Reforged Empyrean Armor +3|+3]]. |
||
Rewards include {{ItemIcon|Ra'Kaz. Sapphire|26}} [[Ra'Kaznar Sapphire]]s, {{ItemIcon|Ra'Kaz. Starstone|26}} [[Ra'Kaz. Starstone]]s, [[ |
Rewards include [[Gallimaufry]], {{ItemIcon|Ra'Kaz. Sapphire|26}} [[Ra'Kaznar Sapphire]]s, {{ItemIcon|Ra'Kaz. Starstone|26}} [[Ra'Kaz. Starstone]]s,{{ItemIcon|Eikondrite|26}} [[Eikondrite]]s, {{ItemIcon|Old Case|26}} [[Old Case]]s and {{ItemIcon|Old Case +1|26}} [[Old Case +1]] containing [[Sortie Rewards|JSE Earrings]].<br /> |
||
*Entering a Sortie instance will unlock all 5 pieces of [[Reforged Empyrean Armor +2]] armor for reforging for that job. |
*Entering a Sortie instance will unlock all 5 pieces of [[Reforged Empyrean Armor +2]] armor for reforging for that job. |
||
*Reaching any area via a Bitzer device will unlock all 5 pieces of [[Reforged Empyrean Armor +3]] armor for reforging for that job. |
*Reaching any area via a Bitzer device (a.k.a Entering the Basement) will unlock all 5 pieces of [[Reforged Empyrean Armor +3]] armor for reforging for that job. |
||
|Secondary Text= |
|Secondary Text= |
||
}} |
}} |
||
| Line 39: | Line 39: | ||
* After completing your first foray into Sortie, you will receive a [[Ruspix's plate]] {{KI}} upon talking to Ruspix. |
* After completing your first foray into Sortie, you will receive a [[Ruspix's plate]] {{KI}} upon talking to Ruspix. |
||
{{:Ruspix's plate}} |
|||
** While your Dull Ra'Kaznarian plate is fully charged or you are in possession of a Shiny Ra'Kaznarian plate, Ruspix's plate will accumulate 1 second of charge for every 5 seconds of real time that passes, up to a maximum of 20 hours of charge after 100 hours of holding a fully-charged Ra'Kaznarian plate. |
|||
** Upon entering Sortie, the amount of charge accumulated on your Ruspix's plate will be reported in the log. |
|||
** When speaking to Ruspix, you have the option to expend the charge from your Ruspix's plate to recharge your Dull Ra'Kaznarian plate. If there is sufficient accumulated charge to fully recharge the plate, it will transform into a Shiny Ra'Kaznarian plate and allow immediate entry into Sortie. Any excess charge on the Ruspix's plate will be retained, but no message about accumulated charge will appear when entering Sortie with a plate obtained in this manner. |
|||
===Objectives=== |
===Objectives=== |
||
---- |
---- |
||
{| style="width: 100%; max-width: |
{| class="sortie tworow" style="width: 100%; max-width: 240px; text-align: center; border-spacing: 1px; float: right;" |
||
! colspan=" |
! colspan="3" style="padding: 3px; font-size: 17px; text-shadow: 0px 0px 3px #000000;" | Sortie Aggro |
||
|- |
|||
|- style="background: #BD77DB;" |
|||
! style="padding: 3px;" | Sector |
|||
! style="padding: 3px;" | Enemy |
! style="padding: 3px;" | Enemy |
||
! style="padding: 3px;" | Detects |
! style="padding: 3px;" | Detects |
||
|- |
|||
|- style="background: #D8D8D8;" |
|||
| rowspan="3" | A |
|||
| style="padding: 1px;" | [[:Category:Acuex|Acuex]] |
| style="padding: 1px;" | [[:Category:Acuex|Acuex]] |
||
| style="padding: 1px;" | {{sound}} |
| style="padding: 1px;" | {{sound}} |
||
|- |
|||
|- style="background: #E8E8E8;" |
|||
| style="padding: 1px;" | [[:Category:Leech|Leech]] |
| style="padding: 1px;" | [[:Category:Leech|Leech]] |
||
| style="padding: 1px;" | {{sound}} {{links}} |
| style="padding: 1px;" | {{sound}} {{links}} |
||
|- |
|||
|- style="background: #D8D8D8;" |
|||
| style="padding: 1px;" | [[:Category:Hecteyes|Hecteyes]] |
| style="padding: 1px;" | [[:Category:Hecteyes|Hecteyes]] |
||
| style="padding: 1px;" | {{sound}} |
| style="padding: 1px;" | {{sound}} |
||
|- |
|||
|- style="background: #E8E8E8;" |
|||
| B, F |
|||
| style="padding: 1px;" | [[Elemental]] |
| style="padding: 1px;" | [[Elemental]] |
||
| style="padding: 1px;" | {{magic}} |
| style="padding: 1px;" | {{magic}} |
||
|- |
|||
|- style="background: #D8D8D8;" |
|||
| B |
|||
| style="padding: 1px;" | [[:Category:Umbril|Umbril]] |
| style="padding: 1px;" | [[:Category:Umbril|Umbril]] |
||
| style="padding: 1px;" | {{sight}} {{magic}} |
| style="padding: 1px;" | {{sight}} {{magic}} |
||
|- |
|||
|- style="background: #E8E8E8;" |
|||
| rowspan="3" | C |
|||
| style="padding: 1px;" | [[:Category:Ghost|Ghost]] |
| style="padding: 1px;" | [[:Category:Ghost|Ghost]] |
||
| style="padding: 1px;" | {{sound}} {{HP}} |
| style="padding: 1px;" | {{sound}} {{HP}} |
||
|- |
|||
|- style="background: #D8D8D8;" |
|||
| style="padding: 1px;" | [[Skeleton]] |
| style="padding: 1px;" | [[Skeleton]] |
||
| style="padding: 1px;" | {{sight}} {{HP}} |
| style="padding: 1px;" | {{sight}} {{HP}} |
||
|- |
|||
|- style="background: #E8E8E8;" |
|||
| style="padding: 1px;" | [[:Category:Corse|Corse]] |
| style="padding: 1px;" | [[:Category:Corse|Corse]] |
||
| style="padding: 1px;" | {{sight}} {{HP}} |
| style="padding: 1px;" | {{sight}} {{HP}} |
||
|- |
|||
|- style="background: #D8D8D8;" |
|||
| D, H |
|||
| style="padding: 1px;" | [[Fomor]] |
| style="padding: 1px;" | [[Fomor]] |
||
| style="padding: 1px;" | {{sound}} {{sight}} {{links}} |
| style="padding: 1px;" | {{sound}} {{sight}} {{links}} |
||
|- |
|||
| rowspan="3" | E |
|||
| style="padding: 1px;" | [[Slime]] |
|||
| style="padding: 1px;" | {{sound}} |
|||
|- |
|||
| style="padding: 1px;" | [[Slug]] |
|||
| style="padding: 1px;" | {{sound}} |
|||
|- |
|||
| style="padding: 1px;" | [[Flan]] |
|||
| style="padding: 1px;" | {{sight}} {{JA}} |
|||
|- |
|||
| F |
|||
| style="padding: 1px;" | [[:Category:Pixie|Pixie]] |
|||
| style="padding: 1px;" | {{sound}} {{sight}} {{magic}} |
|||
|- |
|||
| rowspan="3" | G |
|||
| style="padding: 1px;" | [[Hound]] |
|||
| style="padding: 1px;" | {{sound}} {{HP}} |
|||
|- |
|||
| style="padding: 1px;" | [[:Category:Dullahan|Dullahan]] |
|||
| style="padding: 1px;" | {{sound}} {{sight}} {{HP}} |
|||
|- |
|||
| style="padding: 1px;" | [[Vampyr]] |
|||
| style="padding: 1px;" | {{sight}} {{HP}} |
|||
|} |
|} |
||
* Sortie consists of the entire map of [[Outer Ra'Kaznar]] sharded into eight unequal Sectors labeled A through H, each of which contains: |
* Sortie consists of the entire map of [[Outer Ra'Kaznar]] sharded into eight unequal Sectors labeled A through H, each of which contains: |
||
** several groups of enemies from one or more [[:Category:Bestiary|families of a single type]], |
** several groups of enemies from one or more [[:Category:Bestiary|families of a single type]], |
||
** one minor NM, which can roam around the Sector, |
** one minor NM, which can roam around the Sector, |
||
** one major NM, found behind a Diaphanous Gadget, |
** one major NM, found behind a Diaphanous Gadget, and |
||
** a Diaphanous Bitzer. |
|||
* Ground floor Sectors A through D also contain: |
|||
** a Diaphanous Device, |
** a Diaphanous Device, |
||
** a Diaphanous Bitzer, |
|||
** several unlocked Gates, and |
** several unlocked Gates, and |
||
** several Locked Gates. |
** several Locked Gates. |
||
| Line 90: | Line 119: | ||
* Minor NMs and Gates are associated with [[#Hidden Objectives|Hidden Objectives]]. |
* Minor NMs and Gates are associated with [[#Hidden Objectives|Hidden Objectives]]. |
||
* Enemies take full damage from AoE magic and abilities. |
* Enemies take full damage from AoE magic and abilities. |
||
** Geomancy has full effects on regular enemies but |
** Geomancy has full effects on regular enemies, but is reduced by -50% on NMs. |
||
** All enemies have normal damage type resistances for their [[:Category:Bestiary|family]]. |
** All enemies have normal damage type resistances for their [[:Category:Bestiary|family]]. |
||
* All foes in Sortie are aggressive. |
* All foes in Sortie are aggressive. |
||
** Not all enemies follow their family's normal detection rules. See the table for details. |
** '''Not all enemies follow their family's normal detection rules.''' See the table for details. |
||
===Progression=== |
===Progression=== |
||
| Line 128: | Line 157: | ||
*** Blue: Has a chance to contain a [[Ra'Kaznar Sapphire]], an [[Old Case]]/[[Old Case +1]], or both. |
*** Blue: Has a chance to contain a [[Ra'Kaznar Sapphire]], an [[Old Case]]/[[Old Case +1]], or both. |
||
*** Red: Has a chance to contain a [[Ra'Kaznar Sapphire]], an [[Old Case]]/[[Old Case +1]], or both. |
*** Red: Has a chance to contain a [[Ra'Kaznar Sapphire]], an [[Old Case]]/[[Old Case +1]], or both. |
||
** In order to receive rewards, players must be: |
|||
** Players do not need to be in EXP range of chests in order to receive rewards. |
|||
*** Anywhere on the ground floor when the chest is opened, for chests which appear in sectors A through D; |
|||
*** However, players must be on the same floor, or in the same boss room. |
|||
*** In the boss area, but not necessarily inside the door, for major NM rewards; |
|||
*** In the same sector when the chest is opened, for chests which appear in basement sectors E through H. |
|||
** Chests always grant the same reward to all players in the party. |
** Chests always grant the same reward to all players in the party. |
||
** Chests do not disappear if left unopened. |
** Chests do not disappear if left unopened. |
||
** '''Like in Omen, Summoner Magical Blood pacts do not Qualify for any magic related objectives in zone A, or any Weapon Skill related objectives, since bloodpacts are Job Ability. |
** '''Note''': Like in Omen, Summoner Magical Blood pacts do not Qualify for any magic related objectives in zone A, or any Weapon Skill related objectives, since bloodpacts are Job Ability. |
||
==== |
====Ground Floor==== |
||
{| style="width: 100%; max-width: 788px; text-align: center; border-spacing: 1px;" |
{| class="sortie tworow" style="width: 100%; max-width: 788px; text-align: center; border-spacing: 1px;" |
||
! colspan="3" style="padding: 3px |
! colspan="3" style="padding: 3px; font-size: 17px; text-shadow: 0px 0px 3px #000000;" | Sector A Objectives |
||
|- |
|||
|- style="background: #BD77DB;" |
|||
! style="padding: 3px; width: 15%" | Chest |
! style="padding: 3px; width: 15%" | Chest |
||
! style="padding: 3px; width: 60%;" | Objective |
! style="padding: 3px; width: 60%;" | Objective |
||
! style="padding: 3px; width: 25%;" | Reward |
! style="padding: 3px; width: 25%;" | Reward |
||
|- |
|||
|- style="background: #D8D8D8;" |
|||
| style="padding: 1px; font-weight: bold; color: #930;" | Chest #A1 |
| style="padding: 1px; font-weight: bold; color: #930;" | Chest #A1 |
||
| style="padding: 1px;" | Open any unlocked Gate #A.<br />Ground Floor: (D-4), (F-2), (H-2) |
| style="padding: 1px;" | Open any unlocked Gate #A.<br />Ground Floor: (D-4), (F-2), (H-2) |
||
| style="padding: 1px;" | 100 Gallimaufry {{gdrop}}<br />[[Ra'Kaznar Key A]] {{gdrop}} |
| style="padding: 1px;" | 100 Gallimaufry {{gdrop}}<br />[[Ra'Kaznar Key A]] {{gdrop}} |
||
|- |
|||
|- style="background: #E8E8E8;" |
|||
| style="padding: 1px; font-weight: bold; color: #930;" | Chest #A2 |
| style="padding: 1px; font-weight: bold; color: #930;" | Chest #A2 |
||
| style="padding: 1px;" | Cast magic next to Diaphanous Device #A. |
| style="padding: 1px;" | Cast magic next to Diaphanous Device #A. Any magic works, including summoning an alter-ego / trust. |
||
| style="padding: 1px;" | 100 Gallimaufry {{gdrop}}<br />[[Ra'Kaznar Plate A]] {{gdrop}} |
| style="padding: 1px;" | 100 Gallimaufry {{gdrop}}<br />[[Ra'Kaznar Plate A]] {{gdrop}} |
||
|- |
|||
|- style="background: #D8D8D8;" |
|||
| style="padding: 1px; font-weight: bold; color: #930;" | Chest #A3 |
| style="padding: 1px; font-weight: bold; color: #930;" | Chest #A3 |
||
| style="padding: 1px;" | Vanquish 3 Abject foes using single-target magic for the killing blow. |
| style="padding: 1px;" | Vanquish 3 Abject foes using single-target magic for the killing blow. |
||
| style="padding: 1px;" | 100 Gallimaufry {{gdrop}}<br />[[Ra'Kaznar Shard A]] {{gdrop}} |
| style="padding: 1px;" | 100 Gallimaufry {{gdrop}}<br />[[Ra'Kaznar Shard A]] {{gdrop}} |
||
|- |
|||
|- style="background: #E8E8E8;" |
|||
| style="padding: 1px; font-weight: bold; color: #930;" | Chest #A4 |
| style="padding: 1px; font-weight: bold; color: #930;" | Chest #A4 |
||
| style="padding: 1px;" | Vanquish 3 more Abject foes using single-target magic for the killing blow. |
| style="padding: 1px;" | Vanquish 3 more Abject foes using single-target magic for the killing blow. |
||
| style="padding: 1px;" | 100 Gallimaufry {{gdrop}}<br />[[Ra'Kaznar Metal A]] {{gdrop}} |
| style="padding: 1px;" | 100 Gallimaufry {{gdrop}}<br />[[Ra'Kaznar Metal A]] {{gdrop}} |
||
|- |
|||
|- style="background: #D8D8D8;" |
|||
| style="padding: 1px; font-weight: bold; color: #930;" | Chest #A5 |
| style="padding: 1px; font-weight: bold; color: #930;" | Chest #A5 |
||
| style="padding: 1px;" | Interact with Diaphanous Bitzer #A while naked. |
| style="padding: 1px;" | Interact with Diaphanous Bitzer #A while naked. |
||
| style="padding: 1px;" | 100 Gallimaufry {{gdrop}}<br />[[Ra'Kaznar Sheet A]] {{gdrop}} |
| style="padding: 1px;" | 100 Gallimaufry {{gdrop}}<br />[[Ra'Kaznar Sheet A]] {{gdrop}} |
||
|- |
|||
|- style="background: #E8E8E8;" |
|||
| style="padding: 1px; font-weight: bold; color: #03C;" | Casket #A1 |
| style="padding: 1px; font-weight: bold; color: #03C;" | Casket #A1 |
||
| style="padding: 1px;" | Vanquish 5 Abject foes. |
| style="padding: 1px;" | Vanquish 5 Abject foes. |
||
| style="padding: 1px;" | 100 Gallimaufry {{gdrop}}<br />[[Ra'Kaznar Sapphire]] {{cdrop}}<br />[[Old Case]] {{cdrop}}<br />[[Old Case +1]] {{xdrop}} |
| style="padding: 1px;" | 100 Gallimaufry {{gdrop}}<br />[[Ra'Kaznar Sapphire]] {{cdrop}}<br />[[Eikondrite]] {{cdrop}}<br />[[Old Case]] {{cdrop}}<br />[[Old Case +1]] {{xdrop}} |
||
|- |
|||
|- style="background: #D8D8D8;" |
|||
| style="padding: 1px; font-weight: bold; color: #03C;" | Casket #A2 |
| style="padding: 1px; font-weight: bold; color: #03C;" | Casket #A2 |
||
| style="padding: 1px;" | /heal in the area between Gate #A1 and the Abject Leeches. |
| style="padding: 1px;" | /heal in the area between Gate #A1 and the Abject Leeches. |
||
| style="padding: 1px;" | 100 Gallimaufry {{gdrop}}<br />[[Ra'Kaznar Sapphire]] {{cdrop}}<br />[[Old Case]] {{cdrop}}<br />[[Old Case +1]] {{xdrop}} |
| style="padding: 1px;" | 100 Gallimaufry {{gdrop}}<br />[[Ra'Kaznar Sapphire]] {{cdrop}}<br />[[Eikondrite]] {{cdrop}}<br />[[Old Case]] {{cdrop}}<br />[[Old Case +1]] {{xdrop}} |
||
|- |
|||
|- style="background: #E8E8E8;" |
|||
| style="padding: 1px; font-weight: bold; color: #C03;" | Coffer #A |
| style="padding: 1px; font-weight: bold; color: #C03;" | Coffer #A |
||
| style="padding: 1px;" | Vanquish [[Abject Obdella]]. |
| style="padding: 1px;" | Vanquish [[Abject Obdella]]. |
||
| style="padding: 1px;" | 500 Gallimaufry {{gdrop}}<br />[[Ra'Kaznar Sapphire]] {{cdrop}}<br />[[Old Case]] {{cdrop}}<br />[[Old Case +1]] {{vrdrop}} |
| style="padding: 1px;" | 500 Gallimaufry {{gdrop}}<br />[[Ra'Kaznar Sapphire]] {{cdrop}}<br />[[Eikondrite]] {{cdrop}}<br />[[Old Case]] {{cdrop}}<br />[[Old Case +1]] {{vrdrop}} |
||
|} |
|} |
||
{| style="width: 100%; max-width: 788px; text-align: center; border-spacing: 1px;" |
{| class="sortie tworow" style="width: 100%; max-width: 788px; text-align: center; border-spacing: 1px;" |
||
! colspan="3" style="padding: 3px |
! colspan="3" style="padding: 3px; font-size: 17px; text-shadow: 0px 0px 3px #000000;" | Sector B Objectives |
||
|- |
|||
|- style="background: #BD77DB;" |
|||
! style="padding: 3px; width: 15%" | Chest |
! style="padding: 3px; width: 15%" | Chest |
||
! style="padding: 3px; width: 60%;" | Objective |
! style="padding: 3px; width: 60%;" | Objective |
||
! style="padding: 3px; width: 25%;" | Reward |
! style="padding: 3px; width: 25%;" | Reward |
||
|- |
|||
|- style="background: #D8D8D8;" |
|||
| style="padding: 1px; font-weight: bold; color: #930;" | Chest #B1 |
| style="padding: 1px; font-weight: bold; color: #930;" | Chest #B1 |
||
| style="padding: 1px;" | Open Gates #B1 through #B6 in order. [[Image:B-Key-Route.png |25px|Click to enlarge]] |
| style="padding: 1px;" | Open Gates #B1 through #B6 in order. [[Image:B-Key-Route.png |25px|Click to enlarge]] |
||
| style="padding: 1px;" | 100 Gallimaufry {{gdrop}}<br />[[Ra'Kaznar Key B]] {{gdrop}} |
| style="padding: 1px;" | 100 Gallimaufry {{gdrop}}<br />[[Ra'Kaznar Key B]] {{gdrop}} |
||
|- |
|||
|- style="background: #E8E8E8;" |
|||
| style="padding: 1px; font-weight: bold; color: #930;" | Chest #B2 |
| style="padding: 1px; font-weight: bold; color: #930;" | Chest #B2 |
||
| style="padding: 1px;" | [[Emotes|/hurray]] with Diaphanous Device #B. |
| style="padding: 1px;" | [[Emotes|/hurray]] with Diaphanous Device #B. |
||
| style="padding: 1px;" | 100 Gallimaufry {{gdrop}}<br />[[Ra'Kaznar Plate B]] {{gdrop}} |
| style="padding: 1px;" | 100 Gallimaufry {{gdrop}}<br />[[Ra'Kaznar Plate B]] {{gdrop}} |
||
|- |
|||
|- style="background: #D8D8D8;" |
|||
| style="padding: 1px; font-weight: bold; color: #930;" | Chest #B3 |
| style="padding: 1px; font-weight: bold; color: #930;" | Chest #B3 |
||
| style="padding: 1px;" | |
| style="padding: 1px;" | Perform one weaponskill before defeating them on 5 Biune foes. |
||
:[[Immanence]] and Bloodpacts do not count. |
|||
| style="padding: 1px;" | 100 Gallimaufry {{gdrop}}<br />[[Ra'Kaznar Shard B]] {{gdrop}} |
| style="padding: 1px;" | 100 Gallimaufry {{gdrop}}<br />[[Ra'Kaznar Shard B]] {{gdrop}} |
||
|- |
|||
|- style="background: #E8E8E8;" |
|||
| style="padding: 1px; font-weight: bold; color: #930;" | Chest #B4 |
| style="padding: 1px; font-weight: bold; color: #930;" | Chest #B4 |
||
| style="padding: 1px;" | |
| style="padding: 1px;" | Perform one weaponskill before defeating them on 5 more Biune foes. |
||
:[[Immanence]] and Bloodpacts do not count. |
|||
| style="padding: 1px;" | 100 Gallimaufry {{gdrop}}<br />[[Ra'Kaznar Metal B]] {{gdrop}} |
| style="padding: 1px;" | 100 Gallimaufry {{gdrop}}<br />[[Ra'Kaznar Metal B]] {{gdrop}} |
||
|- |
|||
|- style="background: #D8D8D8;" |
|||
| style="padding: 1px; font-weight: bold; color: #930;" | Chest #B5 |
| style="padding: 1px; font-weight: bold; color: #930;" | Chest #B5 |
||
| style="padding: 1px;" | Interact with Diaphanous Bitzer #B while walking from the start of the zone. If you |
| style="padding: 1px;" | Interact with Diaphanous Bitzer #B while walking from the start of the zone. If you use a Diaphanous Device to warp you must warp back to the start and start over. |
||
| style="padding: 1px;" | 100 Gallimaufry {{gdrop}}<br />[[Ra'Kaznar Sheet B]] {{gdrop}} |
| style="padding: 1px;" | 100 Gallimaufry {{gdrop}}<br />[[Ra'Kaznar Sheet B]] {{gdrop}} |
||
|- |
|||
|- style="background: #E8E8E8;" |
|||
| style="padding: 1px; font-weight: bold; color: #03C;" | Casket #B1 |
| style="padding: 1px; font-weight: bold; color: #03C;" | Casket #B1 |
||
| style="padding: 1px;" | Vanquish 3 Biune foes within 30 {{verification}} seconds of gaining enmity. |
| style="padding: 1px;" | Vanquish 3 Biune foes within 30 {{verification}} seconds of gaining enmity. |
||
| style="padding: 1px;" | 100 Gallimaufry {{gdrop}}<br />[[Ra'Kaznar Sapphire]] {{cdrop}}<br />[[Old Case]] {{cdrop}}<br />[[Old Case +1]] {{xdrop}} |
| style="padding: 1px;" | 100 Gallimaufry {{gdrop}}<br />[[Ra'Kaznar Sapphire]] {{cdrop}}<br />[[Eikondrite]] {{cdrop}}<br />[[Old Case]] {{cdrop}}<br />[[Old Case +1]] {{xdrop}} |
||
|- |
|||
|- style="background: #D8D8D8;" |
|||
| style="padding: 1px; font-weight: bold; color: #03C;" | Casket #B2 |
| style="padding: 1px; font-weight: bold; color: #03C;" | Casket #B2 |
||
| style="padding: 1px;" | Open any Locked Gate #B.<br />Ground Floor: (J-8), (K-8), (M-8) |
| style="padding: 1px;" | Open any Locked Gate #B.<br />Ground Floor: (J-8), (K-8), (M-8) |
||
| style="padding: 1px;" | 100 Gallimaufry {{gdrop}}<br />[[Ra'Kaznar Sapphire]] {{cdrop}}<br />[[Old Case]] {{cdrop}}<br />[[Old Case +1]] {{xdrop}} |
| style="padding: 1px;" | 100 Gallimaufry {{gdrop}}<br />[[Ra'Kaznar Sapphire]] {{cdrop}}<br />[[Eikondrite]] {{cdrop}}<br />[[Old Case]] {{cdrop}}<br />[[Old Case +1]] {{xdrop}} |
||
|- |
|||
|- style="background: #E8E8E8;" |
|||
| style="padding: 1px; font-weight: bold; color: #C03;" | Coffer #B |
| style="padding: 1px; font-weight: bold; color: #C03;" | Coffer #B |
||
| style="padding: 1px;" | Vanquish [[Biune Porxie]] after |
| style="padding: 1px;" | Vanquish [[Biune Porxie]] after meeting the objective for <font color="#03C">'''Casket #B1'''</font>. |
||
| style="padding: 1px;" | 500 Gallimaufry {{gdrop}}<br />[[Ra'Kaznar Sapphire]] {{cdrop}}<br />[[Old Case]] {{cdrop}}<br />[[Old Case +1]] {{vrdrop}} |
| style="padding: 1px;" | 500 Gallimaufry {{gdrop}}<br />[[Ra'Kaznar Sapphire]] {{cdrop}}<br />[[Eikondrite]] {{cdrop}}<br />[[Old Case]] {{cdrop}}<br />[[Old Case +1]] {{vrdrop}} |
||
|} |
|} |
||
{| style="width: 100%; max-width: 788px; text-align: center; border-spacing: 1px;" |
{| class="sortie tworow" style="width: 100%; max-width: 788px; text-align: center; border-spacing: 1px;" |
||
! colspan="3" style="padding: 3px |
! colspan="3" style="padding: 3px; font-size: 17px; text-shadow: 0px 0px 3px #000000;" | Sector C Objectives |
||
|- |
|||
|- style="background: #BD77DB;" |
|||
! style="padding: 3px; width: 15%" | Chest |
! style="padding: 3px; width: 15%" | Chest |
||
! style="padding: 3px; width: 60%;" | Objective |
! style="padding: 3px; width: 60%;" | Objective |
||
! style="padding: 3px; width: 25%;" | Reward |
! style="padding: 3px; width: 25%;" | Reward |
||
|- |
|||
|- style="background: #D8D8D8;" |
|||
| style="padding: 1px; font-weight: bold; color: #930;" | Chest #C1 |
| style="padding: 1px; font-weight: bold; color: #930;" | Chest #C1 |
||
| style="padding: 1px;" | Open Gate #C1 or #C2 before defeating any enemies in Sector C. |
| style="padding: 1px;" | Open Gate #C1 or #C2 before defeating any enemies in Sector C. |
||
| style="padding: 1px;" | 100 Gallimaufry {{gdrop}}<br />[[Ra'Kaznar Key C]] {{gdrop}} |
| style="padding: 1px;" | 100 Gallimaufry {{gdrop}}<br />[[Ra'Kaznar Key C]] {{gdrop}} |
||
|- |
|||
|- style="background: #E8E8E8;" |
|||
| style="padding: 1px; font-weight: bold; color: #930;" | Chest #C2 |
| style="padding: 1px; font-weight: bold; color: #930;" | Chest #C2 |
||
| style="padding: 1px;" | Pull a Cachaemic foe to Diaphanous Device #C and defeat it there. |
| style="padding: 1px;" | Pull a Cachaemic foe to Diaphanous Device #C and defeat it there. |
||
| style="padding: 1px;" | 100 Gallimaufry {{gdrop}}<br />[[Ra'Kaznar Plate C]] {{gdrop}} |
| style="padding: 1px;" | 100 Gallimaufry {{gdrop}}<br />[[Ra'Kaznar Plate C]] {{gdrop}} |
||
|- |
|||
|- style="background: #D8D8D8;" |
|||
| style="padding: 1px; font-weight: bold; color: #930;" | Chest #C3 |
| style="padding: 1px; font-weight: bold; color: #930;" | Chest #C3 |
||
| style="padding: 1px;" | Perform a Magic Burst on 3 Cachaemic foes before defeating them. |
| style="padding: 1px;" | Perform a Magic Burst on 3 Cachaemic foes before defeating them. |
||
| style="padding: 1px;" | 100 Gallimaufry {{gdrop}}<br />[[Ra'Kaznar Shard C]] {{gdrop}} |
| style="padding: 1px;" | 100 Gallimaufry {{gdrop}}<br />[[Ra'Kaznar Shard C]] {{gdrop}} |
||
|- |
|||
|- style="background: #E8E8E8;" |
|||
| style="padding: 1px; font-weight: bold; color: #930;" | Chest #C4 |
| style="padding: 1px; font-weight: bold; color: #930;" | Chest #C4 |
||
| style="padding: 1px;" | Perform a Magic Burst on 3 more Cachaemic foes before defeating them. |
| style="padding: 1px;" | Perform a Magic Burst on 3 more Cachaemic foes before defeating them. |
||
| style="padding: 1px;" | 100 Gallimaufry {{gdrop}}<br />[[Ra'Kaznar Metal C]] {{gdrop}} |
| style="padding: 1px;" | 100 Gallimaufry {{gdrop}}<br />[[Ra'Kaznar Metal C]] {{gdrop}} |
||
|- |
|||
|- style="background: #D8D8D8;" |
|||
| style="padding: 1px; font-weight: bold; color: #930;" | Chest #C5 |
| style="padding: 1px; font-weight: bold; color: #930;" | Chest #C5 |
||
| style="padding: 1px;" | Vanquish at least one Cachaemic foe, Materialize Cachaemic foes at Diaphanous Device #C, then interact with Diaphanous Bitzer #C.<br />The same player who Materializes must interact with the Bitzer. |
| style="padding: 1px;" | Vanquish at least one Cachaemic foe, Materialize Cachaemic foes at Diaphanous Device #C, then interact with Diaphanous Bitzer #C.<br />The same player who Materializes must interact with the Bitzer. |
||
| style="padding: 1px;" | 100 Gallimaufry {{gdrop}}<br />[[Ra'Kaznar Sheet C]] {{gdrop}} |
| style="padding: 1px;" | 100 Gallimaufry {{gdrop}}<br />[[Ra'Kaznar Sheet C]] {{gdrop}} |
||
|- |
|||
|- style="background: #E8E8E8;" |
|||
| style="padding: 1px; font-weight: bold; color: #03C;" | Casket #C1 |
| style="padding: 1px; font-weight: bold; color: #03C;" | Casket #C1 |
||
| style="padding: 1px;" | Vanquish 3 Cachaemic foes within 15 {{verification}} seconds of gaining enmity. |
| style="padding: 1px;" | Vanquish 3 Cachaemic foes within 15 {{verification}} seconds of gaining enmity. |
||
| style="padding: 1px;" | 100 Gallimaufry {{gdrop}}<br />[[Ra'Kaznar Sapphire]] {{cdrop}}<br />[[Old Case]] {{cdrop}}<br />[[Old Case +1]] {{xdrop}} |
| style="padding: 1px;" | 100 Gallimaufry {{gdrop}}<br />[[Ra'Kaznar Sapphire]] {{cdrop}}<br />[[Eikondrite]] {{cdrop}}<br />[[Old Case]] {{cdrop}}<br />[[Old Case +1]] {{xdrop}} |
||
|- |
|||
|- style="background: #D8D8D8;" |
|||
| style="padding: 1px; font-weight: bold; color: #03C;" | Casket #C2 |
| style="padding: 1px; font-weight: bold; color: #03C;" | Casket #C2 |
||
| style="padding: 1px;" | Vanquish all Cachaemic foes. |
| style="padding: 1px;" | Vanquish all Cachaemic foes. |
||
| style="padding: 1px;" | 100 Gallimaufry {{gdrop}}<br />[[Ra'Kaznar Sapphire]] {{cdrop}}<br />[[Old Case]] {{cdrop}}<br />[[Old Case +1]] {{xdrop}} |
| style="padding: 1px;" | 100 Gallimaufry {{gdrop}}<br />[[Ra'Kaznar Sapphire]] {{cdrop}}<br />[[Eikondrite]] {{cdrop}}<br />[[Old Case]] {{cdrop}}<br />[[Old Case +1]] {{xdrop}} |
||
|- |
|||
|- style="background: #E8E8E8;" |
|||
| style="padding: 1px; font-weight: bold; color: #C03;" | Coffer #C |
| style="padding: 1px; font-weight: bold; color: #C03;" | Coffer #C |
||
| style="padding: 1px;" | Vanquish [[Cachaemic Bhoot]] within 5{{Question}} minutes of its spawn.<br />Timer begins upon entering Sector C.<br />Bhoot must be defeated before rematerializing to reset the timer. |
| style="padding: 1px;" | Vanquish [[Cachaemic Bhoot]] within 5{{Question}} minutes of its spawn.<br />Timer begins upon entering Sector C.<br />Bhoot must be defeated before rematerializing to reset the timer. |
||
| style="padding: 1px;" | 500 Gallimaufry {{gdrop}}<br />[[Ra'Kaznar Sapphire]] {{cdrop}}<br />[[Old Case]] {{cdrop}}<br />[[Old Case +1]] {{vrdrop}} |
| style="padding: 1px;" | 500 Gallimaufry {{gdrop}}<br />[[Ra'Kaznar Sapphire]] {{cdrop}}<br />[[Eikondrite]] {{cdrop}}<br />[[Old Case]] {{cdrop}}<br />[[Old Case +1]] {{vrdrop}} |
||
|} |
|} |
||
{| style="width: 100%; max-width: 788px; text-align: center; border-spacing: 1px;" |
{| class="sortie tworow" style="width: 100%; max-width: 788px; text-align: center; border-spacing: 1px;" |
||
! colspan="3" style="padding: 3px |
! colspan="3" style="padding: 3px; font-size: 17px; text-shadow: 0px 0px 3px #000000;" | Sector D Objectives |
||
|- |
|||
|- style="background: #BD77DB;" |
|||
! style="padding: 3px; width: 15%" | Chest |
! style="padding: 3px; width: 15%" | Chest |
||
! style="padding: 3px; width: 60%;" | Objective |
! style="padding: 3px; width: 60%;" | Objective |
||
! style="padding: 3px; width: 25%;" | Reward |
! style="padding: 3px; width: 25%;" | Reward |
||
|- |
|||
|- style="background: #D8D8D8;" |
|||
| style="padding: 1px; font-weight: bold; color: #930;" | Chest #D1 |
| style="padding: 1px; font-weight: bold; color: #930;" | Chest #D1 |
||
| style="padding: 1px;" | Open Gates #D1 and #D2, in either order, within two minutes of each other. |
| style="padding: 1px;" | Open Gates #D1 and #D2, in either order, within two minutes of each other. |
||
| style="padding: 1px;" | 100 Gallimaufry {{gdrop}}<br />[[Ra'Kaznar Key D]] {{gdrop}} |
| style="padding: 1px;" | 100 Gallimaufry {{gdrop}}<br />[[Ra'Kaznar Key D]] {{gdrop}} |
||
|- |
|||
|- style="background: #E8E8E8;" |
|||
| style="padding: 1px; font-weight: bold; color: #930;" | Chest #D2 |
| style="padding: 1px; font-weight: bold; color: #930;" | Chest #D2 |
||
| style="padding: 1px;" | Drop your [[Obsid. Wing]] at Diaphanous Device #D. |
| style="padding: 1px;" | Drop your [[Obsid. Wing]] at Diaphanous Device #D. You will not be kicked out for doing this, and you will get a new one immediately. |
||
| style="padding: 1px;" | 100 Gallimaufry {{gdrop}}<br />[[Ra'Kaznar Plate D]] {{gdrop}} |
| style="padding: 1px;" | 100 Gallimaufry {{gdrop}}<br />[[Ra'Kaznar Plate D]] {{gdrop}} |
||
|- |
|||
|- style="background: #D8D8D8;" |
|||
| style="padding: 1px; font-weight: bold; color: #930;" | Chest #D3 |
| style="padding: 1px; font-weight: bold; color: #930;" | Chest #D3 |
||
| style="padding: 1px;" | Perform a 4-step Skillchain on 3 Demisang foes before defeating them. |
| style="padding: 1px;" | Perform a 4-step Skillchain on 3 Demisang foes before defeating them. |
||
| style="padding: 1px;" | 100 Gallimaufry {{gdrop}}<br />[[Ra'Kaznar Shard D]] {{gdrop}} |
| style="padding: 1px;" | 100 Gallimaufry {{gdrop}}<br />[[Ra'Kaznar Shard D]] {{gdrop}} |
||
|- |
|||
|- style="background: #E8E8E8;" |
|||
| style="padding: 1px; font-weight: bold; color: #930;" | Chest #D4 |
| style="padding: 1px; font-weight: bold; color: #930;" | Chest #D4 |
||
| style="padding: 1px;" | Perform a 4-step Skillchain on 3 more Demisang foes before defeating them. |
| style="padding: 1px;" | Perform a 4-step Skillchain on 3 more Demisang foes before defeating them. |
||
| style="padding: 1px;" | 100 Gallimaufry {{gdrop}}<br />[[Ra'Kaznar Metal D]] {{gdrop}} |
| style="padding: 1px;" | 100 Gallimaufry {{gdrop}}<br />[[Ra'Kaznar Metal D]] {{gdrop}} |
||
|- |
|||
|- style="background: #D8D8D8;" |
|||
| style="padding: 1px; font-weight: bold; color: #930;" | Chest #D5 |
| style="padding: 1px; font-weight: bold; color: #930;" | Chest #D5 |
||
| style="padding: 1px;" | |
| style="padding: 1px;" | Vanquish all Demisang foes, then interact with Diaphanous Bitzer #D.<br />Demisang Deleterious not required. |
||
| style="padding: 1px;" | 100 Gallimaufry {{gdrop}}<br />[[Ra'Kaznar Sheet D]] {{gdrop}} |
| style="padding: 1px;" | 100 Gallimaufry {{gdrop}}<br />[[Ra'Kaznar Sheet D]] {{gdrop}} |
||
|- |
|||
|- style="background: #E8E8E8;" |
|||
| style="padding: 1px; font-weight: bold; color: #03C;" | Casket #D1 |
| style="padding: 1px; font-weight: bold; color: #03C;" | Casket #D1 |
||
| style="padding: 1px;" | Vanquish 6 Demisang foes of different jobs. |
| style="padding: 1px;" | Vanquish 6 Demisang foes of different jobs. |
||
| style="padding: 1px;" | 100 Gallimaufry {{gdrop}}<br />[[Ra'Kaznar Sapphire]] {{cdrop}}<br />[[Old Case]] {{cdrop}}<br />[[Old Case +1]] {{xdrop}} |
| style="padding: 1px;" | 100 Gallimaufry {{gdrop}}<br />[[Ra'Kaznar Sapphire]] {{cdrop}}<br />[[Eikondrite]] {{cdrop}}<br />[[Old Case]] {{cdrop}}<br />[[Old Case +1]] {{xdrop}} |
||
|- |
|||
|- style="background: #D8D8D8;" |
|||
| style="padding: 1px; font-weight: bold; color: #03C;" | Casket #D2 |
| style="padding: 1px; font-weight: bold; color: #03C;" | Casket #D2 |
||
| style="padding: 1px;" | Vanquish in order: |
| style="padding: 1px;" | Vanquish Demisang foes in standard job order:<br />WAR, MNK, WHM, BLM, RDM, THF.<br />Defeating [[Demisang Deleterious]] does not interrupt the order. |
||
| style="padding: 1px;" | 100 Gallimaufry {{gdrop}}<br />[[Ra'Kaznar Sapphire]] {{cdrop}}<br />[[Old Case]] {{cdrop}}<br />[[Old Case +1]] {{vrdrop}} |
| style="padding: 1px;" | 100 Gallimaufry {{gdrop}}<br />[[Ra'Kaznar Sapphire]] {{cdrop}}<br />[[Eikondrite]] {{cdrop}}<br />[[Old Case]] {{cdrop}}<br />[[Old Case +1]] {{vrdrop}} |
||
|- |
|||
|- style="background: #E8E8E8;" |
|||
| style="padding: 1px; font-weight: bold; color: #C03;" | Coffer #D |
| style="padding: 1px; font-weight: bold; color: #C03;" | Coffer #D |
||
| style="padding: 1px;" | Vanquish [[Demisang Deleterious]], then any 3 Demisang foes. |
| style="padding: 1px;" | Vanquish [[Demisang Deleterious]], then any 3 Demisang foes. |
||
| style="padding: 1px;" | 500 Gallimaufry {{gdrop}}<br />[[Ra'Kaznar Sapphire]] {{cdrop}}<br />[[Old Case]] {{cdrop}}<br />[[Old Case +1]] {{vrdrop}} |
| style="padding: 1px;" | 500 Gallimaufry {{gdrop}}<br />[[Ra'Kaznar Sapphire]] {{cdrop}}<br />[[Eikondrite]] {{cdrop}}<br />[[Old Case]] {{cdrop}}<br />[[Old Case +1]] {{vrdrop}} |
||
|} |
|} |
||
{| class="sortie tworow" style="width: 100%; max-width: 788px; text-align: center; border-spacing: 1px;" |
|||
====Basement Floors==== |
|||
! colspan="3" style="padding: 3px; font-size: 17px; text-shadow: 0px 0px 3px #000000;" | Other Objectives |
|||
|- |
|||
! colspan="3" style="padding: 3px; background: #310047; color: #e2a3ff; font-size: 17px; text-shadow: 0px 0px 3px #000000;" | Sector E Objectives |
|||
|- style="background: #BD77DB;" |
|||
! style="padding: 3px; width: 15%" | Chest |
! style="padding: 3px; width: 15%" | Chest |
||
! style="padding: 3px; width: 60%;" | Objective |
! style="padding: 3px; width: 60%;" | Objective |
||
! style="padding: 3px; width: 25%;" | Reward |
! style="padding: 3px; width: 25%;" | Reward |
||
|- |
|||
|- style="background: #D8D8D8;" |
|||
| style="padding: 1px; text-shadow: 1px 0 0 #000, 0 -1px 0 #000, 0 1px 0 #000, -1px 0 0 #000; font-weight: bold; color: #FC3;" | Aurum Coffer |
|||
| style="padding: 1px;" | Vanquish [[Abject Obdella]], [[Biune Porxie]], [[Cachaemic Bhoot]], and [[Demisang Deleterious]].<br />Any rematerialized copies must also be defeated. |
|||
| style="padding: 1px;" | 1000 Gallimaufry {{gdrop}} <br />[[Eikondrite]] {{cdrop}} <br />[[Ra'Kaznar Sapphire]] {{cdrop}}<br />[[Old Case]] {{cdrop}}<br />[[Old Case +1]] {{vrdrop}} |
|||
|} |
|||
====Basement==== |
|||
{| class="sortie tworow" style="width: 100%; max-width: 788px; text-align: center; border-spacing: 1px;" |
|||
! colspan="3" style="padding: 3px; font-size: 17px; text-shadow: 0px 0px 3px #000000;" | Sector E Objectives |
|||
|- |
|||
! style="padding: 3px; width: 15%" | Chest |
|||
! style="padding: 3px; width: 60%;" | Objective |
|||
! style="padding: 3px; width: 25%;" | Reward |
|||
|- |
|||
| style="padding: 1px; font-weight: bold; color: #930;" | Chest #E |
| style="padding: 1px; font-weight: bold; color: #930;" | Chest #E |
||
| style="padding: 1px;" | Vanquish Esurient Botulus using Weapon Skills from behind it. |
| style="padding: 1px;" | Vanquish Esurient Botulus using Weapon Skills from behind it. |
||
All party members must register themselves on the Esurient Botulus's [[Enmity]] list. {{verification}} |
|||
All party members must be within 10 yalms of the Esurient Botulus on death. {{verification}} |
|||
| style="padding: 1px;" | 100 Gallimaufry {{gdrop}}<br />[[Ra'Kaznar Metal E]] {{gdrop}} |
| style="padding: 1px;" | 100 Gallimaufry {{gdrop}}<br />[[Ra'Kaznar Metal E]] {{gdrop}} |
||
|- |
|||
|- style="background: #E8E8E8;" |
|||
| style="padding: 1px; font-weight: bold; color: #03C;" | Casket #E1 |
| style="padding: 1px; font-weight: bold; color: #03C;" | Casket #E1 |
||
| style="padding: 1px;" | Vanquish |
| style="padding: 1px;" | Vanquish 12 Esurient foes in the room containing the Bitzer. |
||
| style="padding: 1px;" | 300 Gallimaufry {{gdrop}}<br />[[Ra'Kaznar Starstone]] {{rdrop}}<br />[[Old Case]] {{vcdrop}}<br />[[Old Case +1]] {{rdrop}} |
|||
If the Diaphanous Bitzer is found in one of the four rooms that form a square, vanquish all 12 Esurient foes in the square. |
|||
|- |
|||
| style="padding: 1px;" | 300 Gallimaufry {{gdrop}}<br />[[Ra'Kaznar Starstone]] {{udrop}} {{verification}}<br />[[Old Case]] {{vcdrop}} {{verification}}<br />[[Old Case +1]] {{vrdrop}}{{verification}} |
|||
|- style="background: #D8D8D8;" |
|||
| style="padding: 1px; font-weight: bold; color: #03C;" | Casket #E2 |
| style="padding: 1px; font-weight: bold; color: #03C;" | Casket #E2 |
||
| style="padding: 1px;" | Vanquish |
| style="padding: 1px;" | Vanquish 15 Esurient Flan. |
||
| style="padding: 1px;" | 300 Gallimaufry {{gdrop}}<br />[[Ra'Kaznar Starstone]] {{ |
| style="padding: 1px;" | 300 Gallimaufry {{gdrop}}<br />[[Ra'Kaznar Starstone]] {{rdrop}}<br />[[Old Case]] {{vcdrop}}<br />[[Old Case +1]] {{rdrop}} |
||
|- |
|||
|- style="background: #E8E8E8;" |
|||
| style="padding: 1px; font-weight: bold; color: #C03;" | Coffer #E |
| style="padding: 1px; font-weight: bold; color: #C03;" | Coffer #E |
||
| style="padding: 1px;" | Vanquish the 6 mini-[[Naakual]]s in either half |
| style="padding: 1px;" | Vanquish the 6 mini-[[Naakual]]s in either half of the split room.<br />Coffer spawns in the doorway between the two halves of the room.<br />Naakuals spawn 5 minutes after entering Sector E.<br />Timer resets if the sector is evacuated before spawn, including the situation where all players enter the boss arena.<br />Basement: (F/G-6) |
||
| style="padding: 1px;" | 1500 Gallimaufry {{gdrop}}<br />[[Ra'Kaznar Starstone]] {{ |
| style="padding: 1px;" | 1500 Gallimaufry {{gdrop}}<br />[[Ra'Kaznar Starstone]] {{rdrop}}<br />[[Old Case]] {{vcdrop}}<br />[[Old Case +1]] {{rdrop}} |
||
|} |
|} |
||
{| style="width: 100%; max-width: 788px; text-align: center; border-spacing: 1px;" |
{| class="sortie tworow" style="width: 100%; max-width: 788px; text-align: center; border-spacing: 1px;" |
||
! colspan="3" style="padding: 3px |
! colspan="3" style="padding: 3px; font-size: 17px; text-shadow: 0px 0px 3px #000000;" | Sector F Objectives |
||
|- |
|||
|- style="background: #BD77DB;" |
|||
! style="padding: 3px; width: 15%" | Chest |
! style="padding: 3px; width: 15%" | Chest |
||
! style="padding: 3px; width: 60%;" | Objective |
! style="padding: 3px; width: 60%;" | Objective |
||
! style="padding: 3px; width: 25%;" | Reward |
! style="padding: 3px; width: 25%;" | Reward |
||
|- |
|||
|- style="background: #D8D8D8;" |
|||
| style="padding: 1px; font-weight: bold; color: #930;" | Chest #F |
| style="padding: 1px; font-weight: bold; color: #930;" | Chest #F |
||
| style="padding: 1px;" | |
| style="padding: 1px;" | Vanquish Fetid Ixion while the horn is broken. Conditions on what breaks the horn are still being tested. {{verification}}. |
||
| style="padding: 1px;" | 100 Gallimaufry {{gdrop}}<br />[[Ra'Kaznar Metal F]] {{gdrop}} |
| style="padding: 1px;" | 100 Gallimaufry {{gdrop}}<br />[[Ra'Kaznar Metal F]] {{gdrop}} |
||
|- |
|||
|- style="background: #E8E8E8;" |
|||
| style="padding: 1px; font-weight: bold; color: #03C;" | Casket #F1 |
| style="padding: 1px; font-weight: bold; color: #03C;" | Casket #F1 |
||
| style="padding: 1px;" | Interact with the |
| style="padding: 1px;" | Interact with the Diaphanous Bitzer while visibly wearing or lockstyling 5/5 pieces of [[Empyrean Armor]] of any upgrade level (including the base piece) for your current job. |
||
| style="padding: 1px;" | 300 Gallimaufry {{gdrop}}<br />[[Ra'Kaznar Starstone]] {{ |
| style="padding: 1px;" | 300 Gallimaufry {{gdrop}}<br />[[Ra'Kaznar Starstone]] {{rdrop}}<br />[[Old Case]] {{vcdrop}}<br />[[Old Case +1]] {{rdrop}} |
||
|- |
|||
|- style="background: #D8D8D8;" |
|||
| style="padding: 1px; font-weight: bold; color: #03C;" | Casket #F2 |
| style="padding: 1px; font-weight: bold; color: #03C;" | Casket #F2 |
||
| style="padding: 1px;" | Vanquish all Fetid Veela |
| style="padding: 1px;" | Vanquish all Fetid Veela. |
||
| style="padding: 1px;" | 300 Gallimaufry {{gdrop}}<br />[[Ra'Kaznar Starstone]] {{ |
| style="padding: 1px;" | 300 Gallimaufry {{gdrop}}<br />[[Ra'Kaznar Starstone]] {{rdrop}}<br />[[Old Case]] {{vcdrop}}<br />[[Old Case +1]] {{rdrop}} |
||
|- |
|||
|- style="background: #E8E8E8;" |
|||
| style="padding: 1px; font-weight: bold; color: #C03;" | Coffer #F |
| style="padding: 1px; font-weight: bold; color: #C03;" | Coffer #F |
||
| style="padding: 1px;" | |
| style="padding: 1px;" | Vanquish the 6 mini-Naakuals.<br />Naakuals spawn when any party member who has previously left Sector F re-enters it.<br />Basement: (J-6) |
||
| style="padding: 1px;" | 1500 Gallimaufry {{gdrop}}<br />[[Ra'Kaznar Starstone]] {{ |
| style="padding: 1px;" | 1500 Gallimaufry {{gdrop}}<br />[[Ra'Kaznar Starstone]] {{rdrop}}<br />[[Old Case]] {{vcdrop}}<br />[[Old Case +1]] {{rdrop}} |
||
|} |
|} |
||
{| style="width: 100%; max-width: 788px; text-align: center; border-spacing: 1px;" |
{| class="sortie tworow" style="width: 100%; max-width: 788px; text-align: center; border-spacing: 1px;" |
||
! colspan="3" style="padding: 3px |
! colspan="3" style="padding: 3px; font-size: 17px; text-shadow: 0px 0px 3px #000000;" | Sector G Objectives |
||
|- |
|||
|- style="background: #BD77DB;" |
|||
! style="padding: 3px; width: 15%" | Chest |
! style="padding: 3px; width: 15%" | Chest |
||
! style="padding: 3px; width: 60%;" | Objective |
! style="padding: 3px; width: 60%;" | Objective |
||
! style="padding: 3px; width: 25%;" | Reward |
! style="padding: 3px; width: 25%;" | Reward |
||
|- |
|||
|- style="background: #D8D8D8;" |
|||
| style="padding: 1px; font-weight: bold; color: #930;" | Chest #G |
| style="padding: 1px; font-weight: bold; color: #930;" | Chest #G |
||
| style="padding: 1px;" | Vanquish Gyvewrapped Naraka. |
| style="padding: 1px;" | Vanquish Gyvewrapped Naraka. |
||
| style="padding: 1px;" | 100 Gallimaufry {{gdrop}}<br />[[Ra'Kaznar Metal G]] {{gdrop}} |
| style="padding: 1px;" | 100 Gallimaufry {{gdrop}}<br />[[Ra'Kaznar Metal G]] {{gdrop}} |
||
|- |
|||
|- style="background: #E8E8E8;" |
|||
| style="padding: 1px; font-weight: bold; color: #03C;" | Casket #G1 |
| style="padding: 1px; font-weight: bold; color: #03C;" | Casket #G1 |
||
| style="padding: 1px;" | Stand still |
| style="padding: 1px;" | Stand still within 6 yalms of the Diaphanous Bitzer while continuously targeting it for 30 seconds. |
||
| style="padding: 1px;" | 300 Gallimaufry {{gdrop}}<br />[[Ra'Kaznar Starstone]] {{ |
| style="padding: 1px;" | 300 Gallimaufry {{gdrop}}<br />[[Ra'Kaznar Starstone]] {{rdrop}}<br />[[Old Case]] {{vcdrop}}<br />[[Old Case +1]] {{rdrop}} |
||
|- |
|||
|- style="background: #D8D8D8;" |
|||
| style="padding: 1px; font-weight: bold; color: #03C;" | Casket #G2 |
| style="padding: 1px; font-weight: bold; color: #03C;" | Casket #G2 |
||
| style="padding: 1px;" | |
| style="padding: 1px;" | Vanquish 19 Gyvewrapped Dullahan. |
||
| style="padding: 1px;" | 300 Gallimaufry {{gdrop}}<br />[[Ra'Kaznar Starstone]] {{ |
| style="padding: 1px;" | 300 Gallimaufry {{gdrop}}<br />[[Ra'Kaznar Starstone]] {{rdrop}}<br />[[Old Case]] {{vcdrop}}<br />[[Old Case +1]] {{rdrop}} |
||
|- |
|||
|- style="background: #E8E8E8;" |
|||
| style="padding: 1px; font-weight: bold; color: #C03;" | Coffer #G |
| style="padding: 1px; font-weight: bold; color: #C03;" | Coffer #G |
||
| style="padding: 1px;" | Vanquish all enemies in both sides of the split room, then defeat the 6 mini-Naakuals that appear.<br /> |
| style="padding: 1px;" | Vanquish all enemies in both sides of the split room, then defeat the 6 mini-Naakuals that appear.<br />Naakuals rematerialize if not defeated in a specific order:<br />🐝Bztavian → 🦈Rockfin → 🦖Gabbrath → 🦅Waktza → 🥦Yggdreant → 🦁Cehuetzi<br />Basement: (J-10) |
||
| style="padding: 1px;" | 1500 Gallimaufry {{gdrop}}<br />[[Ra'Kaznar Starstone]] {{rdrop}}<br />[[Old Case]] {{vcdrop}}<br />[[Old Case +1]] {{rdrop}} |
|||
Naakuals rematerialize if not defeated in order:<br />🐝Bee 🦈Shark 🦖T-Rex 🦅Bird 🥦Broccoli 🦁Lion<br />Basement: (J-10) |
|||
| style="padding: 1px;" | 1500 Gallimaufry {{gdrop}}<br />[[Ra'Kaznar Starstone]] {{cdrop}}{{verification}}<br />[[Old Case]] {{vcdrop}} {{verification}}<br />[[Old Case +1]] {{vrdrop}}{{verification}} |
|||
|} |
|} |
||
{| style="width: 100%; max-width: 788px; text-align: center; border-spacing: 1px;" |
{| class="sortie tworow" style="width: 100%; max-width: 788px; text-align: center; border-spacing: 1px;" |
||
! colspan="3" style="padding: 3px |
! colspan="3" style="padding: 3px; font-size: 17px; text-shadow: 0px 0px 3px #000000;" | Sector H Objectives |
||
|- |
|||
|- style="background: #BD77DB;" |
|||
! style="padding: 3px; width: 15%" | Chest |
! style="padding: 3px; width: 15%" | Chest |
||
! style="padding: 3px; width: 60%;" | Objective |
! style="padding: 3px; width: 60%;" | Objective |
||
! style="padding: 3px; width: 25%;" | Reward |
! style="padding: 3px; width: 25%;" | Reward |
||
|- |
|||
|- style="background: #D8D8D8;" |
|||
| style="padding: 1px; font-weight: bold; color: #930;" | Chest #H |
| style="padding: 1px; font-weight: bold; color: #930;" | Chest #H |
||
| style="padding: 1px;" | |
| style="padding: 1px;" | |
||
Vanquish [[Haughty Tulittia]] after doing X-Amount of '''Indirect Damage''' through the form of AoE's targeted on another monster. <br />(approx. 50%) |
|||
<br /><br /> Potentially could be Vanquish [[Haughty Tulittia]] after <br /> doing so many WS's {{verification}} (Number of WS's needed = Unknown) |
|||
| style="padding: 1px;" | 100 Gallimaufry {{gdrop}}<br />[[Ra'Kaznar Metal H]] {{gdrop}} |
| style="padding: 1px;" | 100 Gallimaufry {{gdrop}}<br />[[Ra'Kaznar Metal H]] {{gdrop}} |
||
|- |
|||
|- style="background: #E8E8E8;" |
|||
| style="padding: 1px; font-weight: bold; color: #03C;" | Casket #H1 |
| style="padding: 1px; font-weight: bold; color: #03C;" | Casket #H1 |
||
| style="padding: 1px;" | |
| style="padding: 1px;" | Leave and re-enter Sector H. |
||
| style="padding: 1px;" | 300 Gallimaufry {{gdrop}}<br />[[Ra'Kaznar Starstone]] {{ |
| style="padding: 1px;" | 300 Gallimaufry {{gdrop}}<br />[[Ra'Kaznar Starstone]] {{rdrop}}<br />[[Old Case]] {{vcdrop}}<br />[[Old Case +1]] {{rdrop}} |
||
|- |
|||
|- style="background: #D8D8D8;" |
|||
| style="padding: 1px; font-weight: bold; color: #03C;" | Casket #H2 |
| style="padding: 1px; font-weight: bold; color: #03C;" | Casket #H2 |
||
| style="padding: 1px;" | |
| style="padding: 1px;" | Kill all Fomor of one job. {{verification}} |
||
<br /> Specifically killing all Haughty Paladin will spawn the chest, other jobs do not seem to spawn the chest. {{verification}} |
|||
| style="padding: 1px;" | 300 Gallimaufry {{gdrop}}<br />[[Ra'Kaznar Starstone]] {{udrop}} {{verification}}<br />[[Old Case]] {{vcdrop}} {{verification}}<br />[[Old Case +1]] {{vrdrop}}{{verification}} |
|||
| style="padding: 1px;" | 300 Gallimaufry {{gdrop}}<br />[[Ra'Kaznar Starstone]] {{rdrop}}<br />[[Old Case]] {{vcdrop}}<br />[[Old Case +1]] {{rdrop}} |
|||
|- style="background: #E8E8E8;" |
|||
|- |
|||
| style="padding: 1px; font-weight: bold; color: #C03;" | Coffer #H |
| style="padding: 1px; font-weight: bold; color: #C03;" | Coffer #H |
||
| style="padding: 1px;" | |
| style="padding: 1px;" | Vanquish one Haughty foe of each job in any order:<br />PLD, DRK, BST, BRD, RNG, SAM, NIN, DRG.<br />Naakuals rematerialize if not defeated in alphabetic order:<br />🐝Bztavian → 🦁Cehuetzi → 🦖Gabbrath → 🦈Rockfin → 🦅Waktza → 🥦Yggdreant <br />Basement: (F-10) |
||
| style="padding: 1px;" | 1500 Gallimaufry {{gdrop}}<br />[[Ra'Kaznar Starstone]] {{ |
| style="padding: 1px;" | 1500 Gallimaufry {{gdrop}}<br />[[Ra'Kaznar Starstone]] {{rdrop}}<br />[[Old Case]] {{vcdrop}}<br />[[Old Case +1]] {{rdrop}} |
||
|} |
|} |
||
{| style="width: 100%; max-width: 788px; text-align: center; border-spacing: 1px;" |
{| class="sortie tworow" style="width: 100%; max-width: 788px; text-align: center; border-spacing: 1px;" |
||
! colspan="3" style="padding: 3px |
! colspan="3" style="padding: 3px; font-size: 17px; text-shadow: 0px 0px 3px #000000;" | Other Objectives |
||
|- |
|||
|- style="background: #BD77DB;" |
|||
! style="padding: 3px; width: 15%" | Chest |
! style="padding: 3px; width: 15%" | Chest |
||
! style="padding: 3px; width: 60%;" | Objective |
! style="padding: 3px; width: 60%;" | Objective |
||
! style="padding: 3px; width: 25%;" | Reward |
! style="padding: 3px; width: 25%;" | Reward |
||
|- |
|||
|- style="background: #D8D8D8;" |
|||
| style="padding: 1px; font-weight: bold; color: #930;" | Chest |
|||
| style="padding: 1px;" | Vanquish [[Esurient Botulus]], [[Fetid Ixion]], [[Gyvewrapped Naraka]] and [[Haughty Tulittia]], then interact with Diaphanous Gadget #? west of the room containing 12 Esurient Flan in Sector E. |
|||
The person who touches the Gadget must be in possession of all 4 [[Ra'Kaznar Frag.|Ra'Kaznar Fragments]]. |
|||
| style="padding: 1px;" | 100 Gallimaufry {{gdrop}}<br />[[Ra'Kaznar Seal]] {{gdrop}} |
|||
|- |
|||
| style="padding: 1px; text-shadow: 1px 0 0 #000, 0 -1px 0 #000, 0 1px 0 #000, -1px 0 0 #000; font-weight: bold; color: #FC3;" | Aurum Coffer |
| style="padding: 1px; text-shadow: 1px 0 0 #000, 0 -1px 0 #000, 0 1px 0 #000, -1px 0 0 #000; font-weight: bold; color: #FC3;" | Aurum Coffer |
||
| style="padding: 1px;" | {{Information Needed}} |
|||
| style="padding: 1px;" | Vanquish [[Abject Obdella]], [[Biune Porxie]], [[Cachaemic Bhoot]], and [[Demisang Deleterious]].<br />Rematerialized copies must also be defeated. |
|||
| style="padding: 1px;" | |
| style="padding: 1px;" | {{Information Needed}} |
||
|- style="background: #E8E8E8;" |
|||
| style="padding: 1px; text-shadow: 1px 0 0 #000, 0 -1px 0 #000, 0 1px 0 #000, -1px 0 0 #000; font-weight: bold; color: #FC3;" | Aurum Coffer |
|||
| style="padding: 1px;" | Defeat the Naakual objectives of E, F, G, and H. |
|||
| style="padding: 1px;" | |
|||
|} |
|} |
||
===Gallimaufry=== |
===Gallimaufry=== |
||
---- |
---- |
||
Gallimaufry is the primary currency of Sortie. It is earned within by vanquishing monsters, opening treasure chests, and defeating NMs. It may be spent with [[Ruspix]] to commission [[:Category:Reforged Empyrean Armor +2|Reforged Empyrean Armor +2]] and [[:Category:Reforged Empyrean Armor +3|Reforged Empyrean Armor +3]] as well as to purchase [[Ra'Kaznar Sapphire]]s, [[Ra'Kaznar Starstone]]s and [[Old Case]]s. |
Gallimaufry is the primary currency of Sortie. It is earned within by vanquishing monsters, opening treasure chests, and defeating NMs. It may be spent with [[Ruspix]] to commission [[:Category:Reforged Empyrean Armor +2|Reforged Empyrean Armor +2]] and [[:Category:Reforged Empyrean Armor +3|Reforged Empyrean Armor +3]] as well as to purchase [[Ra'Kaznar Sapphire]]s, [[Ra'Kaznar Starstone]]s and [[Old Case]]s. It is also used in the creation process of [[Prime Weapons]]. |
||
Gallimaufry from regular enemies is earned via the formula <code>(level - 109) * 3</code>. Minor NMs grant 5x what their level would suggest. |
Gallimaufry from regular enemies is earned via the formula <code>(level - 109) * 3</code>. Minor NMs grant 5x what their level would suggest. |
||
| Line 418: | Line 471: | ||
Rematerializing foes reduces Gallimaufry rewards by approximately <code>(2 + sector) * 3</code> each time (5x for minor NMs). |
Rematerializing foes reduces Gallimaufry rewards by approximately <code>(2 + sector) * 3</code> each time (5x for minor NMs). |
||
The maximum amount of Gallimaufry that can be held at once is '''100,000'''. |
*The maximum amount of Gallimaufry that can be held at once is '''100,000''' initially. |
||
**After you have completed [[The Voracious Resurgence Missions]], your maximum is raised to '''100,000,000'''. |
|||
{| style="width: 100%; max-width: 788px; text-align: center; border-spacing: 1px;" |
{| class="sortie tworow" style="width: 100%; max-width: 788px; text-align: center; border-spacing: 1px;" |
||
! colspan="4" style="padding: 3px |
! colspan="4" style="padding: 3px; font-size: 17px; text-shadow: 0px 0px 3px #000000;" | Normal Enemy Gallimaufry |
||
|- |
|||
|- style="background: #BD77DB;" |
|||
! style="padding: 3px; width: 15%" | Sector |
! style="padding: 3px; width: 15%" | Sector |
||
! style="padding: 3px;" | Level |
! style="padding: 3px;" | Level |
||
! style="padding: 3px; width: 20%" | Gallimaufry |
! style="padding: 3px; width: 20%" | Gallimaufry |
||
|- |
|||
|- style="background: #D8D8D8;" |
|||
| rowspan="3" | A |
| rowspan="3" | A |
||
| 119 |
| 119 |
||
| 30 |
| 30 |
||
|- |
|||
|- style="background: #E8E8E8;" |
|||
| 120 |
| 120 |
||
| 33 |
| 33 |
||
|- |
|||
|- style="background: #D8D8D8;" |
|||
| 121 |
| 121 |
||
| 36 |
| 36 |
||
|- |
|||
|- style="background: #E8E8E8;" |
|||
| rowspan="3" | B |
| rowspan="3" | B |
||
| 123 |
| 123 |
||
| 42 |
| 42 |
||
|- |
|||
|- style="background: #D8D8D8;" |
|||
| 124 |
| 124 |
||
| 45 |
| 45 |
||
|- |
|||
|- style="background: #E8E8E8;" |
|||
| 125 |
| 125 |
||
| 48 |
| 48 |
||
|- |
|||
|- style="background: #D8D8D8;" |
|||
| rowspan="3" | C |
| rowspan="3" | C |
||
| 127 |
| 127 |
||
| 54 |
| 54 |
||
|- |
|||
|- style="background: #E8E8E8;" |
|||
| 128 |
| 128 |
||
| 57 |
| 57 |
||
|- |
|||
|- style="background: #D8D8D8;" |
|||
| 129 |
| 129 |
||
| 60 |
| 60 |
||
|- |
|||
|- style="background: #E8E8E8;" |
|||
| rowspan="3" | D |
| rowspan="3" | D |
||
| 131 |
| 131 |
||
| 66 |
| 66 |
||
|- |
|||
|- style="background: #D8D8D8;" |
|||
| 132 |
| 132 |
||
| 69 |
| 69 |
||
|- |
|||
|- style="background: #E8E8E8;" |
|||
| 133 |
| 133 |
||
| 72 |
| 72 |
||
|- |
|||
|- style="background: #D8D8D8;" |
|||
| rowspan="3" | E |
| rowspan="3" | E |
||
| 134 |
| 134 |
||
| 75 |
| 75 |
||
|- |
|||
|- style="background: #E8E8E8;" |
|||
| 135 |
| 135 |
||
| 78 |
| 78 |
||
|- |
|||
|- style="background: #D8D8D8;" |
|||
| 136 |
| 136 |
||
| 81 |
| 81 |
||
|- |
|||
|- style="background: #E8E8E8;" |
|||
| rowspan="3" | F |
| rowspan="3" | F |
||
| 135 |
| 135 |
||
| 78 |
| 78 |
||
|- |
|||
|- style="background: #D8D8D8;" |
|||
| 136 |
| 136 |
||
| 81 |
| 81 |
||
|- |
|||
|- style="background: #E8E8E8;" |
|||
| 137 |
| 137 |
||
| 84 |
| 84 |
||
|- |
|||
|- style="background: #D8D8D8;" |
|||
| rowspan="3" | G |
| rowspan="3" | G |
||
| 136 |
| 136 |
||
| 81 |
| 81 |
||
|- |
|||
|- style="background: #E8E8E8;" |
|||
| 137 |
| 137 |
||
| 84 |
| 84 |
||
|- |
|||
|- style="background: #D8D8D8;" |
|||
| 138 |
| 138 |
||
| 87 |
| 87 |
||
|- |
|||
|- style="background: #E8E8E8;" |
|||
| rowspan="3" | H |
| rowspan="3" | H |
||
| 137 |
| 137 |
||
| 84 |
| 84 |
||
|- |
|||
|- style="background: #D8D8D8;" |
|||
| 138 |
| 138 |
||
| 87 |
| 87 |
||
|- |
|||
|- style="background: #E8E8E8;" |
|||
| 139 |
| 139 |
||
| 90 |
| 90 |
||
|- |
|||
|- style="background: #D8D8D8;" |
|||
| rowspan="3" | Naakuals |
| rowspan="3" | Naakuals |
||
| 140 |
| 140 |
||
| 93 |
| 93 |
||
|}<br /> |
|}<br /> |
||
{| style="width: 100%; max-width: 788px; text-align: center; border-spacing: 1px;" |
{| class="sortie tworow" style="width: 100%; max-width: 788px; text-align: center; border-spacing: 1px;" |
||
! colspan="4" style="padding: 3px |
! colspan="4" style="padding: 3px; font-size: 17px; text-shadow: 0px 0px 3px #000000;" | Minor NM Gallimaufry |
||
|- |
|||
|- style="background: #BD77DB;" |
|||
! style="padding: 3px; width: 15%" | Sector |
! style="padding: 3px; width: 15%" | Sector |
||
! style="padding: 3px;" | NM |
! style="padding: 3px;" | NM |
||
! style="padding: 3px; width: 20%" | Gallimaufry |
! style="padding: 3px; width: 20%" | Gallimaufry |
||
|- |
|||
|- style="background: #D8D8D8;" |
|||
| A |
| A |
||
| [[Abject Obdella]] |
| [[Abject Obdella]] |
||
| 195 |
| 195 |
||
|- |
|||
|- style="background: #E8E8E8;" |
|||
| B |
| B |
||
| [[Biune Porxie]] |
| [[Biune Porxie]] |
||
| 255 |
| 255 |
||
|- |
|||
|- style="background: #D8D8D8;" |
|||
| C |
| C |
||
| [[Cachaemic Bhoot]] |
| [[Cachaemic Bhoot]] |
||
| 315 |
| 315 |
||
|- |
|||
|- style="background: #E8E8E8;" |
|||
| D |
| D |
||
| [[Demisang Deleterious]] |
| [[Demisang Deleterious]] |
||
| 375 |
| 375 |
||
|- |
|||
|- style="background: #D8D8D8;" |
|||
| E |
| E |
||
| [[Esurient Botulus]] |
| [[Esurient Botulus]] |
||
| 435 |
| 435 |
||
|- |
|||
|- style="background: #E8E8E8;" |
|||
| F |
| F |
||
| [[Fetid Ixion]] |
| [[Fetid Ixion]] |
||
| 450 |
| 450 |
||
|- |
|||
|- style="background: #D8D8D8;" |
|||
| G |
| G |
||
| [[Gyvewrapped Naraka]] |
| [[Gyvewrapped Naraka]] |
||
| 465 |
| 465 |
||
|- |
|||
|- style="background: #E8E8E8;" |
|||
| H |
| H |
||
| [[Haughty Tulittia]] |
| [[Haughty Tulittia]] |
||
| 480 |
| 480 |
||
|}<br /> |
|}<br /> |
||
{| style="width: 100%; max-width: 788px; text-align: center; border-spacing: 1px;" |
{| class="sortie tworow" style="width: 100%; max-width: 788px; text-align: center; border-spacing: 1px;" |
||
! colspan="3" style="padding: 3px |
! colspan="3" style="padding: 3px; font-size: 17px; text-shadow: 0px 0px 3px #000000;" | Major NM Gallimaufry |
||
|- |
|||
|- style="background: #BD77DB;" |
|||
! style="padding: 3px; width: 15%" | Sector |
! style="padding: 3px; width: 15%" | Sector |
||
! style="padding: 3px;" | NM |
! style="padding: 3px;" | NM |
||
! style="padding: 3px; width: 20%" | Gallimaufry |
! style="padding: 3px; width: 20%" | Gallimaufry |
||
|- |
|||
|- style="background: #D8D8D8;" |
|||
| A |
| A |
||
| [[Ghatjot]] |
| [[Ghatjot]] |
||
| rowspan="4" | 2000 |
| rowspan="4" | 2000 |
||
|- |
|||
|- style="background: #E8E8E8;" |
|||
| B |
| B |
||
| [[Leshonn]] |
| [[Leshonn]] |
||
|- |
|||
|- style="background: #D8D8D8;" |
|||
| C |
| C |
||
| [[Skomora]] |
| [[Skomora]] |
||
|- |
|||
|- style="background: #E8E8E8;" |
|||
| D |
| D |
||
| [[Degei]] |
| [[Degei]] |
||
|- |
|||
|- style="background: #D8D8D8;" |
|||
| E |
| E |
||
| [[Dhartok]] |
| [[Dhartok]] |
||
| rowspan="4" | 10000 |
| rowspan="4" | 10000 |
||
|- |
|||
|- style="background: #E8E8E8;" |
|||
| F |
| F |
||
| [[Gartell]] |
| [[Gartell]] |
||
|- |
|||
|- style="background: #D8D8D8;" |
|||
| G |
| G |
||
| [[Triboulex]] |
| [[Triboulex]] |
||
|- |
|||
|- style="background: #E8E8E8;" |
|||
| H |
| H |
||
| [[Aita]] |
| [[Aita]] |
||
|}<br /> |
|}<br /> |
||
{| style="width: 100%; max-width: 788px; text-align: center; border-spacing: 1px;" |
{| class="sortie tworow" style="width: 100%; max-width: 788px; text-align: center; border-spacing: 1px;" |
||
! colspan="3" style="padding: 3px |
! colspan="3" style="padding: 3px; font-size: 17px; text-shadow: 0px 0px 3px #000000;" | Treasure Chest Gallimaufry |
||
|- |
|||
|- style="background: #BD77DB;" |
|||
! style="padding: 3px; width: 15%" | Sector |
! style="padding: 3px; width: 15%" | Sector |
||
! style="padding: 3px;" | Chest |
! style="padding: 3px;" | Chest |
||
! style="padding: 3px; width: 20%" | Gallimaufry |
! style="padding: 3px; width: 20%" | Gallimaufry |
||
|- |
|||
|- style="background: #D8D8D8;" |
|||
| rowspan="4" | A~D |
| rowspan="4" | A~D |
||
| style="padding: 1px; font-weight: bold; color: #930;" | Chest |
| style="padding: 1px; font-weight: bold; color: #930;" | Chest |
||
| rowspan="2" | 100 |
| rowspan="2" | 100 |
||
|- |
|||
|- style="background: #E8E8E8;" |
|||
| style="padding: 1px; font-weight: bold; color: #03C;" | Casket |
| style="padding: 1px; font-weight: bold; color: #03C;" | Casket |
||
|- |
|||
|- style="background: #D8D8D8;" |
|||
| style="padding: 1px; font-weight: bold; color: #C03;" | Coffer |
| style="padding: 1px; font-weight: bold; color: #C03;" | Coffer |
||
| 500 |
| 500 |
||
|- |
|||
|- style="background: #E8E8E8;" |
|||
| style="padding: 1px; text-shadow: 1px 0 0 #000, 0 -1px 0 #000, 0 1px 0 #000, -1px 0 0 #000; font-weight: bold; color: #FC3;" | Aurum Coffer |
| style="padding: 1px; text-shadow: 1px 0 0 #000, 0 -1px 0 #000, 0 1px 0 #000, -1px 0 0 #000; font-weight: bold; color: #FC3;" | Aurum Coffer |
||
| 1000 |
| 1000 |
||
|- |
|||
|- style="background: #D8D8D8;" |
|||
| rowspan="4" | E~H |
| rowspan="4" | E~H |
||
| style="padding: 1px; font-weight: bold; color: #930;" | Chest |
| style="padding: 1px; font-weight: bold; color: #930;" | Chest |
||
| 100 |
| 100 |
||
|- |
|||
|- style="background: #E8E8E8;" |
|||
| style="padding: 1px; font-weight: bold; color: #03C;" | Casket |
| style="padding: 1px; font-weight: bold; color: #03C;" | Casket |
||
| 300 |
| 300 |
||
|- |
|||
|- style="background: #D8D8D8;" |
|||
| style="padding: 1px; font-weight: bold; color: #C03;" | Coffer |
| style="padding: 1px; font-weight: bold; color: #C03;" | Coffer |
||
| 1500 |
| 1500 |
||
|- |
|||
|- style="background: #E8E8E8;" |
|||
| style="padding: 1px; text-shadow: 1px 0 0 #000, 0 -1px 0 #000, 0 1px 0 #000, -1px 0 0 #000; font-weight: bold; color: #FC3;" | Aurum Coffer |
| style="padding: 1px; text-shadow: 1px 0 0 #000, 0 -1px 0 #000, 0 1px 0 #000, -1px 0 0 #000; font-weight: bold; color: #FC3;" | Aurum Coffer |
||
| 3000 {{verification}} |
| 3000 {{verification}} |
||
| Line 618: | Line 672: | ||
===Notorious Monsters=== |
===Notorious Monsters=== |
||
---- |
---- |
||
'''''Please move NM battle information to individual NM pages. Text will be removed from this section at a later date.''''' |
|||
In each area of sortie there will be a minor and major NM. |
In each area of sortie there will be a minor and major NM. |
||
* |
*Each minor NM is tied to their specific area and will drop treasure coffers if a prerequisite objective is met. |
||
**For example, Abject Obdella's |
**For example, Abject Obdella's objective is simply to defeat it. While Biune Porxie's objective is to obtain Casket B#1 first and then defeat the Biune Porxie. |
||
**The coffer will contain 500 to 1000 Gallimaufry {{gdrop}} and possibly a [[Ra'Kaznar Sapphire]] {{udrop}}, [[Old Case]] {{rdrop}}, or [[Old Case +1]] {{vrdrop}}. |
**The coffer will contain 500 to 1000 Gallimaufry {{gdrop}} and possibly a [[Ra'Kaznar Sapphire]] {{udrop}}, [[Old Case]] {{rdrop}}, or [[Old Case +1]] {{vrdrop}}. |
||
** |
**Each minor NM will spawn ''anywhere'' within their respective sections once Sortie has begun and do not have additional spawn conditions. |
||
*** |
***The ground floor minor NMs may start slightly outside of their respective sections. |
||
****Abject Obdella can sometimes start in section D, but will wander back to A over time. |
****Abject Obdella can sometimes start in section D, but will wander back to A over time. |
||
***They can be seen on [[Widescan]]. |
***They can be seen on [[Widescan]]. |
||
*The major NMs can be reached by interacting with a [[Diaphanous Gadget]] while in possession of the corresponding Plate of that area (obtained from doing objectives). Use the Diaphanous Gadget to be teleported to their arena. |
*The major NMs can be reached by interacting with a [[Diaphanous Gadget]] while in possession of the corresponding Plate of that area (obtained from doing objectives). Use the Diaphanous Gadget to be teleported to their arena. |
||
**The major NMs have a proc systems but unclear how |
**The major NMs have a proc systems but it is currently unclear how that system works and what they do. {{verification}} |
||
**Once you aggro the boss the door |
**Once you aggro the boss, the door to the boss room will close and will not re-open unless the boss is defeated or there is no enmity remaining on the NM. |
||
***'''Make sure everyone''' is inside before you aggro the NM. |
***'''Make sure everyone''' is inside before you aggro the NM. |
||
====Major NMs==== |
====Major NMs==== |
||
See individual pages for details. |
|||
{| class="sortie tworow" style="width: 100%; max-width: 788px; text-align: center; border-spacing: 1px;" |
|||
Sector A: [[Ghatjot]] ([[Plovid]]) |
|||
! colspan="4" style="padding: 3px; font-size: 17px; text-shadow: 0px 0px 3px #000000;" | Sortie NM Rewards |
|||
* Any Water damage, including skillchains can cause any of his attacks to deal extreme, and fatal damage. |
|||
|- |
|||
Sector B: [[Leshonn]] ([[Macuil]]) |
|||
* Gains aproximately 5% DT and 5% Damage up whenever he performs his 'absorb' animation. he appears to use this every 30-60 seconds. |
|||
* Skill chains, and more specifically magic bursts opposing his most recently applied element, have a chance to proc {{Blue!}}, which resets his Damage taken, and Damage up effects, and have a chance to disable his Oldest element. |
|||
** For example - If he started with Wind, and brings out his thunder element, Bursting ice or Stone, has a chance to remove his wind element. |
|||
*When his hand contains Thunder, has access to '''Zap''', which copies a random debuff from Leshonn to each player. |
|||
*When his hand contains Wind, has access to '''Chokehold''', which steals a random buff from each player and grants it to Leshonn. |
|||
*It is unclear at this time on what effect the Metals have, they seem to block certain abilities and/or reduce the damage they inflict {{verification}}. |
|||
**The Metals themselves appear to reduce the monsters ability strengths based on the number of monsters of each type killed in the zone {{verification}}. |
|||
**The Ra'Kaznar Metals do not need to be used or consumed even though they are are marked as {{Tmp}} instead of being a KI item. |
|||
Sector C: [[Skomora]] ([[Defiant]]) |
|||
* Standard attacks apply [[Bio]] or [[Bind]] in AoE. |
|||
* [[Cruel Joke]] applies a 5-minute Curse effect, but not [[Doom]]. |
|||
Sector D: [[Degei]] ([[Perfidien]]) |
|||
Sector E: [[Dhartok]] ([[Plovid]]) |
|||
* Has a 3m+ unremovable Taint that does over 200hp a tick. |
|||
Sector F: [[Gartell]] ([[Macuil]]) |
|||
Sector G: [[Triboulex]] ([[Defiant]]) |
|||
* Dooms |
|||
Sector H: [[Aita]] ([[Perfidien]]) |
|||
Mega Boss: [[Aminon]] (Enemy type currently unknown, but likely [[Plouton]]) |
|||
{| style="width: 100%; max-width: 788px; text-align: center; border-spacing: 1px;" |
|||
! colspan="4" style="padding: 3px; background: #310047; color: #e2a3ff; font-size: 17px; text-shadow: 0px 0px 3px #000000;" | Sortie NM Rewards |
|||
|- style="background: #BD77DB;" |
|||
! style="padding: 3px; width: 15%" | Sector |
! style="padding: 3px; width: 15%" | Sector |
||
! style="padding: 3px;" | NM |
! style="padding: 3px;" | NM |
||
! style="padding: 3px; width: 20%" | Shard |
! style="padding: 3px; width: 20%" | Shard |
||
! style="padding: 3px; width: 20%" | Rewards |
! style="padding: 3px; width: 20%" | Rewards |
||
|- |
|||
|- style="background: #D8D8D8;" |
|||
| style="padding: 1px;" | A |
| style="padding: 1px;" | A |
||
| [[Ghatjot]] |
| [[Ghatjot]] |
||
| [[Ra'Kaznar Shard E]] {{gdrop}} |
| [[Ra'Kaznar Shard E]] {{gdrop}} |
||
| rowspan="4" style="padding: 1px;" | |
| rowspan="4" style="padding: 1px;" | 2,000 Gallimaufry {{gdrop}}<br/>[[Ra'Kaz. Sapphire]] {{vcdrop}}<br />[[Eikondrite]] {{vcdrop}}<br />[[Old Case]] {{cdrop}}<br />[[Old Case +1]] {{rdrop}} |
||
|- |
|||
|- style="background: #E8E8E8;" |
|||
| style="padding: 1px;" | B |
| style="padding: 1px;" | B |
||
| [[Leshonn]] |
| [[Leshonn]] |
||
| [[Ra'Kaznar Shard F]] {{gdrop}} |
| [[Ra'Kaznar Shard F]] {{gdrop}} |
||
|- |
|||
|- style="background: #D8D8D8;" |
|||
| style="padding: 1px;" | C |
| style="padding: 1px;" | C |
||
| [[Skomora]] |
| [[Skomora]] |
||
| [[Ra'Kaznar Shard G]] {{gdrop}} |
| [[Ra'Kaznar Shard G]] {{gdrop}} |
||
|- |
|||
|- style="background: #E8E8E8;" |
|||
| style="padding: 1px;" | D |
| style="padding: 1px;" | D |
||
| [[Degei]] |
| [[Degei]] |
||
| [[Ra'Kaznar Shard H]] {{gdrop}} |
| [[Ra'Kaznar Shard H]] {{gdrop}} |
||
|- |
|||
|- style="background: #D8D8D8;" |
|||
| style="padding: 1px;" | E |
| style="padding: 1px;" | E |
||
| [[Dhartok]] |
| [[Dhartok]] |
||
| [[Ra'Kaznar Frag. 1]] {{gdrop}} |
| [[Ra'Kaznar Frag. 1]] {{gdrop}} |
||
| rowspan="4" style="padding: 1px;" | |
| rowspan="4" style="padding: 1px;" | 10,000 Gallimaufry {{gdrop}}<br />[[Ra'Kaz. Starstone]] {{udrop}}<br />[[Old Case]] {{cdrop}}<br />[[Old Case +1]] {{rdrop}} |
||
|- |
|||
|- style="background: #E8E8E8;" |
|||
| style="padding: 1px;" | F |
| style="padding: 1px;" | F |
||
| [[Gartell]] |
| [[Gartell]] |
||
| [[Ra'Kaznar Frag. 2]] {{gdrop}} |
| [[Ra'Kaznar Frag. 2]] {{gdrop}} |
||
|- |
|||
|- style="background: #D8D8D8;" |
|||
| style="padding: 1px;" | G |
| style="padding: 1px;" | G |
||
| [[Triboulex]] |
| [[Triboulex]] |
||
| [[Ra'Kaznar Frag. 3]] {{gdrop}} |
| [[Ra'Kaznar Frag. 3]] {{gdrop}} |
||
|- |
|||
|- style="background: #E8E8E8;" |
|||
| style="padding: 1px;" | H |
| style="padding: 1px;" | H |
||
| [[Aita]] |
| [[Aita]] |
||
| [[Ra'Kaznar Frag. 4]] {{gdrop}} |
| [[Ra'Kaznar Frag. 4]] {{gdrop}} |
||
|- |
|||
|- style="background: #D8D8D8;" |
|||
| style="padding: 1px;" | |
| style="padding: 1px;" | E |
||
| [[Aminon]] |
| [[Aminon]] |
||
| - |
| - |
||
| 30,000 Gallimaufry {{gdrop}}<br />[[Ra'Kaz. Starstone]] {{gdrop}}<br />[[Old Case +1]] {{gdrop}} |
|||
| |
|||
|} |
|} |
||
| Line 720: | Line 741: | ||
==Maps== |
==Maps== |
||
{| class="overflow-visible" style=" |
{| class="sortie onerow" class="overflow-visible" style="text-align:center; width: 100%; max-width: 600px; border-collapse: collapse;" |
||
! style="padding: 3px |
! style="padding: 3px; font-size: 17px; text-shadow: 0px 0px 3px #000000;" | Maps |
||
|- |
|- |
||
| style="display:flex; flex-flow: row wrap; align-items: stretch; align-self: stretch; justify-content: center; flex: 1 1 100%; margin: 1em 0; margin: auto; border-collapse: collapse; padding: 3px;"| |
| style="display:flex; flex-flow: row wrap; align-items: stretch; align-self: stretch; justify-content: center; flex: 1 1 100%; margin: 1em 0; margin: auto; border-collapse: collapse; padding: 3px;"| |
||
{| style="text-align: center; border-collapse: collapse;" |
{| style="text-align: center; border-collapse: collapse;" |
||
| {{imgpop2|[[Image:SortieMapV2.jpg|200px|Click to enlarge]]|[[File:SortieMapV2.jpg|650px|link=]]}} |
|||
|- |
|- |
||
| Ground Floor |
|||
|} |
|} |
||
{| style="text-align: center; border-collapse: collapse; margin-left: 5px;" |
{| style="text-align: center; border-collapse: collapse; margin-left: 5px;" |
||
| {{imgpop2|[[Image:SortieMapBasement.png|200px|Click to enlarge]]|[[File:SortieMapBasement.png|650px|link=]]}} |
|||
|- |
|- |
||
| Basement |
|||
|} |
|} |
||
|} |
|} |
||
Revision as of 05:54, 25 March 2024
|
Sortie Overview
Eligibility
- Have completed the Seekers of Adoulin mission The Light Within.
- Be in possession of the Scintillating Rhapsody
 from completing The Orb's Radiance.
Entering Sortie
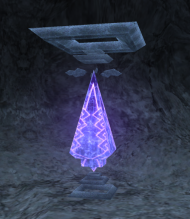
Diaphanous Transposer
- Parties must consist of between 1 and 6 players.
- Trusts may be called within Sortie.
- The number of Trusts you may summon is based on the number of open party slots at the time of entry. Separating into multiple parties once inside the instance will not allow additional Trusts to be called.
- Sortie has a time limit of 1 hour. This cannot be increased.
- All players will be ejected from the instance when time expires, or if 3 minutes elapse with all party members knocked out.
- Each player will receive an
 Obsidian Wing, which allows you to leave the instance before time expires.
- All players must be in possession of a Shiny Ra'Kaznarian plate to enter.
- This is initially acquired by speaking to Ruspix in Leafallia.
- Upon entering Sortie, all players' Shiny Ra'Kaznarian plates will fade into Dull Ra'Kaznarian plates , which will immediately begin recharging.
- Dull Ra'Kaznarian plates take twenty hours to fully recharge. Upon approaching the Diaphanous Transposer at Bivouac #4 in Kamihr Drifts with a fully-charged plate, it will transform into a Shiny Ra'Kaznarian plate. There is no need to talk to Ruspix for this to occur.
- After completing your first foray into Sortie, you will receive a Ruspix's plate upon talking to Ruspix.
- 20 hours after entering Sortie, your Dull Ra'Kaznarian plate will be fully recharged, whether or not you approach the Diaphanous Transposer in Kamihr Drifts to convert it into a Shiny Ra'Kaznarian plate. At this point, your Ruspix's plate will begin (or continue) accumulating charge, at a rate of 1 second for every 5 real-world seconds that pass. The maximum charge which can be accumulated in this manner is 72,000 seconds (20 hours). Upon entering Sortie, a message indicating how many seconds of charge you have accumulated on your Ruspix's plate will appear in the chat log. Your Shiny Ra'Kaznarian plate will be replaced with a Dull Ra'Kaznarian plate, and the 20-hour re-entry timer will begin. The accumulation of charge to Ruspix's plate will pause until the Dull Ra'Kaznarian plate is full again.
- When asking Ruspix about Ruspix's plates, if the amount of charge accumulated on your Ruspix's plate is greater than or equal to the time remaining before your Dull Ra'Kaznarian plate will finish recharging naturally, you will be given the option to use your Ruspix's plate. Using the plate will consume only the amount of charge needed to instantly fill the Dull Ra'Kaznarian plate, and the remaining charge will remain on the Ruspix's plate to use later. The Dull Ra'Kaznarian plate will immediately be replaced with a Shiny Ra'Kaznarian plate. It is recommended to wait to use your Ruspix's plate until right before you enter Sortie, since any additional delay before entering Sortie will go back into charging the Ruspix's plate at the same 5:1 ratio, rather than into your now-full Shiny Ra'Kaznarian plate.
Objectives
| Sortie Aggro | ||
|---|---|---|
| Sector | Enemy | Detects |
| A | Acuex | |
| Leech | ||
| Hecteyes | ||
| B, F | Elemental | |
| B | Umbril | |
| C | Ghost | |
| Skeleton | ||
| Corse | ||
| D, H | Fomor | |
| E | Slime | |
| Slug | ||
| Flan | ||
| F | Pixie | |
| G | Hound | |
| Dullahan | ||
| Vampyr | ||
- Sortie consists of the entire map of Outer Ra'Kaznar sharded into eight unequal Sectors labeled A through H, each of which contains:
- several groups of enemies from one or more families of a single type,
- one minor NM, which can roam around the Sector,
- one major NM, found behind a Diaphanous Gadget, and
- a Diaphanous Bitzer.
- Ground floor Sectors A through D also contain:
- a Diaphanous Device,
- several unlocked Gates, and
- several Locked Gates.
- All enemies and chests reward Gallimaufry.
- Major NMs, Caskets, and Coffers have a chance to reward all participants with a Ra'Kaznar Sapphire, and/or Old Case or Old Case +1.
- Minor NMs and Gates are associated with Hidden Objectives.
- Enemies take full damage from AoE magic and abilities.
- Geomancy has full effects on regular enemies, but is reduced by -50% on NMs.
- All enemies have normal damage type resistances for their family.
- All foes in Sortie are aggressive.
- Not all enemies follow their family's normal detection rules. See the table for details.
Progression
Upon first entry, you will have access to Sector A only. Within Sortie, meeting certain Hidden Objectives rewards ![]() Temporary Items which allow access to additional parts of the map.
Temporary Items which allow access to additional parts of the map.
- Used to open their respective Locked Gates and progress deeper into the area.
- These items are permanent traversal tools which are not lost when opening Gates or leaving Sortie despite being listed as Temporary Items.
- Used to interact with the Diaphanous Devices found near the central elevator shaft. These devices enable teleportation around the map and rematerialization of previously-defeated enemies.
- These items are permanent traversal tools which are not lost when using Diaphanous Devices or leaving Sortie despite being listed as Temporary Items.
![]() Ra'Kaznar Shards and
Ra'Kaznar Shards and ![]() Ra'Kaznar Fragments
Ra'Kaznar Fragments
- Used to teleport to NM arenas via the Diaphanous Gadgets found in the corners of the map.
- Each NM in the basement requires the corresponding shard temporary item from defeating the NM upstairs.
- These items are lost upon successfully defeating the NM within.
![]() Ra'Kaznar Metals and
Ra'Kaznar Metals and ![]() Ra'Kaznar Seal
Ra'Kaznar Seal
- Protect against certain abilities used by NMs found beyond their respective Diaphanous Gadgets.
- These items are lost upon successfully defeating the NM within.
- Used to interact with the Diaphanous Bitzers found at the central elevator shaft. These devices enable transportation to Sectors E through H in the basement.
- These items are permanent traversal tools which are not lost when using Diaphanous Bitzers or leaving Sortie despite being listed as Temporary Items.
Hidden Objectives
- Completing certain objectives within Sortie will cause a treasure chest to appear, along with a message in all players' chat logs informing the group of the current objective progress.
- Each chest contains some Gallimaufry, as well as the following:
- Brown: Guaranteed to contain temporary items which aid in traversal or provide NM arena access for all players who do not already posses the reward.
- Blue: Has a chance to contain a Ra'Kaznar Sapphire, an Old Case/Old Case +1, or both.
- Red: Has a chance to contain a Ra'Kaznar Sapphire, an Old Case/Old Case +1, or both.
- Brown: Guaranteed to contain
- In order to receive rewards, players must be:
- Anywhere on the ground floor when the chest is opened, for chests which appear in sectors A through D;
- In the boss area, but not necessarily inside the door, for major NM rewards;
- In the same sector when the chest is opened, for chests which appear in basement sectors E through H.
- Chests always grant the same reward to all players in the party.
- Chests do not disappear if left unopened.
- Note: Like in Omen, Summoner Magical Blood pacts do not Qualify for any magic related objectives in zone A, or any Weapon Skill related objectives, since bloodpacts are Job Ability.
- Each chest contains some Gallimaufry, as well as the following:
Ground Floor
| Sector A Objectives | ||
|---|---|---|
| Chest | Objective | Reward |
| Chest #A1 | Open any unlocked Gate #A. Ground Floor: (D-4), (F-2), (H-2) |
100 Gallimaufry G Ra'Kaznar Key A G |
| Chest #A2 | Cast magic next to Diaphanous Device #A. Any magic works, including summoning an alter-ego / trust. | 100 Gallimaufry G Ra'Kaznar Plate A G |
| Chest #A3 | Vanquish 3 Abject foes using single-target magic for the killing blow. | 100 Gallimaufry G Ra'Kaznar Shard A G |
| Chest #A4 | Vanquish 3 more Abject foes using single-target magic for the killing blow. | 100 Gallimaufry G Ra'Kaznar Metal A G |
| Chest #A5 | Interact with Diaphanous Bitzer #A while naked. | 100 Gallimaufry G Ra'Kaznar Sheet A G |
| Casket #A1 | Vanquish 5 Abject foes. | 100 Gallimaufry G Ra'Kaznar Sapphire C Eikondrite C Old Case C Old Case +1 VR |
| Casket #A2 | /heal in the area between Gate #A1 and the Abject Leeches. | 100 Gallimaufry G Ra'Kaznar Sapphire C Eikondrite C Old Case C Old Case +1 VR |
| Coffer #A | Vanquish Abject Obdella. | 500 Gallimaufry G Ra'Kaznar Sapphire C Eikondrite C Old Case C Old Case +1 VR |
| Sector B Objectives | ||
|---|---|---|
| Chest | Objective | Reward |
| Chest #B1 | Open Gates #B1 through #B6 in order. |
100 Gallimaufry G Ra'Kaznar Key B G |
| Chest #B2 | /hurray with Diaphanous Device #B. | 100 Gallimaufry G Ra'Kaznar Plate B G |
| Chest #B3 | Perform one weaponskill before defeating them on 5 Biune foes.
|
100 Gallimaufry G Ra'Kaznar Shard B G |
| Chest #B4 | Perform one weaponskill before defeating them on 5 more Biune foes.
|
100 Gallimaufry G Ra'Kaznar Metal B G |
| Chest #B5 | Interact with Diaphanous Bitzer #B while walking from the start of the zone. If you use a Diaphanous Device to warp you must warp back to the start and start over. | 100 Gallimaufry G Ra'Kaznar Sheet B G |
| Casket #B1 | Vanquish 3 Biune foes within 30 |
100 Gallimaufry G Ra'Kaznar Sapphire C Eikondrite C Old Case C Old Case +1 VR |
| Casket #B2 | Open any Locked Gate #B. Ground Floor: (J-8), (K-8), (M-8) |
100 Gallimaufry G Ra'Kaznar Sapphire C Eikondrite C Old Case C Old Case +1 VR |
| Coffer #B | Vanquish Biune Porxie after meeting the objective for Casket #B1. | 500 Gallimaufry G Ra'Kaznar Sapphire C Eikondrite C Old Case C Old Case +1 VR |
| Sector C Objectives | ||
|---|---|---|
| Chest | Objective | Reward |
| Chest #C1 | Open Gate #C1 or #C2 before defeating any enemies in Sector C. | 100 Gallimaufry G Ra'Kaznar Key C G |
| Chest #C2 | Pull a Cachaemic foe to Diaphanous Device #C and defeat it there. | 100 Gallimaufry G Ra'Kaznar Plate C G |
| Chest #C3 | Perform a Magic Burst on 3 Cachaemic foes before defeating them. | 100 Gallimaufry G Ra'Kaznar Shard C G |
| Chest #C4 | Perform a Magic Burst on 3 more Cachaemic foes before defeating them. | 100 Gallimaufry G Ra'Kaznar Metal C G |
| Chest #C5 | Vanquish at least one Cachaemic foe, Materialize Cachaemic foes at Diaphanous Device #C, then interact with Diaphanous Bitzer #C. The same player who Materializes must interact with the Bitzer. |
100 Gallimaufry G Ra'Kaznar Sheet C G |
| Casket #C1 | Vanquish 3 Cachaemic foes within 15 |
100 Gallimaufry G Ra'Kaznar Sapphire C Eikondrite C Old Case C Old Case +1 VR |
| Casket #C2 | Vanquish all Cachaemic foes. | 100 Gallimaufry G Ra'Kaznar Sapphire C Eikondrite C Old Case C Old Case +1 VR |
| Coffer #C | Vanquish Cachaemic Bhoot within 5 Timer begins upon entering Sector C. Bhoot must be defeated before rematerializing to reset the timer. |
500 Gallimaufry G Ra'Kaznar Sapphire C Eikondrite C Old Case C Old Case +1 VR |
| Sector D Objectives | ||
|---|---|---|
| Chest | Objective | Reward |
| Chest #D1 | Open Gates #D1 and #D2, in either order, within two minutes of each other. | 100 Gallimaufry G Ra'Kaznar Key D G |
| Chest #D2 | Drop your Obsid. Wing at Diaphanous Device #D. You will not be kicked out for doing this, and you will get a new one immediately. | 100 Gallimaufry G Ra'Kaznar Plate D G |
| Chest #D3 | Perform a 4-step Skillchain on 3 Demisang foes before defeating them. | 100 Gallimaufry G Ra'Kaznar Shard D G |
| Chest #D4 | Perform a 4-step Skillchain on 3 more Demisang foes before defeating them. | 100 Gallimaufry G Ra'Kaznar Metal D G |
| Chest #D5 | Vanquish all Demisang foes, then interact with Diaphanous Bitzer #D. Demisang Deleterious not required. |
100 Gallimaufry G Ra'Kaznar Sheet D G |
| Casket #D1 | Vanquish 6 Demisang foes of different jobs. | 100 Gallimaufry G Ra'Kaznar Sapphire C Eikondrite C Old Case C Old Case +1 VR |
| Casket #D2 | Vanquish Demisang foes in standard job order: WAR, MNK, WHM, BLM, RDM, THF. Defeating Demisang Deleterious does not interrupt the order. |
100 Gallimaufry G Ra'Kaznar Sapphire C Eikondrite C Old Case C Old Case +1 VR |
| Coffer #D | Vanquish Demisang Deleterious, then any 3 Demisang foes. | 500 Gallimaufry G Ra'Kaznar Sapphire C Eikondrite C Old Case C Old Case +1 VR |
| Other Objectives | ||
|---|---|---|
| Chest | Objective | Reward |
| Aurum Coffer | Vanquish Abject Obdella, Biune Porxie, Cachaemic Bhoot, and Demisang Deleterious. Any rematerialized copies must also be defeated. |
1000 Gallimaufry G Eikondrite C Ra'Kaznar Sapphire C Old Case C Old Case +1 VR |
Basement
| Sector E Objectives | ||
|---|---|---|
| Chest | Objective | Reward |
| Chest #E | Vanquish Esurient Botulus using Weapon Skills from behind it.
All party members must register themselves on the Esurient Botulus's Enmity list. All party members must be within 10 yalms of the Esurient Botulus on death. |
100 Gallimaufry G Ra'Kaznar Metal E G |
| Casket #E1 | Vanquish 12 Esurient foes in the room containing the Bitzer. | 300 Gallimaufry G Ra'Kaznar Starstone R Old Case VC Old Case +1 R |
| Casket #E2 | Vanquish 15 Esurient Flan. | 300 Gallimaufry G Ra'Kaznar Starstone R Old Case VC Old Case +1 R |
| Coffer #E | Vanquish the 6 mini-Naakuals in either half of the split room. Coffer spawns in the doorway between the two halves of the room. Naakuals spawn 5 minutes after entering Sector E. Timer resets if the sector is evacuated before spawn, including the situation where all players enter the boss arena. Basement: (F/G-6) |
1500 Gallimaufry G Ra'Kaznar Starstone R Old Case VC Old Case +1 R |
| Sector F Objectives | ||
|---|---|---|
| Chest | Objective | Reward |
| Chest #F | Vanquish Fetid Ixion while the horn is broken. Conditions on what breaks the horn are still being tested. |
100 Gallimaufry G Ra'Kaznar Metal F G |
| Casket #F1 | Interact with the Diaphanous Bitzer while visibly wearing or lockstyling 5/5 pieces of Empyrean Armor of any upgrade level (including the base piece) for your current job. | 300 Gallimaufry G Ra'Kaznar Starstone R Old Case VC Old Case +1 R |
| Casket #F2 | Vanquish all Fetid Veela. | 300 Gallimaufry G Ra'Kaznar Starstone R Old Case VC Old Case +1 R |
| Coffer #F | Vanquish the 6 mini-Naakuals. Naakuals spawn when any party member who has previously left Sector F re-enters it. Basement: (J-6) |
1500 Gallimaufry G Ra'Kaznar Starstone R Old Case VC Old Case +1 R |
| Sector G Objectives | ||
|---|---|---|
| Chest | Objective | Reward |
| Chest #G | Vanquish Gyvewrapped Naraka. | 100 Gallimaufry G Ra'Kaznar Metal G G |
| Casket #G1 | Stand still within 6 yalms of the Diaphanous Bitzer while continuously targeting it for 30 seconds. | 300 Gallimaufry G Ra'Kaznar Starstone R Old Case VC Old Case +1 R |
| Casket #G2 | Vanquish 19 Gyvewrapped Dullahan. | 300 Gallimaufry G Ra'Kaznar Starstone R Old Case VC Old Case +1 R |
| Coffer #G | Vanquish all enemies in both sides of the split room, then defeat the 6 mini-Naakuals that appear. Naakuals rematerialize if not defeated in a specific order: 🐝Bztavian → 🦈Rockfin → 🦖Gabbrath → 🦅Waktza → 🥦Yggdreant → 🦁Cehuetzi Basement: (J-10) |
1500 Gallimaufry G Ra'Kaznar Starstone R Old Case VC Old Case +1 R |
| Sector H Objectives | ||
|---|---|---|
| Chest | Objective | Reward |
| Chest #H |
Vanquish Haughty Tulittia after doing X-Amount of Indirect Damage through the form of AoE's targeted on another monster. |
100 Gallimaufry G Ra'Kaznar Metal H G |
| Casket #H1 | Leave and re-enter Sector H. | 300 Gallimaufry G Ra'Kaznar Starstone R Old Case VC Old Case +1 R |
| Casket #H2 | Kill all Fomor of one job.
|
300 Gallimaufry G Ra'Kaznar Starstone R Old Case VC Old Case +1 R |
| Coffer #H | Vanquish one Haughty foe of each job in any order: PLD, DRK, BST, BRD, RNG, SAM, NIN, DRG. Naakuals rematerialize if not defeated in alphabetic order: 🐝Bztavian → 🦁Cehuetzi → 🦖Gabbrath → 🦈Rockfin → 🦅Waktza → 🥦Yggdreant Basement: (F-10) |
1500 Gallimaufry G Ra'Kaznar Starstone R Old Case VC Old Case +1 R |
| Other Objectives | ||
|---|---|---|
| Chest | Objective | Reward |
| Chest | Vanquish Esurient Botulus, Fetid Ixion, Gyvewrapped Naraka and Haughty Tulittia, then interact with Diaphanous Gadget #? west of the room containing 12 Esurient Flan in Sector E.
The person who touches the Gadget must be in possession of all 4 Ra'Kaznar Fragments. |
100 Gallimaufry G Ra'Kaznar Seal G |
| Aurum Coffer | ||
Gallimaufry
Gallimaufry is the primary currency of Sortie. It is earned within by vanquishing monsters, opening treasure chests, and defeating NMs. It may be spent with Ruspix to commission Reforged Empyrean Armor +2 and Reforged Empyrean Armor +3 as well as to purchase Ra'Kaznar Sapphires, Ra'Kaznar Starstones and Old Cases. It is also used in the creation process of Prime Weapons.
Gallimaufry from regular enemies is earned via the formula (level - 109) * 3. Minor NMs grant 5x what their level would suggest.
Rematerializing foes reduces Gallimaufry rewards by approximately (2 + sector) * 3 each time (5x for minor NMs).
- The maximum amount of Gallimaufry that can be held at once is 100,000 initially.
- After you have completed The Voracious Resurgence Missions, your maximum is raised to 100,000,000.
| Normal Enemy Gallimaufry | |||
|---|---|---|---|
| Sector | Level | Gallimaufry | |
| A | 119 | 30 | |
| 120 | 33 | ||
| 121 | 36 | ||
| B | 123 | 42 | |
| 124 | 45 | ||
| 125 | 48 | ||
| C | 127 | 54 | |
| 128 | 57 | ||
| 129 | 60 | ||
| D | 131 | 66 | |
| 132 | 69 | ||
| 133 | 72 | ||
| E | 134 | 75 | |
| 135 | 78 | ||
| 136 | 81 | ||
| F | 135 | 78 | |
| 136 | 81 | ||
| 137 | 84 | ||
| G | 136 | 81 | |
| 137 | 84 | ||
| 138 | 87 | ||
| H | 137 | 84 | |
| 138 | 87 | ||
| 139 | 90 | ||
| Naakuals | 140 | 93 | |
| Minor NM Gallimaufry | |||
|---|---|---|---|
| Sector | NM | Gallimaufry | |
| A | Abject Obdella | 195 | |
| B | Biune Porxie | 255 | |
| C | Cachaemic Bhoot | 315 | |
| D | Demisang Deleterious | 375 | |
| E | Esurient Botulus | 435 | |
| F | Fetid Ixion | 450 | |
| G | Gyvewrapped Naraka | 465 | |
| H | Haughty Tulittia | 480 | |
| Major NM Gallimaufry | ||
|---|---|---|
| Sector | NM | Gallimaufry |
| A | Ghatjot | 2000 |
| B | Leshonn | |
| C | Skomora | |
| D | Degei | |
| E | Dhartok | 10000 |
| F | Gartell | |
| G | Triboulex | |
| H | Aita | |
| Treasure Chest Gallimaufry | ||
|---|---|---|
| Sector | Chest | Gallimaufry |
| A~D | Chest | 100 |
| Casket | ||
| Coffer | 500 | |
| Aurum Coffer | 1000 | |
| E~H | Chest | 100 |
| Casket | 300 | |
| Coffer | 1500 | |
| Aurum Coffer | 3000 | |
Notorious Monsters
In each area of sortie there will be a minor and major NM.
- Each minor NM is tied to their specific area and will drop treasure coffers if a prerequisite objective is met.
- For example, Abject Obdella's objective is simply to defeat it. While Biune Porxie's objective is to obtain Casket B#1 first and then defeat the Biune Porxie.
- The coffer will contain 500 to 1000 Gallimaufry G and possibly a Ra'Kaznar Sapphire U, Old Case R, or Old Case +1 VR.
- Each minor NM will spawn anywhere within their respective sections once Sortie has begun and do not have additional spawn conditions.
- The ground floor minor NMs may start slightly outside of their respective sections.
- Abject Obdella can sometimes start in section D, but will wander back to A over time.
- They can be seen on Widescan.
- The ground floor minor NMs may start slightly outside of their respective sections.
- The major NMs can be reached by interacting with a Diaphanous Gadget while in possession of the corresponding Plate of that area (obtained from doing objectives). Use the Diaphanous Gadget to be teleported to their arena.
- The major NMs have a proc systems but it is currently unclear how that system works and what they do.

- Once you aggro the boss, the door to the boss room will close and will not re-open unless the boss is defeated or there is no enmity remaining on the NM.
- Make sure everyone is inside before you aggro the NM.
- The major NMs have a proc systems but it is currently unclear how that system works and what they do.
Major NMs
See individual pages for details.
| Sortie NM Rewards | |||
|---|---|---|---|
| Sector | NM | Shard | Rewards |
| A | Ghatjot | Ra'Kaznar Shard E G | 2,000 Gallimaufry G Ra'Kaz. Sapphire VC Eikondrite VC Old Case C Old Case +1 R |
| B | Leshonn | Ra'Kaznar Shard F G | |
| C | Skomora | Ra'Kaznar Shard G G | |
| D | Degei | Ra'Kaznar Shard H G | |
| E | Dhartok | Ra'Kaznar Frag. 1 G | 10,000 Gallimaufry G Ra'Kaz. Starstone U Old Case C Old Case +1 R |
| F | Gartell | Ra'Kaznar Frag. 2 G | |
| G | Triboulex | Ra'Kaznar Frag. 3 G | |
| H | Aita | Ra'Kaznar Frag. 4 G | |
| E | Aminon | - | 30,000 Gallimaufry G Ra'Kaz. Starstone G Old Case +1 G |
Rewards
See Sortie Rewards for specific item and equipment rewards.
Maps
| Maps | ||||
|---|---|---|---|---|
|


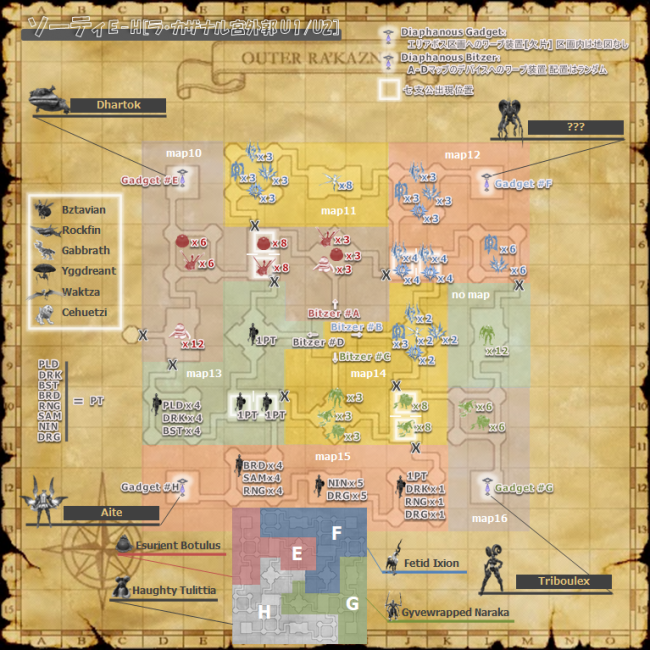
References
- FFXI Sortie Boss #B - Leshonn - In the description discusses how the NM didn't do certain abilities while holding shard/metal
- Aoe doing full damage
- Information regarding temp items - lists also what effect they have
- More leshonn info and drops
- Potential additional info on a hidden objective system/coffers
- Additional reference for hidden objective system/coffers
- More info on objectives/coffers
- Confirmation earring +2 is from case +1
- More detailed treasure coffers information
- Naakual order for G and H
Pages in category "Sortie"
The following 52 pages are in this category, out of 52 total.
L
R
- Ra'Kaznar Frag. 1
- Ra'Kaznar Frag. 2
- Ra'Kaznar Frag. 3
- Ra'Kaznar Frag. 4
- Ra'Kaznar Key A
- Ra'Kaznar Key B
- Ra'Kaznar Key C
- Ra'Kaznar Key D
- Ra'Kaznar Metal A
- Ra'Kaznar Metal B
- Ra'Kaznar Metal C
- Ra'Kaznar Metal D
- Ra'Kaznar Metal E
- Ra'Kaznar Metal F
- Ra'Kaznar Metal G
- Ra'Kaznar Metal H
- Ra'Kaznar Plate
- Ra'Kaznar Plate A
- Ra'Kaznar Plate B
- Ra'Kaznar Plate C
- Ra'Kaznar Plate D
- Ra'Kaznar Seal
- Ra'Kaznar Shard A
- Ra'Kaznar Shard B
- Ra'Kaznar Shard C
- Ra'Kaznar Shard D
- Ra'Kaznar Shard E
- Ra'Kaznar Shard F
- Ra'Kaznar Shard G
- Ra'Kaznar Shard H
- Ra'Kaznar Sheet A
- Ra'Kaznar Sheet B
- Ra'Kaznar Sheet C
- Ra'Kaznar Sheet D
