The Voracious Resurgence | |
| Prime Weapons • Ultimate Weapons • Ultimate Augments • Abjurations iL119 • JSE Necks • Divergence Augments • Escutcheons | |
| Reforged Armor Artifact: +1 • iL109 • iL119/+2/+3/+4 Relic: +1/+2 • iL109 • iL119/+2/+3/+4 Empyrean: +1/+2 • iL109 • iL119/+2/+3 |
Guides • Crafting • Trusts • Apex Monsters |
User:Dumo/DNC sets
Job Abilities
| Job Ability | |
|---|---|
| Name | Notes |
| While in effect, lowers TP cost of dances and steps to 0. Reduces the recasts of all Waltzes to 6 seconds. Job Points Trance Effect: Increase TP by 100. Total 2000. | |
| Contradance | Doubles the potency of the next Waltz. If Healing Waltz is used, it will be AoE with a 10' radius. Job Points Contradance Effect: Reduce Waltz TP consumption by 3%. Total 60% |
| Saber Dance | Grants 50% Double Attack that decays to 20% in the first 30 seconds. Cancels Fan Dance. Saber Dance stacks additively with Double Attack gear, but overwrites the Double Attack job trait.' Merit Points Saber Dance: Reduce Waltz TP consumption by 3%. Total 60% |
| Fan Dance | Enmity +15. The physical damage reduction effect begins at 90%. Every successful physical hit on the Dancer will reduce the effectiveness of Fan Dance by 10%, until it reaches the minimum of 20% damage reduction. Activating this Job Ability automatically cancels out any Samba effect and the effect of Saber Dance, and prevents the player from using Sambas.' Merit Points Fan Dance: Each merit level past the first reduces Waltz recast by 5%. |
| No Foot Rise | Gives one Finishing move per merit level.' Merit Points No Foot Rise: Gives one additional finishing move for every level past the first. |
| Presto | Causes the next Step to increase the target's Daze effect by up to 5 levels at once. Causes the enhanced Step to grant 4 additional Finishing Moves, for a total of 6. tacks with the extra Finishing Move from Terpsichore, for a total of 7. Does not grant any additional Finishing Moves if the Daze effect is already at max level. Gives a 50 Step Accuracy Bonus to the enhanced Step. If the enhanced Step misses, the effect is not consumed. Does not affect Step duration mechanics. |
| Resets Flourish recast timers upon activation and eliminates the recast times and Finishing Move costs of Flourishes. The effect ends after 30 seconds or once three Flourishes are used. Job Points Grand Pas Effect: Increase damage by 1%. Total 20% | |
Equipment Information
Before getting in to full sets, let's discuss some base information. When building out jobs, often there are a few sets to look at for added options. We can discuss weapons, armours from Alluvion Skirmish, Reisenjima and JSE sets.
JSE Armour
| Item | Upgrade? | Notes |
|---|---|---|
Maxixi Tiara +4 
|
Yes | From Maxixi Tiara +3 you get Dual Wield+8 which is great for your haste tiers. Going to the +4 is more defensive stats which you will want even if it isn't a top priority. |
Maxixi Casaque +4 
|
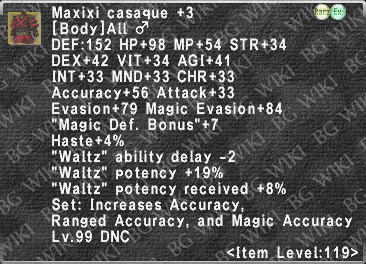
Yes | For Waltz Potency. The +4 isn't a high priority but the added defensive sets is a great bonus. |
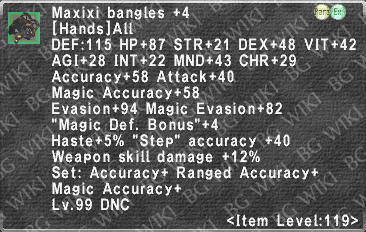
Maxixi Bangles +4 
|
Yes | Big Weapon Skill Damage and Step Accuracy is massive. This is a priority for +4. |
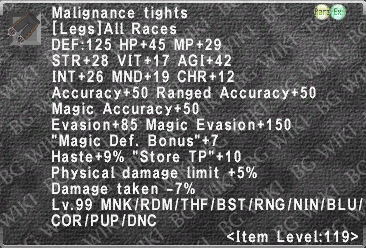
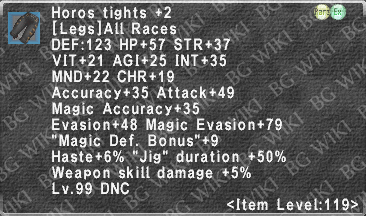
Maxixi Tights +4 
|
No | The Skillchain Bonus isn't worth much. You are better to push weapon skill damage to increase Skill Chain Damage. |
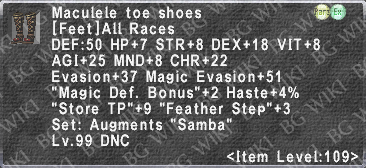
Maxixi Toe Shoes +4 
|
Yes | Jig Duration alone is worth the upgrade. This is not a priority to +4. |
| Item | Upgrade? | Notes |
|---|---|---|
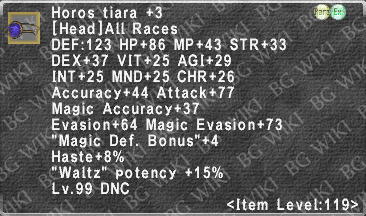
Horos Tiara +4  Enhances "Trance" effect |
Yes | Waltz Potency. Not a priority to +4 but the defensive stats are very helpful. |
Horos Casaque +4  Enhances "No Foot Rise" effect |
Yes | Great TP piece and your go to until Gleti's Cuirass R:25. If you are using it for TP, you want the extra defensive stats are worth the upgrade to +4. |
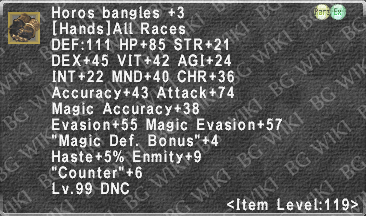
Horos Bangles +4  Enhances "Fan Dance" effect |
Maybe | The counter works well in cleave sets. Since you are holding a hoard of monsters, the defensive stats at +4 are worthwhile. However, you can cleave just fine with the +3. |
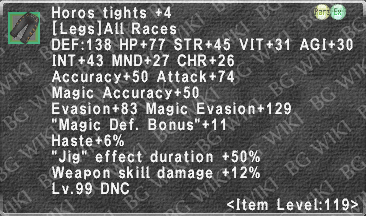
Horos Tights +4  Enhances "Saber Dance" effect |
YES | Weapon Skill Damage, big attack and Jig Duration make this a priority to +4. |
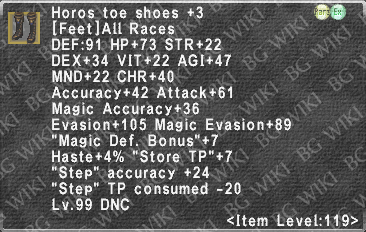
Horos Toe Shoes +4  Enhances "Closed Position" effect |
Yes | Step accuracy and lower TP consumed for steps is great. It is also a great TP piece when you have Closed Position merits and can stand in front of the monster. You typically stop using these for TP after you get Maculele Toe Shoes +2. Since it's in Step sets it's worth upgrading to the +4 for the Accuracy but not the highest priority. |
| Item | Upgrade? | Notes |
|---|---|---|
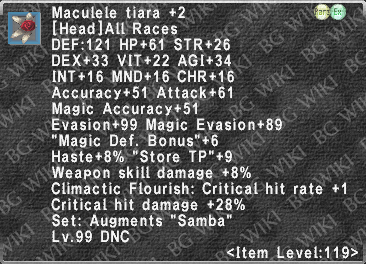
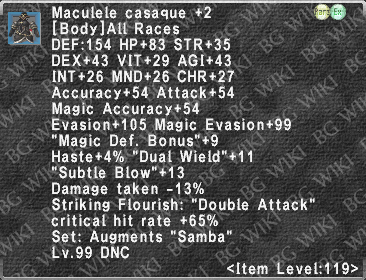
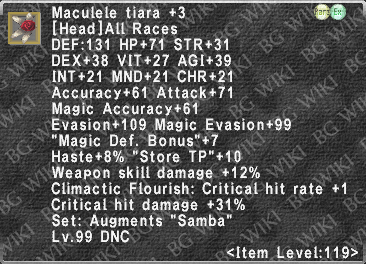
Maculele Tiara +3 
|
YES | One of the best pieces in the game. Massive Weapon Skill Damage but the boost to crit damage during Climactic Flourish does wonders to your damage. Oh but there's solid Store TP? Ya, this goes into your tp as as well.
|
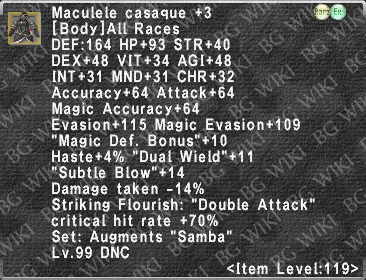
Maculele Casaque +3 
|
Yes | Big Damage Taken, big Dual Wield. Great for DW tiers. I also use it in my Step sets for the DT along with the Accuracy.
|
Maculele Bangles +3 
|
Yes | Reverse Flourish is important. With the Weapon Skills we use, the more TP you have, the more damage you get.
|
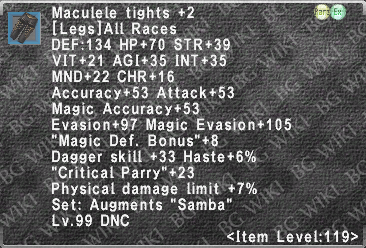
Maculele Tights +3 
|
YES | The PDL is great until you have Aria. Otherwise, this is a piece you use for cleaving to make use of Tactical Parry.
|
Maculele Toe Shoes +3 
|
Yes | The Feather Step bonus is nice but the DT and Store TP are the real winners. You will be using these for every TP set from the moment you get the +2
|
| Item | Upgrade? | Notes |
|---|---|---|
Etoile Gorget  DEX & CHR +15 STP+5 PDL+6 |
N/A | It's not terrible to go with the NQ. You get Waltz potency, STP, ACC and PDL. I personally believe the +1 is where the value is at. |
Etoile Gorget +1  DEX & CHR +20 STP+6 PDL+8 |
N/A | Great value neck piece. You are 1 STP under Anu Torque but with PDL and good ACC. It is used for most Weapon Skills on the job and will be used for TP. |
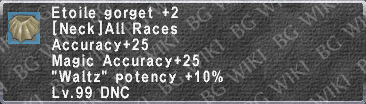
Etoile Gorget +2  DEX & CHR +25 STP+7 PDL+10 |
N/A | It is now your best TP option unless you absolutely need the acc on Null Loop. That has not come up for me so far. It is used in the same Weapon Skill sets as the +2 but is simply better. |
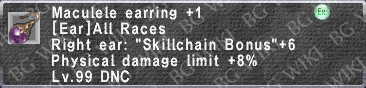
Maculele Earring  Accuracy & Magic Accuracy +6 ~ 10 |
N/A | The Physical Damage Limit is worth having. |
Macu. Earring +1  Accuracy & Magic Accuracy +11 ~ 15 Store TP +3% ~ 5% |
N/A | Same great piece for Weapon Skills but now with the added benefit of being a nice acc TP swap. |
Macu. Earring +2  Accuracy & Magic Accuracy +16~20 Store TP -6%~8% DEX & AGI +7~15 |
N/A | No longer just a Weapon Skill piece for when you are attack capped. It is now your strongest option in general, even with floored rolls. It is also one of your strongest TP options. |
Note on Ambuscade Capes: These are general recommendations. The most important aspect of these capes is the flexibility of options available. Feel free to change things like Damage Taken and Physical Damage Taken as needed for sets. There will be more options for capes. Remember that you can use Abdhaljs Needle to change an augment. If you end up with a cape that can be used over your current Senuna's Mantle, you can needle it into something else.
| JSE Capes | |
|---|---|
| Cape | Suggested Augments |
| Senuna's Mantle | |
| Double Attack | DEX+30, Accuracy/Attack+20, Physical Damage Taken-10, Double Attack+10% |
| Dual Wield | DEX+30, Accuracy/Attack+20, Damage Taken-5, Dual Wield+10 |
| Rudra's Storm | DEX+30, Accuracy/Attack+20, Damage Taken-5, Weapon Skill Damage+10 |
| Evisceration | DEX+30, Accuracy/Attack+20, Damage Taken-5, Critical Hit Rate+10 |
| Pyrrhic Kleos | STR+30, Accuracy/Attack+20, Damage Taken-5, Double Attack+10% |
| Aeolian Edge | INT+30, Magic Accuracy/Magic Damage+20, Damage Taken-5, Weapon Skill Damage+10% |
| Toetapper Mantle | |
| Reverse Flourish | Reverse Flourish+10~30 |
| Null Shawl | |
| TP | This isn't JSE but it needs to be mentioned. You don't get the DT but you do get evasion and magic evasion. This will reduce the need for your Double Attack TP cape. |
Random Augment Sets
Both Alluvion Skirmish and Geas Fete have a set available to players early in progression. These sets can be used to fill in gaps but most importantly, they have unique augments that we can benefit from.
Alluvion Skirmish can reward you pieces of the Taeon Attire Set. Also check for Mellidopt Wings to trade for the pieces through Lorissa at the ??? at (I-10) in Yorcia Weald. Mellidopt Wings can come from Alluvion Skirmish or Mog Pell (Red) which is handed out a few times a year to players for various campaigns. Alluvion Skirmish can easily be soloed but is a different way of setting up a run. Look up some videos on how to solo the content. You can use these to get Phalanx+ pieces but now that the Dark Matter Arcane Glyphics Campaign is running full time, we at least have some other options. Phalanx+ isn't as important on DNC as it would be on something like RUN but it is nice to have. Maybe I'm just obsessed with Phalanx.
You get 3 different augment slots on these sets. Each slot can roll different augments so check the tables to see which stone you need for the augment you want. Higher quality stones are more likely to give you higher rolls on your augments.
- Taeon Boots are something I personally carry. Accuracy, Dual Wield and DEX rolls make this a solid Dual Wield+9 which will help in some very low haste situations. They are squishy but it is 1 piece and you can make up the squish in other places. If you didn't want to carry them and don't want to go that deep into Dual Wield tiers, I can't blame you.
- The entire set can get Phalanx+ 1~3 on every piece through Duskdim Stones. It's not needed but I do love me some extra damage mitigation! You can also get Phalanx+ on the Herculean Armor Set.
- You could roll a Critical Hit Rate and Critical Hit Damage piece for Evisceration but I don't think it's worth the time and cost. You will outgrow them fairly quickly.
- Duskslit Stone can hit Weapon Skill Damage+3 but I don't think it's worth the cost in gil or time as you can work towards JSE which will be a better use of your resources.
We can also obtain the Herculean Armor Set early in our progression. The pieces typically comes from Geas Fete in Reisenjima but we can also obtain them from Domain Invasion. You will take the piece to Oseem to be augmented. We can also use these to fill in some gaps.
- Technique will allow us to roll 6 Dark Mater augments for free every day.
- Phalanx+ 1~5 is always nice to have. 3+ allows us to replace a Taeon piece.
- Treasure Hunter+ 1~2 is a nice option for farming but far from a need. 2 of these would however give you +4 across many jobs which makes things easier.
- You can also hit some Augments that are solid for TP or Weapon Skill Damage. They will eventually be out classed but early on, it would be a solid roll.
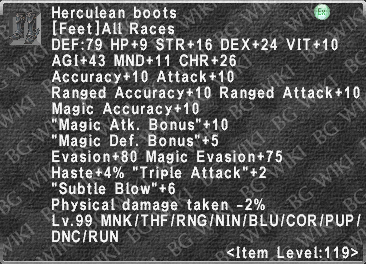
- Herculean Boots
- Triple Attack+4 with Fern Stone would go well and be used until Maculele Toe Shoes +2.
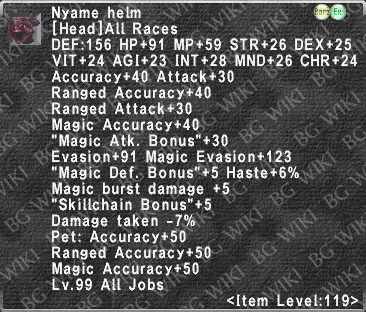
- Weapon Skill Damage+5 is possible through Fern Stone. Since you don't get JSE with WSD in the feet slot, this could last until Nyame Augments.
- Herculean Vest
- Triple Attack+4 with Fern Stone would go well and be used until Horos Casaque +3.
- Weapon Skill Damage+5 is possible through Fern Stone. Since you don't get JSE with WSD in the body slot, this could last until Nyame Augments.
These can be expensive early on and will eat up your Domain Invasion points. For that reason I wouldn't typically focus on these unless you are stuck and just want to get some sort of progress. Phalanx+ is always nice so I would personally build up to +4s through Dark Matter since it will take a fair bit of time anyways.
The set is worth checking out again if you are in need of something unique or just filling in a slot. I have avoided putting augmented Herculean Armor Set pieces into sets because the process can be long and frustrating. The one main exception is Phalanx where you really only have 2 option and both are from augments.
SU3, SU4, SU5 Sets
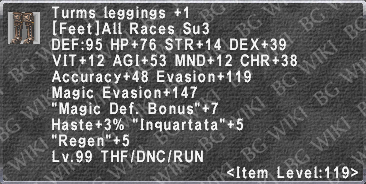
The Turms Armor Set is your SU3 set.
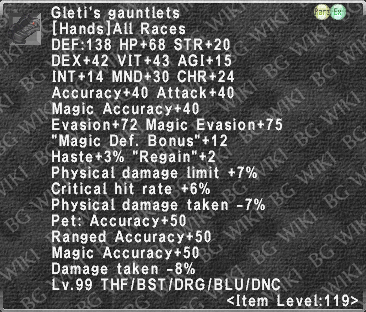
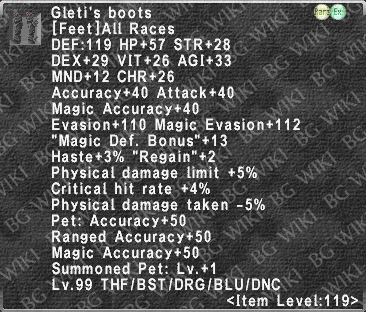
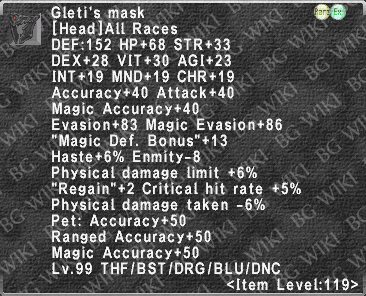
- Turms Cap is for Regain in idle sets. I use Turms Cap +1 in my idle set in Sortie and use it in my sets for Aminon. It was gifted to me or I probably wouldn't have it. The cost is too high and Gleti's Mask works just fine.
- Turms Harness can be used early on in a TP set if you don't have Malignance Tabard. The problem is that its SU3 and you will have other options. I would rather run Horos Casaque +2 into the +3 version and skip the purchase. Horos doesn't need 500 JP to wear it either so may very well be what you use to get to SU3.
- Turms Mittens are interesting. Technically you can use them for tanking purposes. I have them and don't use them. I use a Counter piece in that slot for cleaving. Much cheaper and works wonders.
- Turms Subligar? No thanks.
- Turms Leggings are a wonderful piece. I use Turms Leggings +1 for cleaving. The parry rate increases our TP gain while leaning on Critical Parry. Each Parry also negates the incoming damage which adds up. This is not a critical piece to have but it is one I enjoy using.
The Justice Armor Set/Magnificent Armor Set are your SU4 sets from Limbus. The Duty Armor Set is your SU5 set from Limbus.
I'm not writing a lot about these sets so here are some bullet points,
- Justice Armor Set is dirt cheap but IMO not worth it when the Magnificent Armor Set is still cheap and just better. You could work on RP and transfer up but I feel like that's a waste of gil.
- All of these are the best TP pieces you can get.
- The grind to RP these is ridiculous at this point in time. It's absurdly long in boring content.
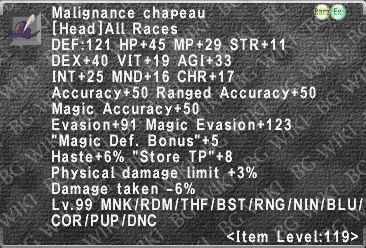
- If I was willing to RP these, I would start with Magnificent Crown to replace your Maculele Tiara +3 in your TP set. It has better TP starts while adding DT.
- It's a slight DT loss over Malignance Chapeau but a much better TP piece.
Mission Rewards
- Suppanomimi Really is the only choice. The Dual Wield+5 is a staple for many jobs.
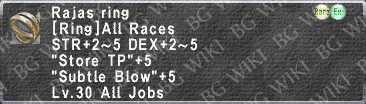
- Rajas Ring will be a good early option for melee sets but it quickly gets overshadowed by other easily obtainable options.
- Magnetic Earring is probably the correct choice even though it does nothing for DNC. Static Earring could be used but Magic Def. Bonus+2 isn't going to be very impactful.
- None. There really isn't a use case for anything from ToaU. The reasons to complete the missions are to make Mythic Weapons and access the HTMBs. ★Puppet in Peril has Bestas Bane which I won't waste a wardrobe slot on. ★Legacy of the Lost doesn't have anything DNC cares about.
- Moonshade Earring allows you to select 2 augments from 2 different lists. Augment list 2 has 1 real choice, TP Bonus +250. Augment list 1 has a few options. The choice would probably be between Accuracy+4, Attack+4, Magic Accuracy+4 and Magic Atk. Bonus+4.
- Finally rewards with real choices! In the end you may not get to pick something specifically for DNC and you may end up changing out the ring for something another one. The sets in this guide do not have any of these rings so you would be putting them in sets on your own. Most are quite obvious. If it's not listed, I don't find it useful for DNC.
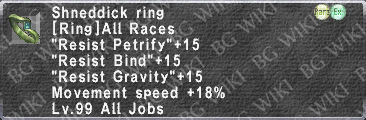
- Shneddick Ring - Movement Speed+18% is hard to come by and our only other option is Skadi's Jambeaux +1 which drops us below 119.
- Vocane Ring - A wonderful Damage Taken option. Especially before you have Defending Ring. The Reduced Distance Knocked Back is quite noticeable and a rare attribute to get on any piece of gear. If you are newer, this is a very solid option and will help while farming your Malignance Attire Set.
- Karieyh Ring - Weapon Skill Damage is a solid option but we do have other Weapon Skill options. This wouldn't be a bad pick early on that could be swapped out later or you could put it in your Regain set for fighting Aminon.
- Orvail Ring - Not something that helps DNC but it does help crafting. I can't fault you for taking this option. Just know that it can be rough and a significant investment in time and gil to start making solid gil from crafting in the current state of the game. It is possible, it just isn't easy.
- Adoulin Ring - Useful for Aeolian Edge but that's about it.
- Weatherspoon Ring - The Fast Cast+5% will help your Fast Cast sets. Too bad you very rarely cast spells. At least you get your trusts out faster... I guess.
- There are no bad options on this list. They will all be used on DNC but some will get more use than others. I will not be placing these in any sets as I don't want to create sets that can't be obtained by everyone and there really isn't a standard ring people choose.
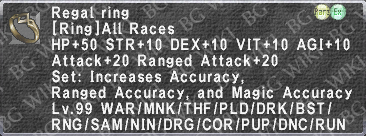
- Ephramad's Ring - A Physical Damage Limit version of Regal Ring is a great option. Under full buffs and debuffs, this should be your strongest Weapon Skill ring. Outside of that situation, you have Attack and STR/DEX+10 which plays well with the Weapon Skills DNC uses. This would be my top pick if I were to choose based on DNC needs and ignoring everything else.
- Cornelia's Ring - Weapon Skill Damage+10% is pretty big! In my opinion, a DNC focused choice would come down to this or Ephramad's Ring.
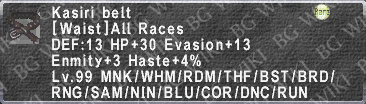
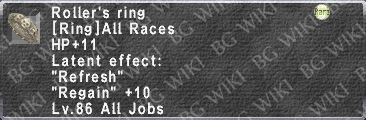
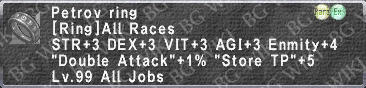
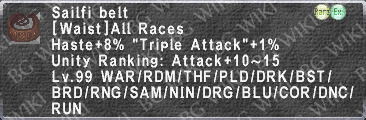
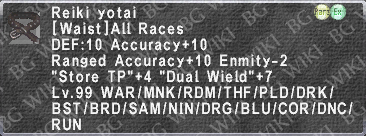
- Lehko's Ring - A great TP ring with Haste. Amazing for Evisceration but we often stick to things that stack well with Climactic Flourish. It is a fine ring for Rudra's Storm, Shark Bite and Ruthless Stroke before you have things like Regal Ring and Epaminondas's Ring. It doesn't really change tp sets much since you will want Sailfi Belt +1 in any set that doesn't need extra Accuracy in the waist slot.
- Ragelise's Ring - Replaces Defending Ring or used alongside to obtain Damage Taken-20% in your ring slots. It's a fantastic ring that is often overlooked for damage potential. This is an amazing idle piece and an amazing tanking piece. I couldn't fault you for taking this ring. Especially if you find yourself doing a lot of tanking or soloing harder fights.
- Medada's Ring - Aeolian Edge greatly benefits from this ring. You don't get much Fast Cast so that alone make a big difference for the set. However, you very rarely need to cast spells. Even Utsusemi is very rare to use on DNC. You can use this on DNC but it wouldn't be my top choice for a DNC focused pick.
- Fickblix's Ring - DNC gets a lot of Double Attack and this stacks nicely. With Saber Dance, you are looking at 60% Double Attack, decaying to 30%. It does slot into your TP sets.
- Gurebu's Ring - Great Idle ring and very strong when trying to resist Ailments.
Sets
Idle sets
|


Step sets
There are a few ways to go about Step sets.
Option 1 is max Accuracy. Since you may end up needing to Quickstep to drop enemy evasion in a pinch, this isn't a terrible option to make sure they land. I personally don't like this option since I've died in step sets in the past.
Option 2 is to keep a high level of DT while making use of the step accuracy pieces available. This is typically what I will run.
Option 3 is to do nothing at all. Some players have decided that if they need those Quickstep to land that badly, you need to change the buffs in the party. Perfectly viable option and DNC is already one of the most accurate jobs in the game so it shouldn't be an issue.
Option 4 is to do a very defensive setup of full Nyame. This is what I have done against Kalunga since I would rather not be Encumbered in a step set and I know I have the acc to land steps since it's my TP set for the fight.
I'm only putting in 2 sets here since I don't agree with the max accuracy set and one of the options involves doing nothing at all.
|


Waltz sets
|


TP sets
Beginner
In this stage, I'm expecting 0 Job Points which means your Dual Wield needs are different than later stages. You will be 6 DW from Attack Speed cap when Haste Samba is down but you will want 0 DW when Haste Samba is active. You should have merits in Haste Samba or you will want to be working on that as soon as possible. Keep Haste Samba active as much as possible.
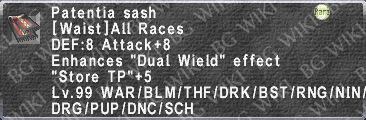
- Patentia Sash is DW+5. This gets you close enough that you wouldn't need anything else. It's also super cheap at 30k.
- Adhemar Jacket and Adhemar Jacket +1 would both cover the DW needs but at significantly higher cost. Personally, I don't think Adhemar Jacket +1 is worth the cost today.
- Toetapper Mantle could also have DW+1 which would make it easier to hit a decent roll but then it messes with you when Haste Samba is up. Realistically, going 1 DW over isn't going to break the set so you can still shoot for DW+1 and a good STP roll.
Going for DT in a slot is a solid option. If you are missing an item for the Beginner phase, you would want to go for Acc in the slot of DT.
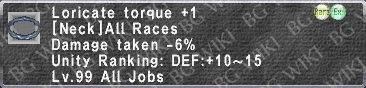
- Twilight Torque, Loricate Torque/+1 or Elite Royal Collar have DT which is always a good option. Loricate will require help and collar is fairly deep into TVR.
- Defending Ring and Murky Ring are similar. Murky is free to get with some work, Defending could cost you millions.
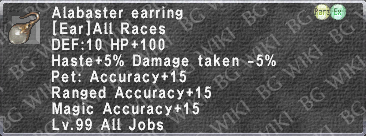
- Alabaster Earring is a great piece with DT and Haste. Being free is just makes it feel better.
In this stage, we are struggling a bit with Accuracy. The goal is to make sets that can hit Apex mobs with trust buffs and without the need to Quickstep debuff them for the full fight. The mobs I targeted were Apex Crabs in Dho Gates. In order to hit a decent Hit Rate against them,
- Max Merit Points in Dagger Skill and DEX.
- Weapon options were limited to Kaja Knife, Enchufla and Polyhymnia.
- Grape Daifuku for the food.
My suggestion would be Kaja Knife and Polyhymnia. If you have friends that will buff you, Kaja Knife and Centovente are fantastic. You would probably want a Madrigal and Distract to make it work and that's just not consistent with trusts.
You can fight weaker Apex to cap Accuracy but I wouldn't expect to be able to drop Accuracy in the set for better TP gain unless you are taking advantage of Quickstep. The capped Lethargic Daze will reduce enemy Evasion by 44.
Things will get better as we get access to more gear and build up job points.
|


Mid Tier
For the Mid Tier, the full Haste sets are the template. Things stay quite consistent as you go through the DW tiers. Take the base set and slap the DW items for the tier over top.
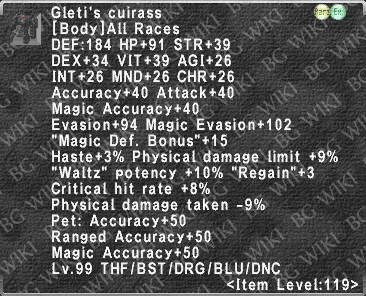
We now have more options but the Malignance Attire Set stands above the rest. You are going to want to grind out the full set. You will be wanting your Empy+2 Set as well. Once you can get +1, it's not too hard to get to +2. It's just a grind and one you can do solo if needed. Anu Torque is your best neck piece for TP but at 1 STP less and a lot more Accuracy, you can feel free to use the Etoile Gorget +1 full time.
At this stage our dagger options open up quite a bit. Looking at our options,
- Centovente is always going to be the go to offhand for Rudra's Storm, Shark Bite and Ruthless Stroke.
- The problem is having the accuracy to make use of it. Luckily, this stage has plenty of options for our sets.
- Tauret is many players strongest dagger for a while.
- As we start leaning on Rudra's Storm more, this becomes less appealing due to the lower base damage.
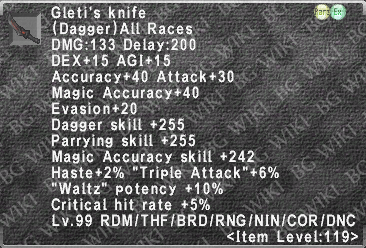
- Gleti's Knife R0 is another really strong offhand but is often overlooked as a main hand option.
- It has higher base damage than Tauret and is the stronger pairing with Centovente.
- When we can't offhand Centovente due to accuracy issues or we are using a weapon skill that doesn't care about the bonus TP, this tends to be the top option.
- Acrontica R0 is often overlooked due to not being as glamorous as other options.
- Higher base damage is nice in the main hand for Rudra's Storm.
- Very strong defensive option in the main or offhand. The offhand is more common.
- Taming Sari can be a very solid option if you are lucky enough to get one with capped augments.
- Base damage is as low as Tauret but more DEX and Triple Attack makes it a better option when fully buffed.
- Great offhand to have before Gleti's Knife.
- Not worth the time chasing the augments but nice to have if you get lucky.
- Crepuscular Knife might exist for you! Don't count on having it.
- Very similar to Gleti's Knife.
- REMA weapons start being much more possible at this stage but I wouldn't expect them for Mid Tier players.
- The gil and effort should still be going into sets at this point but starting to work on the option is always nice.
- Aeneas is often the easier option to get since the investment isn't as high. It will take over your main hand for Rudra's Storm, Shark Bite and Ruthless Stroke.
- All sets were built with Centovente offhand in mind.
- If accuracy is low, switch to a higher ACC set before changing offhand.
- When leaning on Evisceration or Pyrrhic Kleos, switch to Gleti's Knife, Crepuscular Knife or Taming Sari.
- When tanking or just needing to be more defensive, Acrontica can be used in your main or offhand depending on the weapon skill and other dagger you will be using.
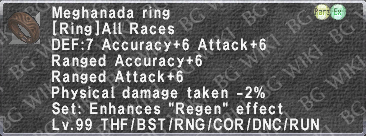
When Saber Dance is down, Meghanada Chausses +2 can come in over Malignance Tights. The effect this has is greater as your overall Haste lowers. This is not so profound that you need to make the swaps but it does make a difference. Unfortunately, the fights where this would matter you are probably riding Fan Dance and trying to stay in more defensive sets. If you are fighting Xevioso, you will likely be staying stance neutral but you want to be fairly defensive.
|


Dual Wield Tiers
|
Full Hate


haste 2 and samba
|
haste 2
|
haste 1 and samba
haste 1
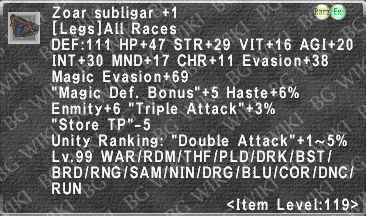
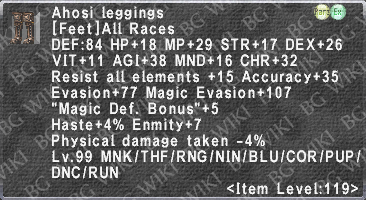
Weapon Skill sets
|


|

Cleave sets
|

Ody Add Tanking
Comparing set ideas for being more taky in Ody during RP when haste may not be capped.
|
|
|
|