The Voracious Resurgence | |
| Prime Weapons • Ultimate Weapons • Ultimate Augments • Abjurations iL119 • JSE Necks • Divergence Augments • Escutcheons | |
| Reforged Armor Artifact: +1 • iL109 • iL119/+2/+3/+4 Relic: +1/+2 • iL109 • iL119/+2/+3/+4 Empyrean: +1/+2 • iL109 • iL119/+2/+3 |
Guides • Crafting • Trusts • Apex Monsters |
CatsEyeXI Content/Crystal Warrior Incursions
| This article is related to the CatsEyeXI Private Server and not the official version of Final Fantasy XI. Private Servers are not sanctioned by Square Enix Holdings Co., Ltd. Please see the Private Server page for further information on this subject. |
|
Allied Incursion: Tier 1
Tier 1 Allied Incursions consist of the following:
- Each Incursion may be attempted daily (JST Midnight)
- One player must be in possessions of a starting item, a
 Beastman Banner (Obtained from Garrison) to begin.
 - Players start with a level sync at the lowest level, which increases as they defeat bosses.
- Each round features a series of target monsters followed by a boss target.
- Each round may feature either a bonus target monster or a bonus chest for extra currency.
- Once engaged, the boss will draw in on the main target.
- You can still walk away from it (except BLMs) and they will follow you, but don't run too far away of they'll draw you in.
- After using a weaponskill on a boss, it will reveal its weapon type weakness. Using a weaponskill that matches the weakness will award an extra bonus.
- Once each round's boss is defeated, the level sync cap will raise, currency will be rewarded, and a purple marker will appear on the ground offering one of several boss bonus buffs.
- A variety of temporary items and effects can be purchased from the Incursion flag or obtained as rewards from bosses and chests to aid in combat.
The Incursion ends when the final round is completed. Defeating the final boss spawns an Incursion Case for each player containing gil, a chance to roll the zone's unique items and a unique randomly augmented item per area.
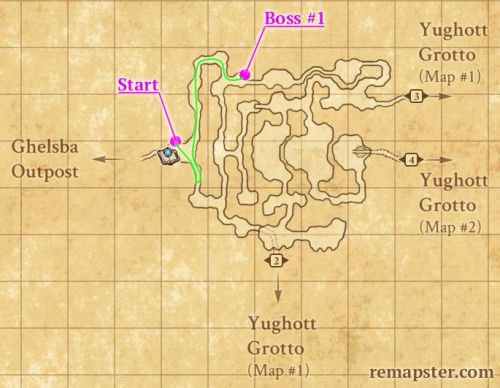
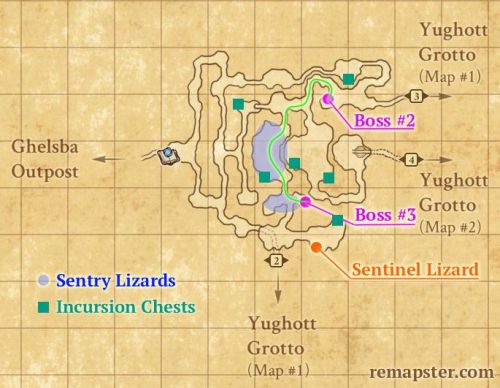
Fort Ghelsba
| Fort Ghelsba Incursion | |||||||||||||||||||||
|---|---|---|---|---|---|---|---|---|---|---|---|---|---|---|---|---|---|---|---|---|---|
| General Info | Drops (from bosses & secret chests) | Incursion Case (after last boss) | |||||||||||||||||||
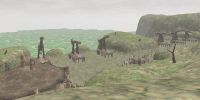 Rallying Point (F-8) Map #1 with a Players: Level cap range: |
|||||||||||||||||||||
| |||||||||||||||||||||


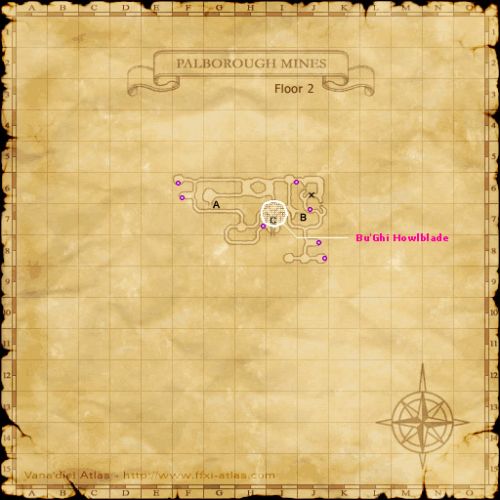
Palborough Mines
| Palborough Mines Incursion | |||||||||||||||||||||
|---|---|---|---|---|---|---|---|---|---|---|---|---|---|---|---|---|---|---|---|---|---|
| General Info | Drops (from bosses & secret chests) | Incursion Case (after last boss) | |||||||||||||||||||
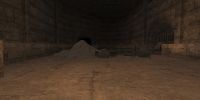 Rallying Point (I-8) Map #1 with a Players: Level cap range: |
|||||||||||||||||||||
| |||||||||||||||||||||


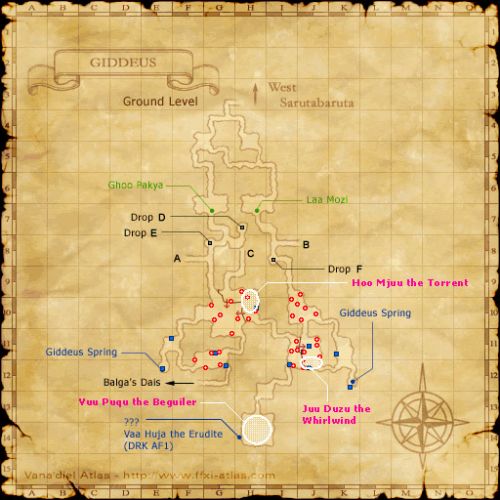
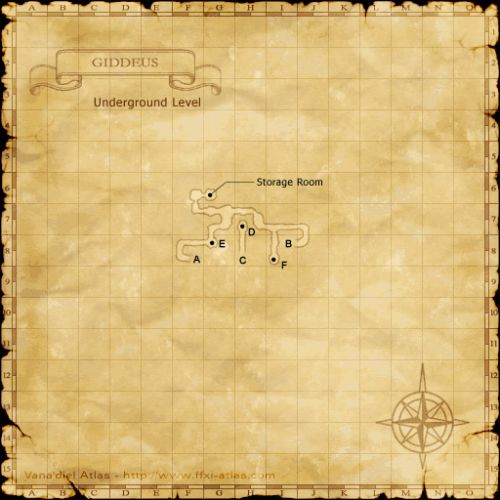
Giddeus
| Giddeus Incursion | |||||||||||||||||||||
|---|---|---|---|---|---|---|---|---|---|---|---|---|---|---|---|---|---|---|---|---|---|
| General Info | Drops (from bosses & secret chests) | Incursion Case (after last boss) | |||||||||||||||||||
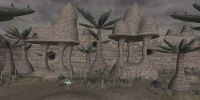 Rallying Point (H-5) Map #1 with a Players: Level cap range: |
One of: Various
Crafting Materials | ||||||||||||||||||||
| |||||||||||||||||||||


Allied Incursions: Caves
Caves Allied Incursions follow the same pattern as Tier 1 Allied Incursions, see above.
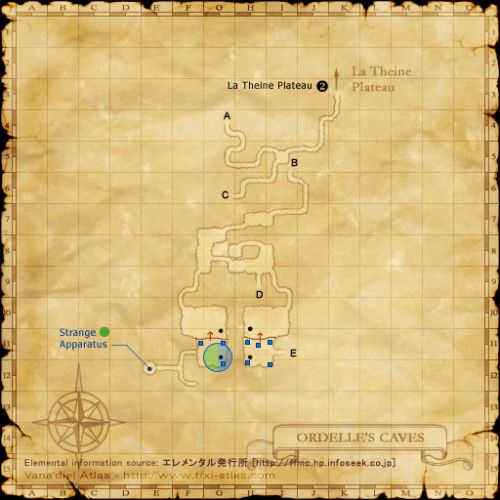
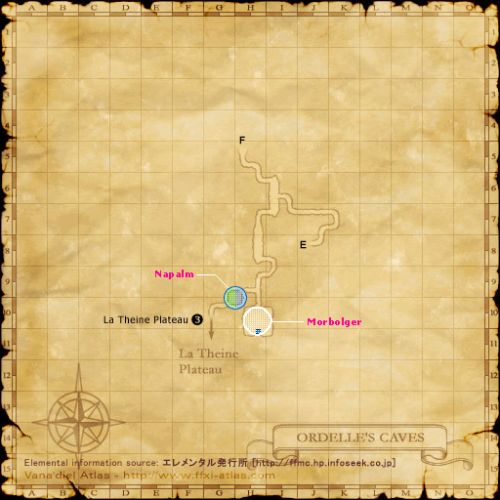
Ordelle's Caves
| Ordelle's Caves Incursion | |||||||||||||||||||||||||||||||||
|---|---|---|---|---|---|---|---|---|---|---|---|---|---|---|---|---|---|---|---|---|---|---|---|---|---|---|---|---|---|---|---|---|---|
| General Info | Drops (from bosses & secret chests) | Incursion Case (after last boss) | |||||||||||||||||||||||||||||||
 Rallying Point (H-3) Map #2 with a Players: Level cap range: |
| ||||||||||||||||||||||||||||||||
| |||||||||||||||||||||||||||||||||


Dangruf Wadi
| Dangruf Wadi Incursion | |||||||||||||||||||||||||||||||||
|---|---|---|---|---|---|---|---|---|---|---|---|---|---|---|---|---|---|---|---|---|---|---|---|---|---|---|---|---|---|---|---|---|---|
| General Info | Drops (from bosses) | Incursion Case (after last boss) | |||||||||||||||||||||||||||||||
|
Start: Rallying Point E-10 on the ledge. Go beyond the secret area, drop down and head north. with a Players: Level cap range: |
|||||||||||||||||||||||||||||||||
| |||||||||||||||||||||||||||||||||
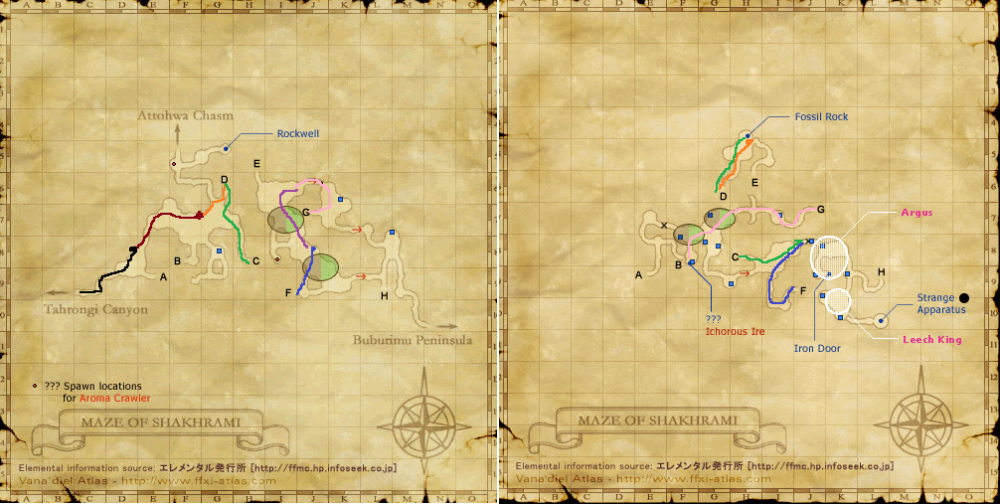
Maze of Shakhrami
| Maze of Shakhrami Incursion | |||||||||||||||||||||||||||||||||
|---|---|---|---|---|---|---|---|---|---|---|---|---|---|---|---|---|---|---|---|---|---|---|---|---|---|---|---|---|---|---|---|---|---|
| General Info | Drops (from bosses) | Incursion Case (after last boss) | |||||||||||||||||||||||||||||||
|
Start: Rallying Point (C-9, Map 1) with a Players: Level cap range: |
|||||||||||||||||||||||||||||||||
| |||||||||||||||||||||||||||||||||

Allied Incursions: Tier 2
Tier 2 Allied Incursions follow the same pattern as Tier 1 Allied Incursions, see above.
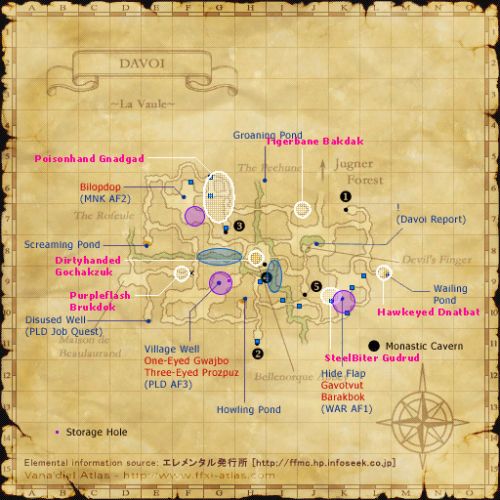
Davoi
| Davoi Incursion | |||||||||||||||||||||
|---|---|---|---|---|---|---|---|---|---|---|---|---|---|---|---|---|---|---|---|---|---|
| General Info | Drops (from bosses & secret chests) | Incursion Case (after last boss) | |||||||||||||||||||
 Rallying Point (J-8) (Map #1) with a Players: Level cap range: |
|||||||||||||||||||||
| |||||||||||||||||||||


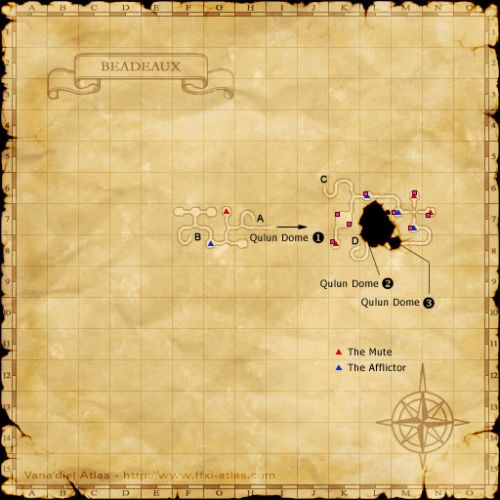
Beadeaux
| Beadeaux Incursion | |||||||||||||||||||||
|---|---|---|---|---|---|---|---|---|---|---|---|---|---|---|---|---|---|---|---|---|---|
| General Info | Drops (from bosses & secret chests) | Incursion Case (after last boss) | |||||||||||||||||||
 Rallying Point (G-7) (Map #1) with a Players: Level cap range: |
|||||||||||||||||||||
| |||||||||||||||||||||


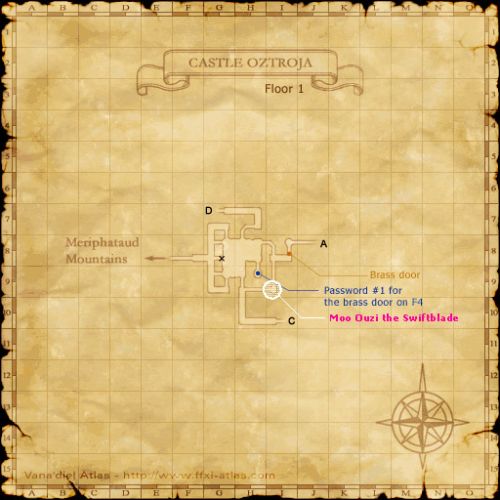
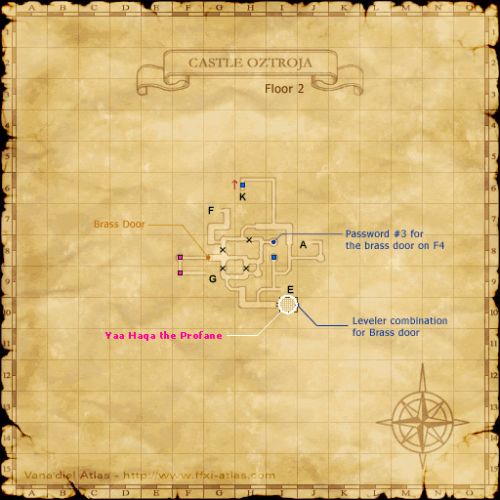
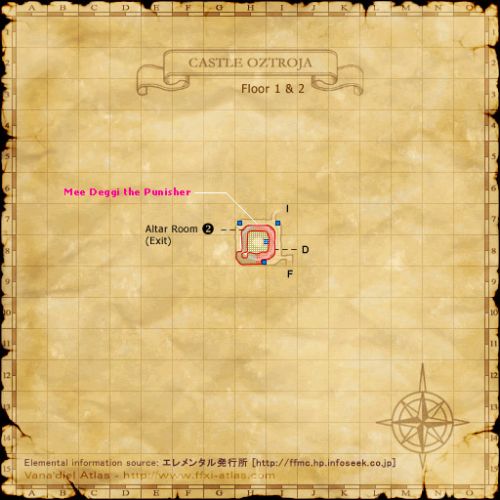
Castle Oztroja
| Castle Oztroja Incursion | |||||||||||||||||||||
|---|---|---|---|---|---|---|---|---|---|---|---|---|---|---|---|---|---|---|---|---|---|
| General Info | Drops (from bosses & secret chests) | Incursion Case (after last boss) | |||||||||||||||||||
 Rallying Point (G-9) Map #1 with a Players: Level cap range: |
|||||||||||||||||||||
| |||||||||||||||||||||


Imperial Incursions: Tier 3
⚠️⚠️⚠️⚠️⚠️⚠️
All the information here is very much WIP and may be incorrect/imcomplete. As we get more info, things will get more organized. Dumping mostly everything in this header for now.
Please share walkthrough info and items screenshot on the #bg-wiki/Incursion T3 thread on Discord.
⚠️⚠️⚠️⚠️⚠️⚠️
Overview
- Imperial Incursion takes place over 5 progressive phases with increasing difficulty.
- Each phase begins at a Rallying Point and involves defeating a number of enemies followed by a boss.
- Phase mobs have a chance to spawn rare enemies with exclusive items.
- Guardians (optional bosses) are dispersed throughout the area, which provide powerful buffs and loot.
- Known buffs:
- Arrapago Reef
- Guardian #1: Spectral Queen - Spectral Shroud (Tank: Magic Dmg Taken-25%, Fast Cast+30%)
- Guardian #2: Siren Guardian - Siren's Wrath (DPS: INT+60, MAB+35, WS Damage+20%)
- Guardian #3: Captain Hollow - Lifedrink Gift (Support: Regen+20, Magic Accuracy+25)
- Halvung
- Guardian #1: Forge Titan - Forgefire Hide (Tank: Damage Taken-25%, HP+250, DEF+50)
- Guardian #2: Alpha Troll - Troll's Might (DPS: Crit Rate+15%, Double Attack+15%)
- Guardian #3: Primal Iron - Ironhand Touch (Support: Cure Potency+40%, Refresh+5, Enmity-30)
- Mamook
- Guardian #1: ??? - Serpent's Scales (Tank: Evasion+50, Enmity+30, Counter+20%)
- Guardian #2: ??? - Predator's Fury (DPS: STR+15, Attack+40, Store TP+25)
- Guardian #3: ??? - Beast Whisperer (Support: Fast Cast+20%, Skillchain Dmg+25%)
- Arrapago Reef
- Known buffs:
- Additional optional mobs such as dragons provide HP/MP restore and other mechanics.
- Players begin with all equipment slots locked and must unlock them through bosses, guardians and chests located throughout.
- Incursion monsters are marked with stars, everything not marked does not aggro while on incursion.
- Bosses can be 'proc'd with elemental weaponskills to increase their damage taken by 10% per proc, up to 60%.
- Users of the elemental weaponskill will be given a hint towards the current proc element.
| Drops | ||
|---|---|---|
| Equipment / Item | Source | |
|
|
||
|
|
Halvung: Phase 2 boss | |
|
|
Arrapago Reef: Lamia Sultana | |
|
|
Arrapago Reef: Lamia Queen | |
|
|
Halvung: Troll Warlord | |
|
|
Halvung: Troll Tyrant | |
|
|
Arrapago Reef: ??? | |
|
|
Mamook: Phase 3 boss | |
|
|
Mamook: Phase 1 boss | |
|
|
Arrapago Reef: Phase 1 boss | |
|
|
||
|
|
Mamook: Phase 2 boss | |
|
|
Halvung: Stage 3 | |
|
|
Mamook: ??? | |
|
|
Mamook: Phase 1 boss | |
|
|
Arrapago Reef: Chimera (phase 4) (can be turned in to DI NPC for 60,000 domain shards) | |
|
|
Halvung: Infernaljaw (can be turned in to DI NPC for 60,000 domain shards) | |
|
|
Arrapago Reef: ??? (can be turned in to DI NPC for 60,000 domain shards) | |
|
|
Mamook: Venomscale (can be turned in to DI NPC for 60,000 domain shards) | |
|
|
Mamook: Hydra (rare) Phase 3 boss | |
| Mamook: Phase 3 boss | ||
| Arrapago Reef: Behemoth | ||
| Mamook: Phase 5 boss | ||
| Mamook: Phase 5 boss | ||
| Arrapago Reef: Mordreth (Wyvern) | ||
| 1-5 star augmented armor: Notes: Augments can be transferred to HQ version |
||
| All bosses | ||


_description.png)
_description.png)
Arrapago Reef
| Arrapago Reef Incursion | ||||||||||||||||||||||||
|---|---|---|---|---|---|---|---|---|---|---|---|---|---|---|---|---|---|---|---|---|---|---|---|---|
| General Info | Drops (from bosses & secret chests) | Incursion Case (after last boss) | ||||||||||||||||||||||
 Trade (the whole party needs to be present to be teleported to the Incursion) Players: Level cap range: |
|
TBC | ||||||||||||||||||||||
| ||||||||||||||||||||||||
Halvung
| Halvung Incursion | ||||||||||||||||||||||||
|---|---|---|---|---|---|---|---|---|---|---|---|---|---|---|---|---|---|---|---|---|---|---|---|---|
| General Info | Drops (from bosses & secret chests) | Incursion Case (after last boss) | ||||||||||||||||||||||
 Trade (the whole party needs to be present to be teleported to the Incursion) Players: Level cap range: |
|
TBC | ||||||||||||||||||||||
| ||||||||||||||||||||||||
Mamook
| Mamook Incursion | ||||||||||||||||||||||||
|---|---|---|---|---|---|---|---|---|---|---|---|---|---|---|---|---|---|---|---|---|---|---|---|---|
| General Info | Drops (from bosses & secret chests) | Incursion Case (after last boss) | ||||||||||||||||||||||
 Trade (the whole party needs to be present to be teleported to the Incursion) Players: Level cap range: |
TBC |
TBC | ||||||||||||||||||||||
| ||||||||||||||||||||||||
Material Sources
| Trade to Imperial Trader |
Source | Reward |
|---|---|---|
| Quartermaster (G-7) Al Zahbi | ||
| Quartermaster (G-7) Al Zahbi | ||
| Quartermaster (G-7) Al Zahbi | ||
| Quartermaster (G-7) Al Zahbi | ||
| T3 Incursion (?) | ||
| T3 Incursion (?) | ||
| T3 Incursion (?) |
Bonuses
| Boss Bonuses | ||
|---|---|---|
| Name | Buff | Ranking |
| Adept's Advance | Haste +5% & Fast Cast +10% | ★ |
| Archer's Aim | Accuracy +10 & Ranged Accuracy +10 | ★ |
| Assailant's Ambush | DEX +5 & Crit. Hit Rate +5% | ★ |
| Braver's Bulwark | Defense +15 & Physical Damage Taken -8% | ★★ |
| Brawler's Brawn | STR +5 & Attack +10 | ★ |
| Champions Command | Combat Skills +10 | ★ |
| Cleric's Clerity | MND +10 & Cure Potency +15% | ★★★ |
| Dancer's Delight | CHR +10 & "Waltz" Potency +15% | ★★★ |
| Fighter's Fury | STR +8 & Attack +15 | ★★ |
| Guardian's Glory | VIT +5 & Phys. Dmg Taken -5% | ★ |
| Healer's Hands | MND +5 & Cure Potency +5% | ★ |
| Hero's Heart | HP +50 & MP +50 | ★ |
| Hoarder's Hostility | Enmity +5 & "Gilfinder" +3 | ★ |
| Mage's Memory | INT +5 & MP + 10% | ★ |
| Maestro's Momentum | Fast Cast +15% & Movement Speed + 25% | ★★★ |
| Marcher's Melody | CHR +5 & Waltz Potency +5% | ★ |
| Plunderer's Precision | DEX +8 & Accuracy +15 | ★★ |
| Rambler's Respite | HP&MP Recovered while healing +25 | ★★★ |
| Roamer's Reprieve | HP&MP Recovered while healing +10 | ★ |
| Rogue Retribution | DEX +10 & Critical hit rate +15% | ★★★ |
| Ronin's Revenge | Weaponskill Accuracy +15 & "Store TP" +8 | ★★ |
| Sage's Seersight | Magic Accuracy +8 & Accuracy +15 | ★★ |
| Sniper's Salvo | Ranged Accuracy +15 & Ranged Attack +15 | ★★ |
| Soldier's Stamina | VIT +5 & HP +10% | ★ |
| Stalwart Sentinel | VIT +10 & Damage Taken -15% | ★★★ |
| Thaumaturge's Tempest | INT +10 & "Magic Attack Bonus" +15 | ★★★ |
| Trickster's Tenacity | AGI +8 & Evasion +15 | ★ |
| Warlord's Wrath | Enmity +8 & Double Attack +15 | ★★★ |
| Wizard's Wisdom | INT +8 & "Magic Attack Bonus" +8 | ★★ |
Incursion Points
Each Incursion boss awards points to purchase materials, cosmetics, Ephemeral Box expansions, Mog Wardrobe slots and temporary buffs at the Rallying Point.
| Tier I - Incursion Points | ||||
|---|---|---|---|---|
| NM #1 | NM #2 | NM #3 | NM #4 | Total |
| 75~100 | 125~150 | 175~200 | 200~225 | 575~675 |
| Tier II - Incursion Points | ||||
|---|---|---|---|---|
| NM #1 | NM #2 | NM #3 | NM #4 | Total |
| 125~150 | 175~200 | 225~250 | 275~300 | 800~900 |
| Garret - Incursion Points Shop | ||||
|---|---|---|---|---|
| Item | Buy | Sell | ||
| - | 10 | |||
| 100 | 25 | |||
| 500 | - | |||
| 1500 | 250 | |||
| 400 | 40 | |||
| 100 | 25 | |||
| 500 | - | |||
| 1500 | 250 | |||
| 400 | 40 | |||
| 100 | 25 | |||
| 500 | - | |||
| 1500 | 250 | |||
| 400 | 40 | |||
| Mog Wardrobe 5 Slot | 1000 | - | ||
| Mog Wardrobe 5 Slot x5 | 5000 | - | ||
| Incursion storage* | 5,000 | - | ||
| Pete's Pet Pouch** | 10000 | - | ||
| Quinn's Quiver*** | 10000 | - | ||
| 15000 | - | |||
| Orcish Warmachine | 50000 | - | ||
* Ephemeral Box Incursion Expansion: Stores base weapons and currencies
** Ephemeral Box Pet Expansion: Stores jugs, food and automaton oil
*** Ephemeral Box Ammo Expansion: Stores Arrows, Bolts, Bullets and adds quiver feature !box ammo
Incursion Weapons
How to Forge
Tier I & Tier II
Smithnix Oldton Movalpolos (I-8) can repair the "Worn" base weapons from Allied Incursion, using currency found in the respective Incursion area and similar crafted weapons as prototypes for the final result.
- A first time fee of 5 Goblin Pies must also be traded
Tier III
Mythrix Provenance Can further upgrade Stage II weapons into Ultimate Weapons using Imperial Incursion materials (Hoards, Imperial Gems) and rare endgame weapons as catalysts.
- Requires completion of Gobbie Travels quest
- After trading materials, defeat the Guardian at the burial site to claim the weapon
Upgrade Paths
| Smithnix & Mythrix's Forging | ||||||
|---|---|---|---|---|---|---|
| Base | Requirements | Stage I | Requirements | Stage II | Requirements | Stage III |
|
|
|
"Temple Guardian" [1] | ||||
|
|
|
"Templar's Solace" [2] | ||||
|
|
|
"Feral Heart" [3] | ||||
|
|
|
"Battle Hymn" [4] | ||||
|
|
|
"Dragon Knight" [5] | ||||
|
|
|
"Realm Defender" [6] | ||||
|
|
|
"Mage Blade" [7] | ||||
|
|
|
"Black Knight" [8] | ||||
|
|
|
"Pestilence" [9] | ||||
|
|
|
"Wind Fury" [10] | ||||
|
|
|
"Transcendence" [11] | ||||
|
|
|
"Sniper" [12] | ||||
|
|
|
"Final Act" [13] | ||||
|
|
|
"Shinobi" [14] | ||||
|
|
|
"Swordsworn" [15] | ||||
|
|
|
"Erudition" [16] | ||||
|
|
|
"Piercing Light" [17] | ||||
|
|
|
"Rousing Melody" [18] | ||||


- ↑ "Temple Guardian": Repair Potency +10
- ↑ "Templar's Solace": Blue Magic Skill +10, Cure Potency +10%, Tactical Parry +5, Inquartata +5
- ↑ "Feral Heart": Killer Effects +5%
- ↑ "Battle Hymn": Cure Potency +15%, Cure Potency Received +15%, Waltz Potency+15%, Enmity Loss reduction -20, Tactical Parry +10, Inquartata +10
- ↑ "Dragon Knight": Jump TP Bonus +30, Wyvern: Breath +40, Effective Breath +1
- ↑ "Realm Defender": Accuracy +20, Cure Potency Received +20%, Retaliation +30, Enmity Loss Reduction +30
- ↑ "Mage Blade": Enhancing Magic Skill +15, Enfeebling Magic Skill +15, Enspell Damage Bonus +15, Magic Potency +15%, Magic Accuracy +30, "Iridescence" +2
- ↑ "Black Knight": TP Bonus +500, Magic Accuracy +20, Occult Occumen +30, Absorb Damage to MP +5, Inquartata +10, Tactical Parry +5
- ↑ "Pestilence": Magic Potency +20%, Magic Accuracy +40, Dark Element: Magic Potency +30%, Dark Element: Magic Accuracy +60, "Iridescence"
- ↑ "Wind Fury": Wind Element: Magic Potency +20%, Wind Element: Magic Accuracy +40, Light Element: Magic Potency +30%, Light Element: Magic Accuracy +60
- ↑ "Transcendence": Pet: MAB+15, M.Acc+15, Attack+20, Accuracy+20, Enmity+10, Enmity loss -10
- ↑ "Sniper": Rapid Shot +10, Snapshot +10
- ↑ "Final Act": Triple Attack +3%, Cure Potency +10%, Waltz Potency +10%, Jig Duration +20, Step TP Consumed -50, Inquartata +3 Accomplice/Collaborator Effect +15
- ↑ "Shinobi": Magic Attack Bonus +10, Ninjutsu Skill +10, Throwing Skill +10, Magic Potency +15%, Magic Accuracy +30, "Iridescence"
- ↑ "Swordsworn": Zanshin +10, Third Eye +15
- ↑ "Erudition": Magic Attack Bonus +10, Magic Potency +15%, Magic Accuracy +30, Cure Potency +10%, "Iridescence" (15%)
- ↑ "Piercing Light": Critical Hit Rate +10%, Rapid Shot +10, Snapshot +10
- ↑ "Rousing Melody": Minuet +4, Madrigal +4, March +4, Prelude +4, Song Duration Bonus +25
Incursion Armors
Six advanced armor sets can be forged by Mythrix in Provenance. Each piece is the final stage of the Crystal Warrior armor progression, combining augmented quest armor, Garrison +1 gear, and materials from Allied Incursion content.
How to Forge
Each piece requires trading the following to Mythrix:
- Augmented CW quest armor upgraded to HQ (consumed) - Crystal Warrior armor quests
 Garrison +1 piece for the same slot (consumed) - Garret
 Stalactite Shard Zone-specific incursion materials - Cave incursion bosses (all difficulties)
 Beastman Shard Beastman catalyst - Any Allied Incursion boss (Hard+ only)
 Orcish Steel Beastman currency - Allied Incursion bosses
| Slot | Zone Material | Catalyst | Currency |
|---|---|---|---|
| Head | x5 | x2 | x50 |
| Body | x8 | x3 | x80 |
| Hands | x4 | x2 | x40 |
| Legs | x6 | x3 | x60 |
| Feet | x4 | x2 | x30 |
Renegade Set
Armor of the Renegade. Light, fast, and unforgiving.
| Renegade (RNG/NIN/COR) — from Noct +1 | |||
|---|---|---|---|
| Piece | Requires | Materials | |
|
|
|||
|
|
|||
|
|
|||
|
|
|||
|
|
|||
Prelate's Set
Armor of the Prelate. Crafted for those who shape the battlefield without drawing a blade.
| Prelate's (WHM/BLM/RDM/SCH) — from Seer's +1 | |||
|---|---|---|---|
| Piece | Requires | Materials | |
|
|
|||
|
|
|||
|
|
|||
|
|
|||
|
|
|||
Bulwark Set
Armor of the Bulwark. A walking fortress. The line that does not break.
| Bulwark (WAR/PLD/DRK/DRG) — from Kampf | |||
|---|---|---|---|
| Piece | Requires | Materials | |
|
|
|||
|
|
|||
|
|
|||
|
|
|||
|
|
|||
Brawler Set
Armor of the Brawler. Loose-fitting and deceptively tough.
| Brawler (THF/BRD/BLU/DNC) — from Garish/Rubious | |||
|---|---|---|---|
| Piece | Requires | Materials | |
|
|
|||
|
|
|||
|
|
|||
|
|
|||
|
|
|||
Drifter Set
Armor of the Drifter. Balanced for those who master multiple disciplines.
| Drifter (BST/SMN/PUP/GEO) — from Soil +1 | |||
|---|---|---|---|
| Piece | Requires | Materials | |
|
|
|||
|
|
|||
|
|
|||
|
|
|||
|
|
|||
Phantom Set
Armor of the Phantom. Infused with darkness, strikes from impossible angles.
| Phantom (MNK/SAM/RUN) — from Shade +1 | |||
|---|---|---|---|
| Piece | Requires | Materials | |
|
|
|||
|
|
|||
|
|
|||
|
|
|||
|
|
|||
Where Materials Drop
| Material | Source | Drop Rate |
|---|---|---|
| Ordelle's Caves bosses | Normal 5% / Hard 10% / V.Hard 15% | |
| Maze of Shakhrami bosses | Normal 5% / Hard 10% / V.Hard 15% | |
| Dangruf Wadi bosses | Normal 5% / Hard 10% / V.Hard 15% | |
| All Allied Incursion bosses (Hard+) | Hard 10% / V.Hard 15% |
Drop Upgrades
Alongside Incursion weapons outlined above, many of the Incursion drops, including ones from the incursion chest(last boss)(these specifically require you to trade the augmented item and the +1 to Garret at the same time.) are able to be augmented via Garret Ru'Lude Gardens (H-9) as below.
| Incursion Upgrades | ||||||
|---|---|---|---|---|---|---|
| Base | Requirements | Tier I (2000 GP) |
Requirements | Tier II (3000 GP) |
Requirements | Tier III (4000 GP) |
|
|
HP+3 | HP+4 | HP+5 STR+1 | |||
|
|
MP+1 | MP+2 | MP+3 INT+1 | |||
|
|
DEF+2 Accuracy+1 |
DEF+3 Accuracy+2 |
DEF+4 Accuracy+3 Enmity+2 | |||
|
|
Attack+1 | Attack+2 | Attack+3 DMG+1 | |||
|
|
HP+8 | HP+10 | HP+12 STR+1 | |||
|
|
Attack+2 Accuracy+2 |
Attack+3 Accuracy+3 |
Attack+4 Accuracy+4 Cure Potency +2% | |||
|
|
Accuracy+1 | Accuracy+2 | Accuracy+3 Magic Atk. Bonus+1 | |||
|
|
HP+4 | HP+6 | HP+8 AGI+1 | |||
|
|
Attack+3 Ranged Attack+3 |
Attack+4 Ranged Attack+4 |
Attack+5 Ranged Attack+5 Magic Accuracy+2 | |||
Allied Skirmish
Allied Skirmish is designed to give solo players with limited time an opportunity to slowly accumulate currency for the ultimate weapon upgrades that would normally only be obtained in Allied Incursion.
- Each participant will be awarded Allied Incursion currency and materials
- The content has no level requirement, but 60+ is recommended for solo players
- Can be attempted once per conquest tally
Walkthrough
- Activate at the Rallying Point at G-7 Map #1 in Castle Zvahl Baileys
- It's the little room with the Ahrimans.
- Beware of the NM Likho who spawns there as well.
- Kill 10 of each Beastmen type (Orc, Quadav, Goblin, Yagudos)
- Go to H-8 Map #2 and click the Skirmish Point to spawn a Drake NM
- It's in the middle of the map
- Lower level characters may want to clear the surrounding first as Ahrimans and Demons might aggro
- Defeat the Zvahl Drake
- Uncapped, can use trusts
- Killable as lv60 with 2 trusts
- Has all usual Drake moves
- Click the Skirmish Point again to release a Skirmish Coffer
Rewards
- 20~25 Orcish Steel or
 Quadav Brass or
  Yagudo Silver
 - 1~
 Orcish Chain or
  Quadav Chain or
  Yagudo Chain
 - 2~3
 Orcish Leather or
  Quadav Thread or
  Yagudo Cloth
 - 2~3
 Beastcoin or
  Silver Beastcoin
