The Voracious Resurgence | |
| Prime Weapons • Ultimate Weapons • Ultimate Augments • Abjurations iL119 • JSE Necks • Divergence Augments • Escutcheons | |
| Reforged Armor Artifact: +1 • iL109 • iL119/+2/+3/+4 Relic: +1/+2 • iL109 • iL119/+2/+3/+4 Empyrean: +1/+2 • iL109 • iL119/+2/+3 |
Guides • Crafting • Trusts • Apex Monsters |
CatsEyeXI Content/EXP
From FFXI Wiki
| This article is related to the CatsEyeXI Private Server and not the official version of Final Fantasy XI. Private Servers are not sanctioned by Square Enix Holdings Co., Ltd. Please see the Private Server page for further information on this subject. |
| Server General Info Login Campaigns Loxley Quest System (LQS) Refer a Friend Seasonal Events |
Guides Content Progression Crafting • Crafting Rewards EXP Fishing How to Wiki Milestone Rewards Missions Navigation New Player (ACE) New Player (CW) Tech Doc & Installation |
Content AMAN Trove BCNMs Campaign Dailies ENMs Garrison Nyzul Isle Prestige Ventures
|
End Game |
|---|---|---|---|
| Game Modes Accelerated Crystal Warrior • CW Rewards Wings Era Warrior | |||
| Augments Abjuration • Artifact +1 • Relic +1 • Salvage |
Professions Digging Fishing HELM Synergy Synthesis |
Ultimate Weapons Relic Mythic Ergon Oboro Mythic WS Aeonic WS |
Misc |
| Trials Adept • Grand • Novice |
|
EXP Guide
The EXP Guide provides teleportation to various EXP spots.
| Suggested Locations | |||
|---|---|---|---|
| Monster Lvl | Name | Zone | Note |
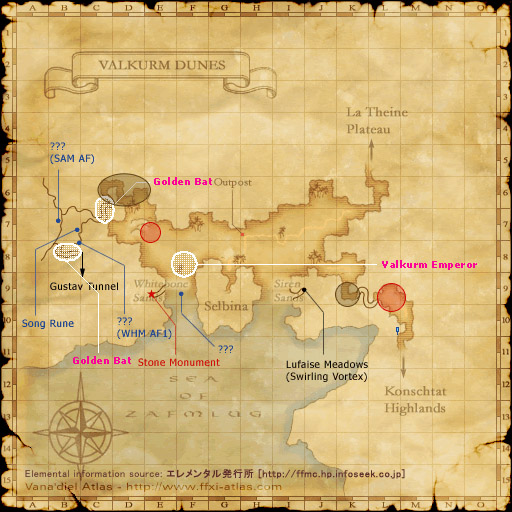
| 15-18 | Hill Lizard and Sand Hare | Valkurm Dunes | Throughout zone |
| 20-23 | Brutal Sheep and Damselfly | ||
| 23-25 | Beach Pugil | Any of the 3 beaches | |
| 25-27 | Greater Pugil | Qufim Island | Alley south of Outpost |
| 25-29 | Clipper | Outpost | |
| 30-33 | Yuhtunga Mandragora | Yuhtunga Jungle | Throughout zone |
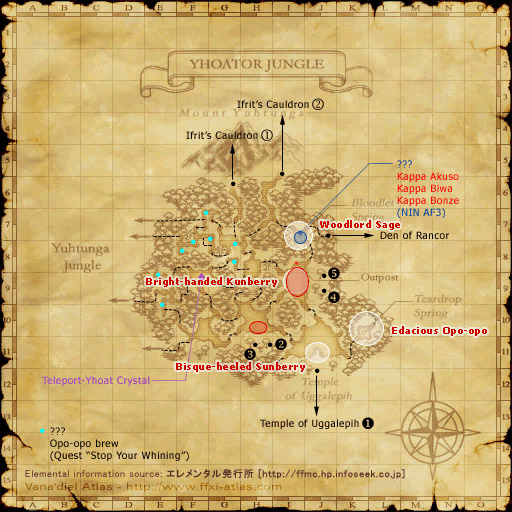
| 35-37 | Yhoator Mandragora | Yhoator Jungle | Throughout zone |
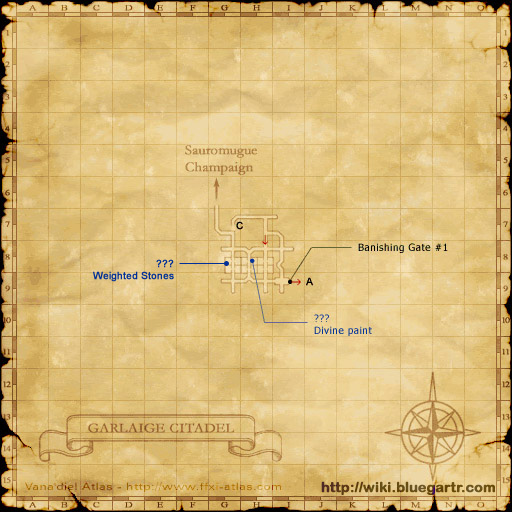
| 40-43 | Siege Bat and Borer Beetle | Garlaige Citadel | From Entrance to Banishing Gate #1 |
| 40-44 | Worker Crawler and Death Jacket | Crawlers' Nest | Entrance to first drop. |
| 42-44 | Caveberry | Long deadend cave to north, after first drop. | |
| 41-43 | Maze Lizard | Bottom of first drop. | |
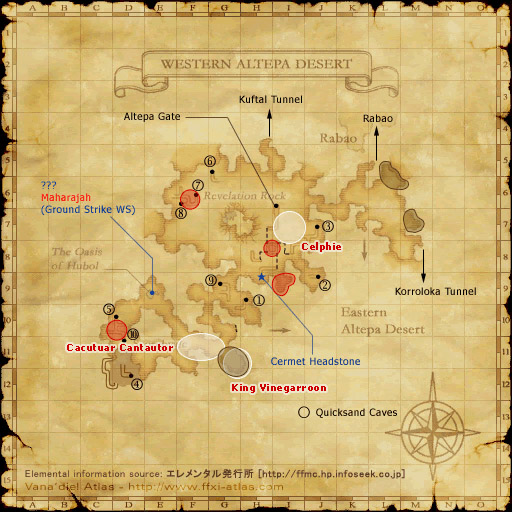
| 47-53 | Desert Beetle and Cactuar | Western Altepa Desert | All around the mountian |
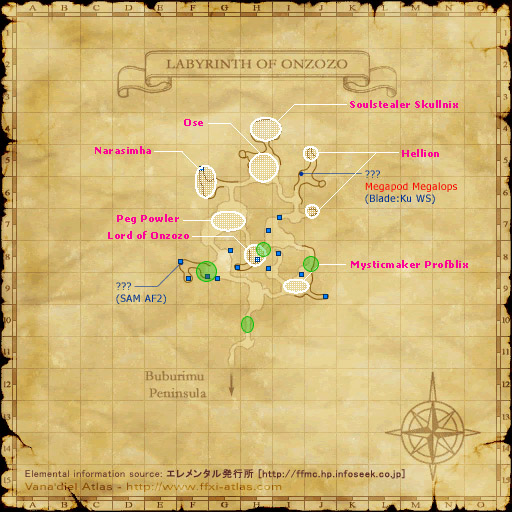
| 50-53 | Cockatrice and Goblin | Labyrinth of Onzozo | Entrance along right wall to Mysticmaker Profblix spawn area. |
| 63-65 | Lesser Colibri | Wajaom Woodlands | |
| 70-73 | Torama | Labyrinth of Onzozo | |
| 77-80 | Ovinnik and Greater Cockatrice | Kuftal Tunnel | Basement area |
| 72-75 | Locus Colibri and Locus Wivre | Bhaflau Thickets | Area you are placed and below the drop to the south |
| Merits Camps | |||
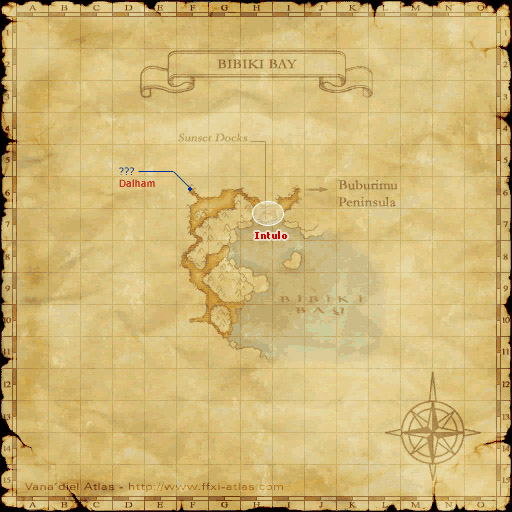
| 80-83 | Locus Ghost Crab, Camelopard, Bight Rarab, Hypnos Eft | Bibiki Bay | Eastern Peninsula. |
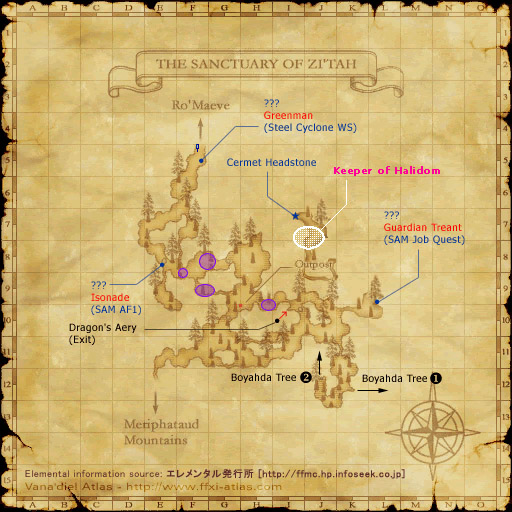
| 82-86 | Eschan Puk, Eschan Shadow Dragon | Escha - Zi'Tah | North of #2 |
| 80-83 | Locus Dire Bat | King Ranperre's Tomb | Underground area |
| 80-83 | Locus Spartoi Warrior, Sorcerer, Locus Hati | King Ranperre's Tomb | Secret area |
EXP Guide (S)
The EXP Guide (S) provides teleportation to various EXP spots.
| Suggested Locations | |||
|---|---|---|---|
| Monster Lvl | Name | Zone | Note |
| 10-12 | Tunnel Worm | North Gustaberg (S) | Spread from (G-8/9) to (H/I/J-9) |
| 12-14 | Walking Sapling | ||
| 15-18 | Vulture | ||
| 10-12 | Tiny Lycopodium | West Sarutabaruta (S) | (G/H-6) near outpost or Windurst Waters zonelines |
| 13-15 | Savanna Rarab | NE of the maw or Windurst Waters zoneline | |
| 10-13 | Carrion Worm | East Ronfaure (S) | (F-7) |
| 11-15 | Forest Hare | (H-7) | |
| 12-14 | River Crab | Spread through the rivers, few in number | |
| 14-17 | Pugil | ||
| 16-18 | Wild Sheep | Spread out grazing around eastern part of (I-7) | |
| 18-21 | Crawler | West Sarutabaruta (S) | SE corner of (I-7) |
| 18-22 | Stone Eater | North Gustaberg (S) | (E-9) and along path |
| 21-23 | Rock Lizard | ||
| 21-23 | Scarab Beetle | East Ronfaure (S) | Around NE corner of (G-8) |
| 22-25 | Carrion Crow | West Sarutabaruta (S) | South half of (H-7) |
| 22-25 | River Crab | F-10/11 | |
| 25-28 | Ornery Sheep | North Gustaberg (S) | (K-7) |
| 28-31 | Lycopodium | Sauromugue Champaign (S) | All Around (G-6) |
| 28-31 | Lycopodium | Batallia Downs (S) | Fort on the hill at (I-9) |
| 29-31 | Sadfly | ||
| 32-35 | Clipper | Coast of (I-10) or ideally the Walls at (J-6/7) | |
| 28-31 | Lycopodium | Near Upper Jeuno (K-8/9) Mobs are few in number, solo player camp. | |
| 24-27 | Stalking Sapling | ||
| 36-37 | Ba | ||
| 34-36 | Goliath Beetle | Vunkerl Inlet (S) | (F-9) near bridge |
| 35-38 | Carrion Marabou | ||
| 35-37 | Savanna Dhalmel | West Sarutabaruta (S) | (J-4/5) |
| 35-38 | Huge Spider | North Gustaberg (S) | (E-11) |
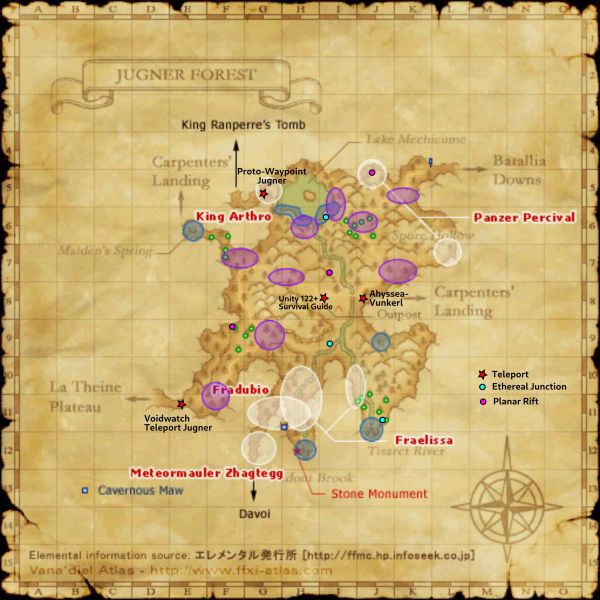
| 38-41 | Stag Beetle | Jugner Forest (S) | (K-9) |
| 38-41 | Land Pugil | (S) East half of (J-11) near the river | |
| 38-41 | Snipper | ||
| 40-43 | War Lizard | Fort Karugo-Narugo (S) | G/H-6. Beware of linking Emela-ntouka |
| 40-42 | Maneating Hornet | North Gustaberg (S) | ~(J-7) Mid to top Zegham Hill |
| 41-43 | Coppercap | SE corner of (H-6) | |
| 44-47 | Diving Beetle | Sauromugue Champaign (S) | (G-7/8) |
| 45-47 | Colibri | East Ronfaure (S) | (H-9/10)~(I-9/10) |
| 45-47 | Ladybug | ||
| 45-48 | Hawker | Rolanberry Fields (S) | (I-13) |
| 46-48 | Lynx | Sauromugue Champaign (S) | Spread around (K-7/8/9) |
| 46-48 | Smilodon | Batallia Downs (S) | Fort on the hill at (F-5) |
| 47-50 | Forester Beetle | ||
| 49-51 | Lynx | Meriphataud Mountains (S) | (E-5),(G-5),(H-5),(I-5) |
| 62-64 | Biddybug | Jugner Forest (S) | (J-5) Take Survival Guide from Batallia (S) |
| 62-64 | Robber Crab | Vunkerl Inlet (S) | (G/F-10) |
| 62-64 | Stygian Pugil | ||
| 68-70 | Electrumcap | Crawlers' Nest (S) | (G-9) Map 2 Deadend room |
| 68-72 | War Lynx | Meriphataud Mountains (S) | (K-4/5) (Less preferred choice to Processionaires) |
| 69-71 | Processionaire | Crawlers' Nest (S) | (E/F-8) Map 2 |
| 73-75 | Grauberg Hippogryph | Grauberg (S) | (G-7/8) |
| 75-77 | Sidhe | (F-5) | |
| 78-80 | Cyhiraeth | Beaucedine Glacier (S) | (F-7) Nue Tower |
| Merits Camps | |||
| 79-82 | Savage Ruszor | Xarcabard (S) | (I-7) |
| 80-82 | Caracal | (G-7) (Lynx) | |
Ventures Locations
Locations which satisfy the mobs must be 3 levels higher than the highest level party member requirement of Ventures.
Standard Camps
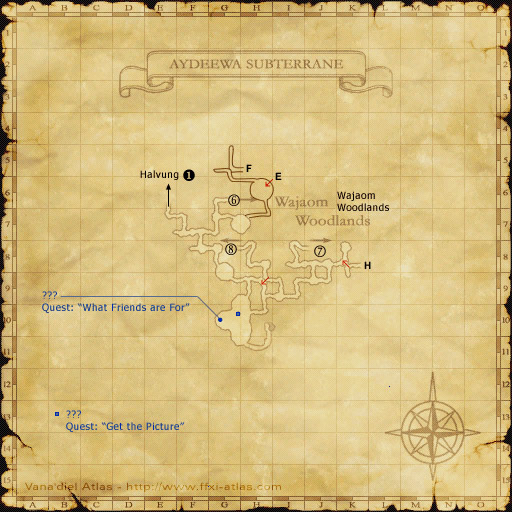
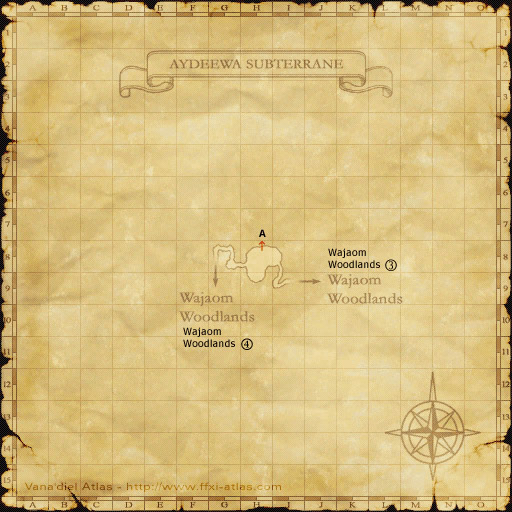
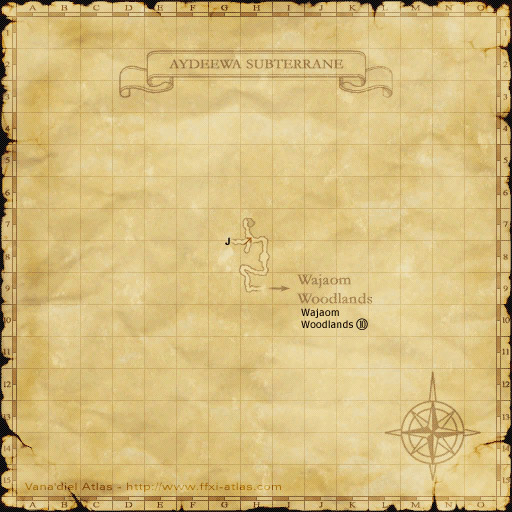
Aydeewa Subterrane


Batallia Downs


- (J-10), lv. 19~25, Clipper at lower levels, then Ba (no page)
- Can start at 18 with a solid group
- (J-6), lv. 22~25, Ba (no pages)
- There are more Ba than on the J-10 camp
Batallia Downs (S)
-map.jpg)

- (I-9), lv. 21~28, Lycopodium (no page)
- (J-10), lv. 28~32, Clipper & Ba (no page)
- The party needs to roam a bit
- Can push to 33~34 on birds only
Bhaflau Thickets


- (I-8) Map1, lv. 56~61, Lesser Colibri
- Can push to 62 but very slow
- Careful about undeads and formor at night
Bibiki Bay


Bostaunieux Oubliette


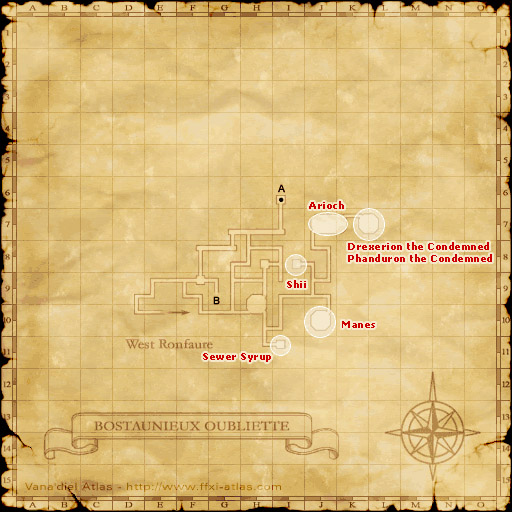
- (D-9) Map2, lvl 49-53 Werebat (Mob Level 55-59)
Buburimu Peninsula

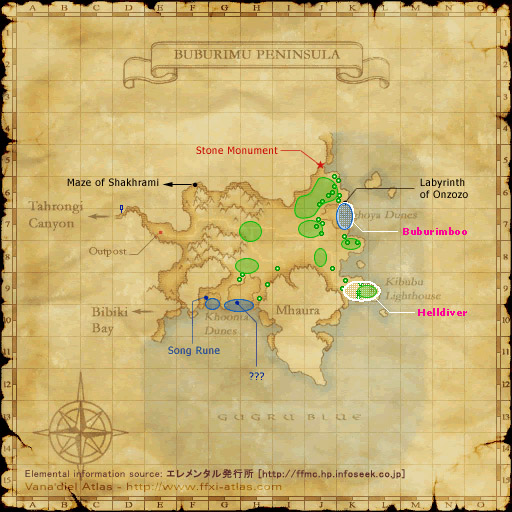
- (K-9), lv. 15~19, Carnivorous Crawler & Bull Dhalmel (page 3)
Caedarva Mire


- (E-10), lv. 56~63, Marsh Murre (no page)
- West exit from Nashmau
- (I-10), lv. 56~63, Marsh Murre (no page)
- South exit from Nashmau
- Harder to pull without links than the West camp
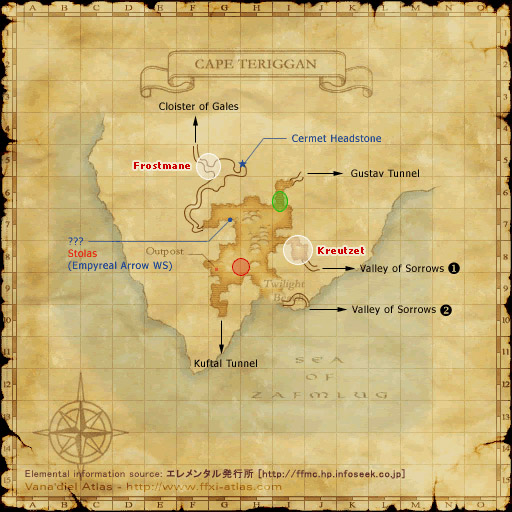
Cape Teriggan

Crawler's Nest

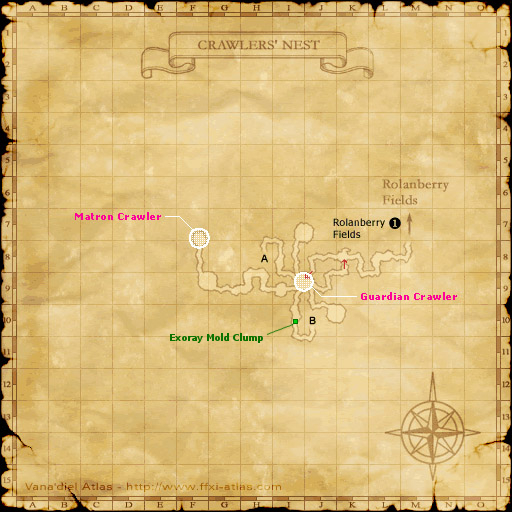

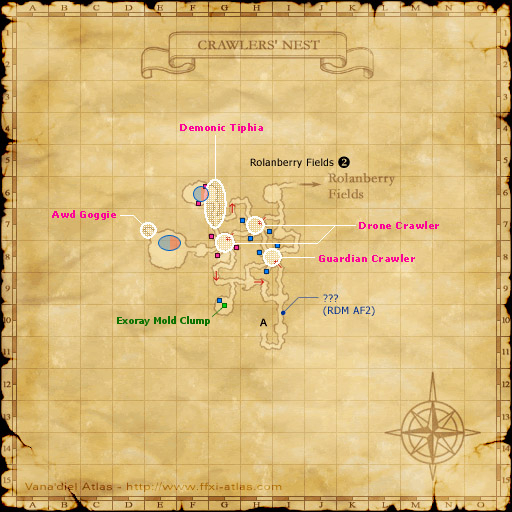

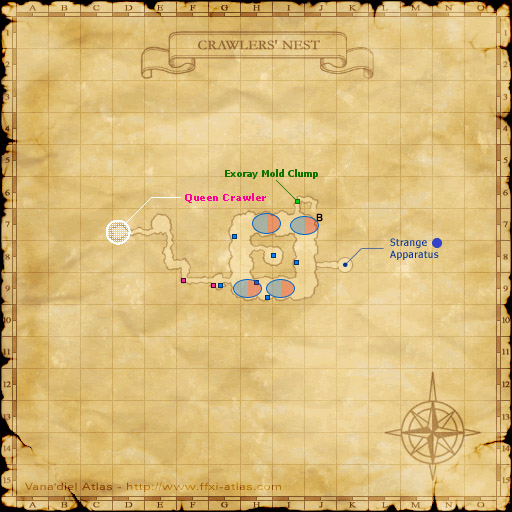
- (K-8/L-8), lv. 31~38, Worker Crawler & Death Jacket (page 1)
- (F-7/F-9), lv. 38+, Soldier Crawler & Nest Beetle (page 2)
- Careful with linking when pulling the crawlers, as well as aggroing the scorpion
East Ronfaure (S)
_Map.jpg)
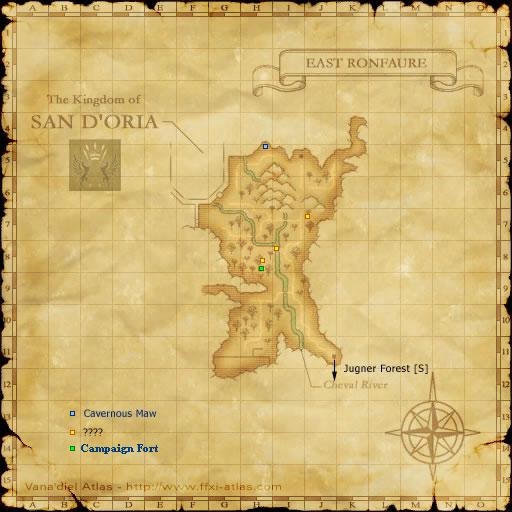
- (G-8/H-8), lv. 17~20, Scarab Beetle (no page)
- Just keep moving
- (I-9/I-9), lv. 37-44, Colibri (no page)
Eastern Altepa Desert

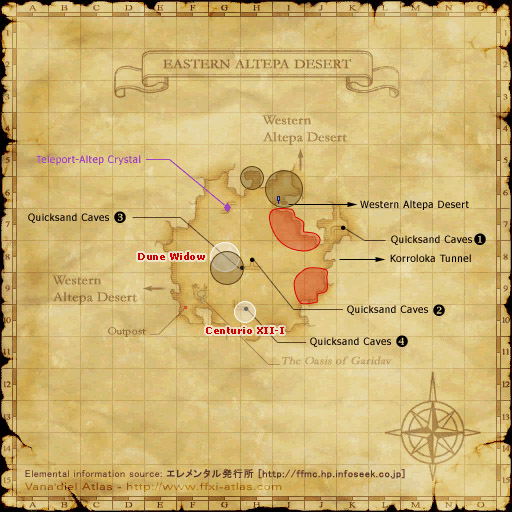
- (I-6), lv. 31+, Sand Beetle & Desert Dhalmel (no page)
- Careful with Donnergugi lottery pop NM from the beetles, and Earth Elementals during weather
- Dhalmels from 33
Garlaige Citadel


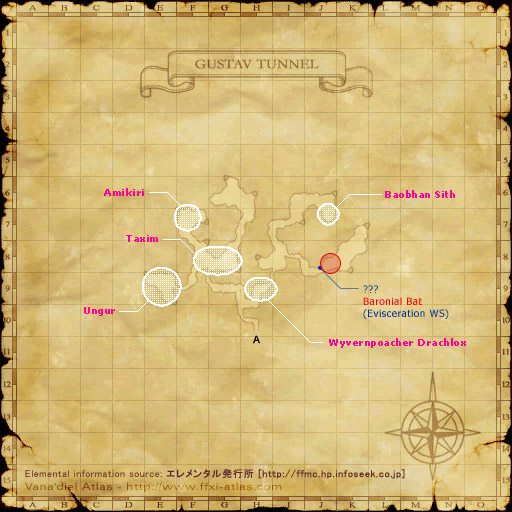
Gustav Tunnel


Jugner Forest

Korroloka Tunnel

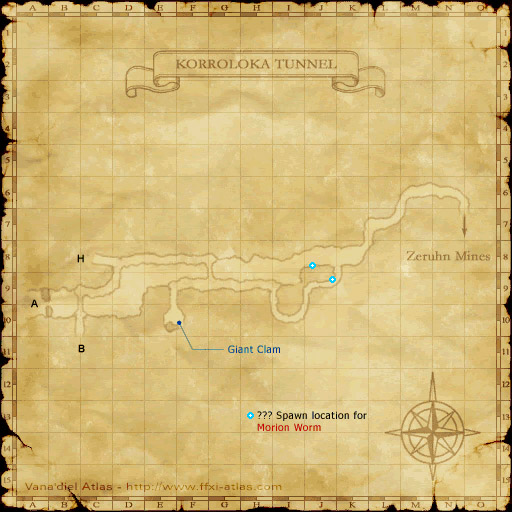


- (H-8/J-8) Map1, lv. 16~24, Land Worm & Seeker Bats (page 1)
- Make sure to Silence the worms
- Can start at 15 with a good group, focussing only on the worms until 18.
- (H-8/I-8) Map5, lv. 24~29, Lacerator & Spool Leech (page 8)
- You'll need sneak/invisible to get there, which you can get from the book by selecting Circumspection for 5 tabs.
- There's a book right there, handy to re-set regen/refresh
Kuftal Tunnel


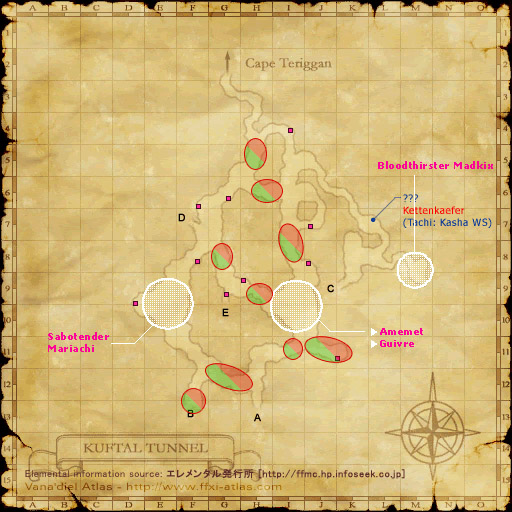
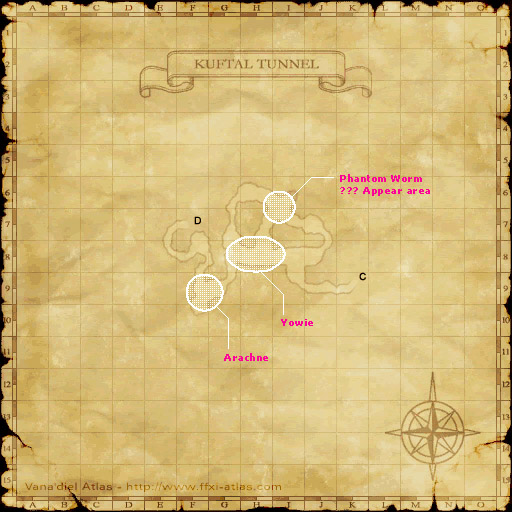
- (I/J-8/9/10) NW, lv. 54~58, Sand Lizard & Rober Crab (page 1)
- Careful with lizards links and crab aggros
Labyrinth of Onzozo

...
Meriphataud Mountains

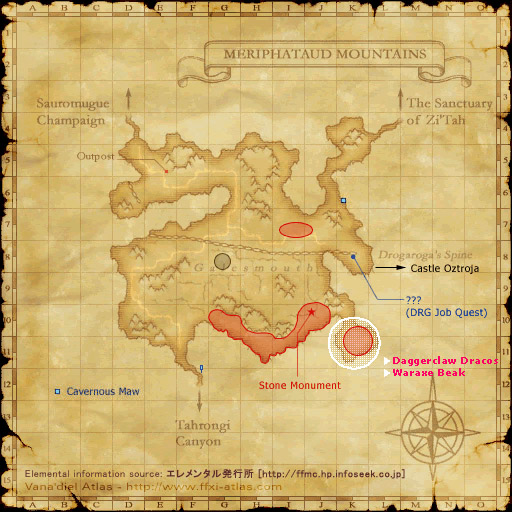
- (H-5) NW, lv. 15~20, Crane Fly & Hill Lizard (page 1)
- Mobs are spread out, the party will have to constantly move up and down the canyon
- (E-6) SW of Outpost area.
- Multiple mobs around this area. Start on saplings, then can change to flies/Lizards and then finally goblins/Boggarts all in this one area.
North Gustaberg (S)
-map.jpg)

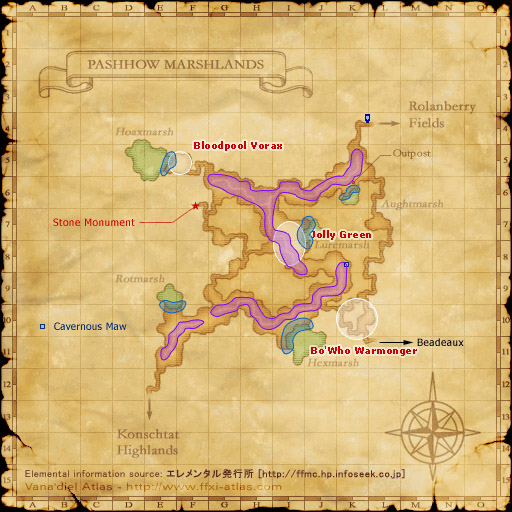
Pashhow Marshlands

Qufim Island


- (F-6) in front of the tower, lv20~23, Clippers
- Stick with lv25~26 clippers for the first couple levels
- (H-6) in the corridor, lv24~27, Clippers & Greater Pugils (page 3)
- Clippers won't really count for the venture anymore, but since the page is 7 pugils & 3 clippers, it shouldn't slow things down too much
Rolanberry Fields

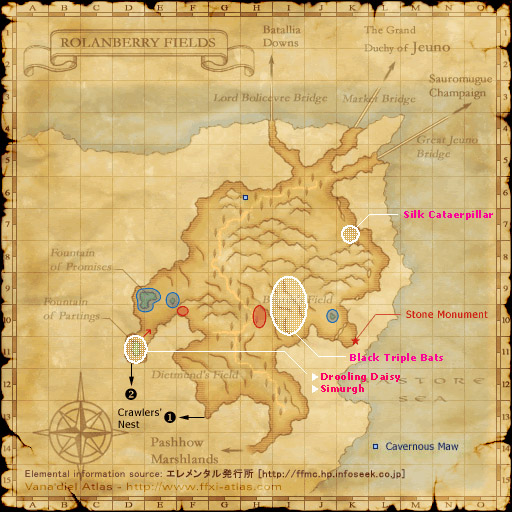
Rolanberry Fields (S)
_Map.jpg)

- (E-9) by the lake, lv. 40~42, Snipper (no page)
- (E-9) in the trees, lv. 42~47, Berry Grub (no page)
- (F-9), lv. 43~49, Champion Crawler (no page)
- (G-7), lv. 45~52, Champion Crawler (no page)
- Can start at 43 with a good group
- (F/G-6/7), lv. 52~60, Dragonfly (no page)
Sea Serpent Grotto


- (L-5) Map 1, lv. 31~36, Royal Leech and Undead Bats (page 1)
- Can start at 28 with a good group
- (N-14) Map1, lv. 32~37, Sahagin and Vampire Bat (page 3)
- (N-14) Map1, lv. 33~38, Sahagin and Bigclaw (page 4)
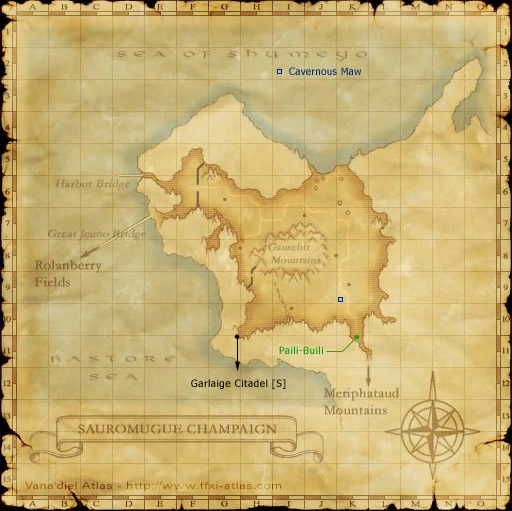
Sauromugue Champaign


- (G-8), lv. 17~25, Hill Lizard & Diving Beetle (page 1)
- Focus on lizards fist
- Can start at 15 with a solid group
- (F-6), lv. 26~32, Tabar Beak (no page)
Sauromugue Champaign (S)
-map.jpg)
The Boyahda Tree

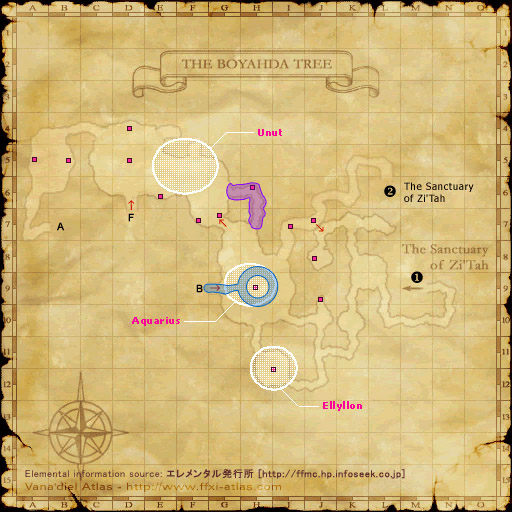
- (H-10) Map 1, lv. 58~63, Mourioche & Robber Crab (page 2)
- (F-6) Map 1, lv. 58~64, Moss Eater (page 3)
The Sanctuary of Zi'Tah

Uleguerand Range


Valkurm Dunes

West Sarutabaruta (S)
-map.jpg)
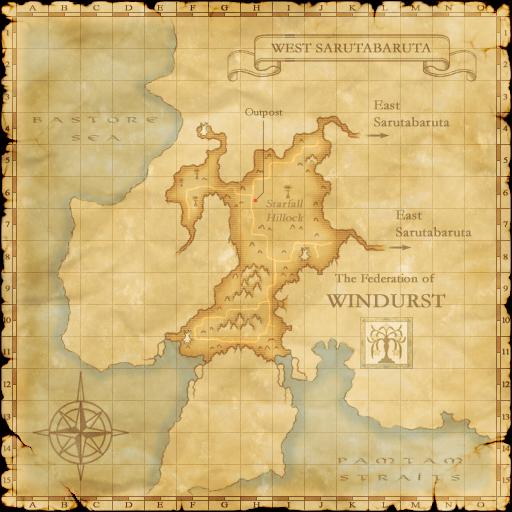
- (I-7), lv. 15~, Crawler (no page)
- (H-11/I-11), lv19~22, River Crab (no page)
- (J-6), lv. 30~34, Savanna Dhalmel (no page)
- (F-10/F-11), lv. 35~40, Toad (no page)
Western Altepa Desert

Yuhtunga Jungle

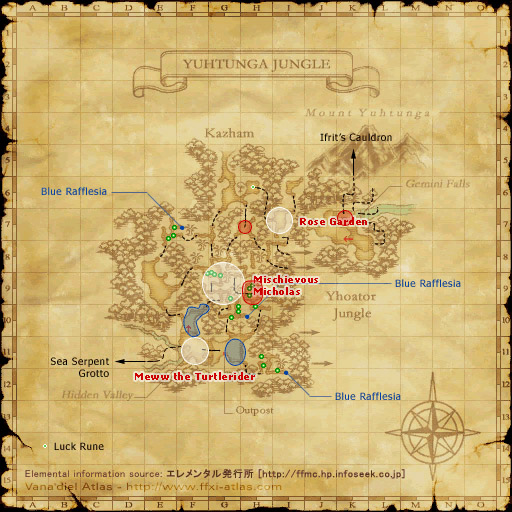
- (G-5/6), lv. 22~28, Yuhtunga Mandragora (no page)
- Watch out for Goblins at this level range
- (I-7), lv. 28~32, Death Jackets and Goblins (page 2)
- Down the hole at (H-6), towards (I-7). Careful with gobs in the tunnel.
Yhoator Jungle

Manaburn Camps
Custom Manaburn Venture camps.
| Manaburn Camp Locations | ||||
|---|---|---|---|---|
| Monster Lvl | Name | Zone | Location | Notes |
| 20-22 | Enchanted Leech | Buburimu Peninsula | (J-6/7) | |
| Enchanted Leech | Jugner Forest | (J-9) | ||
| Enchanted Leech | Maze of Shakhrami | (E-7) Map 2 | Dead End Tunnel Access via A or B | |
| Enchanted Leech | Meriphataud Mountains | (D-8) | ||
| Enchanted Leech | Pashhow Marshlands | (F-10) | ||
| Enchanted Leech | Valkurm Dunes | (I-6) (D/E-7) |
Alcove by cliff Southern borner, against the mini-mountain. | |
| 25-27 | Mystic Leech | Buburimu Peninsula | (I-6) & (J5/6) | |
| Mystic Leech | Jugner Forest | (L-7) | ||
| Mystic Leech | Maze of Shakhrami | (F-9) Map 1 | Dead end. Carefull with aggressive Slime on camp. | |
| Mystic Leech | Meriphataud Mountains | (E-7) | ||
| Mystic Leech | Pashhow Marshlands | (I-11) | ||
| Mystic Leech | Valkurm Dunes | (K-6) | ||
| 28-32 | Mana Leech | Korroloka Tunnel | (C-7) Map 2 | (Near Survival Guide) |
| Mana Leech | Batallia Downs | (H-8) | Lower left corner | |
| Mana Leech | Rolanberry Fields | (K-7) | Lower right corner | |
| Mana Leech | Sauromugue Champaign | (F-5) | ||
| Mana Leech | Qufim Island | (H-6) (H-8) |
lower right corner lower left corner | |
| Mana Leech | Yuhtunga Jungle | (F-10) | Top of cliff | |
| 38-42 | Magic Jar | Yhoator Jungle | (J-11) | With the adjustments to Pots at manaburn camps, this is now a fine camp. |
| Magic Sludge | Sea Serpent Grotto | (C-6) Map 1 | ||
| Magic Jar | Eastern Altepa Desert | (J-7) | With the adjustments to Pots at manaburn camps, this is now a fine camp. | |
| 39-43 | Magic Golem | The Sanctuary of Zi'Tah | (H-8) | Upper left corner |
| 40-44 | Magic Sludge | Garlaige Citadel | (G-9) Map 1 | |
| 41-45 | Magic Berry | Crawler's Nest | (H-9) Map 1 | (Subject to change) |
| 38-42 | Ascended Jar | Western Altepa Desert | (H-10) | Mistaken Level range? With the adjustments to Pots at manaburn camps, this is now a fine camp. |
| 45-48 | Ascended Leech | Gustav Tunnel | (H-8) Map 1 | |
| Ascended Sludge | Toraimarai Canal | (I-6) Map 1 | ||
| Ascended Pugil | Misareaux Coast | (I-6) | Two aggressive Makara at camp | |
| Ascended Pugil | East Ronfaure (S) | (H-8) | River | |
| 48-52 | Ascended Sludge | Labyrinth of Onzozo | (I-7) | |
| 53-56 | Spectral Sludge | Bostaunieux Oubliette | (H-10) Map 3 | |
| 53-56 | Spectral Snoll | Uleguerand Range | (J-9) | |
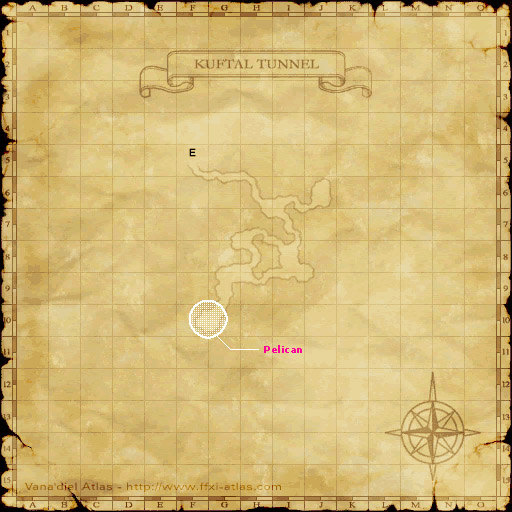
| 61-64 | Spectral Crab | Kuftal Tunnel | (F-7) Map 2 | |
| Spectral Crab | Rolanberry Fields (S) | (K-10) | ||
| Spectral Kisser | Wajaom Woodlands | (J-8) | ||
| 64-66 | Spectral Kisser | Bhaflau Thickets | (G-7) Map 1 | |
| 65-68 | Wizard Leech | The Boyahda Tree | (G/H-9) Map 3 | By Ancient Goobbue Terrible camp, aggressive mobs everywhere |
| Wizard Leech | Caedarva Mire | (H-10) | ||
| Wizard Leech | Cape Teriggan | (I-7) | Another bad camp, lots of nearby aggressive mobs | |
| 66-69 | Wizard Golem | Ro'Maeve | (D-10) | |
| 67-70 | Wizard Uragnite | Bibiki Bay | (G-9/10) | |
| 69-72 | Wizard Sludge | Aydeewa Subterrane | (H-7) Map 6 | Enter from Wajaom Woodlands #10 |
