The Voracious Resurgence | |
| Prime Weapons • Ultimate Weapons • Ultimate Augments • Abjurations iL119 • JSE Necks • Divergence Augments • Escutcheons | |
| Reforged Armor Artifact: +1 • iL109 • iL119/+2/+3/+4 Relic: +1/+2 • iL109 • iL119/+2/+3/+4 Empyrean: +1/+2 • iL109 • iL119/+2/+3 |
Guides • Crafting • Trusts • Apex Monsters |
Quiescence: Rune Fencer Guide

|
|
Quiescence: Rune Fencer Endgame Guide
About This Guide
The Rune Fencer (RUN) job was released alongside the Seekers of Adoulin expansion and has spent a considerable period of time in relative obscurity. Initially considered an exceptionally niche job RUN was a rare sight in endgame content as it was admittedly not complete when it first came out, also because the then-meta of the endgame scene did not mesh well with it's abilities. Now that over two years of development has passed the job has come a long way but a large portion of the player base remains somewhat unaware of what the job can do and why it is so valuable for the endgame scene of today.
Briefly about myself. This guide was written by Ruaumoko of the Asura server. I have had creative input from other career RUN, players like Gashnir, Augusto, Saevel and Constellation. Additionally, I would like to acknowledge the continued input of the RUN community on the FFXIAH forum. I would especially like to acknowledge the efforts of Prothescar for his continued updating of the original post on the AH's guide thread. A link to this thread has been added below. Given that the guide Prothescar wrote is still very much up to date and is factually on point there is little point in adding to what is an excellent entry guide for players new to the job. Therefore, this guide will serve as an endgame guide for players who have progressed to that stage and who need a focused guide which collects the consolidated knowledge and experience of career RUN.
Rune Fencer in Endgame
When does endgame actually start and when should you be looking to begin coming as RUN to your linkshell events? Endgame today pretty much relates to anything in Escha - Zi'Tah, Escha - Ru'Aun and Reisenjima. It also encompasses content such as Tumult Curator and Master Trials. Other events such as Delve, Vagary and Incursion technically qualify as endgame but compared to the aforementioned they are still lower-key. As for when you should be looking to come RUN to Linkshell events there's no easy way to say this without coming across as condescending so I will just say it outright: do not bother coming to events as RUN until you have above average equipment and more importantly have at least 1200 job points (capped ideally) in the job. This is because the fighting style of a RUN is nowhere near as forgiving as a PLD's is and you therefore have little margin for error. It is also important to have the Super Revitalizer unlocked in Escha areas, which you obtain by killing 20,000 targets in any Escha area.
A friend of mine, who plays both RUN and PLD put it best I think. He said that RUN tanks in 'layers', or that it is reliant on several layers of defense to perform properly. This is true as a RUN has a much wider array of Enhancing Magic to defend and support itself compared to a PLD. Comparatively a PLD has a much smaller selection of Enhancing Magic but is infinitely more self-reliant in exchange, because it has access to Healing Magic and several 'emergency button' abilities like Invincible, Intervene, Palisade and Sentinel. If a RUN has all it's defenses up, like Valiance, Pflug and Foil, it becomes extremely difficult to kill but if it has it's defenses removed with a multi-Dispel or if the player is not paying attention they will find themselves on the floor before they know it. The old joke was that an Ochain PLD could establish Enmity on a target, go make a coffee, come back and still be tanking. You cannot do that on RUN, you need to be on your toes at all times - people are counting on you to do so.
As for what RUN brings to endgame content. Where RUN really shines in endgame is in the prevalent meta which revolves around a squadron of BLM bursting off skillchains a SCH makes while being supported by 1-2 GEO. This is because a RUN has excellent Enmity control and more importantly can cripple the magic evasion and defenses of the target, which fits the current meta like a glove. PLD might have similar Enmity control but it cannot do the latter, which makes all the difference in many battles. The fact also remains that the majority of dangerous attacks used by endgame monsters are Magic Damage / Status Ailments and not Physical Damage. In summary, RUN allows for faster battles with less risk - if done properly.
Now that melee strategies are beginning to emerge as a challenge to the prevailing meta RUN has an even greater use. It can defend it's fellow front liners from magic attacks and hold the target's attention, all while dealing damage in the process. Alternatively, a Lionheart RUN is a formidable force on the battlefield and when geared properly and fully supported it will dish out astounding damage.
Here is one such example of this in practice.
Merit Points & Job Points
Group One is really down to the fight in question.
| Rune Enchantment Effect | 5/5 |
| Vallation Effect | 0/5 |
| Lunge Effect | 0/5 |
| Pflug Effect | 5/5 |
| Gambit Recast | 0/5 |
5/5 Pflug and 5/5 Rune Enchantment is very good against certain targets I will go into later in this guide. Gambit Recast is a decent option but since you will typically be with a COR using Random Deal (with 5/5 Loaded Deck) and Wild Card as well as having access to the Super Revitalizer it is somewhat moot. It may seem tempting to put 5/5 into Lunge Effect but I would not advise it as you will not be bursting Lunge off a skillchain because it will reduce the damage subsequent Elemental Magic does.
Group Two used to be straightforward, but changes in the endgame meta have made it more contentious.
Magic Burst Setup
| Ward: Battuta | 3/5 |
| Effusion: Rayke | 5/5 |
| Inspiration | 2/5 |
| Sleight of Sword | 0/5 |
Melee Setup / Omen
| Ward: Battuta | 5/5 |
| Effusion: Rayke | 1/5 |
| Inspiration | 2-4/5 |
| Sleight of Sword | 0/5 |
Rayke should be 5/5 in any given skillchain/magic burst setup. Inspiration is one that needs to be addressed in greater depth though. 5/5 in Inspiration is good for starting out but as you get more Fast Cast equipment you need to start taking merits out of it and putting them into Battuta. The reason for this is because while the Magic Def. Bonus effect of Vallation and Valiance cannot be removed via Dispel the Fast Cast effect CAN AND WILL AT THE WORST OF TIMES. It's therefore not a good idea to put so much faith in something you can lose in an instant and subsequently be left wide open for attack. You can do this if you want, but beware of what might happen when Inspiration is dispelled.
Sleight of Sword is an odd one. It's an ability that has been laughed off as being useless by the player base but honestly, it might make a unsuspected comeback in the coming weeks. This is because RUN was added to a few pieces of 'Subtle Blow II' equipment that was added with Omen. One can assume this means that will enable players with the equipment to bypass the 50% cap on Subtle Blow. Sleight of Sword is actually the strongest Subtle Blow buff in the game. When 5/5 merits are put into it Sleight of Sword will give +30% Subtle Blow for the duration of Swordplay, which puts it above a NIN's 27% (32% with merits allocated). It's still early days but this might be worth looking into as melee setups become more and more prevalent. I'm still on the fence about this trait.
Job points are important for all jobs but for RUN they are an absolute necessity. What you will notice about the gifts a RUN gets through job point progression is that there it gets a great deal of Magic Evasion, Magic Def. Bonus, Evasion Bonus and Inquartata effect. It maths out in the way the table below spells it out.
| Magic Evasion | +10 | +15 | +20 | +25 |
| Magic Defense | +8 | +12 | +16 | +20 |
| Evasion | +8 | +12 | +16 | +20 |
| Inquartata | +2 | +2 | +2 | +2 |
That means a mastered RUN has +70 Magic Evasion, +56 Magic Def. Bonus, +56 Evasion Bonus and +8% Inquartata over one that is not mastered. If you know how those attributes affect and help taking magic damage or resisting status ailments you'll also know how significant those numbers are. This is not even going into the fact that RUN learns the coveted Temper spell at 550 points and gets a healthy Accuracy Bonus of +46 to help the offensive aspect of the job.
Job points are a huge part of RUN survival and I highly advise one invests in them before attempting to tank endgame content.
Subjob Selection
- DRK is a subjob that has risen to the top spot for dealing damage as of the November version update. This update greatly increased the Attack Bonus+% values of the Smite job trait, which DRK gets the second tier of at Lv45 (+14.8%). DRK sub also gives the Last Resort ability which provides the same attack boost as WAR sub but it also provides a very nice 15% Job Ability Haste. Weapon Bash provides a reliable and accurate Stun while the Stun spell itself is very nice for an extra enmity tool. The only danger when using this subjob is that Last Resort cripples your defense, so make sure Phalanx is active before you use it. You also cannot full-time Last Resort so your damage will dip when it falls. Overall this sub is your absolute best go-to sub for any sort of damage dealing and especially if you are in a zerg rush fight where the recast timer of Last Resort is not an issue.
- WAR is another solid option for both dealing damage and it has a niche use for tanking in some situations. Berserk, Smite and Attack Bonus help you overcome the innate attack starvation RUN suffers from and it will allow for some higher weapon skill numbers. Fencer allows for higher damage output on Savage Blade especially if you end up using a one-handed sword. Double Attack complements Temper nicely. Provoke serves as an additional enmity tool even if it is largely 'volatile enmity'. Defender gives a defense boost but it's effect pales in comparison to other options. You can't really go wrong with WAR subjob but be aware that Berserk in particular cannot be maintained full-time.
- SAM is the sub that used to be the best when you were going all-out for dealing damage. Hasso, provided you have magic haste capped, pushes your attack speed even further. Store TP and Zanshin complement two-handed weapon usage while Meditate and Sekkanoki are fantastic tools for weapon skill optimization. The downfall of SAM as a subjob is that Hasso and Seigan cripple your casting and recast timers, even with Inspiration up, so you should not be subbing this if you are tanking in any capacity. This sub lacks the raw power of DRK or WAR but nobody should really question you using it.
- NIN is an odd choice for RUN but it works surprisingly well in some cases. NIN brings the Dual Wield trait which enables you to use two one-handed weapons. It also offers the Utsusemi: Ichi and Utsusemi: Ni spells for damage mitigation. Having those two spells interrupted is not a huge concern as RUN has the Aquaveil spell which will make it impossible to be interrupted while it is active and the Fast Cast effect from Inspiration applies to Ninjutsu. I generally do not use NIN subjob for anything major but I can see how people would like messing around with it.
- BLU is, in my opinion, by far-and-away the absolute best subjob a RUN can use in a tanking situation. BLU provides self-cures in the form of Wild Carrot and Healing Breeze, great enmity tools in Blank Gaze and Jettatura, phenomenal physical defense with Cocoon and a variety of 'killer' traits which occasionally help tanking. The same rules applied to NIN sub apply to BLU sub in that Aquaveil will prevent interruptions on Blue Magic when used from a subjob.
Job Ability/Trait Overview
Gambit & Rayke: What You Need to Know
The help text of Effusion: Gambit reads as 'Expends all runes harbored to reduce an enemy's elemental defense. The types of elemental defense reduced depend on the runes you harbor'. But what does that actually entail and how strong is the effect? Gambit, as most will simply call it, directly increases the amount of elemental damage the target takes by 10% per rune expended. So, if you were to use Gambit with x3 Tenebrae runes you would force the target to take +30% more damage from all forms of dark elemental damage for the duration of the effect. This is a direct increase in damage, similar to what the Pixie Hairpin +1 does for the Death and Comet spells. Typically you will be using x3 runes of the same element to maximize the effect. Gambit has a base duration of 1:00 exactly. This increases to 1:12 with Runeist Mitons +1 and again to 1:32 with these Mitons and 20/20 job points invested in the Gambit Effect Duration category. Gambit will never fail to land on it's target and is not subject to partial resistances: it will remain active until it either wears off or is removed by the target if it has a means of using Erase on itself.
Effusion: Rayke reads as 'Expends all runes harbored to reduce an enemy's elemental evasion'. This one is a little harder to explain. Rayke hits the Species Damage Taken reduction monsters have against elemental damage. An example of this is if you fought a Tulfaire, which has an innate -50% reduction to fire damage, and used Ignis Rayke on it you would cut that -50% reduction to -25%. While this is technically a magic evasion reduction Rayke has another and much more important effect: it allows for more high damage bursts during a skillchain. One of the mechanics the developers added to HNM was to make it so magic attacks burst during a skillchain would see their damage significantly fall after the first spell landed for full effect. You will notice this especially when multiple BLM use Death and then be suddenly perplexed by fluctuating damage that does not seem consistent. This 'resist wall' is classified under Species Damage Taken. Rayke directly reduces the impact that 'resist wall' has on multiple bursts during a skillchain and reduces it significantly. Now, apply that to the prevalent strategy of bursting multiple Death spells off Gravitation or Compression and you have an incredibly powerful ability. It is not too shy of a understatement to say that Rayke is a RUN's single best ability it can bring to endgame content for this exact reason. Rayke has a base duration of 0:30 which increases to 0:42 with 5/5 merit points invested, increasing again to 0:47 with Futhark Boots +1. Rayke, like Gambit cannot be resisted but can be removed by the target if it has a means of using Erase on itself.
The following equipment enhances Gambit and Rayke


Inquartata, Battuta & Foil: What You Need to Know
Essentially the solution to the initial adage that a RUN could not tank because it did not use a shield, Inquartata directly increases the base Parrying rate of the RUN by a set percentage. RUN gets Inquartata V from job traits which gives it a starting rate of 13% parrying bonus. As you read previously, RUN gets 8% Inquartata effect from gifts during it's journey to master status so 13% becomes 21%. Two pieces of equipment directly enhance Inquartata, Erilaz Leg Guards +1 (4%) and the Ogma's Cape (6%) respectively to bring this total to 31%. Battuta with three merit points allocated to it gives another 50% parrying rate bonus (40% is the base and it increases by 4% per merit, you add another 2% through Futhark Bandeau +1), so you are looking at an 81% parrying rate while Battuta is active. What you really need to know about Inquartata however is the neat fact that this parrying rate is applied to you regardless of the level of the target. That means you could be fighting a Lv150 HNM in Reisenjima yet still have a bare minimum parrying rate of 31% if not higher.
With the addition of some newer Superior equipment comes Turms Leggings that provides Inquartata +4 (NQ) and +5 (HQ), which add either 8% or 10% to your parry percentages respectively.
The following equipment enhances Inquartata and Battuta


Foil is a unique spell only RUN has access to. Foil is very simple so I will keep this part brief. Foil basically acts as a reduced version of a SAM's Yaegasumi in that the spell gives you a pretty high, but not guaranteed, chance of evading special attacks (monster TP moves) that come your way. Unlike Yaegasumi however Foil does not increase your own weapon skill damage nor does it's potency remain static throughout it's duration. Once cast the potency of Foil is very noticeable but it decays rapidly, wearing off entirely after 30 seconds. While the spell has a 45 second recast time with the Fast Cast from Vallation or Valiance along with equipment you will be able to keep it up more-or-less full time, which you should. Coupled with Inquartata and especially Battuta you become borderline untouchable with Foil active. However, to emphasize... Foil decays very quickly so you need to keep on your toes by re-applying it frequently.
Tenacity & Pflug: What You Need to Know
Tenacity is essentially a 'Resist All' trait. RUN gets Tenacity VI which gives a base 15% resist chance of outright negating any and all Enfeebling Magic effects that come your way, from spells and special attacks alike. While this seems like a small percentage chance you need to remember that as a RUN you have the highest magic evasion of any job in the game, have access to tanking equipment that pushes this rate higher and have the Pflug ability to help. Pflug, like the other 'Ward' abilities you are familiar with already, uses but does not expend the runes you have active when using it and grants you a boost to your resist chance - essentially acting as a Tenacity bonus. Pflug is like Gambit in a sense as each rune harbored provides a 10% increase to the effect for a maximum of 30%. The exact % increase to this effect, whether it is calculated per rune used or simply added onto the end of the calculation after-the-fact, from using equipment is unknown.
The following equipment enhances Pflug

- Example 1: x3 Flabra are used in conjunction with Pflug. Tenacity's 15% resist rate is increased to 45% for the Petrification, Rasp and Slow ailments but remains 15% for those of other elemental affinities.
- Example 2: x1 Tellus, x1 Unda and x1 Gelus are used in conjunction with Pflug. Tenacity's resist rate is increased to 25% for all ailments aligned with the Thunder, Water and Wind elements but remains 15% for the other elements.
The following equipment is useful for increasing magic evasion and for providing enfeebling resistance in general


If you want an easier point of reference try to remember or at least check before an important battle what elements your target is prone to using and plan accordingly, use these two charts as reference. The first is the basic elemental chart laying out what elements are strong against others and the second spells out the element of a rune and what it is strong against.

 - Paralyze / Distract
 - Silence / Gravity
 - Stun
 - Poison
 - Slow / Petrification / Bind
 - Addle / Amnesia
 - Blind / Sleep / Dispel / Frazzle
 - Lullaby / Finale / Charm
Weapon & Grip Selection
RUN has quite the selection of weapons for endgame usage and I'll do my best to cover the most important ones.
_description.png)
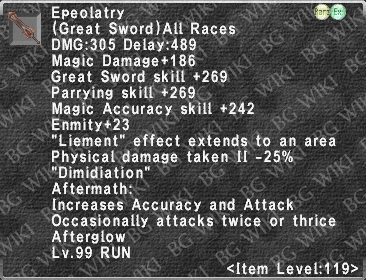
- Epeolatry is the Ergon Weapon available to RUN. The Epeolatry is widely considered RUN's best weapon for tanking endgame content and when you first look at it you can see why many would say that. Sporting a decent base DMG, a huge chunk of Enmity +23 and above all a colossal Physical Damage Taken II -25% (that means it breaks the 50% cap on equipment) this sword is essentially to RUN what Burtgang is to PLD, if not more-so. It's also not too shabby of a damage dealing weapon with AM3 active, but it falls short of the alternative. To balance this out the Epeolatry does have a very large positive in that if you choose to deal damage with it you have that -25% PDT II protecting you if choose to go full throttle, meaning that a target would not be able to smash you into the floor if you forsake the rest of your tanking equipment in favor of damage dealing equipment. Having just heaped praise upon it the sword does have issues you need to be aware of. While it has outstanding physical damage mitigation it does absolutely nothing for evading or defending against magic attacks. We have already established that the majority of danger you will encounter in endgame is magic in nature rather than physical so you might want to check in advance what your target prefers over the other before using this weapon. It also has the issue of pigeon-holeing the RUN into using Dimidiation as it's Light skillchain linker over better options. Dimidiation is not a bad weapon skill per-see but RUN does have much better options available in this aspect. Finally, you need to be aware of it's price tag - which can exceed 250 million gil on some servers. Overall, this is a solid weapon but is it essential for endgame tanking? No. It is not.

- Lionheart is one of the Aeonic Weapons and the only one available to RUN. The polar opposite of the Epeolatry, the Lionheart is a purely offensive weapon. Packing the highest base DMG of any Great Sword in the game, Store TP+10, TP Bonus+500 and a combination of Skillchain Bonus, Magic Burst Bonus and the ability to make an Ultimate Skillchain in it's Aftermath this sword can deal a staggering amount of damage for a job that is first and foremost a tank. What really makes Lionheart a powerhouse however is that the weapon skill you will use with it, the one it clearly spells out for you, is Resolution - your strongest weapon skill. Resolution has a 85% STR modifier with fTP that transfers and with 'Damage Varies with TP'. The +500 TP Bonus (+750 with Moonshade Earring) on a weapon skill like that has outstanding results for damage output. The final and very nice trick Lionheart has is that it adds the Light skillchain property to Resolution, meaning your best weapon skill becomes capable of working with other jobs best weapon skills like Chant du Cygne and Blade: Shun. The drawback to the Lionheart is likewise self-evident: it completely lacks any form of defensive attribute and as such you should not be tanking high-end content with it. Low-mid level content, going as high as Reisenjima T3 at the most, is safe but anything higher you really want to be using a proper tanking weapon. Another drawback is that Aeonic Weapons are still out of reach for a decent chunk of the player base so most RUN will likely not get their hands on the Lionheart for a while.

- Aettir is the Oboro weapon available to RUN. Easily the most accessible of these three weapons the Aettir is a weapon you'll want to pick up as soon as you reach Lv99 on RUN. It is a very good investment with fantastic entry stats which give it phenomenal staying power even after getting one of if not both of the above. The Aettir, like the Epeolatry, has Physical Damage Taken II -% on it but in a much smaller amount - only 5%. Likewise it also has an Enmity boost of +10, again smaller than the Epeolatry. It also boosts the damage Lunge does, which is a nice touch. However, what really makes the Aettir stand out is that it gains a massive +70 accuracy and +50 magic evasion from augmenting it via Oboro. That means that the Aettir is by far the most accurate weapon, because you are not using AM1 on Epeolatry, a RUN can use. It also, and more importantly, gives you what almost equates to an entirely extra dose of magic evasion you got from job points and gifts - making the Aettir unbeatable when taking magic damage and resisting ailments. The drawback to the Aettir is that it cannot take physical damage as well as an Epeolatry and that it lacks the raw power of the Lionheart. Still, it is an exceptional weapon you should keep handy.

- The Zulfiqar is a neat weapon that stands somewhere between the Aettir and the Lionheart for dealing damage, somewhere near the Epeolatry with optimum augments. Sporting a nice base DMG and a small helping of accuracy and attack with the potential to add more through augmenting, the Zulfiqar will serve you well for damage dealing purposes until you get the Lionheart.

- The Montante +1 is an odd weapon. Lower base DMG, accuracy and potentially STR than a fully augmented Zulfiqar but it's not necessarily bad. I suggest using this until you get a good Zulfiqar.

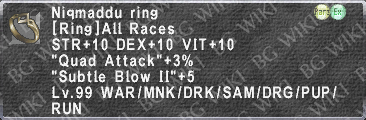
- This is your top-tier grip for tanking purposes, sporting an impressive Damage Taken -3% and a small but nice helping of HP. The Refined Grip and it's HQ variant drop from Voso, a Unity NM. If you get the NQ you can use Voso's Hide x50 to HQ it. I suggest using this grip when fighting something that favors magic damage, which in this day is practically everything.

- Slightly below the aforementioned is the Balarama Grip. This is your go-to grip for anything that uses physical over magic. A good HP boost, more than the Refined Grip +1, additional parrying skill and some enmity make this a solid entry-level option. This drops from Asida.

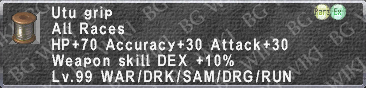
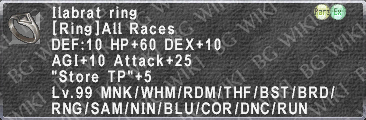
- The grand-daddy of damage dealing grips. Nothing even comes close to the Utu Grip for the times when you're swinging with intent to harm. Despite it packing a metric tonne of accuracy, attack and HP the real draw of this thing is what it does to your weapon skills. The Weapon Skill DEX +10% effect increases the DEX modifier of weapon skills which have them, like Dimidiation, by 10%. However, it also adds a 10% DEX modifier to weapon skills that DO NOT HAVE THEM to begin with. That means, with this, you're using Resolution with 85% STR and 10% DEX as modifiers, or Dimidiation with a whopping 90% DEX mod. This drops from Kin in Omen, but expect competition for it.

- The Alber Strap occupies an odd space. It offers a bit of everything but nothing overly spectacular in everything. What it does have going for it however is +5 Enmity, which is helpful for fights where you absolutely have to hold hate on the target (Ambuscade Frog for example). The increases to magic attack and the double attack help your melee damage while the physical damage taken reduction and enmity increase help your tanking aspect. Unfortunately there are far better options for optimizing melee output and likewise better options for tanking as you see above. This drops from Warder of Courage and is still respectable for your role, but look to get both of the aforementioned.

- Reikiko, I would say, it is your absolute best option if you want to deal damage and you don't have the Lionheart or the upgraded Epeolatry. Sporting a high base DMG, high attack power, critical hit damage, weapon skill damage and regain makes it a very nasty weapon to be on the receiving end of. If you ask me everything about this sword screams Savage Blade spamming - which actually isn't a bad option. This drops from Kouryu and it might take a while for you to see it let alone get it.

- Firangi is another option for dealing damage with a sword and it makes for a nice partner for the Reikiko. This sword likewise boasts a high base DMG and high attack power but forsakes the other aspects of it's counterpart for a heightened double attack rate and a slight increase to Berserk duration. Put bluntly, the Firangi seems disjointed, it seems odd to have Berserk duration and an enmity bonus on a sword probably intended for WAR-main usage when the Reikiko has it beat for weapon skill purposes. Still, this is a fantastic weapon to dual wield with the Reikiko if you are using NIN sub. This drops from Onychophora.

- Not much to really say about the Tramontane Axe besides the fact it gives RUN access to a solid Lv119 Axe and subsequently the Decimation weapon skill that has the coveted Fusion property. That alone makes this thing worth getting and that weapon skill worth unlocking. Exceptionally niche use but you never know when you might need it. This drops from Garuda Prime.

- To finish this section I should mention one of the few good Great Axe weapons RUN has. Decent base DMG, a STR boost and an accuracy boost help the offensive aspects of the weapon but it also has a +120 HP boost and some additional magic evasion for defense. The main reason for using the Beheader +1 is that it gives access to Upheaval and like its smaller axe equivalent the Fusion category.
HNM Tactics
The following testimonials are from my own experience. Your own experiences will inevitably differ but I believe the basic framework will apply for the following battles. I have also assessed the difficulty of each battle on a scale of ★ to ★ ★ ★ ★ ★, again from my own experience.
Escha - Ru'Aun

- Warder of Courage
- Recommended Weapon:

- Recommended Rune: Tenebrae
- Barspell: Barstone / Barpetrify
- Difficulty: ★ ★
This is likely the first high-end battle you will be called upon to tank. The truth is that no matter how good you are or how good your alliance is Warder of Courage is a battle that is largely down to luck. It is luck based purely because of the SP Ability he decides to pull out. No matter what you do Mijin Gakure will likely 1-shot half your alliance, Benediction will likely result in a loss if it is used after he enters 'Bracelets Mode' and Soul Voice will cause a wipe if he uses it twice in a single battle as you can only carry one Charm Buffer. Soul Voice in particular you need to pay attention to as if it is just him using it without his Wynavs you stand a chance of resisting it through Tenebrae and Pflug, this is why I advise that rune three times over for this battle. Barstone and Barpetrify are advised to counter Medusa Javelin, which can inflict petrify at the worst moments. I recommend the Aettir also for this reason, as the extra magic evasion will come in handy here. The physical aspect of Warder of Courage is nothing to write home about and he only gets dangerous when his Wynavs are all on you, which a GEO with Indi-Barrier can counter. Phalanx and Cocoon (if /BLU) will also counter this.

- Kirin / Kouryu
- Recommended Weapon:
- Recommended Rune: Flabra
- Barspell: Barstone / Barpetrify
- Difficulty: ★ ★ ★
Believe it or not, this fight is worse than Warder of Courage - really. Kirin's first form will drop like a sack of potatoes, just be sure to keep Foil active to lessen the chance of Deadly Hold landing. At 50% HP Kirin will despawn and reappear as Kouryu - now the fun begins. The first thing you need to is re-establish enmity fast because you've lost all your accumulated enmity since Kirin has despawned. Next, you need to position yourself on one of his front paws as you do not want to trigger Spike Flail - that's a one-shot kill on your alliance for sure. When you have established enmity use a Steadfast Tonic to prevent Absolute Terror from landing, for a minute at least. Pflug and Vallation with Flabra will negate Slowga and take the edge off his earth-based magics. The massive danger during this second form, the reason this fight is worse than Warder of Courage, is because Kouryu can full-Dispel you with Horrid Roar - kryptonite to a RUN. When he lands this on you you're wide open to attack so have Elemental Sforzo ready to absorb magic damage and Battuta while you get your defenses back up. This fight will be the first real test of whether or not you are ready to tank endgame content on RUN.
Reisenjima

- Albumen
- Recommended Weapon: or

- Recommended Rune: Ignis
- Barspell: Barfire / Baramnesia
- Difficulty: ★ ★ ★
Another tough one. The first order of business when fighting Albumen is to stay alive long enough for his third wave of 'adds' to spawn and then force a wipe. When you re-engage get ready for a fight that is exceedingly annoying more than it is actually difficult. Petalback Spin inflicts Poison, Paralyze, Blind, Silence, Plague and Amnesia. It also resets all Enmity which will make him run to the backline and wreak havoc on your mages and rangers. This is why Ignis rune is recommended to resist Paralyze and Barfire/Baramnesia to resist amnesia allows you to pull hate back fast. If you are solo tanking or have another tank, have one of you position with their back facing the party so a group of Rangers can Decoy Shot off of them. Tepal Twist is another move you need to watch for as it inflicts a substantial Max HP Down effect on you, which coupled with Hundred Fists can floor you very fast. Either have your healer watch for it or hit Battuta when this scenario unfolds. Fatal Scream inflicts a 10-count Doom but it is easily stunned so if it goes off odds are you need a better stunner. In all due seriousness, a competent WHM will be able to remove it. Aside from that Albumen's physical attacks do not hit very hard and he has no means of using Dispel so you can likely get away with using an Aettir. Epeolatry is of course a viable option for this battle.

Just stand there and take hits. Maintain enmity and remain disengaged. It's that simple. Do use an area of effect spell at least once to register enmity on the other helpers.

Much like Albumen this fight is more frustrating than it is actually difficult. Onychophora has very irritating mechanics where he absorbs all damage during TP moves when he is above 50% HP and absorbs all damage during TP moves and magic damage after casting fire magic and all physical damage after casting stone magic. For this fight have either 1 or 2 heavy DDs focused on it, but do not make a skillchain, Resolution and Savage Blade is a good combo. However, you do need to watch for some TP moves and be prepared for them. The first is Dustvoid, which removes all your equipment - leaving you a sitting duck until you put your gear back on. Simply have a macro ready to do just that when it goes off. The second is Gorge, which indicates that he now has access to Disgorge. Immediately go into your maximum Damage Taken -% set when you see this and get ready. Disgorge hits very hard but as long as you have Flabra runes up, Vallation active and if you are in the right set you should survive it. Onychophora does not steal your Enhancing Magic effects so feel free to keep Shell and Phalanx on.

- Zerde
- Recommended Weapon:
- Recommended Rune: Ignis
- Barspell: Barblizzard / Barparalyze
- Difficulty: ★
A very straightforward fight as a SCH in your group will be stun-locking every single TP move Zerde attempts to use. If Just Desserts goes off then you have lost, simple as that. Fusion is the main skillchain used in this fight so prepare accordingly with Ignis for Rayke and Gambit. Use the Epeolatry for increased Enmity and to soak any stray melee hits that come your way. I cannot suggest Lionheart to extend Fusion to Light and then Light to Radience because you will likely not have enough accuracy to land anything on Zerde.

- Vinipata
- Recommended Weapon:
- Recommended Rune: Lux
- Barspell: Barblizzard / Barparalyze
- Difficulty: ★ ★ ★ ★ ★
The first of the 'big three' of the Reisenjima HELMs. Vinipata will be another serious test of your abilities as a RUN. Everything about this battle just sucks. Vinipata summons helpers, smaller duplicates of himself which synchronize TP moves with him unless slept. Force Vinipata into Raksha Stance by having your bard debuff him, this will remove Vinipata's -50% PDT. Position yourself or another tank for Decoy shot for Rangers. Vinipata frequently uses a multiple-Erase on himself, removing Rayke and Gambit. Vinipata has extremely nasty TP attacks. Vinipata has the highest attack power of all the Reisenjima HELM and he has a heightened Quadruple Attack rate and Regain when forced out of his magic reduction stance. Finally, Vinipata has two TP moves which reset your Enmity. Aettir is not the way to go here but you can survive with it if you are exceptionally skilled, otherwise you might want to use Epeolatry or consider letting a PLD take care of this.
These are the attacks you need to watch for. Raksha: Vengeance inflicts Muddle and puts a 1:00 duration Weakened status on you. Raksha: Illusion inflicts Paralyze and Bane, which is -50% Max HP Down. Yaksha: Oblivion inflicts heavy damage, puts -110 to all your attributes, and completely resets your Enmity. Sakra Storm is his second Enmity reset attack. Yama's Judgement inflicts a 5-count Doom which needs to be removed very quickly, a tall order considering how much damage Vinipata does. Turtle up, see if you can have a GEO use Bolster with Geo-Wilt and hold on for dear life. This is going to be a tough battle, give it your best shot.

- Teles
- Recommended Weapon:
- Recommended Rune: Tenebrae
- Barspell: Baraera / Barsilence
- Difficulty: ★ ★ ★ ★ ★
The second of the 'big three' and if you ask me tied with Vinipata for the hardest HNM in Reisenjima. What makes Teles so difficult is the frequency in which she resets your group's Enmity and then proceeds to 1-shot kill your entire backline with Clarsach Call, a wind elemental attack with a 25-30 yalm radius that deals extreme damage. Have your melee jobs make Darkness skillchains to proc Teles, removing the Aura from her SP ability. Tenebrae is recommended to resist the two charm moves Teles has access too during Soul Voice, Entice and Maiden's Virelai. Teles also has some very gimmicky attacks and mechanics on top of this that make her a pain to fight. Sonic Buffet inflicts low light damage but removes x3 effects from you, and she does this frequently. This, coupled with the buffs she herself gets after using Clarsach Call can result in you becoming overwhelmed rather quickly when she goes from barely doing 100 damage per attack to over 1000. All you can do is do your best to get your own buffs back on ASAP and count on your backline to Dispel her frequently. There is a lot going on in this fight at all times, so try not fall behind or Teles will overwhelm you. I advise using the Aettir for this battle as practically all of Teles's attacks are magic based and as such an Epeolatry will do precious little here.
For a fight that is very chaotic and unpredictable you can always know when Teles will use one of her SP Ability: Invincible, Soul Voice or Manafont. Teles will use one of these three abilities at 79%, 59%, 39%, 29%, 19% and then at 9% HP. When she falls below 9% she will begin using these abilities constantly and back-to-back. Each of her SP Ability is accompanied by an aura effect with a considerable range exceeding 25-30 yalms. Invincible gives her a 200-300/tick Dia aura. Soul Voice gives her a Mute aura and Manafont gives her a Magic Defense Down aura. Dia you have to stand there and take, using Lucid Potion III and other HP restoring temporary items to stay alive as your WHM will not be in range of the aura lest they themselves die to it. Magic Defense Down is only a threat if you have not been keeping on top of re-applying Shell to yourself and if your backline have been slacking on Dispels. Mute is the most dangerous one as it prevents you from casting spells to maintain Enmity and as such if she resets Enmity at that moment your group is in for a world of hurt. The only real counter to Mute is to sub WAR for Provoke, which I advise for this fight and this fight alone. Teles also gains access to Virelai and Entice during Soul Voice, both capable of inflicting Charm on you. Fortunately you have countermeasures for this. Your first measure is your Charm Buffer which will prevent you from being Charmed the first time she uses Soul Voice. If she uses it again use Pflug while having your Tenebrae runes active and switch into your 'Resist' set (see the gear I singled out in the Tenacity & Pflug section) and you will be surprised just how often you will outright resist the Charm attempts. If she does it a third time not only are you unlucky but you might be down to your last countermeasure if you do not have Pflug up in time, you have Odyllic Subterfuge which will tank Teles's magic accuracy which is better than nothing. Again, like Vinipata, this battle will be a baptism by fire if you do not have much previous experience against her - just do your best knowing what you do now, nobody should fault you for that.

- Schah
- Recommended Weapon:
- Recommended Rune: Tenebrae
- Barspell: Barblizzard / Barparalyze
- Difficulty: ★ ★ ★
The last of the 'big three'. Nightmare stories likening Schah to the combined efforts of Stephen King and Baum Stoker float around the forums but honestly, Schah is not overly hard. What makes or breaks a successful Schah battle is the reaction time and kill speed of your group as a whole. I strongly suggest using two RUN and two WHM with a COR and GEO for support in your tank party when engaging Schah. Ideally the RUN, we'll call him RUN #1, who spawns Schah will be using an Epeolatry but using an Aettir is doable provided your WHM and GEO are exceptionally good. RUN #2 stands off to the side, approximately 20 yalms away from Schah and waits for Schah to begin summoning his 'pieces'. When the pieces begin spawning RUN #2 uses Flash to grab individual 'pieces' so the GEO and RNG in the backline can target it and quickly dispatch it. RUN #2 needs to know which 'pieces' have priority when they appear. The order I have found most effective is Bhata > Ashva > Gaja > Ratha. A Bhata and Gaja should be main priority, pull them two over a Ratha or an Ashva. If an Ashva is not up target a Gaja. If a Gaja is not up target a Ratha. If none of these are up target a Bhata. What you need to be careful of during this phase is that if you accidentally leave a Bhata alive for more than 2:00 it will respawn as a Mantri and spell game over more or less, so try keep track on which Bhata has been alive the longest (or have your GEO spot for you). You also need to beware that Ashva can and will use Bannaret Charge on you. Gaja likewise can use Besieger's Bane.
While all this is happening RUN #1 stands there taking damage and not engaging Schah or his Mantri. That is very important to remember if you are filling the role of this RUN as if you engage Schah Enmity becomes very unstable and his 'pieces' will begin roaming around causing havoc - do not do this. When all thirteen'pieces'(ignore the Mantri and leave it unclaimed) have been destroyed the fight becomes a race against the clock to take Schah down, which is actually easier than it sounds. Without the support of his 'pieces' Schah is surprisingly brittle and will fold after 10:00 or so. Schah can use Enthrall but since you have Tenebrae up, which counters Charm since it is a light elemental debuff, the chances of it landing are slim. Schah can also use Bannaret Charge and Besieger's Bane himself. Overall this fight is a learning curve more than anything and hugely over-hyped. It only has it's three-star difficulty rating because of this learning curve. You will probably lose this fight a number of times but when you all fully grasp his mechanics and take down his 'pieces' you will cruise past him.
Unity Concord
- Tumult Curator
- Recommended Weapon:

- Recommended Rune: Tenebrae >>> Unda >>> Lux
- Barspell: Barfire / Baramnesia
- Difficulty: ★ ★ ★ ★ ★ ★
- Authors Note: You need x12 Panacea, x12 Remedy and x12 Holy Water for this battle. This is not optional, get them.
This, is an extremely difficult fight. That's not even hyperbole either, this is likely the hardest fight in the game outside Master Trials. Your role as a RUN here is as a damage dealer who also happens to tank. You need a top tier TP and Resolution set for this fight as well as 2100 job points - do not even attempt it without the aforementioned. Tumult Curator is a Lv145 version of the Pandemonium Warden so you will need to progress through three phases before you'll actually fight the Curator himself. The first phase you are going to want x3 Tenebrae active as you will face versions of the Battleclad Chariot, Long-Armed Chariot, Long-Bowed Chariot and the Armored Chariot. These chariots have Light elemental attacks like Diffusion Ray and Brainjack so use Dark runes to counter them. When they are destroyed you're next faced with Medusa, Gurfurlur the Menacing and Gulool Ja Ja. Gurfurlur should be first as he presents the greatest danger. Put up Battuta as soon as you engage him and have Vivacious Pulse ready for when Head Snatch hits you as you do not want to be countered with that low HP. Gulool is second and he's slightly easier, just beware of Mijin Gakure at low HP. Medusa will fold like a pack of cards so take her out last. The final wave you will face before the Curator consists of Hydra, Cerberus and Khimaira. Zerg down the Hydra first, ideally before he puts his physical shield up then target the Khimaira. Cerberus is where you need to be careful as he has a habit of going on a Chainspell rampage as soon as he is engaged, so have x3 Unda ready for him.
When all the aforementioned targets are down the Curator will engage you himself, this is where it gets seriously hard. Switch to x3 Lux runes to counter Dread Spikes, Necrobane and Necropurge. Curator's spells hit for ungodly amounts of damage so you need to be ready to snap into a maximum MDT/DT-% set as soon as you see a line to the effect of 'Tumult Curator starts casting Thunder VI'; if you are uncertain as to whom he is casting on, put your set on immediately in case it is you. With your set on and with no debuffs active on you expect a T6 to smack you for about 1500-2000. If you are not in the right set or if you have Magic Def. Down from Cackle on you expect to get hit for 5000-7000, you're not surviving that. You need to use a Panacea immediately after you see Curator land Cackle on you, do not wait for a healer to take it off you as your healers have enough to do in this fight already. Use a Holy Water if Curator lands Curse on you and use a Remedy to remove Paralyze, it is down to you to remove these. There is a chance you can make a T6 miss you by casting Blink while the Curator is casting on you but those shadows are not Utsusemi and you're not subbing NIN for this fight, so I would not overly rely on it. Curator will use Astral Flow and call every Avatar to attack you at 76%, 51%, 26% and 10% so go into your mitigation set when he approaches those stages and use One for All to take the edge off it. If the Curator is stuck on a more fragile party member, say a WAR for example, and he is casting a T6 use Odyllic Subterfuge to tank Curator's magic attacks for a period of time and save your comrade. Keep an eye on Temper in case it falls as that is a significant drop in DPS output if you neglect it.
Omen: Mid-Bosses

- Glassy Gorger
- Recommended Weapon:
- Recommended Rune: None.
- Barspell: None.
- Difficulty: ★ ★ ★
This battle is somewhat unique in that it punishes you for being overly-buffed. Blessing Sync will copy every single buff all players within range of the Gorger have and will gain a Damage Taken -% effect that increases with the number of buffs it has on it. The goal therefore is to limit the buffs you have so the fight is not too long. It is important to do so because, no matter how good you are at getting enmity, if a fight goes on for too long your healer will eventually have so much CE that the slightest cure will tear enmity off you and onto your healer. The Gorger will copy buffs no other NM in the game can. Runes, Ward effects, One for All, you name it - he can copy it. Since you're not using many buffs on yourself I strongly recommend the Epeolatry and staying in a pure tanking build. You'll want these buffs and these buffs only: Protect, Shell, Haste and Crusade.

- Glassy Thinker
- Recommended Weapon:
- Recommended Rune: Unda / Lux / Lux
- Barspell: Barfire / Barvirus
- Difficulty: ★ ★ ★ ★
This one is tricky, once notoriously difficult but recently (and mercifully) nerfed, this fight is largely down to your melees not being incompetent and/or paying attention. The gimmick with the Thinker is that he uses a unique move called Pain Sync which stores all damage dealt to it during the readying phase of the move before unloading 40% of that total into AoE damage. All it takes is for one wrongly timed weapon skill to go off and you're very likely to wipe. Fortunately there are ways to reduce this damage or outright prevent the Thinker from using Pain Sync in the first place, both of which are beyond your control as the tank. Most Omen groups will bring either a BRD or a SMN to an Omen run in the event they encounter this thing as Sentinel's Scherzo and Earthen Armor will significantly reduce the damage Pain Sync deals if something goes wrong. Alternatively if you bury the Thinker in debuffs that can be removed with the Erase spell it will begin using Winds of Promyvion to remove its debuffs instead of using Pain Sync. Rayke and Gambit can both trigger this so use them if you suspect your back line is slacking. Pain Sync aside you'll need to watch for Shadow Spread which inflicts Sleep and Curse and Stygian Vapor which inflicts Plague. Go with an Unda / Lux / Lux setup to counter both of these. Apart from Pain Sync the Thinker doesn't hit overly hard, so feel free to contribute to damage with the Lionheart if you have it, but be sure to snap into a tanking set when Mighty Strikes goes off.

- Glassy Craver
- Recommended Weapon:
- Recommended Rune: Sulpor
- Barspell: Barwater / Barpoison
- Difficulty: ★ ★
Of the three mid-bosses of Omen the Glassy Craver is without a doubt the easiest to deal with. Craver's gimmick is a simple one that is likewise simple to negate. Craver uses two moves in sequence: View Sync which draws in everyone within a set radius and deals damage, followed by Carousel which knocks everyone he just drew in back away from him. You can negate the damage and irritation of this by fighting him with your back to a wall, and have all of your party members do the same. Geo-Wilt will absolutely wreck his physical damage to the extent that these moves are rendered moot. Impalement is a HP-Critical attack which resets your built up enmity towards the Craver, simply use Pulse to recover your HP if your healer is sluggish. Provided that his attack power is reduced you can honestly get the Lionheart out and start swinging with intent to murder. If your healer dies for some reason, like idling in a non-Damage Taken -% set, then snap into your tanking build and hold it until things are under control.
Omen: Mega-Bosses
- Kin
- Recommended Weapon:
- Recommended Rune: Lux
- Barspell: Barfire / Baramnesia
- Difficulty: ★ ★ ★
Kin is a Caturae you'll likely see a lot of, largely because he drops the Utu Grip and Ilabrat Ring you'll really want for damage dealing purposes. The gimmick with Kin is that he absorbs physical damage during readying and using a TP move and absorbs magic damage, including skillchain damage, during casting a spell. Therefore you want to hold TP for when you see Kin casting so you do not heal him and prolong the fight. Healing Kin for a lot of HP triggers Death Sentence, a 5-second Doom effect. Fortunately you'll resist this half the time if you maintain Lux. Kin has an annoying habit of draining all your MP through repeated use of Aspir III and since you're using Lux to counter Death Sentence you're not going to be able to restore MP in a pinch, so sub WAR for this battle. Kin's special attack is Target, which opens up the ability to use Eleventh Dimension: a 3:00 duration Terror effect.
- Kyou
- Recommended Weapon:
- Recommended Rune: Lux
- Barspell: Barstone / Barpetrify
- Difficulty: ★ ★ ★
Kyou's difficulty seriously depends on the rest of your party. The tank's role is ultimately a shared one as all members tend to stack in front of him to reduce the damage dealt by his unique attack, Unfaltering Bravado. Bravado deals 10,000 damage in a cone-area-of-effect and the cone is very narrow. 10,000 damage is divided between the number of people it hits so a full party of six with a Luopan will take 1428 damage each. Kyou will use this at set intervals: 75%, 50%, 25%, 10%.
(TBC)
Dealing Damage as a Rune Fencer
Dealing damage on RUN is something you really need to go out of your way to do, hence why this section is at the tail-end of this guide. It can be done and can be done to great effect, but you need some spectacular equipment and job points invested to make it worthwhile. The major requirement for being a tank that doubles as a damage dealer is having either the Epeolatry upgraded to +269 skill or to have the Lionheart. Between these two you will get far superior results with the Lionheart but the Epeolatry is passable since you can snap back into your role as a tank with a simple set-change whereas you are committed if you're swinging the Lionheart. The purpose of dealing damage while in a tanking capacity might become more and more significant as the endgame meta might change. While spike enmity like Flash and Foil as viable for keeping attention off backline mages, especially given the way enmity mechanics operate during magic bursts, melee damage is constant and much harder to keep up with. Therefore the best way to actually keep enmity off melee players is to get on their wavelength and start swinging with intent to damage. Melee approaches to endgame content are beginning to creep into the meta so this section might become important in months to come. Gear sets for various weapon skills are posted in the FFXIAH thread linked at the head of this page so I suggest seeing what is needed there. First I will address the Temper spell, then Swordplay, then I will address the various weapon skills you will come across before finally addressing common questions about 'X-Hit Builds'.
Spells and Abilities
Temper - Temper is a big part of any ambition to do any decent damage on RUN. For the longest time this spell was exclusive to RDM but with the gradual expansion of job points the developers decided to give it to RUN as well. Temper basically gives the player a self-targeted buff that boosts the rate at which they execute Double Attack, and the effect scales upward with more enhancing magic skill. You will automatically learn Temper when you spend 550 job points on RUN, regardless of whether you have RDM at the required level and without having to learn it from a scroll. The formula for calculating Temper is very straightforward.
   Enhancing Magic Skill < 360 : DA % = 5%
   Enhancing Magic Skill ≥ 360 : DA % = floor( Enhancing Magic Skill - 300 ) ÷ 10 )
Put simply, this means that if you have below 360 skill you will automatically get a 5% double attack bonus, but if you're above 360 you take your enhancing skill, subtract 300 from it and then divide that by 10 to get your final bonus %. So say for example you have 510 enhancing skill. 510 - 300 is 210, 210 ÷ 10 is 21. You will have a 21% double attack bonus. Seems low, doesn't it? Now, consider that Embolden will boost your next enhancing spell by 50% and this suddenly becomes significant. Finally, consider that RUN is already on a fair amount of double attack equipment and this no longer becomes something to sneer at. This allows for the Lionheart to compensate for not having double and triple attack rolled into it's aftermath but also pushes the Epeolatry further.
Swordplay - Swordplay is a neat ability that is sadly prohibited by it's duration and cool down timer. Upon activation Swordplay will begin ticking up and give you an accuracy/evasion bonus that caps out at +60 but becomes +80 with job points invested. +80 accuracy is quite a bit in the larger scheme of things but sadly the effect takes a little while to charge to full and will reset if you take a hit that takes more than 75% of your maximum HP. Swordplay, coupled with your Accuracy Bonus III trait and what you got from gifts, will give you a good chunk of accuracy giving you leeway to use attack-based food to further power up your damage.
Embolden - I mentioned Embolden above and I should really elaborate on it. Embolden takes the next enhancing magic spell cast on you and increases it's potency by 50% while reducing it's duration by 50%. Note that I said spells cast on you and not on yourself, by yourself, this is going to lead into a very nice trick RUN has. If you happen to be in a party or alliance with a Red Mage it might be worthwhile to co-ordinate with them so they can cast Haste II on you when you have Embolden active. The reasoning behind this, in using Embolden for Haste II rather than Temper, is simple. Haste II has a set strength of 30% magic haste and a good RDM with appropriate equipment can make it last upwards of 10:00 when cast on a RUN when you consider Composure with it's Empyrean set and the Enhancing Effect Duration equipment and gifts RUN gets. Since Embolden would therefore increase the strength of Haste II by 50% it now has a potency of 45%, which puts you over the magic haste cap with one spell. This spell also has a very nice duration if the aforementioned pointers were taken. I suggest making an idle set with the Futhark Trousers +1, Erilaz Galea +1 and Evasionist's Cape (Augmented) in it for this exact situation. It is also worth noting that Boost-STR works with Embolden and will give a +37 STR effect when used with it.
Weapon Skills
- Resolution

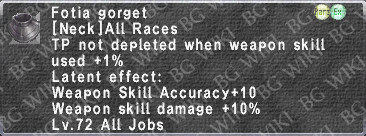
- 85% STR / 5-hits / fTP transfers / attack power varies with TP
- Light / Fragmentation / Scission
Resolution is your go-to weapon skill for punching out big numbers. It's a fantastic weapon skill with a high STR mod, multiple hits, fTP that transfers across said hits and with an attack power that rises as your TP goes over 1000%. RUN is typically starved of both STR and attack equipment so you will have to get creative to compensate. Since the fTP transfers you will be using Fotia Belt and Fotia Gorget when using Resolution. If you do not have either of those, get them - end of. When addressing Resolution's skillchain properties it needs to be said in two cases. If you are not using the Lionheart sadly they are a bit mediocre. Fragmentation is found on a lot of great sword weapon skills as well as other popular weapon types, so creating Light means you're stuck looking for someone who has Fusion category. On the other hand if you are using the Lionheart then Resolution gets a whole lot better. Under the effects of aftermath it gets the Light property by itself, which means it becomes capable of working with very popular weapon skills like Chant Du Cygne as well as becoming able to skillchain with itself. On that note, I recommend maintaining aftermath Lv2 with Lionheart so you do not remove the ability to self-Light by generating Radience - unless your situation specifically calls for it. Given that it's attack power depends on how much TP you have above 1000% Resolution benefits majorly from 'TP Overflow', or not firing it off as soon as you hit 1000%. Fortunately since you're using the Lionheart and a solid TP build the climb to 1500%-1750% is very smooth. Resolution gets absolutely bonkers when you break 2500% TP on it, or close enough to that number so I suggest holding to roughly the aforementioned amount so the additional +750 TP Bonus from your weapon and moonshade will carry you the rest of the way. If you have a GEO using Indi-Fury and Geo-Frailty you will be hitting numbers on Resolution that will put bandwagon BLU to shame.
|
|


- Dimidiation

- 80% DEX / 2-hits / attack power varies with TP
- Light / Fragmentation
Dimidiation is the second of the two go-to weapon skills. Dimidiation differs from Resolution in a few ways. Firstly, it has an 80% DEX mod rather than an 85% STR mod. Secondly, it is only two-hits instead of five. Thirdly and finally, fTP does not transfer so you won't be using Fotia Belt/Gorget. Although it looks inferior on paper Dimidiation really is not that bad of a weapon skill to use in situations where accuracy is an issue. Given that you are using a lot of DEX equipment to as DEX is Dimidiation's modifier you will be getting a fair bit of accuracy into the bargain. It is also the only way a RUN can self-Light if not using the Lionheart so keep that in mind. Like Resolution, Dimidiation also benefits from TP Overflow but not to the same degree.
Note: The 2016 December Version Update added some very powerful pieces that complement Dimidiation very well. Dimidiation is now a lot more competitive with Resolution for damage output.
|
|


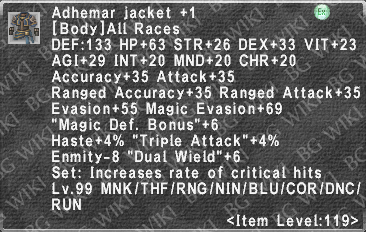
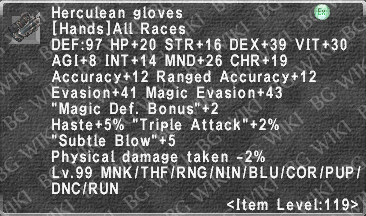
- Herculean Slash

- 80% VIT / 1-hit / duration varies with TP
- Induration / Impaction / Detonation
Herculean Slash is an odd weapon skill. It's the strongest of the three elemental weapon skills accessible to great swords and comes with a paralysis effect. The strength of the paralysis is not significant but if you're fighting solo and literally have no other means of inflicting the same I suppose it's occasionally worth throwing out. Herculean Slash is however quite handy when forming a skillchain: Impaction leads into Fusion and Detonation is not found on any other great sword weapon skill. You'd pretty much use your Lunge set for Herculean Slash so it's not overly difficult to gear for.
- Ground Strike

- 50% STR ~ 50% INT / 1-hit / attack power varies with TP
- Fragmentation / Distortion
Ground Strike's only purpose, and it is a good one, is that of being a Distortion linker when skillchaining with other jobs. Asides from that it is unremarkable and not worth using over either of the above. Ground Strike has an infuriating habit of consistently missing on anything worthwhile. Use only when the situation specifically calls for it.
X-Hit Builds
An 'X-Hit Build' is a general phrase used to describe '4-Hit' or '5-Hit' TP builds through equipment and other buff effects like Samurai Roll. Debates surrounding these builds rage back and forth between players of other jobs but as far as RUN is concerned it is a lot more straightforward. You should never aim for achieving a 4-Hit build through your equipment alone as you will end up sacrificing a great deal of accuracy and multi-attack in the process. There is no point pouring all your effort into stacking Store TP when you seldom score a multi-attack and when you do to only whiff like a DRK. You do not want to build a TP set that has in excess of +100 Store TP but barely breaks 1100 accuracy without Vorseal effects. Fights like the Tumult Curator and newer content like Omen deprive you of the beneficial effects of your vorseals, so if you have accuracy deficiencies in your TP set you will notice very quickly.
This is what you generally want to aim for, before food and vorseals.
- Accuracy - 1150~1250
- Attack - 1150~1200
- Store TP - 70 (5-Hit)
- Double Attack - 25%
- Triple Attack - 13%
Keep in mind that this is only from equipment. Factoring in other elements and you're looking at something more like this.
- Double Attack - 56% (Temper) ~ 65% (Epeolatry AM3) ~ 97% (Epeolatry AM3 & Temper)
- Triple Attack - 33% (Epeolatry AM3)
- Accuracy - 1250~1400 (Food & Swordplay)
Accuracy beyond what you can do yourself is really up in the air and dependent on your support. This guide is about you helping yourself so for all intents and purposes this is what it will stay with.
|
|


RUN has the benefit of actually being quite accurate for a two-handed weapon user, partially down to it's job points and partially down to it's 'light melee' equipment selection which tends to favor accuracy and multi-attack. Again, and I really have to stress this, there is no point making a 4-Hit build if you're missing half your hits. Aim for an accurate 5-Hit build and add multi-attack where you can, but not to the detriment of other attributes in large quantities.
Video Guide
