The Voracious Resurgence | |
| Prime Weapons • Ultimate Weapons • Ultimate Augments • Abjurations iL119 • JSE Necks • Divergence Augments • Escutcheons | |
| Reforged Armor Artifact: +1 • iL109 • iL119/+2/+3/+4 Relic: +1/+2 • iL109 • iL119/+2/+3/+4 Empyrean: +1/+2 • iL109 • iL119/+2/+3 |
Guides • Crafting • Trusts • Apex Monsters |
Community Bard Guide
|

General Information
Bard is one of the premier support classes in FFXI, providing a wide variety of powerful buffs and - when well geared and armed with a ![]() Naegling or other fancy weapon - a reasonable melee damage dealer as well.
Naegling or other fancy weapon - a reasonable melee damage dealer as well.

Capable of singlehandedly capping a party's Magic Haste and/or granting hundreds of Attack or Accuracy - with the option to use niche defensive buffs like Elemental Resistance or Defense instead - a Bard is basically mandatory for any serious endgame content. They also have Lullaby (AoE Sleep) for big packs and a mediocre movement speed buff in Raptor Mazurka that hopefully you will never have to use.
Job Abilities and Traits
Abilities
- Soul Voice: 1-hour ability. Doubles either the potency (for most buffs and debuffs) or the Magic Accuracy and/or Duration (for things like Lullaby, Finale, Virelai, Hymnus, Mazurka, and Scherzo) of your songs.
- Clarion Call: 1-hour ability. Allows you to sing an additional song. (Providing a fifth total song when used with "two additional song" instruments.)
- Pianissimo: Limits the area of effect of the next song you sing to a single target. (Also reduces base song casting time.)
- Tenuto: Makes the next song you sing on yourself impossible to overwrite with other songs. (Just for yourself.)
- Marcato: Increases the potency or Magic Accuracy and Duration (same list as Soul Voice) of your next song.
- Nightingale: Merited ability. Reduces the casting and recast time of songs. Typically used in tandem with Troubadour.
- Troubadour: Merited ability. Increases the song casting time and doubles song duration. Typically used in tandem with Nightingale.
Traits
- Con Anima: Merited trait. Reduces physical damage taken beyond PDT cap by up to 10% while under the effect of a song. (Don't merit this.)
- Con Brio: Merited trait. Reduces magical damage taken beyond MDT cap by up to 10% while under the effects of a song. (Don't merit this.)
- Resist Silence: Increases your resistance to silence. Caps at 30% at levels 81+.
- Critical Defense Bonus: Reduces the chances that an enemy will critically strike you. Caps at 8% at levels 91+.
- Fencer: Grants TP Bonus and critical hit chance when wielding a single one-handed weapon. (A Shield is also allowed.) Caps at 300 TP bonus and +5% Critical Hit Rate at levels 95+.
Merits
| Group I | Effect |
|---|---|
| Lullaby Recast | Reduces recast time of Lullaby spells by 1 second per merit level. |
| Finale Recast | Reduces recast time of Magic Finale by 1 second per merit level. |
| Minne Effect | Increases defense granted by Minne spells by 2 per merit level. |
| Minuet Effect | Increases attack granted by Minuet spells by 1 per merit level. |
| Madrigal Effect | Increases melee accuracy granted by Madrigal spells by 1 per merit level. |
Group I Merit Recommendations:
- 5/5 Minuet Effect - You will often have 2 to 3 Minuets on a DD party. This translates to 10-15 additional attack for your party, which becomes 20-40 after COR and GEO buffs.
- 5/5 Madrigal Effect - When you need accuracy, you need accuracy. And Madrigal is the way to get it.
- Alternate: 5/5 Minne Effect - Minne merits with COR and GEO buffs can result in around a hundred extra Defense. Situations where you're using Defense buffs are incredibly rare, so default to Madrigal and respec when needed.
Note: Lullaby and Finale recast merits are deceptively bad, because you already have other sources of significant recast reduction.
Unmerited, they have a 24 second recast. With capped recast speed gear in your midcast set, the recast is cut to 4.8 seconds.
With 5/5 merits, that reduces the base recast time to 19 seconds. With capped recast speed gear in your midcast this is reduced to 3.8 seconds.
Using 5/5 merit slots for 1 second of recast speed is almost completely ineffective when considering casting times and animation locks.
| Group II | Effect |
|---|---|
| Nightingale | 10 minute recast - Reduces the casting time and recast time of songs. Offsets the negative aspects of Troubadour. |
| Troubadour | 10 minute recast - Increases the casting time of songs, but doubles their duration after additive bonuses. |
| Con Anima | Reduces physical damage taken after PDT calculations when under the effects of songs. |
| Con Brio | Reduces magical damage taken after MDT calculations when under the effects of songs. |
Group II Merits Recommendations:
- 5/5 Nightingale
- 5/5 Troubadour
Note: Nightingale reduces the penalties of Troubadour - the combintion of both abilities is typically referred to as "NiTro".
![]() Relic armor, when worn during ability activation, increases the duration of each ability by 4 seconds per merit rank. With best-in-slot duration gear, your song durations exceed the recast timer of NiTro by over one minute, meaning you only need to stop and sing every 10 minutes. This allows the bard more freedom to contribute in other ways, like off-healing with /WHM, /SCH, or /DNC or spending more time meleeing as /NIN with less singing downtime.
Relic armor, when worn during ability activation, increases the duration of each ability by 4 seconds per merit rank. With best-in-slot duration gear, your song durations exceed the recast timer of NiTro by over one minute, meaning you only need to stop and sing every 10 minutes. This allows the bard more freedom to contribute in other ways, like off-healing with /WHM, /SCH, or /DNC or spending more time meleeing as /NIN with less singing downtime.
Song duration exceeding 10 minutes and proper NiTro timing lets you maintain a full-time Marcato song, too.

NiTro is the bread and butter of Bard contributions to parties.
Support Jobs
- White Mage - Excellent support option, particularly when the party has a SCH to sustain HP with Regen. When done right, BRD/WHM can main heal a party for most lower-end content. In addition to Cures and status ailment removal, having Raise and Reraise can be valuable in situations where getting multiple people up quickly is more important than maintaining their Master Levels. (Hopefully, this will never happen to you, but never say never.)
- Scholar - Like White Mage, but with the ability to make some spells AoE through Accession, like Sneak or Paralyna. SCH is also an excellent subjob for any content where you want access to Tier 1 Elemental spells (usually to help
 proc an enemy) while still keeping access to White Magic spells that remove debuffs like Erase, Poisona, or Cursna. If you want it, you'll know - or at least someone in your party will!
 - Dancer - Kind of like White Mage, but you get to Dual Wield, and in return your healing options require spending TP. Gives access to useful abilities like Haste Samba and Box Step that benefit a Dancer-less party. Job Ability Haste is capped separately from Magic Haste, so you can stack Haste Samba on top of the capped Magic Haste you provide for your party via Marches.
- Ninja - The subjob of choice for a well-geared damage-dealing Bard. Dual Wield lets you offhand a Centovente for 1,000 TP Bonus and deal respectable damage with Savage Blade, Mordant Rime, or Rudra's Storm. Ninja gives more DW than Dancer, hitting the cap with two items easily thanks to your own capped Magic Haste from Marches. Dual Wield also lets you put a weapon with +song duration in your offhand, which is helpful whether or not you have
 Carnwenhan's massive +50%. (Also, you get Utsusemi for those rare situations where something's hitting you in the face. Don't laugh, it works.)
 - Warrior - You could do this for extra ranks in Fencer, but Dual Wielding instead lets you offhand Centovente. Its 1,000 TP Bonus augment results in far more total damage dealt. Don't bother.
_description.png)
Job Points
Obviously, if you're serious about playing Bard (or any job), you'll end up mastering it. Even if you don't explicitly farm Capacity Points, they add up over time and never decrease!
This means you're going to have all of these eventually, it's just a question of when. A rough priority order isn't particularly helpful, but also can't hurt, so:
| Job Point Category | Effect | Total Value | Priority |
|---|---|---|---|
| Soul Voice Effect | Reduces the casting time of songs while under the effects of Soul Voice. | 40% | 6 |
| Clarion Call Effect | Increases the effect duration of songs while under the effects of Clarion Call. | 40 sec | 3 |
| Minne Effect | Increases physical defense granted by Minne. | 20 | 5 |
| Minuet Effect | Increases physical attack while under the effects of Minuet. | 20 | 1 |
| Pianissimo Effect | Reduces the casting time of songs while under the effects of Pianissimo. | 40% | 9 |
| Song Accuracy Bonus | Increases song accuracy. | 20 | 2 |
| Tenuto Effect | Increases the effect duration of songs while under the effects of Tenuto. | 40 sec | 10 |
| Lullaby Duration | Increases the effect duration of Lullaby. | 20 sec | 4 |
| Marcato Effect | Increases effect duration of songs while under the effects of Marcato. | 20 sec | 7 |
| Requiem Effect | Increases damage over time of Requiem. | 60 | 8 |
Songs
- Duration
- Potency
- Re-singing
Maximizing Impact
Instruments
Starter

"Daurdabla Lite"
- This harp is available from Oboro for 150
 Plutons, along with a
  Cehuetzi Pelt, an
  Ebony Harp, and a
  Shofar.
- An additional 300 Plutons are required to augment the Terpander. While not necessary, the stats are useful for avoiding damage while singing.
- Don't use
 Beitetsu, which are much more expensive. Check the price on
  Riftborn Boulders, but they're probably still more expensive than Plutons.
- An additional 300
- This expansion of song slots is immensely important for Bard. The value of 3 songs over 2 cannot be overstated.
- If you're playing Bard, even as a pocket Bard, this is an absolute necessity.


"Gjallarhorn Lite"
- This flute drops in the Cirdas Caverns (U) Alluvion Skirmish.
- More commonly, you can also purchase it from Lorissa with
 Mellidopt Wings, either obtained as a reward from Yorcia Alluvion Skirmish or from other random places like the Adoulin Dial Campaign.
- More commonly, you can also purchase it from Lorissa with
- The augment you want on your first Linos is All Songs +2 from
 Snowdim Stones - regular, +1, or +2 as you can afford - to bring the total bonus to All Songs +3, only 1 behind the beloved
  Gjallarhorn.
 - Even long after making Gjallarhorn, you'll be carrying carrying around multiple Linos (at least 3, if not more) for their useful augments, currently unique in the Instrument slot.
- Expect to make at least one Linos for idling and casting (Magic Evasion, Fast Cast)...
- ...one for TPing (Accuracy/Attack, Quadruple Attack, Store TP/Double Attack)...
- ...and one or more for Weapon Skills (Attack, Weapon Skill Damage, STR or other primary stat).

_description.png)
REMAP
Relic: We're Number Four!
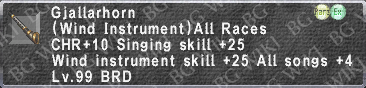
Bard is one of the few jobs that actually wants to use its Relic Weapon in the modern day. (Partially because it's not a weapon, so you can swap it in and out freely.)
![]() Gjallarhorn has a whopping "All Songs +4", the highest in the game.
Gjallarhorn has a whopping "All Songs +4", the highest in the game.
This grants a large boost to every song - typically +40% duration and +40% potency, though it varies by song - and is an essential part of every Bard's toolkit. (But see ![]() Loughnashade below.)
Loughnashade below.)
_description.png)
_description.png)
Empyrean: Bla Bla Bla Bla
Bard's Empyrean Weapon is another Instrument, because SE figured out what we really wanted. (Well, okay, one of Bard's Empyrean Weapons...)
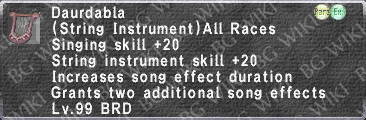
![]() Daurdabla allows you to sing an additional two songs, one more than the
Daurdabla allows you to sing an additional two songs, one more than the ![]() Terpander.
Terpander.
A staple of any bard's arsenal, literally making them 33% more powerful. (But see ![]() Loughnashade below... again.)
Loughnashade below... again.)

Aeonic: It Does One Thing
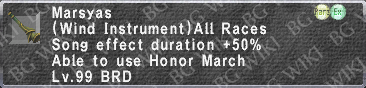
The whole point of ![]() Marsyas is Honor March.
Marsyas is Honor March.
Luckily for it, Honor March is one of the two best Songs in the entire game. (Probably the best, but Aria of Passion is similarly unique and valuable.)
Unlike the other two Marches, Honor March gives Magic Haste and also boosts Attack, Ranged Attack, Accuracy, and Ranged Accuracy.
Marsyas also gives +50% Song Duration, useful in niche cases (like Foe Lullaby) where you don't care about potency.
Prime Cut Miggity-Mo' Macdaddy Gizzabang Doggy Dog Dog (voiced by Cee Lo)
Much like no MC has ever survived that went up against Prime, the newest fancy Instrument ![]() Loughnashade carves a swath through the previous options.
Loughnashade carves a swath through the previous options.
When fully upgraded - at a cost of 8.5 million Gallimaufry - it gives +4 to all songs like ![]() Gjallarhorn, +2 additional songs like
Gjallarhorn, +2 additional songs like ![]() Daurdabla, and access to its own unique song, Aria of Passion.
Daurdabla, and access to its own unique song, Aria of Passion.
Aria of Passion is great in any situation where your party is highly buffed and running into the Physical Damage Limit - for example, when they have a Bard with a fully upgraded ![]() Loughnashade.
Loughnashade.
![]() Loughnashade nearly obsoletes two of the above instruments:
Loughnashade nearly obsoletes two of the above instruments:
- Gjallarhorn still has maximum Wind Instrument Skill for debuff songs, but that's it.
 Daurdabla still has 20 String Instrument skill, solely useful for Horde Lullaby II AoE (see the gearset below), but that's it.
Special Note

A Very Good Place to Start
For those with an unused ![]() Kupon W-MOGB, the
Kupon W-MOGB, the ![]() Miracle Cheer is an interesting one.
Miracle Cheer is an interesting one.
It sets song duration to 15 minutes, overriding literally everything else - both gear and Troubadour - which means it's actually a downgrade for a fully geared best-in-slot Bard, but a significant upgrade for for a new Bard.
It "only" gives All Songs +3 (like ![]() Linos) and "only" gives one additional song (like
Linos) and "only" gives one additional song (like ![]() Terpander)... but it does all that simultaneously, and if you still have a Kupon you probably don't care about a
Terpander)... but it does all that simultaneously, and if you still have a Kupon you probably don't care about a ![]() Diamond Aspis or whatever instead.
Diamond Aspis or whatever instead.


Highly recommended for a second or third character that wants to hit the ground running and be an acceptable pocket Bard. Not so much for a main character that actively wants to play Bard long-term.
Weapons
Starter

"Gotta Start Somewhere"
- When you hit level 99, purchase this from Craggy Bluff inside the Peacekeepers' Coalition at Eastern Adoulin (F-7) (Waypoint #1) for 3,000 Bayld.
- Next, go to a Domain Invasion, hit at least one thing or sing at least one song, and get 100 DI points.
- Tomorrow (IRL), do it again to get another 100, then upgrade to
 Kali and throw this in the garbage.

"Carnwenhan Lite"
- Brand new players can purchase this from Zurim in Norg for 200 Domain Invasion points.
- That's 2 days at the maximum 100 points per day cap.
- Normally drops from Kammavaca, a level 125 Geas Fete fight in Escha - Ru'Aun.
- This fight can be relatively easily farmed with one (or more) friends who are already geared, or on another geared job you already have.
- Not a melee weapon to write home about, but far better than the
 Homestead Dagger.
 - The main attraction here is the Song duration +5, but the Path D augments are also useful.
- Specifically, those augments are Magic Accuracy +15, String Instrument Skill +10, and Wind Instrument Skill +10.
- Keep one of these forever, because it's the best offhand source of song duration when Dual Wielding.
REMAP
Mythic: It Just Keeps Going...
Bard's Mythic Weapon - and it is a proper weapon, not an Instrument - gives a whopping +50% Song duration. It should be equipped whenever you're singing.
Also, Mordant Rime is competitive with Bard's other Weapon Skill options. Having a WS that no other job can use is great when you want unique WSes for each member of the party, like in Dynamis - Divergence, Sheol, and Sortie.
_description.png)
Empyrean Two: The Squeakquel
Bard actually gets two Empyrean Weapons! Make ![]() Daurdabla first. And possibly only.
Daurdabla first. And possibly only.
If you already have this because you made this for Thief or Dancer, or if you really want to be able to make a solo Darkness Skillchain, go for it.
Otherwise, you can just bring ![]() Carnwenhan and/or
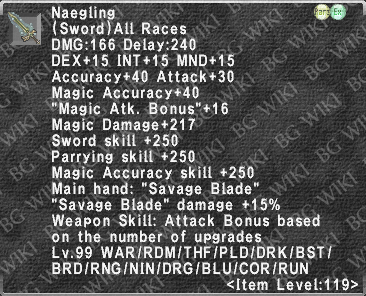
Carnwenhan and/or ![]() Naegling and no one will ever notice, much less complain.
Naegling and no one will ever notice, much less complain.
Your total damage might end up marginally higher with this, but only marginally, and it requires farming Glavoid, one of the least fun Abyssea NMs.
_description.png)
Prime Two: Big Numbers, But...
For Bards, this is absolutely Prime Weapon Two. Much like ![]() Twashtar, make the Prime Instrument,
Twashtar, make the Prime Instrument, ![]() Loughnashade, long before making the actual weapon. (If you ever bother.)
Loughnashade, long before making the actual weapon. (If you ever bother.)
I don't have any firsthand experience with Ruthless Stroke. It's probably very good, like all the other Prime Weapon WSes, and this probably obsoletes every weapon other than ![]() Naegling once you get it.
Naegling once you get it.
If you're a serious full-time Bard, here's where you put your second 8.5 million Gallimaufry. If not, don't grind this out just for your Bard, though obviously use it if you made it.
Special Note For New Players: If you don't have another levelled combat job, spend your first 20,000 Gallimaufry to make ![]() Mpu Gandring (Incomplete)!
Mpu Gandring (Incomplete)!
You can't enter the final fight of The Voracious Resurgence without a Prime Weapon of that stage or higher equipped. And it's only a "Weapon" - neither ![]() Loughnashade (Incomplete) nor
Loughnashade (Incomplete) nor ![]() Duban (Incomplete) qualify!
Duban (Incomplete) qualify!
It isn't fun to waste "two ![]() Fili Attire Set +2 pieces" worth of Gallimaufry, but in return you get
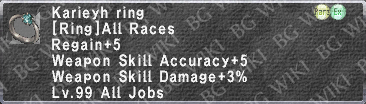
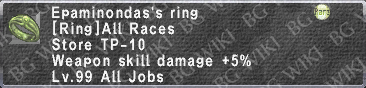
Fili Attire Set +2 pieces" worth of Gallimaufry, but in return you get ![]() Cornelia's Ring. Think of it as buying a best-in-slot ring for 20k Gallimaufry to lessen the blow.
Cornelia's Ring. Think of it as buying a best-in-slot ring for 20k Gallimaufry to lessen the blow.
_description.png)
_description.png)
_description.png)


Other
The Elephant in The Room
Bard can wear ![]() Naegling. Easier to make than a "real" REMA, and more useful than some of them too.
Naegling. Easier to make than a "real" REMA, and more useful than some of them too.
There's very few enemies you can't handle with enough Savage Blades, even if you'll often prefer Piercing damage or WS variety.
New players who don't already know about ![]() Naegling: Make it, use it, love it. You'll see a huge damage increase immediately.
Naegling: Make it, use it, love it. You'll see a huge damage increase immediately.

Sing Softly and Carry a Big Stick
Since BRD isn't on ![]() Maxentius, this is the best blunt weapon option available. Fortunately, it's a very good one.
Maxentius, this is the best blunt weapon option available. Fortunately, it's a very good one.
Dropping from Maiden of the Dusk II at a relatively generous rate (far better than the armor, at least), it's not too difficult to acquire once you have ![]() Naegling and corresponding engaged/WS sets.
Naegling and corresponding engaged/WS sets.

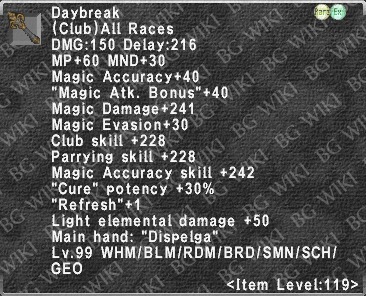
![]() Daybreak provides 30% Cure potency and 1 Refresh for situations where you're healing. along with access to Dispelga for situations where the single-target Magic Finale won't get it done.
Daybreak provides 30% Cure potency and 1 Refresh for situations where you're healing. along with access to Dispelga for situations where the single-target Magic Finale won't get it done.
Also, sometimes you need blunt damage for Sheol or A Shantotto Ascension or whatever.
Offhands (Shields and Dual Wields)
Disclosure: Frankly, I don't know how to rank all the offhand weapons. So go with what works for you, or find someone smarter than me (easy), get their advice, and then edit it in here so I look less stupid. Thanks!
Shields

- This is a Shield. Bard can equip it. Since there are a total of three item level 119 Shields that Bard can equip, that's actually noteworthy.
- The Spell Interruption Rate -10% is nearly useless for Bard because Songs can't be interrupted by physical attacks.
- You can spam One to be Feared II at a low difficulty with Trusts until this drops - which could take a while - or team up with friends and do a higher difficulty to hopefully get it faster.
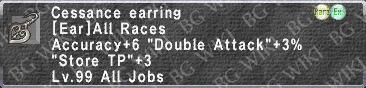
- If
 Cessance Earring doesn't drop before this, consider continuing the farm session until you've got both. There are better TPing earrings, but not many, and none this easily acquired.
- If


- -10% Physical Damage Taken is very nice if you're not PDT capped (-50%) from other gear.
- This also has a higher shield block rate and more Shield skill than the other options, so it's the best idle defensive shield in general by a slim margin.
- Drops from the level 140 Genbu Geas Fete fight in Escha - Ru'Aun.
- Bring friends. It's a sturdy one.

- Enhancing Magic duration +10% does not apply to bard songs, sadly.
- ...but the Magic Accuracy does! (I personally prefer this to
 Genmei Shield and only bother to carry one. It's good enough when you're PDT capped from your other idle set gear.)
- ...but the Magic Accuracy does! (I personally prefer this to
- Drops off Kei in Omen.
- Please don't die to Dancing Fullers.
Dual Wield - Offhand Weapons
- Until you get something better, just Dual Wield another good old reliable Kali.
- The mainhand one should use Path A or B augments for another 15 base damage.

- Don't be fooled by the base stats. Completing the Magian Dagger Trials on the "TP Bonus Path" (ending with Trial 3201) creates a
 Centovente with a TP Bonus +1000 augment.
- Unlike all other augments, Magian Trial weapon augments and Sheol Gaol weapon augments work in the offhand.
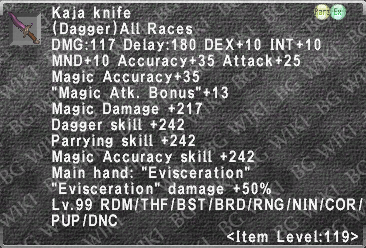
- This has no native accuracy (as opposed to, for example, 242 from the Dagger Skill on the
 Kaja Knife + 35 more from its actual Accuracy stat)
- This means it's best-in-slot for a huge increase in Savage Blade damage on any content where you're not worried about Accuracy...
- ...but leave it in your Wardrobe, not your offhand, when you're doing high-end content.

 Kaja Knife and
  Tauret

- For when you need more accuracy than Centovente and don't have anything better. There's no shame in a good old Kaja Knife.
- I wouldn't bother upgrading this to
 Tauret solely for Bard, but if you already have it you'll obviously be fine using it.
 - To be crystal clear: Your first Pulse Weapon goes to
 Naegling. You can live with Kaja Knife until you have another Pulse to spare, at which point you will likely have one of the below options instead.
- I wouldn't bother upgrading this to

- You can't spell
 Barfawc without "barf". For a ~60 million gil crafted Su5 weapon, this thing's laughably useless.
- The "Song effects: damage taken -3%" only applies to you, and only when it's in the mainhand. If it worked on your party members, I'd at least be a little interested.
- Same goes for the Path C "Song effects: Double Attack +4%". Since it won't work offhand, you're definitely not interested in this.

- Unlike Barfawc, this crafted weapon is actually good. (And much cheaper - a few million gil on Asura, your price may vary.)
- Note that this is Superior Level 2, so you need 100 Job Points invested in Bard to be able to equip it!
- You're not here for the Haste proc, but rather the Occasionally Attacks Twice. It's good enough for now.

- Buyable for somewhere between 450,000 and 4,500,000 gil after defeating Ngai. (Probably the low end. Asura's definitely maxed out the discount.)
- You'll have to unlock Sheol Gaol and then either pay someone to kill it for you or climb your way up to Tier 3 with friends.
- Even at Rank 0 (no augments), this has 6 Triple Attack, plus 2% Gear Haste that sometimes comes up, given Bard's lack of TP gear options.
- At R30, it gains 11 base damage, 45 Attack, 15 Accuracy and 10 Subtle Blow II.
- You probably don't want to farm RP on this solely for Bard, but if you're using it for Thief or something you'll benefit from the investment here too.

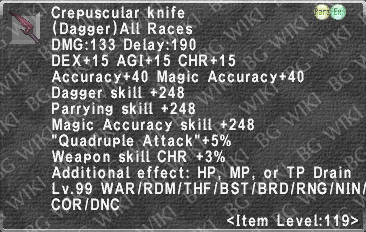
- A vanishingly rare drop (like all the Crepuscular weapons and armor) from The Wyrm God II.
- Don't go out of your way to farm this for Bard alone -
 Gleti's Knife is more than good enough - but if you've got it, flaunt it.
 - Quadruple Attack +5% is obviously great. The stealthier nice part of this pointy friend is the Weapon Skill CHR +3% mod. This adds 3% of your CHR as base WS damage, just like the other stats the WS uses.
- See Weapon Skill Secondary Attribute Modifier for more information, but to oversimplify, just expect +3% damage, ish.
- It's actually more for Mordant Rime, because your MR set is already stacking CHR for its preexisting modifier and that's what you're getting +3% of. (You go from 70% to 73%.)
JSE Equipment
Ambuscade Sets
Relatively easy to get from Ambuscade, and containing at least one piece you'll use literally forever.
This should be your first stop after hitting level 99 and completing some of the Fresh 99 Guide and/or Endgame Progression Guide's recommended tasks.
Bard has two options for Ambuscade armor sets: the Inyanga Armor Set and the Ayanmo Armor Set. The former is mage-focused, while the latter is melee-focused.
| Inyanga Armor Set +2 | |||
|---|---|---|---|
| Worth Buying? | Item Image | Main Uses and Reasoning | |
| No | 
|
Better than wearing nothing, but it doesn't have any bonuses a Bard truly cares about. Its best use is activating the Refresh set bonus for an idle set on a BRD/WHM. You can do better. | |
| Yes | 
|
The highest Fast Cast Bard gets in the body slot. You will use this basically forever - there are very rare options ( | |
| Yes | 
|
Don't be fooled by the phrase "All magic skills" - it includes all three of your Singing, String Instrument, and Wind Instrument skills. These eventually lose out to | |
| Yes | 
|
One of the earliest, and one of the best, song duration pieces you'll ever get. You will use these literally forever. If you're not wearing these, it's because you made a conscious decision to change your song durations to control what gets overwritten. | |
| No | 
|
These aren't for you. They're not really for Summoners either, but they're even less for you. Much like the Tiara, the best use of these is the set bonus. You can do much better. | |
| No | 
|
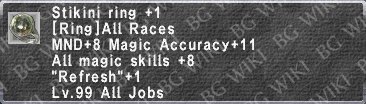
A resounding "meh". 6 Magic Accuracy is as good as anything else you can get right when you hit 99, but the | |


| Ayanmo Armor Set +2 | |||
|---|---|---|---|
| Worth Buying? | Description Image | Priority + Reasoning | |
| Yes | 
|
A reasonable meleeing hat until you get something better. For a new player, that will likely be a while - TP sets are thin on the ground for Bard! For an established player, if you happen to have a | |
| Yes | 
|
Much like the Zucchetto immediately above this, the Corazza is a perfectly functional meleeing piece until you get something better. New players, don't hesitate to make and upgrade this, it'll last you a long time! Established players, you're looking for | |
| No | 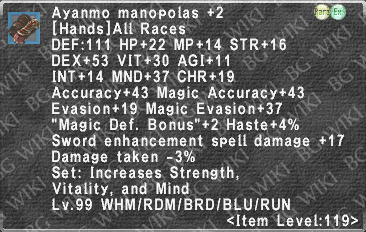
|
This one's for the Red Mages who want to maximize Enspell damage output. Not for you. | |
| Yes | 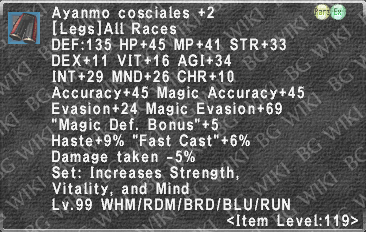
|
6% Fast Cast is only beaten by a few leg pieces, all of which are much harder to get. The less time you spend singing, the more time you can spend doing other things! | |
| No | 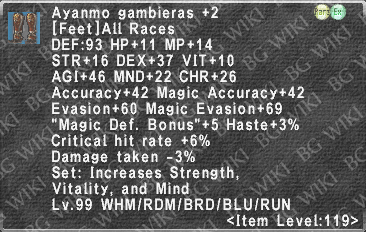
|
Critical hit rate can be a useful thing for some Weapon Skills, but not any of the ones Bard focuses on using. This doesn't really have any other appeal to it. | |
| Yes | 
|
Better than the | |


Artifact
Reforging your Artifact Armor to +3 requires Omen cards, most easily farmed during the Omen Job Card Campaigns... but don't let that stop you.
Going from nothing to a full set of +3 requires 76 ![]() P. BRD Card and 5
P. BRD Card and 5 ![]() Kyou's Scale (which can drop off any trash mob in Omen, along with Kyou, the obvious source.)
Kyou's Scale (which can drop off any trash mob in Omen, along with Kyou, the obvious source.)
It's always better to get some when you're nearing the ![]() Mystical canteen cap (1 held on the player and 3 in reserve at Incantrix) rather than waiting for the Campaign and getting none.
Mystical canteen cap (1 held on the player and 3 in reserve at Incantrix) rather than waiting for the Campaign and getting none.


From there, a full set of +4 reforges costs 100,000 Apollyon Units from Limbus. (This can't be done in less than two weeks, thanks to the 50,000 Units per area per week cap.)
When fully reforged, 4/5 of the AF +4 is best-in-slot for Magic Accuracy, so you definitely care about upgrading those four pieces. You're not much use as a Bard if your enemy can't hear your debilitating singing!
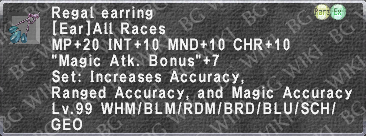
The set bonus for these items is +15 Accuracy, Ranged Accuracy, and Magic Accuracy per piece equipped from 2 to a maximum of 5. This set bonus also counts the ![]() Regal Earring from Ou.
Regal Earring from Ou.
This lets you get away with not reforging the legs, which don't have as much to offer as the other four pieces - though they're still the best Magic Accuracy piece in the slot, so think about it.

While this set is only best-in-slot for MAcc at +4, it's perfectly usable at +3, only losing 10 Magic Accuracy per piece.
The +2s continue that downward trend of -10 per piece, so I wouldn't want to swap these in until +3, but if they're the best piece you have, go for it!
| Brioso Attire Set +4 | ||
|---|---|---|
| Item Image | Additional Notes | |

|
Also best-in-slot for String Instrument skill for Horde Lullaby II AoE. | |

|
Also best-in-slot for String Instrument skill for Horde Lullaby II AoE. | |

|
This has Lullaby +2 even if it lacks String Instrument skill, so it's best in slot for Horde Lullaby II as well for a much more obvious reason. | |

|
8% is good Damage Taken for the leg slot, tying ...Unfortunately for these, their real competition is Think about whether or not to reforge these - while they're best-in-slot for Magic Accuracy, you lose a Wardrobe slot to have them available. In return, you gain 13 MAcc by swapping from | |

|
This is the only foot slot item with song duration. I'd make this first for that reason. | |


Relic
Reforging your Relic Armor to +3 requires either killing 100 trash mobs in each of the four zones of Dynamis - Divergence or killing each zone's corresponding Wave 1 boss.
From there, a full set of +4 costs 100,000 Temenos Units from Limbus. (This can't be done in less than two weeks thanks to the 50,000 Units per area per week cap.)
However, the only piece truly worth taking to +4 is the excellent ![]() Bihu Justaucorps +4, Bard's strongest Weapon Skill body.
So you really only need 30,000 Temenos Units.
Bihu Justaucorps +4, Bard's strongest Weapon Skill body.
So you really only need 30,000 Temenos Units.
Since these pieces get the relevant Job Ability-boosting augments when reforged to item level 109, and those don't change with higher reforges, feel free to leave the legs (and possibly also the feet) at +1.
Note: You should definitely upgrade the good-augment pieces to +1 (item level 119) for the increased base stats and evasion. You can never rule out getting hit with a nasty AoE at the worst time.
| Bihu Attire Set +4 | ||
|---|---|---|
| Item Image | Additional Notes | |

|
Don't even bother reforging your original Bard's Roundlet. This has a lot of raw stats at +4, and might beat a | |

|
A fantastic weaponskill piece. 12 Weapon Skill Damage nearly matches Also, the augment extends the duration of Troubadour, combining well with the feet extending Nightingale. | |

|
Don't even bother reforging your original Bard's Cuffs. Since you should never merit Con Brio, you don't care about the augment. | |

|
Augment grants an extra 30 seconds of duration to Soul Voice. Reforge this to i119 (+1) for the great augment, but don't waste further resources on it. Empyrean legs may have 10 less Magic Evasion (this is best-in-slot for that single stat), but they also have -13% Damage Taken. Easy choice for idle sets. | |

|
Best-in-slot for string skill for Horde Lullaby II AoE. If you don't need the points here or care about that at all, you can leave this at +1 for the augment. Augment extends the duration of Nightingale to match the body enhancing Troubadour duration. Don't let your bird finish early! | |


Empyrean
The first step of reforging your Empyrean Armor to +1 is best done through the use of Kupon I-Seal from the Additional Seal Battlefield Spoils Campaign.
Trust me, it's significantly better than farming Abyssea - which you'll still need to do go from +1 to i109 barring a lot of ![]() Sacred Kindred's Crests spent during the Macrocosmic Orb Campaign.
Sacred Kindred's Crests spent during the Macrocosmic Orb Campaign.

From there, a full set of +3 costs 400,000 Gallimaufry, 5 ![]() Ra'Kaznar Sapphires, and 5
Ra'Kaznar Sapphires, and 5 ![]() Ra'Kaznar Starstones, all from Sortie.
Ra'Kaznar Starstones, all from Sortie.


When fully reforged, Bard Empyrean +3 (like most jobs' Empyrean +3 sets) is great. All five pieces are useful, though some more so than others.
Highlights include bonuses to Madrigal, Minuet, and March, and a whopping -35% Damage Taken across three pieces.
The set bonus, cryptically written as "Augments Songs", makes your buffing songs also give a base stat boost determined by the song's element. It's nice, but not what you're here for.
| Fili Attire Set +3 | ||
|---|---|---|
| Item Image | Additional Notes | |
|
Madrigal bonus is excellent, and the highest -Damage Taken you can get in this slot is just as good. While you may prefer | |

|
Minuet bonus is great. Song duration bonus in the body slot is even better, and unique to this piece. | |
|
The March bonus on this enables a single Bard to cap Magic Haste with These also have the highest Damage Taken in this slot, by quite a lot. | |

|
Ballad bonus is nice, but costs you the song duration from Not to sound like a broken record, but these have the highest Damage Taken in their slot, too, beating | |

|
Scherzo bonus is meh and Movement Speed can come from You may think I'm going to say, "they can't all be gems", but these absolutely blow every other Fast Cast option in the foot slot out of the water. They have more than double the next best option ( | |


Accessories
The old Abyssea sub-level-99 accessories are functional but quickly outclassed by "real" Fast Cast gear. Grab them if you want them, but don't expect to use them forever:


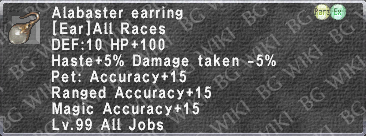
The Sortie earring for Bard looks like it has mediocre raw stats for an already-mastered Bard:
But its guaranteed NQ augment is Magic Accuracy - making it best-in-slot for debuff songs even at the minimum value of +6 - and its +1 augment is -Damage Taken. Hang onto the best one you manage to open.
The real winner for this section, as for every job, is Ambuscade Capes (plural):

While the base stats are unexciting, the various augments make a properly customized cape the best in slot for basically any purpose. Note that, while "Ex" (untradable), they are not rare - you can have as many as you want! And you'll want many. In roughly this order:
1) A cape to wear while engaged for dealing damage.
 Abdhaljs Thread: 20 DEX (Recall that 1 point of Dexterity translates directly to 1 point of Accuracy.)
 Abdhaljs Dust: 20 Accuracy + Attack
 Abdhaljs Sap: 10 Store TP or 10 Double Attack (You can also put 10 Dual Wield on this when starting out, and use an
  Abdhaljs Needle to change it later.)
 Abdhaljs Dye: 10 DEX (That's 10 more Accuracy.)
 Abdhaljs Resin: 5 Damage Taken (or 10 Physical Damage Taken, which is more valuable than MDT thanks to Shell giving direct MDT, unlike Protect which does not give PDT)


2) A cape to wear while using your preferred Weapon Skill.
First, pick your favorite Weapon Skill, and go to its page on this wiki. Using Wasp Sting as an example: its "Stat Modifier" is "100% DEX". This stat modifier is one of the strongest determinants of weaponskill damage. You should always pump the appropriate stat as high as possible for maximum damage! Therefore, a "Wasp Sting cape" should look something like this:
- Abdhaljs Thread: 20 DEX (While this gives accuracy, the goal here is solely to boost damage.)
- Abdhaljs Dust: 20 Accuracy + Attack
- Abdhaljs Sap: 10 Weapon Skill Damage
- Abdhaljs Dye: 10 DEX
- Abdhaljs Resin: 5 Damage Taken (or 10 PDT, as above. It's not uncommon to get hit while in your weaponskill set, and Resin doesn't give offensive stats so there's no tradeoff here.)
3) A cape to wear while singing. You can use this as your Fast Cast cape as well, without sacrificing anything:
- Abdhaljs Thread: 20 CHR (This affects Magic Accuracy for songs.)
- Abdhaljs Dust: 20 Magic Accuracy + Magic Damage
- Abdhaljs Sap: 10 Fast Cast is the most critical stat here.
- Abdhaljs Dye: 10 Magic Accuracy
- Abdhaljs Resin: 5 Damage Taken (see above notes again)
4) A cape to wear while idle, if it's not your singing cape. This can be a place to tweak your Damage Taken to hit 50% PDT/MDT, or for more Magic Evasion... or, honestly, I just use my singing cape. Inventory space is too precious!
5) Any number of additional weapon skill capes as desired.
- Typically Savage Blade, Rudra's Storm, Mordant Rime, and/or Exenterator.
- These are similar to the previous WS cape, but with different primary stats on them.
You can completely ignore the Reive-dropped ![]() Rhapsode's Cape.
Rhapsode's Cape.
It loses in every augment to just making another ![]() Intarabus's Cape.
Intarabus's Cape.

Equipment Sets
Engaged (TP)
Well-established Bards can have a TP set to put them on par with other support/damage dealer hybrid jobs, making them a valuable contributor to total party damage.
Brand new Bards... won't. Without the top end options, Bard is not much of a damage dealer. That said, there are options that will at least let you solo the occasional NM for drops, and you do bring your own powerful buffs.
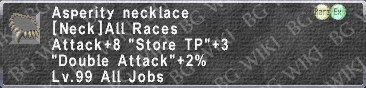
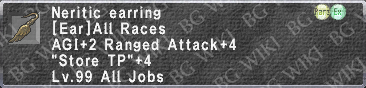
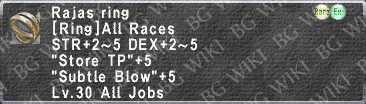
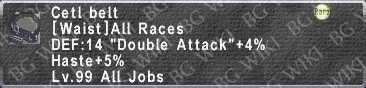
Generally, Bard's biggest problem is getting to 1,000 TP. With Madrigal you'll have reasonable Attack. With March, you'll be capped on Magic Haste. But unlike COR's Samurai Roll and Fighter's Roll, Bards can't increase TP gained per autoattack. Bard melee gear should focus on Double Attack/Triple Attack/Quadruple Attack and Store TP to try to remedy this.
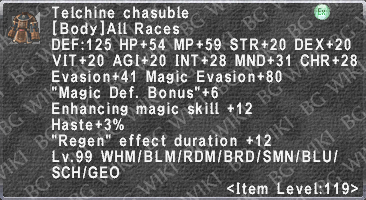
There are a few augment-based workarounds for Bard's total lack of good midrange TPing gear:
- The customizable augments on the
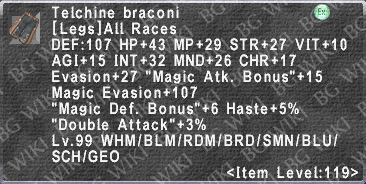
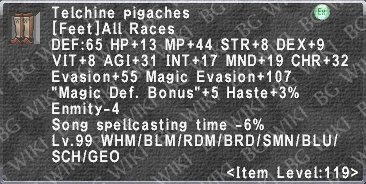
 Telchine Attire Set lets you augment melee stats onto not-very-melee-focused gear.
- Our old friend
 Linos can take even better melee augments, and is best in slot for that purpose forever.
- Our old friend
- Similarly (though not used in these gearsets), the random daily
 Dark Matter Augments available from Oseem in Norg can turn the
  Chironic Armor Set into serviceable melee pieces.
- These augments are totally random. And I do mean totally random. Far too random to categorize and rely on in these sets.


Edit December 10, 2025: With the addition of the new Limbus armor set, Bards are going to have better midrange TP options... but it's all crafted, and we can't even farm up the materials on patch day.
This section won't be updated to include those for a few months until NQ/HQ1/HQ2 gear supply (and prices) stabilize and augment details are known.
Edit December 14: Augments are better than the actual set. The BiS set below will definitely change, if the NQ's cheap enough it's a midrange option, wait for actual supply and we'll see.


Weapon Skills
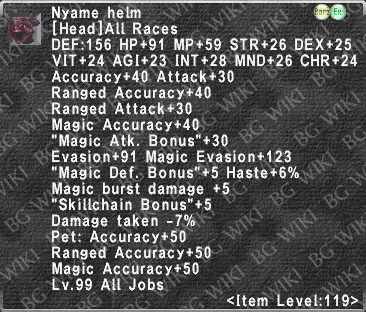
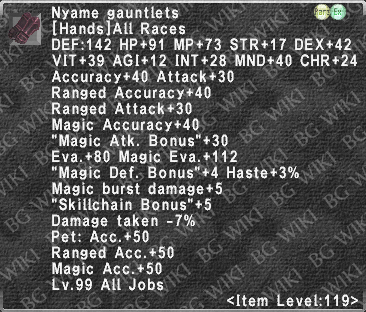
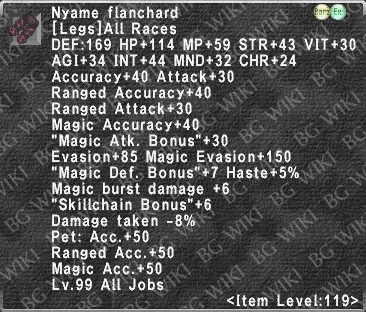
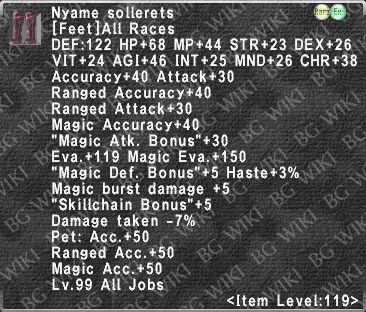
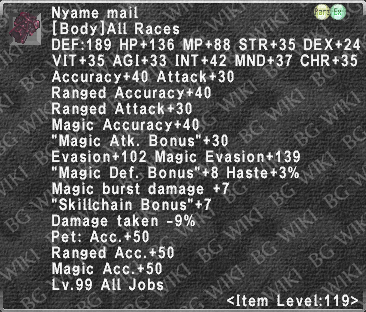
Bard is in the same boat as most other light armor jobs for WS sets: the ![]() Nyame Armor Set fixed everything, providing high Weapon Skill Damage augments and a bunch of raw stats. There's also the obligatory reforged piece,
Nyame Armor Set fixed everything, providing high Weapon Skill Damage augments and a bunch of raw stats. There's also the obligatory reforged piece, ![]() Bihu Justaucorps +4, that's superior. (And like most similar jobs, there's only one of those pieces that beats Nyame.)
Bihu Justaucorps +4, that's superior. (And like most similar jobs, there's only one of those pieces that beats Nyame.)
Before you have access to Nyame augments, there's not a lot of good Weaponskill gear, but there's a few things to farm up:
- The easiest win is a good
 Ambuscade cape.
- See the notes in the "JSE Gear" section above for some details - generally, it's relevant primary stat, Attack, and Weapon Skill Damage ("WSD").
- Pick up another set of Telchine Attire and augment them with WSD, Attack, and Double Attack.
- Don't waste effort chasing WSD Dark Matter Augments on the Chironic Armor Set. Nyame's not that hard to get.
- Don't waste effort chasing WSD
- Completing the various Magian Dagger Trials on the "TP Bonus Path" (ending with Trial 3201) creates a Centovente with TP Bonus +1000.
- Unlike almost all other weapon augments, the augments on these Magian Trial weapons do function in the offhand
- Dual Wielding this Centovente will be an enormous boost to Savage Blade damage, and thus your total DPS, in any content where you don't need to worry about Accuracy.
- Even the humble Kaja Knife gains 242 accuracy from its "Dagger skill +242" that any Centovente is completely lacking. If you can't hit the enemy, use an item level offhand!
- Even the humble
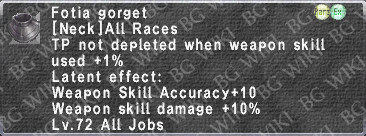
- While
 Fotia Gorget and
  Fotia Belt are not relevant for every WS, they're never going to go out of style.
- Farm up the eight subcomponents of each, then shout for Synergy help (or learn this opaque subsystem yourself for this single purpose) to get them assembled.


|


Fast Cast
The Fast Cast cap is 80. Having it capped will give you 80% faster casts and 40% faster recast time. (Going over 80 does not further decrease recast times!)
Gear that gives "Song Spellcasting Time" reduction, like ![]() Fili Calot +1, gives you faster casts but not recast reduction.
Fili Calot +1, gives you faster casts but not recast reduction.
Therefore, the optimal set has 80 actual "Fast Cast", but you can make up any shortfall with Song Spellcasting Time.

|


Singing
Bard is unique in having multiple Magic Skills that simultaneously apply to a single action.
Everything you sing is affected by Singing Skill, and the type of instrument you have equipped determines whether you add your Wind Skill or your String Skill to that.
This means that Bard effectively benefits twice from some systems - receiving twice as many Merit Point skill boosts, 2 points per Master Level rather than 1, and so on.
The song with the highest skill cap is ![]() Honor March, which caps at a total skill of 900.
Honor March, which caps at a total skill of 900.
A Bard with 2100 Job Points and 8/8 skill merits has 425 in both Singing and Wind Instrument skills for a total of 850.
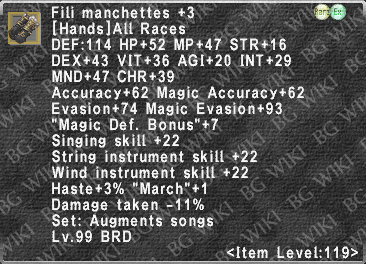
Add another 22+22 from ![]() Fili Manchettes +3 (worn for the March +1 bonus anyway) to reach 894.
Fili Manchettes +3 (worn for the March +1 bonus anyway) to reach 894.
A Master Level 3 Bard will have 900 skill with those two items equipped and every other gear slot empty.
Once you have even 3 MLs, you never have to worry about wearing skill gear specifically to hit caps. (There's one special case - see the Horde Lullaby II sets below.)

Since skills are not a consideration when gearing, song sets look a little different than most casting jobs' sets. There are some general priorities:
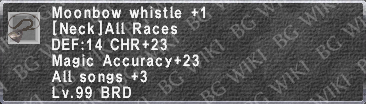
- Song+ effects. These are the rarest and the highest-impact bonuses. If you can be wearing a song+ piece, you should be. This is why
 Moonbow Whistle +1 is so good. (And so expensive.)
 - Song effect duration. This may seem like just quality of life (less total time spent singing), but Soul Voice and Marcato buff songs in a way nothing else can duplicate. Extending the duration of those songs means you're getting more total benefit.
- Song accuracy. (For debuffs only.) Accuracy is determined by CHR, Singing and Instrument skills, and Magic Accuracy. The relative values of these four are debated, but wear more of all four and your debuffs will land more often.
- The
 Fili Attire Set bonus makes your buff songs also give additional primary stats. (For buffs only.) While the buff is small, it's a tiebreaker in any slots that wouldn't otherwise be specifically occupied.

Beyond that, put -Damage Taken or Magic Evasion in unused slots, because you can always get caught in an AoE in midcast gear.
Song+ Effects
Generally, +1 to a Song type will give both +10% duration (additive) and either a boost to Magic Accuracy (for debuffs) or a boost to the stats granted (for buffs).
- Some songs only get one or the other - for example, the Reraise effect from Goddess's Hymnus can't really get a numeric boost, so it only gets duration.
Two equipment slots have "All Songs" equipment, which you want to wear for basically every song unless there's a specific reason you can't:
- Gjallarhorn and
 Loughnashade give +4 to all songs.
- Until you have either, use a Linos augmented with Snowdim Stones for a total of +3 to all songs.
- Until you have either, use a
- Moonbow Whistle +1 also gives +3 to all songs.
- The NQ
 Moonbow Whistle only gives +2, but is typically substantially cheaper. Consider buying one if you're short on gil, then reselling it when you get the HQ.
- The NQ

As of 2025, there are currently no other "All Songs" items, but other pieces have boosts to specific song types:
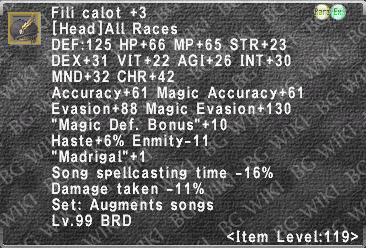
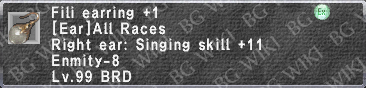
- Fili Calot +3 gives +1 to Madrigal.
 Fili Hongreline +3 gives +1 to Minuet.
 Fili Manchettes +3 gives +1 to March.
 Fili Rhingrave +3 gives +1 to Ballad.
 Fili Cothurnes +3 gives +1 to Scherzo.
 Brioso Cuffs +4 gives +2 to Lullaby.
 Mousai Turban +1 gives +2 to Etude.
 Mousai Manteel +1 gives +2 to Threnody.
 Mousai Gages +1 gives +2 to Carol.
 Mousai Seraweels +1 gives +2 to Minne.
 Mousai Crackows +1 gives +2 to Mambo.
- Intarabus's Cape gives +1 to Madrigal and +1 to Prelude.


Always wear these when casting the appropriate song
- ...except Fili Rhingrave +3 / Mousai Seraweels +1, which require sacrificing the duration bonus from
 Inyanga Shalwar +2. Be careful when putting these in your sets.
 - Absolutely still wear them, just be aware that your Ballads/Minnes will lose 7% duration relative to your other songs, so be careful with song overwriting!
Song Duration
The second most relevant thing you can be doing for buffs. It's great for debuffs too, but it's more important to land the debuff than have it last forever, so prioritize accordingly depending on your target's level and stats.
|

Song Accuracy
Song accuracy is determined by the singer's CHR, Magic Accuracy, Singing skill, and Instrument skill corresponding to the instrument they're playing. The relative value of these four is not entirely nailed down, but wear as much as possible of all of them and you can't go wrong.
|


Horde Lullaby II
Horde Lullaby II has a unique AoE: circular, centered on the caster, with radius determined by the caster's String Instrument skill (but not Singing) at cast time.
Its radius increases by 1 yalm at fixed skill breakpoints of 405, 486, 567, and 648 String skill.
FFXI is a wonky game and I personally never want to rely on mobs being a specific distance from me. So I advocate aiming for the highest realistic breakpoint, the 567 String skill breakpoint.
As of December 2025, 648 requires sacrificing both ![]() Moonbow Whistle +1 and
Moonbow Whistle +1 and ![]() Brioso Cuffs +4.
Brioso Cuffs +4.
Even 567 requires a combination of giving up ![]() Brioso Cuffs +4, having high Mastery Levels, or a few pieces of old gear that impact your overall Magic Accuracy.
Brioso Cuffs +4, having high Mastery Levels, or a few pieces of old gear that impact your overall Magic Accuracy.
Honestly, if you're not sweaty tryharding it, you won't notice the difference between 6 yalms and 7 yalms very often. Just wear your normal MAcc set, plus ![]() Brioso Cuffs +4 for Lullaby +2, and call it a day. But if you care, here you go:
Brioso Cuffs +4 for Lullaby +2, and call it a day. But if you care, here you go:
|


Healing
The potency of Cure spells is determined by the caster's MND/VIT/Healing Magic Skill and subject to both soft and hard caps. This doesn't leave a lot of room for player intervention (other than capping your Healing skill).
What you do have control over are the multiplicative bonuses from the "Cure Potency" and "Cure Potency II" stats, which cap at 50%/30% respectively. (See Cure Potency and Cure Formula for full information.)
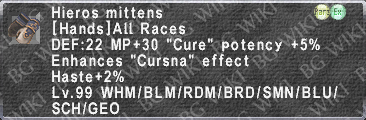
Bard has access to one of the best Cure Potency items in the game, ![]() Daybreak.
Daybreak.
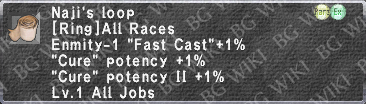
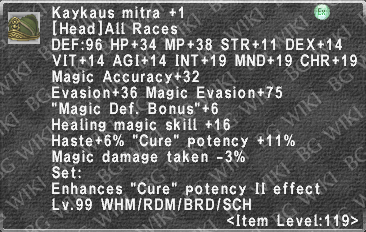
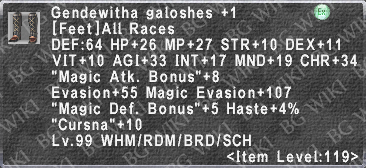
Its only sources of Cure Potency II are the set bonus on the ![]() Kaykaus Attire Set +1 and
Kaykaus Attire Set +1 and ![]() Naji's Loop.
Naji's Loop.
Conveniently, any two pieces of the ![]() Kaykaus Attire Set +1 combined with
Kaykaus Attire Set +1 combined with ![]() Daybreak will cap Cure Potency.
Daybreak will cap Cure Potency.


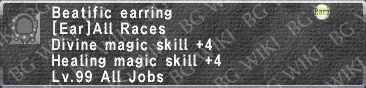
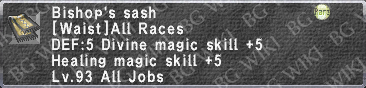
The only other White Magic spell to gear for is Cursna. Since Doom puts a fast clock on someone's lifespan, boosting your success rate matters!
The success rate of Cursna increases with your Healing Magic Skill, which is very low when it's only from your subjob. Therefore, multiplicative increases to Cursna sucess rate from gear aren't as helpful as for a main-job healer, but still good.
When Doomed yourself, equip "Cursna received" or "Enhances Holy Water" gear.
|


Pulling
Requiem has a 20' range.
Pulling set should have -50 DT, then optimize Evasion/Magic Evasion after that.
Idle
In general, your idle set should first aim for -50% Damage Taken, then some combination of Magic Evasion/Elemental Resistance, Status ailment resistance, and Regen or Refresh.
Magic Evasion is more valuable than Physical Evasion, because the worst outcomes are getting slept, petrified, or one-shot - and that's usually via a magic AoE or conal.
A few things to know:
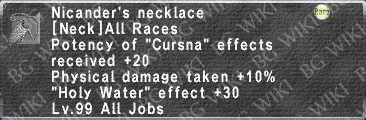
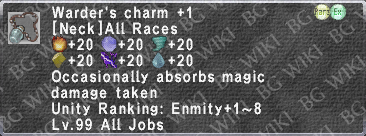
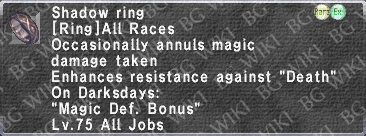
- There are two pieces with a chance to outright nullify magic damage (
 Warder's Charm +1 and
  Shadow Ring). These are valuable once you've hit the DT cap, as an additional layer of protection.
- The Ring's twin for physical nullification is
 Shadow Mantle, which you should never wear because Intarabus's Cape exists.
- The Ring's twin for physical nullification is
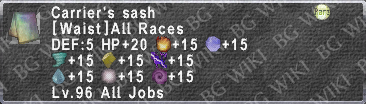
- Having nonzero positive Elemental Resistance unlocks an additional beneficial "resist tier", giving you a chance to take 1/8 damage from an elementally aligned attack.
- With zero resistance, you can't take less than 1/4. With negative resistance, you can't take less than 1/2.
- This means the first point of resistance to each element is disproportionately valuable. Consider
 Carrier's Sash even if you're already wearing Warder's Charm +1.
- Bard should avoid
 Staunch Tathlum +1. Wear an inferior Linos instead to avoid losing TP on swaps.
 - Bard's only idle Regain piece is
 Null Masque.
 - Shell V provides -29% Magic Damage Taken. Since the caps are -50% Physical Damage Taken and -50% Magic Damage Taken, you only "have" to wear -21% MDT to cap if you can rely on having Shell up.
- This is why you often see -10% PDT over -5% DT on Intarabus's Cape.
- As a coward and an inveterate min-maxer, I personally aim for 50 MDT as well, just in case. This is not necessary, but feel free to join me.
- This is why you often see -10% PDT over -5% DT on


|


Miscellaneous
Don't be tricked into wasting precious inventory space on gear aimed at any of:
- Waltz potency
- Elemental Magic damage
- If you need raw damage for low-end content, Naegling and the
 Nyame Armor Set /
  Bunzi's Attire Set you have for other purposes will do.
- If you need raw damage for low-end content,
- Enfeebling Magic (non-Song) duration
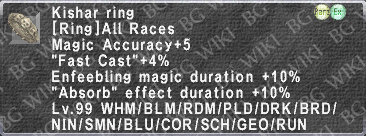
- ...okay, you have the
 Kishar Ring for Fast Cast anyway.
- ...okay, you have the
- Dark Magic
- You literally don't get anything but Drain, Aspir, and Klimaform from /SCH. Don't bother.
- If /BLM or /DRK for Stun, use Magic Accuracy.
- Special note for /DRK strategies for Aminon/Sheol Gaol: Absorb-TP is unaffected by everything except
 Erra Pendant and
  Heathen's Gauntlets +3, neither of which Bard can wear. Sorry!
- Divine Magic
- Banish II is great to cast every 30 seconds against Undead - especially in Apollyon! - but don't bother with
 Fenian Ring and so on.
- Banish II is great to cast every 30 seconds against Undead - especially in Apollyon! - but don't bother with


Playability
- Casting dummy songs and using Clarion Call
Gearswap notes
Changing weapons sets your TP to zero. However, this is not always true with Instruments, and knowing the exact nuances will help you not shoot yourself in the foot:
- You keep your TP when you:
- Go from "nothing in either of the two Ranged/Ammo slots" to an Instrument.
- Go from "nothing in either of the two Ranged/Ammo slots" to an Ammo.
- Unequip an Ammo.
- But you lose your TP when you:
- Unequip an Instrument (emptying out your "Ranged" slot)
- Equip a Ranged Weapon (like a Bow)
- Unequip a Ranged Weapon (emptying out your "Ranged" slot)
- Macro examples
- TBD
Summary
"haha Bard go doot"
