The Voracious Resurgence | |
| Prime Weapons • Ultimate Weapons • Ultimate Augments • Abjurations iL119 • JSE Necks • Divergence Augments • Escutcheons | |
| Reforged Armor Artifact: +1 • iL109 • iL119/+2/+3/+4 Relic: +1/+2 • iL109 • iL119/+2/+3/+4 Empyrean: +1/+2 • iL109 • iL119/+2/+3 |
Guides • Crafting • Trusts • Apex Monsters |
User:Dumo/RUN

Introduction
I'm not going to claim to hold all the secrets to Rune Fencer. I won't claim to be the most knowledgeable or greatest player. I have however tanked just about everything I can in the game. The current community guide is a mess and I would rather do something very different than attempt to fix it and deal with all the other people who have contributed. So, here we are. This is my guide to Rune Fencer. I hope it helps.
If you have any comments or questions, you can reach out to me in discord if you have access to me. Otherwise, please use the Discussion tab.
General
The info this section will cover is in the table of contents. I guess I could leave you with a quite...
"Feeling Spicy. Might delete later."
Role
RUN is a tank specializing in magic evasion, evasion and parrying as the main source of damage mitigation. It doesn’t have the raw defensive capabilities and healing of PLD but it does have Rayke and Gambit to buff mages in fights. This makes it highly desirable in Sortie for magic bursting strategies. In most content, RUN and PLD are interchangeable. When the differences matter, you take RUN for mage strategies for the buffs.
When do you bring RUN specifically?
- When magic evasion matters and resisting certain status effects.
- When you need your tank to do extra damage.
When do you bench the RUN in favour of PLD?
- When AoE cures are needed from your tank.
- When a 100% block rate negates mechanics in a fight.
- When the physical damage is too high for your RUN to tank.
Again, properly geared, RUN and PLD can be interchangeable in most content.
- All current Alliance Content.
- Segments in Odyssey.
- Most NMs in Odyssey.
Tanking
Tanking is holding the monsters attention. This involves surviving while mitigating as much damage and bad effects as possible but also generating enough Enmity to stay ahead of the rest of the party.
Tanking on RUN comes in a few different flavours. You have different needs when tanking for Mage strategies, Melee strategies, AoE Tanking and Super Tanking.
Tanking for Mage strategies is generally much easier. A SCH making Skillchains and everyone Magic Bursting generates a lot less Enmity than Weapon Skills. Any big fights will involve the use of Rayke and Gambit which generate a lot of Enmity while debuffing the monster. Depending on the content, this will be all you are using. A fight like Ongo, for instance, will require you to hold all other job abilities at times so a COR can try to target your Rayke and Gambit for a reset. Often you will be operating with just Flash and Foil for your Enmity generation. In Sortie, you have more options since the fights generally don’t last long enough to bother fishing for a reset. If you need to, something has gone horribly wrong.
Tanking for physical groups will depend on content and setup. Unfortunately many groups ignore buffing their tanks. If you are lucky, you will get a RDM in party with you for Haste, Refresh and a longer Phalanx. If you aren’t buffed for damage, don’t bother trying to deal damage, just come /BLU and spam your Enmity spells. The nice thing is that you can generally hold a fair number of monsters. In Dynamis, it’s common for a BRD to be sleeping everything and common to have a THF trying to tag everything with Treasure Hunter. Since you want to keep these players alive, you will want to use your BLU spells to tag everything to be on your hate list and hold them. This should prevent things from killing your alliance members when they wake up.
The other option when tanking large groups of monsters is to Super Tank them. If you have not taken an action on a monster and it is attacking you, no spells cast on you will generate Enmity on that monster. This means aggroing a group of 10 monsters via sight or sound and performing no actions on them allows you to hold the group while a healer keeps you alive with no risk of being attacked.
Mitigation
The first key component to tanking is your mitigation which consists of preventing damage and dangerous effects. RUN handles mitigation by building up layers of defences.
I want to explain the Damage Taken (DT) stat from your gear. This stat is split into 3 types: Physical Damage Taken (PDT), Magic Damage Taken (MDT) and Breath Damage Taken (BDT). The general “Damage Taken” stat will contain all 3. They all have a cap of 50%. 25 DT and 25 PDT will cap your Physical Damage Taken while giving you half of the cap for Magic Damage Taken and Breath Damage Taken. We also get a limited amount of Physical Damage Taken II (PDT2). This extends the limit of our PDT while also providing that PDT.
Another key component to mitigating physical damage comes from the very basic VIT and DEF stats. You can dig deeper into the stats and the damage formulas if you want. The damage formula works both for and against the player so pay attention to things like pDIF and fSTR. One compares attack to defence while the other compares Strength to Vitality. When pDIF and fSTR are favourable to the attacker, the damage will rapidly increase. When pDIF and fSTR are favourable to the defender, the damage will rapidly decrease. Protect and Cocoon are the largest buffs to help increase your defence.
We can further build layers up using our Evasion, Magic Evasion and Magic Defense Bonus. This includes our Rune Enchantments which we can use for things like Pflug, Valiance and Liement. We also have parry coming in from Inquartata and enhanced via Battuta which negates incoming physical damage.
I’m giving an extra mention to Phalanx in hopes that readers don’t miss this important piece of the puzzle. It reduces a set amount of damage based on the potency of the spell and gear. Typically, you will want to put on your Phalanx set and have a RDM or SCH give you a longer Phalanx than you can cast on yourself. If that’s not an option, you just gotta keep it up on yourself. It is very important to your survival. Don’t overlook it.
- Phalanx+ on armour is Phalanx Received.
The other layers will be covered when discussing the sets with them. Ideally, you put up as many layers as possible. If you hit caps on one layer, add a new one. Are you at DT cap? Have enough DEF? Consider more Evasion or start adding in Absorb/Nullify damage pieces!
Enmity
The second key component to tanking is Enmity. I’m going to try to simplify here but for a proper understanding, go to the Enmity Page. It’s a major part of the job so the more you understand the better you can perform.
- Enmity is what decides who the monster will be targeting at any given time.
- Enmity is generated by nearly all actions taken including, Spells, Job Abilities, Cures and Damage. It also comes in 2 flavours which are separated in the way they decay.
- Cumulative Enmity (CE) decays when you take damage from the monster or are the target of an enfeebling spell.
- Has a cap of 30,000.
- The enmity is lost even when fully resisting the enfeeble.
- Volatile Enmity (VE) simply decays over time.
- Has a cap of 30,000.
- Total Enmity is the combined total and therefor has a combined cap of 60,000.
- Cumulative Enmity (CE) decays when you take damage from the monster or are the target of an enfeebling spell.
- When 2 players share the same enmity amount, the last to perform an action will be the target of the monster.
- This can often come up during long fights when enmity hits the cap.
Enmity Tables
| RUN Enmity Table | ||
|---|---|---|
| Ability | CE | VE |
| Elemental Sforzo | 1800 | 7200 |
| Odyllic Subterfuge | 1 | 318 |
| Rune Enchantments | 0 | 0 |
| Vallation | 450 | 900 |
| Valiance1 | 4501 | 9001 |
| Pflug | 450 | 900 |
| Liement2 | 4502 | 9002 |
| Battuta | 450 | 900 |
| Rayke | 640 | 1260 |
| Gambit | 640 | 1280 |
| Swordplay | 160 | 320 |
| Embolden | 160 | 320 |
| One for All1 | 1601 | 3201 |
| Swipe | Damage Based | Damage Based |
| Lunge | Damage Based | Damage Based |
| Vivacious Pulse | Unknown | Unknown |
| Spell | CE | VE |
| Flash | 180 | 1280 |
| Foil | 320 | 880 |
| /DRK Enmity Table | ||
|---|---|---|
| Ability | CE | VE |
| Last Resort | 0 | 1280 |
| Weapon Bash | 0 | 900 |
| Souleater | 0 | 1280 |
| /DRK Spells | CE | VE |
| Absorb-Stat | 1 | 640 |
| Absorb-TP | 320 | 320 |
| Stun | 180 | 1280 |
| Poison(2) | 1 | 320 |
| Poisonga | 1 | 320 |
| Sleep(2) | 1 | 300 |
| /BLU Enmity Table | ||
|---|---|---|
| Ability | CE | VE |
| Burst Affinity | 1 | 300 |
| Chain Affinity | 1 | 300 |
| /BLU Spells | CE | VE |
| Blank Gaze | 320 | 320 |
| Jettatura | 180 | 1020 |
| Sheep Song | 320 | 320 |
| Stinking Gas | 320 | 320 |
| Geist Wall | 320 | 320 |
| Soporific | 320 | 320 |
| Cold Wave | 320 | 320 |
| Frightful Roar | 1 | 320 |
| /WAR Enmity Table | ||
|---|---|---|
| Ability | CE | VE |
| Provoke | 1 | 1800 |
| Warcry1 | 01 | 3201 |
| Berserk | 0 | 80 |
| Defender | 0 | 80 |
| Aggressor | 0 | 80 |
1 AoE effect and Enmity is per player affected.
2 Single target unless Epeolatry equipped. When AoE, Enmity is per player affected.
- All Bar Spells have Enmity values of 1 CE and 300 VE.
- Poisonga and Frightful Roar are not meant to hold Enmity but to tag monsters to be on their Enmity list.
One massive source of enmity that is going to give you headaches is physical damage. You can check the Enmity page for the actual calculations but quite simply, you aren’t holding a monster when the DDs are popping weapon skills for capped damage every 4 seconds. Your spells and abilities just can’t generate Enmity that quickly. You can use your own damage to offset this difference but unfortunately few groups properly buff their tanks. Without buffs, your damage will be low enough that you should just spam spells.
Skill chains can work to your advantage. Being part of a skill chain allows you to generate Enmity from your damage while also slowing down the damage output of the DDs.
Magic damage works differently. Both magic bursting and magic weapon skills generate less Enmity and are much more forgiving to tank.
Tanking Types
- Single Target
- Holding a single monster and keeping your Enmity ahead of the other party/alliance members.
- AOE Tanking
- Holding multiple monsters at once. For this, you need to act on all of the monsters so you can generate Enmity on them. We often refer to this as a tag and we will have to use our subjob tools to AoE tag. Poisonga and Geist Wall are some options used. From there, anything that is self targeting will generate enmity against all of the targets. Foil and Pflug are some wonderful options.
Note: Rune Enchantments do not generate Enmity.
- Holding multiple monsters at once. For this, you need to act on all of the monsters so you can generate Enmity on them. We often refer to this as a tag and we will have to use our subjob tools to AoE tag. Poisonga and Geist Wall are some options used. From there, anything that is self targeting will generate enmity against all of the targets. Foil and Pflug are some wonderful options.
- Super Tanking
- Simple aggro will have the monster target you but you will not be on the monsters list until you act upon them. This means that healers can Cure bomb you all they like without generating Enmity, preventing any risk to the healers. This also means that anyone acting on monster(s) will be the first on the Enmity list and the target of that monster.
- This is excellent for content like Odyssey where you are pulling for a BRD to sleep the group. You can gather groups of monsters, have them slept and run off to gather more.
Some important things to know, each spell and most job abilities have a set amount of Enmity they generate. Runes do not generate any Enmity but pretty much everything else has a set amount of CE and VE they produce and our gear can amplify those numbers. Enmity+ on gear is a percentage. Enmity+1 adds 1% more Enmity to the action. This caps at 200 but we can’t currently hit the cap so there is no need to worry about going over the cap. We also have the Erilaz Surcoat +3 which decreases the CE lost while taking damage.
Tanking Tips
- Know when you need to actively stay ahead on the Enmity list. Know when you just need to keep monsters away from the mages.
- Divergence typically doesn’t require you to tank against the DDs for most monsters. Only the NMs. The hoard of monsters just needs to be looking at you when they aren’t actively being killed by the DDs. The exception will be when the group is at a lower level of gearing. If the majority of your DDs have DT in their TP sets, you won’t need to fight for Enmity against them and you can focus on pulling quickly.
- If the monsters aren’t being slept or tagged with Treasure Hunter, you are better off Super Tanking them.
- When tanking Physical Strategies against the DDs, you want to start by spiking your Enmity early. Often I will open with,
- When tanking for Magic Bursting Strategies I typically,
- Some bursting strategies like Ongo, involve the use of Rayke and Gambit as the only Job Abilities to start so you can target them directly with Random Deal. After Random, you can pop anything you need before the Wild Card then only Rayke and Gambit again for the next possible Random Deal.
- Make sure you know if your Runes are going to be used offensively or defensively. Set them accordingly.
- If you don’t have much support for Refresh and MP is a concern, using Tenebrae for MP returned during Vivacious Pulse will work. This will not be an option against actually difficult content where you need the Runes to prevent nasty status ailments.
- There are many times where you will be acting more as a Puller than a tank.
- Dynamis - Divergence will often have you pulling until the NMs when you will tank against the DDs.
- Omen in groups typically has you pulling a full family or a full floor.
- Once slept, you either AoE tag and tank them or you help with objectives or killing the monsters.
- Odyssey Segment farms will see you as a puller until there is a family too dangerous to let the DDs take hits or the monsters cannot be slept.
Job Abilities
Job Abilities do not have a casting or usage time for activation. For this reason, we have 2 basic things to consider for JA specific sets.
- What affects the Ability on activation.
- What affects the Ability during the duration.
Anything that will affect a Job Ability on activation is a Precast. Anything that affects the Job Ability during the duration is just an overlay. They are not a Midcast because a Midcast is something that is worn when a spell resolves.
- As a tank, a LOT of our Job Abilities are used to generate Enmity.
- Most of our sets will be a form of Enmity set with any possibly helpful pieces in their slots.
- Anything worn for the duration of the ability will be mentioned but sets will not be provided in this section.
- The Job Abilities that have armour for the duration of the abilities are,
- Pflug - we don't typically use the piece.
- Embolden - The piece is used in conjunction with a buff received set.
- Battuta - The set involved will be for Parry Based Tanking and covered in that section.
- Swordplay - The piece is Precast then can be worn to gain the Augment effect but we don't typically put merits in that category.
- The Job Abilities that have armour for the duration of the abilities are,
Rune Enhancements
You can’t discuss RUN without discussing the Rune Enhancements.
- You can have 3 up at any given time.
- You can stack 3 of the same elements or mix them up.
- Your Runes can be used defensively or offensively.
Defensively,
- Each Rune gives 54 elemental resistance.
- Though merits and job points, the resistance can be pushed to 84 per Rune for 252 total resistance.
- Some abilities require Runes harboured to activate.
- Vivacious Pulse - Stat mod and potency for HP(or MP) recovered based on Runes harboured.
- The effects of the Ward abilities are affected by the Runes harboured.
Offensively,
- Has an Additional Effect Damage on melee strikes of the Element which the Rune is offensively aligned.
- The damage is based on your main hand weapons unmodified DPS and is not affected by haste, dual wield or martial arts.
- See the Rune page for more details on calculations as well as the interaction with DW and MA.
- Damage does scale with more of the same Rune active.
- Day/Weather does affect damage.
- Elemental Affinity does affect damage.
- MAB does not affect damage.
- RUN main job or sub job does not change damage other than maximum Rune count.
- The element used is either the most abundant Rune or, if using unique Runes, the newest Rune used.
- Runes can be expended through Effusion type abilities.
- Lunge - Expends all Runes harboured. Damage of the element of Runes expended.
- Swipe - Expends one Rune harboured. Damage of the element of Rune expended.
- Gambit - Expends all Runes harboured. Reduces an enemy's elemental defence. The types of elemental defence reduced depend on the Runes you harbour.
- Rayke - Expends all Runes harboured. Reduces an enemy's resistance ranks 1 step for each element of the Runes expended.
Enmity and Gear Swaps,
- Generates 0 Enmity.
- No gear that affects the job ability or the effects of the Runes.
- This means Runes can be activated through the menu without being hindered or taking up macro space!
- The in game menu will show the Runes Offensive alignment.
- If you do not remember which element is the Defensive alignment,
| Rune Association | |||
|---|---|---|---|
| Rune | Resist | Offence | Debuff Association |
| Ignis | Paralyze, Bind, Frost, Evasion Down | ||
| Gelus | Gravity, Silence, Choke, and Defense Down | ||
| Flabra | Slow, Petrify, Terror, Rasp, Accuracy Down | ||
| Tellus | Stun, Shock, Magic Defense Down | ||
| Sulpor | Poison, Drown, Attack Down | ||
| Unda | Plague, Amnesia, Addle, Burn, Magic Attack Down | ||
| Lux | Dark Sleeps, Bio, Blind, Dispel, Magic Evasion Down | ||
| Tenebrae | Charm, Certain Sleeps, Dia, Flash, Finale, Magic Accuracy Down | ||
You should know ahead of time how your Runes will be utilized.
- Bursting strategies will always want you to use your Runes for Rayke and Gambit.
- Many fights have nasty effects you are trying to mitigate.
- A3 Odyssey fights are elementally aligned.
Be prepared to change your defensive Runes if,
- An unexpected issue arises.
- You need to change to Tenebrae for the MP return from Vivacious Pulse.
Vallation, Valiance and Liement
These 3 Wards are grouped together because they share the same effect slot.
- Vallation and Valiance can not overwrite each other!
- You will have to let them ware off or manually click them off to use.
- Liement will overwrite Vallation and Valiance.
- Both give -15% SDT per Rune for the related elements.
- This can be pushed to -20% SDT per Rune through Merits.
- The term is multiplicative with MDT and passed the MDT cap.
- Stacking 3 of the same Runes can get us -60% SDT for that element.
- Can not overwrite each other and will need to ware off or be manually clicked off.
- Both use yourself as the target.
Vallation is a single target effect on you.
- 2 minute duration, 3 minute recast.
Valiance is an AoE effect of 14' from you.
- 3 minute duration, 5 minute recast.
Enmity and Gear Swaps
- Cumulative Enmity: 450, Volatile Enmity: 900
- The same armour affects both abilities even if only 1 is stated.
- Affected by the Runeist Coat line up and gains duration up to Runeist Coat +3.
- Duration +15~19 seconds.
- Affected by Ogma's Cape.
- Duration +15 seconds.
We will use our Enmity set with the Runeist Coat.
- Absorbs elemental damage based on the available Runes.
- 1 Rune = 100% Absorbed.
- 2 Runes = 115% Absorbed.
- 3 Runes = 130% Absorbed.
- Damage is calculated before Magic Damage Taken but after Magic Defense Bonus.
- Another great source of Enmity.
- Overwrites and prevents Vallation and Valiance.
- With Epeolatry, Liement becomes a 10' party-AOE.
- Furthering the possible Enmity spike.
- Uses yourself as a target.
Enmity and Gear Swaps
- Cumulative Enmity: 450, Volatile Enmity: 900
- Affected by Bidenhander.
- Increases duration by 3 seconds.
- Affected by Futhark Coat line up to Futhark Coat +4.
- Increases duration by 2~5 seconds.
- Affected by Epeolatry.
- Changes Liement to 10' AoE party buff.
We will use our Enmity set with the Futhark Coat.
We can add in Bidenhander when we are willing to do weapon swaps.
Using Epeolatry will make the Liement AoE while also adding gear Enmity.
Pflug
Pflug increases your resistance to status ailments by a base value of 15% per Defensive element of each Rune active at time of activation.
- This base value is reduced to 10% if subjob RUN.
- Resistances follow the Debuff Association table in the Rune Enhancements section.
- Generates a large amount of Enmity.
Enmity and Gear Swaps,
- Cumulative Enmity: 450, Volatile Enmity: 900
- The Pflug+X gear enhancement is applied during the status resist check (the resolution of the enemies action) rather than on the job ability activation.
- The equipment must be worn as the enemy's action is finishing for the bonus resistance to apply.
- It does not necessarily need to be worn during the job ability's activation at all.
The Pflug+ gear is not worth leaning into.
Use your Enmity Set.
Embolden
Embolden enhances the effects of the next Enhancing Magic spell you cast on you by 50%, but reduces effect duration by 50%.
- Job Points brings this to 70% potency.
- Embolden and Accession will only give the bonus to you.
- The potency enhancement is applied before buff gear enhancements like "Phalanx+".
- (base buff*embolden bonus)+gear bonuses.
One of the absolute best use cases for Embolden is Protect V.
- It's long duration means it will last through multiple Embolden phases.
- Helps with the Physical damage mitigation which is our weaker side.
- Protect V starts at 220 DEF and can be increased to 374 DEF with Embolden.
- Sheltered Ring or Brachyura Earring brings this to 384 DEF
Options for Embolden buffs,
- Protect V - the DEF covers for a struggle in general. Lasts multiple Emboldens so you can stack another buff.
- Barspells - the barspells line up really well with our Embolden timer and since we typically tank magic damage, this is a great option.
- Crusade - Enmity+30 becomes Enmity+51
- Regen V from a SCH. A 70% increase in Regen potency and a duration long enough to last most of the way back to Embolden again.
- Temper - it doesn't last very long but the Double Attack rate helpful for TP gain.
- Phalanx - from a RDM or SCH for the longer duration.
- This is a rare use case where the danger is very short lived.
- 70% bonus only applies to the skill based portion of the spell, not your Phalanx+
- At 500 skill, the 35 damage mitigated becomes 59.
- Can be used if you are struggling on the last floor halo in Odyssey since the danger decreases quickly as things are killed.
- You can't rely on this and will need to reapply Phalanx very quickly as it ends.
- Once the danger is over, you would want to manually click off Phalanx and reapply. You will not be able to overwrite the Embolden Phalanx.
Gear Swaps
Evasionist's Cape can be augmented with Embolden+5%~15%.
- This increases the duration of the spell received under Embolden.
- Evasionist's Cape must be worn at the time the spell is received.
- Does not have to be worn after the spell has been received.
Wear your Evasionist's Cape and any gear for the buff you are receiving.
Vivacious Pulse
Vivacious Pulse restores HP (or MP) based on current Runes and the base stat associated with those Runes.
- HP Restored = (10 + floor(Divine Skill ÷ 2 × (1 + [Vivacious Pulse Job Point %]) ) + floor(Stat1× 0.5) + floor(Stat2× 0.5) + floor(Stat3× 0.5) × (1 + [Dynamis Divergence RUN Weapon Augment %] )
- The Divine Magic Skill contribution to the formula equates to 3 HP for every 5 skill.
- It's not worth fighting for skill to increase your Vivacious Pulse but if you have the gear, you may as well use it.
- Morgelai does not help this part of the equation.
- The Stat portion of the formula is based on the Runes in each slot.
- Each Rune has a different base stat.
- If there is no Rune in that slot, the Stat is 0.
- See table below for stat association.
- Tenebrae does not have a base stat associated.
- It will recover less HP due to not having the base stat part of the formula.
- It will make up for this by recovering MP.
- MP Restored = floor(Divine Skill ÷ 10 × (1 + [Vivacious Pulse Job Point %]) ) × (Number of Tenebrae Runes + 1)
- The skill contribution for restoring MP equates to a little less than 1 MP per 5 Divine Magic Skill.
- you will not be gaining enough skill to meaningfully increase your MP returns.
- Morgelai does not help this part of the equation.
- If you are under supported, typical in Dyna, you can ride Tenebrae and your own Refresh to try to keep enough MP to function.
- Each Rune has a different base stat.
You will want to use this as often as you can.
Gear Swaps
Morgelai, Peord Claymore and Futhark Claymore all increase the HP gained using Vivacious Pulse.
Erilaz Galea/+1/+2/+3 will cause Vivacious Pulse to remove a status ailments at random.
- May remove Poison, Paralyze, Blind, Silence, Mute, Curse, Bane, Doom, Virus, Plague, Petrify.
- Jump to the Vivacious Pulse Set
| Rune | Stat |
|---|---|
| STR | |
| DEX | |
| VIT | |
| AGI | |
| INT | |
| MND | |
| CHR | |
| MP |
Battuta
Battuta increases the base Parry Rate by 40% regardless of the level of the enemy.
- Increases to a maximum of 56% when full merits are allocated to the ability.
- Inquartata is added on top of your base parry rate.
- RUN gets Inquartata+19% through Job Point Gifts.
- Base Parry Rate with Battuta active is 59% for a master RUN and can go as high as 75% with 5/5 merits.
- Armour with Inquartata is added on top of the Base Parry Rate.
- Ogma's Cape can be augmented with Parrying Rate.
- This works the same as Inquartata
- Generates a large amount of Enmity.
Enmity and Gear Swaps
- Cumulative Enmity: 450, Volatile Enmity: 900
- Futhark Bandeau +4 augments the damage from the Counter effect of Battuta.
Consider Inquartata and Parrying Rate for the duration of the ability if you aren't already tanking in a Parry Based Tanking Set.
- Turms Leggings - Inquartata +4%
- Turms Leggings +1 - Inquartata +5%
- Ogma's Cape - Parrying Rate +5%
- Erilaz Leg Guards - Inquartata +1%
- Erilaz Leg Guards +1 - Inquartata +2%
- Erilaz Leg Guards +2 - Inquartata +3%
- Erilaz Leg Guards +3 -Inquartata +4%
With your parry rate so high, you will want to make use of the Turms Mittens.
- Turms Mittens - Parry: Recover HP+75
- Turms Mittens +1 - Parry: Recover HP+100
We will use our Futhark Bandeau and our Enmity Set for activation.
Rayke and Gambit
Rayke expends runes to reduce elemental resistance of the target.
This reduces an enemy's resistance ranks, which has 3 effects. Increased Skillchain Damage, increased Magic Burst Damage and reduced Elemental Magic Evasion.
- 30 second, 5 minute recast.
- Each additional merit increases duration by 3 seconds. Up to 12 addition seconds.
- Resistance ranks lowered is based on the element of the Runes used, and the number of elements used.
- Enemy resistance ranks will fall 1 tier per Rune harboured while Rayke is in effect. See the Resist page for tiers.
Rayke also serves as a counter to the magic damage penalty for consecutive elemental spells. Also known as the Nuke Wall.
- Rayke will reduce the penalty for the Nuke Wall by 50% (-60% → -30%) regardless of the number of corresponding runes used.
- This effect is separate from the elemental resistance ranks.
- You will generally want to Rayke 3 of the same element to stack both effects.
- You can Rayke with multiple elements harboured to remove the Nuke Wall for the Runes harboured.
Often combined with Gambit to increase the monsters damage taken.
Enmity and Gear Swaps
- Cumulative Enmity: 640, Volatile Enmity: 1260
- Futhark Boots line Enhances the duration of Rayke by 1 second per merit point, for a maximum of +5s.
Wear your Enmity set with Futhark Boots.
Gambit expends all runes harboured to reduce an enemy's elemental defence. The types of elemental defence reduced depend on the runes you harbour.
- 1 minute duration, 5 minute recast.
- Duration increased to 1 minute 20 seconds through Job Points.
- Recast can be reduced via Merit Points by 10 seconds per Merit.
- It is not typically recommended to Merit Gambit recast.
- Increases damage taken of the appropriate element(s) by 10% per Rune consumed.
Often combined with Rayke to reduce resistance tiers.
Enmity and Gear Swaps
- Cumulative Enmity: 640, Volatile Enmity: 1280
- Runeist Mitons line increases duration.
- The duration increases with upgrades from Runeist Mitons, 10 seconds to Runeist Mitons +3, 16 seconds. Runeist Mitons +4 does not get an increase.
Wear your Enmity set with Runeist Mitons.
Swordplay
Swordplay increases Accuracy and Evasion until you take severe damage.
- Job Points increase maximum amounts of accuracy and evasion by 1.
- This ability's potency increases accuracy and evasion upon activation and then each tick:
- +3 Accuracy/Evasion upon activation.
- The equipment modifier adds to this base bonus (3 + X*3) where each X+ is a ticks worth.
- Caps at Evasion/Accuracy+60 regardless of being main or sub RUN.
- Evasion/Accuracy+80 with Job Points.
- +3 Accuracy/Evasion upon activation.
Enmity and Gear Swaps
- Cumulative Enmity: 160, Volatile Enmity: 320
- Futhark Mitons line increases starting point.
- Futhark Mitons starts at 3 ticks. Futhark Mitons +3 starts at 9 ticks. Futhark Mitons +4 does not get an increase.
You can use an Enmity set with your Futhark Mitons
One for All
One for All grants a Magic Shield effect for party members within area of effect.
- Duration: 30 seconds, Recast: 5 minutes.
- Duration increased to 50 seconds with Job Points.
Enmity and Gear Swaps
- Cumulative Enmity: 160, Volatile Enmity: 320
- Enmity is for each party member within the area of effect.
- No gear affects the ability.
You can use your Enmity set.
Swipe and Lunge
Swipe expends a single Rune to deal damage to a target.
- The last activated Rune is consumed first.
Lunge expends all Runes to deal damage to a target.
Both are directly influenced by the Combat Skill of the weapon in your main hand. Both are treated as Elemental Damage.
- Blocked by shadows.
- Treated as an Elemental Magic damage source.
- Can Magic Burst, subject to day and weather bonus.
- Does not have a dINT and so stacking INT will not help the damage.
Enmity and Gear Swaps
- Enmity based on damage dealt.
- Hachirin-no-Obi and Orpheus's Sash do affect damage.
- Aettir and Soulcleaver have the same effect on the damage.
- Increases a multiplier in the formula from 0.75 to 0.85.
- Best performed with a Great Sword due to it being our highest Combat Skill.
Swipe and Lunge are not overly important and should not be a focus early on. The damage you add is minimal and you are better off putting your resources into improving other aspects of your RUN.
Not worth building a set for Swipe and Lunge as a beginner.
We will use sets similar to typical nuke sets and bursting sets.
Elemental Sforzo and Odyllic Subterfuge
Elemental Sforzo Grants immunity to all magic attacks.
- 30 second duration, 1 hour recast.
- Recast dropped to 45 minute upon reaching 2100 Job Points.
- Increase amount of elemental magic damage absorbed via Job Points.
- The player will absorb 40% of the damage a magic attack would have normally dealt.
Enmity and Gear Swaps
- Cumulative Enmity: 1800, Volatile Enmity: 7000
- Futhark Coat line will all increase duration by 10 seconds.
Wear your Enmity set with Futhark Coat.
Odyllic Subterfuge Greatly reduces the target's magic accuracy.
- 30 second duration, 1 hour recast.
- Recast dropped to 45 minute upon reaching 2100 Job Points.
- Reduces target's Magic Attack Bonus via Job Points.
- Target's Magic Attack Bonus-40.
Enmity and Gear Swaps
- Cumulative Enmity: 1, Volatile Enmity: 318
- No gear affects the ability.
Wear your Enmity set.
The Setup
In this section we will learn about the options and considerations we should be making before heading out to do some form of content.
- Merit and Job Point allocation.
- Sub Job options and when to use them.
- Food choices for emphasizing different parts of our job.
- Medicines that will keep us alive and remove excess burden from the mages.
Merit & Job Points Progression
Beyond the typical suggestions for job specific merits, a RUN actually has some important considerations to be made with their Other merits category. I will highly recommend putting merits into Spell Interruption Rate.
| Merit Point Recommendations | ||
|---|---|---|
| Other | ||
| Description | Notes | |
| Enmity Increase | Increases your Enmity 1 point. | As a general rule, you don't mess with your Enmity. This is for flexibility purposes.
|
| Enmity Decrease | Decreases your Enmity 1 point. | As a general rule, you don't mess with your Enmity. This is for flexibility purposes.
|
| Critical Hit Rate | Adjust your critical hit rate by 1%. | This one doesn't help RUN but it may help your other jobs. I don't run it but wouldn't fault you for taking the extra crit rate. I feel like the real choice is between this and Enemy Critical Hit Rate.
|
| Enemy Critical Hit Rate | Adjust enemies' your critical hit rate by 1%. | Critical hits hurt. They hurt on any job. A bunch of crits landing close together generally ends with you on the ground. I personally put my merits into this category. This helps when I decide to pull on the squishy jobs like Bard and allows me to play those jobs more aggressively. There is an argument to be made for Critical Hit Rate so choose what you feel is best.
|
| Spell Interruption Rate | Adjust your spell interruption rate by 2%. | For the impact, I don't think there is a better place to put your merits. SIRD-10% is big. Especially for RUN. To be blunt, our SIRD sets suck. They have gotten so much better since Erilaz Armor Set +2/+3 but they still aren't great. This category is the difference between the sets in this guide vs removing something defensive for another piece of the Taeon Attire Set. I would highly recommend this category.
|
| Group 1 | ||
| Description | Notes | |
| Rune Enhancement Effect | Increase potency of runes harbored by 2 points. | +10 Magic Evasion per Rune is fantastic.
|
| Vallation Effect | Adds an elemental damage reduction to Vallation and a magic defense bonus to Valliance of 1 point per harbored rune. | Vallation/Valiance gives -15% SDT per Rune for the related elements. This brings us up to -20% SDT per Rune. This term is multiplicative with Magic Damage Taken and therefor surpasses the MDT cap. This is too good to pass on. If there comes a time you need to move merits around, you will probably be taking from the Rune Enhancement and leave this one alone.
|
| Lunge Effect | Increase the accuracy of Lunge by 3 points per harbored rune. | It's just not a good choice.
|
| Pflug Effect | Enhance the likelihood of resistance activating by 1 point per harbored rune. | Pflug is halved against NMs. The Runeist Bottes need to be equipped for the duration of Pflug and is overall disappointing. It could be interesting but as it stands, just not worth the merits.
|
| Gambit Effect | Shorten recast time by 10 seconds. | Gambit is fantastic but unfortunately, 50 seconds off isn't really helping in any fights. The problem is that when we need it, we are typically fishing for resets from the COR. In Sortie, the NMs need to be dead before Gambit will be back up anyways.
|
| Group 2 | ||
| Description | Notes | |
| Battuta | Allows you to use Battuta. Increase chance of parrying by 4 percent per rune harbored. | There is also an increase to Counter damage but that's not something to worry about. The base is a 40% Parry Rate and can go as high as 56%. This is massive damage mitigation when you can keep things in front of you. You will generally want at least 1/5 in this at all times and 5/5 when you can. I usually increase these merits when decreasing Rayke merits.
|
| Rayke | Allows you to use Rayke. Increase duration of effect by 3 seconds. | Rayke and Gambit are why you are the tank for nearly every Bursting strategy. Sortie has a consistent use for RUNs to be tanking for Bursting strategies and you will want 5/5 for those. Otherwise, you want to keep 1/5 just to have another Enmity tool. I would typically suggest sharing the merits with Battuta. Keeping 1 at 1/5 while the other gets 5/5.
|
| Inspiration | Grants a “Fast Cast” effect to Vallation and Valiance. Increase cast speed by 10 percent. | This solves a lot of your Fast Cast challenges on RUN. Being able to merit a massive increase in Fast Cast allows us to move gear around to balance HP. It can be dispelled so you can't ignore General Fast Cast sets but you will want Inspiration and want it active as often as possible. For newer RUNs, I would recommend taking away one from Rayke or Battuta to have them at 1/5 and 4/5 just to keep this capped. Once gear improves, you can reduce them. I typically run 4/5.
|
| Sleight of Sword | Grants a “Subtle Blow” effect during Swordplay. Increase the maximum value of Subtle Blow by 5 points. | If we were to 5/5 and wear Futhark Mitons, we would get an extra 35 Subtle Blow. This isn't bad. It's just very niche. There may come a day when this is handy but that day is not today. If that day ever comes, you can decide the needs and move merits around appropriately.
|
| Job Point Progression | ||
|---|---|---|
| Priority | Notes | |
| 1 | Rune Enchantment Effect
|
An extra 20 Magic Evasion per Rune is big. Especially starting out. Early on this is basically and extra piece of armours worth of Magic Evasion. |
| 2 | Vallation Duration |
Between the 2 Job Abilities, you can keep the effect on yourself full time. This does however make it a bit easier to keep up with. It's not that the extra 20 seconds is that needed. It's more that the effect is just that important to you early on. |
| 3 | Embolden Effect
|
It can be a difficult choice between Embolden and Vivacious Pulse but my recommendation is to start with Embolden. You will do well enough against magic damage but struggle against physical when you can't parry. Being able to Embolden and receive a Protect V for 374 DEF instead of the usual 220 DEF is going to make a noticeable difference. |
| 4 | Vivacious Pulse
|
Vivacious Pulse helps your survivability. You will typically be wanting to use it on cool down. With so many uses and the role it plays, it just makes sense to increase it's effect early. |
| 5 | Gambit Effect Duration
|
Rayke and Gambit are some of the most important abilities you have. They are what cements you in Magic Bursting compositions. A longer Gambit means more damage from the mages which means quicker kill times. |
| 6 | One for All Effect Duration
|
This can save lives. The magic shield lasts the full duration so extending it can by time for your party when under heavy AoE damage. It can give enough time for mages to get HPs topped off and remove a bunch of debuffs. |
| Player Choice 7~9 |
Swordplay Effect
|
Between Parry and Evasion, we can mitigate quite a bit of physical damage. Each Evasion mitigates 100% of the damage. Swordplay caps at 60 Evasion before JP and 80 after. 20 Evasion isn't amazing but everything counts when trying to stack enough to floor monster Accuracy. |
| Player Choice 7~9 |
Elemental Sforzo Effect
|
Elemental Sforzo is our first SP and it can be quite amazing as it is. Adding an absorb effect just makes it that much better. By putting it this low on the list, you can probably tell I don't use it as much as I probably should. It's not going to help you during the Apex grind and for newer RUNs, I tend to be more concerned with their ability to mitigate physical damage. |
| Player Choice 7~9 |
Odyllic Subterfuge Effect
|
Odyllic Subterfuge is our other SP. It floors an enemies Magic Accuracy for 30 seconds. Adding a reduction to MAB just furthers the effect. Since this helps the entire party, this can prevent nasty effects from landing. Adding the job points and it can be another 30 seconds of very little incoming damage. |
| 10 | Swipe Effect |
When using Swipe or Lunge, the combat skill of your main hand weapon is used as a multiplier. This can add up to 20% to that multiplier. Even afterwards, you aren't a BLM, you aren't even a NIN. Your damage is not what's winning the fight. It's not terrible but it is not worth walling a proper nuker. That's not to say you won't use the abilities. You just aren't adding any worthwhile damage until you are geared. That portion is a long ways away and not a priority. |
Sub Jobs
|
|
|
|
|
|
Tanking /BLU
Since BLU is our go to subjob for tanking physical damage and AoE tanking, we should really discuss how this actually works. This isn't a BLU guide so if you wanted to learn more, I would recommend this excellent guide to BLU[1].
Blue Mage does not learn spells or get traits the way other jobs do and their spell list is not filled like other mages.
Instead, BLU sets spells that they will have access to cast and those spells cost points to set and have points towards traits. Those spells must be learned directly from monsters. You will need to have enough Blue Magic Skill to learn the spell, have a monster perform the spell in combat against a party member or yourself and then defeat the monster for the chance to learn the spell. This can be a slow process and rather frustrating to rush so I would suggest accepting that it is time consuming and enjoy the change in pace.
- At level 99, you will be able to set 14 spells for a total of 30 points.
- At ML5, you will be able to set 16 spells for a total of 35 points.
| Essentials | |||
|---|---|---|---|
| Spell | Points | Reason | Stat Bonus |
| Cocoon | 1 | DEF +50% | VIT+3 |
| Grand Slam | 2 | Used in combination with Terror Touch to get Defense Bonus I | INT+1 |
| Terror Touch | 3 | Used in combination with Grand Slam to get Defense Bonus I | HP-5 MP+10 |
| Wild Carrot | 3 | Used to wake up mages Can be used to get Resist Sleep |
HP+5 |
| Healing Breeze | 4 | AoE for waking up party Used to get Auto Regen |
CHR+2 HP+10 |
| Sheep Song | 2 | AoE Enmity Used to get Auto Regen |
CHR+1 HP+5 |
| Jettatura | 4 | Conal big enmity, big cooldown | MP+15 |
| Geist Wall | 3 | AoE enmity, super fast | HP-5 MP+10 |
| Blank Gaze | 2 | Single Target enmity (lucky dispel) | None |
| Point Total | 24 | ||
| More Options | |||
| Pollen | 1 | Combines with Wild Carrot to obtain Resist Sleep | CHR+1 HP+5 |
| Magic Fruit | 3 | Combines with Pollen to obtain Resist Sleep Replaces Wild Carrot at ML45 |
CHR+1 HP+5 |
| Bomb Toss | 3 | Pulling in Wave 3 One of Bomb Toss or Cursed Sphere |
STR+2 |
| Cursed Sphere | 2 | Pulling in Wave 3 One of Bomb Toss or Cursed Sphere |
MND+1 |
| Sound Blast | 1 | Used in combination with Cursed Sphere to get MAB | None |
| Chaotic Eye | 2 | Decent Enmity May get a lucky Silence |
AGI+1 |
| Soporific | 4 | AoE Enmity | HP-5 MP+5 |
| Screwdriver | 3 | Just for Base Stats | VIT+1 CHR+1 HP+10 |
| Frightful Roar | 3 | Quick AoE tag at ML5 | AGI+2 |
| Cold Wave | 1 | AoE Enmity at ML15 | INT-1 |
| Killer Effect Traits | |||
| Foot Kick | 2 | Used in combination with Claw Cyclone to get Lizard Killer | AGI+1 |
| Claw Cyclone | 2 | Used in combination with Foot Kick to get Lizard Killer | VIT+1 |
| Wild Oats | 3 | Used in combination with Sprout Smack to get Beast Killer | CHR+1 HP+10 |
| Sprout Smack | 2 | Used in combination with Wild Oats to get Beast Killer | MND+1 |
| Power Attack | 1 | Used in combination with Mandibular Bite to get Plantoid Killer | MND+1 |
| Mandibular Bite | 2 | Used in combination with Power Attack to get Plantoid Killer | INT+1 |
| Bludgeon | 2 | Used in combination with Smite of Rage to get Undead Killer | STR+1 |
| Smite of Rage | 3 | Used in combination with Bludgeon to get Undead Killer | AGI+3 |
As nice as it is to optimize traits and stats from our spellset, the gains are minimal. I personally would avoid stacking too many instances of -HP but otherwise, it’s all fair game.
Typically, I want to stack physical defensive stats and traits as much as I can but with Defense Bonus only being DEF+10, even that can be dropped if the situation calls for something else.
The big pull for /BLU is the toolset you gain. Cures to wake up others, AoE tagging, Enmity tools and Cocoon are your big ticket items.
While tanking /BLU, you will want to keep Cocoon up as much as possible. DEF +50% plus your Embolden Protect V is going to bring that DEF up high enough to tank some serious physical damage. Add Phalanx on top of that and you are mitigating a massive amount of damage.
Remeber,
- Keep Cocoon up.
- Use your AoE Enmity tools.
- Sheep Song, Jettatura, Geist Wall, ect.
- Use AoE tags so you can generate Enmity with Job Abilities and Foil.
- Bomb Toss, Cursed Sphere, Frightful Roar, ect.
- Keep a Cure equipped to wake others.
- Wild Carrot, Healing Breeze, Pollen, ect.
Food
![]() Miso Ramen
Miso Ramen
The current go to food for tanking.
Good stats on the food with a resist slow for an added bonus.
- HP +100
- STR +5
- VIT +5
- DEF +10% (Cap: 170)
- "Magic Def. Bonus"+5
- Magic Evasion +10% (Cap: 50)
- "Resist Slow" +10
![]() Omelette Sandwich
Omelette Sandwich
Another great food.
More HP but giving up MEVA, MDB and 50 DEF for Enmity and Acc.
- HP+11% (Max. 150)
- VIT+7
- MND+7
- Accuracy+11% (Max. 80)
- DEF+11% (Max. 120)
- Enmity+4
![]() Black Curry Bun
Black Curry Bun
This food has a hidden effect of getting stronger when more players are in the party.
With 4+ players you get the effect of the HQ version which has 25% DEF and caps at 200 DEF.
The HQ does not have this hidden effect which makes it a rather attractive cheap alternative.
- DEX +2
- VIT +4
- INT +1
- Accuracy +5
- Ranged Accuracy +5
- Evasion +5
- Defense +15% (Cap: 180@1200)
- Resist Sleep +3
- HP Recovered While Healing +2
- MP Recovered While Healing +1
![]() Fried Popoto
Fried Popoto
Dirt cheap food.
If you just want something as cheap as you can get.
- HP +30
- VIT +2
 +20
+20- Defense +20% (Cap:145)
- Subtle Blow +8
![]() Popotoes Con Queso
Popotoes Con Queso
A decent attack food with Evasion and Magic Evasion.
- STR+5
- MND+5
- Attack+20% (Max. 130)
- Ranged Attack+20% (Max. 130)
- Evasion+10% (Max. 50)
- Magic Evasion+10% (Max. 50)
Medicine
![]() Panacea
Panacea
A lot of player avoid these because of the cost but the benefits are massive. They become more important in fights where you will be hit with multiple effects needing Erase at once. You could wait for the WHM to spam Erase on you but those are casts that could be cures keeping players alive. It's best to just pop a Panacea and have them all disappear at once. 20k sounds like a lot but really, Odyssey gil will handle the cost and you will see less deaths around you because of it.
- Macro these. You don't have time to look through your items when you need them.
![]() Remedy
Remedy
Removes Blind, Paralyze, Poison, Silence, and potentially Disease. These are cheap enough to keep and just pop to save your healers the trouble. The one that you will often need help with is Paralyze since it can prevent you from consuming your Remedy. Call it out if you need help.
- Macro these. You don't have time to look through your items when you need them.
![]() Reraise Earring /
Reraise Earring / ![]() Reraise Gorget /
Reraise Gorget / ![]() Reraise Hairpin
Reraise Hairpin
Reraise is always good to keep on you. If something happens in a fight, it can be quite the ask to have a healer raise you while also keeping others alive. Being able to pop back up and start regaining Enmity can save a wipe.
- I would only keep 1 of these around. Generally which one depends on price and availability in the moment.
![]() Reraiser /
Reraiser / ![]() Hi-Reraiser
Hi-Reraiser
Quick Reraise effects when something goes wrong or when you are tanking the wave 3 boss and need to keep a Reraise on for Odin. The benefit of these are getting them back up without needing to wait on the cool down after equipping one of the accessories.
- I would try to keep at least 1 around. Always useful to have in a pinch.
- Always bring both for a Dynamis - Divergence Wave 3 attempt.
![]() Echo Drops
Echo Drops
Removes Silence. Remedy can also do the same but these are cheaper. I tend to keep a couple stacks around and favour them over Remedy for silence.
- Macro these. You don't have time to look through your items when you need them.
![]() Antidote
Antidote
Removes Poison. The only time you would really consider using these is during Sortie. You will need the temp items for them to work against Ghatjot (Ra'Kaznar Metal A) and Dhartok (Ra'Kaznar Metal #E). You will grow out of the need for these as the NMs melt quickly when properly geared but it is worth having them around when you are newer and the fights are taking longer. It's just significantly cheaper than burning multiple stacks of Remedies.
- Macro these when you need them. Get rid of the macro and stop carrying them as you grow out of the need.
![]() Holy Water
Holy Water
They save lives! Not every WHM has 100% Cursna sets. Not every WHM has Yagrush. Not every party has a WHM! AOE Doom happens and is nasty. Everyone should have these and you can even macro armour to swap with them to help the effectiveness.
- Macro these. Macro gear to go with them. Armour options to be discussed later.
![]() Vile Elixir /
Vile Elixir / ![]() Vile Elixir +1
Vile Elixir +1
Handy for restoring MP in a pinch. Good to have as a backup during fights where you may run into MP issues.
- I typically only pick these up before doing content where they may come in handy.
- You can clear your bazaar before an event and toss these in for 1 gil to give your mages quick access during an event.
![]() Elshimo Pachira Fruit
Elshimo Pachira Fruit
1hp/tick Poison Effect for 2 minutes. Prevents sleep and can also prevent more potent Poison effects.
- Keep a stack around.
Equipment Progression
I know a lot of what's found hereafter will be basically "shopping list" material for the vast majority of players. However, if you're intent on making the most of your time as a Rune Fencer in FFXI, be sure to expand some of the notes in each set and read through the provided context and section introductions. Hopefully they'll provide some insight and useful information as you progress as a RUN!
The intent behind the progression sets (i.e. Beginner → Mid-Tier → High-Tier) is to show character/job progression through certain stages or levels of "Content." (Indicated by the "top caption" of each equipment set that falls under those 3 categories.)
Beginner
This stage is often fairly long as you are placing the building blocks of your character. It starts after you hit level 99 and get into your first i119 Armour Set. In this stage, you will be unlocking content and beginning to partake in that content.
Your goals will consist of,
- Work on completing the various Missions.
- Rhapsodies of Vanadiel and Seekers of Adolin will be your main priorities.
- Obtain Aettir from Oboro and augment it.
- You will need to complete Rhapsodies of Vanadiel to augment Aettir.
- Commission your JSE sets.
- Continue the quest line with Forging New Bonds through Epiphany.
- Unlock weapon skills you will need
- Dimidiation via Rune Fencing the Night Away.
- Ground Strike via Inheritance.
- Resolution via spending Merits.
- Work on building key Early Game Sets.
- Tanking, Fast Cast, Enmity and Phalanx+.
- Start looking for a group to run Dynamis - Divergence and Omen.
- There are new player friendly Linkshells on every server that will run this content twice a week.
- There are now Shared Areas in Dynamis which you can enter solo to unlock your Futhark Armor Set +2.
- Although these can be entered solo, the set will still be saved for the Mid-Tier due to the cost to upgrade.
- Clear the Vagary bosses so you can upgrade your Empyrean Armour to +1.
- Work towards getting all of the desired JSE Armour to +1.
- Clear the Odyssey RoEs for A, B and C.
- You character will need to be 45 days old in order to begin Odyssey.
- Attempt reach and interact with any of the Translocators in the zones to allow for fast travel later.
- This Tier has no Job Point expectations. Your time is better spent working on your Armour Sets and placing the building blocks like Merits.
- If you get the opportunity to join a group, go get those Job Points!
- Rhapsodies of Vana'diel
Players at this level of progress should be close to, if not completely done, with the entire RoV storyline. Completing the RoV storyline will grant you access to both Omen and Dynamis - Divergence. For many, this is the first content you will be playing in groups. It is also content you will be playing constantly throughout your time with FFXI. This will help you upgrade your JSE which contains pieces that last through the highest level of the game. They aren't all used as much as others but as we build jobs out, we want to optimize as many actions as possible and the unique attributes of our JSE will last. - Seekers of Adoulin
You are also going to need to work through the Seekers storyline. This will get you access to Vagary which you will need to upgrade to your Reforged Empyrean Armor +1. You will be able to enter Vagary once you have reached Outer Ra'Kaznar. The other option is to clear the Alternative Vagary Battlefields. To enter all of these battlefields, each party member will require the completion of Abomination.- Your Reforged Empyrean Armor +1 is incredibly important to Rune Fencer and will become more and more important as you are able to upgrade it further.
- Strange Happenings in Vana'diel
This event brought some very interesting armour for newer players. It will eventually be rendered nearly useless but at the start of your journey, the pieces will grant you some much needed Damage Taken with other decent defensive stats. For RUN this can slide right into our tanking and idle sets. The issue is that the event will end and we don't know when the pieces will be available again. For this reason, I will not be including them in the sets below. Hurray! You get to be better than the other players just because you were willing to read! The rest of your time in FFXI will grant you similar benefits for reading!
| i119 RSE Equipment | |||
|---|---|---|---|
| Hume ♂ | Hume ♀ | Elvaan ♂ | Elvaan ♀ |
| Tarutaru | Mythra | Galka | |


- Oboro
This NPC has many functions but the one we are currently concerned with is the creation of JSE Oboro Weapons. There are several options to open up this service but the easiest will probably be clearing normal Ambuscade on Normal difficulty or higher OR clearing Intense ambuscade on any difficulty. The item we want to create is Aettir. An amazing Great Sword for tanking purposes. SE really gave us a solid option here that is easy to obtain. Get this and you can put off any other weapon for quite a while. Even at the very end of our gearing progression, this still has uses!
To create our weapon we need to trade Oboro a Cehuetzi Claw, a Zweihander, a Nagan, and 150 of either Plutons, Beitetsu, or Riftborn Boulders. You cannot mix and match the Plutons, Beitetsu, or Riftborn Boulders.
Next we want to augment our weapon. Trade your Aettir and 1 Pluton, Riftborn Boulder, or Beitetsu. You will then trade 299 of the rock you traded him.
In all stages, check for the cheapest option. In general, Pluton is the cheapest and Beitetsu is the most expensive. However, markets do crazy things sometimes so just check before investing into your option.
- Domain Invasion
You will want to start DI as soon as possible. Here's a list of noteworthy items you can focus on for RUN:
| Domain Invasion Rewards | |||
|---|---|---|---|
| 100~200 Points | 600 Points | 800 Points | 1,000 Points |
|
|||
- Ambuscade Gear
Work towards obtaining the NQ armour sets. You can now get a full set upgraded to +2 through Total Hallmarks. This would require a running total of 12,500 Hallmarks which is steep solo but possible. Don't stress yourself out reaching it solo and keep chipping away. You can now get one of the weapons fully made with Total Hallmarks at 9,600 but you would still need a Pulse Weapon. You can however get them to the Kaja Stage at 5,300 which will be more than enough for this stage of progression.
Note on the weapons! These are NOT needed immediately. These weapons are being listed because the content is accessible at this level of gearing.- Kaja Sword is for damage and may be your best option when trying to do Job Points parties.
- Kaja Chopper is not needed until you are participating in the skillchain while fighting Ongo. May however be a fun option for Job Points parties.
- Kaja Axe is used for the Ongo V25 fight and you are SOOO far away that you don't even have to think about it.
| Ambuscade Rewards | ||
|---|---|---|
| Ambuscade Armor | Ambuscade Capes | Ambuscade Weapons |
- Unity Base Items
There are a handful of items from UNM that you will not only want but want to upgrade with RP as well. Work toward upgrading these to their +1 variants by trading them and 50 of the Unity NM's material items to any of the Unity NPCs in the 3 starting nations at a cost of 10,000 Unity Accolades per weapon, armour piece, or accessory. The sheer number of items to upgrade and the associated cost in Accolades can bite into newer players' means of obtaining quick & easy gil through Sparks & Accolades, so be sure to try and farm up as many of the upgrade materials from the NMs as you can. You will likely get lucky on several of them and obtain the +1 variants right from the coffer. Coffers are doubled during Unity Wanted Campaigns, so be on the lookout for those events. This list covers options I believe are worth getting but not all of them are used in the same frequency as others. Check sets and know why you are obtaining/upgrading the item before chasing the item. The cost to upgrade all of the ones you need is overwhelming so don't add to your personal list without having a reason. Some are more obvious than others. Some are nice options for later. Some get used constantly.- The ones written in bold are the ones I believe you should focus on for the early stages and the ones I think you should RP first. The rest, help others farm and make the +1 for yourself for later.
| Unity Rewards | ||
|---|---|---|
| Unity Weapons | Unity Armor | Unity Accessories |
- Vagary
The wonderful thing about Vagary is that if you can put together a group of motivated and capable players, you all can set a weekly Content → Vagary RoE objective and earn extra upgrade materials simply for clearing the NMs! Three weekly objectives is likely more than enough to acquire the materials you need for upgrading JSE.
Alternative Battlefields were added that will allow solo players the ability to unlock access to the Empyrean Armour Reforging process. These alternative battlefields come with no additional drops or rewards from the NMs within, so for any upgrade materials like Etched Memories and NM specific upgrade drops you'll either have to spend hard-earned gil or brave the eerie depths of Ra'Kaznar after all!
| Vagary Rewards | ||
|---|---|---|
| Accessories & Armor | JSE Upgrade Materials | JSE Upgrade Currency |
- Delve
Like Vagary, this content requires a minimum of 3 people in a party to enter, but there are a number of items and upgrade materials that can be grabbed from doing this content. Additionally, as you do this content you'll be rewarded with Mweya Plasm which can be used to purchase rewards from NMs you have cleared or stored up and used for Rune Fencer and/or Geomancer
 Ergon Weapon forging.
In order to go for your Epeolatry, you will need to complete the quest Quiescence which has multiple parts. It is a long grind that requires a minimum of 3 months earth time, grinding a bunch of content and a significant gil investment. One of grinds involves obtaining a Pristine Yggrete Crystal which costs 2.5 million Plasm. With some help and a campaign, it's not as daunting as it seems.
Don't concern yourself with Epeolatry yet. Aettir is a fantastic option and has use cases even after Epeolatry. You can tank an absurd amount of content in the game with an Aettir. Eventually you will hit a progression point where you are running out of things to do or simply want more out of RUN specifically. That would be a good time to start targeting your Ergon.
In the mean time, I suggest you begin working on your Coalition Assignments. They are the 3 month grind but even if you decide not to take RUN that far, they improve your Ionis which you will make use of during Sortie. The assignments are also used if you want the HQ Adoulin Rings or the trust Ygnas.
| Delve Rewards | ||
|---|---|---|
| Accessories | JSE Upgrade Materials | |
- Reforged JSE
Work on getting your JSE armour sets to their +1 variants.
- BEGIN! Omen
With your Artifact JSE reforged to Item Level 119, maybe even a little bit before then if you have a group to run with, now is the time to start getting to know the ropes in Omen. Upon entry for the first time you gain access to your Runeist Armor Set +2, and soon thereafter you'll gain access to your +3 Artifact JSE after defeating either 100 foes in Omen or one of the Glassy (Empty) mid-bosses. You'll need a bunch of
  P. RUN Cards anyway, so get in as often as you can!
Solo you will mostly be killing as many monsters as you can as fast as you can. The struggle will be to get off the first 2 floors, especially early on. You don't have great damage dealing options and a Kaja Sword may make the difference here. Target the objective to get off the floor for floors 1&2 then try to focus as many objectives as you can on floor 3. As you get stronger, killing everything will be less of a problem and you can try for more objectives on the first 2 floors. /WAR would be my recommendation if you are using Kaja Sword and /SAM if you are using a Great Sword.
In Groups you will most likely be tanking. Often you round up the monsters for sleeps. Buff up the best you can, Cocoon is fantastic here. If you are fighting bosses, you will most likely be tanking. Do your best to hold Enmity and learn all the mechanics of the fights. /BLU is recommended.
- BEGIN! Dynamis - Divergence
Same goes for having reforged your Relic JSE to Item Level 119, it's a great time to start getting into Dynamis - Divergence or "Dynamis-D" as it's popularly called. You'll often play a pivotal role in Dynamis-D as a RUN playing a tank role. Typically you will pull a statue which will spawn several monsters. Your goal is to keep enough monsters pulled while not having so many that it overwhelms and kills you. You will also have to control these enemies so they don't kill your healers. You can use spells like Poisonga or Sheep Song to get on the list of these monsters and use something self targeting to produce Enmity against all of them. Foil is a wonderful tool for this purpose but you also have the option of many Job Abilities for the same purpose. The hoard of enemies usually doesn't need too much Enmity built because they will die quickly. You are just keeping them away from the mages.
Against the NMs, you will want to try to keep your Enmity above that of the DDs. You will need to spike your Enmity early and keep trying to build more and more. The issue is that DDs these days can produce so much damage that their Enmity will be above yours and you have no way of getting it back. Don't worry, this is common for new tanks. They better have good DT sets because they will be taking hits. Keep generating Enmity so that you protect everyone else. Eventually the NM dies or the DD dies and you want to be who it turns to next. Things will get better as your gear improves.
One tactic you best become familiar with, Phalanx. You of coarse can self cast Phalanx but it is relatively short. Know who has a longer Phalanx? RDM and SCH! If your group doesn't hate you and puts a RDM or SCH in your party, you should communicate with them for Phalanx casts. Your Phalanx+ should actually read Phalanx Received+. Get into all of your Phalanx+ armour and have the spell cast on you. This way, you will get the benefits of your gear with the benefits of their long duration! If your groups hates you, sorry, gotta cast it on yourself.
If these are your first experiences with this content, do NOT hesitate to ask questions! Any group worth their weight in gold is going to be as informative and helpful to you as possible.
On first entry, you'll gain access to Futhark Armor Set +2. Like Omen before this, you'll swiftly gain access to your +3 Relic JSE after killing either 100 trash mobs, or the Statue mid-boss looming over Wave 1.
- Special Note on Spending: in no way is this an attempt to redirect how players spend their hard-earned gil, but I feel so very often the advice of the more established players gets washed in a mix of "... just buy X item to be good," and "... save your gil for your AF, Relic, Empyrean upgrades." For me personally, I like to suggest players follow per slot spending limits for the purpose of saving for item progression.
- Try to stick to a 1,000,000 gil/equipment slot limit for this tier of progression. This should give you enough overhead to complete your 119 JSE equipment, pick up a few of the more pricey NQ crafted items, and even throw a little extra Unity augmenting materials at any +1 items you might currently have.
Mid-Tier
In this stage, we will continue the unfinished work from the Beginner stage while pushing our gear further. This means staying on top of our merits while not needing to specifically farm them. Spend merits before you do content and spend merits after content has completed. You will eventually get everything capped. The goals will now become,
- JSE to the +2 versions.
- Nyame Armor Set unlocked.
- This is done by simply defeating Bumba and is a task experienced players will often help with very early.
- Start working on Phalanx+ through Dark Matter Arcane Glyphics Campaign.
- As of July 2025, the Dark Matter Arcane Glyphics Campaign has been made permanent.
- You will need to pick up the body, hands, legs, feet of the Herculean Armor Set for this.
- I have never obtained a Phalanx+5 from Dark Matter. +4 is just fine.
- Get to 500 Job Points and keep working towards Master.
- This can happen very quickly. If you get the opportunity to get JP in a group, go for it.
- Work on building a version of all the sets.
- This adds sets like Enhancing Magic, SIRD, Cursna Received, Cure, Job Ability Specific swaps, Fast Cast and Enmity swaps based on actions, states or situations.
- Work on Unity Rewards RP.
- All of your main Unity Items should be taken to R15.
- Prepare your WHM subjob if you haven't already.
- Start Odyssey and Sortie.
- Job Points are not something I push on players until the Mid-Tier because the limitations from gear during the Beginners Tier makes the process painfully slow. This is made even worse for RUN. Mid-Tier gearing helps but to be honest, it's still painfully slow solo. Group up every chance you get. Start solo and every time anyone comes into your Linkshell chat, ask them if they want to join. It is so much more appealing to players to join a party in progress than it is to start one from scratch. Obviously you will need to be the DD if you are solo. In groups, you will most likely be the puller or opening a Skillchain for someone who hits harder than you. Ideally, you would end Skillchains with the hardest hitting Weapon Skill in the group.
- Omen/Dynamis Progression
Players should typically be involved with groups that regularly attend Omen and farm both Wave I & Wave II (Divergence) at this stage in their development. The rewards from Omen will help you build your jobs and the gil you can make from Dynamis-D is going to be a massive help. The more consistently you can attend Dynamis-D, the easier it will be to build gil and afford upgrades.
- Ambuscade Gear
By now, you should be working toward or close to finished upgrading your armour sets to their +2 variants.- Continue working on your never-ending list of Ambuscade Capes, hoarding up as many of the cape augmenting materials as you can each month.
- Note on the weapons! Lycurgos and Dolichenus are only used for their skillchain properties. The damage in those fight is negligible. You do NOT need to go past the Kaja stage on these. You can if you wish and you can find some fun uses but from a purely progression point of view, it's not needed.
- Naegling is not really needed on RUN but it is very good and it's use may come up. Maybe you are helping Savage Blade Bumba for your Nyame Armor Set or just trying to help kill monsters in Odyssey. The weapon is heavily used for nearly all jobs that can equip it. This is very worth a pulse even on RUN since there aren't really any other needs through the Ambuscade Weapons.
- Nandaka does have a use case but it's not one I would worry about. I personally have skipped it so far but for completions sake, it's on the list. If you have an extra pulse, go ahead and play around with this option.
| Ambuscade Rewards | ||
|---|---|---|
| Ambuscade Armor | Ambuscade Capes | Ambuscade Weapons |
- Unity Rewards
If you have not upgraded your Unity Rewards to the +1 variants, you should put a focus on that now. Very soon, you may be able to begin the augment process on the ones you need. This will be discussed when we begin talking about Odyssey. You will need Lustreless items to augment your Unity Items and some of them become quite strong. The list hasn't changed, you are just focusing on +1s and possible RP now.- The bold items are the same and the ones I believe you should focus Augment efforts towards.
- Loricate Torque +1 is not only very important to RUN but cheap and easy to augment. Ask around for Linkshell members doing constant Odyssey runs. They may be sitting on so many Lustreless Scales that they want them out of their inventory. We typically save ours to give to new players for free. Some of our LS member are sitting on stacks of boxes on mules. Seriously, ask around. If not, they are dirt cheap.
| Unity Rewards | |||
|---|---|---|---|
| Unity Weapons | Unity Armor | Unity Accessories | JSE Upgrade Materials |
- Omen
You should be familiar with this content by now but this stage of progression will focus mainly around completing this content and gearing up for harder challenges yet to come. This content can vary in difficulty from soloable "card/detritus" farming to Caturae NM battles. Teaming up with a group up to ~18 people strong is possible, but not required at all, even for the Caturae NM battles in many cases.- Gin's Scale is used for the +3 upgrades but you should get them early and hold onto them. I am only listing 4 needed and the number of Cards to reflect that we will most likely be skipping the upgrades to our Runeist Bottes.
- P. RUN Card amount reflects the total needed for all of the +2 and +3 upgrades while skipping our Runeist Bottes.
| Omen Rewards | |||
|---|---|---|---|
| Midboss Accessories | Caturae NM Gear | JSE Upgrade Materials | |
| |||
- Delve
Continue participating in this content. It will always be a fairly decent source of additional income long after you've acquired the upgrade materials you need.
| Delve Rewards | |||
|---|---|---|---|
| JSE Upgrade Materials | |||
- Dynamis - Divergence
You should be somewhat familiar with this content by now. Entry into each zone will gain you access to Relic JSE +2. Defeating 100+ squadron foes in Wave 1 of the corresponding zone, or defeating the Mid-Boss Statue will grant you access to Relic JSE +3.- Not all of you Relic set needs to be upgraded fully but you can make use of all of the pieces which means full upgrades will be better defensively.
| Dynamis - Divergence | ||
|---|---|---|
| Zone for Clear | +2 Upgrade Materials | +3 Upgrade Materials |
| ||
| ||
| ||
| ||
All Zones Clear |
||
- BEGIN! Odyssey
- Sheol A, B, C
 Lustreless Scales: Used to
  Augment Level 119~122 Unity Gear.
 Lustreless Hides: Used to Augment Level 125~128 Unity Gear.
 Lustreless Wings: Used to Augment Level 135~145 Unity Gear.
- Sheol: Gaol
Consider starting up or joining a group of players at similar points in progression as yourself. Start tackling some of the Gaol NMs. Even at Vengeance 1 these NMs are not terribly hard with some thoughtful organization and party composition planning. I would not recommend Vengeance 0 unless no one in the group has access to a higher Vengence Level. The rewards for gaining access to the gear are overshadowed by the ability to "RP" anything gained from Vengeance 1 up to .
.
Upon completing the 3 RoE for Odyssey, you will be given 3x Moglophone II. If you have 3 jobs at 99 (they don't need to be geared,) you can enter a fight for a clear. If you can get help from someone to clear Bumba you will get access to the Nyame Armor Set which is a MASSIVE leap in you survival capabilities. It is immediately useful as the base armour due to the massive defensive stats on the set. You can tank a lot of the game with this armour.
- Sheol A, B, C
- BEGIN! Sortie
The focus here should be to enter the zone and gain access to your Erilaz Armor Set +2. You can just as easily in the same instance get access to your
  Erilaz Armor Set +3 by entering one of the basement (E~G zones), which will give you the
  Ardent rune fencer's soul; H zone is locked out by a rather tough objective to solo, and can even put some groups willing to try on their heels. That one will come later when you're actually doing full blown NM runs with a group. Farming Gallimaufry and Ra'Kaz. Sapphires for upgrading to your
  Erilaz Armor Set +1 → Erilaz Armor Set +2 should be your current goal.
There are fairly easy to perform low man runs to take out some NMs which involve Gravity kiting the NMs while others kill it. For this, you would typically build a Cure set and go /whm. You hold Enmity and run the outside of the room to try to keep the NM in the middle. You are /whm so you do not need to be baby sat by someone to stay alive. Another option is properly tanking a mage setup. A SCH would set up skill chains to be burst by a BLM, GEO, RDM. Since you are tanking, you will pull with Flash, Gambit the correct element, Rayke the same element and survive. You shouldn't need much more Enmity but obviously you still have access to more tools to keep it flowing. It is not hard for a group at this stage to at least take out Ghatjot and Dhartok. A simple run that can be performed by a group that is somewhat newer to the content and will be able to push 20k Gallimaufry a run. Plenty to get your +2s done and build out your +3s which will allow the group to push many more NMs.
- BEGIN! Limbus
Currently the newest content in the game. At this point in time you are able to get upgrades for your JSE and some new accessories. Since you are not expected to reach the Runeist Armor Set +3 and the Futhark Armor Set +3 sets until the end of this tier, the only thing we should concern ourselves with is the accessories.
At this stage, I wouldn't actually focus on RP. Nor would I actually bother with +4s since that comes after the next stage. Do at least 1 climb in Apollyon and 1 in Temenos, get your Ring/Earring and then you can ignore this content for a while. If you catch a run, go for it but don't sink too much time into this yet. There is other content that will give you better results and allow you to make gil. You can and should go pick up the Shiny whenever someone announces where it's location.
The JSE armour upgrades will be brought up in the next progression tier and discussed in the JSE section. Murky Mantle - The weakest of the group. Personally, I wouldn't even bother unlocking this. It could be used for Swipe/Lunge if you had nothing else but it's not worth the effort.
 Murky Ring - A better Defending Ring. In fact, if you wanted to skip D. Ring, you could. RP makes it even better but isn't make or break.
 Alabaster Earring - This thing is amazing and just gets better with RP. DT, HP and Haste allow for some interesting set options and adding STP later through the augment is just too good to pass up. This is nearly the HP of Odnowa Earring +1 while not cutting into your MP.
 Alabaster Mantle - Not worth much at base and is an interesting option as you get RP. I wouldn't throw anything into this until your Alabaster Earring is done. It does allow you to drop or change your Dimidiation cape if you wanted to save inventory space. You can't do this until you have RP though since you will want the ACC.
There are now crafted armour sets that need a large Limbus grind for RP. All of the pieces are quite solid but at 3 months per piece, it's a hard sell for me. Meanwhile, they are SU pieces and will need quite a few job points before you can even wear them. Personally, I would work on Nyame and skip these but if you want to go all in, go for it. If I'm going to spend over a year grinding RP on gear (I'm not going to but if I did...) it would be for a different set. At least this is significantly better than what the mages got!
 Trust Platemail - SU4
 Prestige Platemail - SU4
 Sworn Platemail - SU5
- Reforged JSE
Work on upgrading your JSE to their +2 variants.
- Special Note on Spending:
- Try to stick to a 5,000,000 gil/equipment slot limit for this tier of progression. This should give you enough overhead to complete your 119+2 JSE equipment, perhaps splurge a little on a +1 crafted item here and there, and keep throwing extra Unity augmenting materials at the ever growing number of +1 Unity items starting to clog your inventory.
High-Tier
Mid-Tier can often be the shortest stage of progression but it is also the stage most players struggle to leave. One issue is the ever growing list of desired jobs. Another issue is the intimidating increase in the price of gear. Want to know what's more expensive than JSE+3s? Starting a couple new jobs and trying to get everything they need to function. Getting firmly into the High-Tier will allow you to do content more efficiently which can also lead to more gil. Unless you need a new job for content, continue into the High-Tier. RUN can tank most of the game so you shouldn't be too worried about other jobs at this point in time. Some groups will have different focuses and you may end up needing to split your resources but ideally, you focus fully on RUN for now. You can tank Omen, Dyna, Ody Segs, Almost all Ody NMs and you can tank Mage strat Sortie. You should be very OK to put the focus into RUN.
That said, lets look at our goals.
- Job Master (2100 Job Points) and begin the Master Level grind.
- RUN is often used to tank Peach Power which is 60k Exemplar Points.
- JSE upgrades completed.
- If you want to be all the RUN you can be this would be a great time to focus on completing Epeolatry.
- It's not wrong to do this earlier but at this stage, you should have figured out how to make gil and have some prerequisites completed.
- Odyssey push for clears and RP.
- Sortie runs improved.
- As your Erilaz Armor Set +3 gets completed, you will look towards other jobs and start thinking about a Prime Weapon.
- Stabilize your Sets and balance your HP.
- Sets should not be constantly changing as upgrades are much slower and a lot of options are at the highest level available.
- Experiment, Test, Have Fun!
- Not that fun isn't being had throughout this entire process but once gear stabilizes, the only thing left to do is push boundaries. That's just fun.
- Sortie/Odyssey Progression
By this stage, you should have a handful of jobs available, and be running with groups that regularly work on Odyssey NM progress and likely even Sortie NM runs.
- Ambuscade
At this point, Ambuscade will primarily be about making gil or gathering currency to build REMA Weapons. Continue spam-buscade at your leisure to facilitate this endeavour.
- NOTE: There really is only 1 that we use at the highest levels of difficulty and there is little content where you would feel it as a requirement. More on that as we discuss the weapon choices.
- Unity
If you're all caught up on upgrades and most of your augments to this gear, Unity Wanted Campaign is an excellent way to supplement the farming of

 items for your REMA building process.
- Omen
Continue with Omen to get a hold of some of the Regal accessories, if you haven't quite gotten everything on the list yet. Otherwise it can be a viable alternative source for gathering Astral Detritus to augment any of your REMA weapons you happen to be building.
- Dynamis Wave III
By now, you and your group should be well versed in the basic mechanics of the game. Enough that you should be able to work your way through and to victory in Dynamis - Divergence: Wave III. This will round out your development when it comes to REMA weapons since it is the single largest source of Astral Detritus in a single sitting. Just remember, less is more when it comes to planning a winning strategy. Too many groups often go in unprepared for the significant jumps in required Accuracy, Magic Accuracy, and just general attentiveness and situational awareness.
| Dynamis - Divergence | ||
|---|---|---|
| Zone for Clear | Disjoined NM | Augment Clear |
| Disjoined Tarutaru |
| |
| Disjoined Mithra | ||
| Disjoined Galka | ||
| Disjoined Elvaan |
| |
- Odyssey
Here's (in my honest opinion) where the real challenge and fun begins. As you progress through Odyssey Vengeance levels, you will find some of the most challenging content that you have ever and likely will ever face in Final Fantasy XI. As such, some absolutely fantastic rewards will come to all of your jobs. Unfortunately, Square decided that this tank should be put on the nuking set... I will forever be sad that we weren't put on the Gleti's Armor Set. That said, the Nyame Armor Set is amazing for us. Through RP, it builds up to being a Weapon Skill set for all jobs while being a tanking and TP set for RUN! Since you will be doing the Agwu's Attire Set during your progression, you may as well RP it and add it to your Swipe and Lunge sets and hammer some home during the bursting strats.
A lot of the following rewards you should have at least some progress on RP-wise or at the very least have acquired them as you worked through Mid-Tier progression:
| Odyssey Rewards | ||
|---|---|---|
| Atonement 1 & 2 Rewards | Atonement 3 Rewards | Atonement 4 Rewards |
- Sortie
As you work through Odyssey RP progress, you'll likely get into some Gallimaufry & Ra'Kaz. Starstone farming in Sortie to upgrade the Erilaz Armor Set +2 → Erilaz Armor Set +3
Additionally, the higher and higher your RP accrues on your Odyssey Gear, the more likely you'll be working toward possibly building some of the most powerful Ultimate weapons in the game - the Prime Weapons. Rune Fencer's option:
- For more information, go here.
- Limbus
You can tank this content to make it easier for groups to blitz to the end of the floors. Your main goals are Runeist Armor Set +4, Futhark Armor Set +4 and RP on the accessories. Nothing has changed with regards to the accessories but you will want to get RP on them. This content can be gross solo on any job but can be particularly rough on RUN. Having only 3 trusts and lacking damage output from the start is not a fun place to be. The good news is that you can use Shockwave to put mobs to sleep and allow you the time to get off the floor. In groups, you lead the way and pull at the end of the floor. Accessories RP is discussed in the Mid-Tier progression section above. The JSE upgrades will be discussed in the JSE section. The sort version,- Alabaster Earring and Murky Ring are priorities for RP.
- The JSE upgrades are minimal and not needed. Put those units into RP or upgrades for other jobs.
- The exception is if you choose to tank in your
 Runeist Coat +3. Upgrading that to
  Runeist Coat +4 is a solid improvement.
- The exception is if you choose to tank in your
- Reforged JSE
Complete your JSE armour upgrades to their +3 variants. - Complete your JSE armor upgrades to their +4 variants.
- Special Note on Spending:
- Try to stick to a 10,000,000 gil/equipment slot limit for this tier of progression. This should give you enough overhead to complete your 119+3 JSE equipment. At this point, rounding out sets will be all about saving for the higher end +1 crafted items, and still throwing extra Unity augmenting materials at the absolute infestation of +1 Unity items utterly destroying any hope of inventory management you thought you had. Focus your prayers here.
- Typically the gil limit per slot eventually comes off somewhere during this stage of progression. Pieces from the Turms Armor Set +1 are not cheap but quite desirable. Moonlight Rings are another high priced want as well as adding items for more damage.
Equipment Information
Before getting in to full sets, let's discuss some base information. When building out jobs, often there are a few sets to look at for added options. We can discuss weapons, armours from Alluvion Skirmish, Reisenjima and JSE sets.
Weapons
| Weapon Options | |
|---|---|
| Weapon | Notes |
Obtained via Sparks.
| |
Obtained via Craggy Bluff using 3,000 Bayld.
| |
Obtained via Zurim using 200 Domain Points.
| |
Obtained via Oboro, this is the first serious option you will have access to for tanking.
| |
Obtained via Vagary when defeating Putraxia.
| |
| Obtained via Ambuscade and generally one of your best options for Swipe and Lunge. I guess you could macro it in for JA use if you don't care about the TP loss. Since Swipe/Lunge work off of your main hand weapons skill, Nandaka allows you to use that A+ Great Sword skill. As with all Ambuscade Weapons, it has some solid stats for magic damage. | |
Obtained via the UNM, Sarama.
| |
Can be purchased after defeating Ongo.
| |
Obtained via Ambuscade and is a Skillchain option. It is not used often but does get used during the V25 Ongo fight.
| |
Obtained via Ambuscade and is a Skillchain option. I have not used this much outside of the earlier Ongo fights when you are working with the COR to create the Skillchains.
| |
Obtained via Ambuscade and is a one of the best options most jobs have to deal damage. RUN isn't special here. Equip and spam Savage Blade then you can join in with the rest of the community whining about how useful it is. You may be asked to Savage Blade during fights that punish you for Skillchains.
| |
| Obtained via the UNM, Grand Grenade. This is your Blunt damage option and one of the only good option you have outside of Slashing damage. | |


| REMA Options at Rank 0 | |
|---|---|
| Weapon | Notes |
Ergon Weapon made from Quiescence. This is considered RUNs Ultimate Weapon. It can be a fantastic damage dealing option but it truly shines in it's defensive capabilities. You do not need this to play the job but you will start wanting it around Dynamis - Divergence Wave 3, V20+ in Odyssey and for some of the NMs in Sortie though most of them do magical damage. Almost all of this can be done with Aettir. I have tanked every zones Wave 3 with Aettir, Everything up to V20 Odyssey and again, most of the Sortie NMs are magic based damage where Aettir is better.
| |
Aeonic Weapon. This has always been a damage dealing option. Unfortunately it hasn't grown so well with our job.
| |
Prime Weapon. This is our top damage dealing option. The PDL aftermath and a big weapon skill exclusive to the weapon pushes the damage out for us.
| |
_description.png)

_description.png)
| REMA Options at Rank 15 | |
|---|---|
| Weapon | Notes |
We gain a large chunk of base damage, accuracy and 15% damage for Dimidiation which is one of our strongest weapon skills.
| |
At
| |
| Crafted Su5 weapon for RUN. The good:
The bad:
| |

JSE Armour
Note: There is no current need to upgrade to the Runeist Armor Set +4 and Futhark Armor Set +4. The stat increases are quite minimal. That said, they are still increases and currently free to obtain. If you have multiple jobs, I would consider a focus on the +4s for the other jobs first. One exception may be the Runeist Coat +4 if you are using it to tank. Do remember that they all increase your HP and almost all of these pieces are used in sets where we expect lower HP values. They certainly are not useless upgrades. They just don't have the same effect on our job as a WSD piece for a DD.
| Item | Upgrade? | Notes |
|---|---|---|
Runeist Bandeau +4 
|
Yes | From Runeist Bandeau +1 all the way to the end, this will be used in the same sets and simply get better |
Runeist Coat +4 
|
Yes | You will use this for Valiance and Vallation from the moment you obtain it at 109 and it will keep getting better as you upgrade. With the lower DEF, it is often a tough call to bring in. |
Runeist Mitons +4 
|
Yes | One of the times you actually get to shine is using Rayke and Gambit in bursting strategies. These are important to that function.
|
Runeist Trousers +4 
|
Maybe | Used in a status ailment resistance set which currently isn't needed for the more important content. Things do change and niche use cases do exist. If it even had Magic Accuracy, it could compete with other options for a niche Repose set but sadly, it has none.
|
Runeist Bottes +4 
|
No | Unfortunatly, to get the benefit of these, you would need to wear them with Pflug active at the time of the spell being cast on you to receive the effect. If it were for ability activation, these would be a great piece but this is not the case. Go ahead and skip. |
| Item | Upgrade? | Notes |
|---|---|---|
Futhark Bandeau +4  "Enhances 'Battuta' effect". Increasing counter damage of Battuta by 4% per merit |
Yes | Phalanx is essential to your role and this is the largest source of improvement you get. The only things close are random Oseem augments during Dark Matter campaigns. It will be useful to you the moment it hits the 119 version and last all the way through the end of your progression.
|
Futhark Coat +4  Enhances Elemental Sforzo. Duration by +10 seconds. |
Yes | This will always be worn when using Elemental Sforzo so you may as well +3 it for that alone. The extra duration of Liement means more time absorbing damage instead of taking damage.
|
Futhark Mitons +4  "Enhances 'Sleight of Sword' effect". Adds 2 Subtle Blow per merit. |
Maybe | You probably wont be putting merits into Sleight of Sword. Swordplay hitting it's cap earlier is nice but not something you will really notice. I made it, I use it. Make your own choice. |
Futhark Trousers +4  "Enhances 'Inspiration' effect". Fast Cast +2% per merit up to an additional 10%. |
YES | Capped Inspiration gives you 50% Fast Cast and these will bring you to 60% whenever Vallation or Valiance are active. You can start using these from the 109 version and keep upgrading them.
|
Futhark Boots +4  "Enhances 'Rayke' effect". Rayke Duration+1 second per merit point. |
Maybe | They look like they could be OK but without any form of DT, I don't see a use case for them. If you are doing anything with parry, you are probably using Turms Leggings or Turms Leggings +1. If you aren't, you are probably using Nyame Sollerets or Erilaz Greaves +3. For the other use case, Rayke, you get the full effect from the time they are made at 109. At the very least, upgrade these to 119. You probably should take them to +3 so you have more defence when using Rayke.
|
| Item | Upgrade? | Notes |
|---|---|---|
Erilaz Galea +3 
|
Yes | The SIRD will finally make your SIRD sets feel a whole lot better. They are pretty terrible before the +3. Augments "Vivacious Pulse" allowing it to remove status ailments at random.
|
Erilaz Surcoat +3 
|
Yes | By the time you can get the +2, you are wearing Nyame Mail and I don't like the trade off for the enmity retention. If you can make up for not having DT on your body early on, this can be a good option for early progression. The problem is that it can be difficult to make a good set with it.
|
Erilaz Gauntlets +3 
|
Yes | The Great Sword Skill makes this a very high Accuracy and Attack piece. The DT is huge and the resistance to Status Ailments makes this an incredibly attractive tanking piece. Before the +2, it doesn't have the DT to make it worthwhile.
|
Erilaz Leg Guards +3 
|
YES | These come into the world as an excellent tanking piece. Sporting Inquartata, good PDT, and Enmity. Then they end up out classed by Nyame. Then they come roaring back in changing to massive DT and increasing all the great stats they had before. These are fantastic and a great boost in survivability in several sets. They will be in your Enmity sets from start to finish.
|
Erilaz Greaves +3 
|
Yes | Solid DT, highest Enmity in the slot. Massive Evasion and massive Magic Evasion propped up further by All Resistances+35. Early on they will be used in your tanking sets. There are better Enmity options but Ahosi Leggings come from a HELM fight in Reisenjima and are out of reach of most new players. By the time you get to the Erilaz Greaves +2, you have caught up in Enmity. I would suggest sticking to the Erilaz Greaves for your enmity sets the entire way through. The +2 can come pretty quickly these days.
|
| Item | Upgrade? | Notes |
|---|---|---|
Futhark Torque  HP +30 STR & MND +10 Damage Taken -5% |
N/A | If you have nothing else, this is a dirt cheap option. Typically not worth the price tag.
|
Futhark Torque +1  HP +45 STR & MND +12 Damage Taken -6% |
N/A | At +1 this becomes competitive with the previously listed options while having a decent amount of enmity. This can be an alternative to the Futhark Torque +2 in all sets although you may want to adjust for the missing DT if the set originally lands at 50%. Worth the price tag.
|
Futhark Torque +2  HP +60 STR & MND +15 Damage Taken -7% |
N/A | At +2 this give more DT than other options, matches the Enmity of most options and has great Magic Evasion. It still has many of the same alternatives but it closes the gaps better. Worth the price tag but the +1 version is significantly cheaper and will be plenty for it's use cases. At the price point, I would buy Moonlight Necklace before upgrading the this version.
|
Erilaz Earring  Accuracy & Magic Accuracy +6 ~ 10 |
N/A | Regen Received is a great option to have and one of the best Magic Evasion options for your ear. |
Erilaz Earring +1  Accuracy & Magic Accuracy +11 ~ 15 Damage Taken -3% ~ 5% |
N/A | Regen Received is a great option to have and one of the best Magic Evasion options for your ear. Even a low roll makes it tied with Odnowa Earring +1 for the most DT on an ear. Any extra just makes sets easier to build. |
Erilaz Earring +2  Accuracy & Magic Accuracy +16~20 Damage Taken -6%~8% STR & MND +7~15 |
N/A | Regen Received is a great option to have and one of the best Magic Evasion options for your ear. A low roll now makes this the most DT on an ear. By far. The STR & MND are unmatched for RUN. |
Note on Ambuscade Capes: These are general recommendations. The most important aspect of these capes is the flexibility of options available. Feel free to change things like Damage Taken and Physical Damage Taken as needed for sets. There will be more options for capes. I am not including a TP cape but feel free to make one. If you don't expect to use a cape often, you can put it off. Remember that you can use Abdhaljs Needle to change an augment. If you end up with a cape that can be used over your current Ogma's cape, you can needle it into something else.
| JSE Capes | |
|---|---|
| Cape | Suggested Augments |
| Ogma's cape | |
| Enmity | HP+80, Evasion/Magic Evasion+20, Damage Taken-5, Enmity+10 |
| Parry | HP+80, Evasion/Magic Evasion+20, Parrying rate+5%, Enmity+10 |
| Fast Cast | HP+80, Evasion/Magic Evasion+20, Physical Damage Taken-10%, Fast Cast+10 |
| SIRD | HP+80, Evasion/Magic Evasion+20, Spell Interruption Rate Down-10%, Enmity+10 |
| Dimidiation | DEX+30, Accuracy/Attack+20, Weapon Skill Damage+10%, Damage Taken-5% |
| Savage Blade/Fimbulvetr | STR+30, Accuracy/Attack+20, Weapon Skill Damage+10%, Damage Taken-5% |
| Resolution | STR+30, Accuracy/Attack+20, Double Attack+10%, Damage Taken-5% |
| Evasionist's Cape | |
| Embolden | Embolden+15 |
Random Augment Sets
Both Alluvion Skirmish and Geas Fete have a set available to players early in progression. These sets can be used to fill in gaps but most importantly, they have unique augments that we can benefit from.
![]() Taeon Attire Set - Comes from Alluvion Skirmish. Also check for Mellidopt Wings to trade for the pieces through Lorissa at the ??? at (I-10) in Yorcia Weald. Mellidopt Wings can come from Alluvion Skirmish or Mog Pell (Red) which is handed out a few times a year to players for various campaigns. Alluvion Skirmish can easily be soloed but is a different way of setting up a run. Look up some videos on how to solo the content. These used to be incredibly important for RUN because it was the only way to get 4/5 of our Phalanx+ pieces. Now that the Dark Matter Arcane Glyphics Campaign is running full time, we at least have some other options. Sadly we are still locked behind random augments for our Phalanx set.
Taeon Attire Set - Comes from Alluvion Skirmish. Also check for Mellidopt Wings to trade for the pieces through Lorissa at the ??? at (I-10) in Yorcia Weald. Mellidopt Wings can come from Alluvion Skirmish or Mog Pell (Red) which is handed out a few times a year to players for various campaigns. Alluvion Skirmish can easily be soloed but is a different way of setting up a run. Look up some videos on how to solo the content. These used to be incredibly important for RUN because it was the only way to get 4/5 of our Phalanx+ pieces. Now that the Dark Matter Arcane Glyphics Campaign is running full time, we at least have some other options. Sadly we are still locked behind random augments for our Phalanx set.
You get 3 different augment slots on these sets. Each slot can roll different augments so check the tables to see which stone you need for the augment you want. Higher quality stones are more likely to give you higher rolls on your augments.
- Snow - Snowslit, Snowtip, Snowdim and Snoworb.
- We typically use this slot for defensive stats. Either Defense, Evasion or Magic Evasion
- Leaf - Leafslit, Leaftip, Leafdim and Leaforb.
- Leafdim Stones if you need SIRD- 1~10%.
- Leaftip Stones if you need Enemy Critical Hit Rate- 1~4%.
- Dusk - Duskslit, Dusktip, Duskdim and Duskorb.
- Duskdim Stone for Phalanx+ 1~3 or Regen Potency+ 1~2.
![]() Herculean Armor Set - Can also be obtained the early in our progression. The pieces typically comes from Geas Fete in Reisenjima but we can also obtain them from Domain Invasion. You will take the piece to Oseem to be augmented. We can also use these to fill in some gaps.
Herculean Armor Set - Can also be obtained the early in our progression. The pieces typically comes from Geas Fete in Reisenjima but we can also obtain them from Domain Invasion. You will take the piece to Oseem to be augmented. We can also use these to fill in some gaps.
- Technique will allow us to roll 6 Dark Mater augments for free every day.
- Phalanx+ 1~5 is the target. 3+ allows us to replace a Taeon piece.
- Treasure Hunter+ 1~2 is a nice option for farming but far from a need.
- Melee can be used to help us create some better TP sets. Just remember you aren't a DD so these generally are not a major priority.
- Fern Stone can get you better augments for Store TP or Triple Attack. Ideally you get some extra Accuracy with them.
- You don't have great options for your feet in TP sets and Herculean Boots will be your best option until you have augmented Nyame Sollerets.
- Fern Stone can get you better augments for Store TP or Triple Attack. Ideally you get some extra Accuracy with them.
- Magic can be used to get some extra Fast Cast if you are missing. some in a slot.
- Fern Stone can used to get Fast Cast 1~6.
These can be expensive early on and will eat up your Domain Invasion points so don't focus on these pieces outside of the need for Phalanx+. They are worth checking out again if you are in need of something unique or just filling in a slot. I have avoided putting augmented Herculean Armor Set pieces into sets because the process can be long and frustrating. The one main exception is Phalanx where you really only have 2 option and both are from augments.
Abjuration Sets
![]() Lustratio Armor Set +1 - I personally don't believe the NQ version has much value to us. What you want from the set is the Weapon Skill Damage from the set bonus. For that, you need 2 piece and you would probably want to take the Lustratio Subligar +1 and the Lustratio Leggings +1. However, they aren't currently worth the investment. You would be better served working towards augments on your Nyame Armor Set.
Lustratio Armor Set +1 - I personally don't believe the NQ version has much value to us. What you want from the set is the Weapon Skill Damage from the set bonus. For that, you need 2 piece and you would probably want to take the Lustratio Subligar +1 and the Lustratio Leggings +1. However, they aren't currently worth the investment. You would be better served working towards augments on your Nyame Armor Set.
![]() Adhemar Attire Set +1 - This was the last time RUN was put on a good TP set but it is showing it's age with how paper thin it is. I am listing the HQ pieces but the NQ will work just fine. These can be used for some glass canon TP if you don't have any risk of death and don't care about holding Enmity. The NQ are generally pretty cheap and accessible. The cursed items are the Vexed or Jinxed items and are purchased from the Auction House. The Abjurations can be obtained via Geas Fete or for 400 Domain Invasion Points. 4 days of DI isn't too bad if you don't have other needs for the points.
Adhemar Attire Set +1 - This was the last time RUN was put on a good TP set but it is showing it's age with how paper thin it is. I am listing the HQ pieces but the NQ will work just fine. These can be used for some glass canon TP if you don't have any risk of death and don't care about holding Enmity. The NQ are generally pretty cheap and accessible. The cursed items are the Vexed or Jinxed items and are purchased from the Auction House. The Abjurations can be obtained via Geas Fete or for 400 Domain Invasion Points. 4 days of DI isn't too bad if you don't have other needs for the points.
- Adhemar Bonnet +1 - Triple Attack is not easy to come by on RUN. These will be the best TP piece you will get but again, it's paper thin.
- Adhemar Jacket +1 - This is the best Fast Cast body you will get before Erilaz Surcoat +2. Luckily that's not too far off. You can skip this one.
- While Triple Attack is not easy to come by on RUN, I would avoid these since you can run Ayanmo Corazza +2 to some solid success. It isn't much more defensive but it is more defensive.
- Adhemar Wristbands +1 - The Triple Attack and Store TP is hard to replace. Too bad the defences are so weak on the set. If you wanted to add just 1 piece of Adhemar to your TP set, this would be the one you choose.
- Adhemar Gamashes +1 - Can get Store TP+7 which is pretty good. I would however skip it and see what you can get for augments on some Herculean Boots.
SU3
You cannot wear this set until you are SU3 which happens when you have spent 500 Job Points on your RUN.
![]() Turms Armor Set
Turms Armor Set
- Turms Cap/Turms Cap +1 - Only really useful for as an Idle Regain piece. If you have it, you can use it but I wouldn't go out to get one. Probably Skip.
- Turms Harness/Turms Harness +1 - A lot of Store TP but you can just stick to Ayanmo Corazza +2. Skip.
- Turms Mittens/Turms Mittens +1 - This is where I will probably annoy some people. I don't think the NQ hold any real value and the HQ are used far more than players should use them. Simply put, wearing these can give some solid returns on parry procs but you are giving up much more defensive options to have them. As you progress further, they tend to fall off in use cases. You aren't able to parry any of the monsters TP moves and a lot of NMs have slow, hard hitting attacks. They certainly have their uses and when you can parry. They freely top off your HP during Battuta and are wonderful against a monster using Hundred Fists. You need to really decided when you will and will not get value out of them. They are a tool to use in the right situation, they are not something you default to in every fight in the game today. They can however decrease the burden of healers when you can parry things and with Null Masque and Adamantite Armor, you can build sets that are very solid around their use.
- Turms Subligar/Turms Subligar +1 - They could be an Idle piece I guess but why waste the gil? Skip them.
- Turms Leggings +1/Turms Leggings +1 - Similar to the Turms Mittens +1 in which you need to understand when you can and can't parry things. They work well together but if I were to make a set with just one, it would be the Turms Leggings +1. Adding a flat 5% parry rate on top of what you already have is wonderful. A parry negates the damage completely which can mitigate a lot of damage. The problem comes from wearing them in situations where you either can't parry or the rate of attacks won't mitigate enough damage to be valuable. You are giving up better raw defensive stats to wear these so you don't want to wear them when you could be getting more out of something else. I find it interesting how little these are discussed vs the Mitts when these are part of the pieces that drive the value of the Mitts. I would suggest getting the Turms Leggings +1 as the first HQ piece of this set.
Limbus
You cannot wear the Trust Armor Set or Prestige Armor Set until you are SU4 which happens when you have spent 1200 Job Points on your RUN.
You cannot wear the Sworn Armor Set until you are SU5 which happens when you have spent 2100 Job Points on your RUN.
![]() Trust Armor Set
Trust Armor Set
This set is pretty ridiculous. It has higher magic evasion and physical defences than the Nyame Armor Set but less evasion. Even the Sworn set has less Damage Taken on some pieces but it's close enough to make up for it in other slots.
For Magic Def. Bonus
- Trust has 1 less.
- Prestige has the same.
- Sworn has 1 more.
The augments push this set even further. They all augment with Triple Attack and Phalanx+ and the augments are the same for every quality. The Trust Crown and the Sworn Crown will have the same augments on them. These are some of the highest Phalanx pieces you can get as well as your best TP set. The nice part is that these are by far the most sturdy Phalanx+ pieces you can get so it becomes much safer to reapply during combat.
So what's the problem? Well, as of now, you are looking at a 3 month grind per piece if you cap out in Limbus every week and don't have bad luck from the chests. It's a long grind for what is 1 more Phalanx and a TP set for a job that isn't actually taken for it's damage potential. It's up to you if you want to do the grind for these. At the moment, there is nothing that actually needs these pieces. When compared to the Nyame Armor Set, they are close enough for tanking and when you start adding in Adamantite Armor, they are even less impressive for tanking. Also note that you don't need SU to wear the Nyame Armor Set, Adamantite Armor, JSE or most of the other things you will be tanking in.
- Trust Crown/Prestige Crown/Sworn Crown - Sworn has the same DT as Nyame. Trust has 2 less DT than Nyame. Phalanx+4 is underwhelming compared to your AF. Best you will get for TP.
- Trust Platemail/Prestige Platemail/Sworn Platemail - Sworn has the same DT as Nyame. Trust has 2 less DT than Nyame. Phalanx+6 is the best you can get. Best you will get for TP.
- Trust Gauntlets/Prestige Gauntlets/Sworn Gauntlets - Sworn has 2 less DT than Nyame. Trust has 4 less DT than Nyame. Phalanx+5 which ties it for the most in the slot. Best you will get for TP.
- Trust Brais/Prestige Brais/Sworn Brais - Sworn has the same DT as Nyame. Trust has 2 less DT than Nyame. Prestige Brais at base has the same Fast Cast as Agwu's Slops while having more HP. Sworn Brais at base has 1 more FC and the HP. This is a pretty high cost for a set that isn't being used much while gaining very little increase in the effect. Most of your FC needs will be under Inspiration and you will be wearing Futhark Trousers. Phalanx+4 is ok. Best you will get for TP.
- Trust Sabatons/Prestige Sabatons/Sworn Sabatons - Sworn has 1 less DT than Nyame. Trust has 3 less DT than Nyame. Phalanx+5 which ties it for the most in the slot. Best you will get for TP.
Mission Rewards
 Suppanomimi doesn't do anything for you but it really is the only choice. The rest aren't great and Dual Wield+5 is a staple for many jobs.
 Rajas Ring or
  Sattva Ring would be the choice for a RUN. Rajas Ring will be a good option for melee sets but it quickly gets overshadowed by other easily obtainable options. Sattva Ring could be a decent early Enmity ring. Again, overshadowed early. My personal opinion, Rajas Ring is more useful.
 Magnetic Earring is really the only good option. Luckily for us, it's an amazing earring. RUN struggles to have decent SIRD sets and Magnetic Earring really helps bring the sets together.
- None. There really isn't a use case for anything from ToaU. The reasons to complete the missions are to make Mythic Weapons and access the HTMBs. ★Puppet in Peril and ★Legacy of the Lost don't have anything RUN cares about. It's always good to have the option and if you play long enough, you will want to build a Mythic Weapon for at least 1 job.
 Moonshade Earring allows you to select 2 augments from 2 different lists. Augment list 2 has 1 real choice, TP Bonus +250. Augment list 1 has a few options. The choice would probably be between Accuracy+4, Attack+4, Magic Accuracy+4 and Magic Atk. Bonus+4.
- Finally rewards with real choices! In the end you may not get to pick something specifically for RUN and you may end up changing out the ring for something another one. The sets in this guide do not have any of these rings so you would be putting them in sets on your own. Most are quite obvious. Let's look at some of our better option.
 Shneddick Ring - The only other option for Movement Speed+18% is Carmine Cuisses +1. For tanking and pulling, Shneddick Ring just makes for better sets. There are still some jobs that don't get Movement Speed+18% so Shneddick Ring makes things easy.
 Vocane Ring - A wonderful Damage Taken option. Especially before you have Defending Ring. The Reduced Distance Knocked Back is quite noticeable and a rare attribute to get on any piece of gear. There are only 5 pieces in the game that affect Knockback and RUN can only wear 3 of them.
 Karieyh Ring - Weapon Skill Damage is a solid option. We do have other Weapon Skill options and RUN is still going to struggle doing damage but if you choose this for another job, it will find a home in sets for RUN.
 Weatherspoon Ring - The Fast Cast+5% will help your Fast Cast sets. It is not the go to for rings on RUN but it will be used. The Quick Magic is not something I particularly care for but it is nice to have. The strongest part of this ring has no effect on RUN. The Light Element Attack Bonus is considered Light Affinity and is massive for Light based magic Weapon Skills. Seraph Blade on RDM, Trueflight on RNG and Primal Rend on BST are just a few Weapon Skills that love this ring.
 Janniston Ring - I don't like the negative Enmity but Cure Potency II is nice! The problem is that you are dropping 12 Enmity or dropping below Damage Taken-50% to use this ring in your Cure set.
 Orvail Ring - Not something that helps RUN but it does help crafting. I can't fault you for taking this option. Just know that it can be rough and a significant investment in time and gil to start making solid gil from crafting in the current state of the game. It is possible, it just isn't easy.
- There are no bad options on this list. They will all be used on RUN but some will get more use than others. I will not be placing these in any sets as I don't want to create sets that can't be obtained by everyone and there really isn't a standard ring people choose.
 Medada's Ring - Helps fix troublesome Fast Cast Sets. Great for Swipe and Lunge. Both are not things that are holding you back on RUN. Fast Cast sets certainly enjoy the help when you are outside of Vallation and Valiance but it's not going to be game breaking. Swipe and Lunge are not worth investing so much into but... I like the ring.
 Gurebu's Ring - Great Idle ring and very strong when trying to resist Ailments.
 Cornelia's Ring - Weapon Skill Damage+10% is pretty big and your Weapon Skills certainly could use the help! Don't expect this to suddenly turn RUN into a damage dealer but if you have it for other jobs, it's a great option to drop into your Weapon Skill sets.
 Ragelise's Ring - Replaces Defending Ring or used alongside to obtain Damage Taken-20% in your ring slots. It's a fantastic ring that is often overlooked for damage potential. RUN appreciates the DEF and VIT while taking advantage of the Cure Received in the Cure Sets. Most of the time, RUN is curing themselves and and extra 10% means less time curing yourself while getting beat up by a monster.
 Lehko's Ring - A great TP ring with Haste. It changes a lot of TP sets as the reliance of Haste in the waist slot is no longer needed. It is often talked about as a decent Weapon Skill ring with the large amount of DEX but RUN has better options available for Weapon Skills.
 Fickblix's Ring - Double Attack+10% is strong and Fickblix's Ring pairs very nicely with Niqmaddu Ring for the multihit and Subtle Blow. It doesn't really change sets much but it creates some interesting sets. If you want a ring purely for TP, go with Lehko's Ring. If you want the Subtle Blow or decide to pick a ring for pet jobs, Fickblix's Ring will still find uses on [[RUN].
 Ephramad's Ring - A Physical Damage Limit version of Regal Ring is a great option. Under full buffs and debuffs, this should be your strongest Weapon Skill ring. Outside of that situation, you have Attack and STR/DEX+10 which plays well with the Weapon Skills RUN uses.
Gear Sets
Lets start with clearing up some of the language we use in the community.
- Precast Set - A set you put on to initiate an action.
- Fast Cast sets for spells.
- Job Ability Sets.
- Weapon Skill Sets.
- Midcast Set - A set you wear when a spell resolves.
- Often potency to make the spell stronger.
- Idle Set - A set you wear when you are not in combat and not performing an action.
Unless stated otherwise feel free to use the lower tiered item.
- Ayanmo Cosciales until you manage to upgrade to Ayanmo Cosciales +1 then to Ayanmo Cosciales +2
- Some lower tiered items lose out on important things like DT or HP.
- Gelatinous Ring doesn't have access to the extra HP+100 of Augments available to the HQ version.
- Odnowa Earring has the HP but misses the DT of Augments available to the HQ version.
- These items will still get used in sets for their advantages but it will be suggested to switch to something else if the missing stats become a problem.
Since there is now so much Damage Taken armour in the game, we have a lot of options presented to us. One slot where we have a lot of options is the Earrings. We have DT options, HP options, DEF options and more. Here is a table you can use to quickly find an earring to suit your needs. Just remember to watch your DT and HP amounts to prevent your HP from bouncing.
| Defensive Earring Options | |
|---|---|
| Piece | Advantage |
| HP, VIT, MDT | |
| HP, VIT, MDT, | |
| HP, VIT, DEF | |
| HP, DEF, Haste, DT-3%, | |
| EVA, Magic Evasion | |
| Magic Def. Bonus | |
| AGI, EVA | |
| DEF, VIT, PDT-2% | |
| Magic Evasion | |
| Magic Evasion, DT-3%~5% | |
| Resist Stun, Resist Bind, Resist Gravity, Resist | |
| Resist Stun, Resist Bind, Resist Gravity, Resist | |
Idle sets
An Idle set is anything that you wear while not performing an action. This could be anything from running places to tanking monsters while not engaged. We can use our set to recover HP/MP, gain TP, move quicker, receive stronger buffs or again, tank.
We want Damage Taken-50% in all of our Idle Sets. This will cover us even if we lose some buffs.
We should stop for a moment to talk Movement Speed. It is a wonderful quality of life but also something heavily used in fast paced content like Sortie and Odyssey... fast as in we don't want to stand around waiting. We need to run as fast as we can as soon as we can through those purple hallways!
Sortie is 50min or more of running. Most of your group will be at 18% movement speed and you should have Bolter's Roll up. You can get through the run with 12% but everyone will be waiting on you at the end of every long run which is the majority of the content. Especially while new, you may feel the need to have 18% just to stay with everyone so you don't get lost.
For Odyssey, Segment farming, you are pulling. You ideally don't want to be a step behind the rest of the group because the sooner things are pulled, the better.
Know that Movement Speed+ does not stack. It will take the highest bonus on your armour. This means you are sacrificing a single slot when you want to get that extra zoom zoom in your step. So, here are your options.
- Carmine Cuisses - 12%.
- Carmine Cuisses +1 - 18%
- I would recommend saving for the HQ so you can keep up with everyone else.
- Shneddick Ring(+1) - 18%.
- This was my choice. It's all jobs and allows for better defensive sets. It just makes life easier for me.
|


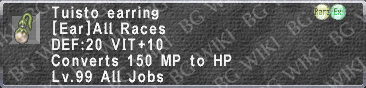


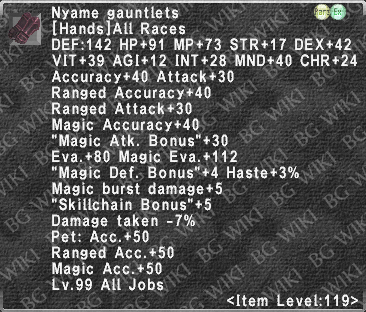

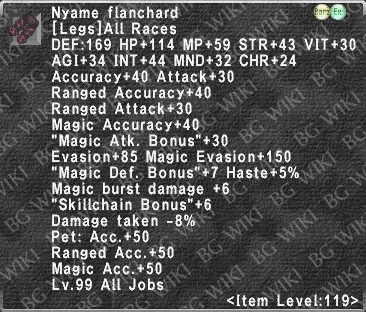
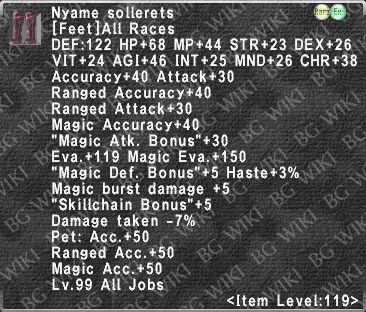
Buffs Received Idle
I typically start content in an Idle Set that contains armour options for receiving buffs. After the initial buffs are done, I will change to an Idle set that is better suited for the content. My set still retains the typical defensive needs.
- DT-50%
- High DEF
- High Magic Evasion.
|
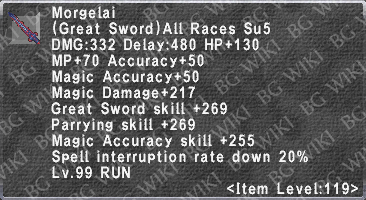

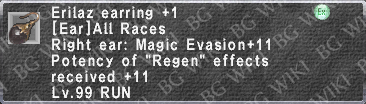
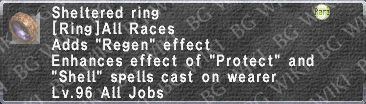

Regen, Refresh and Regain Options
Sometimes you want to recover while Idle. I personally don’t see the need for these kinds of sets. I don’t do much content where I’m running around enough without engaging to justify a set like this… outside of Sortie. The problem is that in Sortie, I have a RDM, GEO or both. Refresh III or Indi-Refresh between NMs keeps me topped off. If it’s mage strats, SCH Regen will keep me topped off. It’s not bad to have some Regain when running over to slap something with a Weapon Skill but it certainly isn’t moving the needle. Either way, ppl seem to really love these kinds of sets so let’s show the options. Lay them over your Idle set then fill in the gaps to hit your desired DT, HP and whatever else you want to push for in your set.
|

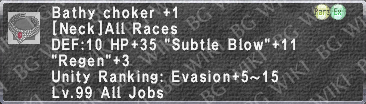


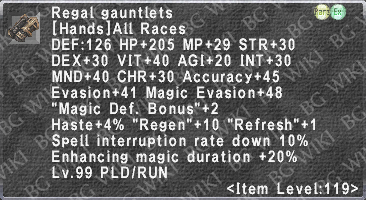


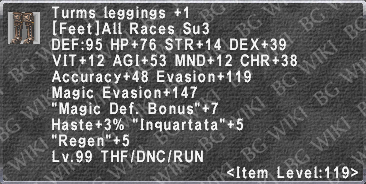

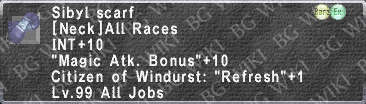


Tanking Sets
The goal early on will be PDT-50% and MDT-21%.
- Shell V gives MDT-39% so 21 in gear caps.
As we progress, we will want to have different sets based on the content we are tanking.
- Physical Tanking
- Parry Based Tanking
- Magic Damage Tanking
- Resistance Focused Tanking
Physical Tanking
Tanking Physical Damage
Early Goal
Late Goals
- Be as close to DT cap as we can.
- Have solid DEF, Magic Evasion.
- Add layers for mitigation.
- Keep HP balanced so we aren't dipping and losing too much HP during swaps.
|


Parry/Inquartata Tanking
Parrying allows you to completely avoid an attack and take no damage.
- You must be engaged and the enemy must be in front of you.
- A Parry can occur on any attack in front of you, not just attacks from the target with whom you are engaged.
- Your base Parry Rate is based on the monsters level compared to your Parry Skill.
- In most content, the Parry rate is floored to 5%.
- Parry Rate+ directly adds to that rate.
- It is not efficient to try to increase your Parry Rate by increasing your Parrying Skill.
Inquartata adds to your parry rate. It can be viewed as Parry Rate+%.
- You get Inquartata+19 from traits and job gifts.
- Turms Leggings and Turms Leggings +1 have Inquartata+4 and +5.
- The Erilaz Leg Guards line has Inquartata+1~4.
- Ogma's Cape comes with Inquartata+3
- : Parry Rate +5%
Unfortunately newer RUNs don’t have access to the tools to make proper use of Inquartata so I will not be making a set for them.
|


Magical Tanking
The idea of these set's are to do fights where you are mostly or only magic damage. Remember to set your Runes to the Defensive Element you need. You can look up the monster you are fighting and check the moves. You will find out if the TP moves are ![]() magical and in the majority of cases, know the element. You can also set up to mitigate the magic damage of one element while using Runes to protect yourself against a Status Effect.
magical and in the majority of cases, know the element. You can also set up to mitigate the magic damage of one element while using Runes to protect yourself against a Status Effect.
For the Mid-Tier, I have presented 2 Options. Both have advantages and disadvantages. I wouldn't be overly concerned with which set is built. The idea is to give 2 options for those that are struggling to get 1 set or the other. If you have both, I would mix the 2 or just build Option 2 since it only requires 1 Moonbeam Ring.
|


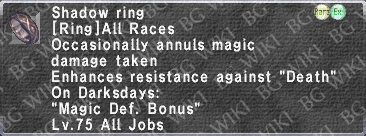
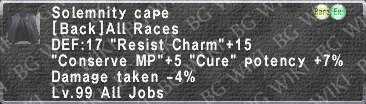

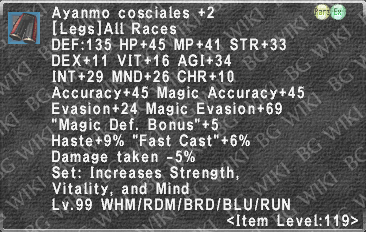
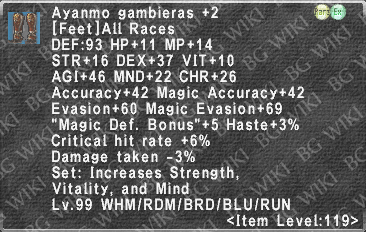

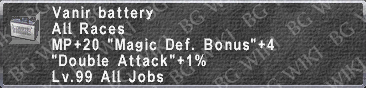


Resist Ailments and Knockback
At the moment, there are no fights where I specifically gear for Resisting Ailments or Knockback but things can always change. At this point in time, I swap to Magic Evasion based tanking sets instead of trying specific Ailment resistances. For now, here are the pieces available for these options.
Resist All Ailments Notes.
- Remember you still need enough survivability to tank the enemy.
- Gurebu's Ring is a Voracious Resurgence Reward.
- It's a fantastic ring but so are all of the others. Taking this gives up other options.
- I did not take this ring myself and it is not a common option.
|
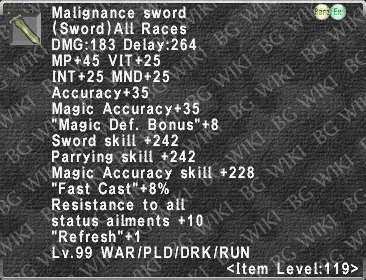

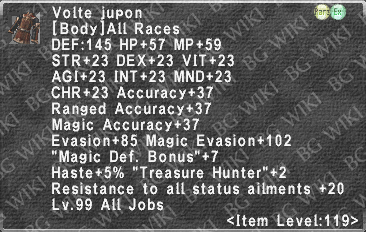
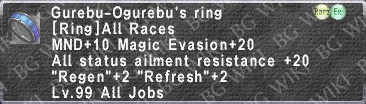

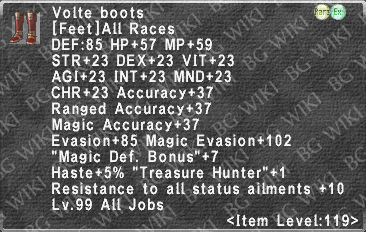
Resistance options for each Ailment.
Many of the specific resistances to Ailments have unknown amounts. Since there are so many pieces, I'm not going to list them all. In the table beflow, I will list the ones with known amounts. I will also link the individual resistance pages to make it easier to find more pieces. I would highly recommend sticking to accessories or the i119 Armours so you don't drop below 119. Remember, you are still tanking and dropping core defences from your level as well as all of the DEF, Magic Evasion and base stats may not be worth the added resistance chances. A lot of effects wind up being mitigated by our obscene amounts of Magic Evasion that we can hit.
| Specific Ailment Resistance Options | |
|---|---|
| Armour | Resist |
| Amnesia | |
| Mantoptera Eye | 10% |
| Bind | |
| Arete del Luna | 15 |
| Arete del Luna +1 | 20 |
| Shneddick Ring | 15 |
| Shneddick Ring +1 | 17 |
| Blind | |
| Charm | |
| Solemnity Cape | 15% |
| Arete del Luna +1 | |
| Unmoving Collar | 8% |
| Unmoving Collar +1 | 9% |
| Dusksoul Ring | 1% |
| Curse | |
| Death | |
| Shadow Ring | 25% |
| Samnuha Coat | 15% |
| Eihwaz Ring | 10% |
| Warden's Ring | 10% |
| Gravity | |
| Arete del Luna | 15 |
| Arete del Luna +1 | 20 |
| Shneddick Ring | 15 |
| Shneddick Ring +1 | 17 |
| Paralyze | |
| Icecrack Ring | 15% |
| Petrify | |
| Shneddick Ring | 15 |
| Shneddick Ring +1 | 17 |
| Poison | |
| Tantalic Cape | 15% |
| Silence | |
| Etiolation Earring | 15% |
| Sleep | |
| Acipayam Belt | 10% |
| Insomnia Earring | 5% |
| Nesanica Ring | 5% |
| Arete del Luna +1 | |
| Stun | |
| Arete del Luna | 15 |
| Arete del Luna +1 | 20 |
| Slow | |
| Ginger Cookie | 10% |
| Wizard Cookie | 12% |
| Stun | |
| Arete del Luna | 15% |
| Arete del Luna +1 | 20% |
| Anu Torque | 10% |
| Icecrack Ring | 5% |
| Terrasoul Ring | 1% |
| Tantalic Cape | 15% |
| Dominance Earring | 10% |
| Dominance Earring +1 | 11% |
Knockback Notes.
- There are only 3 options but they have a noticeable effect.
- I am not advocating for Vocane Ring though its a great ring and was my choice before Defending Ring dropped.
- The knockback resistance only has to be worn by the player being targeted by the monster.
- Their knockback resistance will be given to the rest of the party.
| Knockback Reduction Options | |
|---|---|
| Armour | Resist |
| Dashing Subligar | Reduces distance knocked back +2 |
| Repulse Mantle | Reduces distance knocked back +2 |
| Vocane Ring | Reduces distance knocked back +2 |
Enmity Sets
Progression Options
If you are missing something from the set, put something defensive in that slot instead. Often this is just pulling from your Tanking and Idle sets. Remember, there is the Earring Table above for the wide options for defensive earrings. Often, you will either be focused on balancing your HP or finding more DT.
If you can't make an Ogma's Cape right away or just have one of the other options, you can use that until you have a proper Enmity cape. See the table for the alternative options.
| Back Alternatives | ||
|---|---|---|
| Piece | Enmity | Notes |
| Reive JSE Cape PDT-3%, | ||
| 7 | Easy to obtain DEF, HP, VIT | |
| 6 | From Ark Angel MR | |
| 6 | From Ark Angel TT DEF, HP, EVA | |
| 6 | From Kouryu. DEF, HP+130, Enemy Crit Rate-3%, MDT-8% | |
There are also a number of Ring alternatives. Realistically the first 3 tend to stand above the rest.
| Ring Options | ||
|---|---|---|
| Piece | Enmity | Notes |
| 5 | HP+70, Resist Death+10% | |
| 5 | HP+30, VIT+5 | |
| 5 | DEF:15 VIT+3 | |
| 5 | HP+30 | |
| 5 | Only offers Enmity. Increases damage from Tonberry. | |
| 4 | VIT+3 AGI+3 | |
| 4 | HP+55 MDB+4 | |
| 4 | DEF+10 | |
| 0 | DT-10% | |
| 0 | DT-10%, DEF+10, SIRD-3% | |
| 0 | HP+100,DT-4% | |
| 0 | HP+110,DT-5% | |
| 0 | HP+35, PDT-6%, MDT+2% | |
| 0 | HP+35, PDT-7%, MDT+1% | |
The Erilaz legs and Feet start well and grow into our best options. There are some options that compete with the Enmity on the pieces I have shown. These are short lived. I would run Erilaz the entire time and bypass the other options. The Futhark Mitons are rarely the best option but they are desired at +3 so you are already building them. May as well pull double duty until you get the Kurys Gloves.
I could leave the grips out of the sets but for some, they are needed to get DT into a decent place. You will also be tanking most things wearing Refined Grip +1 that are of any actual danger. If you need sets with other grips, say Utu Grip for instance, either go with 3 less DT or adjust the set to make up for the loss.
For spells,
- Use the most Enmity you can get.
- Make considerations for safety and HP values.
- Cast in your Enmity Set
Foil is Enhancing Magic which gives a buff and Enmity.
- Amazing Enmity tool which is self targeting so applies the enmity to everything you have tagged.
- Provides a substantial amount of Evasion when facing "Special Attacks" (starting at 150 evasion).
- This effect decays at a rate of 3 evasion loss per tick.
- "Special Attacks" typically means TP moves.
- Cast in your Enmity set with Futhark Trousers +4 to extend the duration of the buff.
Remember to keep Crusade up to increase your Enmity further.
|

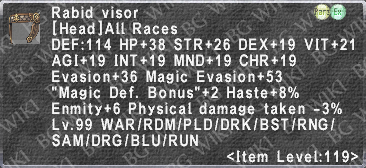


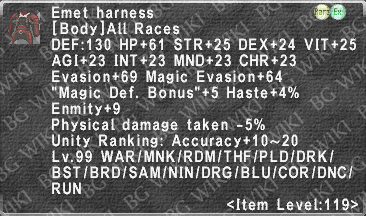

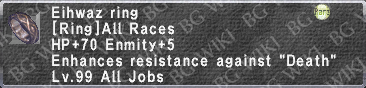
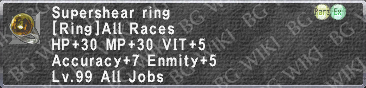
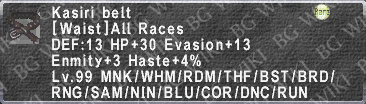


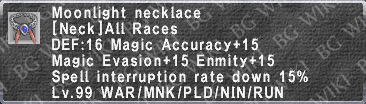
Changes Based on Job Ability
Several of our Job Abilities have a piece of armour that increases the effectiveness of the ability while also having high Enmity values. For those sets, use your Enmity set with that piece swapped in it's slot. Be sure to ballance HP to the best of your ability.
I am going to include the fully upgraded pieces in the table but you can use whichever version you have at the time.
- Note the weapon swaps are only if you are willing to lose TP and are allowing weapon swaps.
- See each abilities section for more information!
| Job Ability Swaps | ||
|---|---|---|
| Job Ability | Armour | Notes |
| Vallation | Runeist Coat +4 | Extends duration by 19 seconds. |
| Valiance | Runeist Coat +4 | Extends duration by 19 seconds. |
| Pflug | Runeist Bottes +4 | Not worth using. Used for duration of ability. Not activation. |
| Embolden | Evasionist's Cape | Worn while receiving the next buff along with that buffs received gear. Not on activation. |
| Battuta | Futhark Bandeau +4 | Increases counter damage of Battuta by 4% per merit. May want to change to a Parry Tanking set for duration. |
| Rayke | Futhark Boots +4 | Extends duration of by 1 second per merit point. |
| Gambit | Runeist Mitons +4 | Extends duration of by 16 seconds. |
| Swordplay | Futhark Mitons +4 | Starts Swordplay 9 tics into the ability. Enhances Sleight of Sword by 2 Subtle Blow per merit. |
| One for All | None | No gear affects the ability. You can use your full Enmity set. |
| Elemental Sforzo | Futhark Coat +4 | Extends duration by 10 seconds. |
| Odyllic Subterfuge | None | No gear affects the ability. You can use your full Enmity set. |
| Liement | Futhark Coat +4 | Extends duration by 5 seconds |
| Bidenhander Epeolatry |
Extends duration by 3 seconds. If willing to swap weapons. | |
| Epeolatry | Makes the Liement AoE. If willing to swap weapons. | |
| Foil | Futhark Trousers +4 | Extends duration of by buff due to Enhancing Duration.
|
Safe Enmity Sets
Typically, you need all the Enmity you can get. However, there are fights where you may face the risk of Encumbrance. For these fights, you change your Enmity sets to be more defensive. This prevents you from being locked into a set that could get you killed.
- Arebati is a good candidate for needing to use Safe Enmity Sets.
|

Precast
A precast set is any set that comes on before we start the action. For many Job Abilities, we will bring in something specific to the JA but we also want as much Enmity as possible on many of our actions. For spells, we ideally want to bring in Fast Cast before all of them.
Some notes for those using in game gear sets,
- Fast spells such as Flash don't need Fast Cast.
- Obviously it's ideal to have but the 1 second delay to swap hurts.
- Single line swaps do not have the same 1 second delay as using gear sets.
- You can bring in Platinum Moogle Belt early without disruption your gear set swaps.
- You can swap in a big piece for Fast Cast to have the spell come out a little faster while not having to do a full gear set swap.
- 5/5 Inspiration merits can give you and extra 60% Fast Cast with Futhark Trousers +4.
- This is 75% for Enhancing Magic. See Foil.
- Futhark Trousers +4 as the only swap for Foil can be instant and immediately go into an Enmity set.
- Rune Enchantments do not generate Enmity and have no swaps available for them.
- You can menu your Rune Enchantments to save macro space and not lose any effect.
Our Fast Cast sets pose bit of a problem for us. All of this effort to balance HP hinges on the fact that these sets will be the lowest HP we have and therefore gaining more here will allow us to add more to other sets. One issue is that we often need everything to cap our Fast Cast. This makes it difficult to have extra slots for HP balancing.
- Your Fast Cast set HP dictates what your other sets need to hit.
- Platinum Moogle Belt is always a solid choice but it needs to be a priority swap to come on first.
- Keep at least 1 Merit in Inspiration and as many as you can as often as you can.
If you happened to have taken a reward ring with Fast Cast you can put it into the sets. I will not be placing any reward rings in actual sets.
- Medada's Ring is Fast Cast+10%
 Weatherspoon Ring/+1 are Fast Cast+5%, Quick Magic+3% and Fast Cast+6%, Quick Magic 4%.
Spells
General Fast Cast
This is your Fast Cast set when you either don't have Merits in Inspiration, didn't put up Vallation/Valiance or your Vallation/Valiance was dispelled. Ideally, you would never actually need to use this but in practice, it happens quite a bit.
Probably the most common instance is when casting after some short down time. You want to save Vallation and Valiance for Enmity so the initial Flash will go out with the General Fast Cast set. It's not game breaking but you certainly feel it when you are stuck getting dispelled often and aren't set up to use your General Fast Cast set.
|

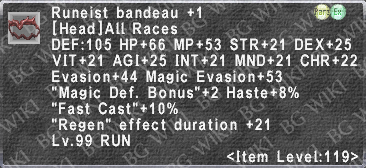


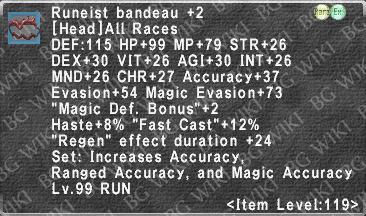


Inspiration Fast Cast Template Inspiration grants a "Fast Cast" effect to Vallation and Valiance.
- Group 2 Merit category.
- Each Merit increase the Fast Cast effect by 10%.
- Futhark Trousers gets an additional increase of 2% Fast Cast for each merit.
- 5/5 Merits and Futhark Trousers will give you 60% Fast Cast while under the effects of Vallation and Valiance.
|


Enhancing Fast Cast
This is pretty simple. The Futhark Trousers have Enhancing Magic Casting Time reduction on them. Add in the Inspiration bonus and we have some easy Fast Cast sets.
For our In Game Gear Sets RUNs, you can just slap these on for you precast while ignoring the gear sets. This allows you to go right into the spell casting and do an equip set without the delay.
For Foil you can,
- /equip legs "Futh. Trousers +4"
- /ma "Foil" <me>
- /equip set 1
With 5/5 Inspiration this will give you 75% Fast Cast with no other swaps.
Instead of me doing full sets for each these, just understand that each piece has not only it's Enhancing Magic FC Value as well as a value from Inspiration Merits. This means that Enhancing Magic can treat your Trousers as,
| Futhark Trousers Enhancing FC Values | ||||||
|---|---|---|---|---|---|---|
| Inspiration Value | ||||||
| Piece | 0/5 | 1/5 | 2/5 | 3/5 | 4/5 | 5/5 |
| 12 | 24 | 36 | 48 | 60 | 72 | |
| 13 | 25 | 37 | 49 | 61 | 73 | |
| 14 | 26 | 38 | 50 | 62 | 74 | |
| 15 | 27 | 39 | 51 | 63 | 75 | |
| 15 | 27 | 39 | 51 | 63 | 75 | |
With that understanding, you can make the sets pretty easily with your Idle or Tanking sets, your Futhark Trousers and whatever else from your Inspiration Fast Cast sets to meet the needs of your Enhancing Magic Fast Cast sets.
Enhancing Magic
When casting our Enhancing Magic spells, we will have to take into account,
- Spell specific enhancements.
- Enhancing Magic Skill.
- Enhancing Magic Duration.
At times we will have to create a balance between the 3.
|


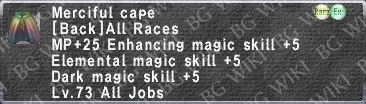
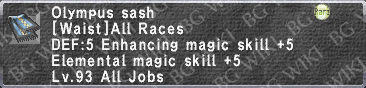
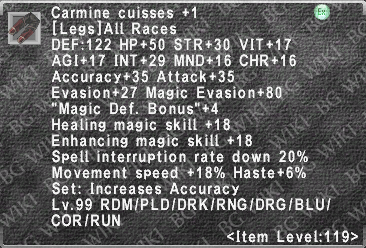
Phalanx
Phalanx reduces damage by a set amount, which depends on Enhancing Magic skill, and caps at 500, which gives -35 damage.
- Phalanx+ further reduces the damage by the amount on the armour.
- Phalanx+3 and 500 skill will reduce damage by 38.
- Phalanx+ is Phalanx Received.
- Damage reduction from Phalanx is calculated after Damage Taken equipment.
Start working on your Phalanx sets as soon as you can. You can always repurpose the Taeon Attire Set pieces later. Get a piece of the Herculean Armor Set early, that is not the head, and start doing your 6 Daily Dark Matter rolls with Oseem. Once you have a piece of Herc with Phalanx+3 or more, you can turn the Taeon of that slot into something else. Regen and SIRD are prime options.
For every set, we can add Deacon Sword if we are willing to swap weapons and lose the TP.
Phalanx Received
It is very common to have a tank and RDM or SCH collaborating for the casting of Phalanx. The tank will equip their Phalanx set so the RDM or SCH can cast on them. This gives the benefit of the higher Enhancing Skill along with the much higher duration.
- You generally want a separate set for receiving the spell vs self casting the spell.
- This is so you can receive Phalanx while still tanning to reduce down time.
|
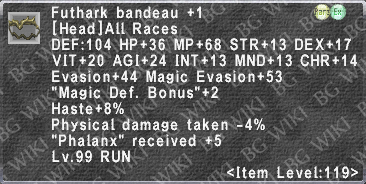


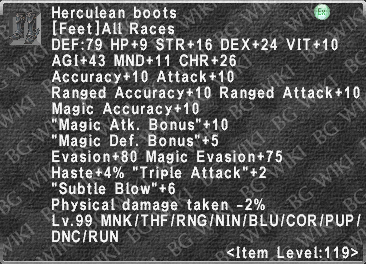


Self Casting Phalanx
When discussing a self casting Phalanx, we need to account for the Enhancing Magic Skill.
- We can add 16 Enhancing Magic Skill through general Merit Points.
- At RUN 99 we have 388 Enhancing Magic Skill.
- 404 Enhancing Magic Skill total.
- Mastered we have 424 Enhancing Magic Skill.
- 440 Enhancing Magic Skill total.
You will also get Enhancing Magic Skills through Job Point Gifts.
- Enhancing Magic Skill+5 at 125 Job Points.
- Enhancing Magic Skill+8 at 450 Job Points.
- Enhancing Magic Skill+10 at 1050 Job Points.
- Enhancing Magic Skill+13 at 1900 Job Points.
Now we check the table to see the benchmarks when we get another damage mitigated.
| Notable Phalanx Tiers | ||||||||
|---|---|---|---|---|---|---|---|---|
| Skill: | 300 | 329 | 358 | 386 | 415 | 443 | 472 | 500 |
| -Dmg: | -28 | -29 | -30 | -31 | -32 | -33 | -34 | -35 |
- NOTE: Understand that we are going to have to eat an HP dip when casting Phalanx. Luckily, we don't spam the spell and ideally, we cast it before the pull so less of an issue to deal with.
|

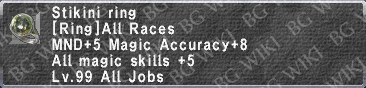
Regen
Regen restores HP over time in 3 second intervals (Ticks).
- Regen IV - 30 HP/tick base.
- Regen V - 40 HP/tick base. Only SCH has access.
- Light Arts provides a bonus of 24 HP/tick recovery and +48 seconds of duration. This only applies to SCH main.
We can further enhance this with Regen Potency and Regen Received gear.
- Below are the viable options for Regen Potency, Received, Duration and Enhancing Duration.
- The Taeon Attire Set can be augmented to have Regen Potency +1~3 Duskdim Stones.
Regen+ does not help when casting or receiving the spell.
Regen Potency Pieces
- Taeon Attire Set - 1~3 per piece.
- Sacro Gorget
- Sroda Belt
Regen Duration Pieces
- Runeist Bandeau +4 - The entire Runeist Bandeau/+1/+2/+3 line has Regen Duration. Runeist Bandeau +4 does not get an increase.
- This is in seconds added to Regen.
- The entire Erilaz Galea/+1/+2/+3 line has Enhancing Magic Duration.
- This is a percentage added to Enhancing Magic.
- Regal Gauntlets
- Futhark Trousers +4 - The entire Futhark Trousers/+1/+2/+3 line has Enhancing Magic Duration. Futhark Trousers +4 does not get an increase over the +3.
- This is a percentage added to Enhancing Magic.
- Sroda Belt
Regen Received Pieces
- Morgelai/Peord Claymore - Path: C. Peord Claymore is the more reasonable option.
- Erilaz Earring +1 - The entire Erilaz Earring/+1/+2 line has Regen Received but I refuse to put a +2 earring into a guide.
Self Regen
For this set we will be trying to combine our options to give us a decent duration then add potency.
- If you do not have the Armour at the tier in the set, use what you have within that line.
- Example: use Futhark Trousers if you do not have Futhark Trousers +4.
- You can augment and use any piece of the Taeon Attire Set to fill in gaps.
- You DO NOT NEED Morgelai or Peord Claymore.
- Fill the rest of the slots with DT and try to balance HP with the rest of your sets.
|
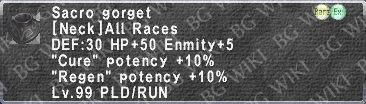
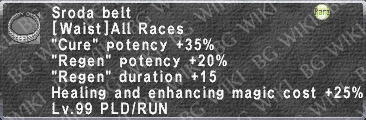
Regen Received
There are only 2 options at this current time for Regen Received. If you have an Erilaz Earring +1, you may opt to keep it in your idle and tanking sets so that you always have the added Regen Received effect form it. If you bother to pick up Morgelai, or more likely Peord Claymore, you can choose to bring it in when having Regen cast on you. I usually start with it at the beginning of fights and don't typically switch back mid fight. I will generally accept the weaker Regen over removing my Epeolatry. You can decide what is right for you. If that includes not putting together a Received set at all, that is perfectly acceptable in my mind. It's 1 earring and an over priced toy. I will say though, the amount of Regen you get with just Erilaz Earring +1, Peord Claymore and a SCH with Musa is pretty fun.
Refresh
We get Refresh natively which means we always have the option. Unfortunatly, not having the higher tiers means it can still be rough on MP management and we will greatly appreciate Refresh III and Ballads when we can get them.
- Refresh (Base 3 MP/tick over 150 seconds for 150 MP)
- From yourself or a SCH for added duration.
- Refresh II (Base 6 MP/tick over 150 seconds for 300 MP)
- From a RDM.
- Refresh III (Base 9 MP/tick over 150 seconds for 450 MP)
- From a RDM with 1200 Job Points.
The potency is not increased via Enhancing Magic Skill.
- We will focus on Refresh Potency and Enhancing Duration.
|
Aquaveil/Bar-Spells/Temper
Aquaveil prevents X interruptions, where X is a function of Enhancing Magic Skill and enhancing gear.
- At 300 skill and below, Aquaveil prevents 1 interruption.
- At 301 skill and above, Aquaveil prevents 2 interruptions.
- At 501 skill and above, Aquaveil prevents 3 interruptions.
- Aquaveil+ gear will transfer when using Accession.
We always want Aquaveil active. Server lag makes it impossible to say you will always have perfect timing to get spells through so this creates a wonderful fall back. Don't ignore your cast timing because you have it active but enjoy the benefits when you need it to cover for you. It is a very short cast spell with a long duration that we can pump up.
We will want to hit 501 Enhancing Magic Skill then add in Enhancing Duration.
Receiving the spell from a RDM or SCH via Accession grants a few benefits.
- 501 Enhancing Magic Skill prevents 3 interruptions.
- Their Aquaveil+ transfers to you for that many added interruptions prevented.
- Much longer duration.
Barspells are Enhancing Magic Spells that increase Magic Evasion against specific elements or negative status effects. The resistance increased will depend on the spell, and they can typically be divided into two categories based on the kind of resistance they increase:
- Bar-Element Spells increase Magic Evasion against a specific element.
- Bar-Status Spells increase Magic Evasion against a specific status effect.
- Only 1 Barspell from each category can be active at any one time.
- Single Target Barspells will overwrite AoE Barspells.
- AoE Barspells cannot overwrite Single Target Barspells.
- Base duration of both Bar-element and Bar-status spells is 8 minutes.
Bar-Element Spells
- Based on Enhancing Magic Skill and caps at 500 skill.
- WHM gets a lot of armour to increase the effectiveness of Bar-Element Spells.
- Do not overwrite a WHMs Bar-Element Spells.
- Do not cast your own Bar-Element Spell with a WHM in the party because they cannot overwrite your spell.
Bar-Status Spells
- Single target Bar-Status are more potent than AoE Bar-Status.
- The only armour to increase the effect is Sroda Necklace which is RDM and WHM only.
Temper grants the ability to occasionally attack twice.
- Gives Double Attack and directly stacks with all other Double Attack sources.
- You will get 1% Double Attack for every 10 Enhancing Magic Skill.
- Obtained via spending 550 Job Points.
- Big help when TPing.
- Can be used during Dispel fights as fodder to be removed instead of something important.
Ideally, try to stay as close to the even 10s. You could fill the rest up with HP or DT.
- There won't be much space left.
Use your Enhancing Magic Skill set.
|
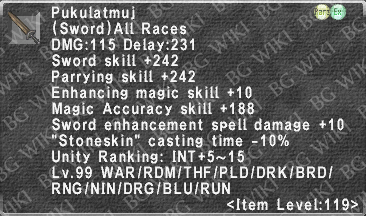
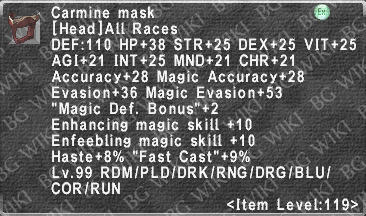
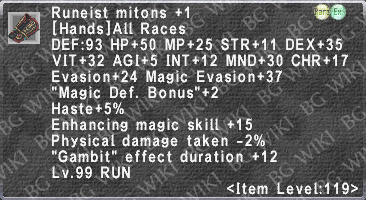

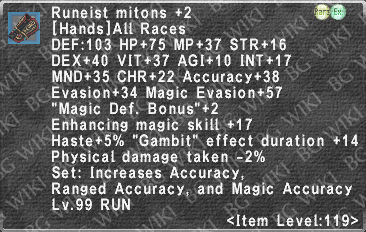
Stoneskin
Stoneskin absorbs a certain amount of damage from physical and magical attacks.
- Depends on MND and Enhancing Magic Skill.
- Caps at 350 damage absorbed.
- Capped Enhancing Magic Skill at 99 will cap Stoneskin.
- Damage cap can be extended by armour.
Common uses for Stoneskin are pulls or when trying to feed 0 TP in fights. By lowering the incoming damage by enough, we have have our Stoneskin last the full duration. Keeping [[Stoneskin] up prevents the monster from gaining TP from their auto attacks which makes it more manageable to prevent TP moves.
Our options will drop us below i119.
Use all of our Stoneskin+ options, add duration, try to keep DT high.
|


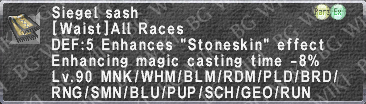

Protect, Shell and Spikes
Protect and Shell are set potency.
- Cast in your Enhancing Duration Set.
- If it is self cast, use either Brachyura Earring or Sheltered Ring.
We have access to 3 Spikes Spells.
- Blaze Spikes
- Offensive effect only and does more damage than the other 2 options.
- Ice Spikes
- Shock Spikes
- Can Stun the attacking enemies on contact.
- Can be great for Kiting/Pulling as a short stun will allow you to create distance and prevents you from being hit.
The strength of the spikes is based on your INT at the time of casting and is treated as Magic Damage.
- Caps at 250 INT at time of casting.
- Magic Damage affected by armour at the time the enemy makes contact.
- Magic Attack Bonus, Day/Weather bonuses, Magic Affinity all affect the damage.
Cast in your Enhancing Duration Set.
Damage Dealing Sets
I put very little importance on these sets. You are a Tank, not a DD. RUN has been left off relevant TP and WS gear for years. They have no JSE to help with either aspect of the job. That’s not to say it can’t add damage, it just isn’t the DD I often hear the community yelling it is.
RUNs TP sets are somewhat similar to jobs like GEO and SCH. Even WHM has more recent TP additions. Just keep that in mind when you decide you are a DD RUN. The BRD is better equipped for damage. However, there are times where danger is low and you actually have buffs. There are situations where you need to partake in skillchains or the strategy is for you to hybrid tank. We have sets for that.
TP Sets
|


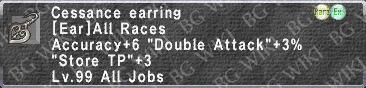

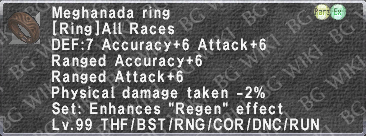
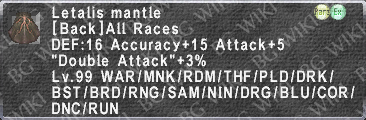
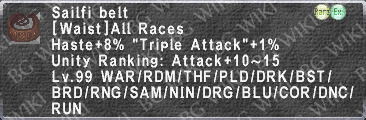
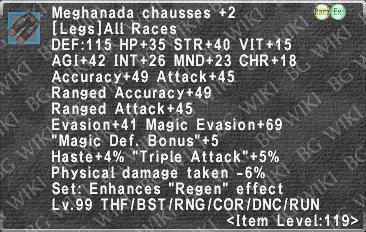
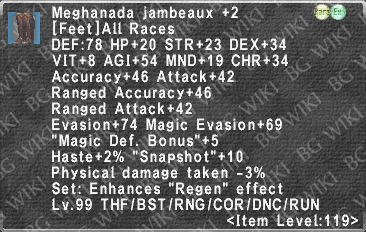
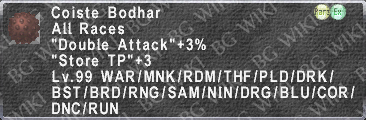
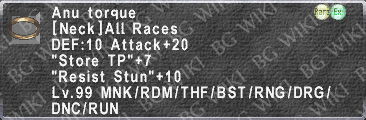
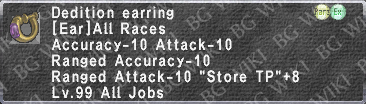


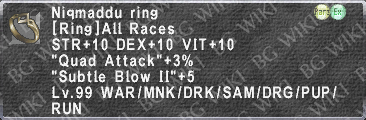
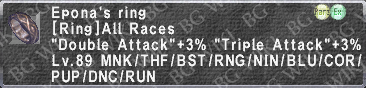


Hybrid TP
For all of these sets, Alabaster Earring ![]() : 30 is an option. The haste also allows us to change belts. Kentarch Belt +1 becomes an option for more Accuracy.
: 30 is an option. The haste also allows us to change belts. Kentarch Belt +1 becomes an option for more Accuracy.
Your skillchain for for Ongo from V0 to V20 will be Upheaval > Leaden Salute > Steel Cyclone > Wildfire.
|
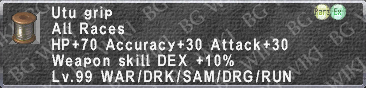


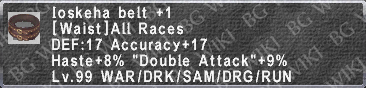
Weapon Skill Sets
We don't have a lot of great options for Weapon Skill sets on RUN. Early on you are basically going to be stacking attack then adding either multihit or base stats. As things branch out further into the higher tiers, it becomes full Nyame. The only real exceptions are full acc sets.
I will start with the Beginner options since there really is 1 set with some accessories changed at this point.
|
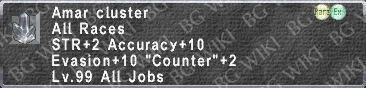
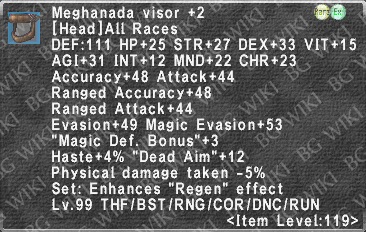


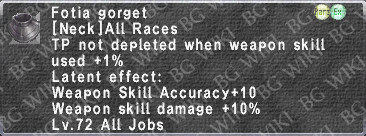

From here on, there will be no Beginner sets. This would be a lot harder to do if we had more options but really it boils down to Nyame RP. Once you have R... anything, it becomes your go to for anything wsd. as you hit R20 and the Double attack comes in, you will start running that in slots for multihit weapon skills.
All 2 hand weapon skills are improved by Utu Grip.
Dimidiation is a 2 hit weapon skill.
- Scales well with more TP.
- Does not transfer fTP across both hits.
- This makes WSD very good.
- 80% DEX modifier.
- Gets an Attack modifier giving it 25% more Attack.
|

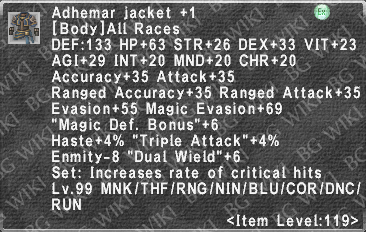
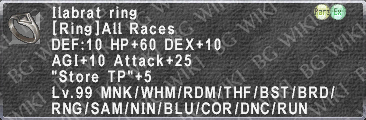
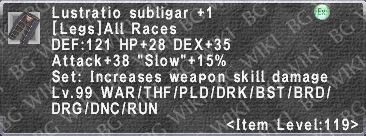
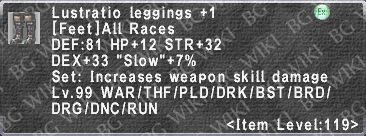

Resolution is a 5 hit weapon skill.
- Scales well with more TP.
- fTP is transferred across all 5 hits.
- This makes Elemental Gorgets and Elemental Belts good options.
- 73~85% STR modifier depending on merits.
- Gets an Attack modifier giving it 15% less Attack.
When being used with Lionheart,
- The STR modifier is set to Rank 5 no matter how many merits are invested.
- This is STR 85%.
- Resolution gains access to the Light skill chain property.
- Allows the user to perform an Ultimate Skillchain.
- Also see Aeonic Aftermath for more details.
I muled my Lustratio stuff when I got Nyame R:20. It's not that much more of a boost and I don't care that much about a small amount of added damage on a job that just doesn't hit well and is rarely buffed to hit well. You can still do the majority of the work with 5/5 Nyame and dropping the hands for Erilaz Gauntlets +3 when not meeting pdif.
Savage Blade is a 2 hit weapon skill.
- Scales very well with more TP.
- Does not transfer fTP across both hits.
- This makes WSD very good.
- 50% STR and 50% MND modifiers.
With Naegling,
- Savage Blade damage +15%
- Attack+1% per buff effect.
|

These set are strickly for situations where you absolutly need the weapon skill to land. You can use these for your Great Axe weapon skills during Ongo. Your damage has no real meaning but you cannot miss your weapon skill. These will also be used for anything that needs an added effect. You will want both Physical and Magical Accuracy to land the hit and then not have the effect resisted. You are free to do a more damaging set for things like Armor Break but if you just want the effect to land and minimize the chances of a resist, this is the way to go.
|

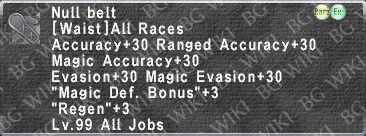
Fimbulvetr is a single hit weapon skill.
- Can only be used with Helheim.
- Stage 3 can only use the weapon skill in Sortie.
- Stage 4 and 5 can use the weapon skill anywhere.
- Scales well with TP.
- This makes WSD very good.
- 60% STR and 60% VIT modifiers.
|
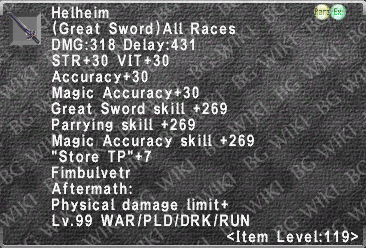
Utility Sets
Vivacious Pulse Set
Just a reminder of the Stat Association Table.
| Rune | Stat |
|---|---|
| STR | |
| DEX | |
| VIT | |
| AGI | |
| INT | |
| MND | |
| CHR | |
| MP |
Things to consider,
- Have a few pieces for HP+ so aren't losing the HP you are restoring.
- Use pieces that have all around high base stats to attempt to cover for any Runes you have at the time.
- You will lose TP if you weapon swap.
For more information you can visit the Vivacious Pulse page.
To jump back up to the Vivacious Pulse section of the guide, Click Here.
|
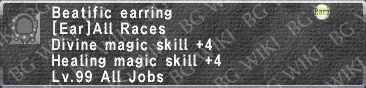

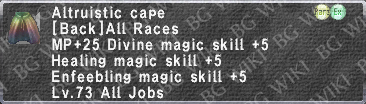
Swipe and Lunge Sets
Swipe expends a single Rune to deal damage to a target.
- The last activated Rune is consumed first.
Lunge expends all Runes to deal damage to a target.
Best performed with a Great Sword due to it being our highest Combat Skill.
Orpheus's Sash vs Hachirin-no-Obi.
- There are 3 terms taken into account for the Obi.
- First Weather, Second Weather, Matching Day.
- If 2/3 terms match the element of your Rune(s), Hachirin-no-Obi will be better.
Swipe and Lunge are not overly important and should not be a focus early on. The damage you add is minimal and you are better off putting your resources into improving other aspects of your RUN.
Not worth building a set for Swipe and Lunge as a beginner.
We will use sets based similar to typical nuke sets and bursting sets.
|


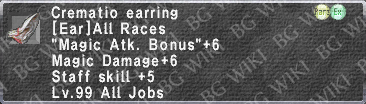
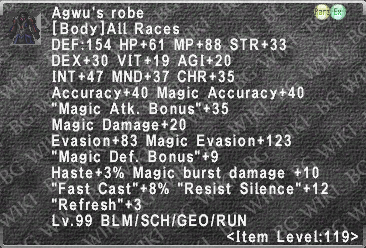
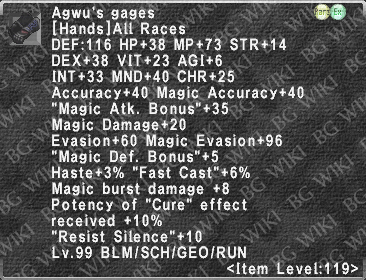


Cure
You can use your Cure Set with Blue Magic Cures but the real reason you want this set is to tank during Sortie mage strategies. This also works quite well if you are doing low man runs kiting the NMs. The purpose is to be self sufficient instead of needing to be baby sat. Since the mages don't have to be worried about you, they can focus on zerging the NMs. Enmity during bursting strategies is pretty easy to maintain so you will have time to get Cures off on yourself. Make sure you have Echo Drops/Remedies and you may have to call for a Paralyna if you are having issues. Otherwise, you should have any issues Curing yourself.
- We want to have Cure Potency +50%.
- We want to have capped DT.
- We need to be at or close to the Gear Haste cap for recast purposes.
- We will put more emphasis on tanking magical damage during this set.
|
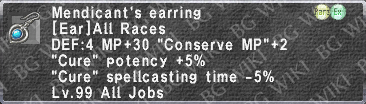

Enfeebling
Not something that gets broken out often but sure can come in handy to toss out a Repose or Silence pull. This is not a set I would bother with before you get the Erilaz Armor Set +2. Even then, piece it together with whatever Magic Accuracy you have or can easily acquire.
- This is mainly used in Sortie and generally only upstairs.
- Magic Accuracy needs there are fairly low.
|
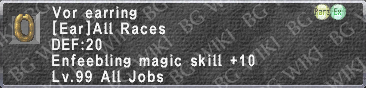
Spell Interruption Rate Down
When casting spells, your casts can be interrupted by Physical Damage. Typically we time our casting between attacks and avoid the need for SIRD. For issues with lag or tanking a few monsters at once, we have Aquaveil which should always be active on you. We will want to have access to casting certain things in SIRD while doing content where we are tanking several monsters at once.
- Omen during the floors on the way to bosses.
- Dynamis Divergence while pulling multiple statues at once.
- Odyssey pulling families.
- Sortie during some pulls.
SIRD is a bit tricky. It is represented as a percentage in game but in actuality, it is a value of x/1024. For this reason we typically look for 102% SIRD or more to be sure we cannot be interrupted.
To be quite honest, our SIRD sets kinda suck. Especially in the beginning. We really want to use the SIRD merits to help make decent sets viable. Even then, the set is so rough that, as a Beginner, I would rather you focus that gear into a Phalanx set. Luckily, a lot of the content where you would be reaching for SIRD can be reasonably easy to sleep. In Odyssey, Shaol A, everything can be slept and the Magic Accuracy needs are pretty low. You can get by without and start focusing these sets in the Mid-Tier.
Some good use cases for SIRD are,
- Getting buffs back up mid fight such as Cocoon. Even weaker versions of your buffs are better than nothing.
- Getting a tag on things so you can generate Enmity with Job Abilities which can't be interrupted.
- Flash and Foil can be difficult when tanking a lot of monsters. We can use SIRD at those times to get it out but we will use a more specialized set.
|
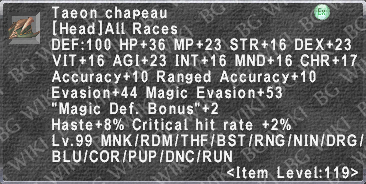


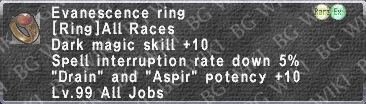
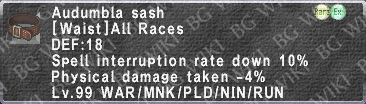


Enmity SIRD
With how terrible the SIRD set is for Beginners, there really isn't a point in attempting an Enmity SIRD set. Peord Claymore can be a big help with your SIRD sets if you are willing to lose the TP. At the High-Tier, you would be better served with Epeolatry so if you wanted to completely skip Peord Claymore, you could. If, for some crazy reason you have, Morgelai but not Epeolatry, you can use that to make a solid set at the High-Tier. The Mid-Tier set gains nothing of real value from the added 5 SIRD compared to Peord Claymore.
If you are considering Morgelai and do not have Epeolatry, put your gil into H-P Bayld for Epeolatry. You will get far more value from your Ergon Weapon.
You will be trying to avoid using SIRD sets for your spells so you can gain the largest effects you can from them. However, sometimes you just need the spell to get through the crowd. If it is an Enmity spell, we will want these sets.
Here are some of the Enmity spells that will specifically want Enmity SIRD sets,
|
|
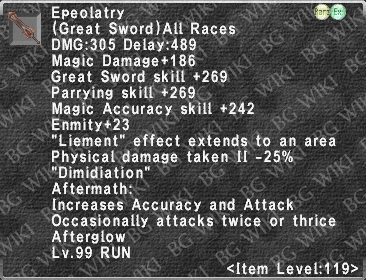
Cursna Received and Holy Water
Well, these were in nice gear set tables but I have used too many tables on this page. They are no less important IMO and sets I include on every single job!
Cursna
When you get Doomed, you are on a very obvious timer. It sucks watching casters repeatedly cast Cursna on you and fail to remove the Doom. If only they had better sets! Or you could just make this simple set, which you should have on all jobs. It comes in over whatever you have on at the time and greatly assist the chances of Cursna being successful. Pair that with your healers making proper Cursna sets and you will actually find it rare to see it fail to go 1/1.
These pieces just come in over whatever I'm currently using.
- Eshmun's Ring is Cursna effect received +20%
- Saida Ring is Cursna effect received +15%
- Will work perfectly fine.
You can double up on the Eshmun's Ring or Saida Ring. I find this works perfectly fine with my healers have Cursna sets and allows me to have a better chance removing with Holy Water if the mages can't cast on me for whatever reason.
Holy Water
Holy water specific sets are for times where you want to be able to simply holy water yourself instead of the healers needing to cast on you. Sgili is a perfect example. You can spike Enmity very early in the fight and do not need much to maintain it. By running this set, your SCH can stay in Addendum: Black for the entire fight while you use Holy Water to stay alive.
These pieces just comes in over whatever I'm currently using.
- Blenmot's Ring +1 gives Holy Water effect +10%.
- Purity Ring gives Holy Water effect +7%.
- Blenmot's Ring gives Holy Water effect +5%.
- Significantly cheaper but remember it's half the success rate and you are time limited to find success.
